¡Holiii, amigos de la comunidad de Hivearte! Espero que estén muy bien el día de hoy, ¿qué tal? (─‿‿─)♡ Por acá les traigo un dibujito a lápiiiz, por fin me atreví a compartir un dibujo tradicional con ustedes por acá y no solo dibujos a digital. Ya sin más, acompáñenme en este proceso… ¡Vamos allá! (˵ •̀ ᴗ •́ ˵ )
Hiii, friends of the Hivearte community! I hope you are very well today, how are you? (─‿‿─)♡ Here I bring you a pencil drawing, I finally dared to share a traditional drawing with you here and not only digital drawings. Without further ado, join me in this process... Here we go! (˵ •̀ ᴗ •́ ˵ )

¡Proceso! (˵ •̀ ᴗ •́ ˵ )
... algo largo (。Ŏ ᗜ Ŏ ̆ 。)
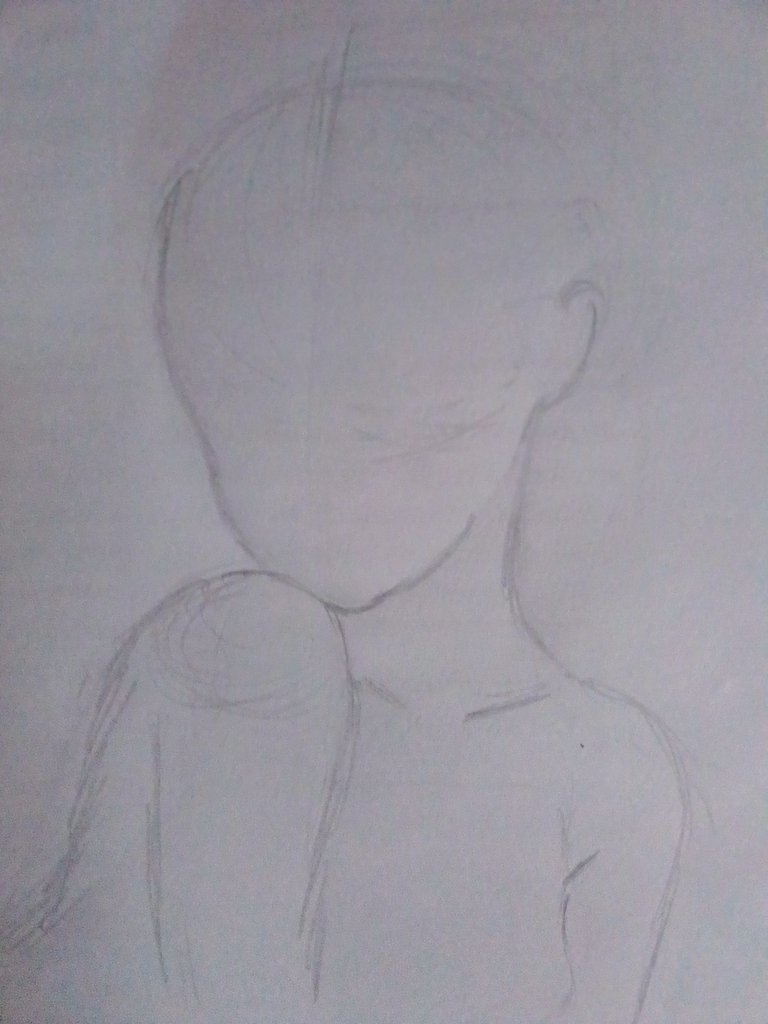
Ok, amigos, comenzamos con el boceto. Yo lo que hago, como siempre, es un círculo. Lo divido más o menos a la mitad, con una línea curvada que nos servirá para luego guiar nuestro mentón. Por otro lado, yo divido el círculo en otras dos partes, una raya horizontal a la mitad y otra raya horizontal justo en nuestro extremo inferior. La de la mitad la tomo como referencia para dibujar dónde comienza la oreja, y la línea de abajo nos ayuda a saber donde estará la nariz. Espero que se esté entendiendo mi explicación, además, esta forma de aprender a hacer los rostros la aprendí hace mucho tiempo guiándome más o menos de como los hacen en el anime importante aclarar, ya que mi estilo de dibujo no busca ir hacia lo realista tampoco (y porque cuando empecé a dibujar hace como 10 años, me gustaban mucho los animes de los 90's y y2k, me declaro culpable jajaja).
Bueno, me he extendido mucho con este punto, pero continuo: casi al final del círculo, comienzo a hacer una curva que vendría siendo la mejilla de la chica, siguiendo abajo para hacer la forma del mentón, haciendo una pequeñísima curva y subiendo para conectar con la oreja. Este rostro quise hacerlo de manera que se viera un poco gordito, con rasgos muy redondos y lindos.
Para el cuerpo hice dos círculos que me indicaban donde estaban los hombros, y luego de ahí solo fue trazar líneas hacia abajo, mínimamente curvadas, para hacer los brazos. Por otro lado, al lado del hombro izquierdo hice un trazo con forma de S muy suave, que sería la espalda/caja torácica de la chica. Mientras, en el hombro derecho hice una pequeña línea que vendría siendo la axila, y baja con una pequeña curva, siendo esto ya el busto.
Una explicación muy larga, lo siento, creo que ni siquiera mencioné el cuello, que lo dibujo como una línea recta que baja por la oreja y que se curva solo un poco para luego trazar otra línea recta que conecta con el hombro. Debería aprender los nombres de esos músculos/ partes del cuerpo para poder explicar mejor, pero espero que las imágenes también ayuden a ilustrar.
En fin, esto es lo que quería explicar de una forma un poco más detallada, lo demás es mucho más simple. Importante aclarar que usé una imagen de referencia para esto, la cual dejaré al final del post, en los respectivos créditos.
Ok, friends, let's start with the sketch. What I do, as always, is a circle. I divide it more or less in half, with a curved line that will serve to guide our chin. After that,, I divide the circle in two other parts, a horizontal stripe in the middle and another horizontal stripe right at our lower end. The middle one I take as a reference to draw where the ear starts, and the bottom line helps us to know where the nose will be. I hope my explanation is being understood, besides, I learned this way of learning how to make the faces a long time ago, more or less guided by how they do them in anime, important to clarify, since my drawing style does not seek to go towards realism either (and because when I started drawing about 10 years ago, I really liked the anime of the 90's and y2k, I plead guilty hahaha).
Well, I've have been going on too long with this point, but I'll continue: almost at the end of the circle, I start to make a curve that would be the girl's cheek, continuing down to make the shape of the chin, making a very small curve and going up to connect with the ear. I wanted to draw this face so that it would look a little chubby, with very round and pretty features.
For the body I made two circles that indicated where the shoulders were, and then from there it was just drawing downward lines, minimally curved, to make the arms. On the other hand, next to the left shoulder I made a very soft S-shaped line, which would be the girl's back/thoracic cage. Meanwhile, on the right shoulder I made a small line that would be the armpit going down with a small curve, this being the bust.
A very long explanation, sorry, I don't think I even mentioned the neck, which I draw as a straight line that goes down by the ear and curves just a little bit, to then draw another straight line that connects to the shoulder. I should learn the names of those muscles/body parts so I can explain better, but I hope the pictures also help to illustrate.
Anyway, this is what I wanted to explain in a little more detail, the rest is much simpler. It is worth mentioning that I used a reference image for this, which I will leave at the end of the post, with its respective credits.
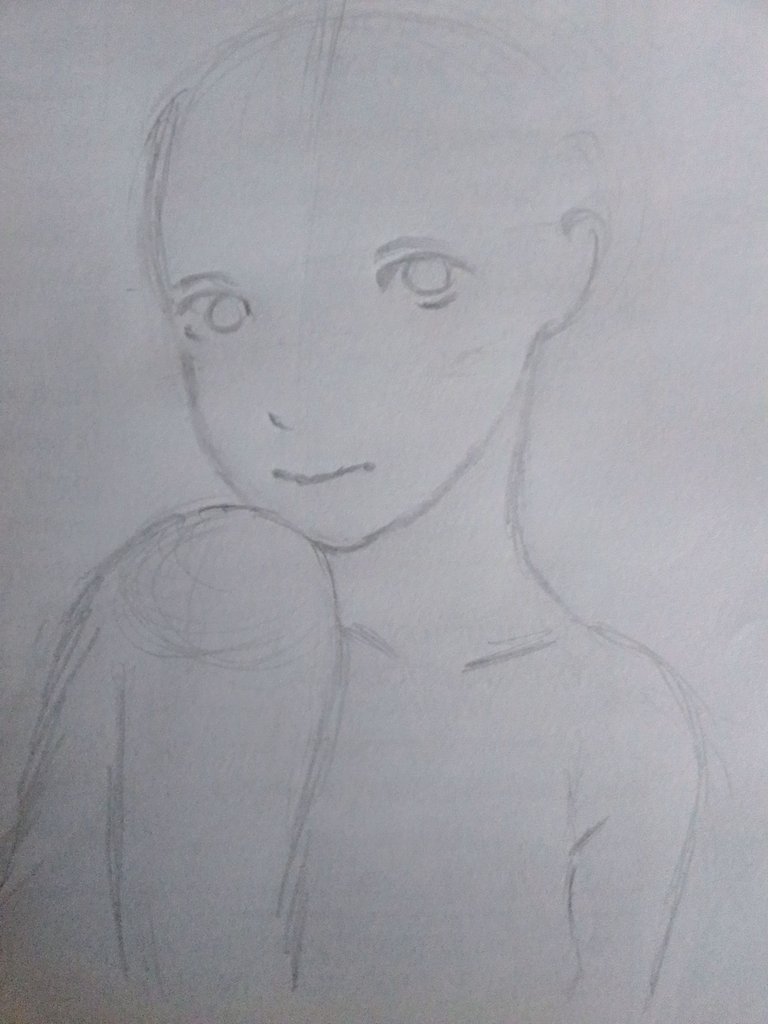
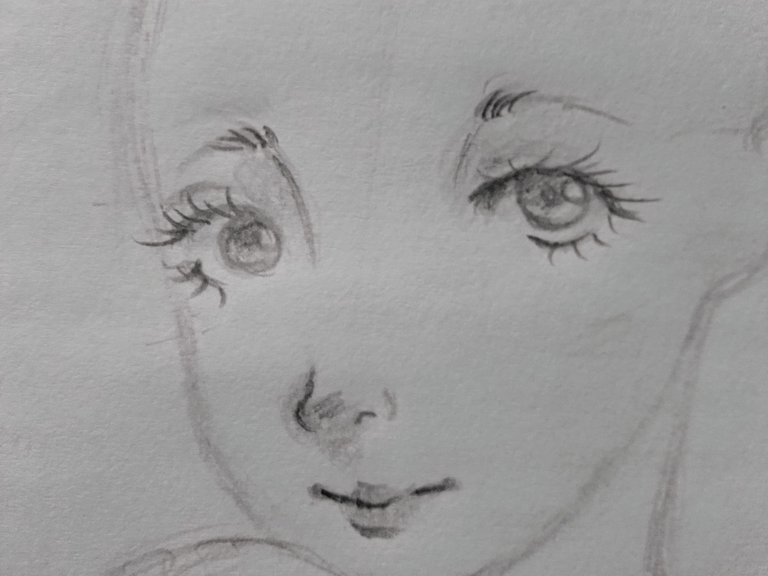
Ahora, hago el boceto de la cara. A mí, por alguna razón, siempre me gusta empezar por dibujar los ojos, creo que hay uno de dos motivos: o cuando veía tutoriales comenzaban por dibujar los ojos, o lo hago porque considero que es uno de los detalles del rostro que me resultan más importantes. O quizá sean las dos.
Para los ojos hago una especie de arco cuya curvatura depende del ángulo del rostro y de cuál ojo sea. Por ejemplo, en el ojo derecho hago una curvatura más suave, mientras que en el izquierdo es una un poco más pronunciada y que está ligeramente inclinada hacia abajo, podría decirse. Esta diferencia, para mí, se debe al ángulo desde el que se miran los dos ojos, el que está más lejano me da una sensación de que se ve un poco más curvado e inclinado. En fin, este arco que estoy describiendo es el parpado superior, ¿me explico?
Luego hago dos semicírculos que son los iris. Su ubicación depende de hacia donde miren, en este caso es hacia el espectador. Luego hago dos arcos mucho más pequeños y no tan pronunciados, que serían el parpado inferior. Muchas veces no lo dibujo por gusto propio, pero en este caso quise hacer unos ojos que se notaran más redondos. También, agregué otros dos arcos arriba, que son los parpados, al final del dibujo quedan más como sombras, ya que esto forma parte del boceto, el cual hago con un lápiz cuyo grafito es muy claro.
Para la nariz decidí hacer solo un pequeño trazo que me indicará donde está.
Y para la boca hice dos puntos a lado y lado, que vendrían siendo las comisuras, y luego los conecté poco a poco, curvándolos hacia abajo, de manera que se note que sonríe sutilmente.
Now, I'll sketch the face. I, for some reason, always like to start by drawing the eyes, I think it may be one of two reasons: either when I watched tutorials they started by drawing the eyes, or I do it because I consider them to be one of the most important details of the face. Or maybe it's both.
For the eyes I make a kind of arc whose curvature depend on the angle of the face and which eye it is. For example, on the right eye I make a softer curvature, while on the left eye it's a little more pronounced and slightly downward slanting, you could say. This difference, to me, is due to the angle from which the two eyes are viewed, the one that is farther away gives me a feeling that it looks a little more curved and slanted. Anyway, this arc I'm describing is the upper eyelid, you know what I mean?
Then I draw two semicircles that make for the irises. Their location depends on where they look towards, in this case it is towards the viewer. Then I draw two much smaller and not so pronounced arcs, which would be the lower eyelid. Many times I don't draw it for my own taste, but in this case I wanted to make the eyes look rounder. Also, I added two other arches above, which are the eyelids, at the end of the drawing they are more like shadows, since this is part of the sketch, which I do with a pencil with a very clear graphite.
For the nose I decided to make only a small stroke to indicate where it is.
And for the mouth I made two points on the side and side, which would be the corners, and then I connected them little by little, curving them downwards, so that you can see that she is smiling subtly.
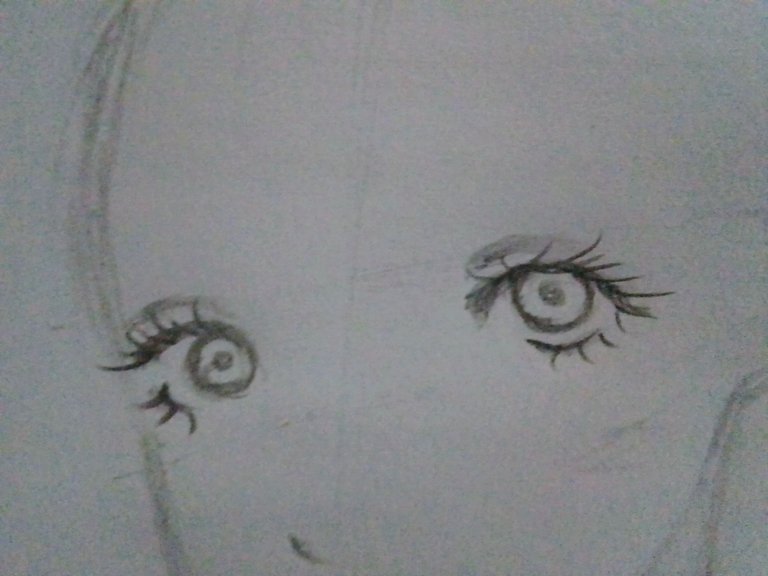
Primero, remarqué el parpado superior e inferior, respectivamente, ahora con mi lápiz más oscuro. Importante aclarar que yo no tengo lápices de dibujo, todo esto lo hago con un lápiz que compré porque su grafito es más suave y claro, y mi otro lápiz es solo el típico Mongol número 2 natural, que usamos para escribir normalmente. La diferente oscuridad de los trazos se debe a la presión que aplico cuando hace falta.
Bueno, continuando, después de remarcarlos, ahora hago las pestañas. Esta parte me pone muy ansiosa, ya que para que queden bien tengo que hacer trazos muy rápidos, para que termine en una punta filosa. Entonces es básicamente eso, partiendo de la parte más baja de lo que sería “el parpado superior”, hago trazos muy cortos y muy rápidos, que estarían curvados hacia afuera. Luego repito lo mismo en el parpado de abajo.
También remarqué los iris e hice dos puntos grandes para las pupilas.
Ok, since I'm done with the sketch, the explanation will be shorter, because it's just detailing each element.
First, I highlighted the upper and lower eyelid, respectively, now with my darkest pencil. It is important to clarify that I don't have drawing pencils, I do all this with a pencil that I bought because its graphite is softer and lighter, and my other pencil is just the typical Mongolian number 2 natural, the one we use to write normally. The different darkness of the strokes is due to the pressure I apply when needed.
Well, moving on, after highlighting them, I now do the eyelashes. This part makes me very anxious, because in order to get them right I have to make very fast strokes, so that it ends in a sharp point. So that's basically it, starting from the lowest part of what would be “the upper eyelid”, I do very short and very fast strokes, which would be curved outwards. Then I repeat the same thing on the lower eyelid.
I also highlighted the irises and made two large dots for the pupils.
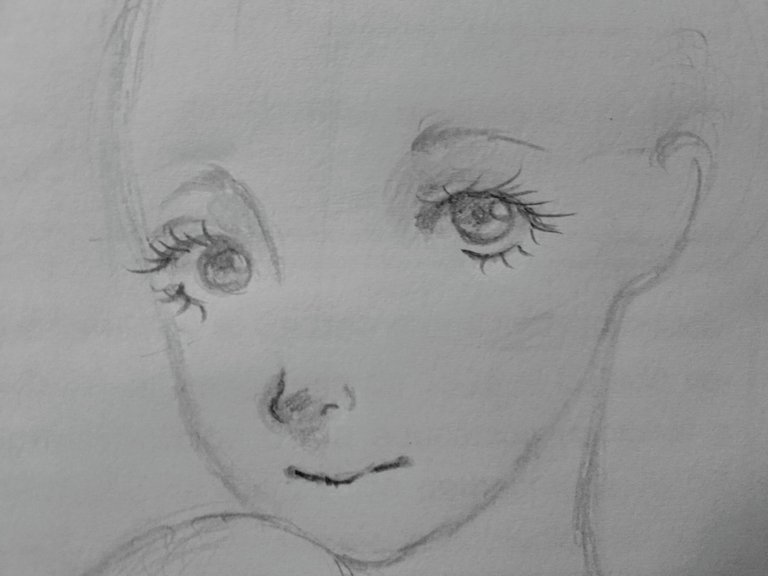
También abajo de la ceja izquierda hice una pequeña curvatura que sería el tabique de la nariz, mientras que en el ojo derecho solo hice un sombreado suave con el lápiz más claro.
Remarqué un poco la boca y luego hice dos líneas, una arriba y otra abajo, las cuales comprenderían los labios superior e inferior. Luego, trazos circulares para “colorear” los labios. El labio inferior está más remarcado para hacer la sombra.
También remarqué las cejas, las cuales dibujo usando el mismo método de las pestañas: pelos que dibujo con trazos cortos y rápidos, en dirección hacia donde crecen las cejas.
Ya con esto tenemos la cara de la chica, como les dije, intenté hacerle rasgos redondos y una cara dulce.
Now it's time to draw the nose, so I'm going to detail it. Guided by the small stroke I made before, I will now extend it upwards, Imagining a triangular but round shape to use as a guide. Keeping this triangle in mind, I make the curved line of the fin, and in the center a semicircle which is the nostril. I like to embellish the nose with a few small strokes, which would be like a small blush, and underneath a light shadow with the light pencil.
Also below the left eyebrow I made a small curvature which would be the septum of the nose, while on the right eye I just did a soft shading with the lighter pencil.
I outlined the mouth a little and then made two lines, one above and one below, which would comprise the upper and lower lips. Then, circular strokes to “color” the lips. The lower lip is more highlighted to make the shadow.
I also highlighted the eyebrows, which I draw using the same method as the eyelashes: hairs that I draw with short and fast strokes, in the direction where the eyebrows grow.
Now we have the face of the girl, as I said, I tried to make round features and a sweet face.
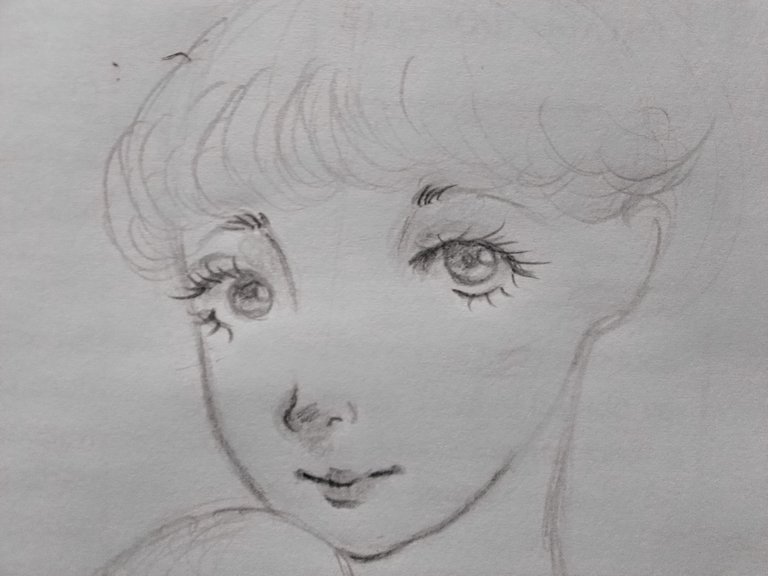

Para el cabello considero que también es importante hacer un boceto, esto para que puedas saber la dirección y forma del mismo. Por ejemplo, para este dibujo sentí que debía hacer un cabello corto, esponjoso y con un flequillo. Esto porque este dibujo me recordó mucho a las muñecas de porcelana, y por alguna razón las relaciono más con estos peinados.
Cuando voy a hacer los trazos del cabello de este tipo, no sigo reglas, simplemente dejo que mi mano haga muchas líneas curvas aquí y allá, todo esto con el lápiz de grafito claro. Para el flequillo, si hice muchas líneas curvadas hacia la misma posición, que más o menos dan a entender hacia donde está peinado. Hice la división del cabello en el centro y, a cada lado, líneas que siguen la forma de la cabeza.
Lo único importante es hacer muchas líneas redondeadas, pero que ya me den una idea sólida de cómo será que dibujaré el cabello.
For the hair I think it is also important to make a sketch, so you can know the direction and shape of the hair. For example, for this drawing I felt that I should make a short, fluffy hair with a fringe. This because this drawing reminded me a lot of porcelain dolls, and for some reason I relate them more to these hairstyles.
When I do the hair strokes of this type, I don't follow rules, I just let my hand do a lot of curved lines here and there, all this with the light graphite pencil. For the bangs, I did make a lot of curved lines towards the same position, which more or less hint to where it is styled. I made the hair parting in the center and, on each side, lines that follow the shape of the head.
The only important thing is to make many rounded lines, but ones that give me a solid idea of how I will draw the hair.
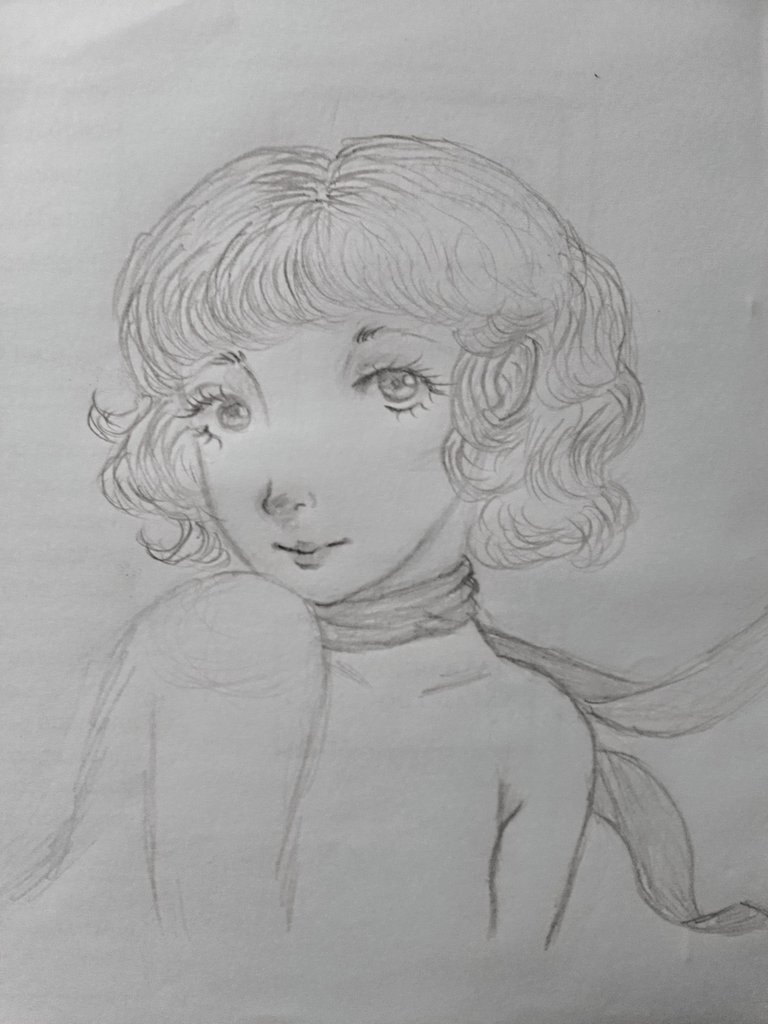
Aquí lo que hice fue remarcar algunas líneas del boceto y hacer otras líneas adicionales, cuya dirección dependería de la dirección del cabello ya establecida anteriormente por el boceto. Todo esto con trazos rápidos.
Luego dibujé la bufanda, que básicamente sería como una línea curvada alrededor del cuello, a la cual luego añadiría arrugas en las puntas, y unas cuantas líneas en el centro, la cual también serían arrugas. Después, detrás, dibujaría el resto de la bufanda, la cual está siendo movida por el viento y se dobla. Finalmente, “coloreo” la bufanda con el lápiz y difumino un poco con el dedo.
Por otra parte, detallé los pechos, haciendo las curvas, como dato solo hace falta recordar que la gravedad existe, y que tampoco son taaan detallados. En el estilo anime es muy común que los detallen mucho e innecesariamente, de formas poco realistas. Respeto gustos, pero no es algo que me agrade. En fin, eso no va al caso, aquí hice un vestido que se supone tiene corte de corazón, entonces hago esa misma forma, extendiéndola hasta la espalda. Soy muy mala dibujando ropa, espero que se pueda entender. Por último solo rellené de color dando trazos aleatorios con el lápiz.
Here what I did was to highlight some lines of the sketch and make additional lines, whose direction would depend on the direction of the hair already established previously by the sketch. All this with quick strokes.
Then I drew the scarf, which basically would be like a curved line around the neck, to which I would then add wrinkles at the ends, and a few lines in the center, which would also be wrinkles. Then, behind, I would draw the rest of the scarf, which is being moved by the wind and folds. Finally, I “colored” the scarf with the pencil and blurred a little with my finger.
After that, I detailed the breasts, making the curves, as a fact it is only necessary to remember that gravity exists, and that they are not so detailed either. In the anime style it's very common to detail them a lot and unnecessarily, in unrealistic ways. I respect tastes, but it's not something I like. Anyway, that's not the point, here I made a dress that is supposed to have a heart cut, so I make that same shape, extending it to the back. I'm very bad at drawing clothes, I hope you can understand. Finally I just filled in the color with random pencil strokes.
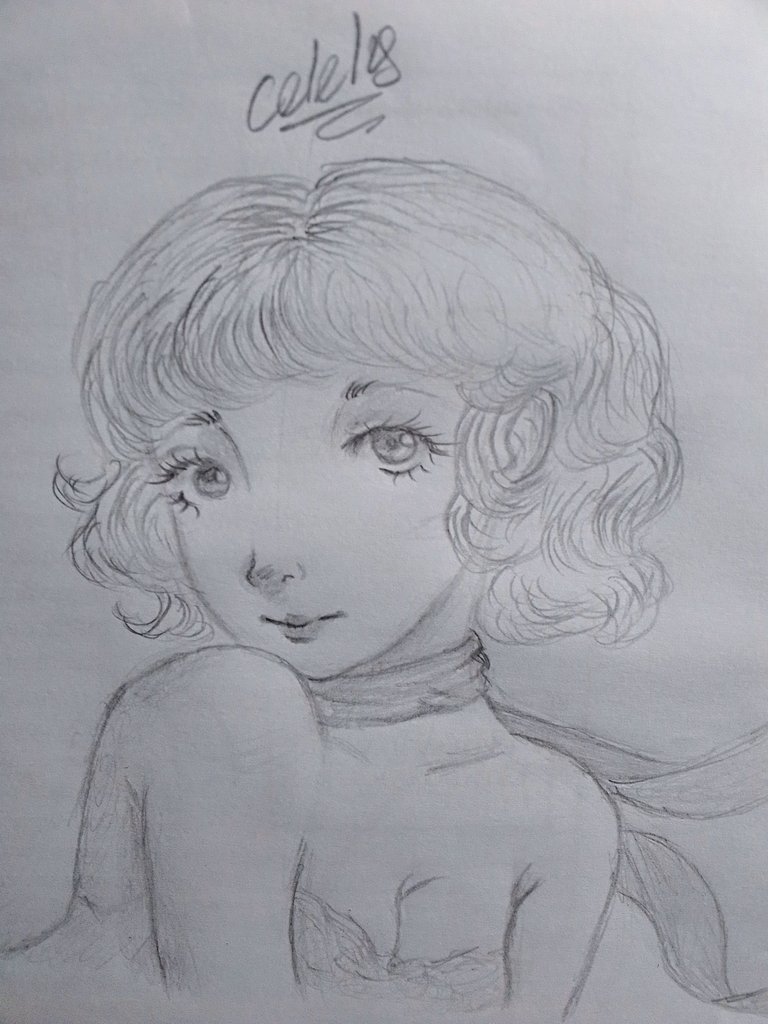
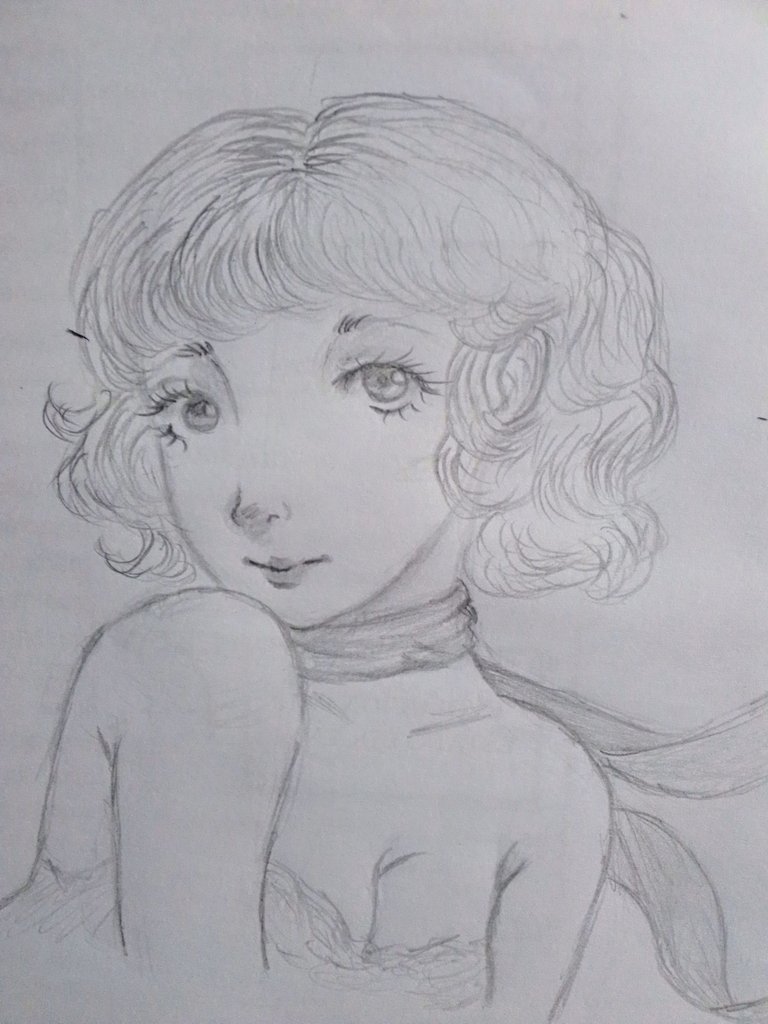
Remarqué un poco algunos detalles del dibujo, borré una parte del brazo porque sentí que se veía raro, y en la referencia lo dibujaban con esa parte borrada, así que supongo que es la manera más correcta o más estética, no tengo mucha práctica con la anatomía, pero precisamente es lo que estoy haciendo ahora: practicar, sé que algún día saldrá mejor.
También añadí algunas sombras detrás del brazo izquierdo y bajo el cuello, las remarqué un poco más.
Espero que se haya entendido toda la explicación y que, además, les haya gustado el dibujo… Creo que uno nunca termina de aprender a hacer algo, y yo soy el claro ejemplo de ello, que a pesar de llevar mucho tiempo dibujando, hay muchas cosas que se me dificultan, que olvidé, o que no entiendo; pero lo importante, creo yo, es que el simple hecho de dibujar ya nos haga sentir bien y felices, ¿y qué más da, no?
Sé que practicar es fundamental, pero disfrutar el proceso lo es aún más, he visto personas que se quejan mucho por no ser perfectas en lo que hacen, y yo me incluía ahí, pero luego recordé que esto lo hago por amor, y sentir amor al dibujar debería ser lo primero que me importe, lo demás puede esperar.
I remarked some details of the drawing, I erased a part of the arm because I felt it looked weird, and in the reference they drew it with that part erased, so I guess it's the most correct or more aesthetic way, I don't have much practice with anatomy, but that's precisely what I'm doing now: practicing, I know that someday it will come out better.
I also added some shadows behind the left arm and under the neck, I emphasized them a little more.
I hope that all the explanation has been understood and that, in addition, you liked the drawing... I believe that one never finishes learning to do something, and I am the clear example of it, that in spite of having been drawing for a long time, there are many things that are difficult for me, that I forgot, or that I don't understand; but the important thing, I believe, is that the simple fact of drawing already makes us feel good and happy, and what else matters, right?
I know that practicing is fundamental, but enjoying the process is even more so, I have seen people who complain a lot for not being perfect in what they do, and I included myself there, but then I remembered that I do this for love, and feeling love for drawing should be the first thing that matters to me, the rest can wait.
Y sin nada más que añadir, queridos, espero que hayan disfrutado el post tanto como yo disfruté hacerlo. Se me cuidan, pórtense bien y no se olviden de sonreír. Haaasta la próxima, muaaak. (˶ᵔ ᵕ ᵔ˶)♡
And with nothing more to add, my dears, I hope you enjoyed this post as much as I enjoyed making it. Take care of yourselves, be good and don't forget to smile. See you neeext time, mwaaah. (˶ᵔ ᵕ ᵔ˶)♡
Créditos | Credits
Traducción al inglés | English Translation: DeepL
Imagen de referencia | Reference Image
Los separadores fueron hechos con una imagen de Freepik y editados con Canva.
The dividers were made with an image from Freepik and edited with Canva.
Congratulations @celely! You have completed the following achievement on the Hive blockchain And have been rewarded with New badge(s)
Your next target is to reach 4750 upvotes.
You can view your badges on your board and compare yourself to others in the Ranking
If you no longer want to receive notifications, reply to this comment with the word
STOPContáctenos para saber más del proyecto a nuestro servidor de Discord.
Si deseas delegar HP al proyecto: Delegue 5 HP - Delegue 10 HP - Delegue 20 HP - Delegue 30 HP - Delegue 50 HP - Delegue 100 HP.
Lindo dibujo.