After 1 month, maybe more, of joining in Splinterlands Art Challenge and getting used to both the XPPen Deco drawing tablet and Krita, I finally was able to make the animation part of Krita listen to me.
After a lot of anguish, trying it out off-screen and every Art Challenge, I can finally use it properly. The main challenge I had was the layering. Unlike frame animation in Photoshop, you can't just separate the lineart and color layers in Krita and expect it to do animation somehow. In Photoshop, you can do that but not in Krita. Krita is much more complicated in terms of animation and while this is less user friendly than Photoshop, it's also more powerful.
It's hard to explain in detail using words what are all the differences and why I am this hyped and excited but read this post and see the big difference in the timelapse section. I promise you that you will see a big difference from my other posts.
Drawing Process
Guide and Lineart

In this post, I also upgraded my guides. The head and body are cleaner circles because I used the ellipsis tool of Krita. There's also a major change here with the brush point I used. Before, I am using "Ink-4 Pen Rough" because among the Krita brushes, this has the best change in pen size for pen pressure. In this drawing, I used only "Basic-1" which is the brush I use for coloring. It is solid all throughout, no pen pressure at all and I am surprised it looked really good. For the sharp edges, I did that manually by doing erasing the edges of the circular edge.

Since this is just a guide, this can be faster for me. Like I said always, I mostly just use the guides for perspective and it would change a lot on the lineart step.

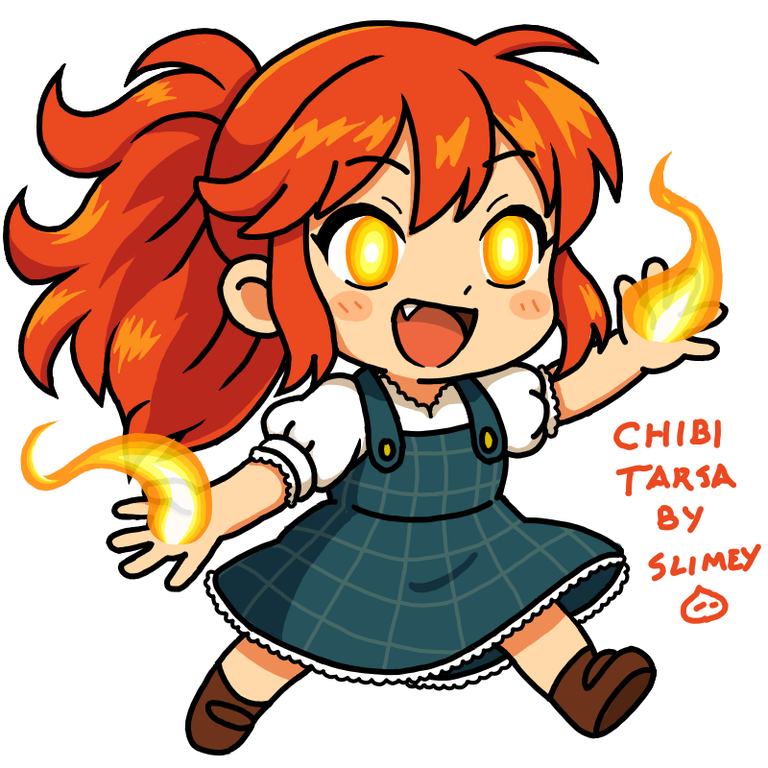
For the Lineart, since I am also practicing chibis for youtube thumbnails, I decided to hit two birds in one stone and do chibi characters from Splinterlands for the meantime as well. One of my friend also praised me when I showed her this chibi Gawr Gura that I used for my youtube thumbnail which made me inspired to do chibi Splinterlands characters.
Base Color Guide and Adding Base Color

I believe I also added this step on the last drawing I did but it's a little different this time. For the color guides, I added it on the sides so unlike before, you won't see where it goes until I apply it. The reason for this is to make the Krita animation work, I have to do some steps multiple times for the animation. I'm still developing my work system in Krita so this might change as I polish it more but for now this is working really well.
Adding Details

I added a new layer on top of the base color and punched in the keyframe for animation. So, with Krita, whenever you do something, you must also create a keyframe for that. Think of it like this. If you're doing animation in Photoshop, each layer is a piece of paper you rearrange. In Krita, layers are now folders and each layer, you have keyframes in the animation section. If you change something in one layer, it would be changed in all the keyframes. It's very difficult to explain in words and is better to see it on your own so I'll skip this for now and I'll probably talk more about it in the future but for now, let's continue adding the shadows.
I added shadows on top of the base color. I also used this part to add minor details I think is needed in the drawing that cannot be added in the lineart step like highlights or other minor details. Instead of just shadows step, this is now the details step.
Eyes
On the original art, Tarsa's eyes are of the same color as her fire so I did the same here.
I also added a little blush on the cheeks during this part just to make it look cuter.
Fire

After doing the eyes I used the same color scheme for the fire. If you've been following which colors I used up to this point, this is where that five color guide on the right comes into play from innermose to outermost although I build fire in drawing the other way around. First, you add the darkest outermost layer and build it going inside. This is easier for me than other guides I found on the internet.
Original Art

Narrative Timelapse

That's it. This is my new updated style and I do hope you all like it. I do think this is my best work so far and everything is much more pleasing to the eyes, don't you agree?

Hi, y'all. Slimey here, your jolly and gullible little blue slime. I got reincarnated to this world to better my art and join community challenges to get more practice and improve my skill.
Know more about me by checking out my introduction post
See funny vtuber clips and animations by checking out my youtube channel.
Support me by joining Splinterlands using my referral code.
Images are taken from Splinterlands, Drawn in Krita, Animated in Photoshop and Edited in Canva.
I loved it, it was super adorable and very well explained.
You have amazing art too maybe better than professionals
Congratulations @slimeyph! You have completed the following achievement on the Hive blockchain And have been rewarded with New badge(s)
Your next target is to reach 900 upvotes.
You can view your badges on your board and compare yourself to others in the Ranking
If you no longer want to receive notifications, reply to this comment with the word
STOPThanks for sharing! - @isaria
