
Saludos, amigos con este tercer tutorial completo la trilogía de tutoriales básicos sobre este juego que cada día que pasa me encanta más: Rising Star. En este concretamente vamos a detenernos en describir las propiedades de las cartas, que son importantes porque nos ayudan a armar nuestras estrategias.
Y al hablar de nuestras estrategias, también hay que indicar un elemento que en el juego siempre debemos estar atentos para potenciar nuestras ganancias: El Ego.
Al igual que los dos tutoriales anteriores, les dejos una imagen y una breve explicación:
Greetings, friends with this third tutorial complete the trilogy of basic tutorials on this game that every day I love more: Rising Star. In this particular we will stop to describe the properties of the cards, which are important because they help us build our strategies.
And when talking about our strategies, we must also indicate an element that at stake we must always be attentive to enhance our gains: The Ego.
Like the two previous tutorials, I leave you with an image and a brief explanation:


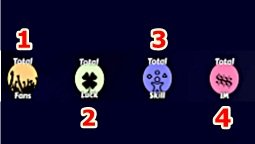
Fans. Hay de dos tipos, permanentes, que son los que están asignados a cada carta y temporales, ya que son aficionados borrachos que sólo seguirán nuestro camino al estrellato por 12 horas. Estos últimos pueden ser adquiridos al pasar una misión. El número de fans está relacionado con la mayor cantidad de starbits que podemos ganar en cada misión.
Suerte. Su número influye en las oportunidades que tenemos para conseguirnos con ciertos premios al avanzar en el juego (por ejemplo, fans borrachos, trozos de pizza, etc.) La suerte asignada a las cartas de instrumentos influye en la mayor cantidad de skills que podemos ganar por lecciones de música, según el tipo de instrumento.
Habilidad. Las adquirimos de dos formas: por nuestras cartas y por las lecciones de música y es una estadística muy importante porque también potencia nuestras ganancias, tal como lo veremos en el apartado sobre el Ego. Además, tendrá su importancia en ulteriores fases del juego, como por ejemplo, para las batallas entre bandas.
I.M. Es una propiedad que influye en un 20% en la tabla de ranking de los jugadores. Más adelante, tendrá también otras aplicaciones.
Fans. There are two types, permanent, which are assigned to each card and temporary, as they are drunken fans who will only follow our path to stardom for 12 hours. The latter can be acquired by passing a mission. The number of fans is related to the highest amount of starbits we can win in each mission.
Luck. Their number influences the opportunities we have to get certain prizes when advancing in the game (for example, drunk fans, slices of pizza, etc.) The luck assigned to the instrument cards influences the greater amount of skills we can win for music lessons, according to the type of instrument.
Skill. We acquire them in two ways: by our cards and by music lessons and it is a very important statistic because it also boosts our earnings, as we will see in the section on Ego. Moreover, it will have its importance in later phases of the game, for example, for the battles between bands.
I.M. It is a property that influences 20% in the ranking table of the players. Later on, it will also have other applications.
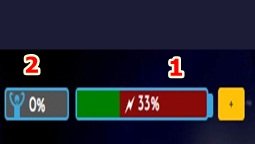
Barra de energía. Si no utilizamos ningún potenciador se recarga 1% cada 5 minutos, así tenemos que en una hora se recarga el 12 % (=60/5).
Barra de Ego. A partir del nivel 15 o si llegas a 1000 fans te va a aparecer esta barra, la cual suma los puntos de ego ganados por misión más la cantidad de fans. Debes estar muy pendiente de esto para potenciar tus ganancias por misión, pues:
Si tienes menos skills que ego, éste subirá y será menos starbits lo que podrás ganar por misión.
Si tienes igual cantidad de ego que skills o incluso más de éstos, mantienes el Ego al 0% y así tienes más posibilidad de ganar más starbits.
Energy bar. If we don't use any power bar, it recharges 1% every 5 minutes, so in one hour we have to recharge 12% (=60/5).
Ego bar. From level 15 or if you reach 1000 fans this bar will appear, which adds up the ego points earned per mission plus the number of fans. You must be very attentive to this to increase your earnings per mission:
If you have less skills than the ego, it will go up and there will be less starbits you can earn per mission.
If you have the same amount of ego as skills or even more of them, you keep the ego at 0% and you have more chance to earn more starbits.

Para comprender mejor esta tercera guía, es conveniente que repases las dos primeras:
To better understand this third guide, you should review the first two:
Muchas gracias por haberme acompañado en la lectura de este post, espero tus comentarios y que nos podamos volver a encontrar en una próxima publicación, hasta luego.
Thank you very much for having accompanied me in the reading of this post, wishing you always the best and that we can meet again in a next publication, I say goodbye, see you later.

- Traducido con www.DeepL.com/Translator || Translated with www.DeepL.com/Translator


Muy bueno Jesus!!
!BEER
View or trade
BEER.Hey @jesusalejos, here is a little bit of
BEERfrom @nupulse for you. Enjoy it!Learn how to earn FREE BEER each day by staking your
BEER.This post gives you one entry into the weekly prize draw to win a 3 card Rising Star booster pack.
Post original high quality posts once a day and use the #risingstar tag to get more entries.
The prize draw takes place during our weekly live stream on Sundays.
Join our curation trail to automatically upvote posts about Rising Star.
!BEER
View or trade
BEER.Hey @jesusalejos, here is a little bit of
BEERfrom @risingstargame for you. Enjoy it!Learn how to earn FREE BEER each day by staking your
BEER.Excelente, sigue así que gran aporte a la comunidad