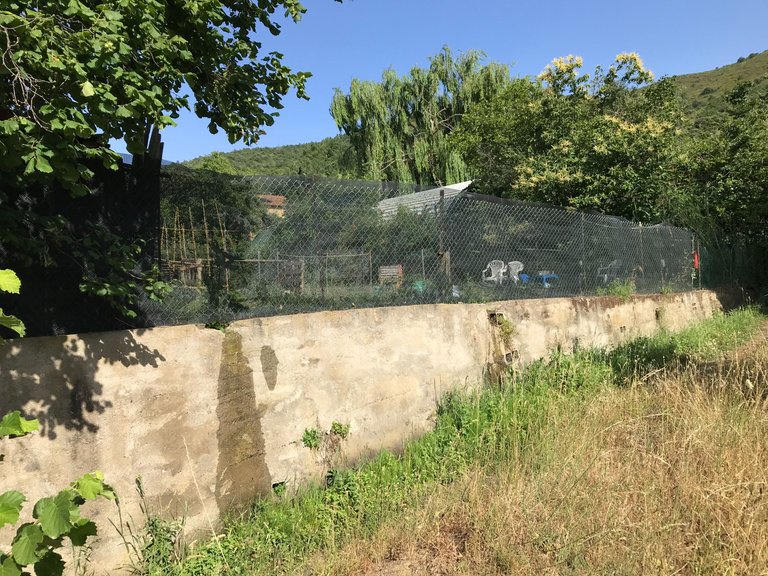
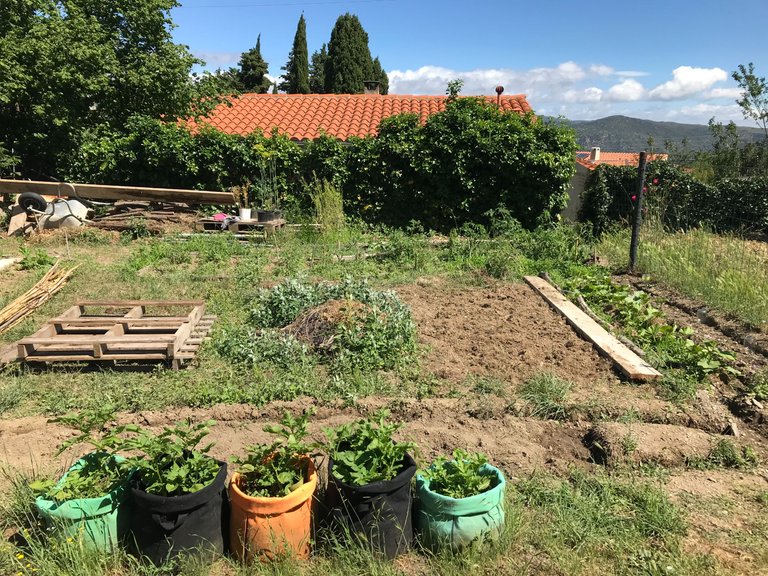
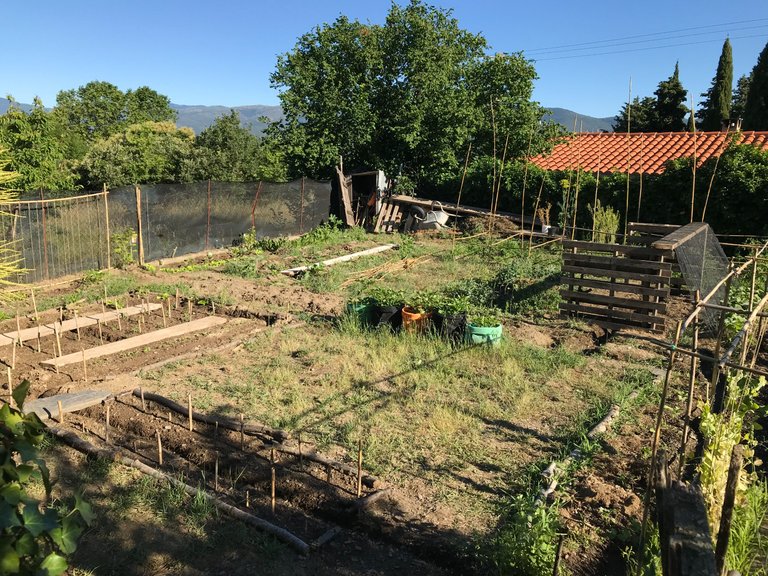
Our new garden has a great exposition receiving direct sunlight from sunrise to sunset but this is too much for many plants and they will not thrive as they should in the heat of the Summer here in the South of France where temperatures regularly push over 35°C at this time of year.
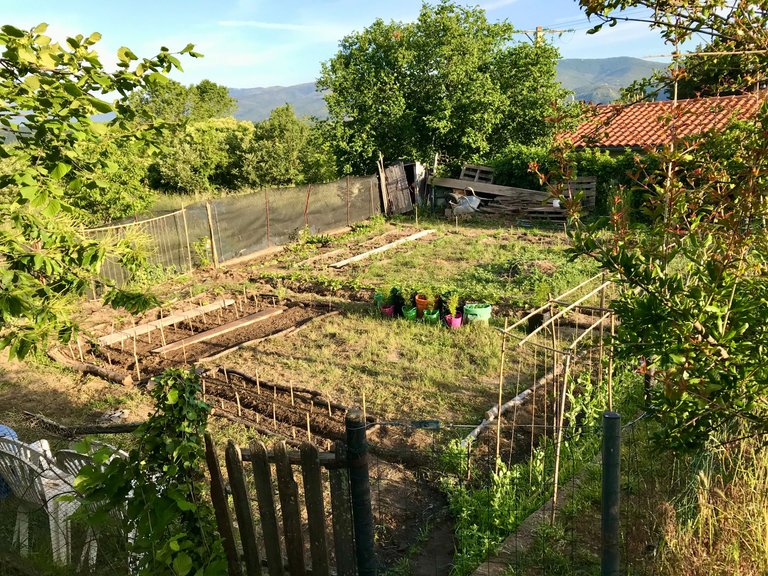
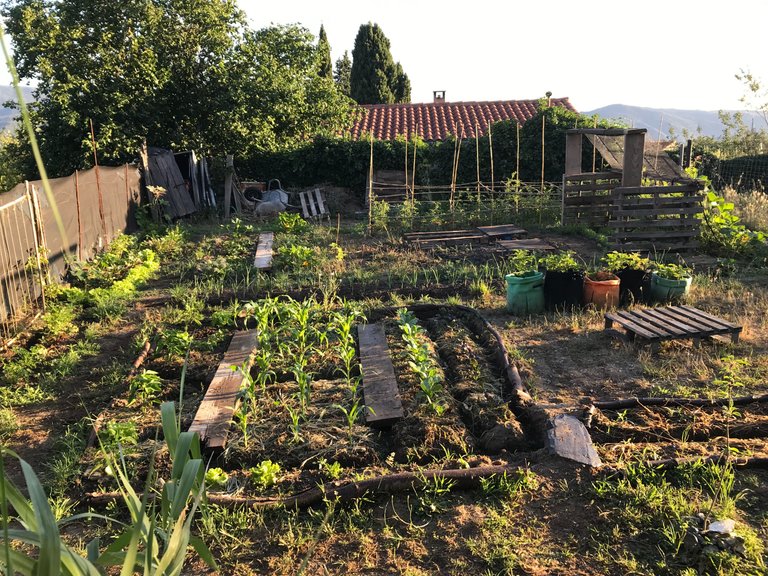
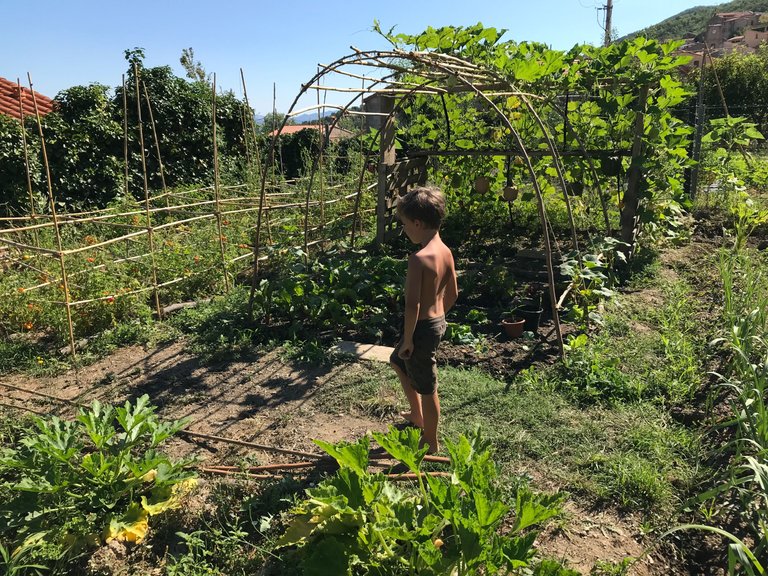
Determined to make the most of my new grow space (seen above at the beginning of May) I set about finding solutions, the first of which is a pretty obvious one: plant stuff which likes full sun! And so, the majority of this garden is dedicated to pumpkins, butternut squash, courgettes, cucumbers, melons & cucamelons which are all members of the same family known for its ability to tolerate this kind of sun intensity.
The second solution is rather more radical and a lot more work, but has the bonus effect of doubling the size of my grow space. I will tell you about that in a moment. First there is a little story.
Observation leads to new ideas
One year ago we planted a few pumpkin seeds in a car park on the other side of our ancient village, just for fun.
The plants excelled there, reaching lengths of over 10M, producing enough pumpkins for the entire village to help themselves. Which they did! Leaving very few for us in fact.
This was fine because what I gained from the experience was much more valuable. Despite google's assurances that the larger varieties of pumpkin can only grow up to 4.5M in length, producing a max of 1-2 pumpkins per plant, what I saw last year in that car park was so much more impressive.
With this in mind, an idea started to brew.
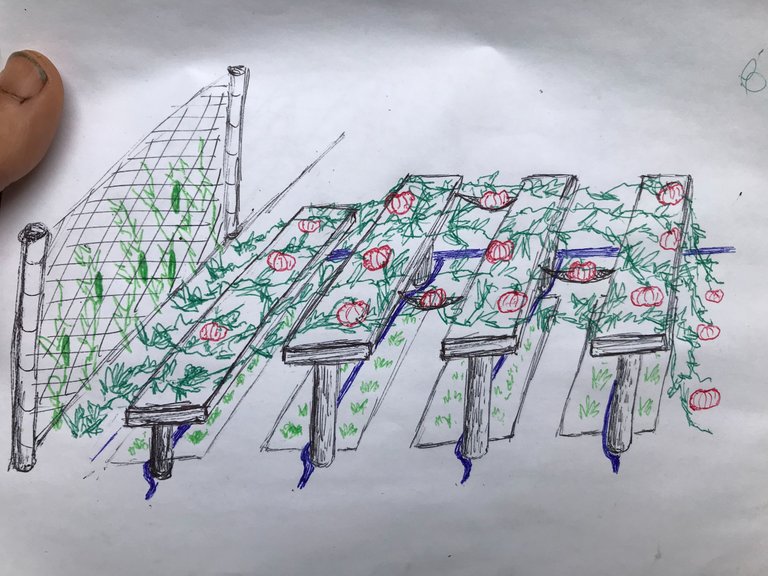
In the end it looked nothing like this but the principle remained the same. I would elevate them above the ground and use their incredible length to create shade for plants underneath them. The only downside I could see was amount of work involved in creating a structure strong enough to hold the weight of a large number of pumpkins. But I think those of you who have followed me for some time will know that I am not afraid of hard work. On the contrary, I thrive in these situations! Particularly when we are talking about something creative & functional, like the stone house.
And so, I invite you now to sit back and enjoy my photographic documentation of the construction process of a pumpkin house, which I also encourage you to try out for yourselves and improve upon. This is of course only my third year as a food producer and I have much to learn yet, so I am always open to your input.
The watering system
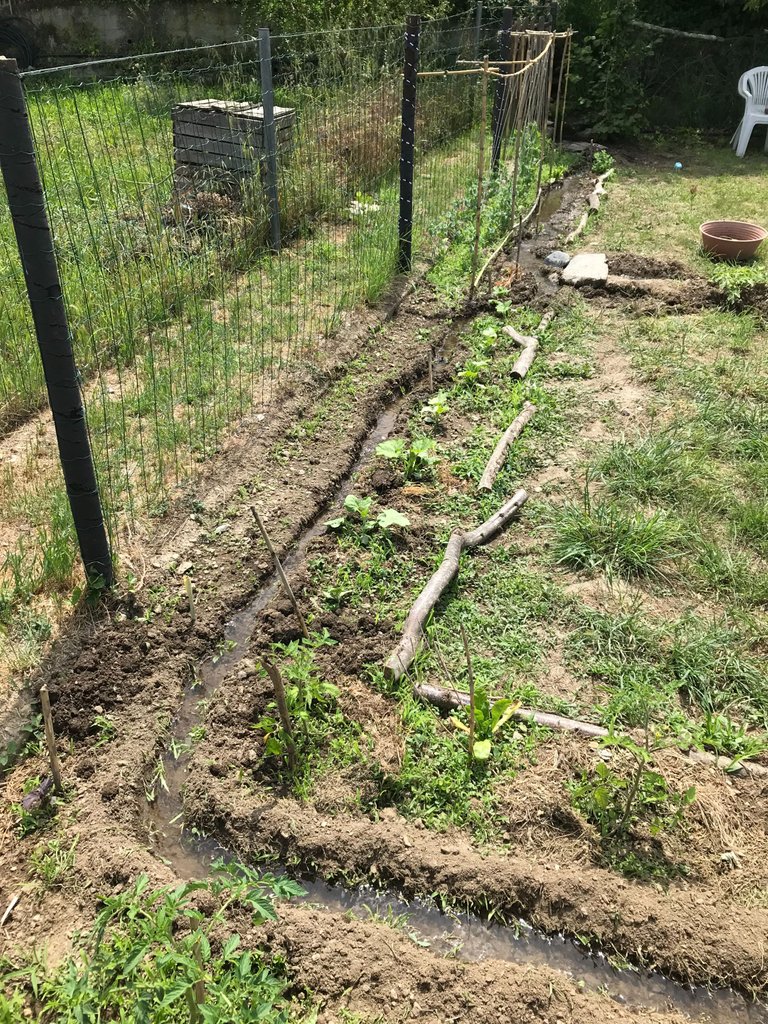
One essential component of a successful full sun garden is an effective watering system and thankfully this land has a canal which runs along side it, so all I have to do is lift that piece of metal up...
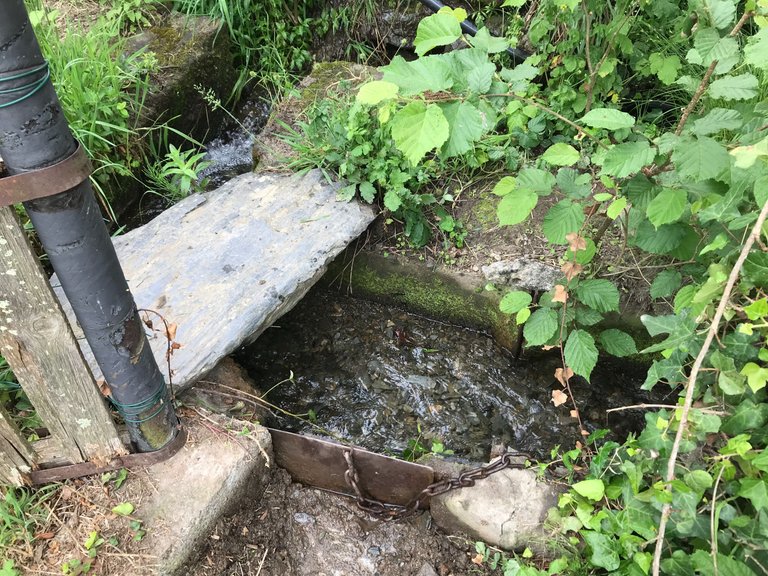
...and the water flows into the garden.

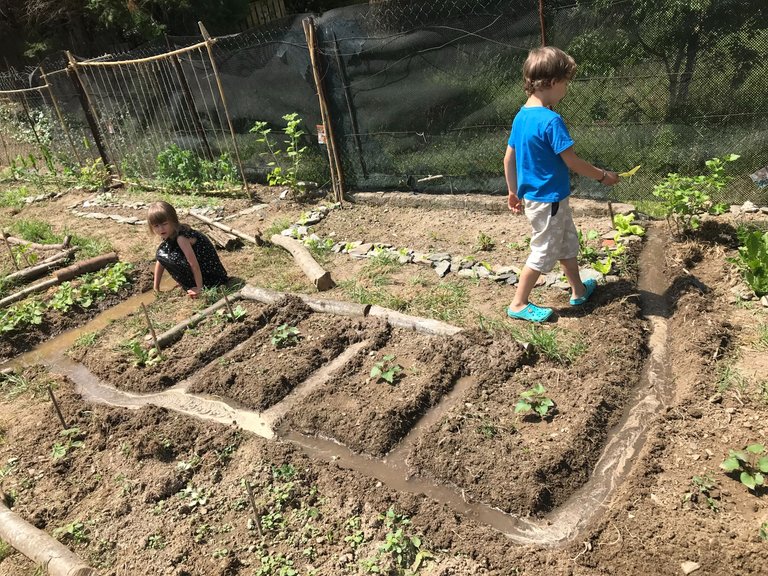
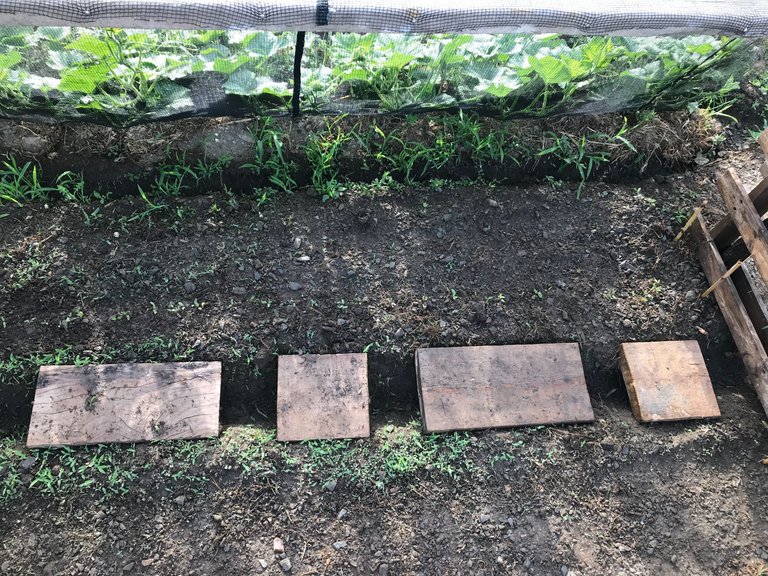
It was a lot of fun planning & digging these channels! Sweet potatoes seen here each with their own block.
Whoever designed this land did so with this basic watering system in mind because there is a slight gradient to it, permitting the water to run from one side to the other.
Once it has completed its journey, the water exits at two specific spots where the concrete permits and is returned to the canal beneath.

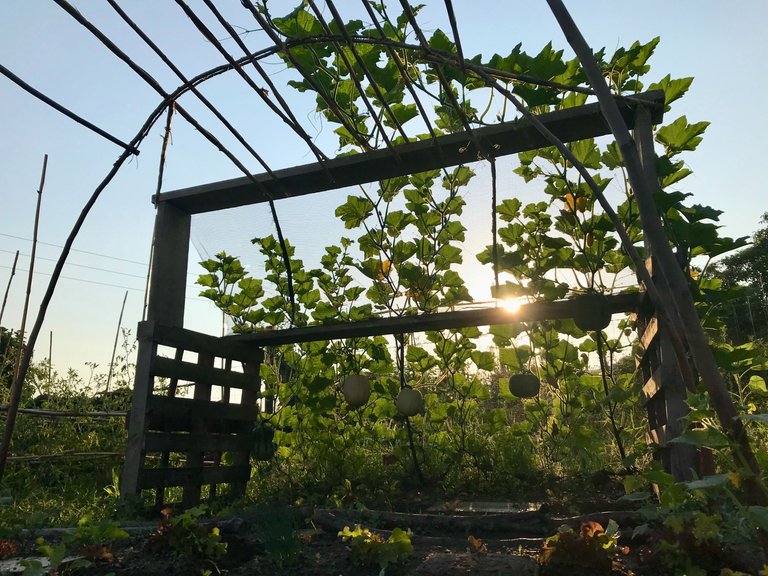
Getting back to the pumpkins, here you can see seven of them growing happily along side their watering channel.
All that space to the right of the shot I intend to fill with other plants, under the shade of the pumpkin leaves.
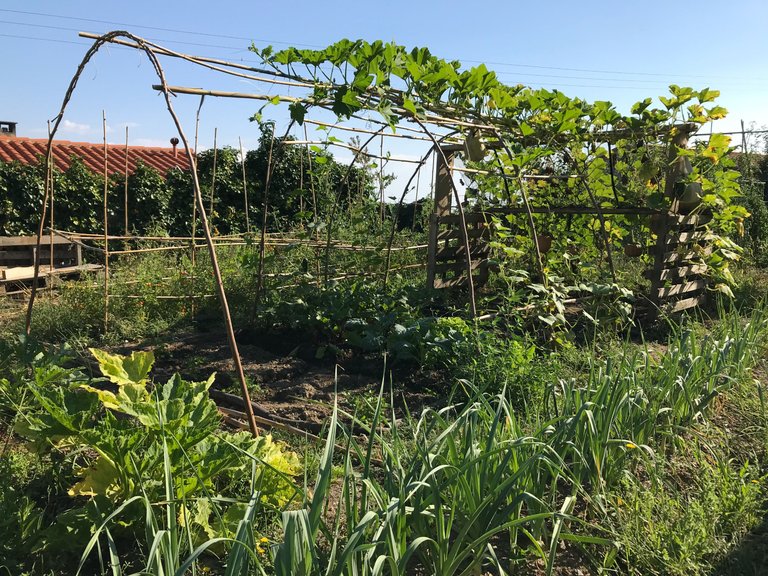
Pumpkin house & butternut house
So, on one side I have seven pumpkins and on the other I have seven (currently very small) butternut squash which will ultimately need a little house of their own.
But first I must create one for the pumpkins which are faster to get started.
For your information the jam jars on the left are covering small cucumber plants to save them from getting eaten by slugs!
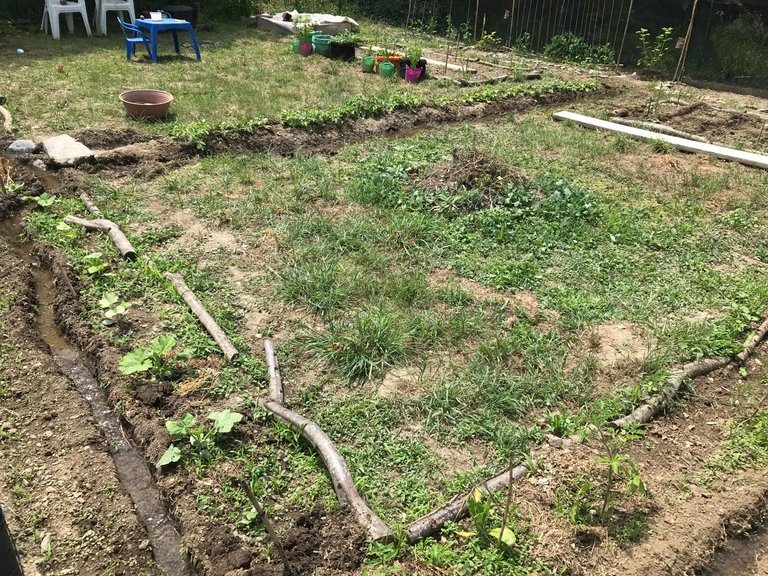
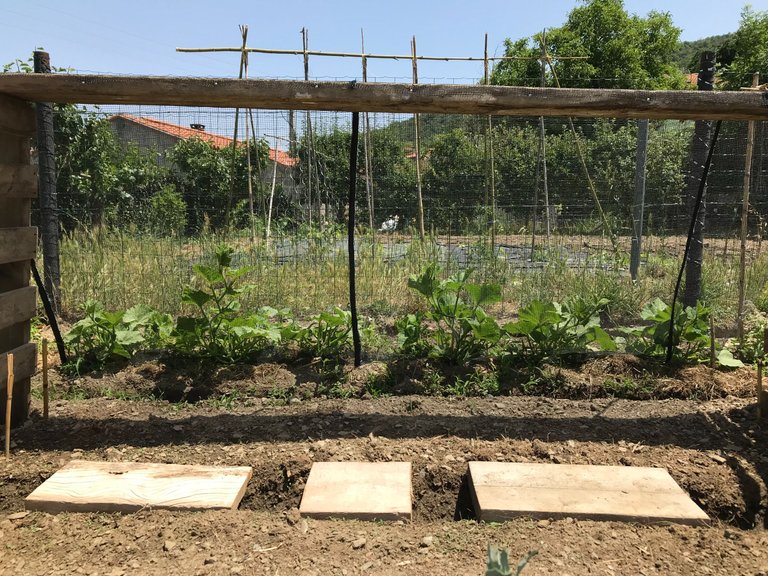
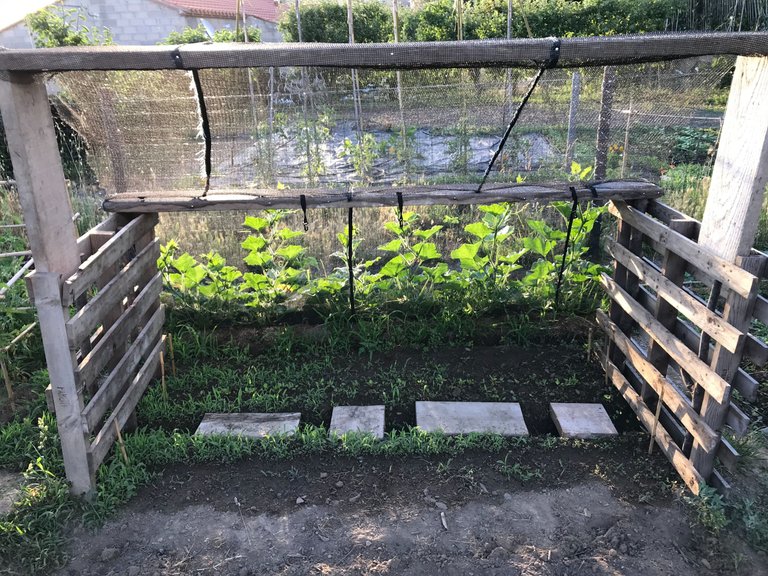
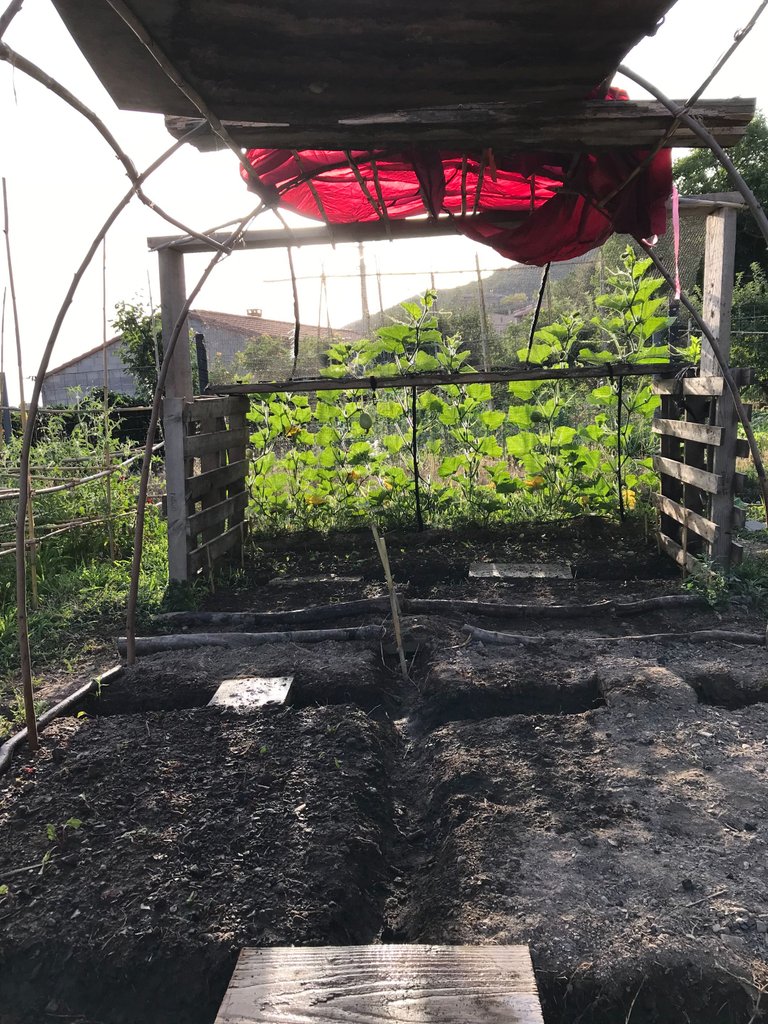
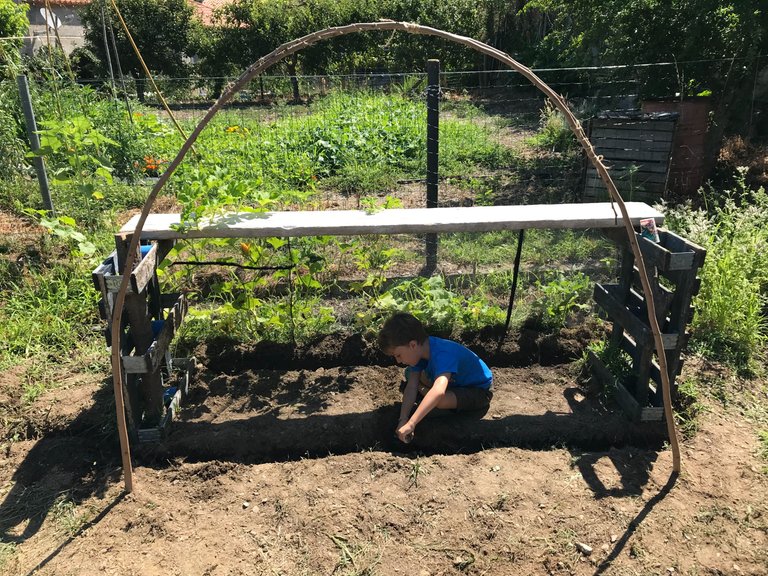
Getting started now with the pumpkin house area first I prepared the bed & watering channels beneath.
There were some pallets on the land so I used these as the base of my structure, each one held in place by two logs dug deep into the ground.

This garden also came with a bunch of these wooden planks which have been incredibly helpful as walkways over the watering channels. And now for this.
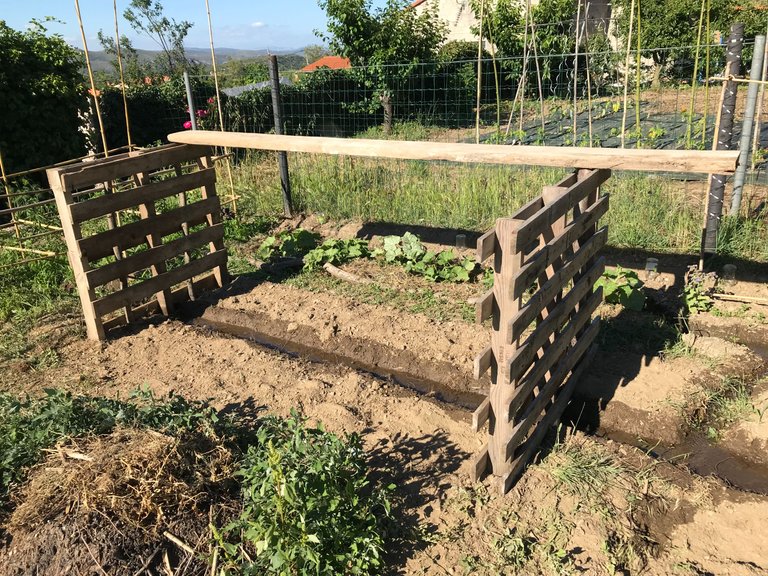
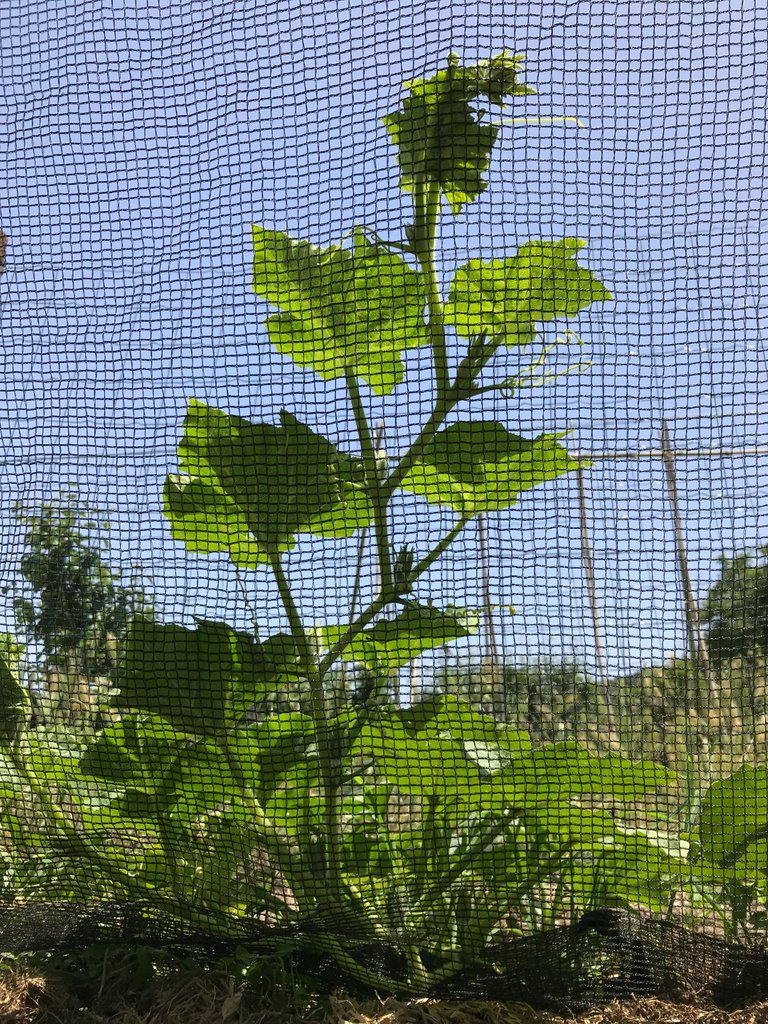
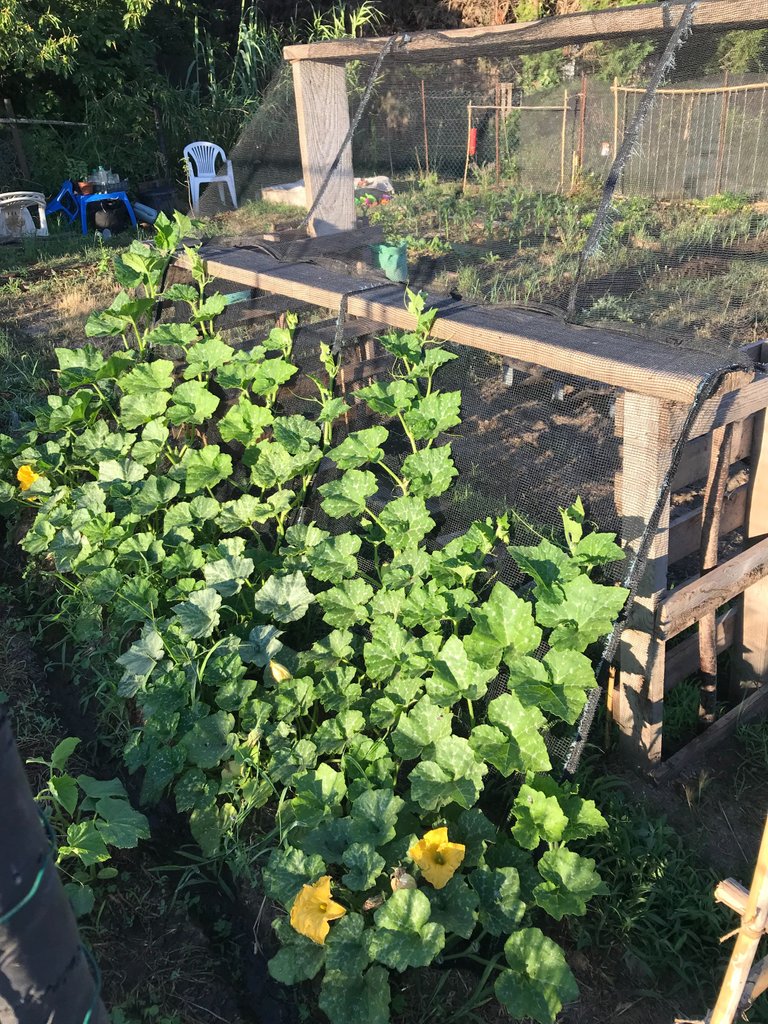
I used the safety net from our trampoline as the material required to get the pumpkins off the ground, up onto the top of the pallets.
And I must say, it couldn't be more perfect for this purpose!
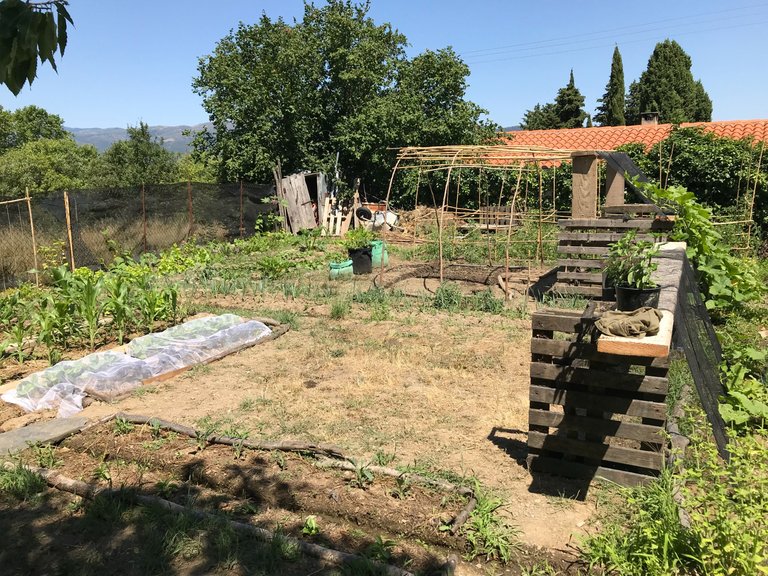
Stepping back you can see the rest of the garden taking shape at the same time, leaving those two large areas for my constructions.
The pieces of wood over the watering channels are essential in this situation, permitting me to kneel close to the action and get my fingers into the mud ;)
Love the way the pumpkins look from this side, so strong and green.
There is already a decent bit of shade now.
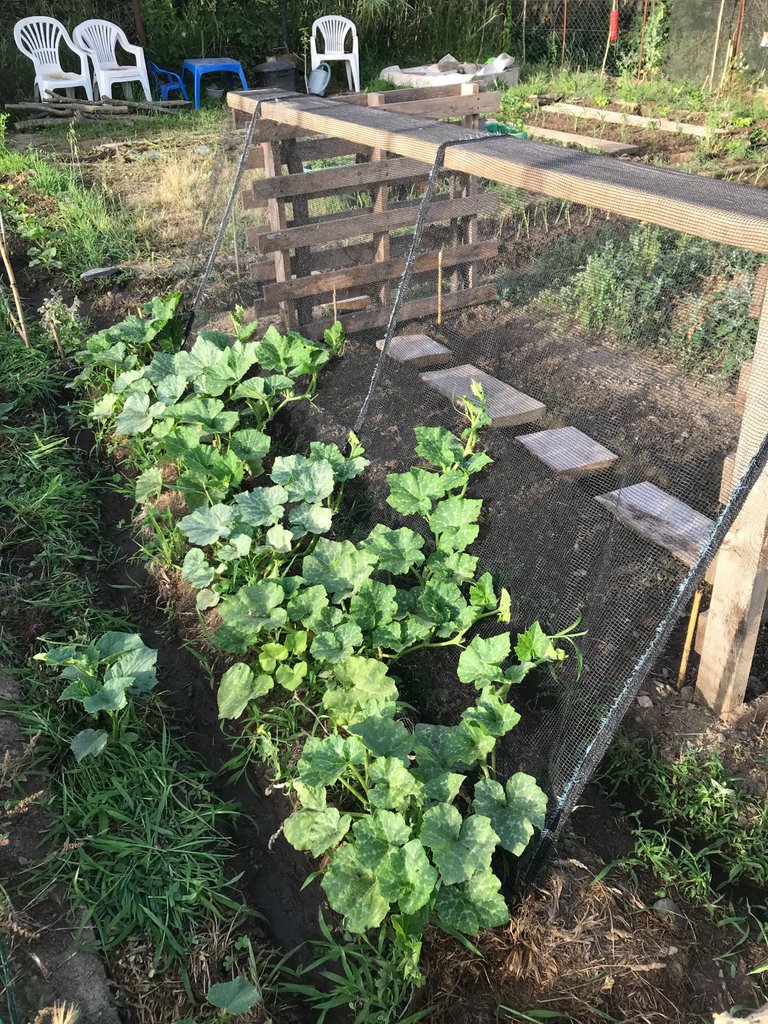
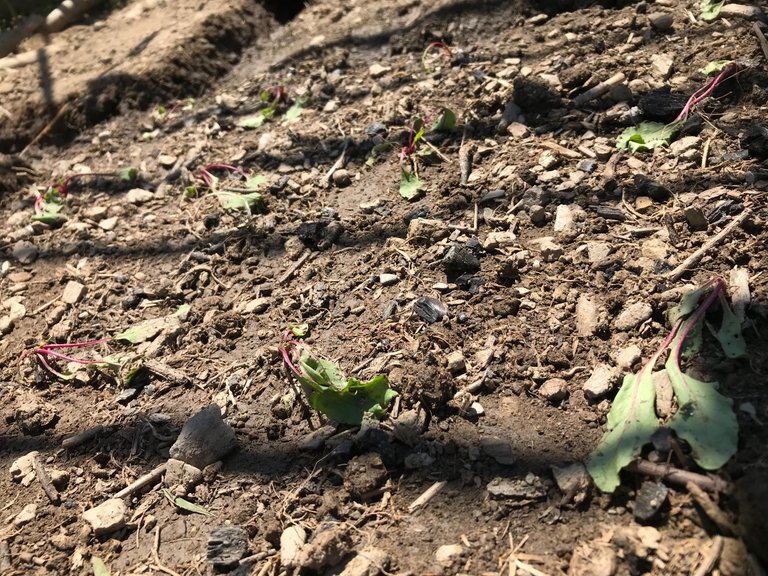
Enough for me to plant 76 beetroot babies.
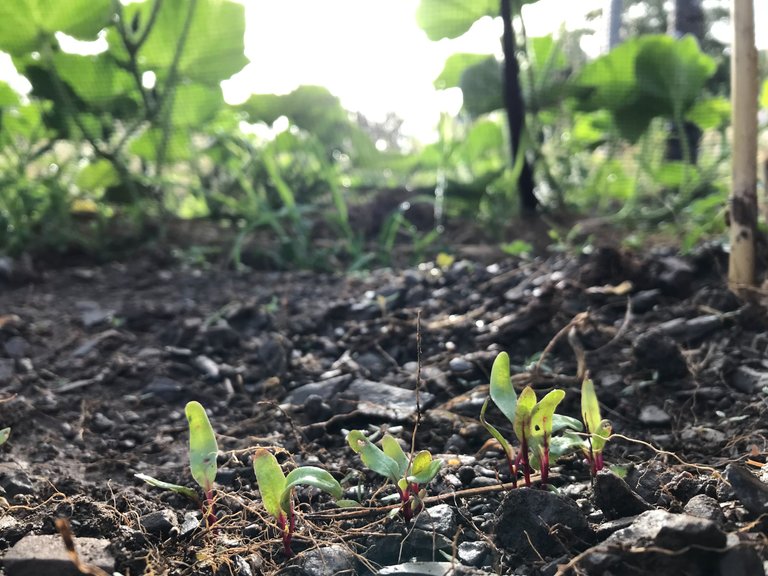
I planted one line of beetroot with the intention of re-distributing them once they have grown up a bit. My personal observations with beetroot are that they transplant extremely well with a very high success rate.
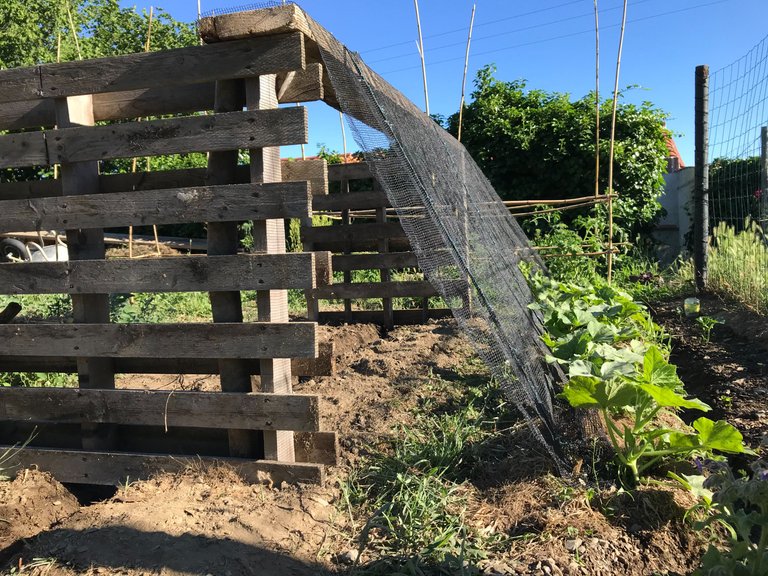
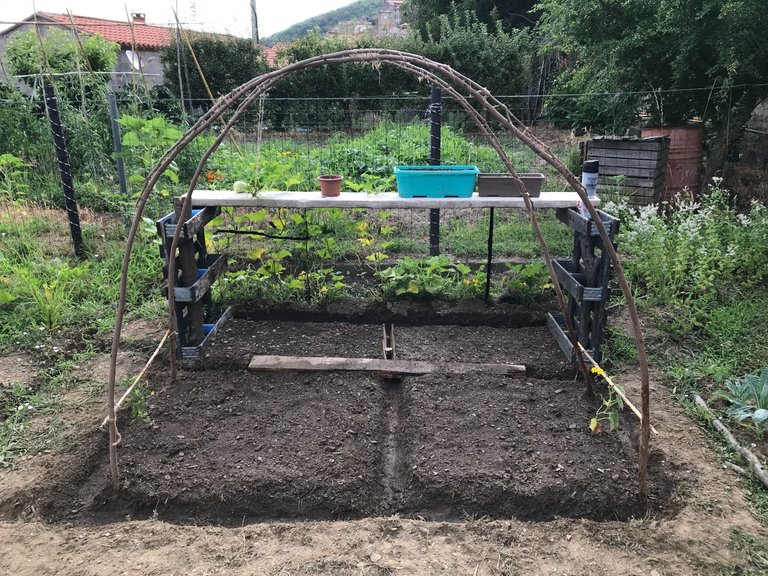
I am now cutting small holes in the net to permit for the pumpkins to grow through and ultimately hang down beneath it.
Here you can see the next layer of the construction, taking the pumpkins up to head height.
They crawled up that net at an amazing rate. Probably between 5-10cms a day.

Again, stepping back from the action you can see the rest of the garden slowly taking shape around the two empty spaces.
Up and up they climb.
Forever prompting me to begin the next stage of construction...
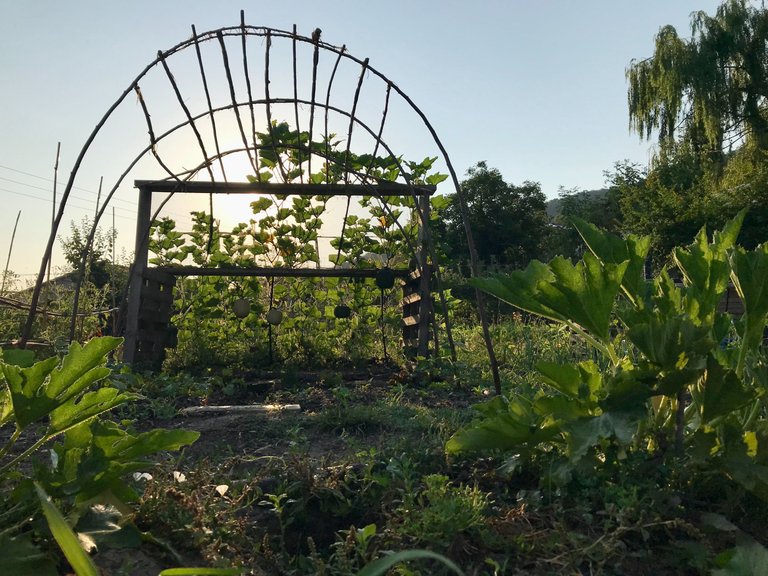
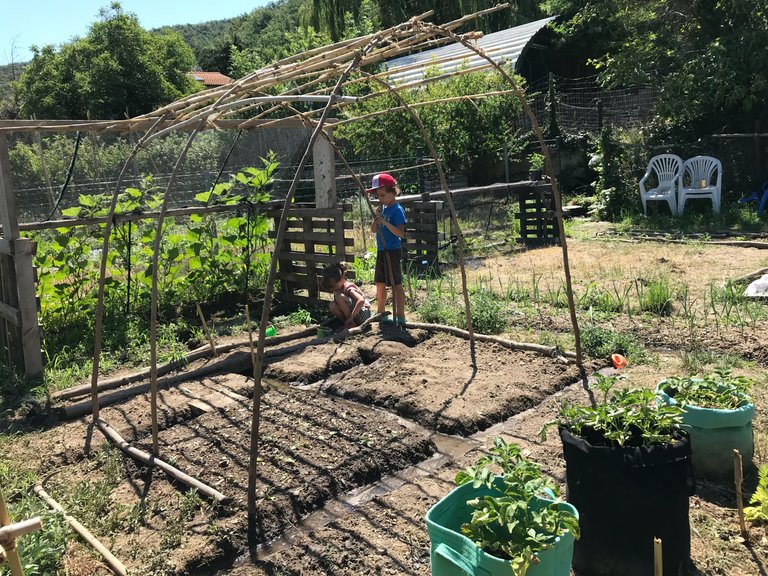
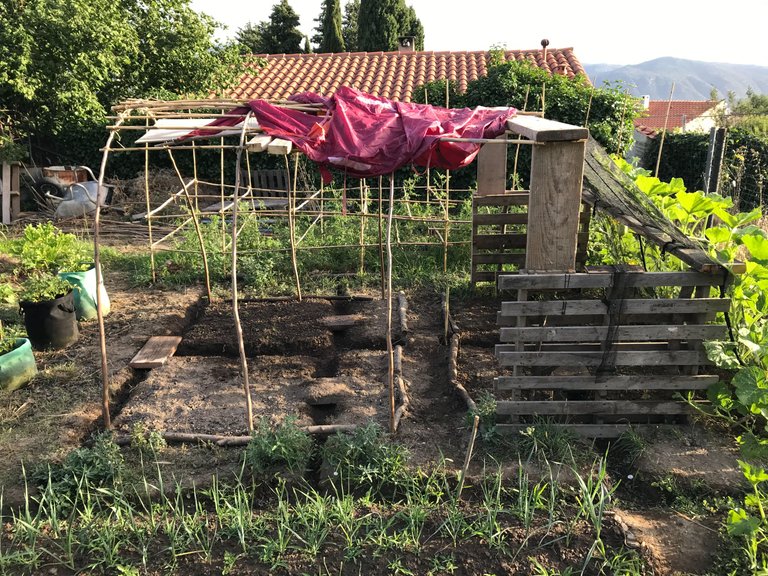
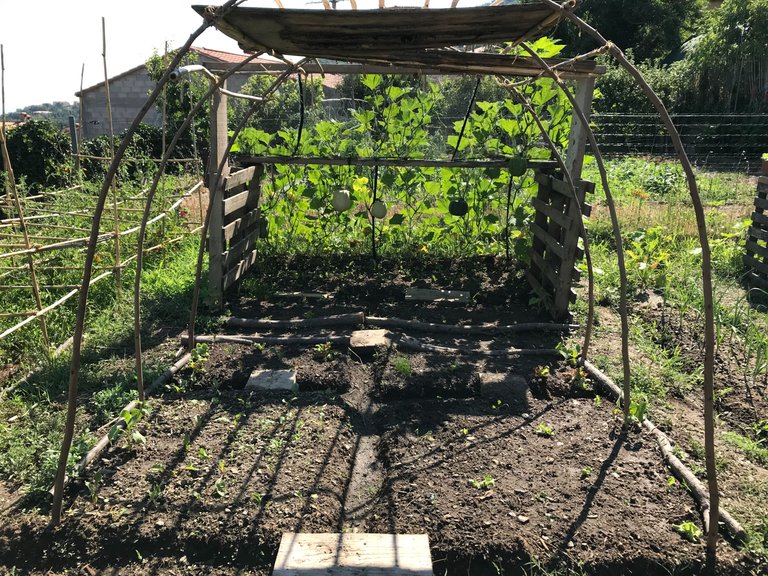
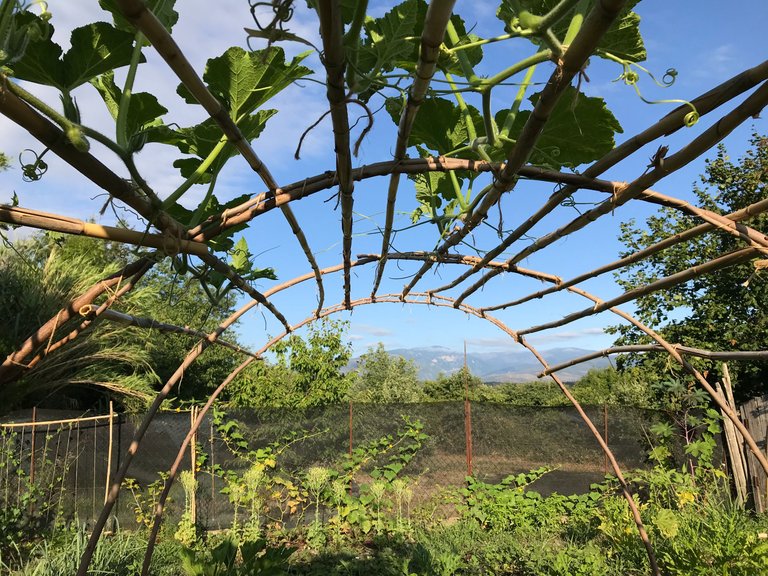
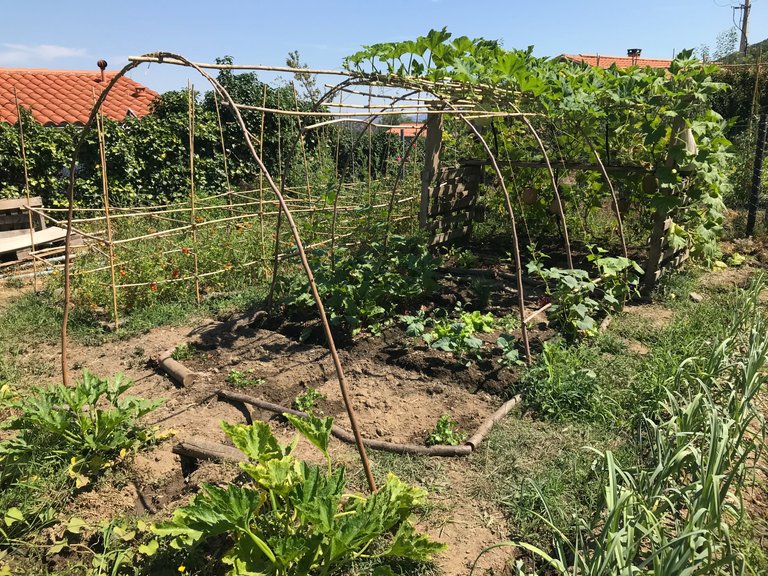
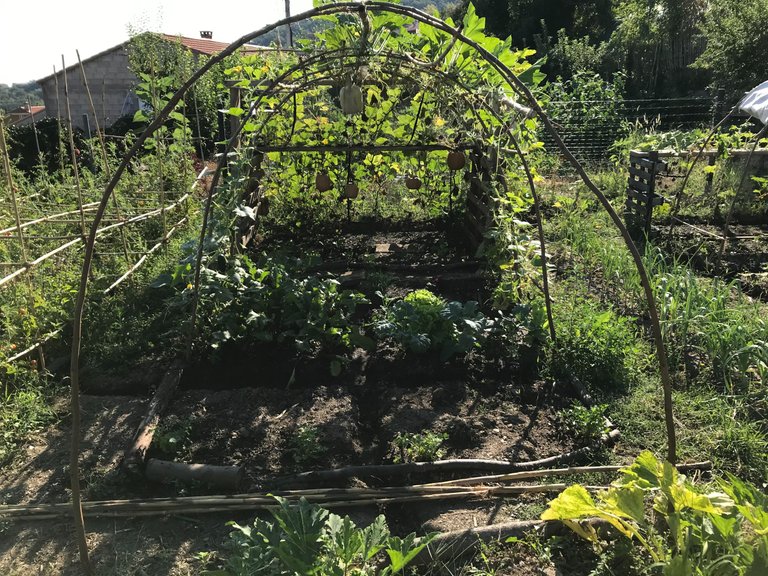
The 'house' itself.
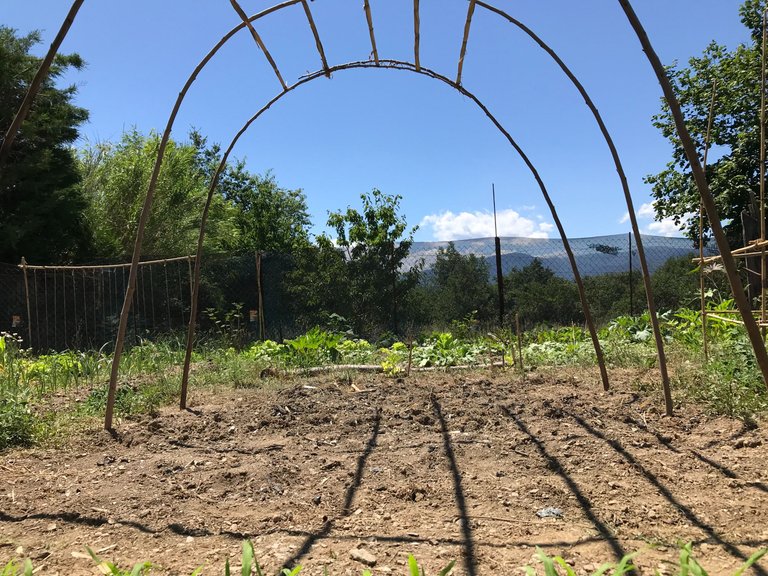
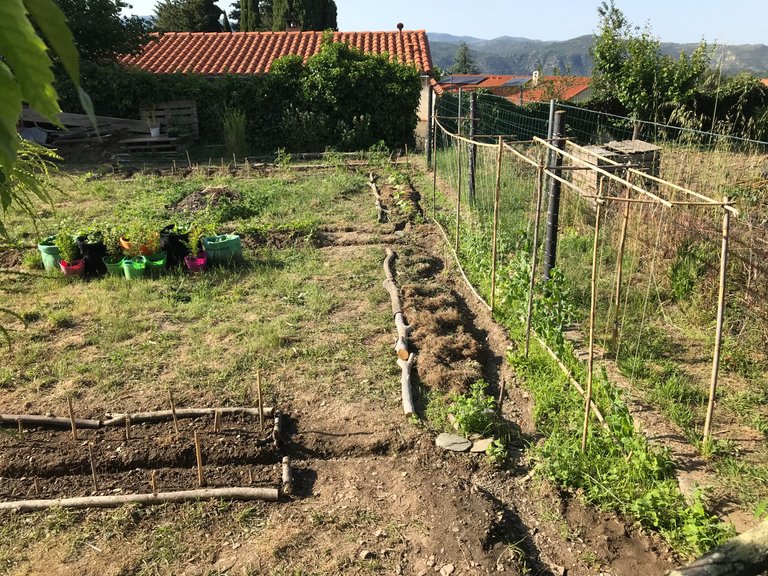
This was made with young hazelnut wood (abundant around here) dug deep into the ground and bent inward to create arches, linked together with string & bamboo.
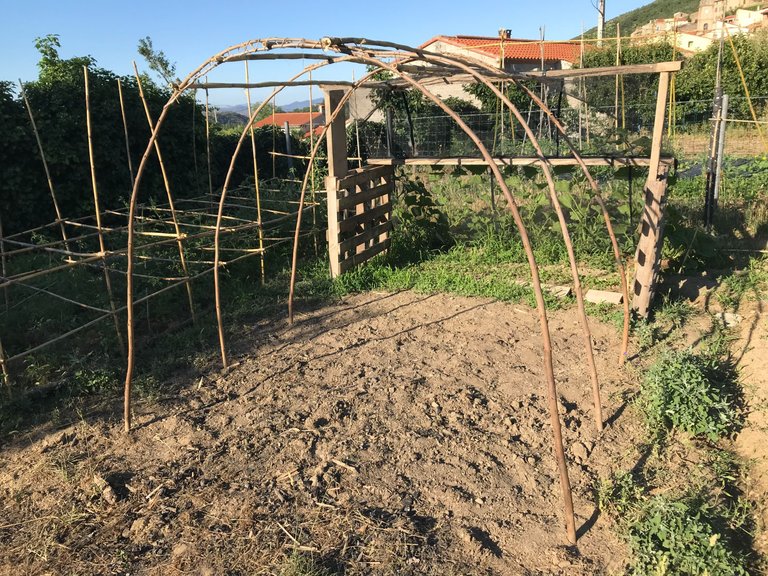
The watering channels went in next next.
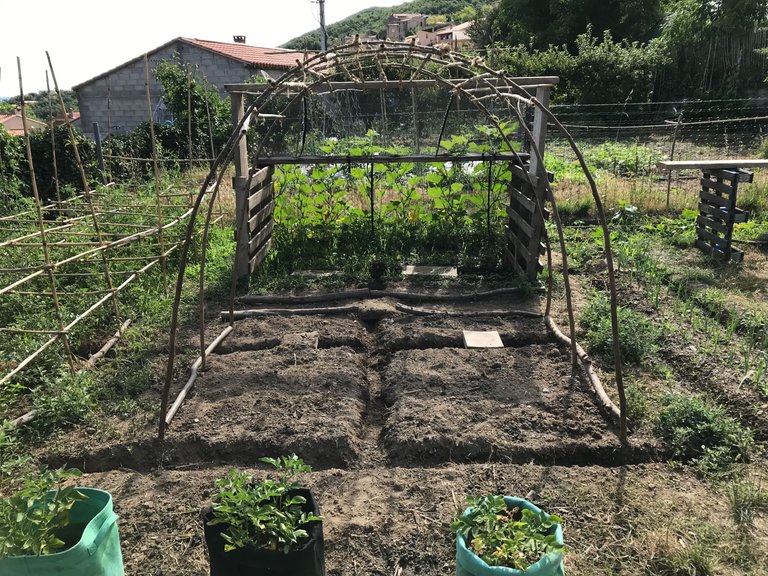
And finally we plant stuff!
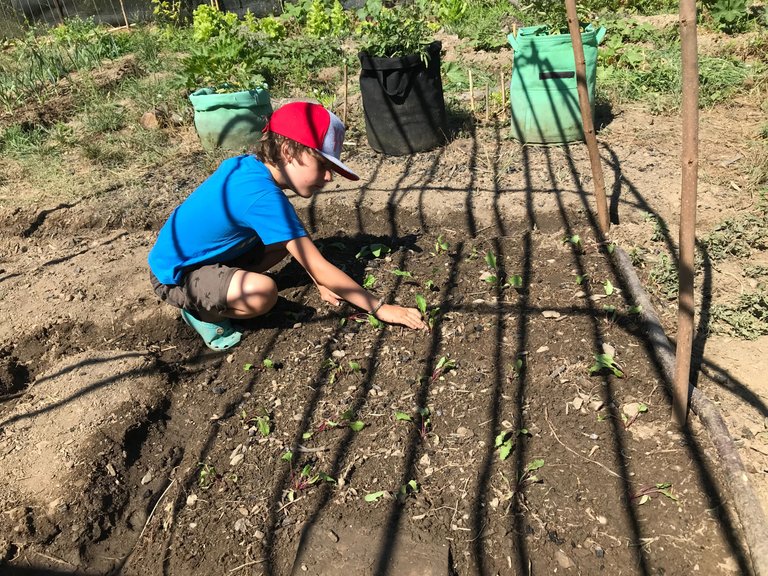
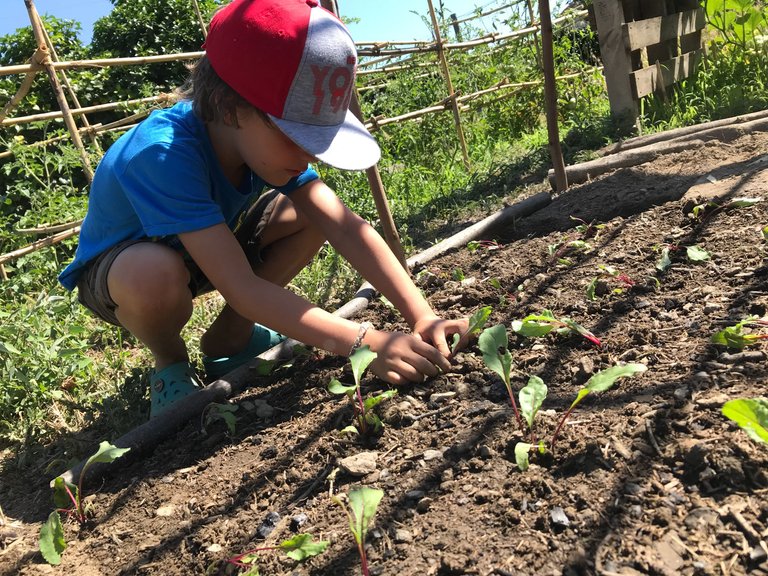
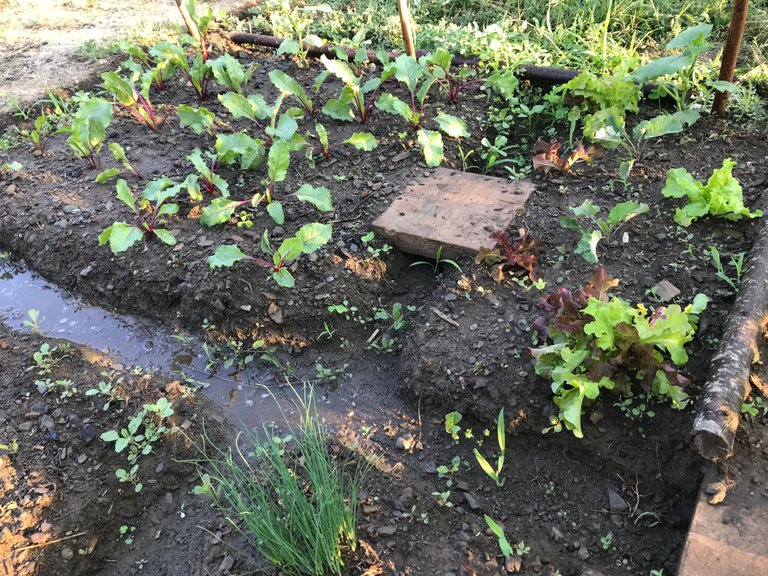
In this block Esteban transplanted beetroot from the shaded area.
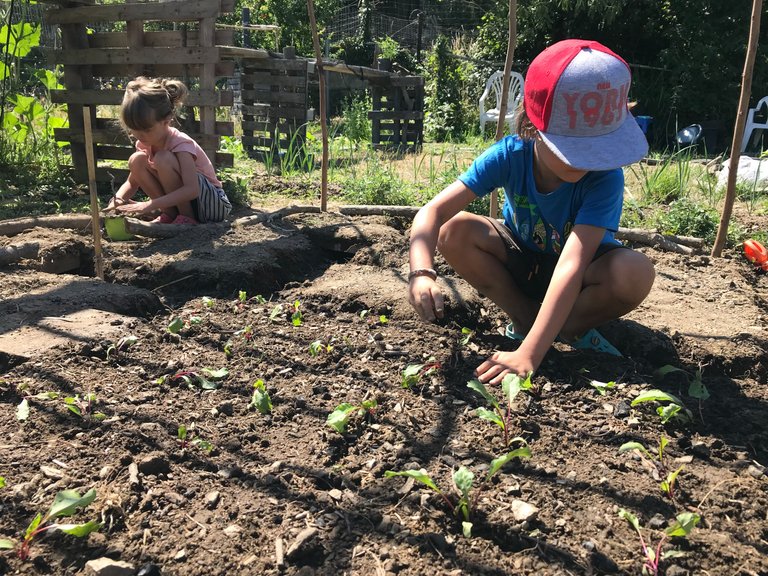
He is a really diligent little gardener now with some great knowledge & skills.
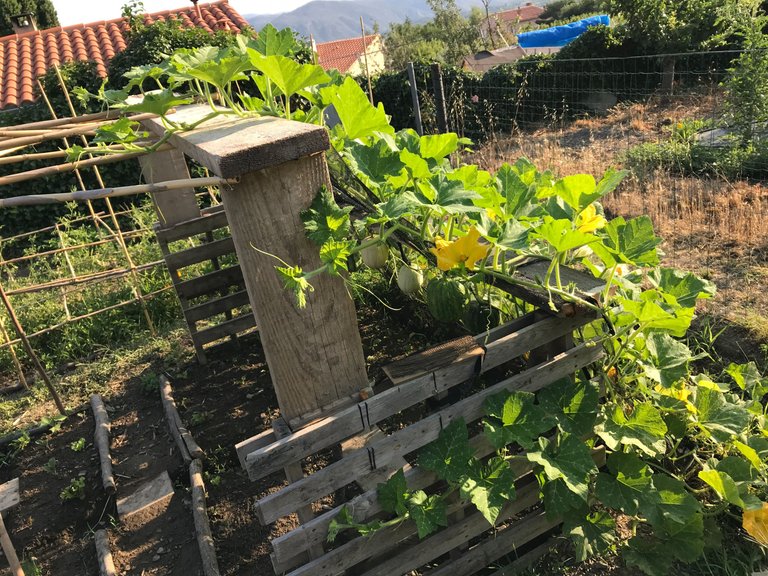
You can see in the background the second 'house' starting to take shape for the butternut squash.
The butternut will fill this last empty space, next to the pak choi which are now covered with a net to stop them getting eaten by hungry bugs.
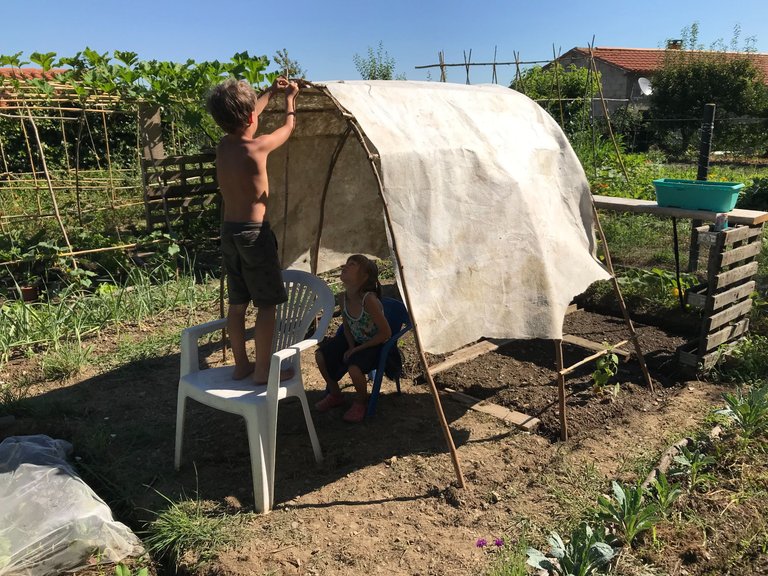
Esteban was concerned the beetroot transplants were dead the following day but I assured him they always look like this for the first few days.
With that said, I did feel a small sense of concern because we were pushing up to 40°C at the time and young transplants don't like this at all, especially when they are in the full sun all day. So we decided in the end to create some temporary shade until the pumpkins plants had covered the roof.
An old tent and some wood did the trick nicely!
Spending time here in the mornings when the sun is low it is clear how effective my system is for the babies below, basking in dappled shade.
Glorious perfection.
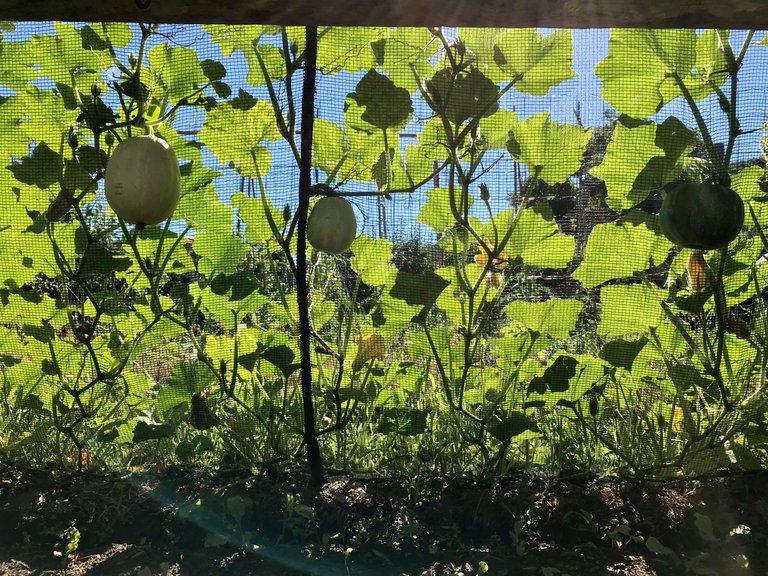
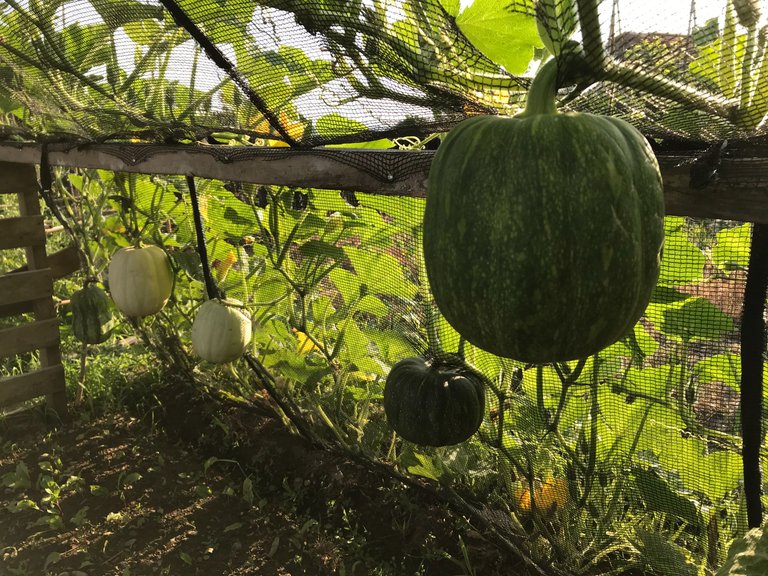
Am a bit confused why the first five pumpkins all look quite different and am wondering now if the white ones are not perhaps something else?
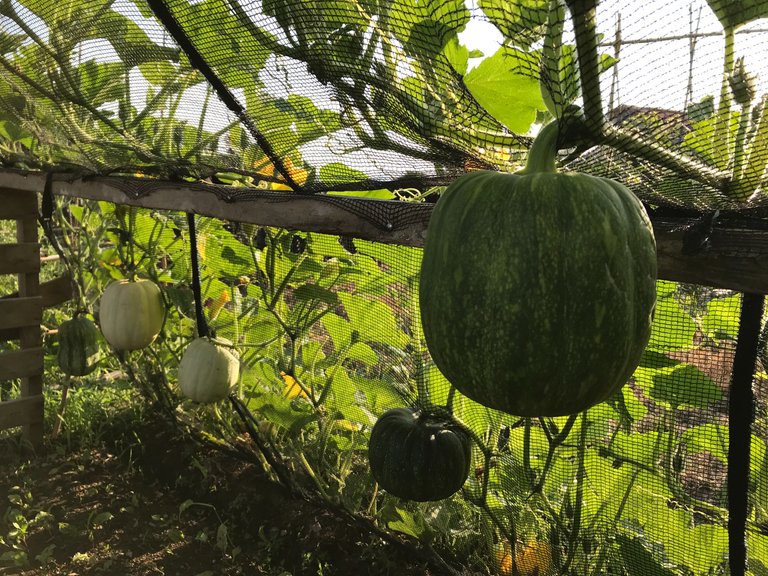
No matter. They are no doubt edible whatever they are.
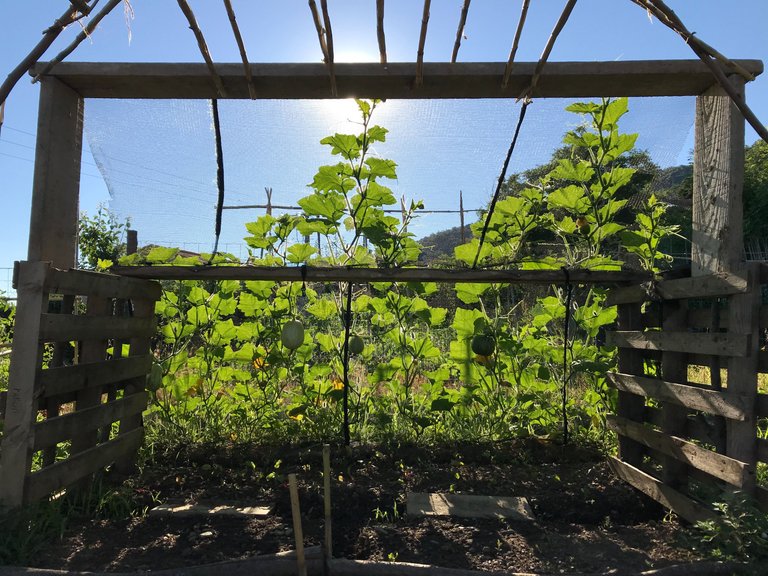
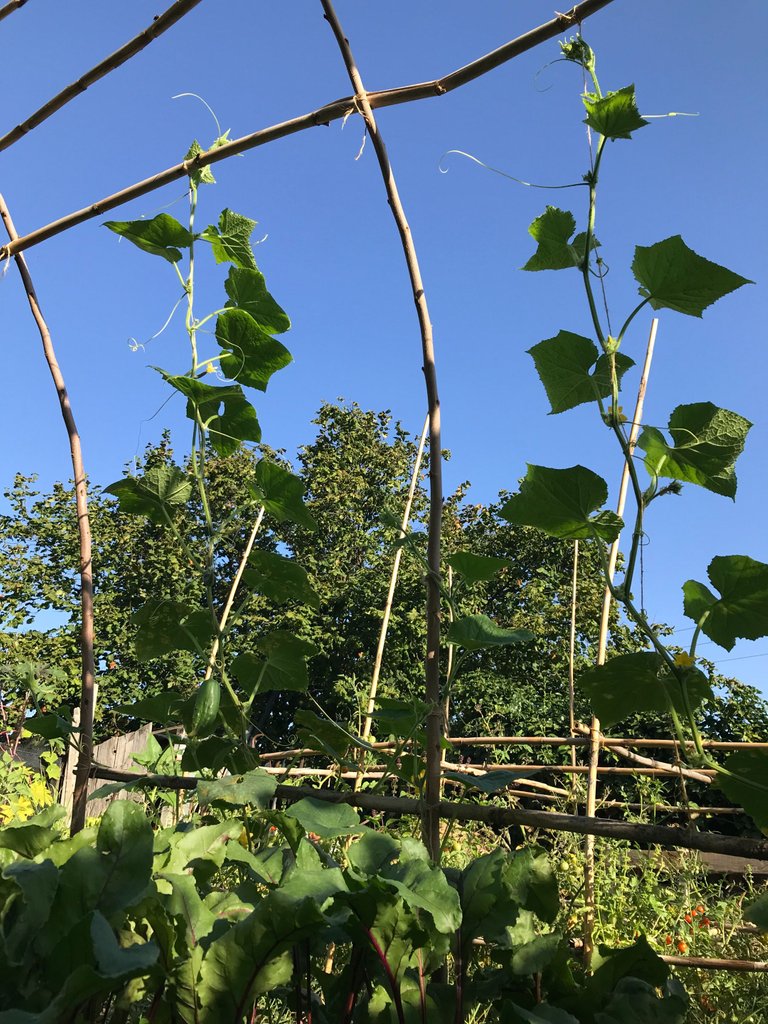
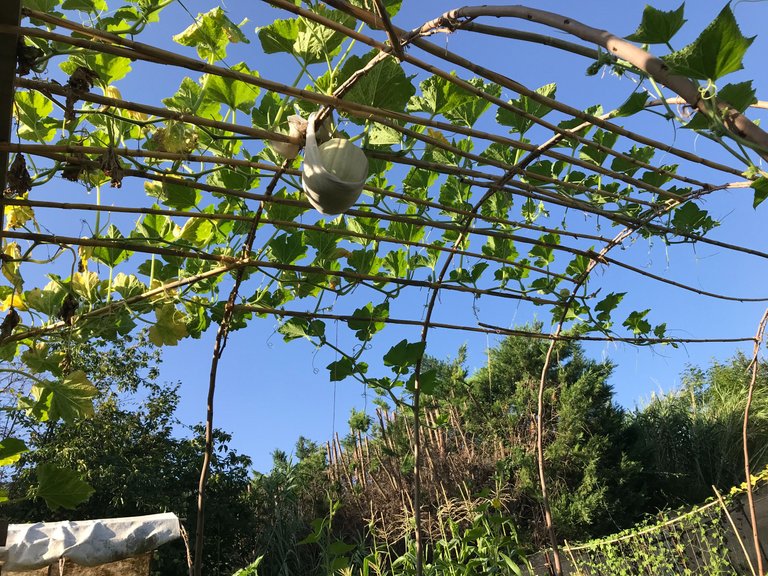
They have hit the top of my structure now and basically looking great.
Side view here.
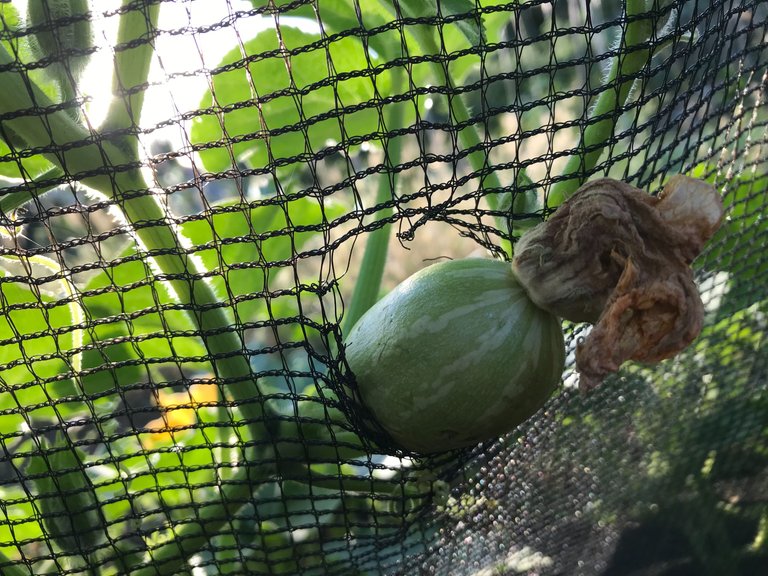
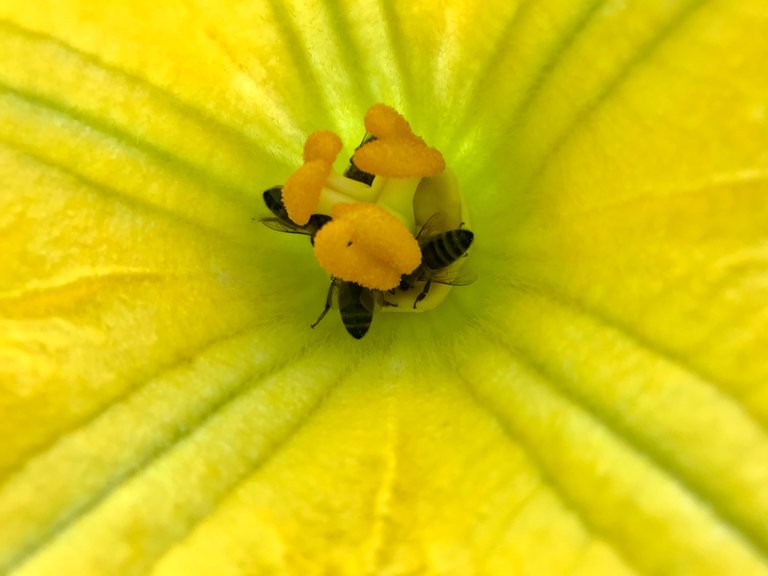
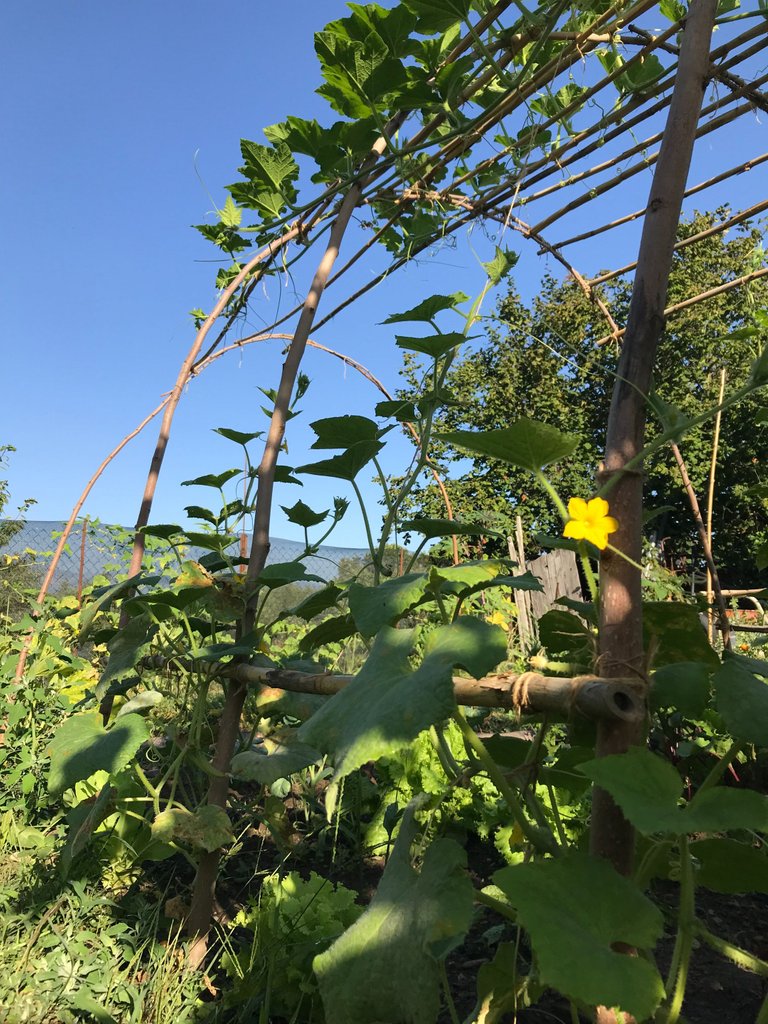
Love the way the flowers form after the fruit itself.
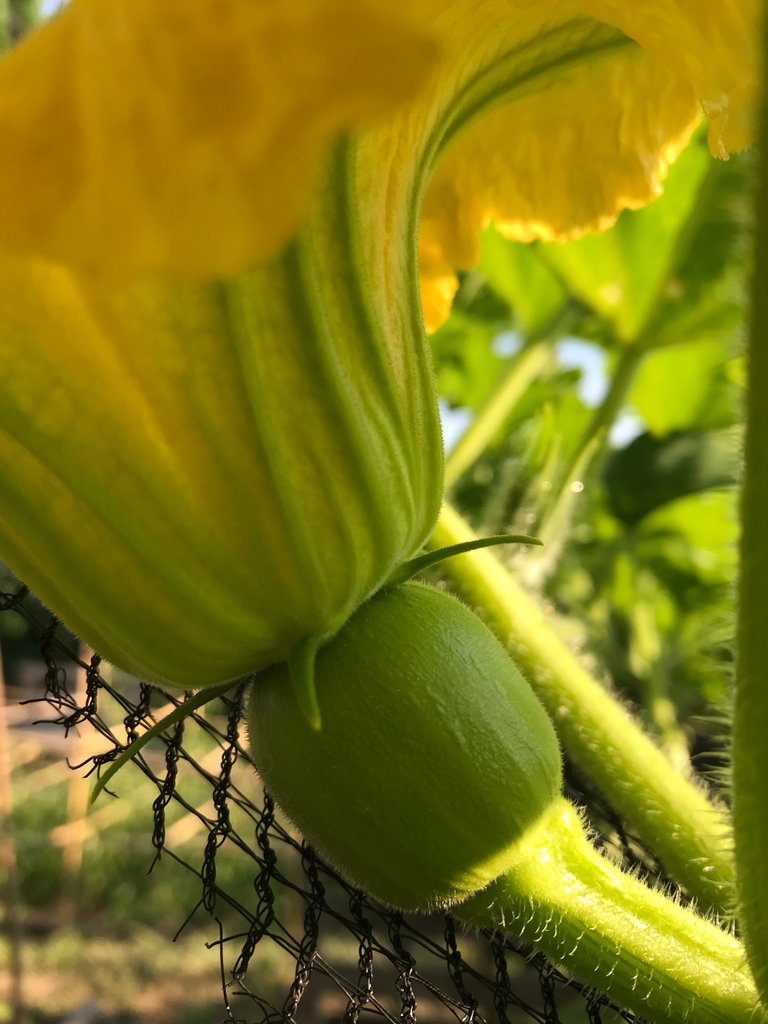
If the flower is successful in attracting pollinators the fruit will live. If not, it turns yellow and dies.
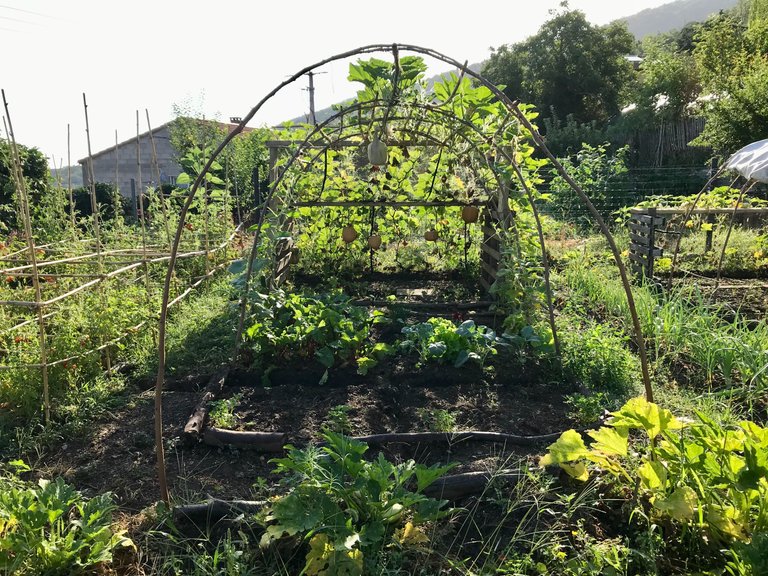
As you can see the first pumpkins are getting big now.
They have reached the top where I am attaching them with string to the bamboo.
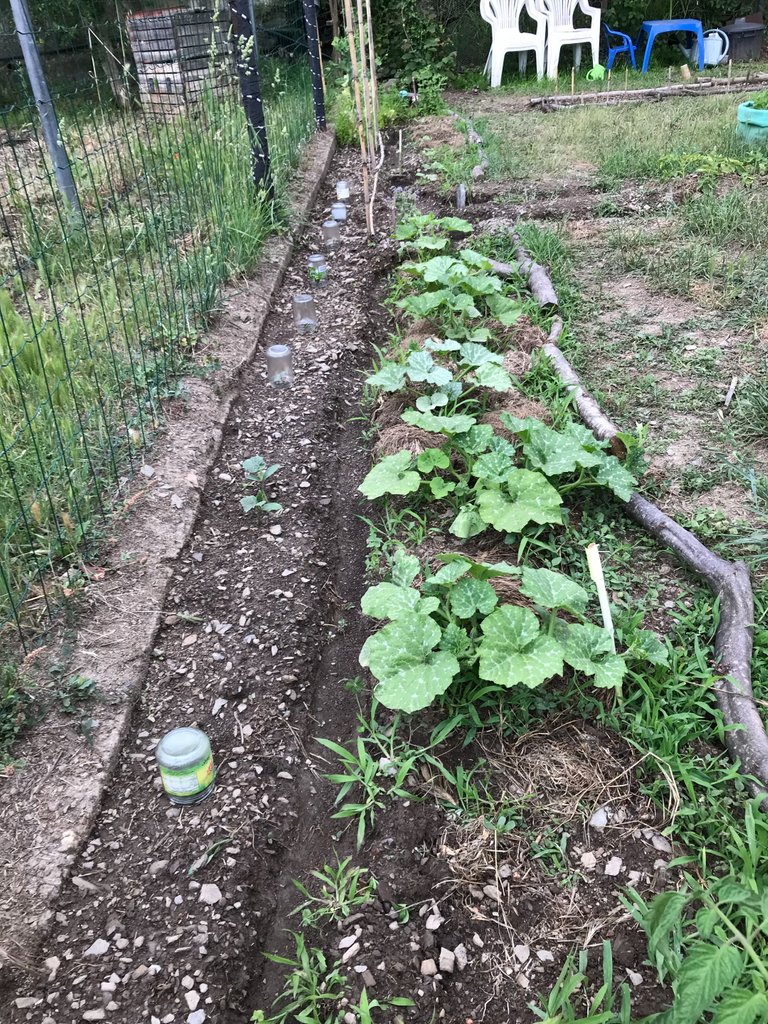
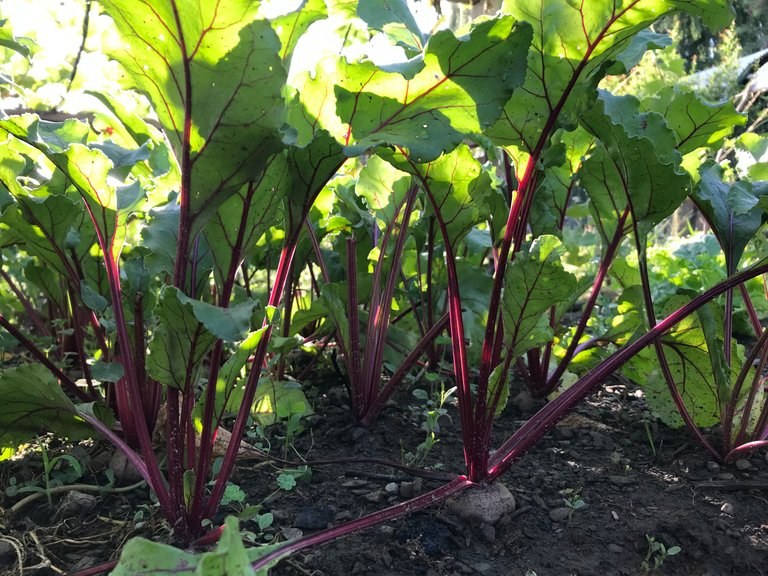
Underneath the structure the beetroot is super happy, anything but dead!
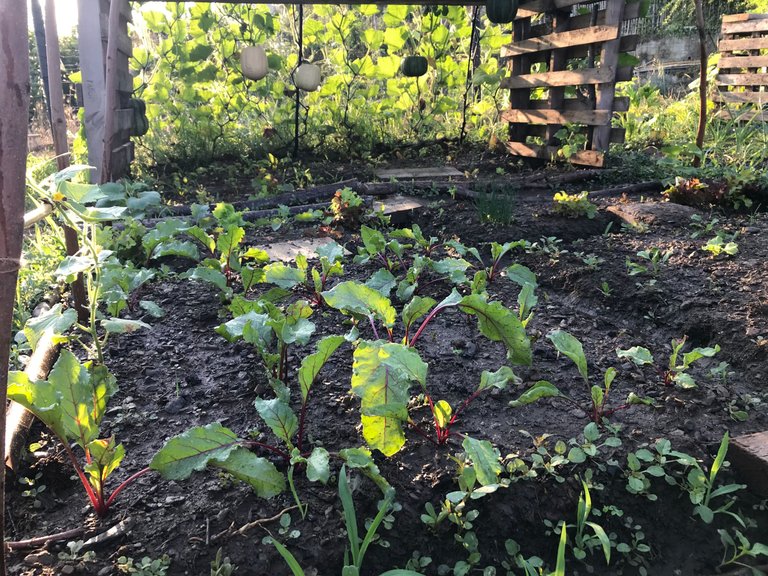
Not a single one died in fact. And the lettuce, chives and kale are also pretty happy there.
Love the way it looks at sunrise.
My 'roof' feels almost complete now.
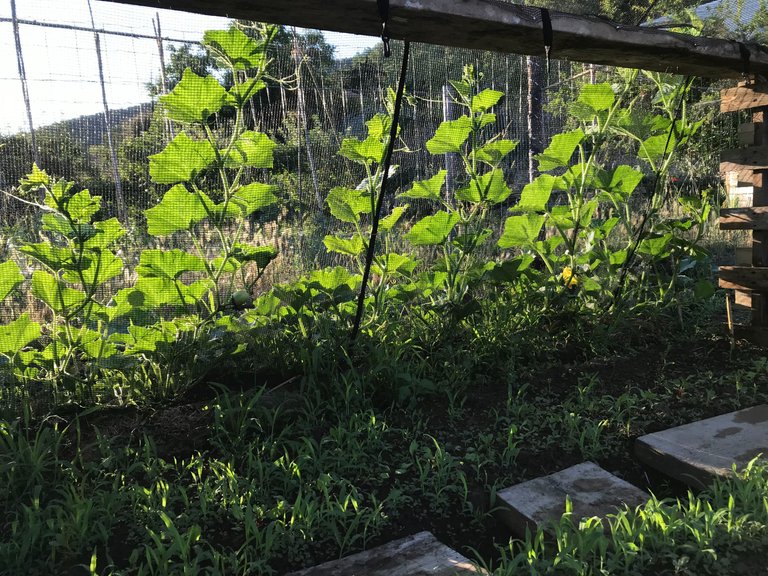
I planted cucumbers on the sides as I figured these would provide a bit of extra shade for the plants below.
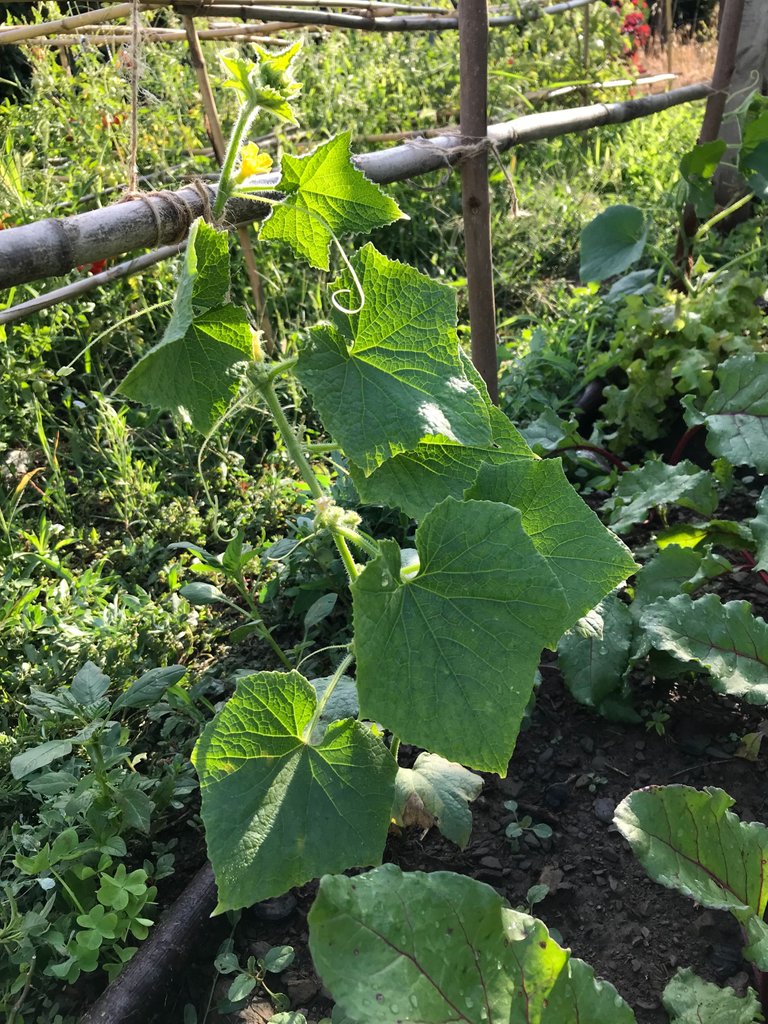
And I was right!
Each cucumber grows up a single piece of string. You don't need more than this in fact.
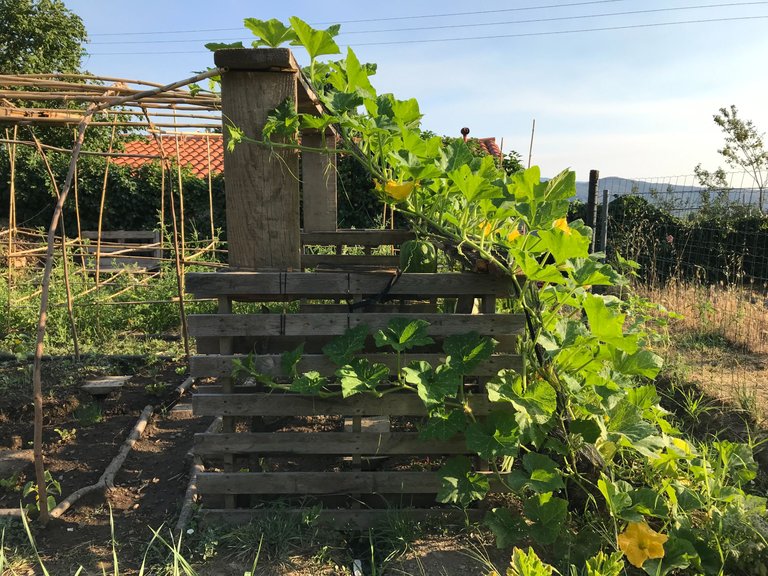
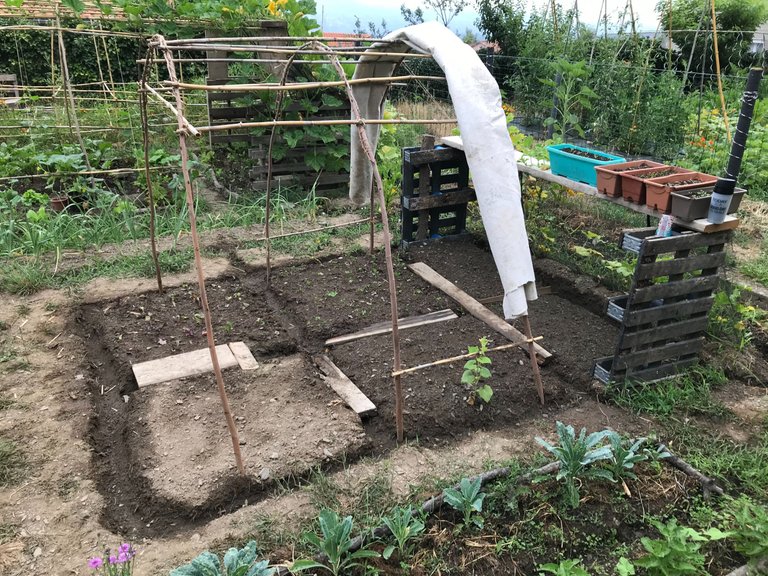
Moving over to the butternut house now, Esteban & I get to work.
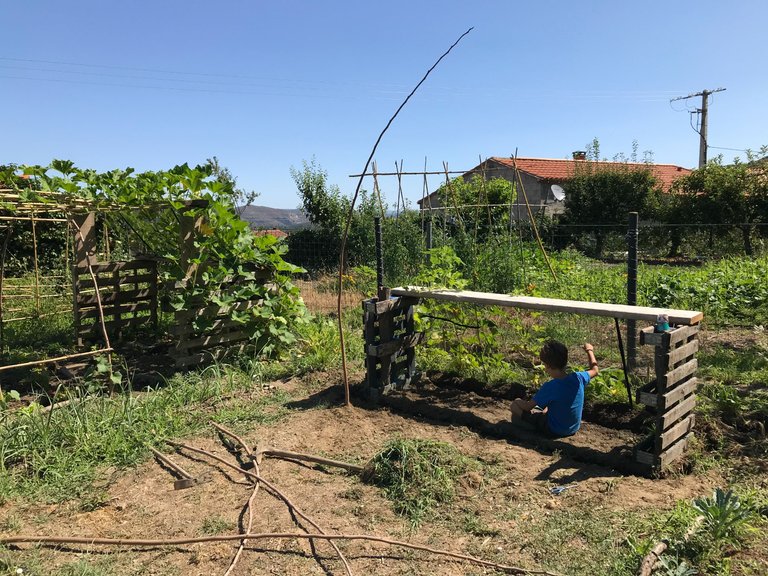
He really loves helping me dig the watering channels.
First stage finished here.
And now we are done. This time using a white piece of material for the temporary roof.
I like this cover because it can easily be rolled back on cloudy days.
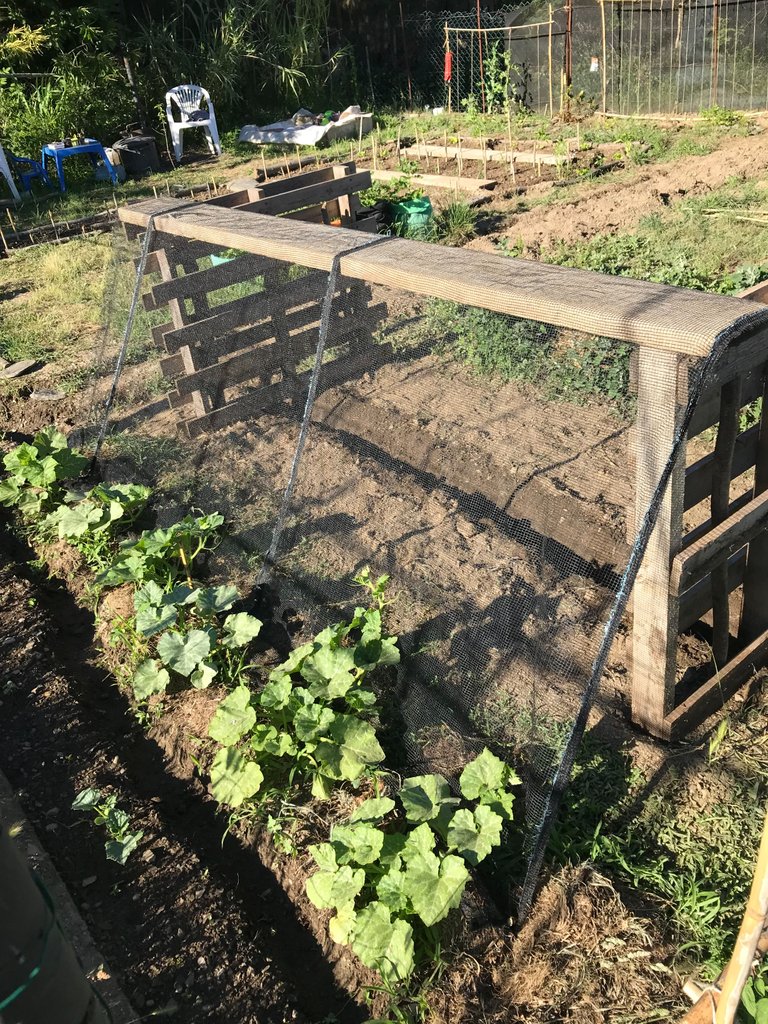
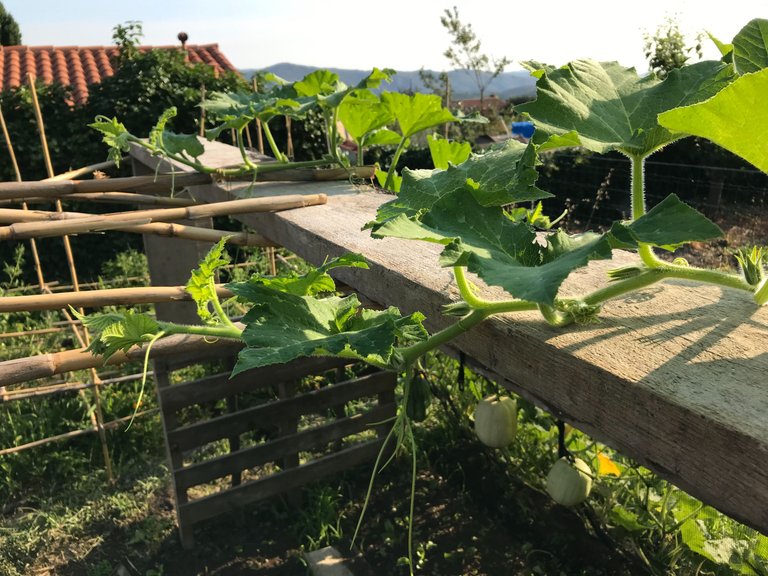
Over at the pumpkin house they have almost reached the end of the structure, once more prompting me to extend it.
And so, a few hours later the extension was complete, giving them a bit more space.
A beautiful sight to behold I think you will agree.
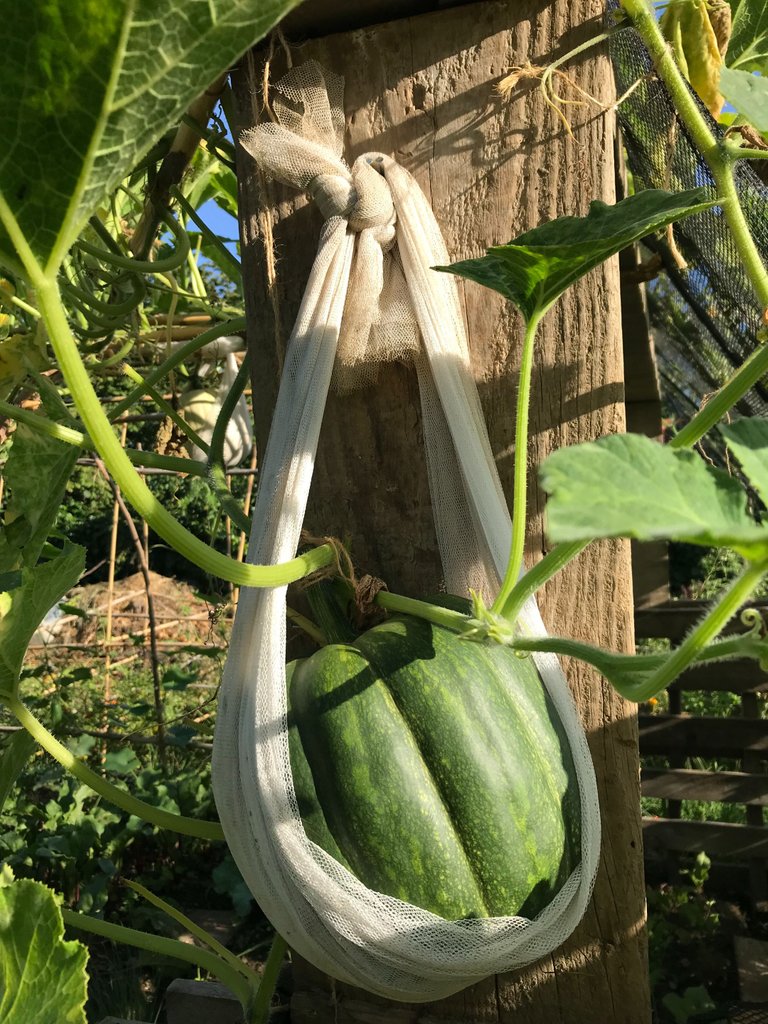
Some of the pumpkins need a little extra support so I used these nets to tie them up.
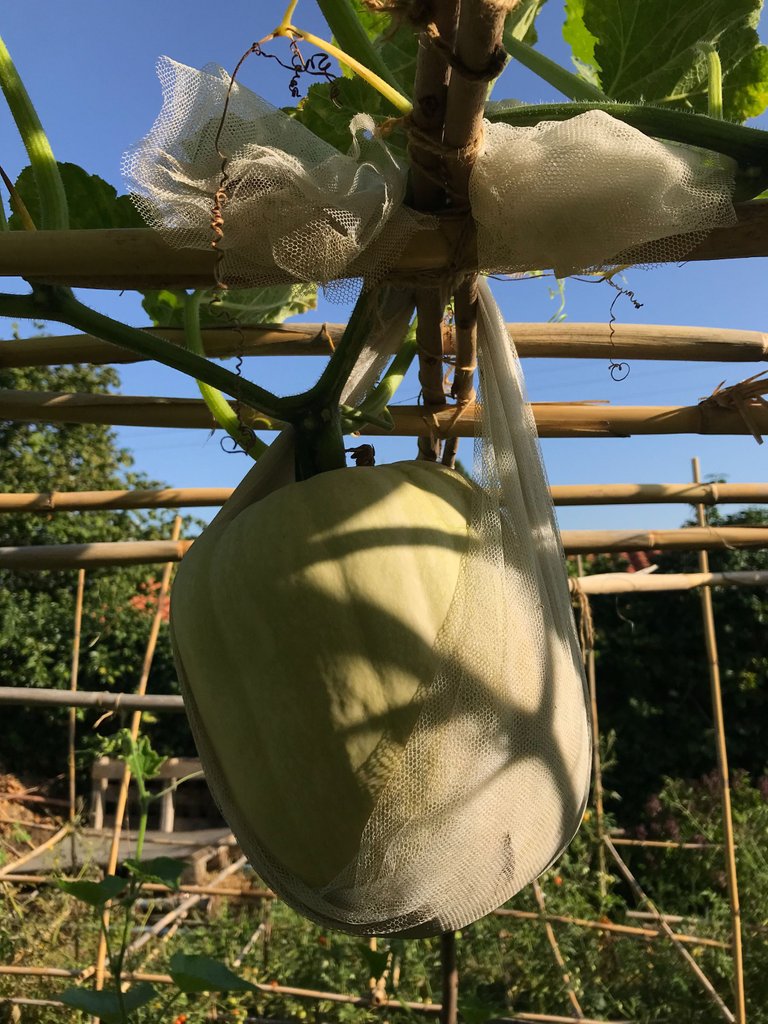
Esteban calls them pumpkin nappies ;)
Looks great right! A perfect roof to create dappled shade.
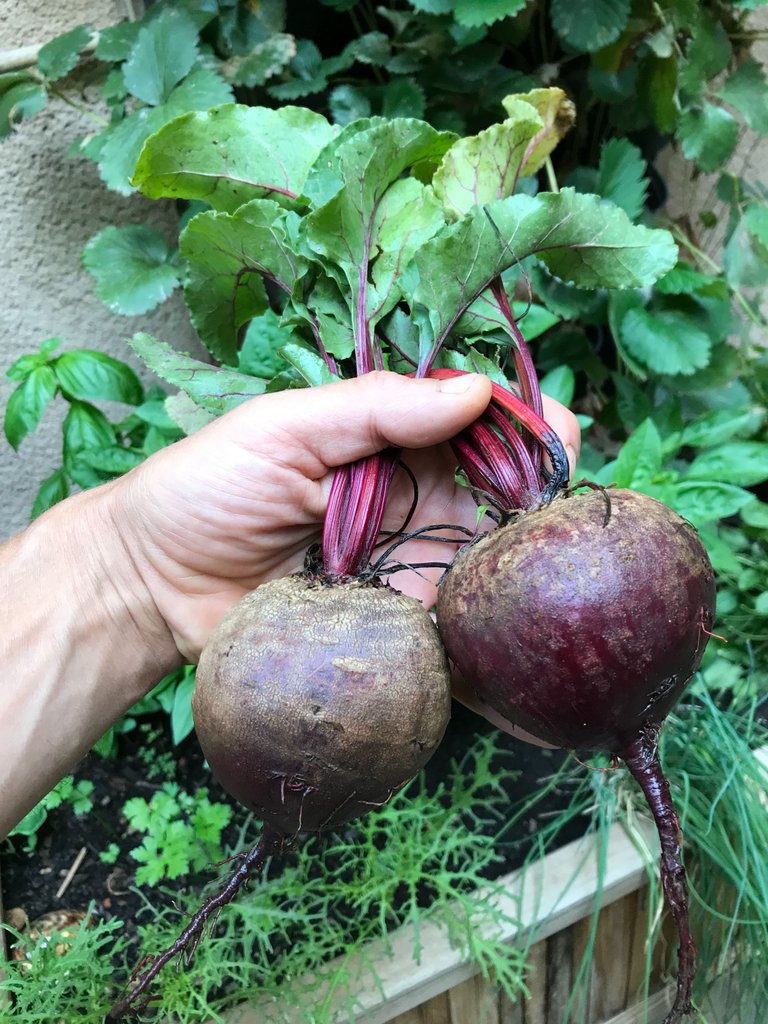
The beetroot plants underneath are truly magnificent.
Even better in my salads & juices ;)
Like I said before, if any of you have suggestions or ideas for other plants I might be able to use next year for creating shade, I would most interested to hear your thoughts. Or perhaps you have ideas about plants which might enjoy this kind of dappled shade underneath?
I was actually thinking about tomatoes as a potential candidate for the next roof but would have to keep them well pruned to stop them taking over the whole house.
So I think that's all I want to say about that.
I built a pumpkin house.
And it works :)
Love & Light everyone 🌱
Great garden. Here are some ideas: now, for the winter lettuce you can strew cornsalad seeds (great in autumn and early spring, but it overwinters, too) and matador variety of spinach (overwinters), or some winter chicory, or wintercress, and maybe chinese kale. In spring take care that some of the spinach and cornsalad create seeds and are blown around by wind or pluck the plant out when the seeds seem to ripen and place them where you'd like the cornsalads to grow in the autumn. For the shadow you can also use snakebean, new zealand variety of summer spinach, akebia chocolata (considered an invasive plant in Europe), passion flower (makes good fruits), or maybe raisin variety of grapevine, Chinese schisandra, kudzu plant (also considered an invasive plant, root used as thickener, but needs quite some preparation), maybe you can even plant goji berry plants (it creates a bush, but I've seen them hanging over a fence as more or less single branch as they thrive in full sun) and you can plant climbing beans next to the corn plant as it is their fertilizer, and spinach leaves phosphorus in the soil. Cornsalad thrives also under tomatoes if seeded in August. I guess artichokes would do well too (leaves are used as tea). Or you can plant some bamboo for bamboo shots and leaves as tea (it's invasive plant too).
And as for higher mountain ideas maybe you check Sepp Holzer.
Awesome! Thank you so much for all these amazing ideas. You've clearly had a lot of experience with plants and I am deeply grateful for this list which I will save for future reference 🙏
Here are some more I forgot. For climbing plants: lagenaria longissima (great for making chutney), momordica, luffa, high climbing Indian cress (buds used as capers, leaves as lettuce or tea), semi shade: swiss chard, parsley, coriander, celery, rucula. In full sun you can also have pepino (sort of melon, unripe used as curgette), potato + indian cress, egg plants, portulaca sativa, ocra, tigernuts, saffron, imortelle, yacon, also peperoni like full sun but not drought. I guess kiwi would give quite a shadow, too. Maybe you can grow a strawberry tree (bush) and mastic tree (bush actually, pistacia lentiscus), laurel, too. Happy gardening.
Incredible knowledge!
Wow Sam, this is such a great idea, look at you! This is very impressive, my garden did not too good this summer, getting water to it has been a lot of work and what being away for a little bit and then hurting my back, it didn't get to flourish like it should have.
You re so inspiring my friend, I love how you just go for things and make them happen, that is exactly what we need right now. Much Love xxxxx
Sorry to hear about your back injury! And can only imagine how different an experience it would be here if we didn't have such a convenient water supply (which does seem to be running consistently at the moment.) In fact, my other garden has suffered in the heat with all my attention on the new one, but I guess that's how it goes. Can't be in two places at once!
The pumpkin house has been an awesome creative focus for the last 4 months and I am mostly satisfied with it now, though the recent hail trashed the leaves pretty good!
Once the Summer is over I am going to remove the pumpkins and use the structures as greenhouses. Am thinking to use cling-film for this purpose. Sounds mad I know but I've seen enough evidence on YouTube to believe this could actually work.
Love love love xxx
Amazing story Sam - Eden and I have attempted growing some veg in our tiny little garden and enjoying some interesting observations - like our mint taking over, our lettuce growing so well and then changing shape and dimension as we kept picking from it and having it in our salads, and peppers and cauliflower that we are not sure what is happening - will need to google it. Well done to you as always.
Good for you giving it a go! This is super great to hear :)
And those observations you are making are all a part of the process.
Sure, mint can take over quickly if you don't eat a lot of it. I use in my smoothies & my mojitos ;)
Sending lots of love to all of you x
Sam,
i love your projects; So inspiring!
Regarding the pumpkins, you will likely have noticed that these squash plants will re-root into the ground along the length of the vine. This is probably what allowed it to grow so long at the car park. This may have limited the growth on the pumpkin house.
Regarding alternatives, i would recommend a simple pole bean. Plant one side and then plant the other side 2 weeks later so that all the beans don't come at the same time. i used an heirloom called Kentucky Wonder but there are many.
Here is a photo of the beans we planted in Mexico. i planted them very close together, every 2". They ended up climbing 10 feet and created a lot of shade.
Awesome brother. I knew you would have some suggestions having experienced a much more consistent heat than ours. Beans would actually be perfect for this! Somehow we didn't plant any this year. Only the dwarf variety which grow without supports. Good call on staggering the planting. There are only so many beans one can eat each week ;)
I did wonder how a lack of secondary root points would affect the pumpkin plants and in fact I can't see that it has made any difference. They are still pushing 6M today (with at least a few more months left in the growing season) and don't seem like they want to slow down. Our biggest problem was the hail which killed 50% of the leaves and even completely snapped some of the growing points. New shoots are appearing now however and the roof is naturally re-building itself. Which is very heart-warming to see!
Six of the pumpkins have turned orange already and I am wondering if this means they are ready to harvest? Normally they don't change colour till later in the year.
i believe that most squash will show their ripeness when the stem dries up.
Nice looking red russian kale you have there on the bottom left!
Your post has been chosen by @ligayagardener for the next addition of 'The Garden Shed', a collection of archived posts by @gardenhive that feature useful gardening advice, DIY tips, homesteading tips and inspiring gardens.
Thank you!
Hi Sam! How have you been? It has been a while since I have seen you posted on this community. By the way, I love your garden.
Hello brother. Doing great thanks. Yes, I've not posted here for 4 months because I was was busy creating this garden and this post. Didn't want to spoil the surprise basically ;)
oh wow what a truly fantastic post and a awesome garden. What an effort.
I love France, spent lots of time there as a teenager, in a tiny weee village in the middle. lol.
We have not had room for pumpkins yet. I have started some seeds and hoping we can get the concrete/stone jungle cleared enough to plant them this season.
please keep posting your progress, i am truly interested.
thanks for sharing your magnificent garden. Just tagging @riverflows in case she has not seen this post yet.
Regards
Blingit (Sarah)
love and light right back.
Hey there Sarah! Many thanks for your enthusiastic words and great to learn you spent some time here in France when you were younger. Do you speak any French as a consequence? Mine is still terrible! Just can't seem to get the hang of it for some reason.
Though I believe I am very much getting the hang of growing food! At this time of year almost everything I eat is from the garden and my body responds to it by giving me extra energy :)
Will have to do a few more updates on this garden because I've not yet shown you all the other things growing here. Have you every heard of cucamelons? They are a cross between cucumbers & melons! And children love them :)
Morning, yes i do speak some French. However i have forgotten a lot of it. I find Southern French people more difficult to understand though. I learnt at school and at university.
Cucamelons? i planted them last week!!! lol. Very cute looking little plant. I have had them before, but YEARS ago before kids. I cant wait to see what they are like. We have had problems this season finding cucumber seed varieties and no seedlings out in the shops yet. I guess it IS still too cold for them really but i wanted to start them inside. I have been meaning to get some heated seed mats for the seeds. I must look them up this morning.
I love seeing progress across the gardens, so please update us. And show us the cucamelons. I would love to see how much space they take up. my Kids are cucumber addicts so hopefully they like them
thanks for your reply
Sarah
damn, what a cool garden!
love the watering system :)
@tipu curate
The watering system is truly a blessing but we did freak out a bit during the week they switched the canal off! Easy to become reliant on a system. Less easy to find alternatives. Rainwater collection is on the list for next year. Just in case these canal cuts become more regular!
ah fuck, so it is based on humans and probably the normal water system..
one would need such canals coming off a little stream/ creek.
Technically that's exactly what it is, coming from a river which runs constantly from the glacier in the mountain but the 'authorities' still have the power to switch it off. On this occasion they said they did it because the wildlife wasn't getting enough water further downstream. Apparently this is more important than the agriculture which relies on the canals. Go figure.
:///
Upvoted 👌 (Mana: 25/35) Liquid rewards.
Very cool and I loved seeing Estaban working on all the projects. :))
It is such a joy working on projects like this with my children. I think my stone house project a few years ago was the 'seed' for them because they are both so excited by the idea of building projects now! Which is perfect ;)
I will never build alone again!
The rewards earned on this comment will go directly to the people( @johndieo ) sharing the post on Twitter as long as they are registered with @poshtoken. Sign up at https://hiveposh.com.