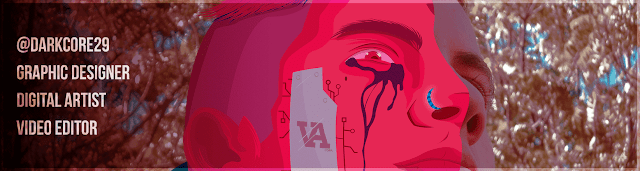

Muy buenas a todos amigos y amigas de la comunidad de EspaVlog y comunidad Hive en general, el día de hoy les traigo un super tutorial de como podrán Crear o Editar sus miniaturas y cualquier otra imagen que necesiten para sus post sin necesidad de usar programas como Canvas, Gimp, Photoshop, etc (Este último tiene truco jeje), pues si hay truco, ya que en esencia no usaremos programas pagos como es el Photoshop y tampoco usaremos un programa como tal -Bueno, no mas allá de nuestro navegador- y tengo que aclararles que esto es compatible solo con PC ya que no he probado hacerlo desde el teléfono, pero en fin, vamos a lo que interesa, damas y caballeros, les presento a Photopea!
Very good morning to all friends of the EspaVlog community and Hive community in general, today I bring you a super tutorial on how you can create or edit your thumbnails and any other image you need for your post without using programs like Canvas, Gimp, Photoshop, etc. (The latter has a trick hehe), because if there is a trick, because in essence we will not use paid programs such as Photoshop and we will not use a program as such -well, not beyond our browser- and I have to clarify that this is compatible only with PC as I have not tried to do it from the phone, but anyway, let's get down to business, ladies and gentlemen, I present to you Photopea!
Aviso que será un post algo extenso pero valdrá la pena y trataré de explicar lo mejor posible!
I warn you that this will be a long post but it will be worth it and I will try to explain as best as possible!
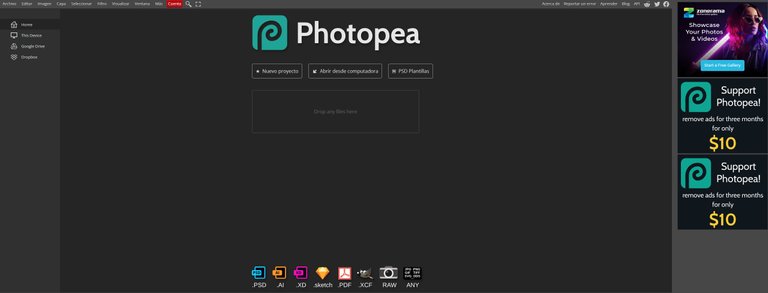
Photopea en esencia es un clon online del Photoshop, similar incluso en diseño, aunque claro, con varias limitaciones, no es tan completo como el programa estrella de Adobe, sin embargo, que eso no los engañe, Photopea tiene una variedad de herramientas mas que suficientes con las cuales podemos trabajar e incluso es compatible con archivos editables como .psd .ai .xd .sketch .pdf .xcf .raw y muchos mas, es una herramienta poderosísima y bastante completa en comparación a muchas otras por ahí -Que incluso son pagas-
Photopea in essence is an online clone of Photoshop, similar even in design, although of course, with several limitations, it is not as complete as Adobe's flagship program, however, do not let that fool you, Photopea has a variety of tools more than enough with which we can work and even supports editable files such as .psd .ai .xd .sketch .pdf .xcf .raw and many more, is a very powerful and quite complete tool compared to many others out there -which are even paid-.
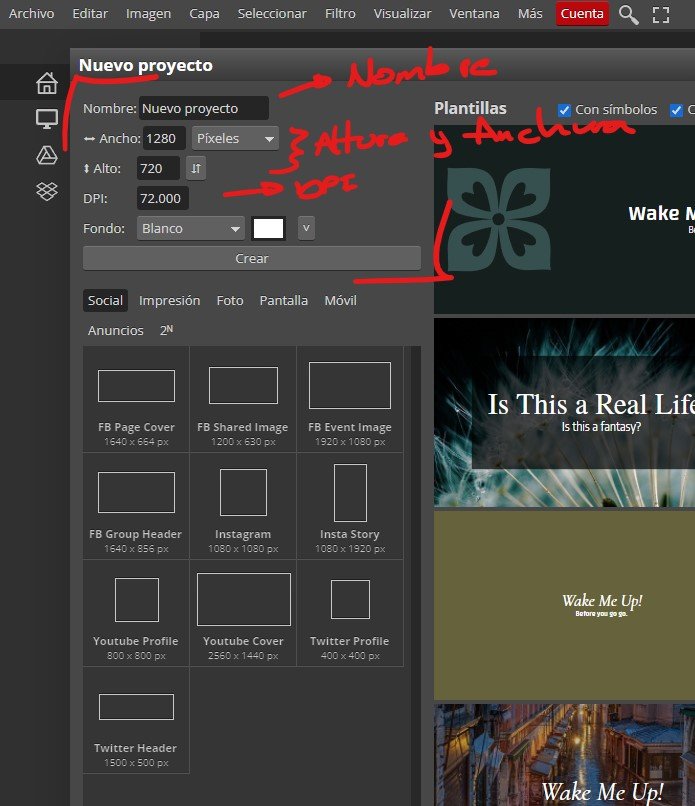
Así que vamos a ponernos manos a la obra, lo primero será dirigirnos a la web oficial de Photopea, nos va a mostrar una interfaz muy similar a la de Photoshop -por no decir calcada- y lo primero que haremos es irnos a Archivo y dar click en 'Nuevo', nos abrirá una pequeña ventana y también nos mostrará una serie de plantillas que podemos usar, ustedes si gustan pueden utilizar una de esas plantillas y editarla, pero en este caso lo haremos todo desde cero.
Vamos a colocarle un nombre a nuestro documento, en ancho colocamos 1920 píxeles y en alto 1080 píxeles, y el DPI lo dejamos en 72, el fondo podemos dejarlo en blanco o en transparente según queramos y damos click en Aceptar.
So let's get down to work, the first thing to do is to go to the official website of Photopea, it will show us an interface very similar to Photoshop -not to say the same- and the first thing to do is to go to File and click on 'New', it will open a small window and also show us a series of templates that we can use, if you like you can use one of these templates and edit it, but in this case we will do everything from scratch.
We are going to put a name to our document, in width we put 1920 pixels and in height 1080 pixels, and the DPI we leave it in 72, the background we can leave it in white or transparent as we want and we click in OK.
Una vez creado el documento nos creará el lienzo con el tamaño que le dijimos, podemos presionar la combinación Ctrl + R para mostrar las reglas en caso de que las necesitemos, en esta guía les mostraré como hacer una miniatura sencilla pero atrayente, igual ustedes pueden hacerlo a su gusto y experimentar. Lo primero que haremos es importar un fondo para nuestro lienzo, eso lo haremos yendo a Archivo y en 'Abrir y Colocar', nos abrirá una ventana y allí buscaremos una imagen en nuestra PC que queramos usar de fondo.
Once the document is created it will create the canvas with the size we told it, we can press the combination Ctrl + R to show the rulers in case we need them, in this guide I will show you how to make a simple but attractive thumbnail, you can do it as you like and experiment. The first thing we will do is to import a background for our canvas, we will do that by going to File and 'Open and Place', it will open a window and there we will look for an image on our PC that we want to use as a background.
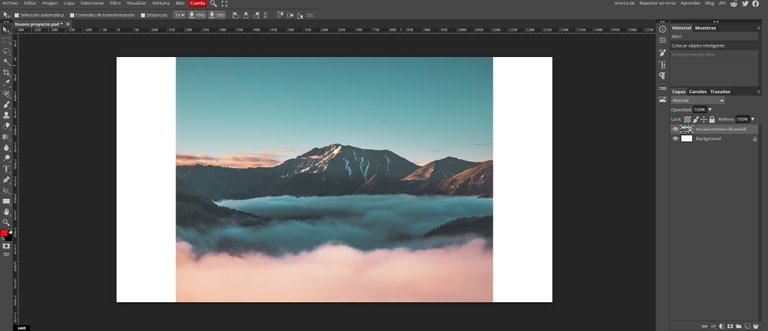
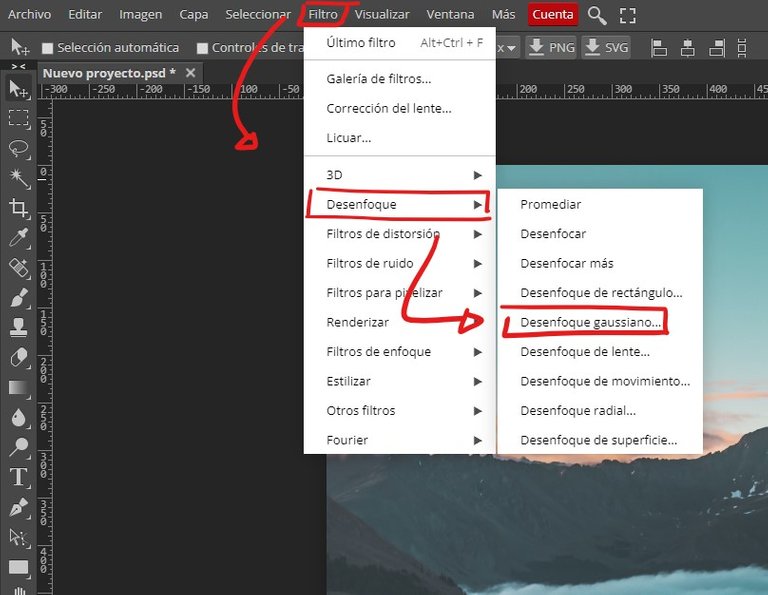
Vamos a irnos a una de las esquinas, y el cursor se nos cambiara por unas flechas, haciendo click en una esquina de nuestra imagen y manteniendo presionadas las teclas Shift y Alt vamos a agrandar la imagen para que cubra la totalidad del lienzo, una vez hecho esto presionamos Enter. Lueno nos iremos a Filtros, luego a Desenfoque y luego Desenfoque Gaussiano, le damos un desenfoque de 10px y presionamos Enter
We will go to one of the corners, and the cursor will change to arrows, clicking on a corner of our image and holding down the Shift and Alt keys we will enlarge the image to cover the entire canvas, once we have done this we press Enter. Next we will go to Filters, then Blur and then Gaussian Blur, we will give a blur of 10px and press Enter.
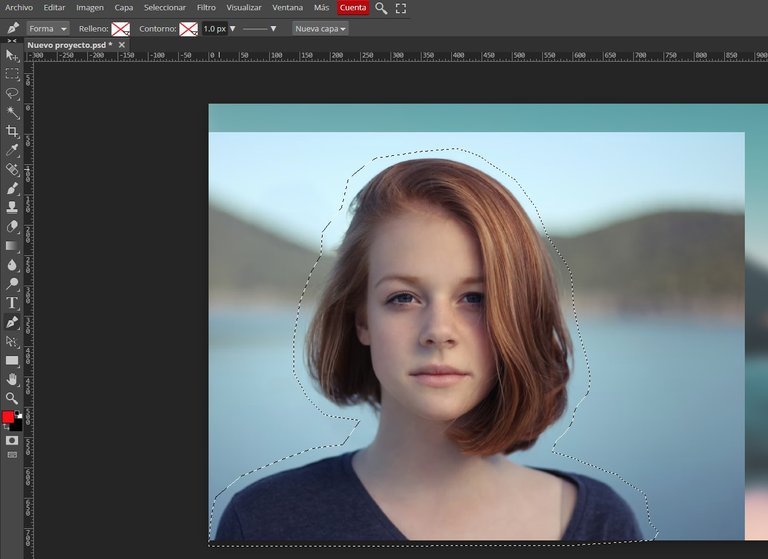
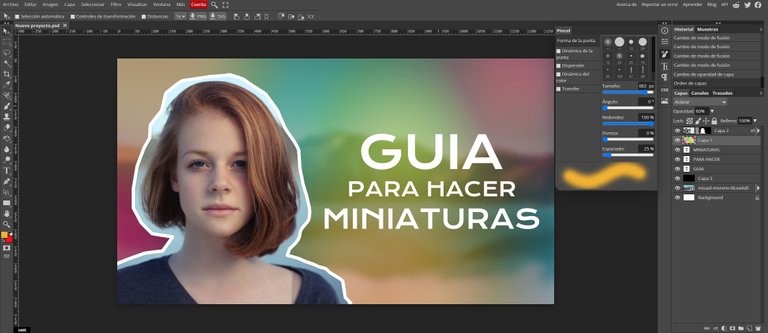
Ahora vamos a importar una imagen de nosotros que nos hayamos tomado con anterioridad ya sea de un momento en específico para nuestro post o alguna que nos guste, en ese caso utilizaré una de mi repositorio de imágenes, esto podemos hacerlo tal cual hicimos el paso donde importábamos nuestro fondo y vamos a proceder a colocarla del tamaño que queramos y en el sitio que nos guste (No se preocupen, borraremos el fondo) . Presionando la tecla P para usar la herramienta de Pluma vamos a hacer un recorte alrededor de nuestra silueta, dejando un espacio de por medio y haciendo la selección un poco descuidada (No tiene porqué ser perfecta), esto lo haremos dando click y creando 'puntos de ancla' con nuestra pluma, dando varios clicks a nuestro alrededor hasta completar la selección.
Now we are going to import an image of us that we have taken previously either from a specific moment for our post or one that we like, in this case I will use one from my image repository, we can do this as we did the step where we imported our background and we will proceed to place it in the size we want and in the place we like (Don't worry, we will delete the background) . Pressing the P key to use the Pen tool we are going to make a crop around our silhouette, leaving a space in between and making the selection a little sloppy (It doesn't have to be perfect), we will do this by clicking and creating 'anchor points' with our pen, giving several clicks around us until we complete the selection.
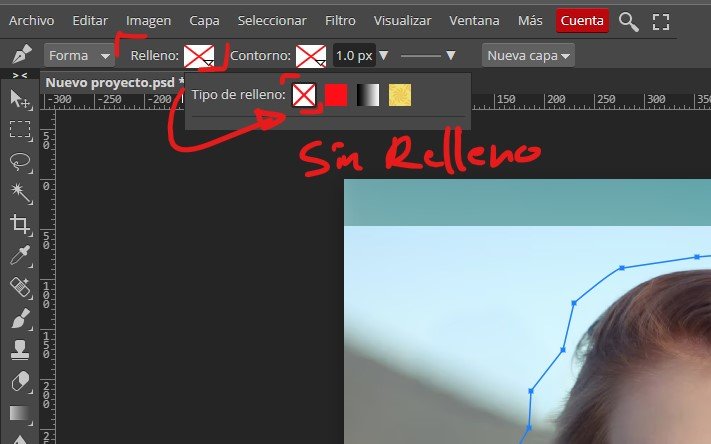
Se nos habrá hecho una forma en color rojo, no se alarmen, arriba, donde dice 'Relleno' damos un click y seleccionamos la caja blanca con una X roja para indicarle que no queremos un color de relleno y sea transparente, una vez hecho esto volvemos a nuestro lienzo, damos click derecho sobre nuestro trazado que hicimos con nuestra pluma y damos click en 'Make Selection' y damos click en 'Si'.
We will have a red shape, don't be alarmed, above, where it says 'Fill' we click and select the white box with a red X to indicate that we don't want a fill color and be transparent, once done we return to our canvas, right click on our path that we made with our pen and click on 'Make Selection' and click on 'Yes'.
Ahora teniendo nuestra selección activa, vamos a elegir la capa de nuestra foto en el Panel de capas que está de nuestro lado derecho y vamos a darle click en el pequeño icono de abajo que es un rectángulo con un circulo oscuro en el centro y así crearemos una máscara de capa y se recortará nuestra foto en función al trazado que hicimos anteriormente.
Now having our selection active, let's choose the layer of our photo in the Layers Panel on the right side and click on the little icon below which is a rectangle with a dark circle in the center and thus create a layer mask and our photo will be cropped according to the path we did before.
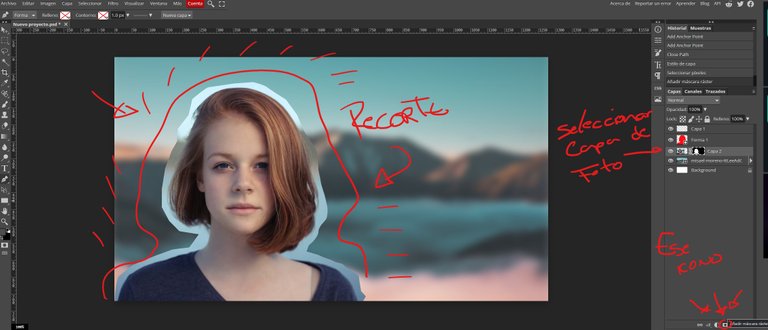
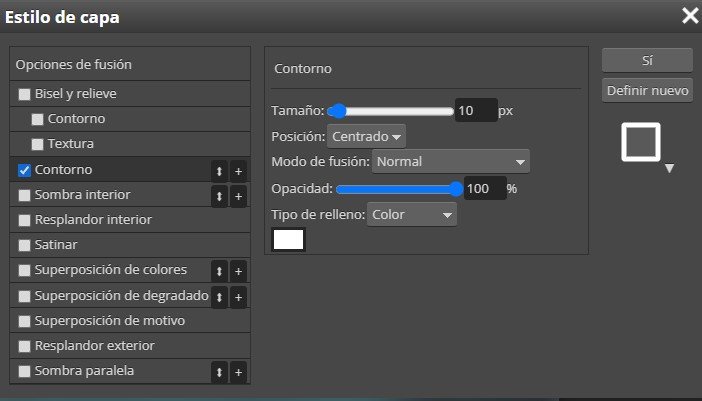
Ahora daremos click derecho sobre la capa de nuestra foto recortada y damos click en 'Opciones de Fusión' , se abrirá una ventana y vamos a activar la casilla de Trazo o Contorno, en las opciones de nuestro contorno, cambiaremos su color a Blanco, un Tamaño de 10px, Posición 'Centrado' (Puedes cambiar estos valores a tu gusto) y damos click en aceptar.
Now we will right click on the layer of our cropped photo and click on 'Blend Options' , a window will open and we will check the box for Strait or Outline, in the options for our outline, we will change its color to White, a Size of 10px, Position 'Centered' (You can change these values to your liking) and click on accept.
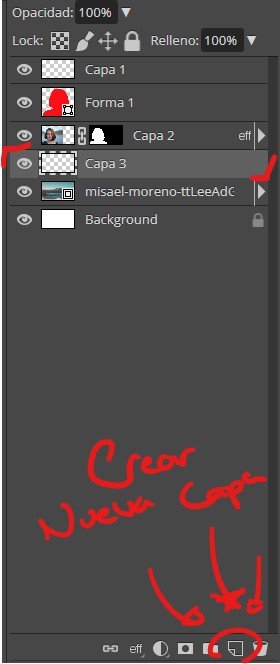
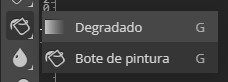
Movemos nuestra foto de ser necesario, una vez hecho esto vamos a crear una nueva capa dando al icono de una nota de papel con la esquina doblada en nuestro Panel de capas y la vamos a arrastrar por debajo de nuestra Foto, la vamos a rellenar de un color Negro, usando la Herramienta de Bote de Pintura que está en el panel izquierdo (Si no se ve el icono del bote de pintura, estará uno de un degradado de gris, simplemente mantenemos el click sostenido sobre dicho icono y nos permitirá cambiarlo por el bote de pintura), seleccionamos el color negro y pintamos el fondo.
We move our photo if necessary, once this is done we are going to create a new layer by hitting the icon of a paper note with the corner folded in our Layers Panel and we are going to drag it underneath our Photo, we are going to fill it with a Black color, using the Paint Bucket Tool which is in the left panel (If you don't see the paint bucket icon, there will be a gray gradient one, just hold click on it and it will allow us to change it to the paint bucket), select the black color and paint the background.
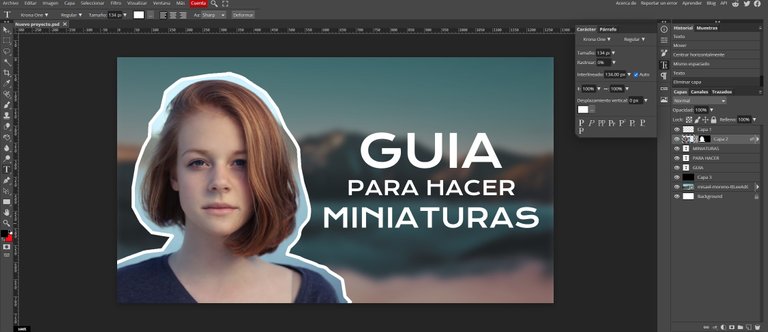
A esa capa Negra vamos a quitarle opacidad y vamos a dejarla en un 35%, una vez hecho esto vamos a comenzar a ponerle texto a nuestra miniatura, esto lo hacemos presionando la tecla T, esperamos un momento a que cargue las tipografías que nos incluye Photopea y comenzamos a escribir lo que queramos. Podemos cambiar la tipografía, su tamaño, distribución, etc, todo desde las opciones que están arriba, una vez estemos satisfechos tendríamos algo como esto...
To that Black layer we are going to remove opacity and we are going to leave it at 35%, once this is done we are going to start adding text to our thumbnail, we do this by pressing the T key, we wait a moment for it to load the typographies that Photopea includes and we begin to write what we want. We can change the typography, its size, distribution, etc, everything from the options that are above, once we are satisfied we would have something like this...
Vamos a crear una nueva capa que estará por encima de todo, y vamos a seleccionar la herramienta de Pincel presionando la tecla B y vamos a agrandarlo bastante, esto lo hacemos en el Panel de opciones de Pincel que está en nuestro lado derecho (Su icono es un pincel con unos deslizadores pequeños), allí le daremos un tamaño de entre 600 y 900px y 0% de Dureza para tener un pincel difuso y elegimos un color que nos guste y comenzaremos a dar pequeños clicks en nuestro lienzo como puntos de color, esto podemos hacerlo con varios colores.
We are going to create a new layer that will be on top of everything, and we are going to select the Brush tool by pressing the B key and we are going to make it quite big, we do this in the Brush Options Panel that is on our right side (Its icon is a brush with some small sliders), there we will give it a size between 600 and 900px and 0% Hardness to have a diffuse brush and we choose a color that we like and we will begin to give small clicks on our canvas as points of color, we can do this with several colors.
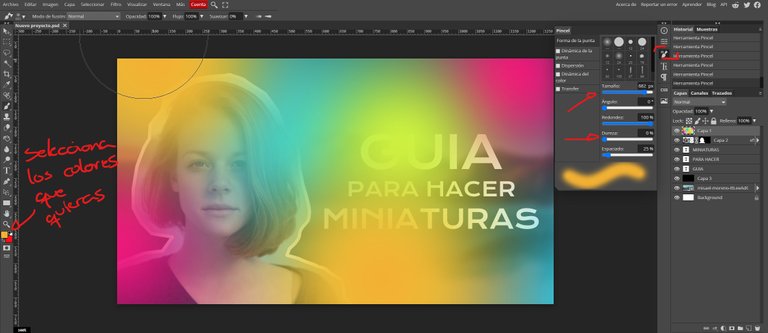
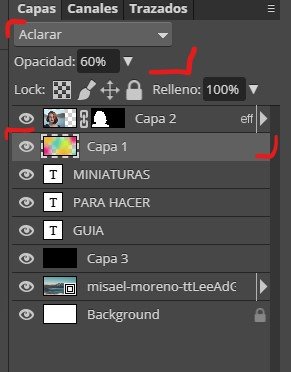
Cuando ya estemos satisfechos con nuestros puntos de color, nos dirigimos a nuestro Panel de Capas y vamos a cambiar su Modo de Fusión a alguno que nos guste el resultado, en mi caso lo dejé en modo Aclarar y una Opacidad del 60%, como les dije, esto es meramente como a ustedes mejor les parezca, incluso pueden poner esta capa por debajo de la capa de su foto para que no le afecte el cambio de colores.
When we are satisfied with our color points, we go to our Layers Panel and we will change its Blend Mode to one that we like the result, in my case I left it in Lighten mode and an Opacity of 60%, as I said, this is merely as you see fit, you can even put this layer below the layer of your photo so that it is not affected by the change of colors.
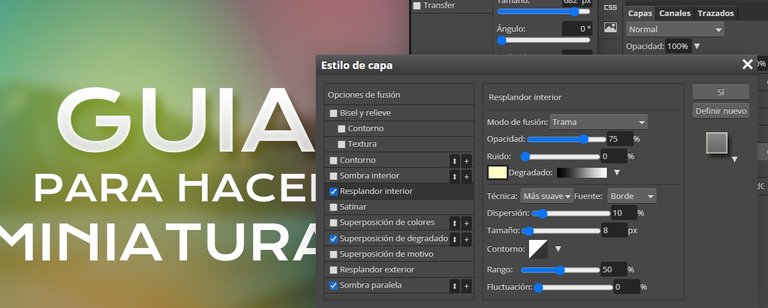
En este punto podemos dedicarnos a agregar mas detalles si quisiéramos, por ejemplo agregar sombra y quizá un degradado a nuestro texto, eso podemos hacerlo desde sus Opciones de Fusión dando click derecho sobre dicha capa de texto y activando la Sombra Paralela, yo en mi caso activé la sombra, el resplandor interior y la superposición de degradado sobre mi texto.
At this point we can add more details if we want to, for example add shadow and maybe a gradient to our text, we can do that from your Blend Options by right clicking on the text layer and activating the Parallel Shadow, in my case I activated the shadow, the inner glow and the gradient overlay on my text.
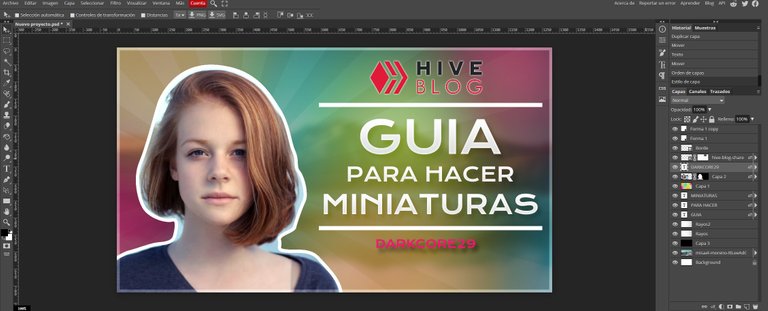
Nos quedaría algo mas o menos así...
We would be left with something more or less like this...

Y experimentando un poco con las demás herramientas como la Herramienta de Forma y la Forma Rectangular podemos hacer un borde o adornos para nuestra miniatura, también experimentando con los efectos y modos de fusión podemos agregar efectos muy interesantes a toda la composición, como por ejemplo yo tomé unos rayos de sol, los coloqué en Modo de Fusión Multiplicar y lo coloqué por detrás de la foto de la chica. En general se trata de experimentar con nuestras imágenes hasta que nos guste (Si algo no nos gusta o nos equivocamos, siempre podemos presionar Ctrl + Z)
And experimenting a bit with the other tools like the Shape Tool and Rectangular Shape** we can make a border or ornaments for our thumbnail, also experimenting with the effects and blend modes we can add very interesting effects to the whole composition, like for example I took some sun rays, placed them in Multiply Blend Mode and placed it behind the girl's picture. In general it's all about experimenting with our images until we like it (If we don't like something or we make a mistake, we can always press Ctrl + Z).
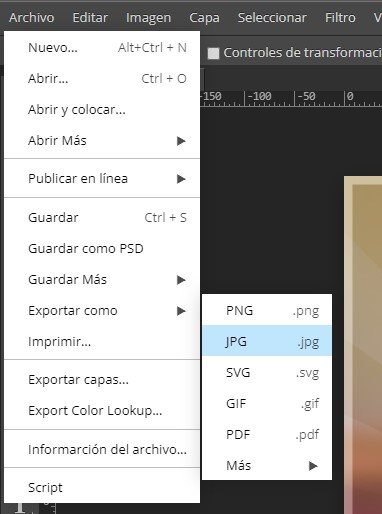
Ya solamente nos quedaría guardar nuestra obra una vez estemos satisfechos con ella, para ello, nos dirigimos a Archivo y tenemos varias opciones, por ejemplo, podemos guardar un archivo editable .psd si queremos editar nuestra obra mas tarde o si queremos usarla como plantilla para posteriores post, o bien solo exportar nuestra obra, para ello daríamos click en Exportar como y elegimos el formato en el que queramos la imagen, por lo general puedes gaurdarlo como .JPEG con la calidad al 100% o .PNG al igual al 100% de calidad y solo esperamos a que se guarde.
Now we only have to save our work once we are satisfied with it, to do this, we go to File and we have several options, for example, we can save an editable . psd if we want to edit our work later or if we want to use it as a template for later posts, or just export our work, for this we would click on Export as and choose the format in which we want the image, usually you can save it as .JPEG with 100% quality or .PNG with the same 100% quality and just wait for it to be saved.
Y ya estaría lista nuestra portada!, espero de verdad esta guía les sea de mucha utilidad al igual que la herramienta ya que de verdad puede salvar de un apuro, pronto traeré mas post explicativos sobre diferentes tópicos y utilidades (Así como también vídeos) un abrazo a todos, y nos vemos en la próxima!
And now our cover is ready, I really hope this guide is very useful as well as the tool because it can really save you from a hurry, soon I will bring more explanatory posts on different topics and utilities (as well as videos) a hug to all, and see you in the next one!

¡Felicidades! Esta publicación obtuvo upvote y fue compartido por @la-colmena, un proyecto de Curación Manual para la comunidad hispana de Hive que cuenta con el respaldo de @curie.
Si te gusta el trabajo que hacemos, te invitamos a darle tu voto a este comentario y a votar como testigo por Curie.
Si quieres saber más sobre nuestro proyecto, acompáñanos en Discord: La Colmena.
Muchas gracias por compartir, andaba buscando precisamente un sustituto para photoshop y me has dado una opción muy interesante.
De nada amigo, me alegra mucho que te haya servido, pronto subiré otras alternativas que también funcionan como sustituto, espero puedas sacarle todo el potencial a Photopea, saludos!
Your content has been voted as a part of Encouragement program. Keep up the good work!
Use Ecency daily to boost your growth on platform!
Support Ecency
Vote for new Proposal
Delegate HP and earn more
Congratulations @darkcore29! You have completed the following achievement on the Hive blockchain and have been rewarded with new badge(s):
Your next target is to reach 1500 upvotes.
You can view your badges on your board and compare yourself to others in the Ranking
If you no longer want to receive notifications, reply to this comment with the word
STOPCheck out the last post from @hivebuzz:
Support the HiveBuzz project. Vote for our proposal!
The rewards earned on this comment will go directly to the person sharing the post on Twitter as long as they are registered with @poshtoken. Sign up at https://hiveposh.com.