¡Hola queridos Hivers!
Espero que hayan pasado un día del amor y la amistad genial, junto a los que más quieren. Hoy quiero compartir con ustedes como se hace una Mapa Estelar, para aquellos que poco conocen de la astronomía, un mapa estelar es aquel que nos indica como estaba el cielo en determinadas coordenadas geográficas a un tiempo determinado. Esto quiere decir, que podemos recrear el cielo de un día muy especial para nosotros o para el de nuestros seres queridos. Es por eso que siendo la astrología una de las ciencias de las cuales me encantaría saber mucho más de lo que he aprendido, quise mostrarles como pueden hacer este mapa.
Hello dear Hivers!
I hope you had a great day of love and friendship, with the ones you love the most. Today I want to share with you how to make a Star Map, for those who know little about astronomy, a star map is one that tells us how the sky was in certain geographical coordinates at a certain time. This means that we can recreate the sky of a very special day for us or for our loved ones. That is why being astrology one of the sciences of which I would love to know much more than what I have learned, I wanted to show you how you can make this map.
 by @angelik-a Canva
Para realizar un mapa estelar no es necesario saber de diseño, incluso podemos hacerlo en Word o Power Point, o usando editores online como Canva o Pixlr , podemos regalar un mapa estelar a nuestro novio, esposo, hijo madre, realmente es un recuerdo muy emotivo recordar esos momentos especiales a partir del conocimiento de cómo se encontraba el cielo en un preciso momento que nos causo felicidad. Así que lo primero que debemos tener es las ganas y la voluntad y luego manos a la obra.
To make a star map it is not necessary to know about design, we can even do it in Word or Power Point, or using online editors like Canva or Pixlr , we can give a star map to our boyfriend, husband, son, mother, it is really a very emotional memory to remember those special moments from the knowledge of how the sky was at a precise moment that caused us happiness. So the first thing we must have is the desire and the will and then let's get to work.
Ahora que ya te he presentado, como son los mapas estelares, vamos a lo propio, explicarles como se hace.
Primero que nada debemos conocer los datos específicos que queremos recrear, es decir, Fecha (dia//mes/año) Hora(00:00am) Latitud y Longitud, es decir las coordenadas exactas donde sucedió el hecho, estas las ubicamos fácilmente en Google solo debemos colocar como palabra clave para la búsqueda, el nombre de la Cuidad y el País y allí encontraremos estos datos.
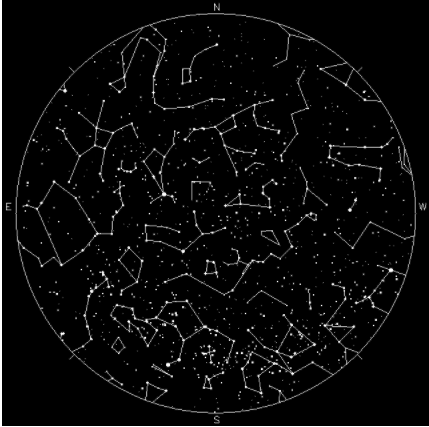
Una vez conociendo estos datos, procedemos entonces a visitar el siguiente sitio web Yoursky donde colocaremos todos los datos que ya hemos encontrado.
Now that I have already introduced you, how are the star maps, let's go to the proper thing, explain how it is done.
First of all we must know the specific data we want to recreate, i.e. Date (day//month/year) Time(00:00am) Latitude and Longitude, i.e. the exact coordinates where the event happened, these are easily located in Google we just have to put as a keyword for the search, the name of the City and Country and there we will find this data.
Once we know this data, we then proceed to visit the following website Yoursky where we will place all the data we have already found.
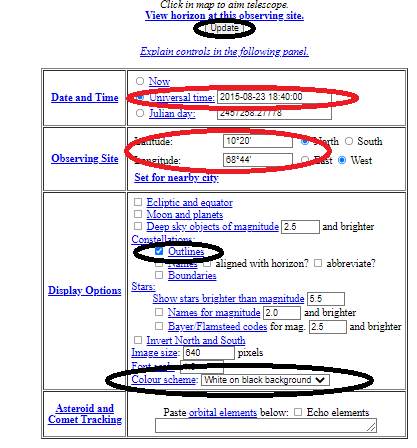
Es importante que te fijes bien en los círculos que he señalado en la imagen, pues los círculos rojos se corresponden con los datos que tú vas a agregar y los círculos negros con la configuración que debes verificar para obtener el mapa estelar.
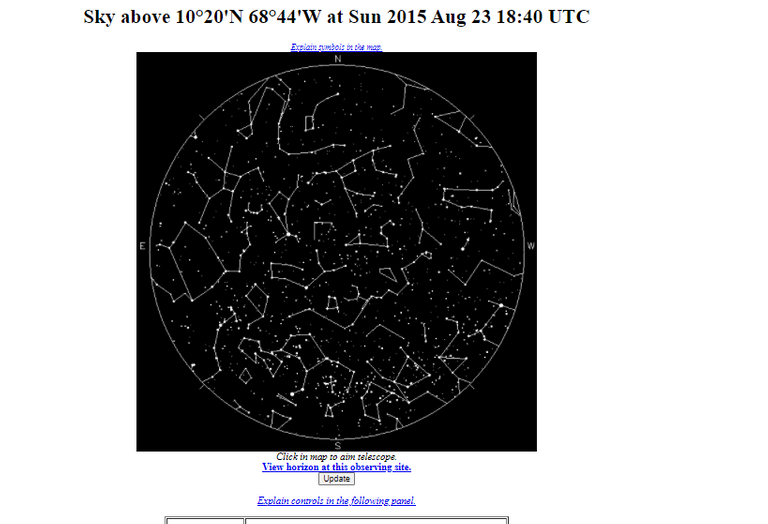
Una vez coloques los datos para que se genere de manera automática el mapa debes hacer click en el botón de actualizar. Posterior a esto debes guardar la imagen del mapa estelar haciendo click derecho sobre el mapa y escogiendo a opción Guardar Imagen Como…
It is important that you pay attention to the circles that I have pointed out in the image, because the red circles correspond to the data that you are going to add and the black circles correspond to the configuration that you must verify to obtain the star map.
Once you place the data so that the map is generated automatically, you must click on the update button. After this you must save the image of the star map by right clicking on the map and choosing the option Save Image As....
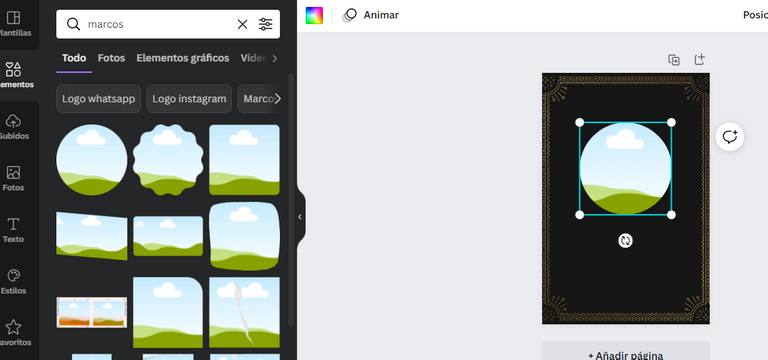
Una vez con el mapa guardado, vamos al editor de tu preferencia y realizas tu diseño, en este caso utilizaré Canva como uso canva pro tengo acceso a los diseños pro, sin embargo con la versión gratuita puedes hacerlo muy bien también.
Una vez has ubicado tu plantilla puedes empezar a usar la imaginación y diseñar, yo use la fecha de nacimiento de mi hija y imprimiré el diseño para enmarcarlo en madero y colgarlo en su cuarto, así que use como medidas 20x30cm, ustedes pueden hacerlo en las medidas que prefieran.
Ya después de esto procedí a limpiar la plantilla y quedarme solo con los elementos que usaré, que en este caso es el marco.
Generalmente como la presentación del mapa estelar es redonda, tratando de conservar la totalidad del mapa se ubica en un espacio igualmente redondo, pero es como sea de tu preferencia y creatividad, y también en donde vayas a usar el diseño.
Once you have the map saved, go to the editor of your choice and make your design, in this case I will use Canva as I use canva pro I have access to the pro designs, however with the free version you can do it very well too.
Once you have located your template you can start using your imagination and design, I used my daughter's birth date and I will print the design to frame it in wood and hang it in her room, so I used as measures 20x30cm, you can do it in the measures you prefer.
After this I proceeded to clean the template and keep only the elements that I will use, which in this case is the frame.
Generally as the presentation of the star map is round, trying to keep the whole map is placed in a round space, but it is up to your preference and creativity, and also where you are going to use the design.
Una vez con nuestro mapa estelar en el diseño, procedemos a colocar los datos de la persona a la que queremos regalarle este detalle, puede ser el nombre, o si es una fecha especial para una pareja, el nombre de cada uno -Tu&Yo- podemos también colocar alguna frase en la parte de abajo y un código QR si quieres hacerlo más dinámico, en mi caso busque la canción que siempre le colocaba a mi bebé cuando estaba en mi pancita en youtube y utilice el sitio web Codigos QR en el cual solo colocas el link de un sitio web al que quieres redirigir cuando sea leído el código QR.
Once we have our star map in the design, we proceed to place the data of the person to whom we want to give this detail, it can be the name, or if it is a special date for a couple, the name of each -You & I- we can also place a phrase at the bottom and a QR code if you want to make it more dynamic, in my case I looked for the song that always placed my baby when I was in my tummy on youtube and use the website [Codigos QR]( https://www. codigos-qr.com/generador-de-codigos-qr/) in which you just put the link of a website you want to redirect to when the QR code is read.
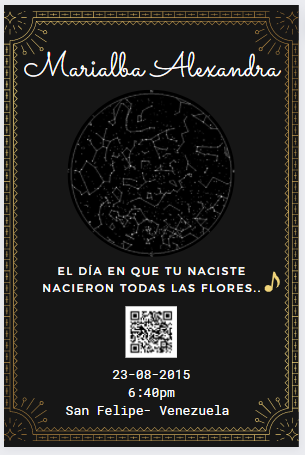
Añadí el QR al final de diseño y justo debajo coloque la fecha de nacimiento y el lugar con el que se corresponde el mapa estelar, esto lo puedes o no hacer, yo le veo simbolismo y por eso decidí agregarlo.
Ya después de esto, solo queda imprimir nuestro mapa estelar y enmarcarlo en madera y colgarlo en el cuarto en este caso porque es una fecha de nacimiento, sin embargo, se puede colocar donde sea según se la fecha que ese este recreando.
Espero que este post les haya gustado y sobre todo que hayan entendido lo fácil que es recrear esos momentos de felicidad en nuestras vidas, el cielo representa desde la antigüedad a conexión con el universo al cual pertenecemos y en gran parte desconocemos, esto le da ese toque enigmático y debido a la gran sabiduría que encierra, y sentirnos parte de este enorme universo nos hace seres grandiosos.
I added the QR at the end of the design and just below I placed the date of birth and the place with which the star map corresponds, you can do this or not, I see symbolism and that's why I decided to add it.
After this, just print our star map and frame it in wood and hang it in the room in this case because it is a birth date, however, can be placed anywhere depending on the date that is recreating.
I hope you liked this post and above all that you have understood how easy it is to recreate those moments of happiness in our lives, the sky represents since ancient times a connection with the universe to which we belong and largely unknown, this gives it that enigmatic touch and because of the great wisdom that holds, and feel part of this huge universe makes us great beings.
Cuéntame que te ha parecido este post y si te has animado a hacer tu mapa estelar no dudes en contármelo para ver cómo te resulto, un abrazo para ti
The images that appear in this publication are screenshots that correspond to the tutorial explained, others are canva designs.
Las Imagenes que aparecen en esta publicación son capture de pantalla que se corresponden con el tutorial explicado, otras son diseños en canva
The rewards earned on this comment will go directly to the person sharing the post on Twitter as long as they are registered with @poshtoken. Sign up at https://hiveposh.com.
Congratulations @angelik-a! You have completed the following achievement on the Hive blockchain and have been rewarded with new badge(s):
Your next target is to reach 900 comments.
You can view your badges on your board and compare yourself to others in the Ranking
If you no longer want to receive notifications, reply to this comment with the word
STOPCheck out the last post from @hivebuzz:
Support the HiveBuzz project. Vote for our proposal!