
Les presento mi primer muñequito
¡Y como esta mi gente linda , mi gente bella? Yo vengo hoy ¡más contenta que niña en fábrica de caramelos! Después de tanto tiempo de estar intentando y estarlo posponiendo por fin realicé mi primer muñeco en manta polar. Recuerdo que cada vez que se acercaba el mes de diciembre me decía "Voy hacer un peluche de navidad" pero nunca lo hacía, eso se me hacía muy complicado, creía que no era lo mío, pero ahora estoy animada y vi que no es para nada difícil y teniendo los materiales necesarios puedes hacer muchos de ellos en un santiamén.

Patrón y materiales que utilicé:
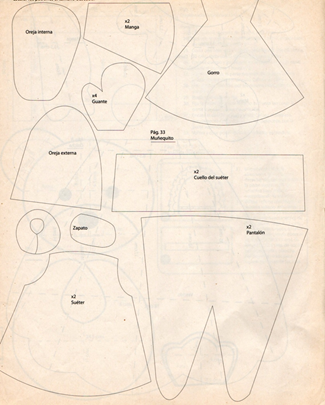
Este es el patrón original, lo que hice fue llevarlo a una escala más grande, copié, tracé los patrones y corté.
Para esto utilicé telas en manta polar color piel, verde y veis, también relleno, aguja e hilo.
También vamos a necesitar botones negros para los ojos, cinta de organza y lana o estambre para el cabello del color que prefieras.
Pasito a pasito hice primero la cara del muñequito
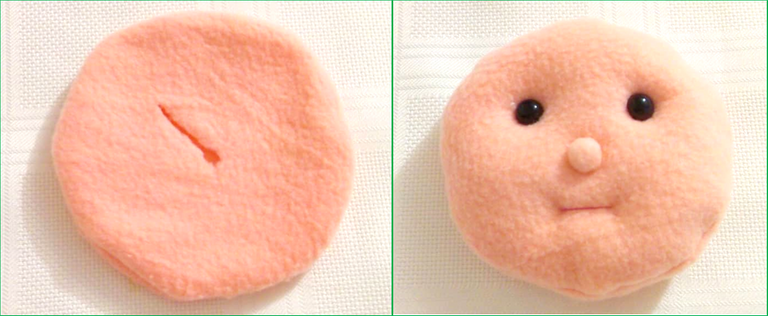
Les voy a comentar que lo primero que hice fue hacer la cara, me lo tomé con calma, corte dos círculos en manta polar color piel y cocí a mano con punto festón, también lo podía hacer en la máquina de coser pero quise intentarlo de esta forma para demostrarles que no hace falta tener una máquina para hacer este tipo de cosas. Luego hice una abertura en la parte posterior y por ahí volteé al derecho, rellené y cerré la abertura nuevamente.
Con una aguja larga de muñequería e hilo de color piel hice unas puntadas y apreté de manera fuerte para hacer como una especie de profundidad en donde va a ir metida la nariz y los ojos.
Con un pequeño círculo de un diámetro de 2 cm hacemos la nariz; la boca la hacemos con varias puntadas a cierta distancia de un lado a otro con hilo de color rosado o fucsia.
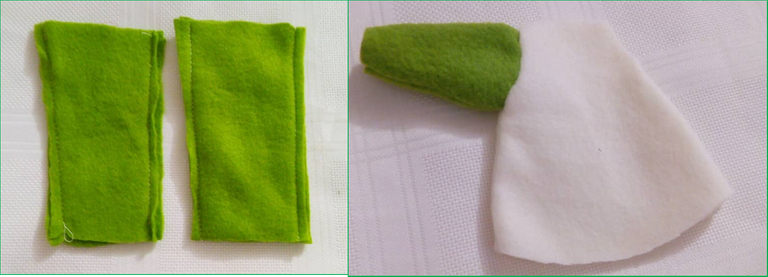
- Al ver que la cara me había salido bien continué con las demás piezas. Las mangas las hice bien largas para luego doblar un poco en la punta que es donde va a ir metida la mano.
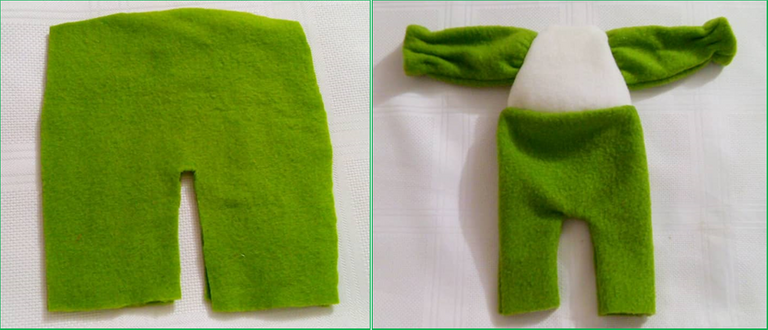
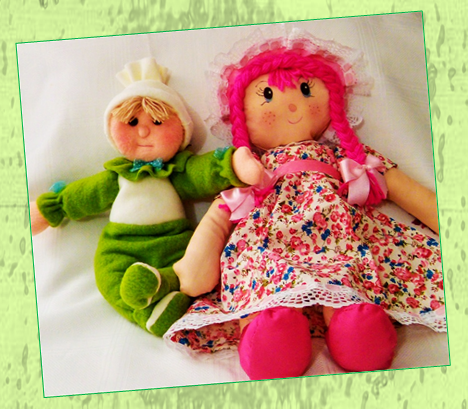
De igual forma hice con los pantalones, los hice bien anchos y largos como lo ves en la imagen y no en forma de punta como sale en el patrón original.
Para finalizar uní todas las piezas del cuerpo y rellené. Seguido junté cuerpo con cabeza, manos y pies y decoré a mi gusto.
Definitivamente estoy muy contenta con el resultado y motivada para seguir por este camino, quiero ahora perfeccionar la técnica y para eso me estoy investigando unos cursos de muñequería, me gustaría para el mes de Diciembre tener unos cuantos muñecos hechos para vender. Estuve haciendo un sondeo con mis amigas que tienen niños y me dicen que la cerdita Pepa, de la serie infantil y las muñecas LOL están muy de moda todavía, así que por ese camino debo ir.
Espero que les haya gustado este proyecto de hoy y se animen a realizarlo en casa. Les digo hasta pronto y los quiero mucho, gracias por todo su apoyo y el reconocimiento que me dan. bye bye.
La FELICIDAD es... hacer las pequeñas cosas de una gran manera.

I present to you my first doll
And how are my beautiful people, my beautiful people? I come today happier than a girl in a candy factory! After all this time of trying and postponing, I finally made my first polar blanket doll. I remember that every time that December was approaching I said "I'm going to make a Christmas cuddly toy" but I never did it, that was very complicated for me, I thought it wasn't my thing, but now I'm encouraged and I saw that it's not difficult at all and having the necessary materials you can make many of them in a jiffy.***
Pattern and materials I used:
This is the original pattern, what I did was take it to a larger scale, I copied, traced the patterns and cut.
For this, I used fabrics in leather polar blanket, green and you see, also stuffing, needle and thread.
We will also need black buttons for the eyes, organza ribbon and wool or yarn for the hair in the color you prefer.
Step by step I made the doll's face first
I'm going to tell you that the first thing I did was to make the face, I took it easy, I cut two circles in skin colored polar blanket and I sewed by hand with festoon stitch, I could also do it in the sewing machine but I wanted to try it this way to show you that you don't need a machine to do this kind of things. Then I made an opening in the back and turned it to the right, filled it in and closed it again.
With a long doll's needle and skin-colored thread I made some stitches and squeezed hard to make a sort of depth where the nose and eyes are going to go.
With a small circle of a diameter of 2 cm we make the nose; the mouth we make it with several stitches at a certain distance from one side to the other with pink or fuchsia thread.
- When I saw that the face had come out well, I continued with the other pieces. I made the sleeves very long and then folded them a bit at the end, where my hand will go.
In the same way I made the pants, I made them wide and long as you see in the image and not pointed as it comes out in the original pattern.
To finish, I joined all the pieces of the body and filled them in. Then I joined body with head, hands and feet and decorated as I liked.
I'm definitely very happy with the result and motivated to continue on this path, I want now to perfect the technique and for that I'm investigating some courses of dolls, I would like for the month of December to have a few dolls made to sell. I was doing a survey with my friends who have children and they tell me that the little pig Pepa, from the children's series and the LOL dolls are still very fashionable, so I must go that way.
I hope you liked this project today and that you will be encouraged to do it at home. I say goodbye and I love you very much, thanks for all your support and the recognition you give me. bye bye.
HAPPINESS is... doing the little things in a big way.

Que hermoso te quedó, te felicito!!!
y si, para diciembre haz muchas peppas pig y a su hemanito. Los niños aman esos cerditos.. Empieza desde ahorita, también los muñecos de nieve y renos son muy buscados en navidad.
Si estoy en busca de una buena maestra aquí dentro de la comunidad, yo conozco algunos sitios en Caracas donde podría recibir las clases pero para allá no están dejando pasar y todo esta cerrado. es una cosa seria lo que nos esta pasando.
Si estoy en busca de una buena maestra aquí dentro de la comunidad, yo conozco algunos sitios en Caracas donde podría recibir las clases pero para allá no están dejando pasar y todo esta cerrado. es una cosa seria lo que nos esta pasando.
Que tierno, me encantó.
Gracias amiga bella
Thank you my friend. I love you
Está bello🥰
Qué hermoso y tierno, @carolinacardoza. Me encantó.
Que lindo te quedó. Yo se el trabajo que representa, hace años tuve mi propia empresa de hacer muñecas, uy trabajé mucho y la cerré jajaja.
Quedó fantástico, de verdad que tiene muchísimo talento y creatividad.