Hola querida comunidad. ¡Espero estén todos muy bien!
Hello, dear community. I hope you're all very well!
.png)
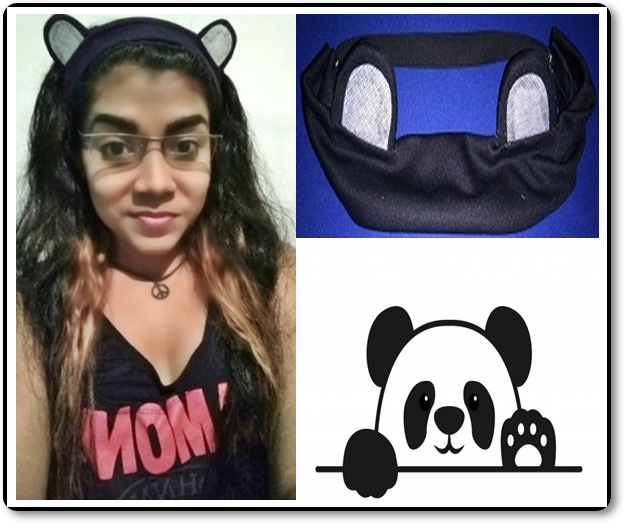
Feliz martes Hivers.
Espero que su fin de semana haya sido placentero, pero es un nuevo día y es tiempo de seguir avanzando, de seguir compartiendo contenido de calidad, como ya es costumbre en mi perfil, les mostraré en esta publicación otra actividad creativa, para que puedan sacar provecho del tiempo libre que tienen por la cuarentena.
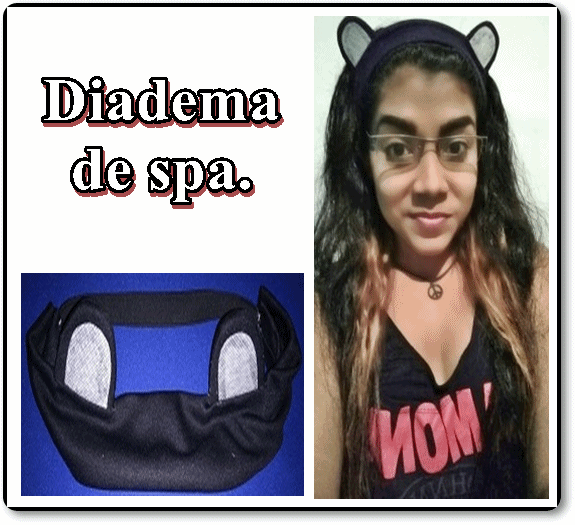
En esta ocasión, el paso a paso mostrará como realizar una diadema de spa, muy tierna y sobretodo útil, pueden emplearla para maquillarse, a la hora de aplicarse un facial, o simplemente si quieren usar algo lindo como accesorio.
Me lo mejor de esta manualidad, es que en cuestión de minutos y siguiendo unos simples paso, podrán tener una linda diadema de spa.
Los invito a seguir leyendo, encontraran muy divertida la elaboración de esta manualidad.
Happy Tuesday, Hivers.
I hope your weekend was pleasant, but it's a new day and it's time to keep moving forward, to keep sharing quality content, as it is already customary in my profile, I will show you in this publication another creative activity, so you can take advantage of the free time you have because of the quarantine.
In this occasion, the step by step will show you how to make a spa headband, very tender and above all useful, you can use it for make-up, when applying a facial, or simply if you want to wear something nice as an accessory.
The best thing about this manual is that in a matter of minutes and following a few simple steps, you can have a beautiful spa headband.I invite you to continue reading, you will find the elaboration of this manual very amusing.

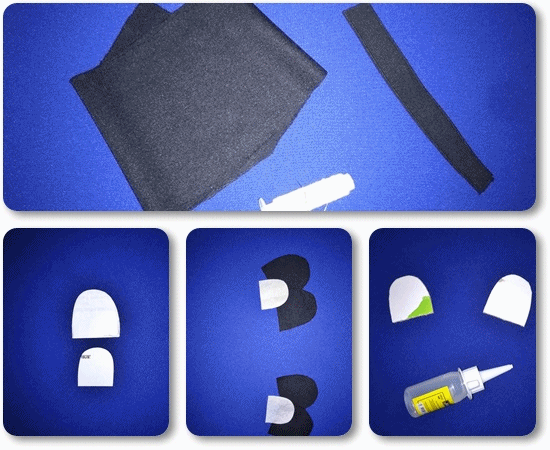
MATERIALES:
MATERIALS:
- 1 Tira de tela, del tamaño de tu cabeza.
- 5 cm de elástica.
- Hilo y aguja.
- Patrones de papel (recorta una de oreja de oso en papel, y otra mas pequeña que será el centro de la oreja).
- Orejas de tela (usa los patrones para recortar en tela las orejas, 4 grandes y 2 del centro).
- Orejas de cartón (con el patrón grande, recorta dos orejas en cartón).
- Pegamento.
- Tijeras.
- 1 strip of cloth, the size of your head.
- 5 cm of elastic.
- Thread and needle.
- Paper patterns (cut out a bear's ear on paper, and another smaller one that will be the center of the ear).
- Cloth ears (use the patterns to cut out the ears in cloth, 4 big ones and 2 in the center)
- Cardboard ears (use the large pattern to cut out two ears from cardboard).
- Glue.
- Scissors.
PASO A PASO:
STEP BY STEP:
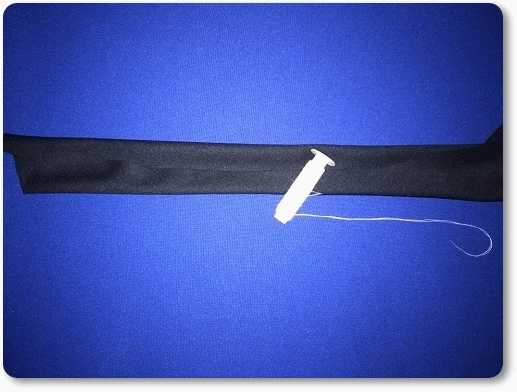
- Deben tomar la tira de tela y doblarla a la mitad, cosan ambas mitades con hilo, luego den la vuelta al cilindro que se formará, para que la costura quede oculta, ahora deben coser la elástica en ambos extremos del cilindro para unirlos.
You must take the strip of fabric and fold it in half, sew both halves with thread, then turn the cylinder to be formed, so that the seam is hidden, now you must sew the elastic on both ends of the cylinder to join them.

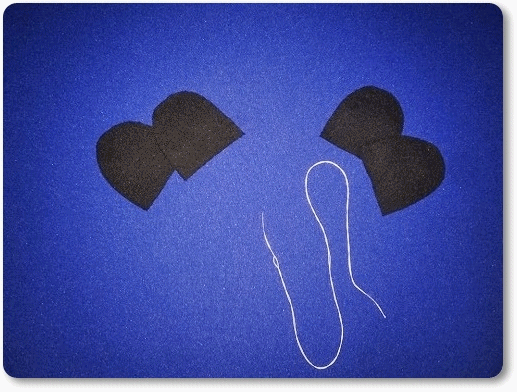
- Unan dos de las orejas en tela negra, cosan todo el alrededor, luego den vuelta, introduzcan el cartón dentro de ella, y peguen el centro que recortaron en color blanco.
Join two of the ears in black cloth, sew around it, then turn it over, put the cardboard inside it, and glue the center that you cut out in white.
- Abran una pequeña abertura en la diadema, considerando donde quieren situar las orejas, agreguen pegamento en el extremo de la oreja e introduzcan en la abertura.
Open a small opening in the headband, considering where you want to place the ears, add glue to the end of the ear and insert it into the opening.
RESULTADO FINAL:
FINAL RESULT:
PUBLICACIONES RECIENTES / RECENT PUBLICATIONS:
1 ¡RECICLAJE CREATIVO! (MARCO PARA ESPEJO HECHO CON CDs USADOS) / CREATIVE RECYCLING! (MIRROR FRAME MADE WITH USED CDs)
2 ¡HAZLO TU MISMO! Juguete para tu perro (1 MATERIAL)
3 ¿Cómo hacer guantes desechables con bolsas plásticas? ¡MUY FÁCIL! / How to make disposable gloves from plastic bags? VERY EASY!
4 Ravioles caseros, rellenos de espinaca y queso crema / Homemade ravioli, filled with spinach and cream cheese
5 El poder curativo de la risa

Imágenes tomadas desde mi Alcatel One Touch Idol 4 / Images taken from my Alcatel One Touch Idol 4.
Gifs realizados desde PhotoScape / Gifs made from PhotoScape.
¡Duuuude, que simpatico! No había visto a alguien usar los gif para explicar los step_by_step. Te quedó súper Jenny 👌 estoy ojeando tu blog y es para dar instafollow ✨
Me halagas, siempre trato de elaborar publicaciones atractivas y que sean divertidas de leer, así puedo motivar a los demás creadores a que exploren su lado creativo, muchas gracias por el apoyo. Saludos @tesmoforia
Pues lo lograste Jenny, keep going!
Me encanta!! Aunque no se cocer jajaja, pero me animaste a realizarlo
Lo importante es que lo intentes, gracias por el apoyo. Saludos!
Love it.
Shared at Twitter