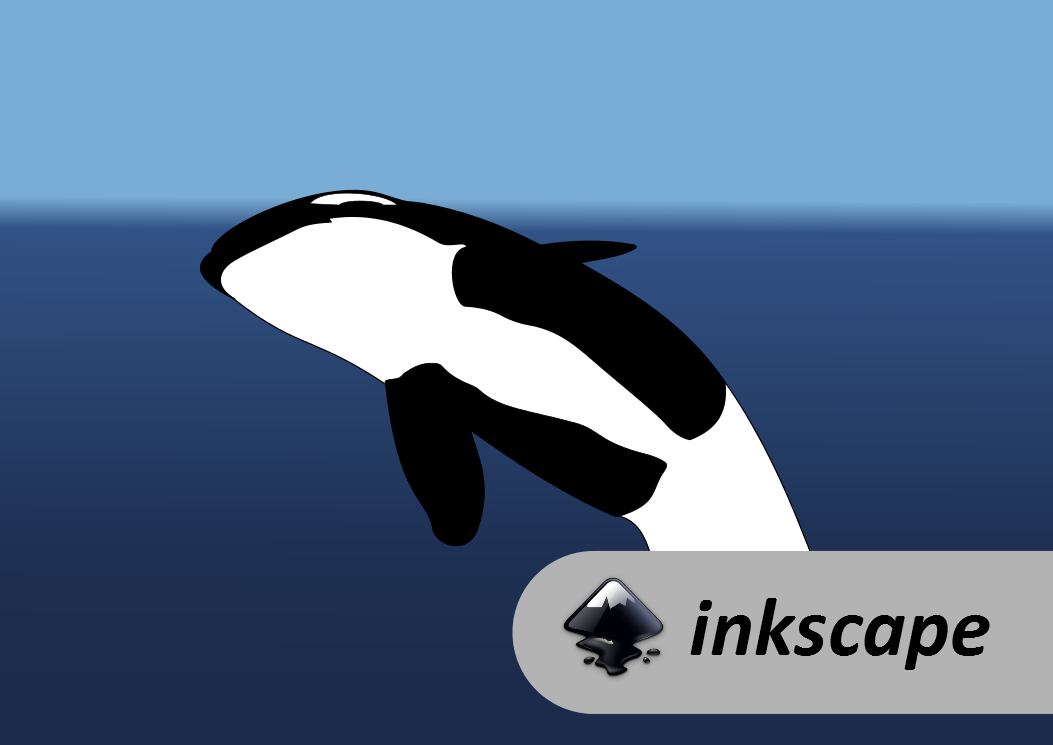
Hello friends, today I will introduce a tutorial on how to make the @upmewhale healer logo with Inkscape design program
Hola amigos, hoy presentaré un tutorial sobre cómo hacer el logotipo de sanador @upmewhale con el programa de diseño Inkscape
Step 1: Open the Inkscape program and with the tool to draw curves and straight lines (Mayús + F6) we make our sketch of the whale
Paso 1: Abra el programa Inkscape y con la herramienta para dibujar curvas y líneas rectas (Mayús + F6) hacemos nuestro boceto de la ballena

Step 2: Now with the tool to edit route nodes or control controllers (F2) we proceed to shape our sketch
Paso 2: Ahora con la herramienta para editar nodos de ruta o controladores de control (F2) procedemos a dar forma a nuestro boceto

Step 3: With the select or transform objects tool (F1) we adjust our drawing to the worksheet
Paso 3: Con la herramienta de selección o transformación de objetos (F1) ajustamos nuestro dibujo a la hoja de trabajo

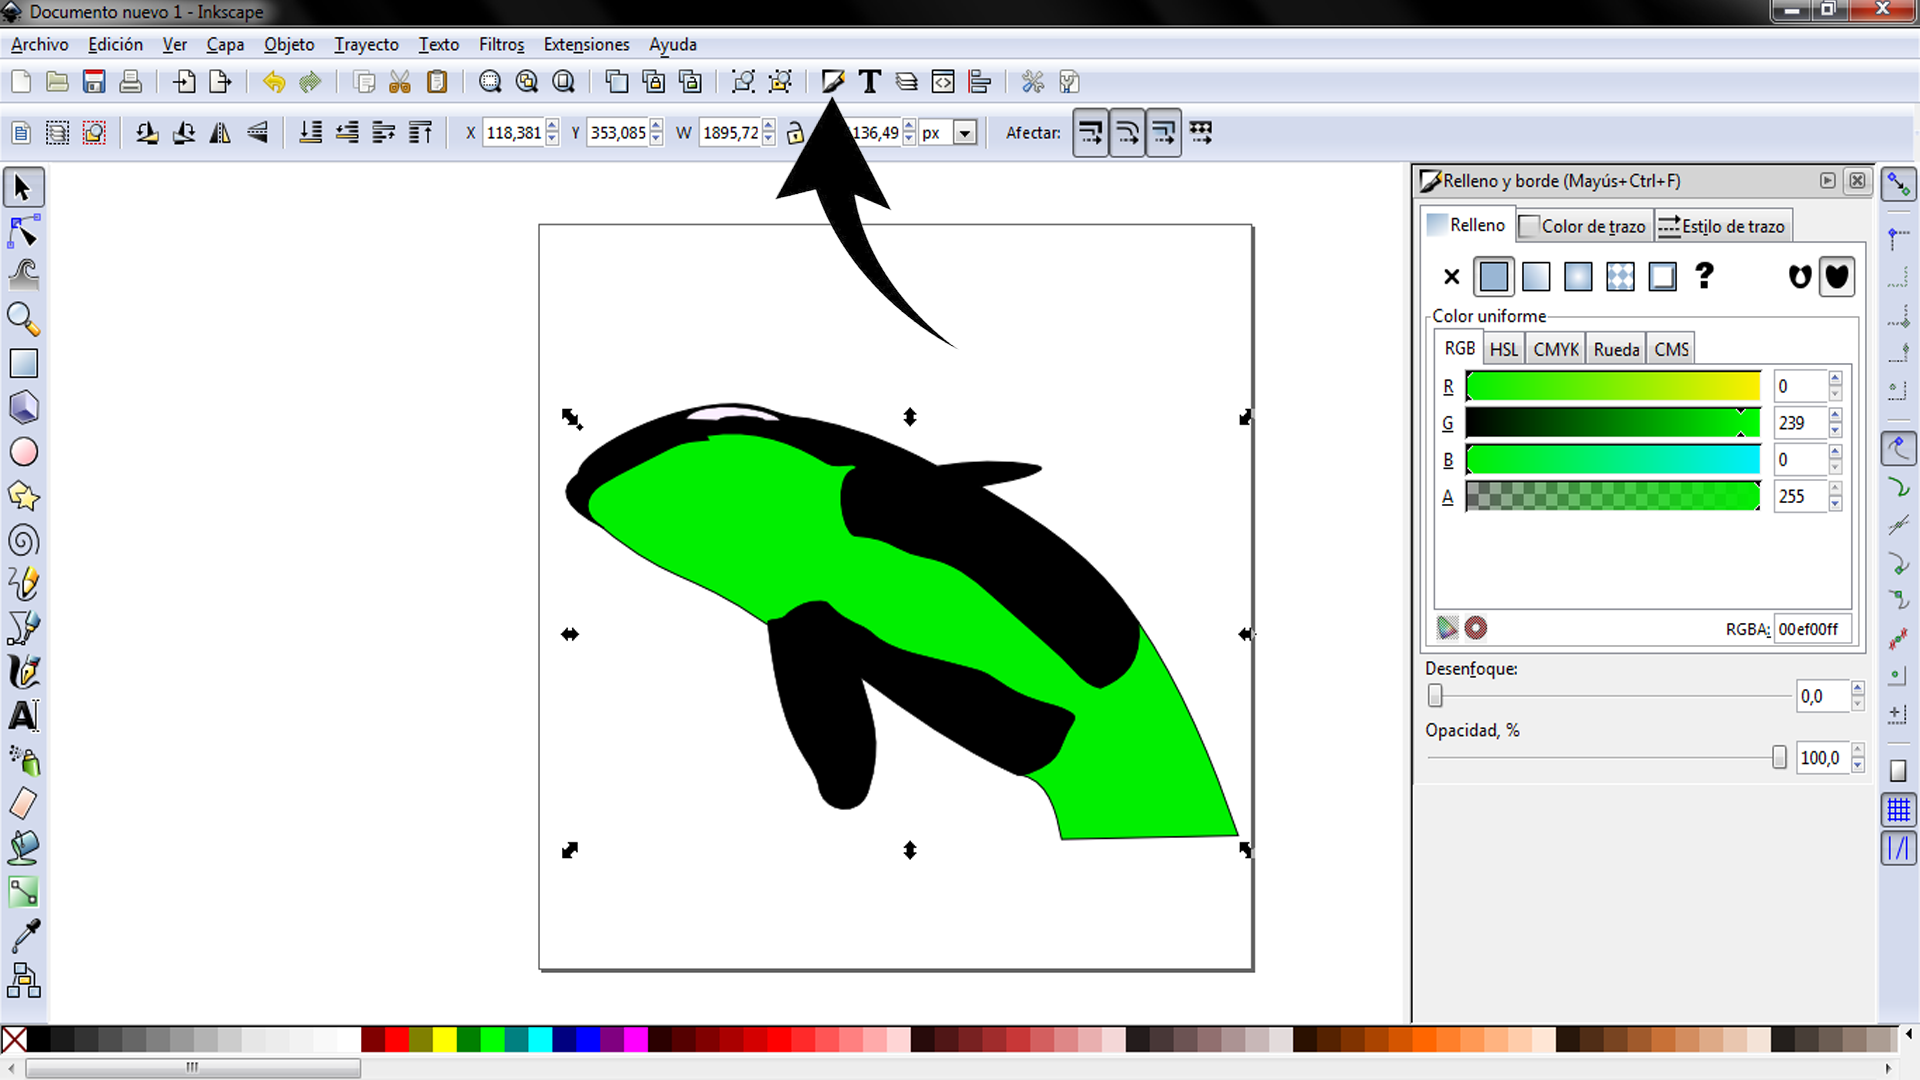
Step 4: With the tool to edit objects, colors, gradients, stroke width, date point, line patterns ... (Mayús + Ctrl + F) we proceed to paint our drawing
Paso 4: Con la herramienta para editar objetos, colores, degradados, ancho de trazo, punto de fecha, patrones de línea ... (Mayús + Ctrl + F) procedemos a pintar nuestro dibujo
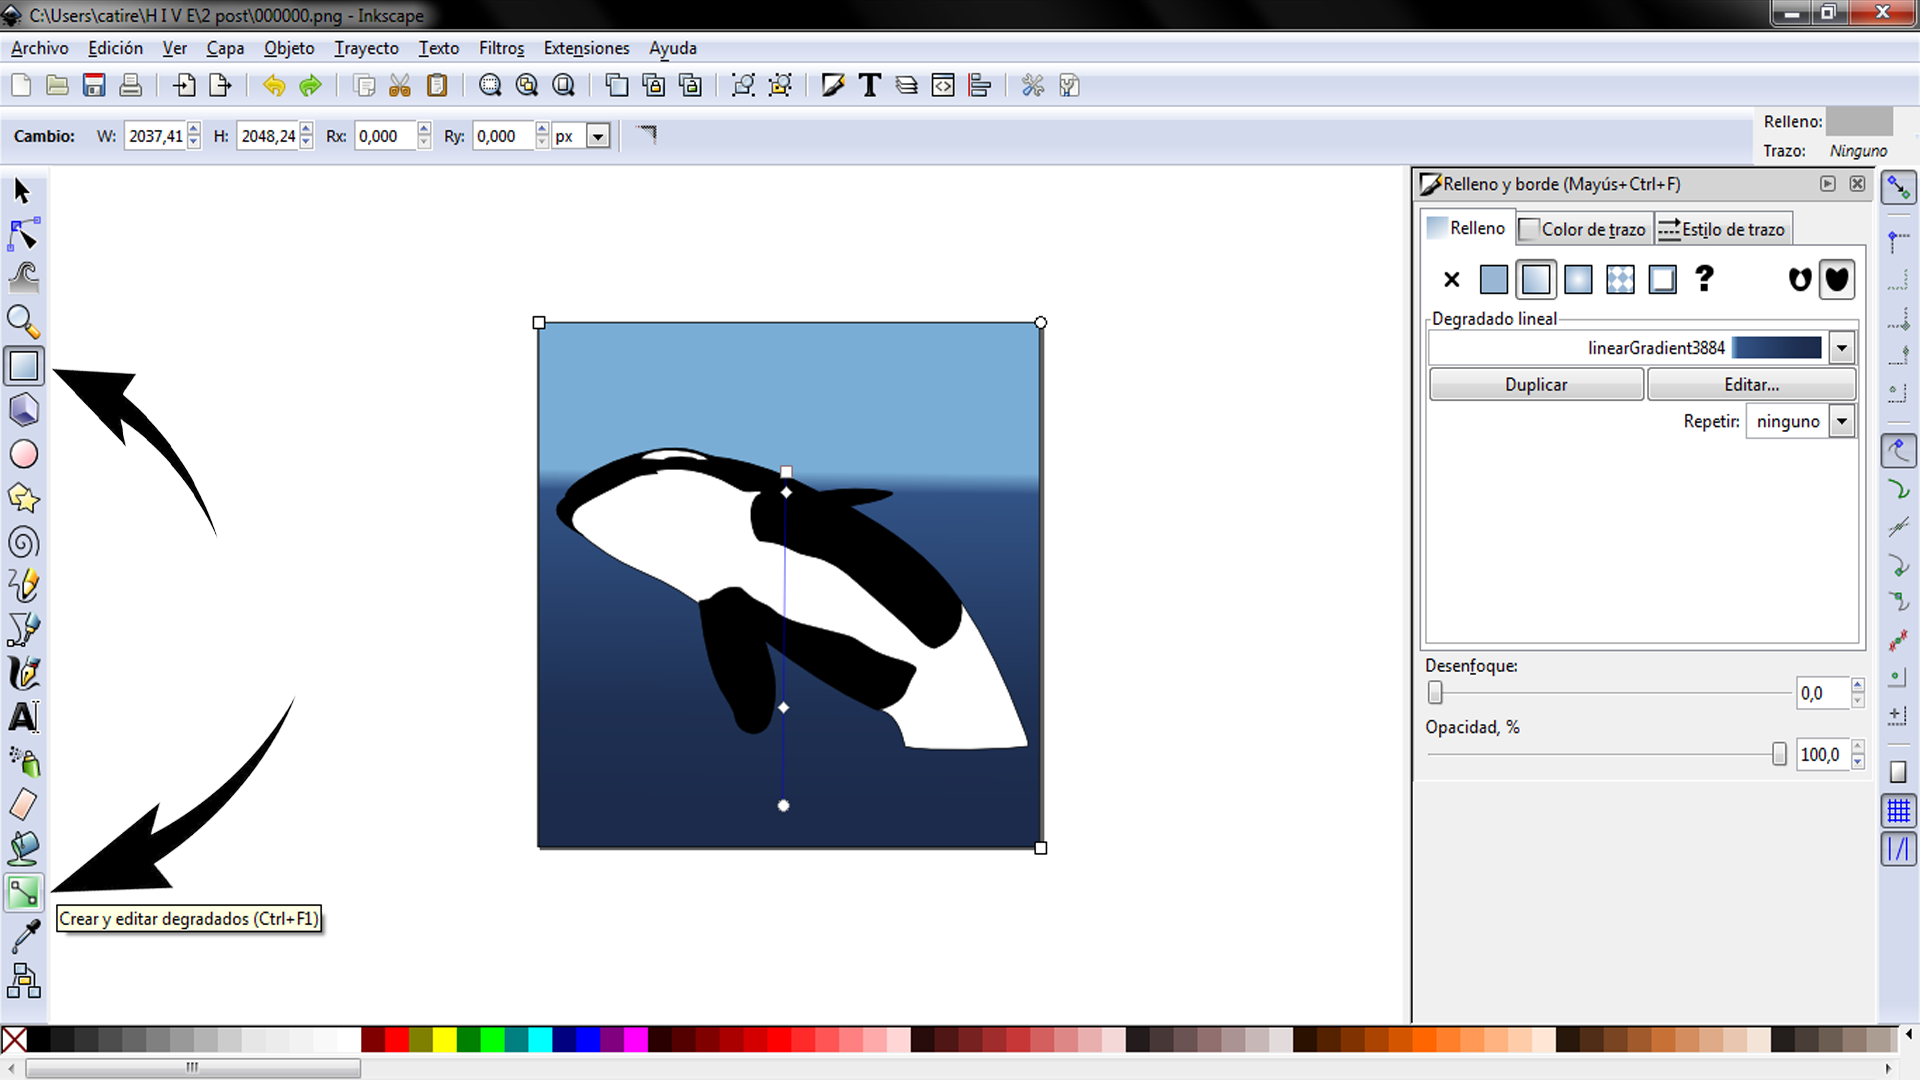
Step 5: With the tool to create rectangles and squares (F4) we make a square that will be the background of our drawing and with the tool to create and edit gradients (Ctrl + F1) and we make a gradient that will be sea and sky
Paso 5: Con la herramienta para crear rectángulos y cuadrados (F4) hacemos un cuadrado que será el fondo de nuestro dibujo y con la herramienta para crear y editar gradientes (Ctrl + F1) y hacemos un gradiente que será mar y cielo
Step 6: Now select the file and click save as
Paso 6: Ahora selecciona el archivo y haz clic en guardar como

Step 7: We will get a window where we can find the folder where we want to save the drawing, change the name and format, select the title and look for the option that says Png and press save and you would already be saving our drawing
Paso 7: Obtendremos una ventana donde podemos encontrar la carpeta donde queremos guardar el dibujo, cambiar el nombre y el formato, seleccionar el título y buscar la opción que dice Png y presionar guardar y ya estaría guardando nuestro dibujo


I hope you liked it, see you in the next post
Espero que os haya gustado, nos vemos en el próximo post

Step 1: Open the Inkscape program and with the tool to draw curves and straight lines (Mayús + F6) we make our sketch of the whale
Paso 1: Abra el programa Inkscape y con la herramienta para dibujar curvas y líneas rectas (Mayús + F6) hacemos nuestro boceto de la ballena
Step 2: Now with the tool to edit route nodes or control controllers (F2) we proceed to shape our sketch
Paso 2: Ahora con la herramienta para editar nodos de ruta o controladores de control (F2) procedemos a dar forma a nuestro boceto
Step 3: With the select or transform objects tool (F1) we adjust our drawing to the worksheet
Paso 3: Con la herramienta de selección o transformación de objetos (F1) ajustamos nuestro dibujo a la hoja de trabajo
Step 4: With the tool to edit objects, colors, gradients, stroke width, date point, line patterns ... (Mayús + Ctrl + F) we proceed to paint our drawing
Paso 4: Con la herramienta para editar objetos, colores, degradados, ancho de trazo, punto de fecha, patrones de línea ... (Mayús + Ctrl + F) procedemos a pintar nuestro dibujo
Step 5: With the tool to create rectangles and squares (F4) we make a square that will be the background of our drawing and with the tool to create and edit gradients (Ctrl + F1) and we make a gradient that will be sea and sky
Paso 5: Con la herramienta para crear rectángulos y cuadrados (F4) hacemos un cuadrado que será el fondo de nuestro dibujo y con la herramienta para crear y editar gradientes (Ctrl + F1) y hacemos un gradiente que será mar y cielo
Step 6: Now select the file and click save as
Paso 6: Ahora selecciona el archivo y haz clic en guardar como
Step 7: We will get a window where we can find the folder where we want to save the drawing, change the name and format, select the title and look for the option that says Png and press save and you would already be saving our drawing
Paso 7: Obtendremos una ventana donde podemos encontrar la carpeta donde queremos guardar el dibujo, cambiar el nombre y el formato, seleccionar el título y buscar la opción que dice Png y presionar guardar y ya estaría guardando nuestro dibujo
I hope you liked it, see you in the next post
Espero que os haya gustado, nos vemos en el próximo post
I hope you liked it, see you in the next post
Espero que os haya gustado, nos vemos en el próximo post
Me agrado lo que esplayaste, espero ver mas de tus publicaciones gracias.