
Designed by me on canva
INTRODUCTION
Hello and good day to you all. I welcome you all to my first post in this amazing community on Hive and also my second post on this platform. Today I share with you all a little tutorial showing a simple tricks that you can used to check and fix malware on your computer system. Thanks to the management of this community for giving me such a wonderful opportunity to sharing my knowledge on that.
HOW TO USE POWERSHELL TO SCAN FOR MALWARE ON YOUR COMPUTER
Most of us here do use our personal computer on daily basis to do most stuffs here on this wonderful platform and on other areas of work without knowing if the computer is been attacked by a malware or not.
Today I will showing you simple codes you can use to scan and fix malware using Powershell which I think will benefit most of us.
But before we begin, let’s get ourselves familiar with some terminologies.

PowerShell is a cross-platform task automation solution made up of a command-line shell, a scripting language, and a configuration management framework. PowerShell runs on Windows, Linux, and macOS. source
To launch Windows PowerShell on Windows 10:
Click on the start menu on the computer and type
powershellin the search bar.Run Windows PowerShell as administrator

Screenshot from my laptopThe will be a popular menu asking if you want to make changes on your device. You click on
Yesto approve the changes.
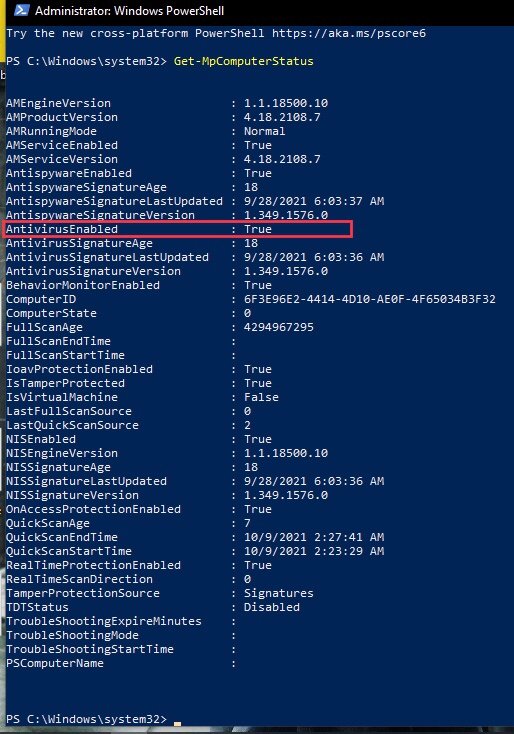
To check your Microsoft defender status, you use the below code:
Get-MpComputerStatus
Description
The Get-MpComputerStatus cmdlet brings a list of status of antimalware software that are installed installed in your computer.
When the above code is typed, a long list of Microsoft Defender details.
For now, our main interest is on AntivirusEnabled label; if this is True, then our windows Defender is configured and it is running correctly on our PC.
Screenshot from my laptop
Let me take you through how to check and fix system files in your computer
The Windows System File Checker (SFC) is special tool found in the new versions of Windows that is built onto them and to allows one to scan and aide them repair corrupted system files in Windows on his computer.
A basic SFC scan using the /scannow which is used to resolve most issues. But apart from that, there are also other modifiers that can be used for other specific purposes. To check for that, you just key in the below code in powershell and all other modifiers will be displayed.
sfc

Screenshot from my laptop
Note: You noticed the code is in lower case letter. Your codes will executed error if upper case/block letter are used using the system file checker.
Modifiers and their Functions:
I will be explaining the four commonly used modifiers and their functions below.
/scannow - Scannow code scans every system files on the computer and replaces corrupted files.
/verifyonly - This code is executed to scans all integrity of all protected system files. No repair operations is done.
/scanfile - This code is executed to scan integrity of a specific reference file. It repairs corrupted files if identified. Location of file must be specified with full path.
/verifyfile - This code executed to scan the integrity of a file with a specific reference location file. No repair operation is done after excited.
since we are interested in only scanning and fixing corrupted files, we will begin be using the /verifyonly code to check our computers to see if they have any corrupted files on them.
Key into powershell the below code to check that. Let’s do it together.
sfc /verifyonly
NOTE
Others might be faced with an error in their execution. Please don’t be confused. After typing sfc you give space before typing in the remaining code. That is /verifyonly
This will take a little while to complete the system file verification process since it will be verifying every system file on you computer for corrupted files.

Screenshot from my laptop
Below is the outcome that was displayed to me on my laptop. The outcome might vary so don’t be confused.

Screenshot from my laptop
You realized from the above picture powershell found corrupted file and the detail of where to locate the errors has been specified to me.
Now let’s scan and fix the corrupted files on our computers. Type in the below code to start the process.
sfc /scannow
It will take a while to run through that verification phase.

Screenshot from my laptop
Above is the outcome that will displayed to me. The integrity violation found using the sfc /verifyonly code has been corrected using sfc /scannow code.
Now all errors in your system files has been corrected. To prove that, you need to run the sfc /verifyonly code to confirm that.

You can see from the above image ther was no integrity violation found and the image contains all all the codes from where we started.
Now all system files has been corrected. Isn’t is simple?
There are only five possible messages that one could receive after typing the above codes in system file checker.
The below image shows the possible outcome that will be displayed to your when you run the above codes.

screenshot from my laptop
Windows Resource Protection did not find any integrity violations.
Windows Resource Protection found integrity violation.
Windows Resource Protection found corrupt files and successfully repaired them.
Windows Resource Protection found corrupt files but was unable to fix some of them.
Windows Resource Protection could not perform the requested operation.
A full malware scan is one that checks every single file on your Windows computer
Running a Full Scan on the Microsoft Defender is sometimes very troublesome, so it is best when using PowerShell to run a deep malware scan of your computer. You can use the below cmdlet command to run a Microsoft Defender full scan:
Start-MpScan -ScanType FullScan

Screenshot on my laptop
After running the above code, this will be what will be displayed to you. With this type of Full scan it can take you more than one (1) hour depending on the content of your computer files.

screenshot from my laptop
This same about code can sometimes be used to scan for malware in externally connected USB flash drives.
Below is a list of common advantages one could benefit from if you constantly scan/ full scan your computer.
It can prolong the life of your computer.
You don’t need to pay to be able to use the software to run the scan. It’s free and simple.
It is a helpful too for removing virus on your computer when you don’t have any antivirus installed.
CONCLUSION
I am very thankful to the management of POB for providing such a wonderful platform where we can showcase our talent and skills and also share ideas. If you find the tutorial helpful or you are facing any challenges following the tutorial, please leave a comment below.
Congratulations @mukadas! You have completed the following achievement on the Hive blockchain and have been rewarded with new badge(s):
Your next payout target is 50 HP.
The unit is Hive Power equivalent because post and comment rewards can be split into HP and HBD
You can view your badges on your board and compare yourself to others in the Ranking
If you no longer want to receive notifications, reply to this comment with the word
STOPTo support your work, I also upvoted your post!
Support the HiveBuzz project. Vote for our proposal!
Thank you very much
Gonna save this post. I think this can be a help for me in the future. Thanks. :))
Yeah. I think it will. Thank you for stopping by
Thanks for your contribution to the STEMsocial community. Feel free to join us on discord to get to know the rest of us!
Please consider delegating to the @stemsocial account (85% of the curation rewards are returned).
You may also include @stemsocial as a beneficiary of the rewards of this post to get a stronger support.
Thank you
Long but well-explained post! Very useful for increasing your safety.