For a while I wanted to share a little more about my processes. I am like those people who say: I am going to register my processes, they take a photo at the beginning, and when they realize they are taking the photo at the end and the process is pending.
Yes, it always happens to me when I go out to have fun with people, it annoys me a bit to break with the moment to take a photo in which everyone poses.
That's why I decided to share a part of my process, the only one that was registered. Although procreate is this magnificent software in which we can export a speedpainting on what we painted from start to finish, I don't work exclusively with procreate. In fact, usually the first animation sketches I do in OpenToonz. This is because it is better to do inbetweens, and to determine the timing of the animation flow. Once this is done, I convert the video to layers and color it in procreate or adobe fresco, simply because their brushes are second to none.
So is the case with this little animation.
I started making the hand, taking mine as a reference while I moved it. Doing this for an animation is a bit tricky, because you need the lines to follow a sequence, especially when it's moving so slowly. But I did it after a while and here the first result:
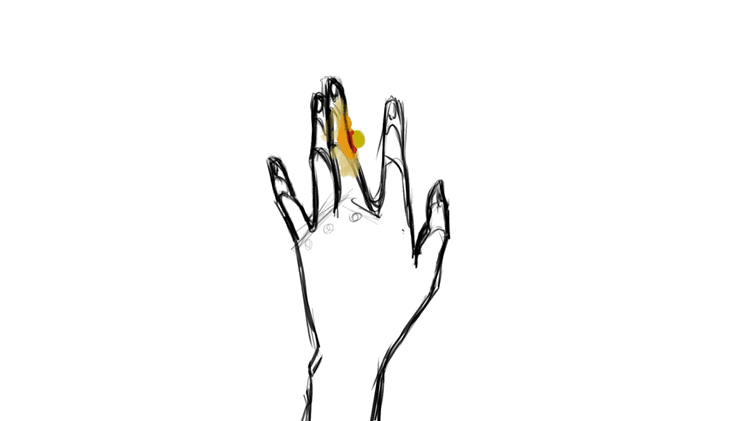
By this time I felt very proud of what I had achieved, and although the most important part of the job was done, I would soon realize that being the type of person who adds paint details would also make things a little more complicated. .
First I decided to redraw the lines of the hand, to make a clearer guide of what I wanted. then I started coloring. I loved the first painting, but when I went to the second I realized that I had colored the first one in a not so simple way, and that doing the rest in the same way would take me forever. So I preferred to copy the first painting and work on the rest of the paintings based on it.
Then I corrected edges and filled in spaces that had been cut in the process.
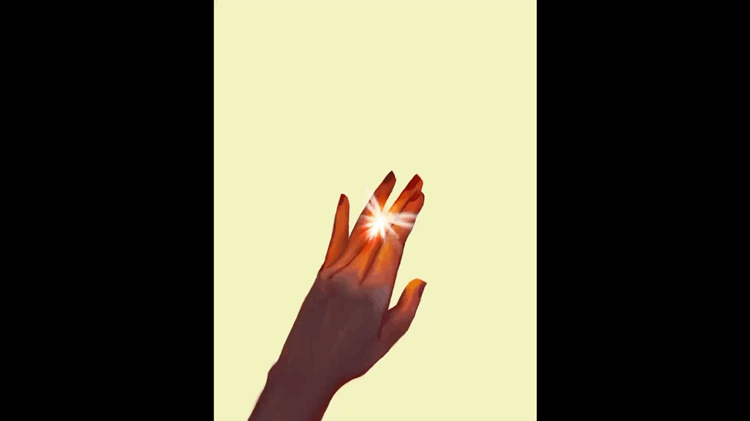
The part I enjoyed doing the most was the light part. I think the light being painted with light textures is very beautiful, because it's more like the way we know the interaction of light on our skin, for example. My skin tone varies a lot with lights and shadows, adding shades from reds and oranges to purples. This is one of the things that fascinates me the most about painting people.
The rest of the video, that of the person in the field, is also affected by the use of various software. Although I did the painting in procreate, I did the camera zoom in open toonz, this because I wanted it to look natural, and to a certain degree cinematic, and that when I moved my camera forward the different layers of grass would react . This was one of the most fun parts, and after a couple of tutorials it was not only easy, but I was left with a lot more desire to do camera movements in this program.
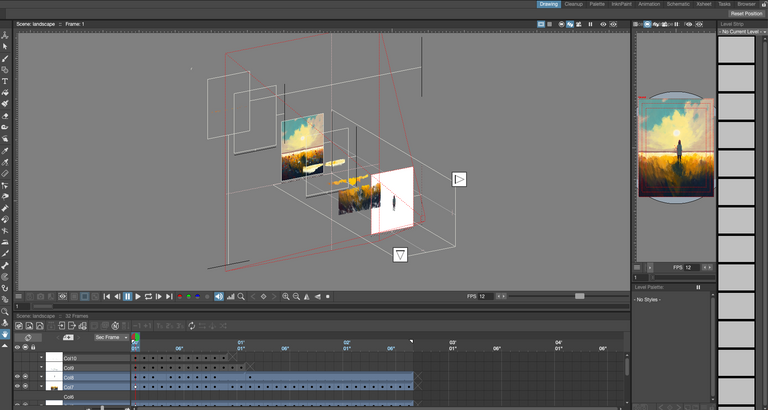
Once I had the camera movement ready, I decomposed the animation into frames again and went back to procreate, where I painted frame by frame some details, because as the camera moves they are supposed to make changes to the grass. And of course, I painted the hand animation, which was simpler than I thought.

You can enjoy the video at this link. Includes sound that makes it a little more special. For sound I always always get help from Jody 😍 He's been a very important part of my process since we met.
Thanks for reading. If you have any recommendations or questions, please leave me a comment.
My links
https://linktr.ee/alejandraher
Desde hace un tiempo quería compartir un poco más sobre mis procesos. Yo soy como esas personas que dicen: voy a registrar mis procesos, le toman una foto al principio, y cuando se dan cuenta le están tomando la foto al final y el trámite está pendiente.
Si, siempre me pasa cuando salgo a divertirme con la gente, me fastidia un poco romper con el momento de sacarme una foto en la que todos posan.
Por eso decidí compartirles una parte de mi proceso, el único que quedó registrado. Aunque procreate es este magnífico software en el que podemos exportar un speedpainting sobre lo que pintamos de principio a fin, no trabajo exclusivamente con procreate. De hecho, normalmente los primeros bocetos de animación los hago en OpenToonz. Esto se debe a que es mejor hacer intermedios y determinar el tiempo del flujo de la animación. Una vez hecho esto, convierto el video en capas y lo coloreo en procreate o adobe fresco, simplemente porque sus pinceles son insuperables.
Así es el caso de esta pequeña animación.
Empecé a hacer la mano, tomando la mía como referencia mientras la movía. Hacer esto para una animación es un poco complicado, porque necesitas que las líneas sigan una secuencia, especialmente cuando se mueve muy lentamente. Pero lo hice después de un tiempo y aquí el primer resultado:
Para este momento me sentia muy orgullosa de lo que habia logrado, y aunque la parte mas importante del trabajao estaba hecha, pronto me daria cuenta que el hecho de ser ese tipo de personas que agrega detalles de pintura también haria las cosas un poco mas complicadas.
Primero decidí volver a trazar las lineas de la mano, para hacer una guia mas clara de lo que queria. luego empecé a coloreas. el primer cuadro me encantó, pero cuando pasé al segundo me di cuanta que habia coloreado de una forma poco simple el primero, y que hacer el resto de la misma manera me tomaría por siempre. Así que preferí copiar el primer cuadro pintado y trabajar en base a este el resto de los cuadros.
Luego corregí bordes y llené espacios que habían quedado cortados en el proceso.
La parte que mas disfruté hacer fue la de la luz. Creo que la luz siendo pintada con luces de texturas es muy hermosa, porque algo mas a la forma como conocemos la interacción de la luz en nuestra piel, por ejemplo. Mi tono de piel varía muchísimo con las luces y sombras, agregando tonalidades desde los rojos y naranjas hasta los morados. Esta es una de las cosas que mas me fascina sobre pintar personas.
El resto del video, ese de la persona en el campo, también está afectado por el uso de varios softwares. Si bien la pintura la hice en procreate, el acercamiento de la cámara lo hice en open toonz, esto debido a que quería que se viera natural, y hasta cierto punto cinemático, y que cuando moviera mi cámara hacia adelante las diferentes capas de pasto reaccionaran. Esta fue una de las partes mas divertidas, y después de un par de tutoriales no tan solo fue sencillo, sino que quedé con muchas más ganas de hacer movimientos de cámara en este programa.
Una vez que tenía el movimiento de cámara listo, descompuse la animación en cuadros de nuevo y volví a procreate, donde pinté cuadro por cuadro algunos detalles, porque se supone que a medida que la cámara avanza deberían hacer cambios en el pasto. Al igual que la forma como las nubes se mueven.
Puedes disfrutar del vídeo en este enlace. Incluye sonido que lo hace un poco más especial. Para el sonido siempre siempre recibo ayuda de Jody 😍 Ha sido una parte muy importante de mi proceso desde que nos conocimos.
Gracias por leerme. Si tienes alguna recomendación o duda, por favor dejame un comentario.
My links
https://linktr.ee/alejandraher
Art and review By ©Alejandra Her
Congratulations @alejandra.her! You received a personal badge!
You can view your badges on your board and compare yourself to others in the Ranking
Check out our last posts:
Support the HiveBuzz project. Vote for our proposal!