Hello to all art lovers!!! and Of those who for some reason like corporate mascots ^_^
These days I am preparing things for the exhibition of my students, specifically making the frames where the drawings will be displayed, which takes me a lot of time, because of this I have 2 weeks without having been able to publish anything on the platform, and for Unfortunately, my two star students stopped attending, so things are not going as I wanted, but hey, you do what you can, to be honest, I already saw that things would not turn out as planned.
On the subject of sculpture, my class was suspended until further notice or until children interested in taking the class are found, (if I only had one student and for scheduling reasons they withdrew from my class) I will use this time to improve my skills and record videos to be used for publicity, but most likely I will not make more sculptures for a short time, the reason will be to gather material to make sculptures.
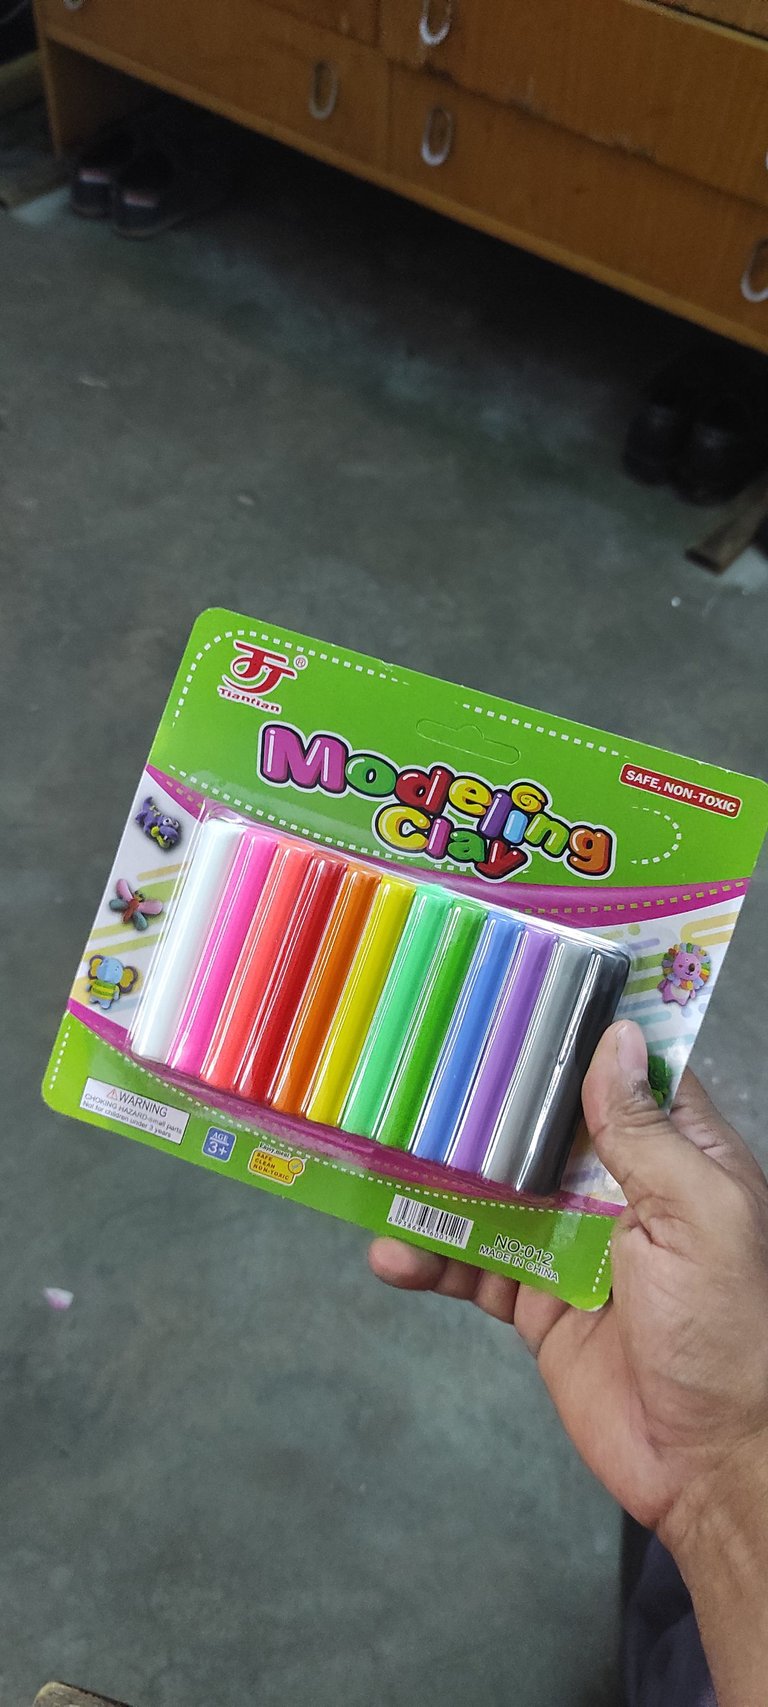
This is the brand with which all my works are made, its price is super affordable for my pocket, but most importantly it is of very good quality, its texture is very comfortable to work with, it is not greasy, it does not stain and over time it tends to to harden slightly, which gives it greater durability without asking for its flexibility to the sculptures made with it, I tried others of similar or cheaper cost and they are disgusting to work with that I would not recommend using even my worst enemy, but I have little left.
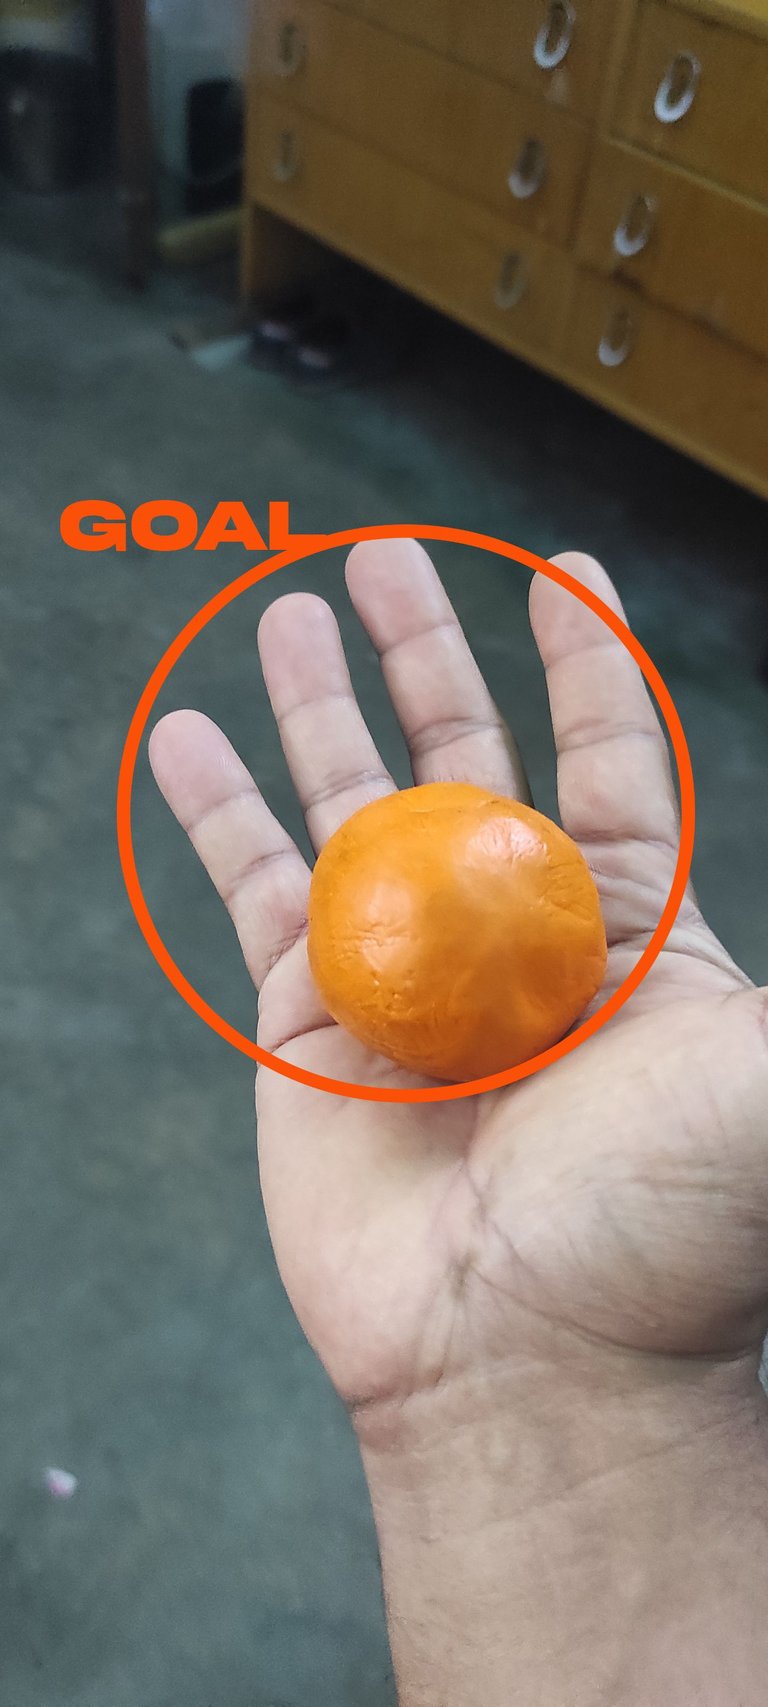
The amount of plasticine I have to make new sculptures are 12 5.5cm balls, which should be at most a little more than a kilo of plasticine, and I decided to increase the size of each ball to 12 cm, which will allow me to work on larger works. larger and more elaborate, I also have a rare plasticine that I never use, which tends to harden over days when exposed to the air and it's time to use it while I gather the other one ^_^

The reference for sculpture
In my work it turns out that they have a mascot with which they advertise a lot on social networks, this character is called Argi, he is supposed to be an anthropomorphic flame, although to be honest when I saw him for the first time I thought he was a brush, and in fact I haven't met the first person yet who knows it's him, which I find funny they always have to explain what he is.
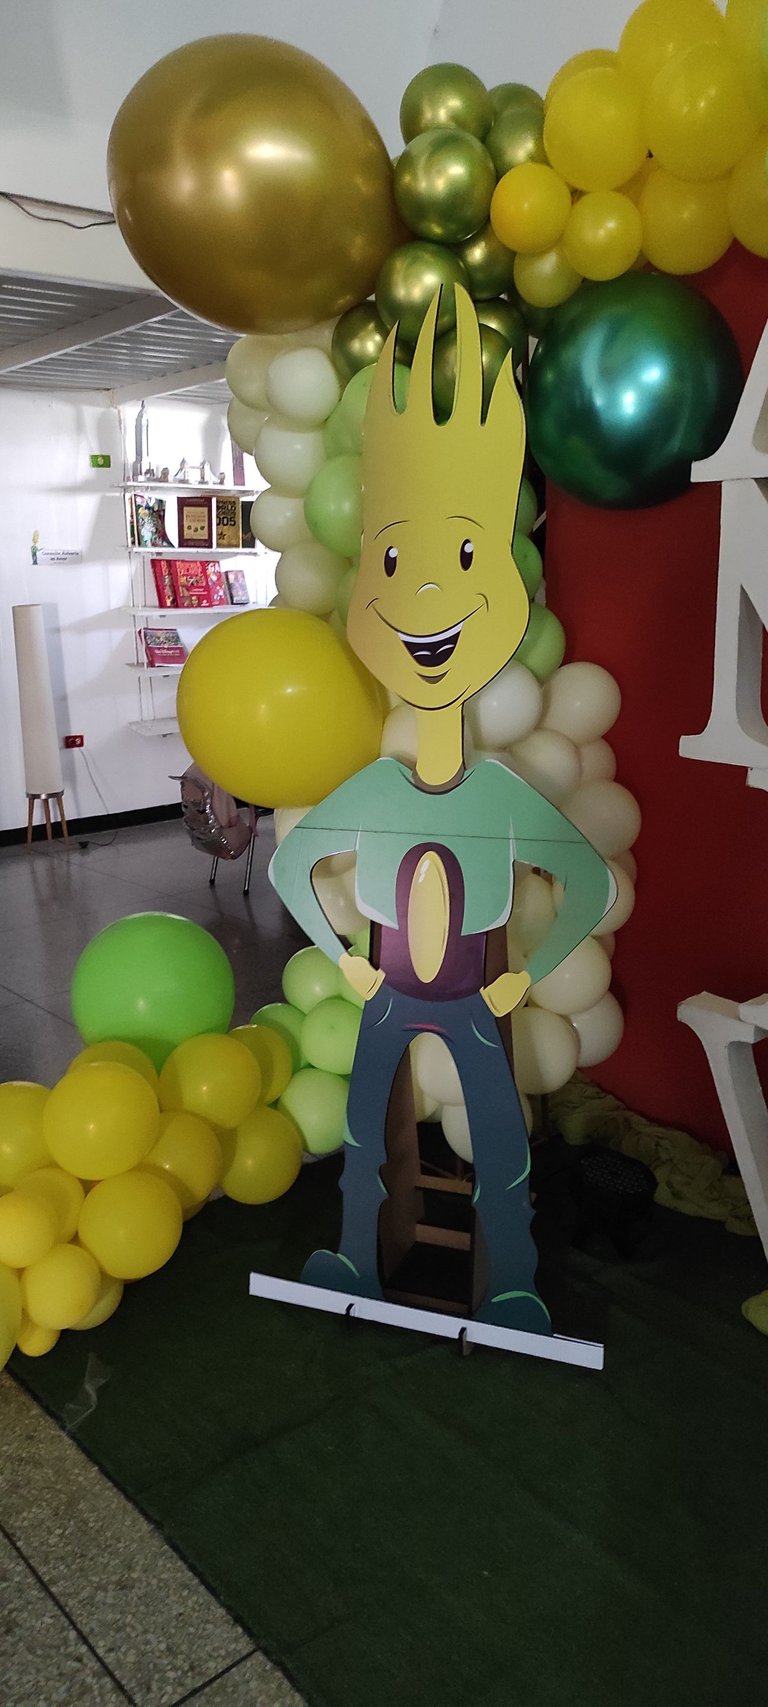
As I wanted to have support material to promote the sculpture classes, I decided to make a sculpture of Argi, with the plasticine that was left over from the Among Us disaster of the vacation plan, but since it is something that would remain permanent in the institution I wanted to be more ambitious with my capabilities, that's how I decided that this would be my biggest work so far.

To make a great sculpture
In addition to being big, he wanted his pose to be dynamic, that despite being a statue, it showed an allusion to movement.
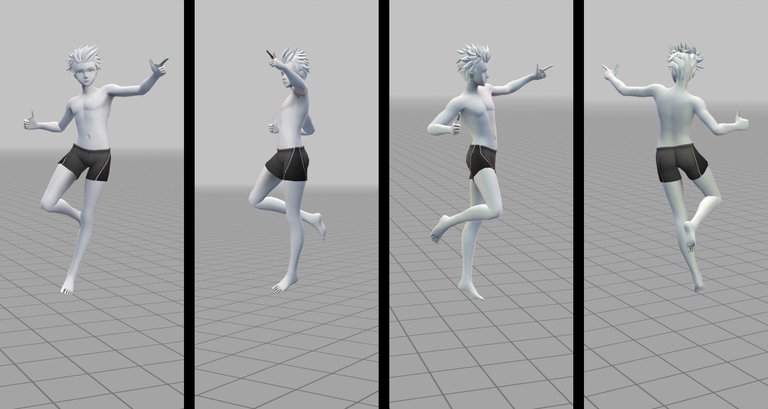
One of the best apps that I could install on my phone is called: "easypose" which allows you to manipulate character models made in CGI so that they make the pose you need, either for drawing or sculpture, which is my case, so I used the model of a boy to make the dynamic pose that Argi would have, once done I took 4 captures in the different main angles (front, back and sides) to use it as a reference.
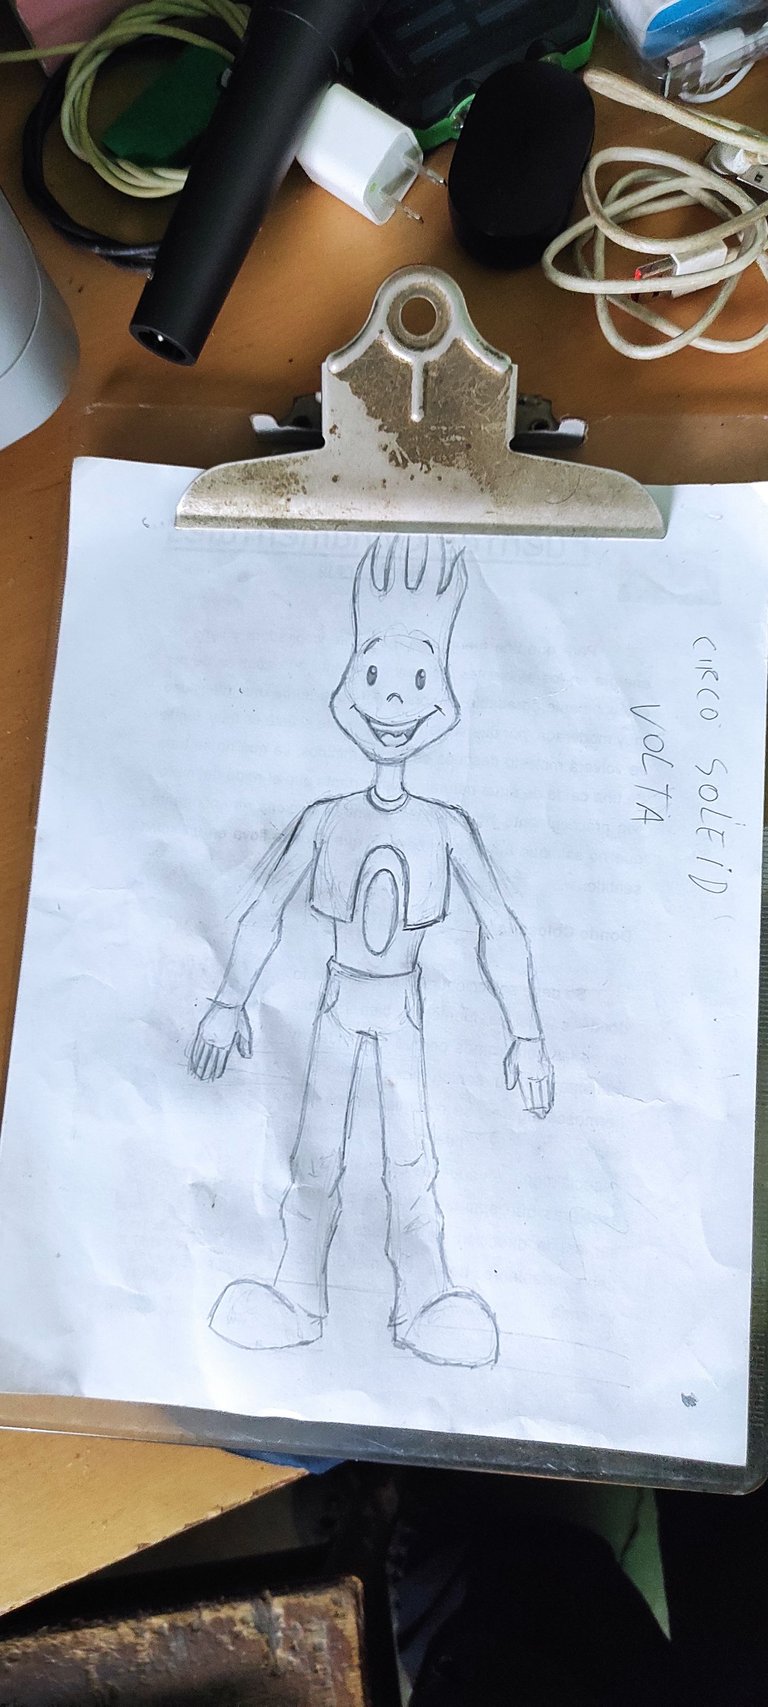
Something curious about this character is that apparently the one who designed it never did a character study, because in all the images where they use it they have different proportions and sometimes their arms are much longer than their legs and in others the extremities are normal , so in order not to be wrong I made a drawing correcting the proportions and harmony of this character.
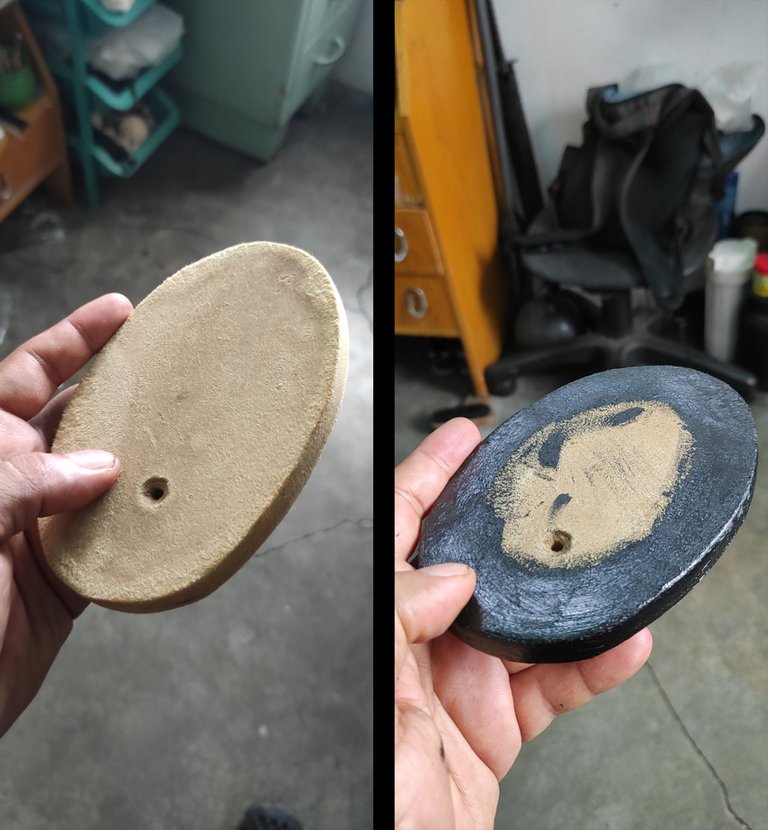
Having ready the design and the idea of how I want the sculpture to look, I begin to prepare the base of the structure, for this I recycled an oval piece of MDF that I had lying around in my workshop, and I painted it around the edges with black acrylic paint.
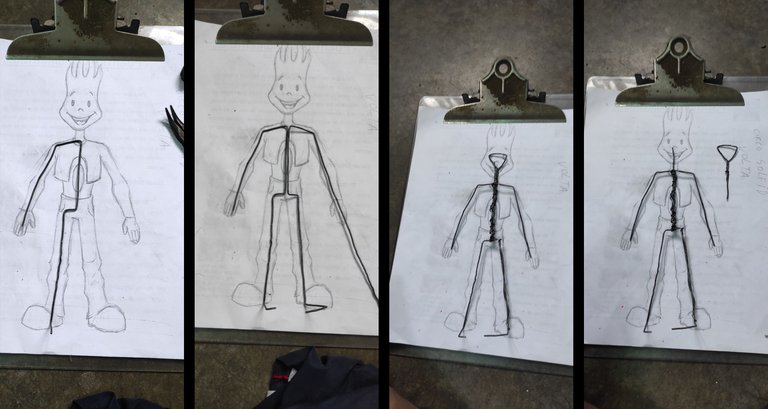
When I made the drawing I made sure to do it to the real scale of what I wanted to do, in order to guide me when making the wire structure, as I was experimenting here, I made the structure different from how I used to use it, mainly with the head that I did so that it is removable, and work better with it.
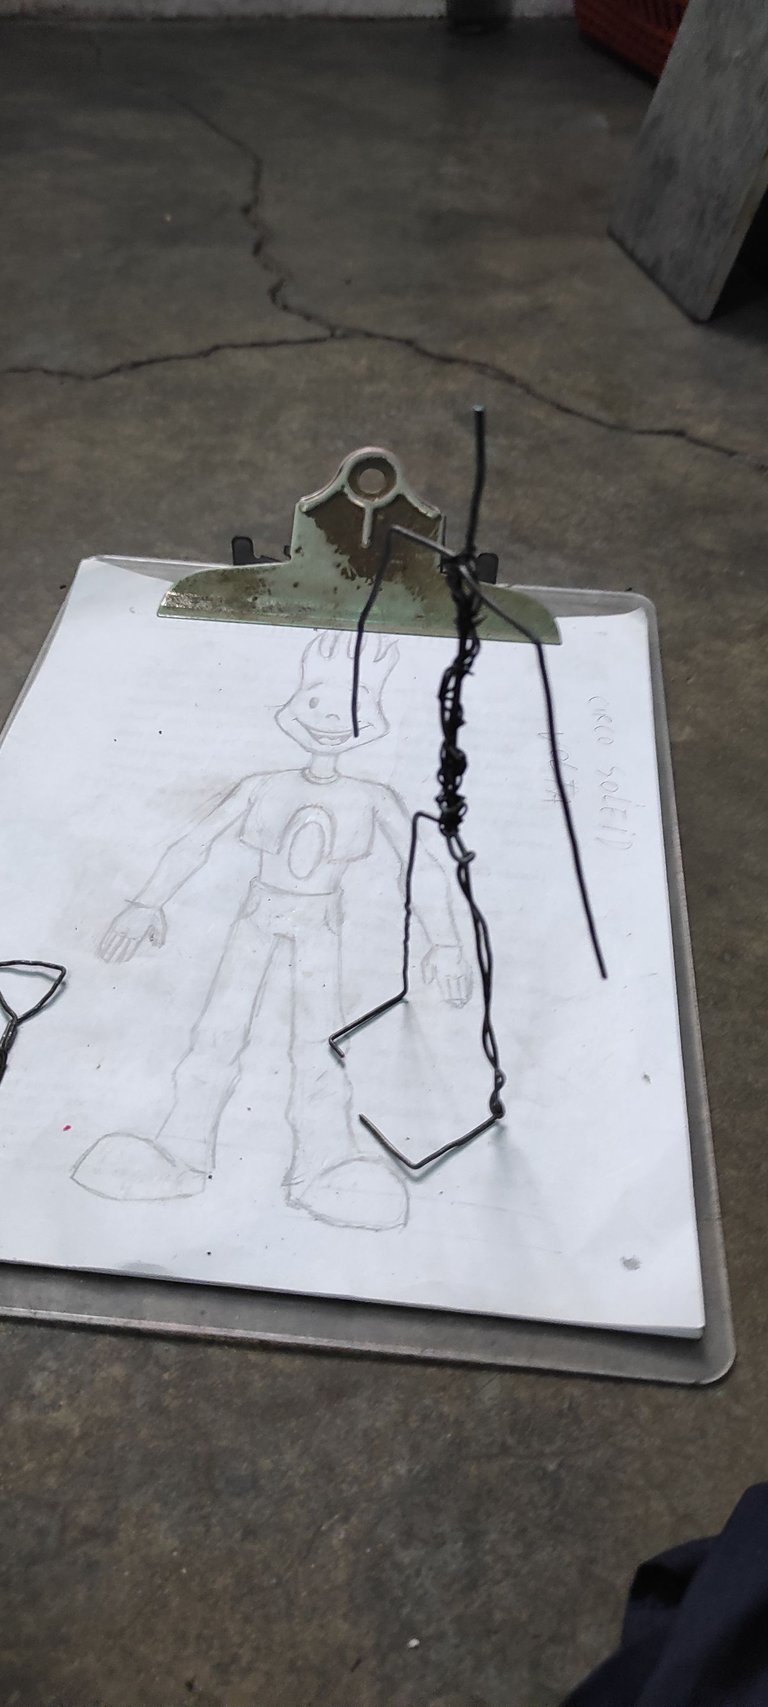
Something that I always do at this point is to see if the structure can stand up on its own, to see if it is well balanced, this character will have big feet like a clown, so leave a lot of space in that area to be able to better hold on to the base.
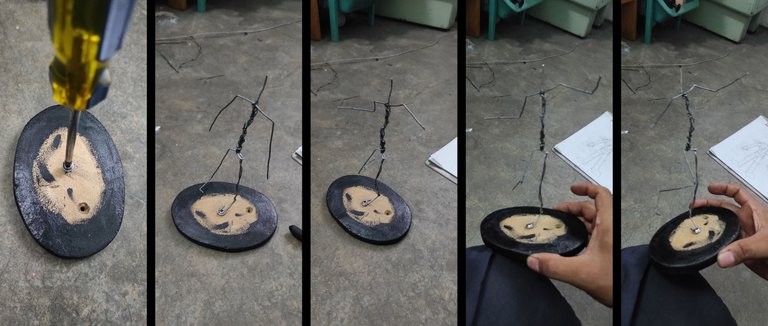
Now I place a screw in the center of the base and tighten the left foot and begin to bend where the joints are until I achieve the pose.

After achieving the pose with the wire, I cover the entire structure with aluminum foil to give volume, I covered almost the entire body only excluding the neck, feet and hands.
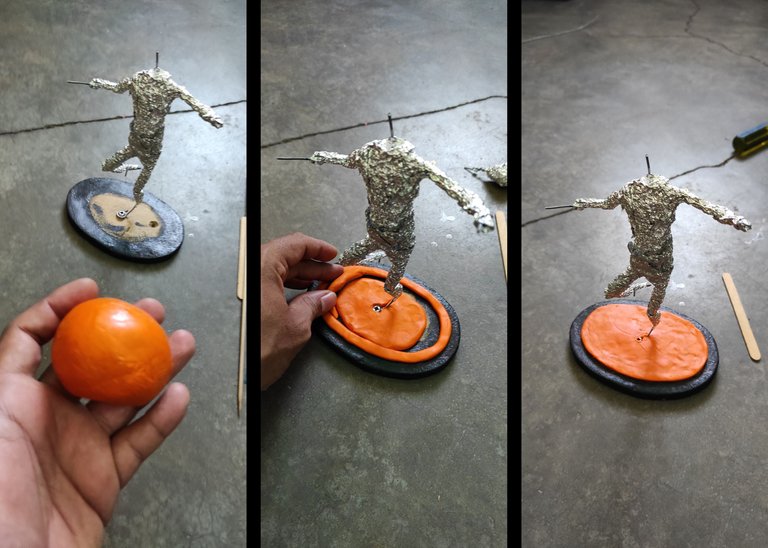
It's finally time to apply the clay, and I always recommend starting from the bottom up, so I took orange clay and covered the top of the base in an oval shape, leaving a small border.
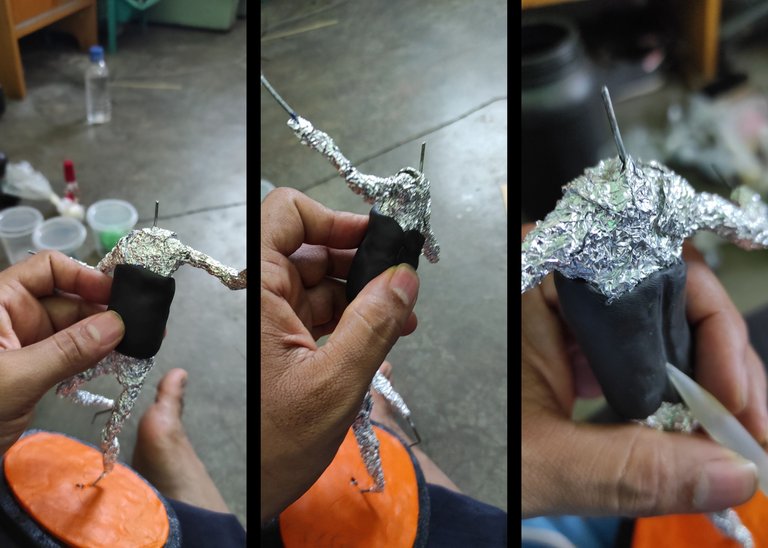
Here I was going to start with the legs, but since this character was wearing pants, I decided to start with the entire central area of the trunk, in other words the lower part of the chest, abdomen, waist and back, which I covered with black plasticine, I also covered it. I did because something happened and the aluminum foil was coming loose from that part all the time.
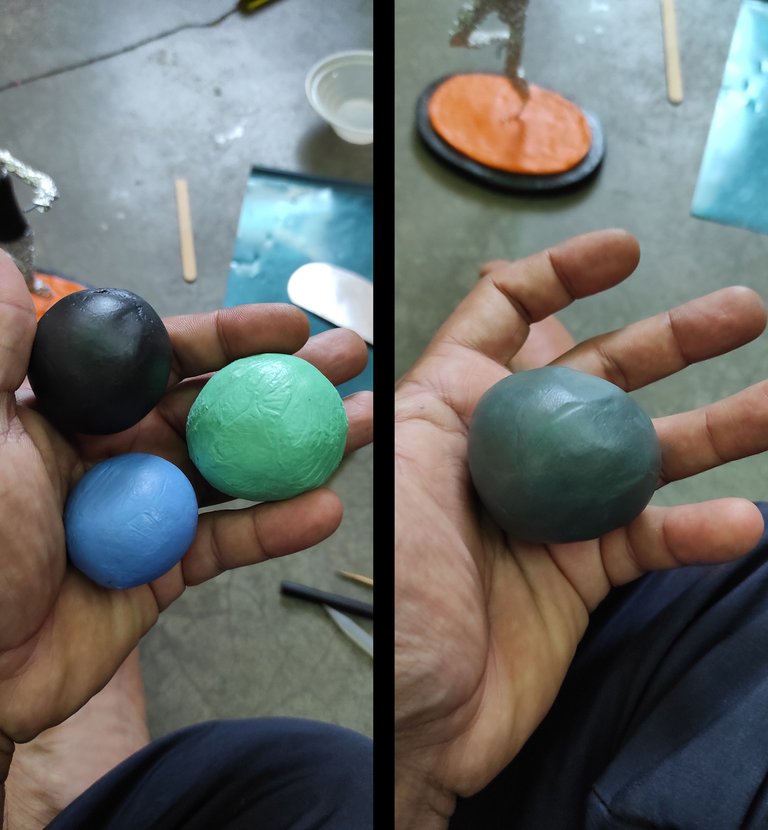
Now I was going to start covering the legs, but Argi's legs are a dark green that I didn't have so I had to make the tone by mixing these 3 plasticines.
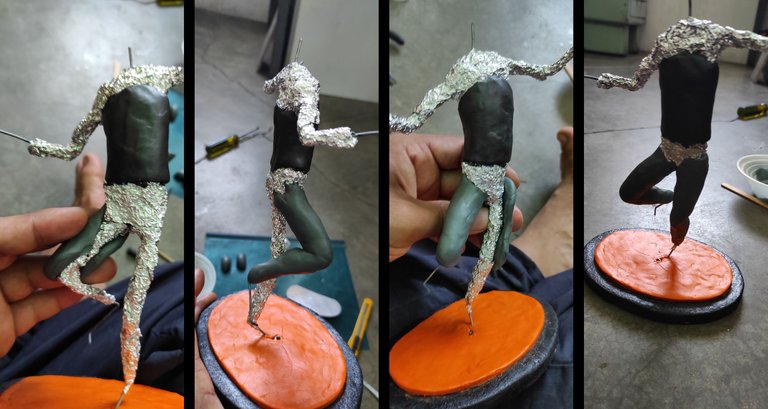
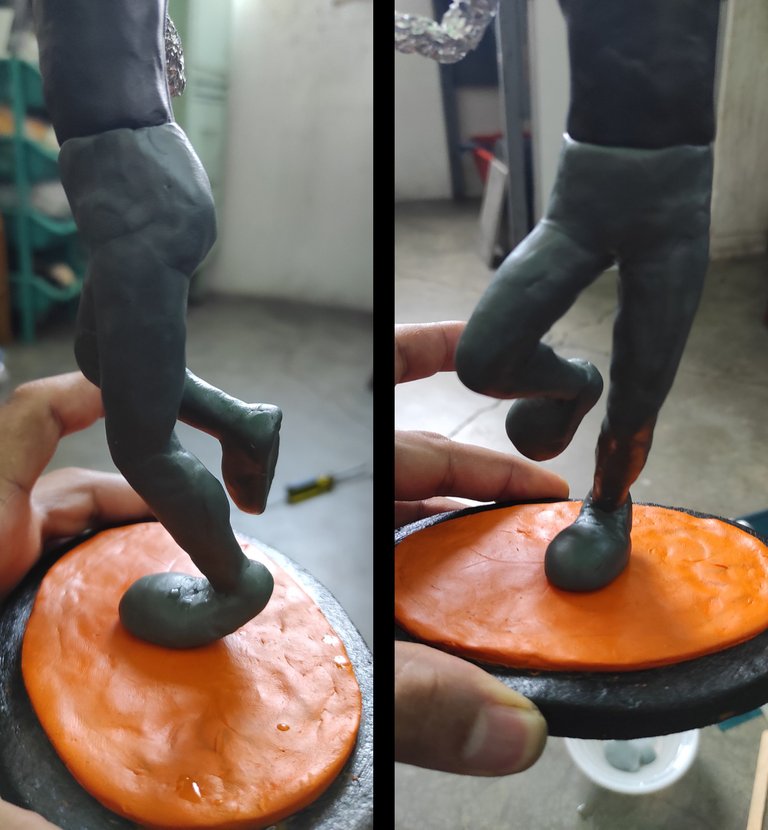
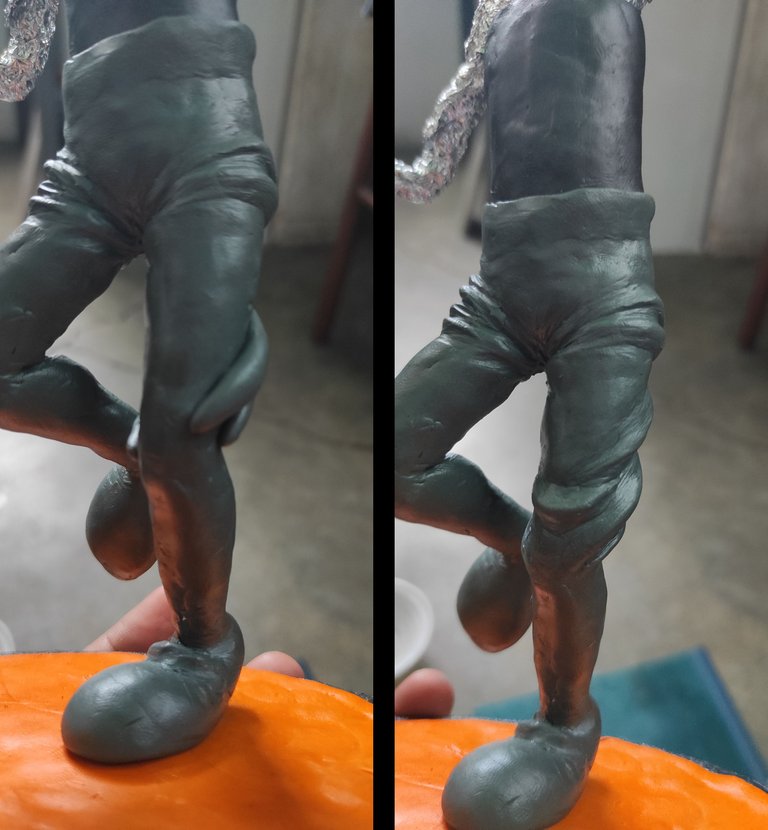
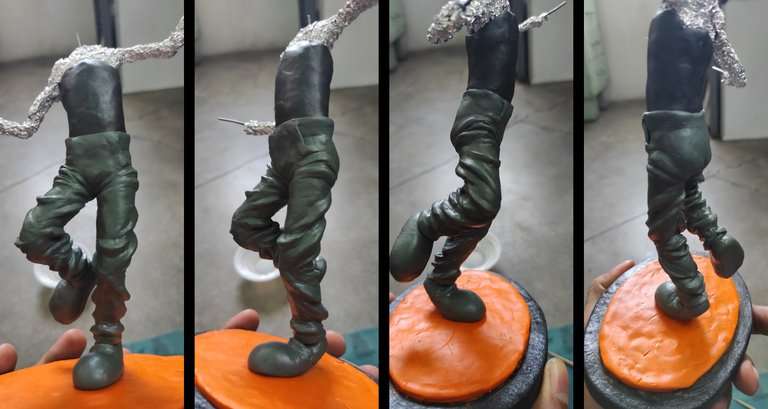
Now having enough material, I begin to cover both legs, and at once I am defining the shape of these, mainly the thighs and calves.
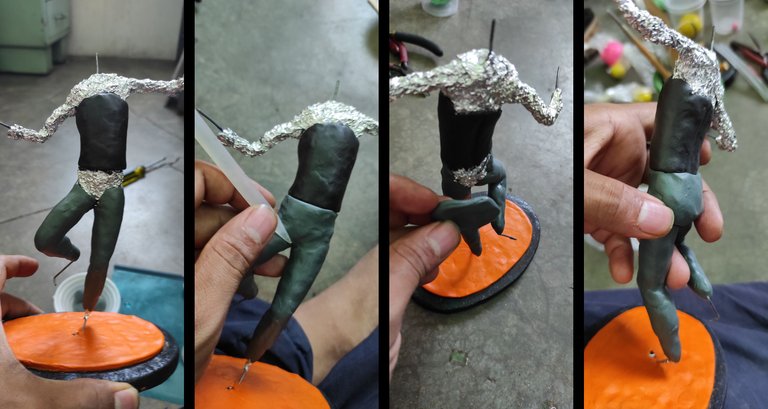
With the legs covered I continue to cover the entire pelvic area and splicing so that everything is unified, in the rear area I added more material.
The legs are ready, I start with the feet and I start with the right one, the way I mentioned is shaped like a clown's foot, to integrate it into the body, I first remove a little material from where the ankle will be, then I made a cut in the center of the foot of the length of the wire, which I cover with the cut of the piece.
Then very carefully I begin to join with my fingers and the silicone bar, all the cuts and joints until it seems to be in one piece.
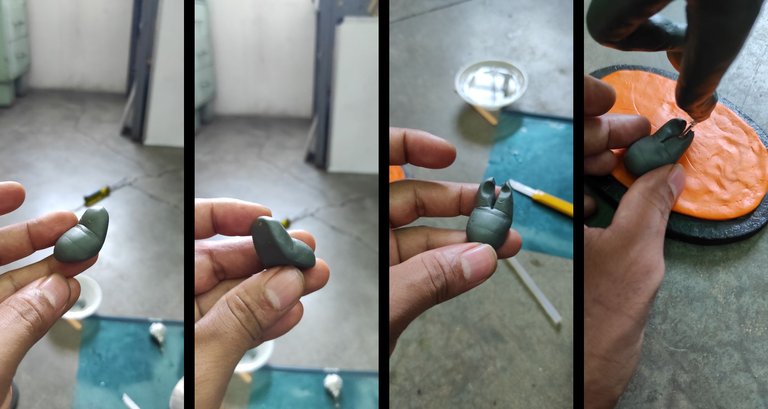
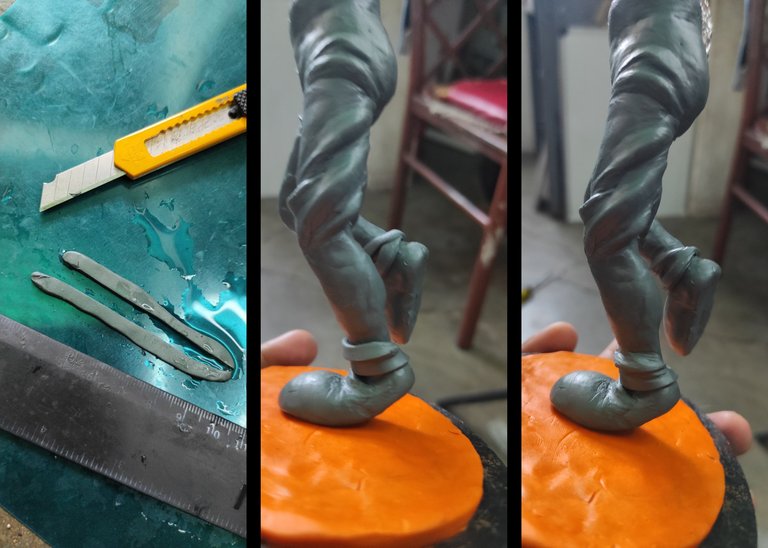
With the left foot I had to do the same piece in mirror mode, but with the difference, that this is a flexed foot, so I had to make a cut to be able to bend the foot as necessary, then I repeated the same process to integrate it to the left leg.
I also had to splice to unify everything, but I also had to soak in water to harden the plasticine a bit, because from so much splicing it is getting hot.
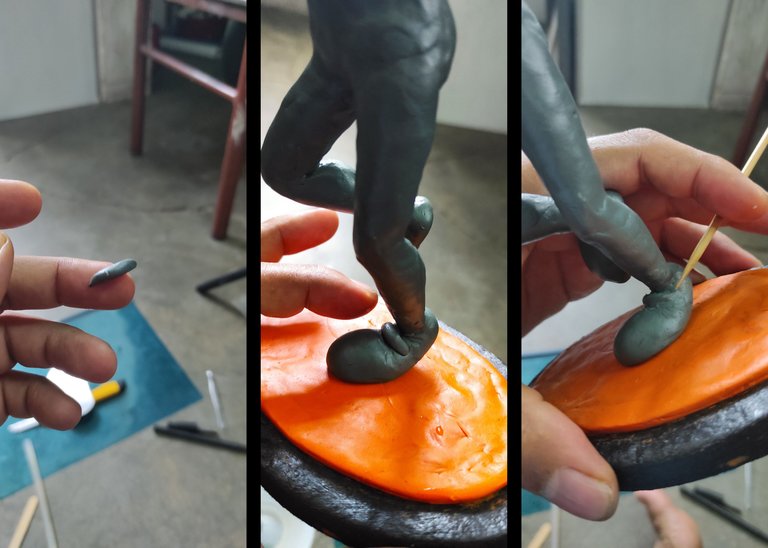
To show naturalness I used a tiny piece of green plasticine to make a pressure crease on the left shoe, which I had to fill in with the tip of a wooden toothpick due to the smallness of the piece.
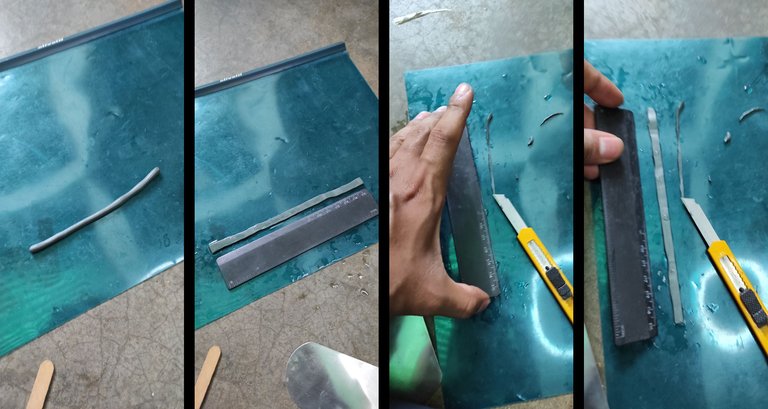
At this point I will return to the waist and for this I make a long strip of green plasticine which I flatten a bit, and with the help of a cutter I remove the excess to have a very rectangular piece.
I put this piece around the entire waist and only join the edge that joins the pants using the wooden toothpick very carefully.
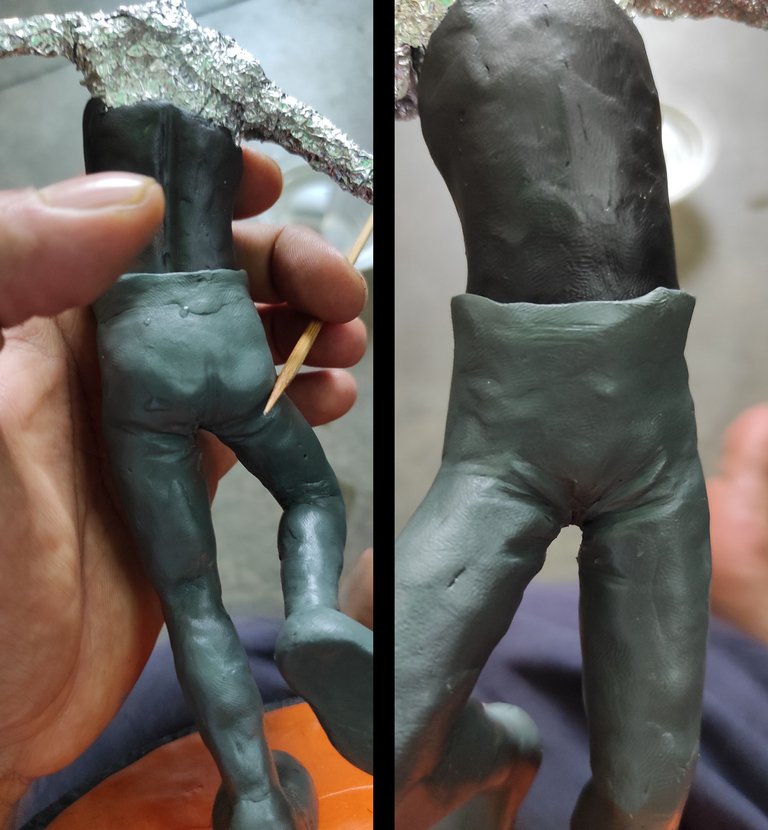
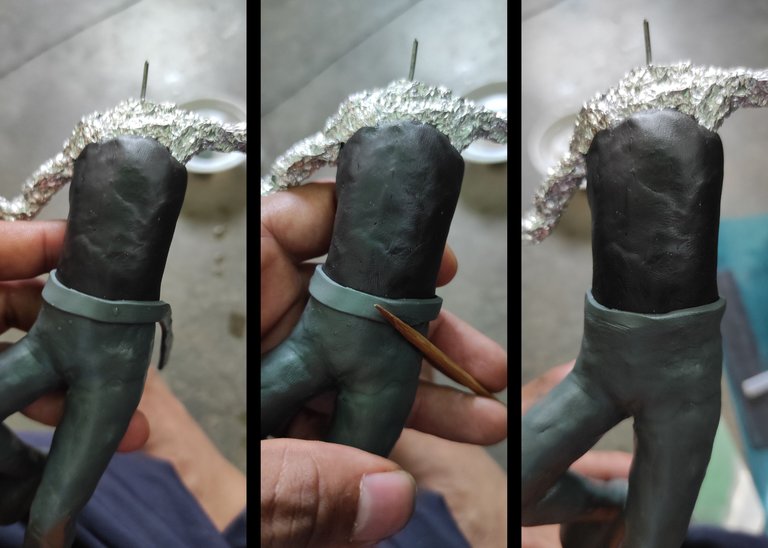
Once that part is ready, with the tip of the wooden stick, I make wrinkles and folds of fabric in the crotch area and just below the buttocks.
To better highlight the folds because this character wears very baggy pants, I make some small strips in the shape of worms which I place on the sides of the pelvic area just where it joins the legs, which I carefully join with the tip. of the stick, on the right leg as it is bent upwards I had to add more of these folds.
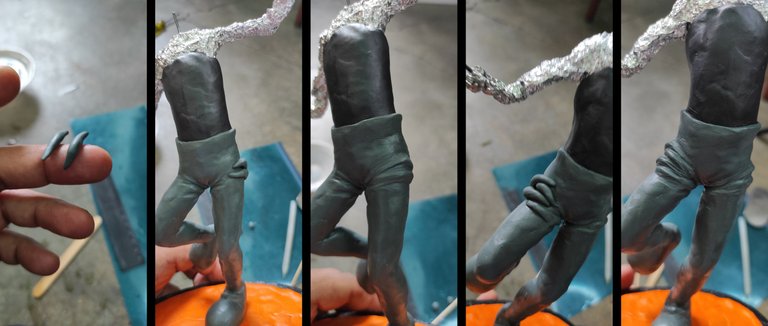
As I mentioned this character wears baggy pants so with more strips of different thicknesses I made more folds on the left thigh.
As I did with the top edge of the pants at the waist, I did the same process to a lesser extent to make the pant hems.
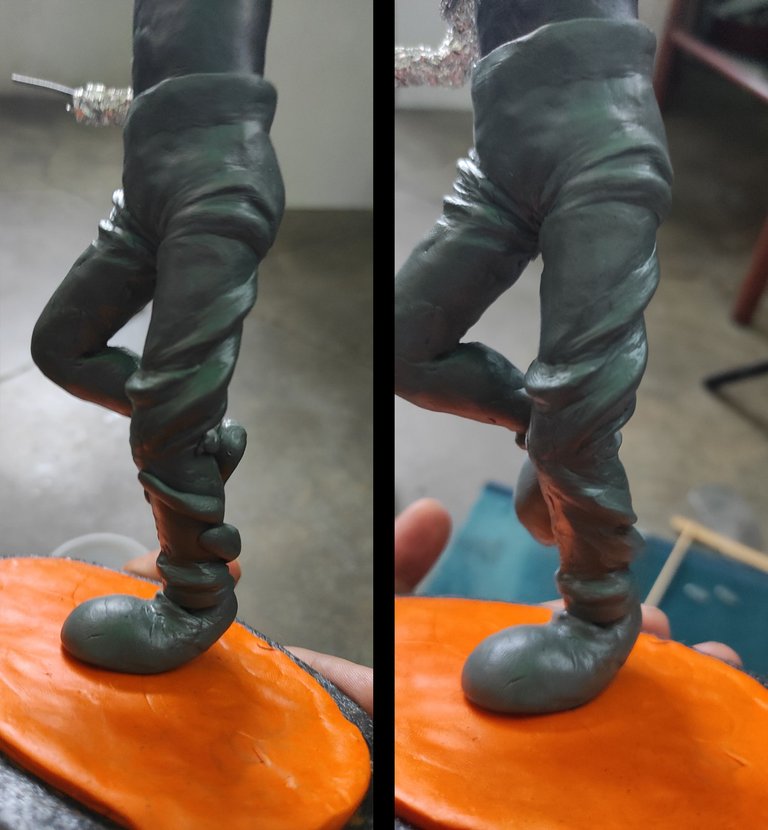
And to finish with the left leg I make more folds around the calf.

Now I only needed to carry out the same process with the right leg, but since it is bent in the air I had to carry out a greater number of folds, mainly behind the knee.
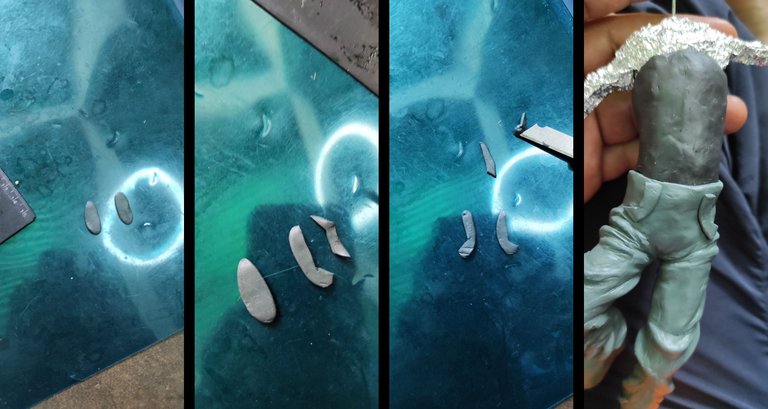
Another detail that was missing was to add the pockets, for that I flattened two small portions of plasticine and cut them in the shape of the letter "J" and placed them where the pockets would be represented.
When they were spliced at their lower edge, the pants and shoes were officially ready.
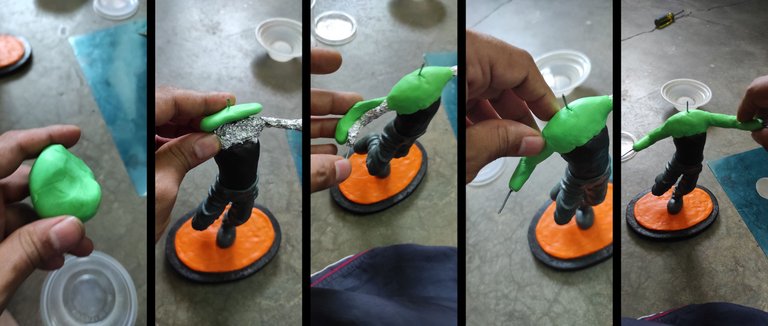
Argi wears some kind of green sweater or shirt, so I used the light green clay and covered her shoulders and arms.
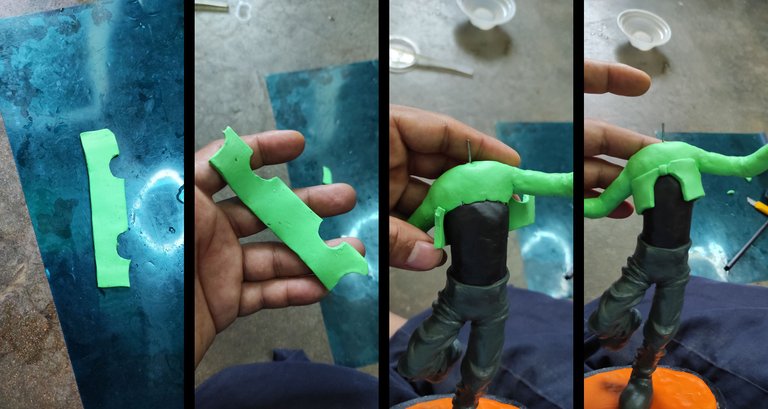
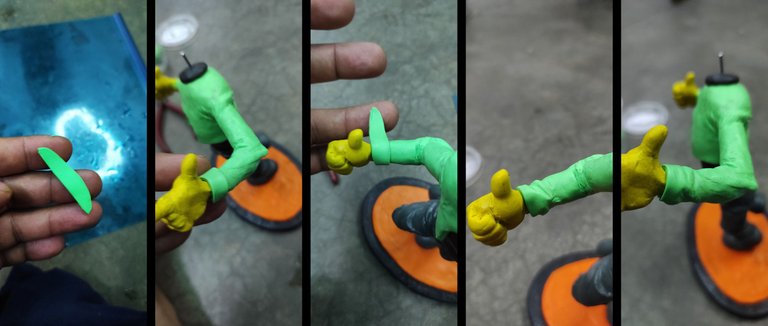
With the same green plasticine I made a long and flattened rectangle, which would be used for the bottom edge of his shirt or sweater, I had to cut two semicircles for this one that was where his arms would be and I also had to make a shaped cut bow for the front.
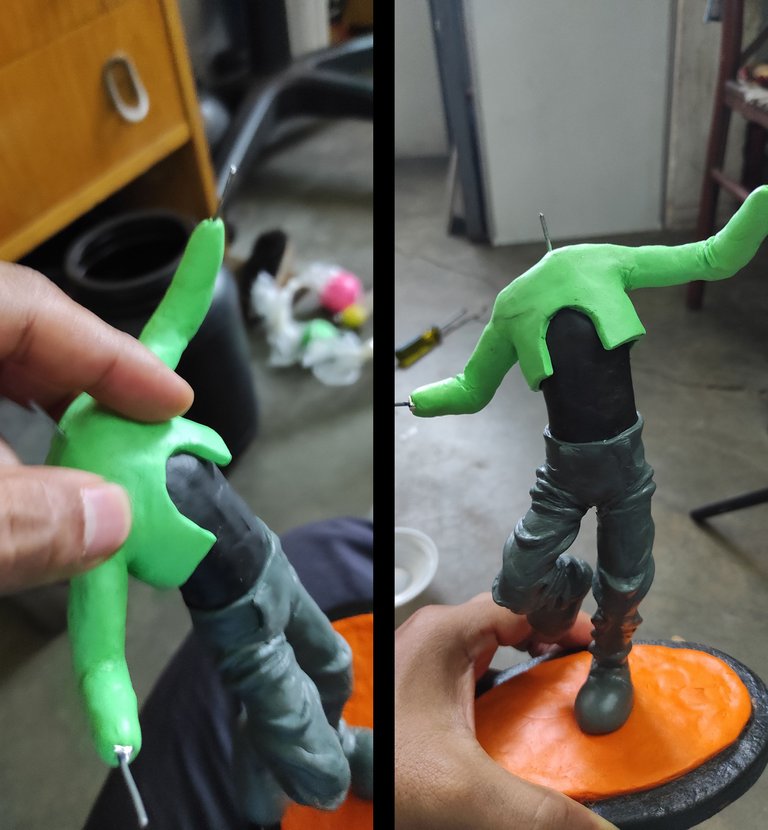
I had to splice this area gently but firmly with my fingers to unify it without damaging the edges.
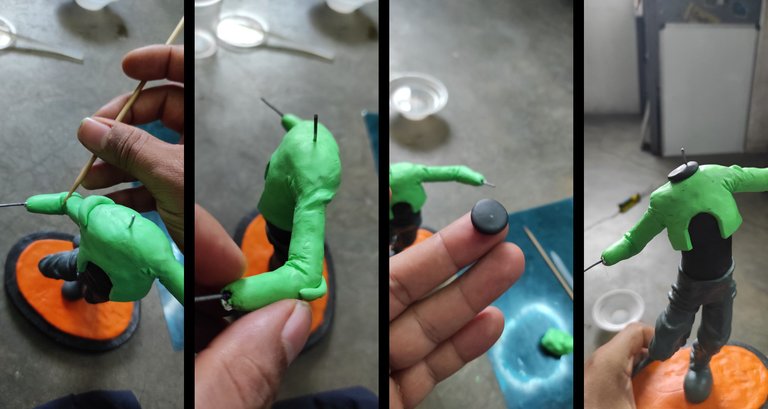
The sleeves are tight so I only had to make some pleats on the shoulders and elbows, I also added a flat circle of black plasticine for the neck of the garment.
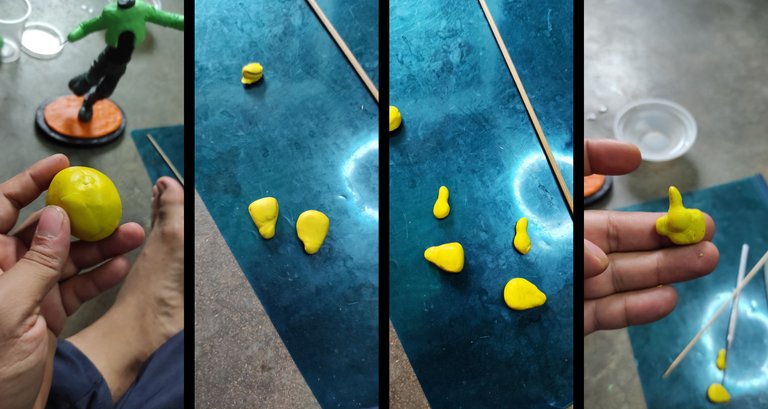
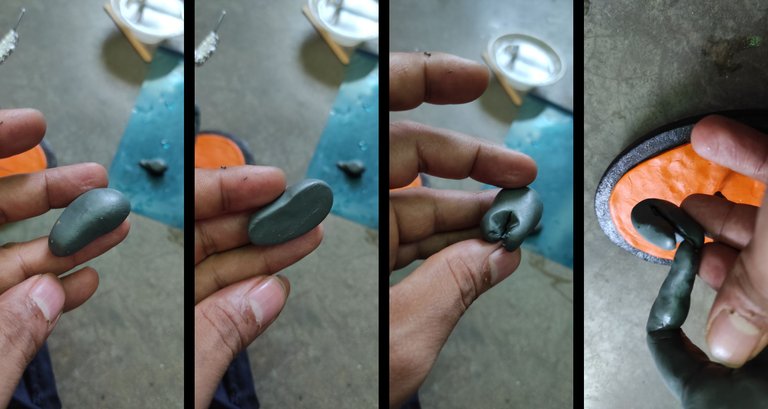
It is time to make the hands and for this I used yellow plasticine with which I made two equal pieces that are the palms with their respective wrists, I also made both thumbs which I joined and spliced very carefully not to deform.
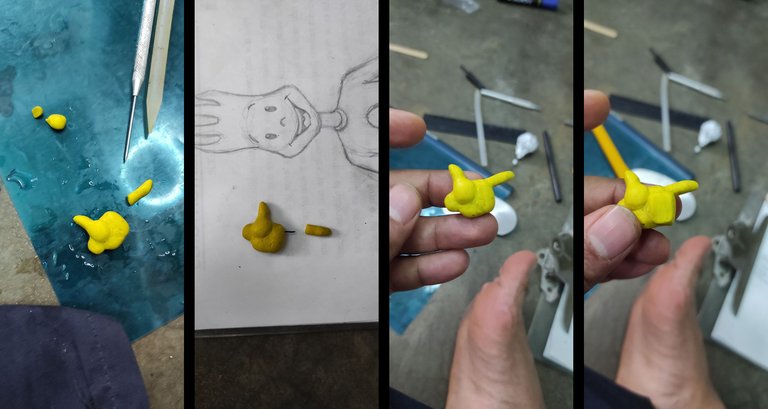
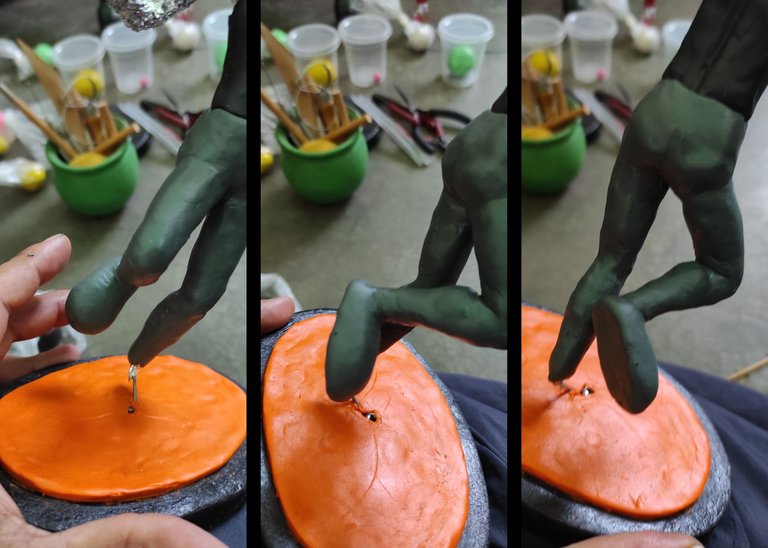
I go first with the left hand since it is pointing to reinforce this finger I introduced a wire inside and then under this finger I put a small rectangle of yellow plasticine.
I spliced this rectangle where the knuckles would be, and with the tip of the stick on it I made the mark of the 3 missing fingers of the hand.
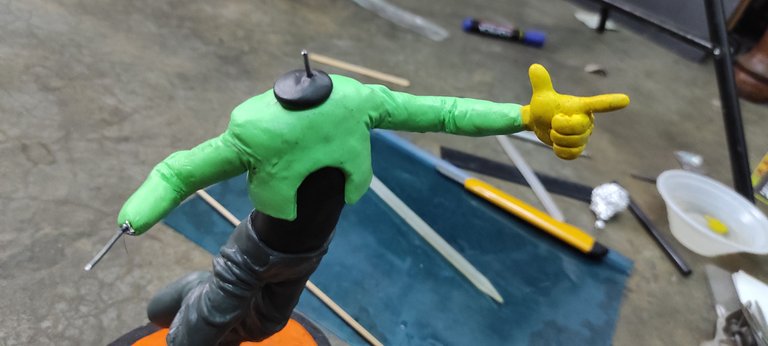
Having ready the hand the key on the wire of the structure and slightly join the doll to the green plasticine to fix it.
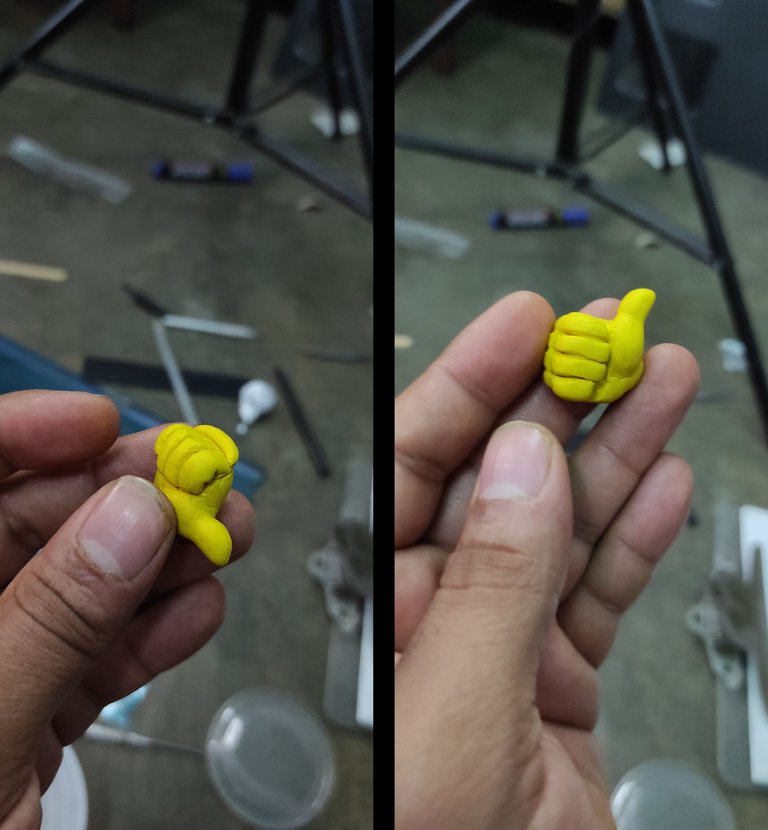
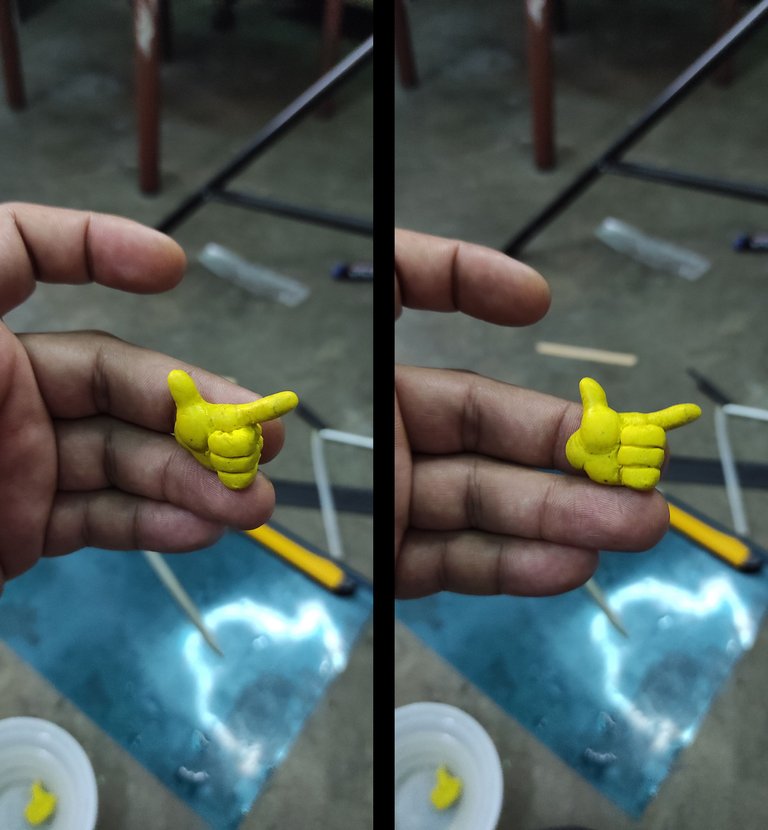
The right hand was simpler, since this is a clenched fist with the thumb up, the only difference is that I added a small strip of yellow clay to better shape the knuckles.
This also fixed it in its respective arm and observing that the proportion was correct.
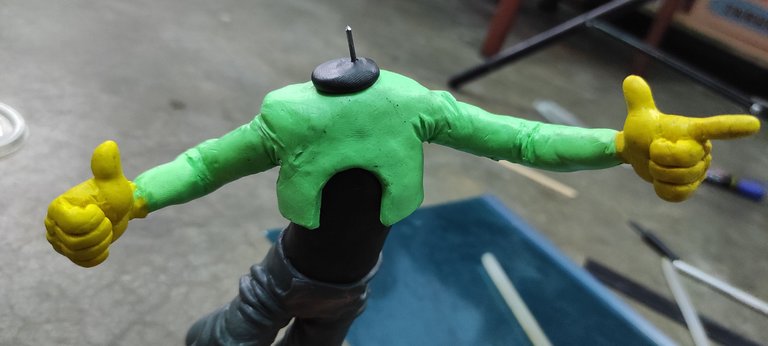
As I did with the hem of the pants, I used light green clay to finish the edges of both sleeves and thus cover the joint of the green clay with yellow.
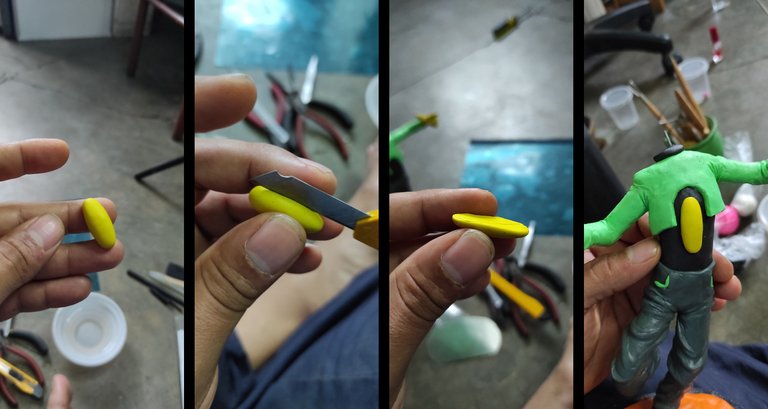
This character has a kind of light bulb in the abdomen, to do it I made an oval with yellow plasticine, which I carefully cut in half to have a flat part, the serious one where it would be attached to the abdomen, I also took advantage of it and added some tiny portions of light green plasticine to highlight the pockets of the pants.

With the body completely finished, I finally start to make the head, I begin by covering the entire ball of yellow paper with yellow plasticine until I have something similar to a lollipop.
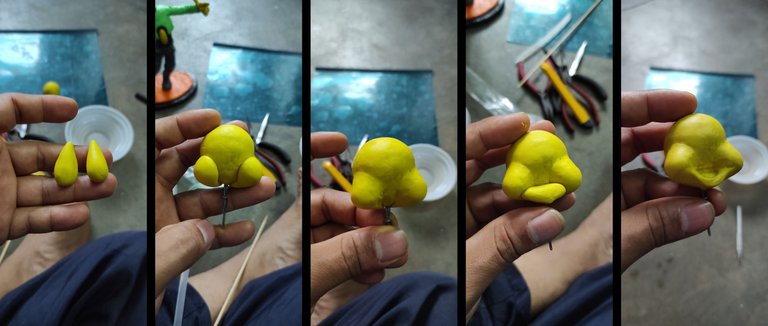
Then I make two large pieces in the shape of a water drop to make the cheeks, which I place on the lower sides and butt, I also take advantage and add some plasticine under these to make the jaw, which I finish shaping with the silicone bar.
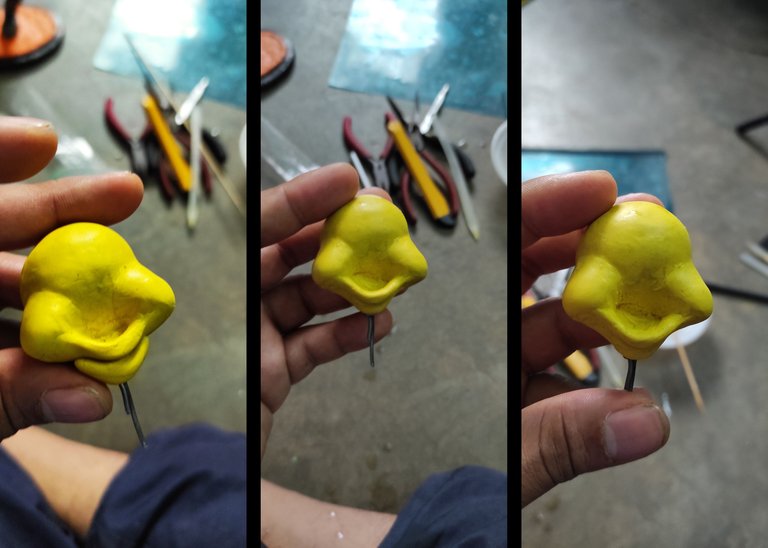
Under the jaw I added a portion of plasticine to finish forming the chin, which I had to join with the silicone bar and the tips of my fingers.
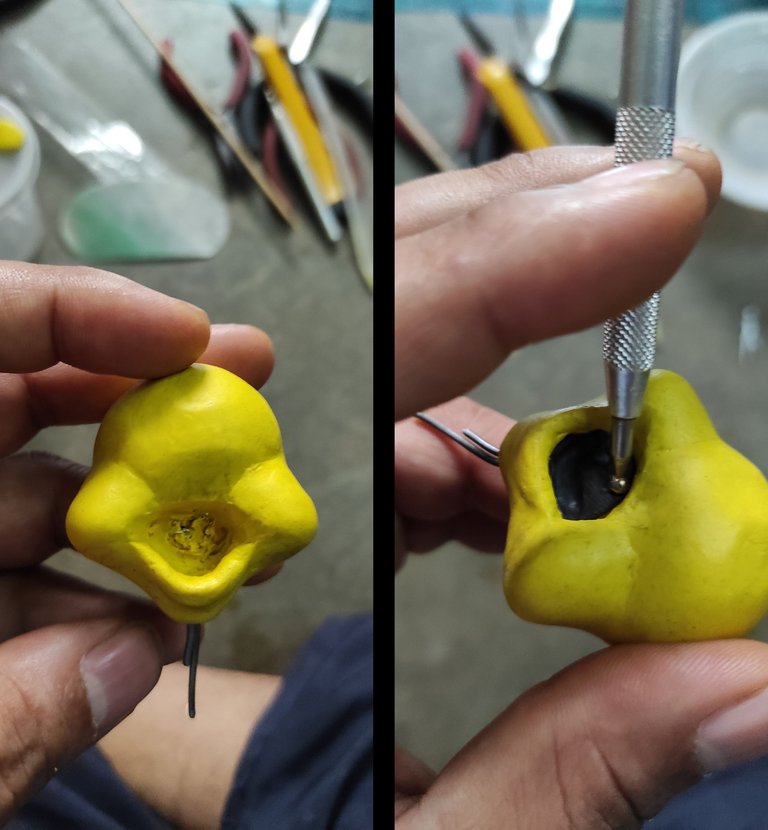
Inside the jaw, where the mouth would be, I remove as much material as possible and cover and flatten that entire area with black plasticine with the help of this tool that I found.
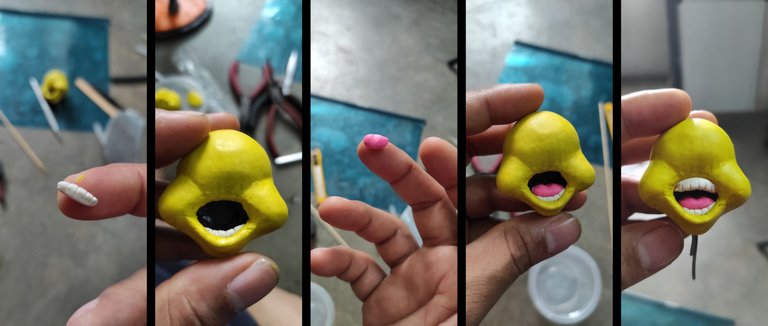
With white plasticine I made two small strips of the same size to make the teeth, pressing slightly with the cutter I made the details of the teeth, first I place the jaw teeth, then with pink plasticine I make the tongue which I place behind the teeth and To finish I place the upper teeth.
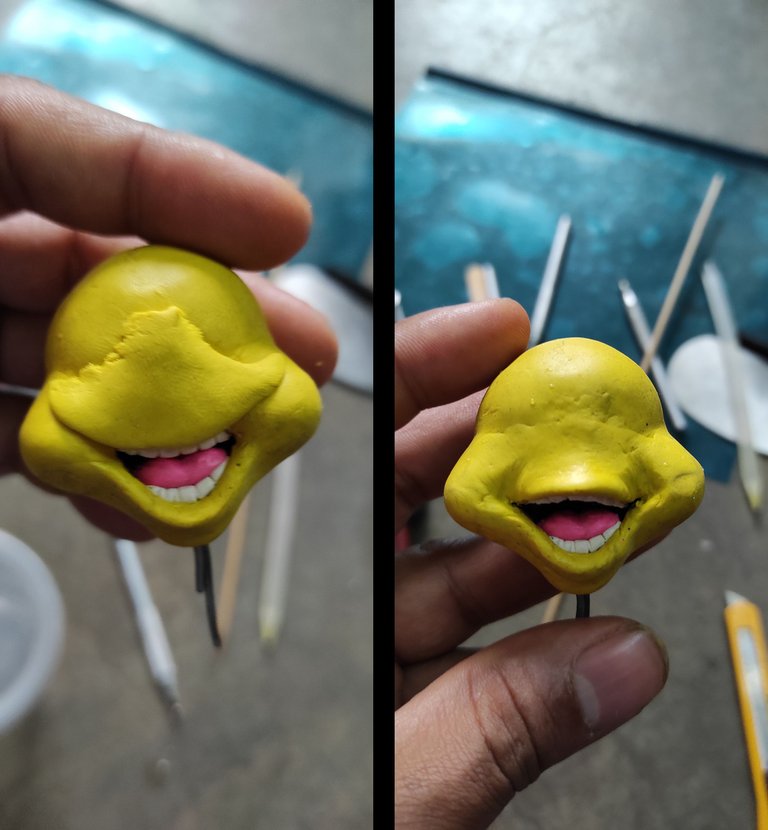
To finish the mouth, I place a generous portion of yellow plasticine, in the shape of a crescent for the upper lips and to better trace the shape of the smile, I had to remove some of that material, but with the help of the wooden stick I was splicing and giving shapes the corners of the mouth, reaffirming the entire shape of the mouth and achieving the smile (at this point the result is somewhat Creepy).
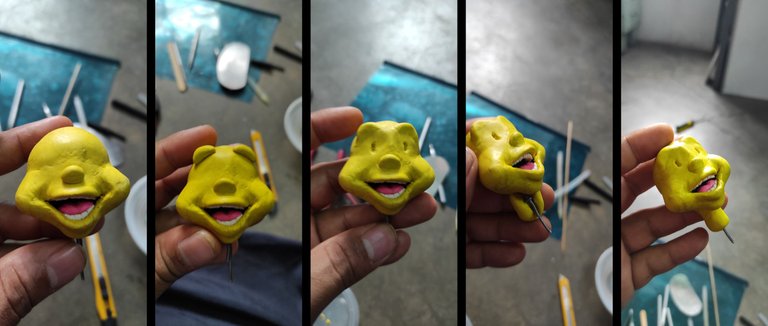
Few details of the face are missing (although very important) for the nose I only made a small oval, which when placed in its respective place I only spliced the lower part of it, then I made 2 half moons to make eyebrows, which I spliced on the upper part of the head, I take advantage of it and mark where the eyes will be located, finally I cover the neck with clique plasticine, obtaining a conical shape from it.
With this ready I place the head on its body and make sure it is well fixed.
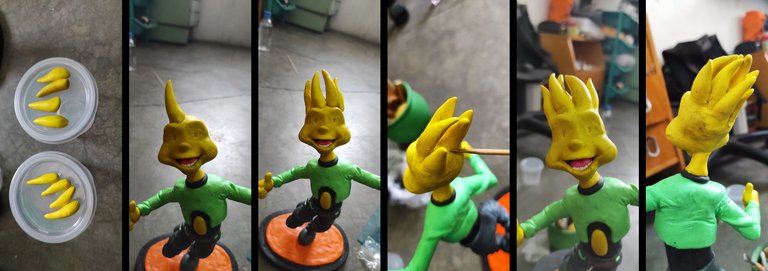
Here I make 8 long cones of yellow plasticine to finish his head, each of these are of different sizes, and I am placing and joining them according to the reference drawing.
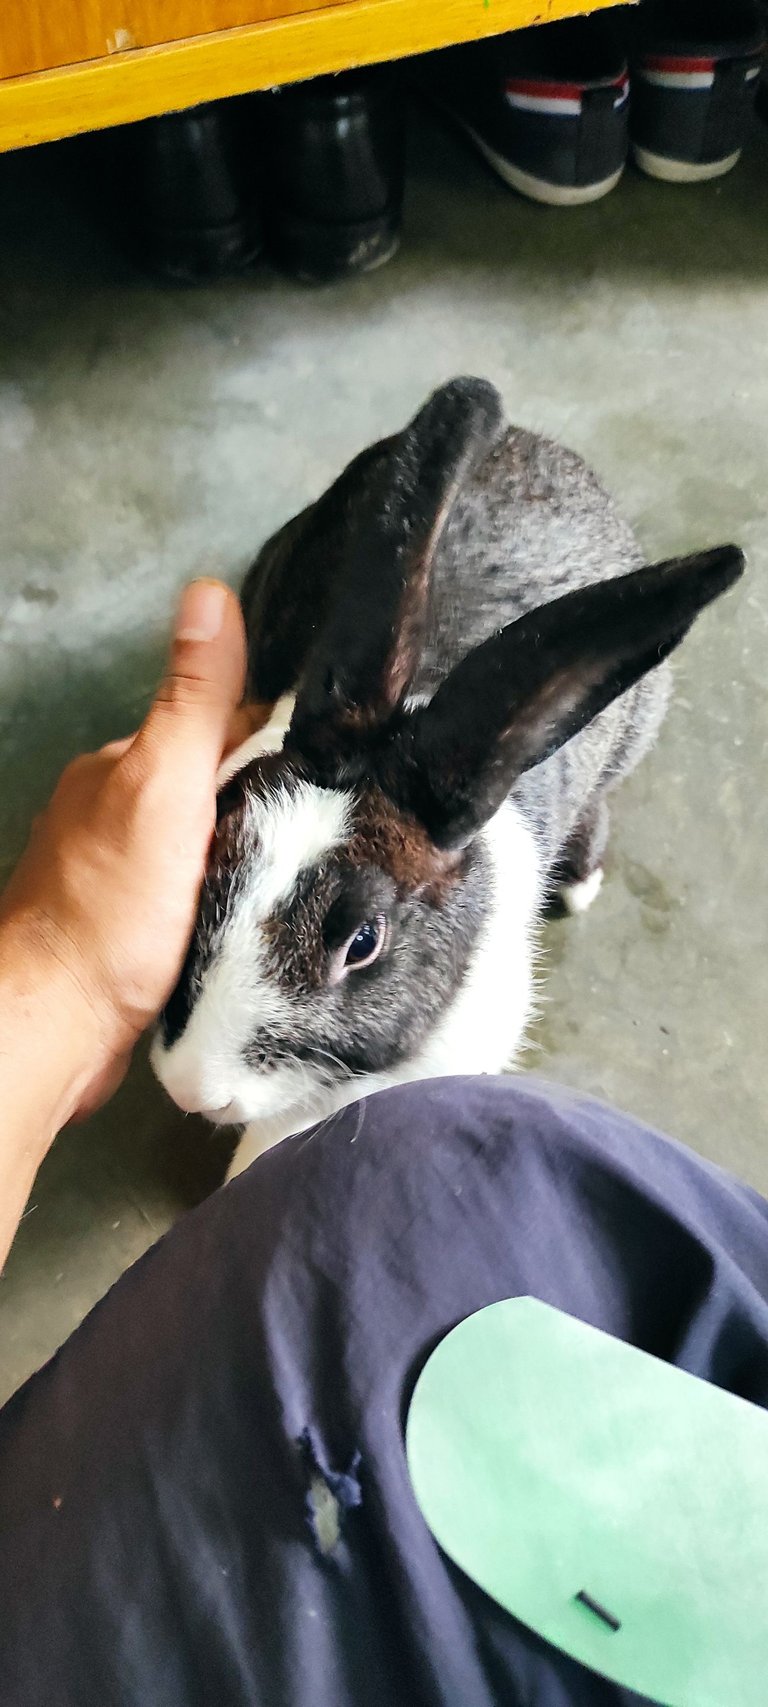
Here I had to stop the process and my pet rabbit appeared asking for my attention and affection, and it became impossible for me to refuse to give him the affection he was asking for.
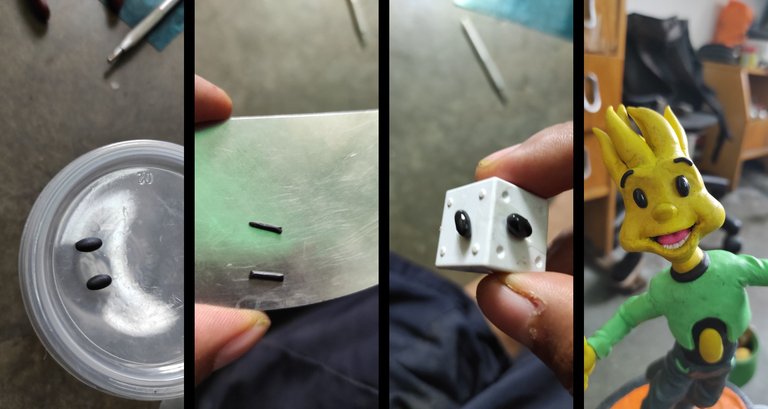
When Romancito (that's the name of the rabbit) left, you can do the eyes and eyebrows that remained to be done for this character, the eyes are in the shape of a tiny bean and I varnished them with nail polish so that they would have a shiny appearance with the eyes really, for the eyebrows I just made some very tiny strings.
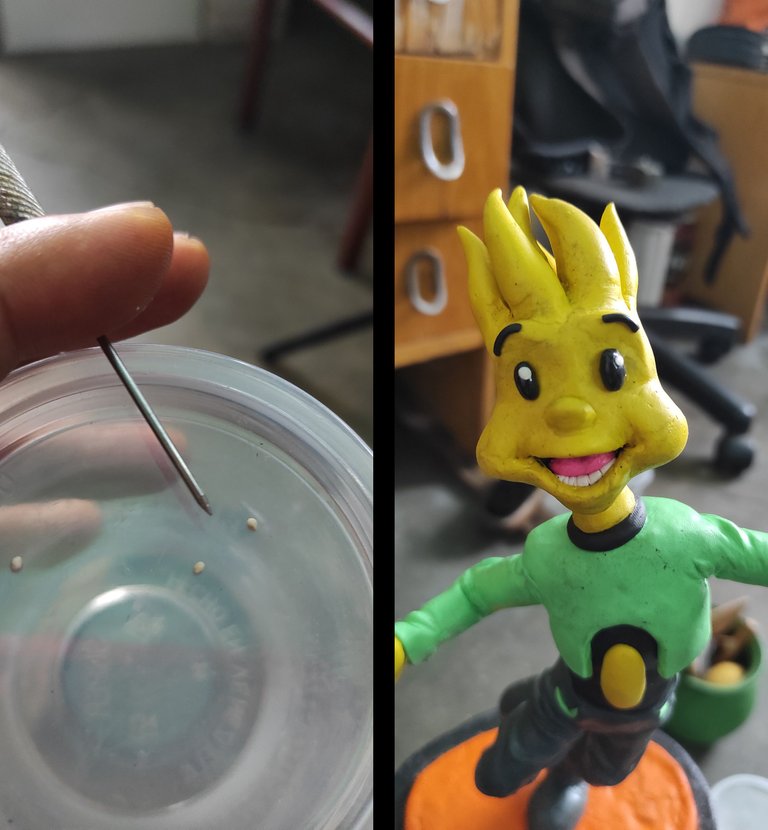
To finish with the eyes, I made two tiny white dots to highlight the shine in both eyes, which I had to add very carefully.
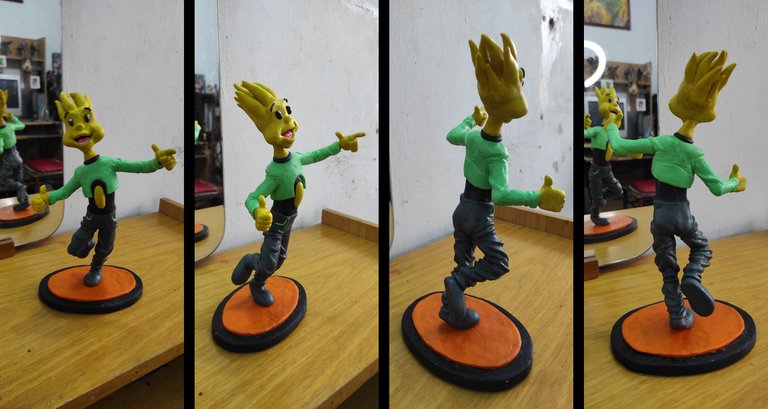
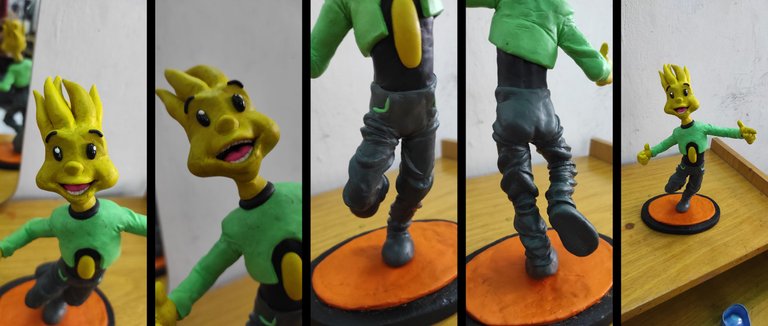
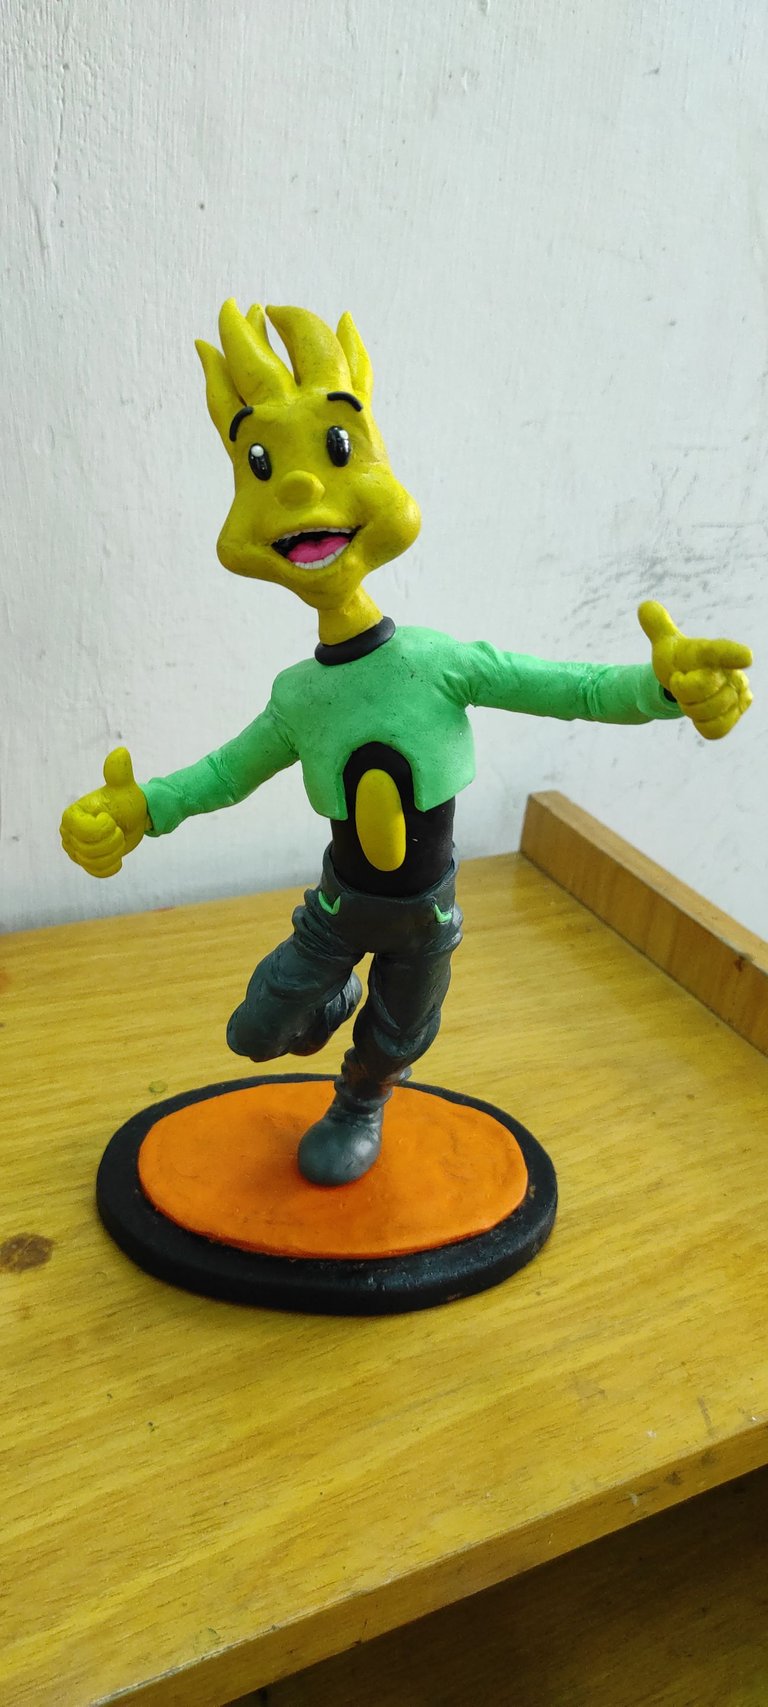
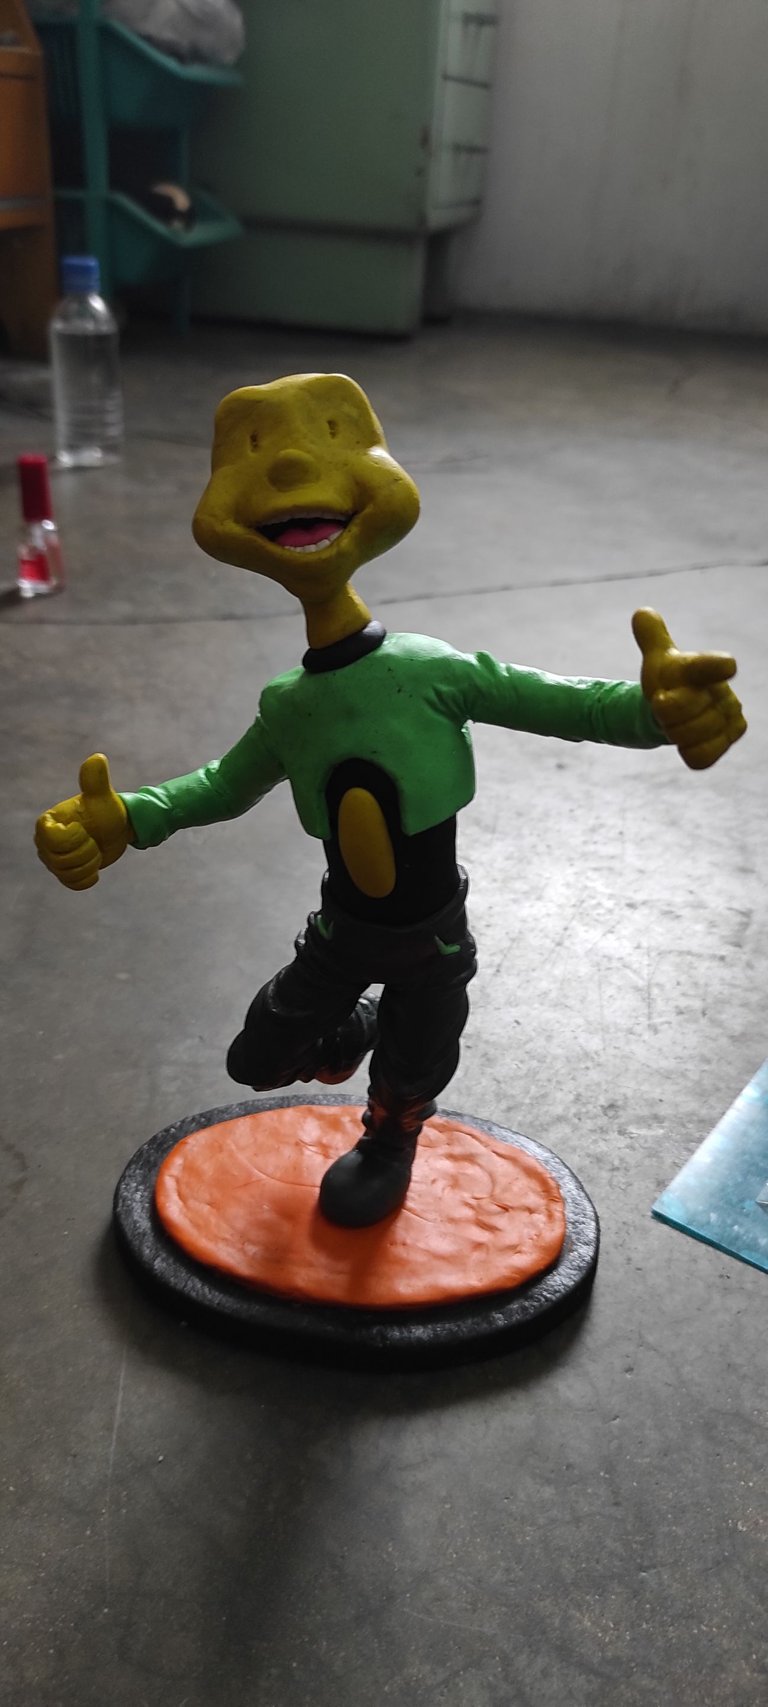
Finally, the sculpture of Argi was completely finished, and I am really proud of my result, it is the most detailed sculpture I have done to date, I still feel that I can improve a lot more but I loved what I got with it.
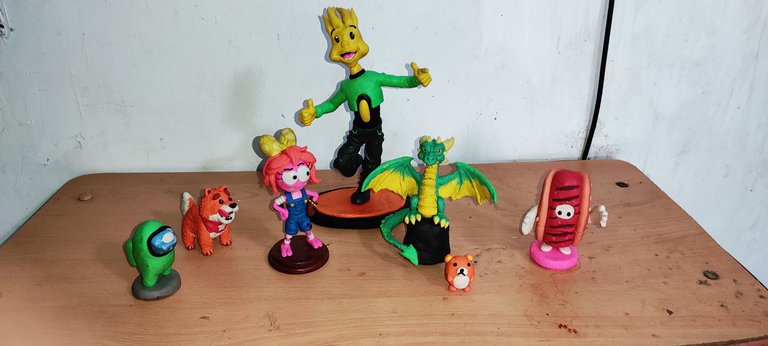
Comparing this sculpture with the previous ones, this is without a doubt the largest of all, having a height of 26 cm, now the problem is to see how I can transport it from my house to my work by bicycle and that it survives the entire journey.
(Spoiler alert: he survived the trip, but he arrived very badly injured, mainly with a broken neck and hands, but I was able to repair it ^_^)
Thank you very much for reading my post
I hope you liked my plasticine sculpture
If you have any suggestions or advice
Write it in the comments that I will be reading them
See you in a next publication
Inu-Jim
Copyright @inu-jim –Allrightsreserved
I hope you liked my plasticine sculpture
If you have any suggestions or advice
Write it in the comments that I will be reading them
See you in a next publication
Inu-Jim
Copyright @inu-jim –Allrightsreserved
The rewards earned on this comment will go directly to the people sharing the post on Twitter as long as they are registered with @poshtoken. Sign up at https://hiveposh.com.
Thank you for sharing this post on HIVE!
Your content got selected by our fellow curator desro & you just received a little thank you upvote from us for your great work! Your post will be featured in one of our recurring compilations which are aiming to offer you a stage to widen your audience within the DIY scene of Hive. Next time make sure to post / cross-post your creation within the DIYHub community on HIVE and you will receive a higher upvote ;) Stay creative & HIVE ON!
Please vote for our hive witness <3
Very cool. Even after all these years, it is a great material.