About two years ago, I wrote my first how-to guide for non-coders on training custom AI models. Back then, GANs were the most cutting-edge form of AI art. Today that title belongs to Clip-guided diffusion models, but a lot of the underlying prep work for creating custom models remains similar and creating custom models remains accessible, even if you can't code at all.
In this article, I'll be focusing on guiding you through building an image dataset, and then turning that dataset into a custom clip-guided diffusion model. More specifically, your end result will be an unconditional clip-guided diffusion model. This is a fancy way of saying that all you need to provide to the training notebook is an image dataset, none of the metadata/associated text that would be used to train a conditional model. Due to technological wizardry, an unconditional model is still fully guidable by text inputs!
I won't be getting into the differences between GANs and diffusion models or how diffusion models work in this tutorial. If you're new to AI art and the concepts I'm discussing here, the recent Vox piece on clip-guided diffusion (which I'm actually featured in!) is a really good place to start; I recommend that you watch it first and maybe play around with tools like Disco Diffusion before launching into this. I've tried to make this guide pretty simple, but at the same time, it's definitely written with the expectation that you have some experience with AI art/colab notebooks.
To complete this tutorial, you will need:
- A Google Colab Pro account to train your model and navigate the final result
- ImageAssistant, a Chrome extension for bulk-downloading images from websites
- BIRME, a bulk image cropper/resizer accessible from your browser
- Alex Spirin's 256x256 OpenAI diffusion model fine-tuning colab notebook, for training a model based on your dataset
- Custom Model-Enabled Disco Diffusion v 5.2 notebook for periodically checking in on your model's training progress
Step 1: Gathering your dataset
This section is more or less a direct port from my 2020 piece on training GANS, since dataset gathering and prep is basically the same for diffusion models.
AI models generate new images based upon the data you train the model on. The algorithm's goal is to approximate as closely as possible the content, color, style, and shapes in your input dataset, and to do so in a way that matches the general relationships/angles/sizes of objects in the input images. This means that having a quality dataset collected is vital in developing a successful AI model.
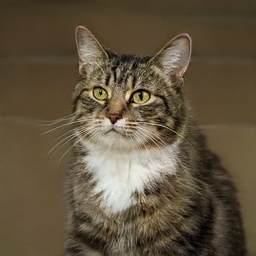
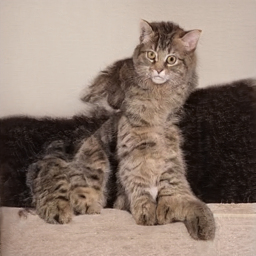
If you want a very specific output that closely matches your input, the input has to be fairly uniform. For instance, if you want a bunch of generated pictures of cats, but your dataset includes birds and gerbils, your output will be less catlike overall than it would be if the dataset was made up of cat images only. Angles of the input images matter, too: a dataset of cats in one uniform pose (probably an impossible thing, since cats are never uniform about anything) will create an AI model that generates more proportionally-convincing cats. Click through the site linked above to see what happens when a more diverse set of poses is used--the end results are still definitely cats, but while some images are really convincing, others are eldritch horrors.
If you're interested in generating more experimental forms, having a more diverse dataset might make sense, but you don't want to go too wild--if the AI can't find patterns and common shapes in your input, your output likely won't look like much.
Another important thing to keep in mind when building your input dataset is that both quality and quantity of images matter. Honestly, the more high-quality images you can find of your desired subject, the better, though the more uniform/simple the inputs, the fewer images seem to be absolutely necessary for the AI to get the picture. Even for uniform inputs, I'd recommend no fewer than 1000 quality images for the best chance of creating a model that gives you recognizable outputs. For more diverse subjects, three or four times that number is closer to the mark, and even that might be too few. Really, just try to get as many good, high res images as you can.
But how do you get that number of high-res images without manually downloading every single one? Many AI artists use some form of bulk-downloading or web scraping. Personally, I use a Chrome extension called ImageAssistant. This extension bulk-downloads all the loaded images on any given webpage into a .zip file. Downsides of ImageAssistant are that it sometimes duplicates images, and it will also extract ad images, especially if you try to bulk download Pinterest boards. There are Mac applications that you can use to scan the download folders for duplicated images, though, and the ImageAssistant interface makes getting rid of unwanted ad images fairly easy, and it's WAY faster than downloading thousands of images by hand.
Images that are royalty-free are obviously the best choice to download from a copyright perspective. AI outputs based on datasets with copyrighted material are a somewhat grey area legally. That being said, it does seem to me that Creative Commons laws should cover such outputs, especially when the copyrighted material is not at all in evidence in the end product. I'm no lawyer, though, so use your discretion when choosing what to download. A safe, high-quality bet would be to search on Getty images for royalty-free images of whatever you're building an AI model to duplicate, and then bulk-download the results.
Sometimes, in spite of exhaustive web searches, you just won't have quite enough images. In cases like that, a little data augmentation is called for. By bulk-flipping your images horizontally, you can double the size of your dataset without compromising its diversity. I generally practice this on all my datasets, even if I have a reasonably-sized dataset to start with.
Step 2: Preprocessing Your Dataset
This is where we get all of our images nice and cropped/uniform so that the training notebook (which only processes square images) doesn't squash rectangular images into 1:1 aspect ratios.
For this step, head over to BIRME (Bulk Image Resizing Made Easy) and drag/drop the file you've saved your dataset in. Once all your images upload (might take a minute, depending on the number of images), you'll see that all but a square portion of the images you've uploaded are greyed out. The link I've provided should have "autodetect focal point" enabled, which will save you a ton of time manually choosing what you want included in the square, but you can also do your selections by hand, if you wish. When you're satisfied with all the images you've selected, click "save as Zip."
We're choosing to save images as 512x512 squares instead of 256x256 squares because even though our model outputs will be 256x256, the training model doesn't care what size the square images it's provided are. Saving our dataset as 512x512 images means that, should we decide to train a 512x512 model in the future, we don't have to re-preprocess our dataset.
Step 3: Training your Model
Head over to the fine-tuning colab notebook and connect to Google Drive.
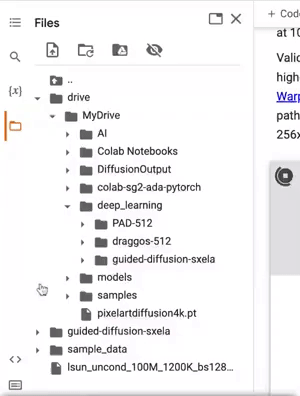
Once it's connected, you'll see a new folder has been added to your Drive: "deep-learning."
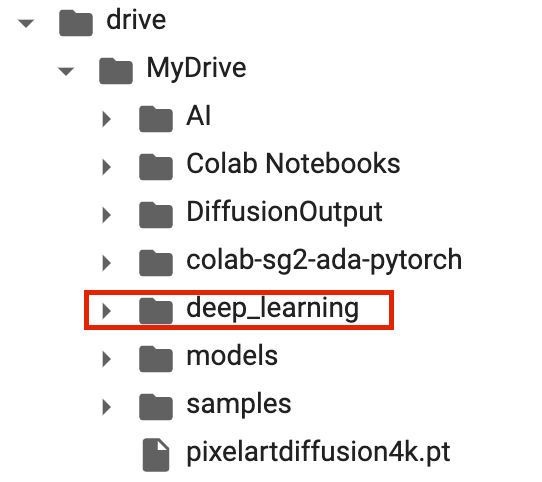
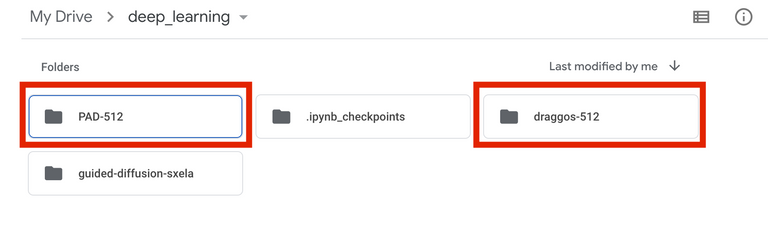
Now hop over to your Google Drive and place the unzipped folder containing your cropped dataset in the deep-learning folder (NOT in any of the subfolders within deep-learning). Name it something descriptive if you want. In the example below are two of my dataset files, PAD-512 (my current Pixel Art Diffusion dataset) and draggos-512, which is for a custom dragon pixel art model I'm currently tweaking.
Once your images finish uploading to Drive, head back over to the fine-tuner and have a look at the cell with red text. You'll only need to touch one of the things in this cell right now--your dataset path.

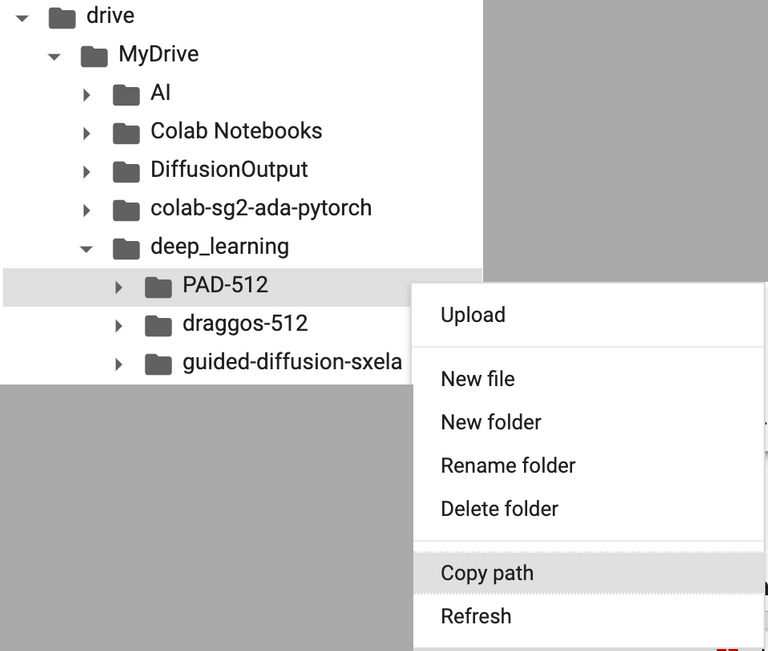
This is the direct path within Drive that leads to the folder containing the dataset of images we just uploaded. To find it, click on the drop-down menu beneath deep-learning in your file browser, find your dataset folder with the descriptive name that we just made, right-click, and select "copy path."
From there, just go back to the cell with the red text and paste your path where it specifies that you should.
We're now ready to begin training if this is a new model. Restarting models that have stopped training from a saved checkpoint takes one more step, but is still really easy. All you'll need to do is replace the default checkpoint (LSUN's bedroom model which--yup--generates bedrooms) with your most recent saved .pt file.

The hardest part of this is making sure you choose the right saved file, as the fine-tuner will save three types every 2000 steps. For restarting from a saved .pt, you'll want you most recent model .pt file. See the below gif for where these are located.
Copy the path to the .pt file like we did for our dataset, and paste it in place of the LSUN .pt file. Your training should now resume from where you left off when you start your run.
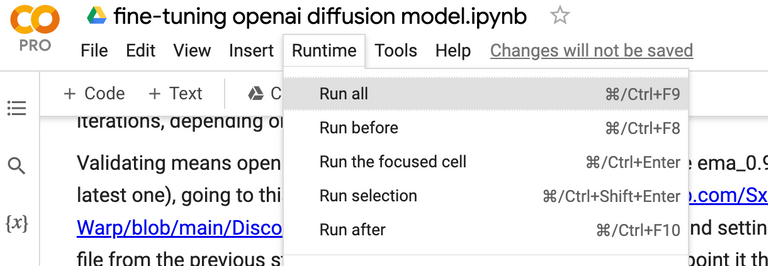
To start the run, simply head up to the top of the notebook, select "Runtime," and then click "run all."
Your training has now begun!!!
Step 4: Monitoring Your Model While It Trains
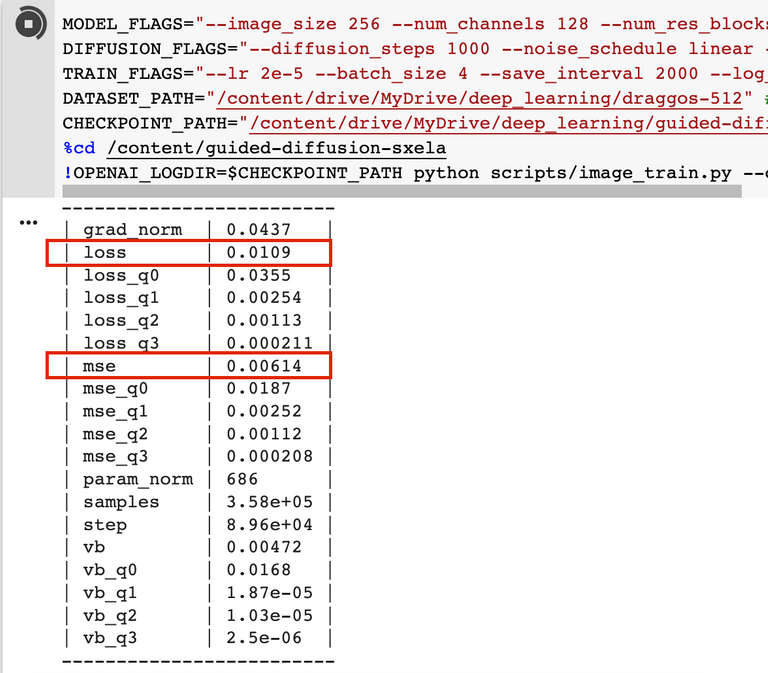
Once your training starts, you'll notice that, every 50 training steps, a new log appears below the cell with the red text. This is your training log, and it's the information that gets saved in the log(n).txt files. There's a lot of values in this log, and I'm not even going to pretend I know what all of them mean. I just focus on two values: Loss and MSE.
Again, I don't pretend to be able to explain what these values measure, exactly (you can google it if you're curious and a math person), but the basic goal of training is to get each of these numbers as close to 0 as possible without over-training your model. Over-training is what happens when your model fits too well to the dataset and starts spitting out images very close to or identical to images it trained on. We do not want this. What we want is a model that produces novel images that could have come from the training data.
The LSUN checkpoint that we begin training from is used because it has a really low score already, meaning that, hopefully, you'll have less work getting your model to this point. When your model starts, the Loss/MSE will be around .02. In the example below, I've gotten each down to a much lower number.
Numbers are all well and good, but sometimes seeing what your model is capable of producing is the most fun--and helpful. To do this, we'll use Alex Spirin's fork of Disco Diffusion v 5.2, which allows us to load a custom model from Drive into Disco.
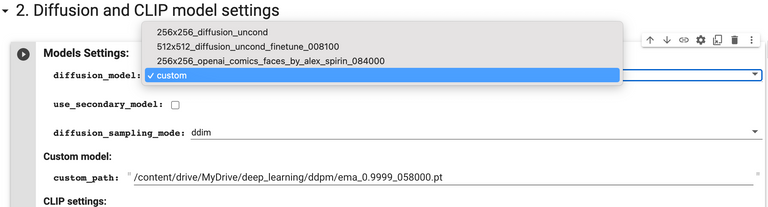
To load your custom model into the notebook, make sure you connect to the same Google drive account as you did with the fine-tuner. Once connected, you'll want to copy the path of your most recent ema checkpoint (NOT model, like we did above when restarting from a saved .pt). Scroll down to "2. Diffusion and CLIP model settings", expand the cell, select "custom" from the drop-down menu, paste your checkpoint path in placee of the default one, and your model should load when you run the notebook!
You can use this to check on your new .pts as they're created, and before you know it, you'll have your own, fully-trained diffusion model!
That's really all there is to training your own custom diffusion model! It's really not as daunting a task as it may seem from the outset; that being said, if you have questions or if you run into issues, don't hesitate to reach out. I can't wait to see what everyone creates!
If you found this guide useful, please feel free (but in no way obligated) to sign up for my Patreon or follow me on Twitter if you haven't already--I'm always up to some sort of AI art stuff on both!
Only one question, when do we stop training?
Good question! There's no hard-and-fast rule. I'd say stop when things look good enough :)
I would like to add one thing. If your dataset consists of images in 256x256 or 512x512 format only, when you try to generate an image higher than this resolution, there are tiling issues. I ran into this with my first trained model.
So, with my second model, I kept higher resolution files as they are, did not resize them. And the tiling issues disappeared.
On a side note, I tried generating images in rectangular proportions, all working well. No tiling issues. So, I think it is best to train with the highest image sizes we can afford to train with, in square formats....
thank you 🙏
Of course :)
Hello, great tutorial! Do you suggest using a large dataset? I have a dataset contains about 150k images. And I couldn't make loss and mse low enough. Should I try to train more steps or make the dataset smaller? Thanks.
Great tutorial! just one question, i'm training with a set of cartoon charactors, will CLIP know who they are or at least what they are? so i can use the name in the text prompts for Disco Diffusion to generate a new character?
Can the models learned in this process be used in stable diffusion?
(disco diffusion's generation time is slow.. 😢)