Hello, fellow hivers!! Welcome back!
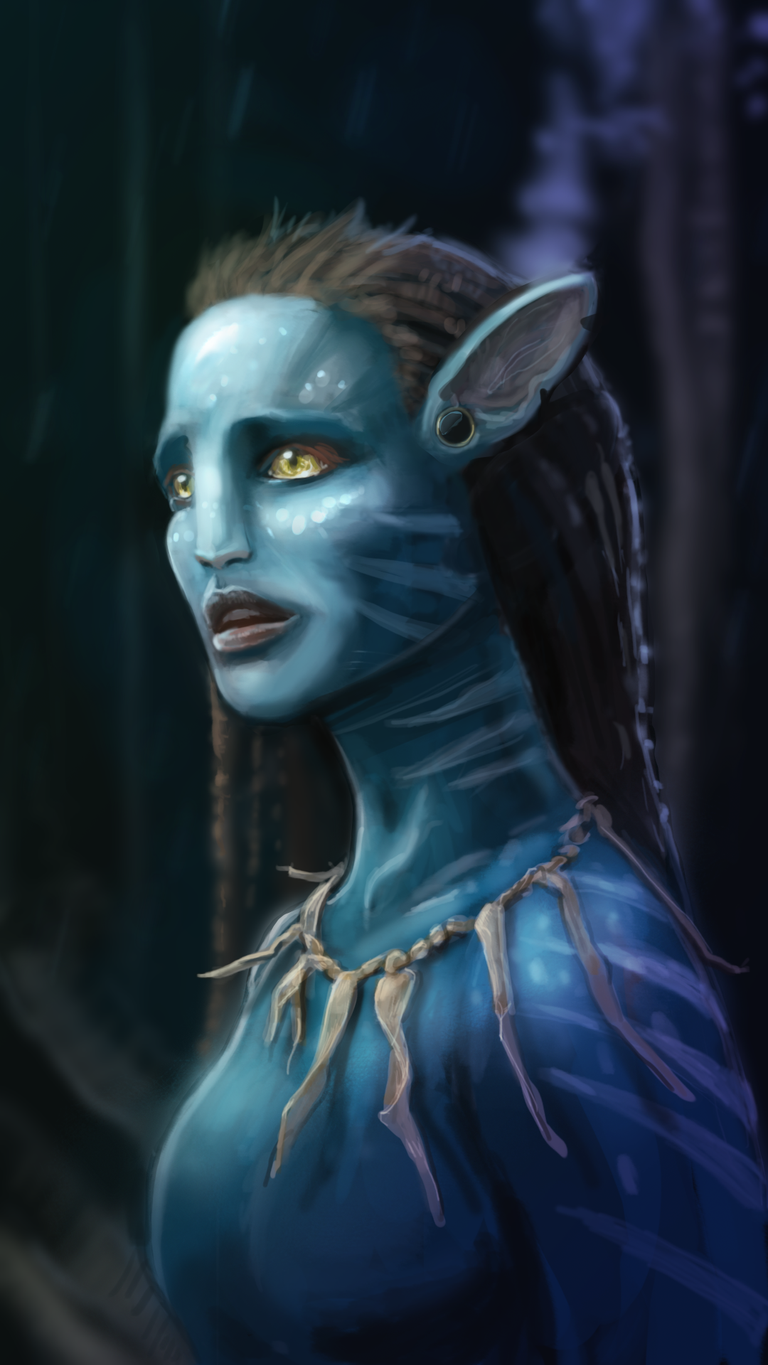
Today I wanted to do a nice exercise with you. We will turn the beautiful Natalie Portman into a
Na'Vi character from the Avatar movie.

Step 1 - Gather your references!
Natalie has so many cool pictures on the internet. After so many awesome movies, it is not difficult to find great reference pics of her. I personally liked the one below, as her face seemed like she was flabbergasted by something:

You guys know me, I love to think about the potential story of an illustration. The moment I saw this image, my immediate thought was:
"Wow, cool! Perhaps this is the moment when she sees her Na`Vi lover in human form and can't believe her eyes and the disconnection to the feelings her heart was pulling."
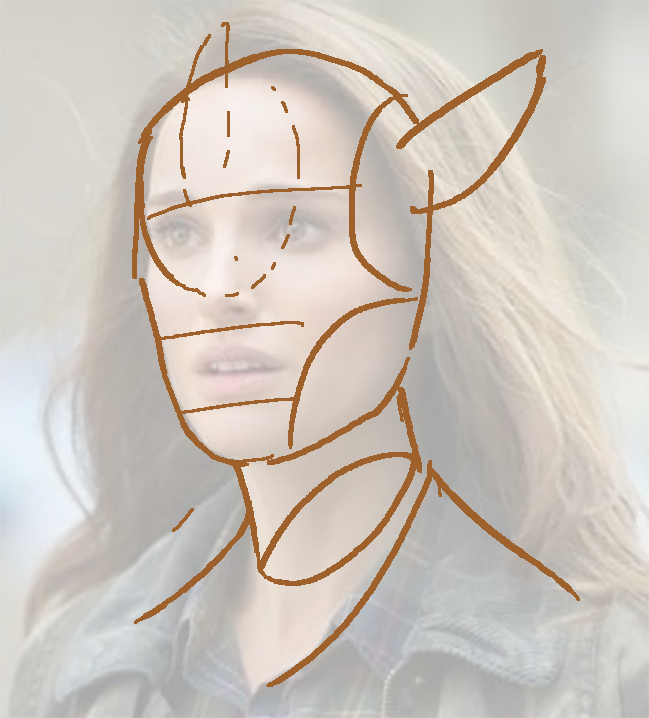
Step 2 - Study your reference!
The Na`Vi were humanoids with ears WAY ABOVE their usual placement in the human face. I needed to have a proper understanding of Natalie's head proportions if I was ever trying to make changes to it. So I washed out the colors with a 50% opacity white layer and started to sketch her features and the potential ear shape right on top of it:
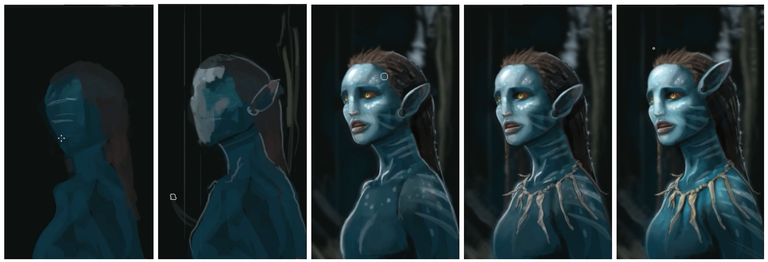
Step 3 - Painting!
Much like most of my previous videos here on HIVE, I started with the biggest shapes. You don't have to be exact at first.
- Get rid of your white canvas by just putting some paint on it.
- Make it so that the paint blob suggests what you are planning on drawing.
- Slowly, carve the shapes that you desire, going always from the biggest to the smallest.
- Define your light source based on your reference.
- Be creative with the background, make it blurry if you wanna bring attention to your subject.
- Make sure your subject has sharp details and high contrast in areas where you want to draw your viewer's eyes.
- Rim lights can help you sell the tridimensionality of the forms. Remember: Light, Shadow, and Reflective light after the shadow can really help you out here.
- Slow and steady you will get there.
Step 4 - Polishing details
To ensure you are properly communicating your shapes, your understanding of volume needs to be sharp! If you're a beginner, perhaps it is easier to start with a sphere. In our example below I've removed the cast shadows of the sphere, so it is not sitting on top of a table. In fact, this is the lighting scheme of a sphere that is floating in the air. Just like in space. 👽
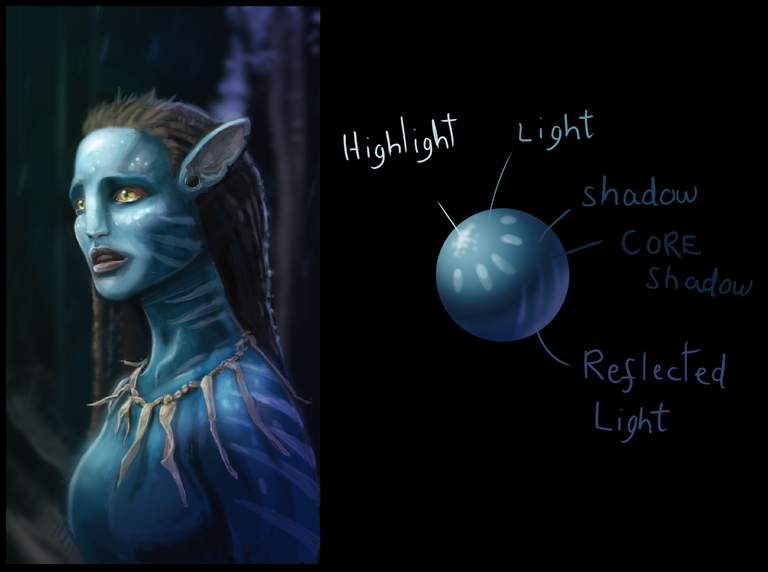
Notice how my painting of Natalie as a Na`Vi really is similar to the lighting scheme of this sphere:
- We have white as the brightest light spot of the image.
- Then it progressively moves towards a light cyan blue.
- Soon it becomes darker, like a marine blue.
- We finally hit the SHADOWLINE which represents the CORE SHADOW of the image. It's the spot where the light barely gets in.
- Then we start seeing light again! This is the reflected light, which can also be the RIM LIGHT (which means "the light that comes from behind the subject").
If you follow this scheme in your paintings I assure you that your shapes will have a hard time being flat-looking. It is so easy to give things volume when you have all these five key lighting elements in your shape.
Awright! This is it for today!! I hope you enjoyed the trip into the magic realms of Avatar while studying how to light a scene and studying references. Let me know what your thoughts are! I'm glad to answer any questions you may have!
Happy to have you here, guys!
Your bro,
Galiant
A great piece💝
Oh hey @francisftlp !! Thank you!! I'm glad you liked it! Did this post help you a little bit? Hope so! 😊🙏
Hey! Awesome! Thanks for publishing it! =)
Awesomeeee 😍😍
Super cool...
Hi @samsino !! Thank you for dropping a comment! So great that you liked it! =D
Do you paint as well? I'm gonna check your profile! =)