Accepting crypto tips on your website is relatively straightforward (see How to Accept Crypto Tips, but things get more complicated when you want to accept payments. With tips and donations, the donor only needs to have a copy of your crypto address, but with payments, you need to:
- Choose a cryptocurrency.
- Place a ‘Pay’ button on your product page.
- Get your product’s description and price.
- Get the current value of your chosen cryptocurrency.
- Convert your price to cryptocurrency.
- Add a button and QR Code for copying your crypto address.
- Add a button for copying the crypto amount.
- Link the payment to the purchaser.
Payment gateways will carry out these tasks for you, but they can be expensive.
PayButton is free and provides JavaScript code for adding donation and payment buttons to your website. It seems to work well, but I haven't been able to connect the payment to the customer.
An Example
I have assumed every product has its own page, and I used HTML and JavaScript to keep the explanation as simple as possible.
JavaScript isn’t suitable for receiving data from a previous webpage, so I have used only one page, which hides and reveals different sections to give the appearance of going from page to page.
There are three sections (divisions):
- An Order Button division.
- A Pay Button division.
- A Payment Data division.
1. Order Button
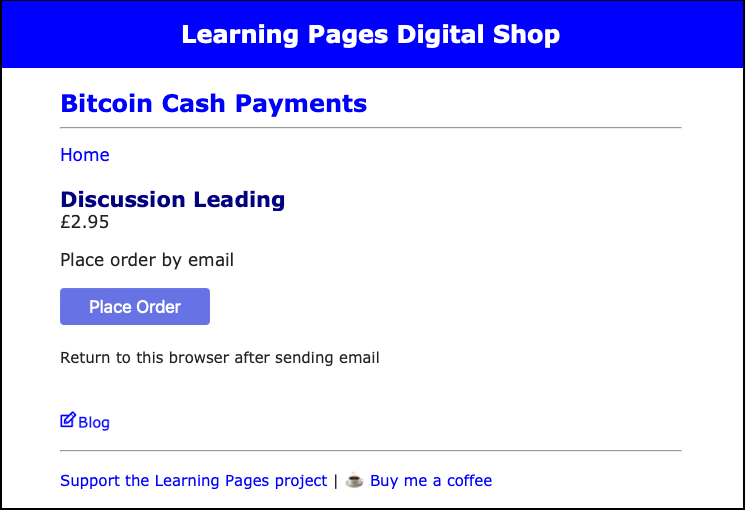
When the customer reaches the ‘Bitcoin Cash Payments’ page, they only need to see the ‘Order’ section, so hide the other two sections by placing this code after the </body> tag:
<script>
document.getElementById('pay-button').style.display = "none";
document.getElementById('payment-data').style.display = "none";
</script>
The following code adds the Place Order button to the page:
<div id='order-button'>
  <p>Place order by email</p>
  <input type=submit onclick='order()' value='Place Order' style='width:150px;background-color:#6772E5;color:#FFF;padding:8px 12px;border:0;border-radius:4px;font-size:1em;cursor:pointer'><br><br>
  <span class=notes>Return to this browser page after sending email</span><br>
</div>
Clicking the button calls the order() function:
function order() {
  window.location.href = 'your-email-address?subject=Digital%20Product%20Order&body=Product:%20Discussion%20Leading%0D%0APrice:%20£2.95%0D%0ASKU:%20ER005';
  document.getElementById('order-button').style.display = "none";
  document.getElementById('pay-button').style.display = "inline";
}
This function should be added after the ‘setup’ code in the script. The first line opens the customer’s email client with a draft email ready to be sent to you. Notice that two parameters — ‘subject’ and ‘body’ — have been added after your email address. These add the product’s details to the email. Spaces are represented by ‘%20’, and line breaks are represented by ‘%0D%0A’. An SKU (Stock Keeping Unit) is a unique identifier for a product.
By sending an email, the customer links the purchase to the payment.
N.B. Using this method of sending an email from a website can reveal your email address to any visitor.
The next two lines hide the Place Order button and reveal the Pay button.
2. Pay Button
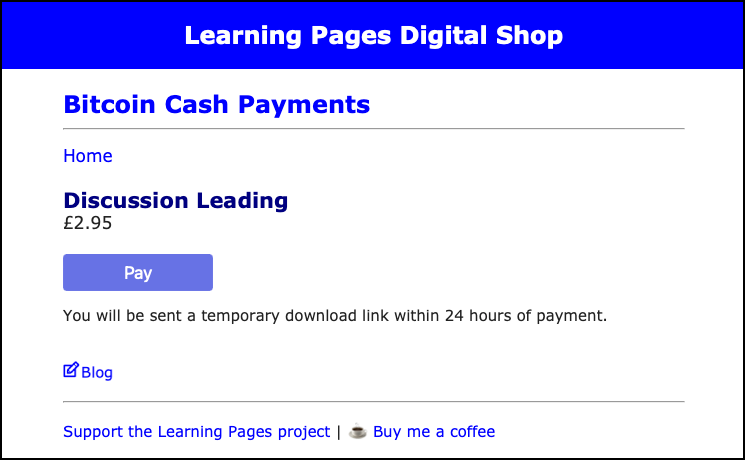
The Pay button is added to the page with this code:
<div id='pay-button'><br>
  <input type='submit' onclick='pay()' value='Pay' style='width:150px;background-color:#6772E5;color:#FFF;padding:8px 12px;border:0;border-radius:4px;font-size:1em;cursor:pointer'>
  <p class=notes>You will be sent a temporary download link within 24 hours of payment.</p>
</div>
Clicking the Pay button calls the pay() function:
function pay() {
  document.getElementById('pay-button').style.display = "none";
  document.getElementById('payment-data').style.display = "inline";
}
This function should be added after the order() function in the script. It hides the Pay button and reveals the Payment section.
3. Payment Data
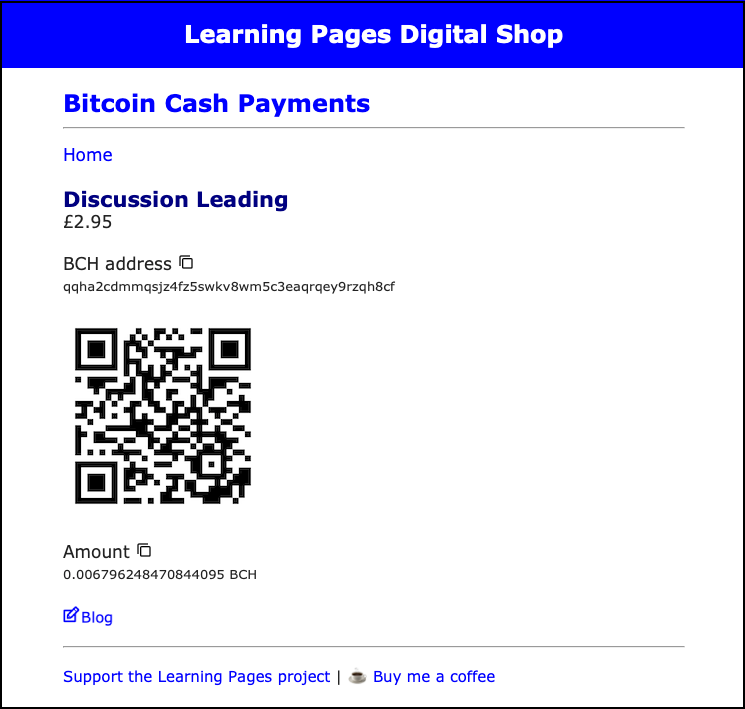
The Payments section is added to the page with this code:
<div id='pay-button'><br>
<input type='submit' onclick='pay()' value='Pay' style='width:150px;
background-color:#6772E5;color:#FFF;padding:8px 12px;border:0;
border-radius:4px;font-size:1em;cursor:pointer'>
<p class=notes>You will be sent a temporary download link within 24 hours of payment.</p>
For this section, you will need to:
- Choose a cryptocurrency.
- Get a cryptocurrency wallet.
- Get your cryptocurrency’s address.
- Display the address.
- Add a button and QR code for copying the address.
- Get the cryptocurrency’s current value.
- Convert the product’s price to cryptocurrency.
- Display the cryptocurrency amount.
- Copy the cryptocurrency amount.
Choose a Cryptocurrency
There are many cryptocurrencies to choose from. I chose Bitcoin Cash (BCH) because of its fast transfers and low fees. Bitcoin Cash was brought to my attention by Pantera.
Get a Cryptocurrency Wallet
There are a bewildering number to choose from, and I am still investigating which would be best for my needs. The are a number of factors to take into account:
- Ease of use.
- Purpose.
- The identity verification process.
- Transfer fees.
- The minimum purchasing/selling amount.
- The exchange rate.
For this example, I am using the Bitcoin.com wallet.
Get Your Cryptocurrency’s Address
Go to your wallet, click ‘Receive’, and you should be able to copy/scan your address from there.
Bitcoin.com adds a ‘bitcoincash:’ prefix to the address — an incompatible format for some wallets. I have found that using the address without the prefix hasn’t caused any problems.
Display the Address
I put my BCH address between tags to reduce the font size, keeping it on one line when viewed with a smartphone.
Add a Copy Button and QR code
Address Copy Button
The address copy button is an image of a copy icon between tags. The button is styled so that it has a white background and no borders. Clicking the Copy button calls the address() function:
function address() {
  navigator.clipboard.writeText("qqha2cdmmqsjz4fz5swkv8wm5c3eaqrqey9rzqh8cf");
  alert("Address copied");
}
This function should be added after the pay() function in the script. It copies the BCH address to the clipboard.
QR Code
Providing a QR code for the customer to scan is a good idea. Many thanks to @karerinaramm for describing how to create a QR code using Canva. See Create and Customise your QR for free! for more details.
- Open Canva (I used the desktop version)
- Click ‘Create a design’ (top righthand corner)
- Select ‘Instagram’ Post (Square)
- Select ‘Apps’ (lefthand menu)
- Search for ‘Dynamic QR Codes’
- Select ‘Dynamic QR Codes’
- Select ‘QR Code’ template
- Enter your BCH address in the ‘Enter URL’ box
- Click ‘Share’ (top righthand corner)
- Click ‘Download’
- With ‘PNG’ selected, click ‘Download’
Use the <img> tag to add the QR Code to the page. You may want to reduce the size of the image.
Get the Cryptocurrency’s Current Value
The following code is a modified version of the one shared by LucianoSphere in Obtaining historical and real-time crypto data with very simple web programming.
const getBtcData = async () => {
   fetch('https://min-api.cryptocompare.com/data/price?fsym=BCH&tsyms=GBP')
  .then(response => response.json())
  .then(data => {
    console.log(data);
    document.getElementById('amnt').innerHTML = 2.95/data.GBP
  });
}
getBtcData();
tcount=setInterval(function(){
  tcount++
  if (tcount==10) {getBtcData(); tcount=0}
},1000);
Add the code after the address() function.
The first section of this code fetches the crypto amount (data.GBP) for 1 unit of fiat (traditional) currency. This can be easily modified in fetch():
fetch('https://min-api.cryptocompare.com/data/price?fsym=BCH&tsyms=GBP')
I am using BCH (Bitcoin Cash) and GBP (pounds sterling) in this example. The second section of the code refreshes the data every 10 seconds.
Convert the Product’s Price to Cryptocurrency
The product’s price is converted to cryptocurrency by dividing the price by the current value of the cryptocurrency (2.95/data.GBP).
Display the Cryptocurrency Amount
This code displays the amount in
document.getElementById('amnt').innerHTML = 2.95/data.GBP
Copy the Cryptocurrency Amount
The amount copy button is similar to the BCH copy button. Clicking it calls the amount() function:
function amount() {
  amount = document.getElementById("amnt").innerHTML;
  navigator.clipboard.writeText(amount);
  alert("Amount copied");
}
Add the code before the </script> tag. It reads the amount from <span id=’amnt’></span> and copies it to the clipboard.
If you would like to see how this example works in practice, please visit my Bitcoin Cash Payments page. Please note that sending an order email will result in it bouncing.
A Real-Life Version
The version I use for payments on my website uses a combination of PHP, Javascript and a MySQL database. PHP is a server-side programming language, so it provides more protection from prying eyes.
I am planning for my digital shop to have many products, so I am using a database to hold information about the products. The database also records information about orders that have been placed.
The Product Page

The product page gives details about the product, including the price. These details are held in a database:
The customer needs to provide a valid email address before clicking the Buy button.
Payments Page
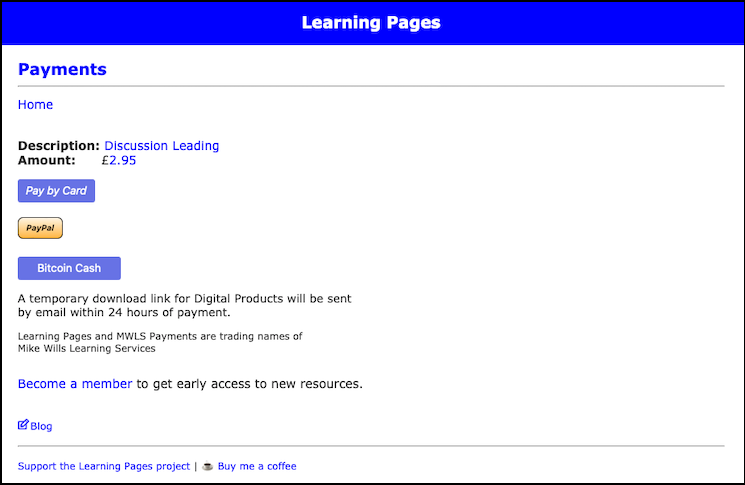
When the customer reaches the Payments page, an email is automatically sent to the store owner to provide notification of the order.
The customer can choose to pay by card, PayPal or with Bitcoin Cash. Clicking the Bitcoin Cash button opens the Bitcoin Cash Payments page.
Bitcoin Cash Payments Page
The order details are also added to the database. These data include the following:
- The product’s SKU.
- The customer’s email.
- The BCH amount.
- The date and time that the order was placed.
I’ll get a notification when my wallet receives a payment, and the above details help me link the order to the customer.
Previously published on LearningPages.org
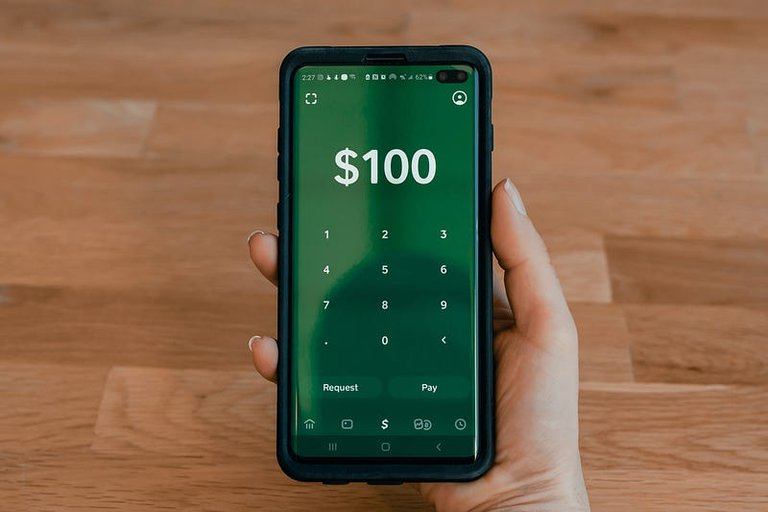
Photo by Tech Daily on Unsplash