A few years ago creating a cryptocurrency was a task that was only available to a few expert crypto programmers. Currently there are very simple ways to create cryptocurrencies and, therefore, it is available to the general public without having to have programming notions.
In summary, throughout this tutorial you will learn in an easy and simple way to create a digital currency, put your own blockchain into operation, mine the genesis block, configure a wallet to mine your own cryptocurrencies (in the same way that it works bitcoin mining) and create a node in a VPS (Virtual Private Server) so that your currency is always active and all users of it can synchronize their wallets.
Create a cryptocurrency and configure it
There are many ways to create a cryptocurrency, since it can be created manually as Satoshi Nakamoto did with bitcoin or, on the contrary, you can use any of the services that currently exist to create blockchains in an automated way.
In the network there are many companies that have launched into the creation of Blockchains, but of all of them I have chosen Wallet Builders for the following reasons:
Allows you to create a FREE Blockchain.
If you want extra accessories, it is one of the cheapest.
It offers you the wallet for Windows and Linux for FREE.
It is very easy, fast and simple to use.
If you want to choose a payment plan, you will need to pay in Bitcoins.
Step 1: Configure the type of Blockchain.
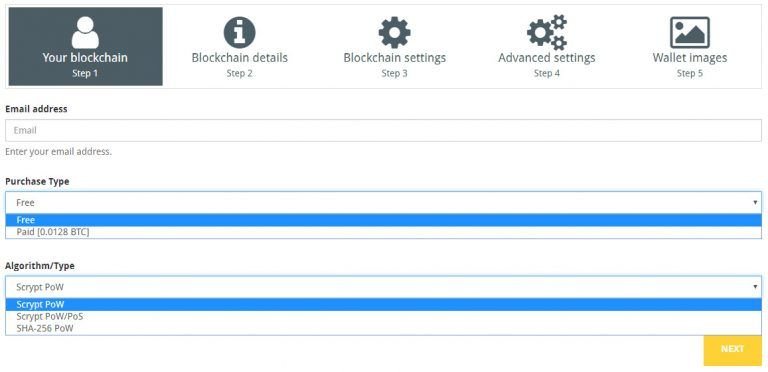
First, you have to access the website of www.walletbuilders.com and fill in the information that appears in the image below.
Configure the type of Blockchain
You must indicate an email, which will be where the link to download the wallet and the information of the cryptocurrency you have created will be sent.
Second, you have to choose a plan, I have chosen the free one. The paid plan offers one month of free hosting for the Node (in the free one only 5 days) and, in addition, it offers the possibility of adding an icon to the cryptocurrency, among other things. In the tutorial I will explain how to host the node in a free VPS for a year and, therefore, the free plan is enough, since you can create a complete and indefinite cryptocurrency.
Finally, to create a cryptocurrency it is necessary to choose the type of algorithm that the blockchain will use. The free plan only offers the first two. For the tutorial I have used a Scrypt Pow algorithm.
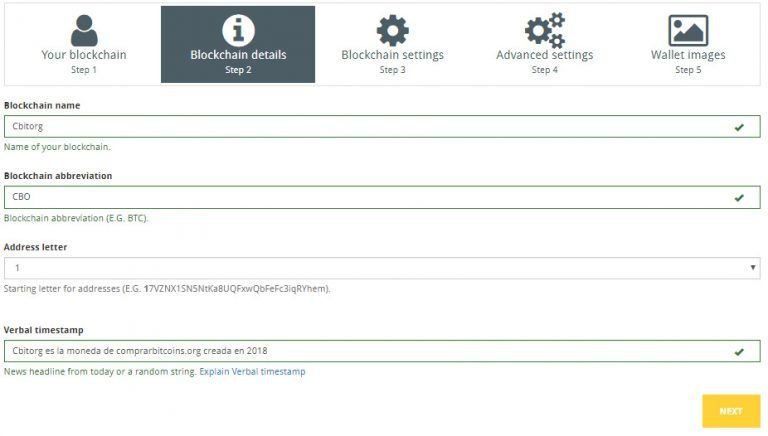
Step 2: Configure the details of the Blockchain.
to create a cryptocurrency
Configure Blockchain details
The data that I have added to create a cryptocurrency are the following:
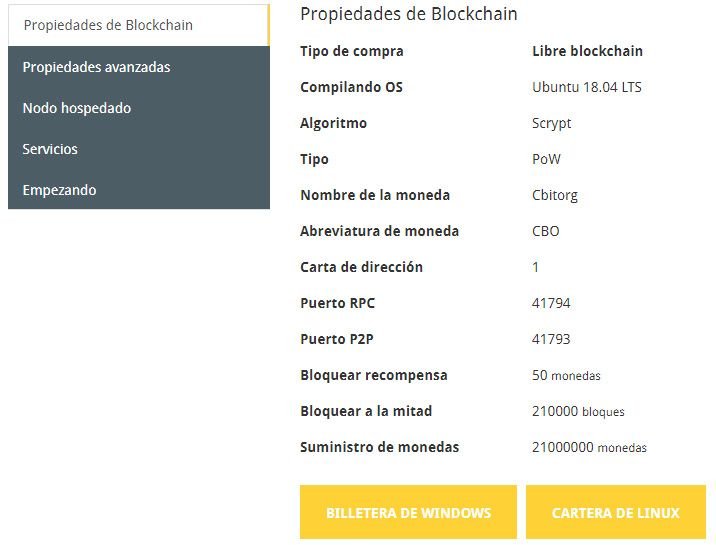
The name that the cryptocurrency will have: Cbitorg (from ComprarBITcoins.ORG) Letter or number with which the public addresses will begin. I have chosen number 1, but it is somewhat indifferent.
Abbreviation: In the same way that Bitcoin has the abbreviation BTC, my cryptocurrency has the abbreviation CBO).
Phrase that will be included in the genesis block: Sathosi Nakamoto included the phrase "The Times 03 / Jan / 2009 Chancellor on brink of second bailout for banks" which translated into Spanish means "The Times 03 / Jan / 2009 Chancellor on the verge of second rescue for banks ”. It is a phrase for posterity that, among other things, is intended to show that the first block was created at a given time. For this reason, Sathosi Nakamoto chose a news headline from The Times newspaper to show that the first block was not generated before January 3, 2009.
Step 3: Set up circulating coins and miner rewards.
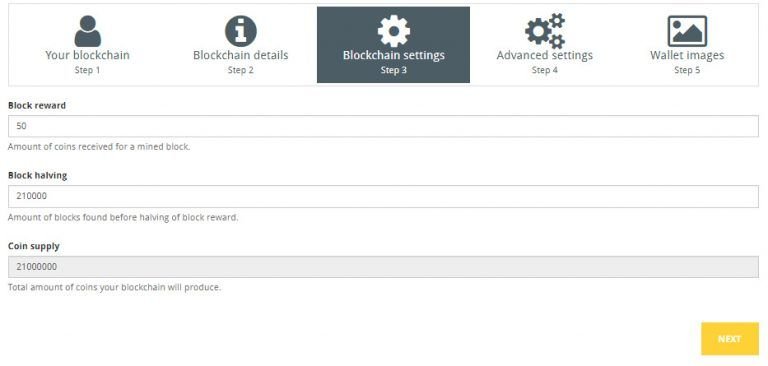
Set up circulating coins and miner rewards
The first point allows you to enter the reward for mining a block. In the second section you can configure how many blocks the halving has to take place (reduce the reward by half) and, finally, you have to enter the maximum coins that may be in circulation once all are mined (in the version free you can only put 21,000,000). In my case, to create a cryptocurrency I have left everything by default.
Step 4: Advanced Blockchain Settings
Advanced Blockchain Settings
Lastly, the app offers a secure and once versatile setup. As this tutorial is an experiment, I have changed some aspects of what it offers us by default:
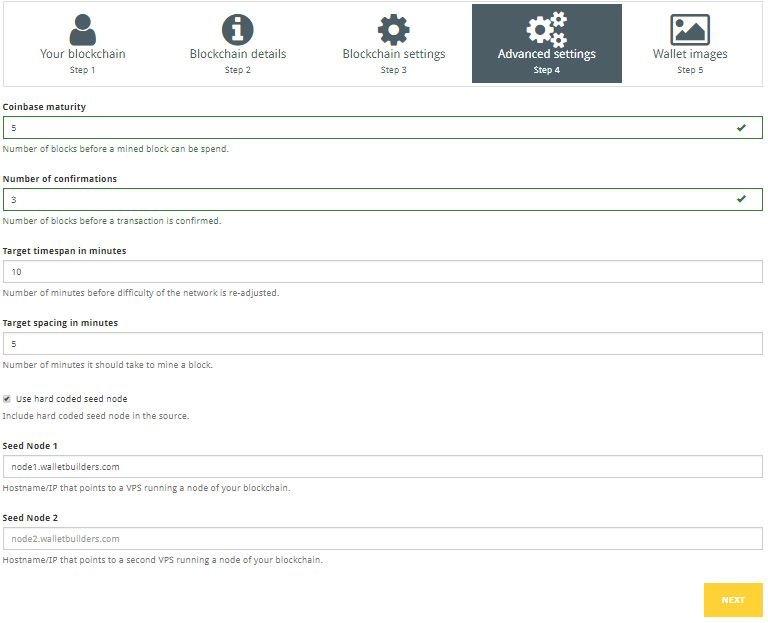
In the section "Coinbase maturity" I have put 5. That means that the coins obtained after a mined block can be spent after 5 confirmations. By default it says 20. This affects the security of my blockchain, but on the contrary I will be able to send the coins obtained by mining without waiting so long.
In the second section I have put 3. It refers to the number of confirmations that there must be for a transaction to be valid. By default it came 6.
The rest of the sections I have left by default, as I have not considered it appropriate to change them to improve the performance of the Blockchain.
In the application you can see a 5th step (configure the icon) that is only available to those who have chosen the payment option. In the case of having chosen the free version, you will have already finished the work and, therefore, it only remains to wait to receive an email with the download link of the Wallet that is very similar to bitcoin wallets
Download the wallet and mine the first block of the Blockchain
After about 30 minutes, the program will have established the blockchain and from the link that is sent to the email, you can download the wallets and check the characteristics of the blockchain.
Download the wallet
The wallet can be downloaded for both Windows and Linux. Once downloaded and opened, the wallet will be synchronized with the node that the web provides us for 5 days (afterwards we must have our own node established).
Open purse
Once the wallet is downloaded and opened, the first block must be extracted and, in this way, we will obtain the first reward of 50 Cbitorg. To mine you have to follow three steps [UPDATED 2019]:
In the wallet directory (APPDATA \ Tumoneda) create the file tumoneda.conf with the following code:
rpcuser = rpc_tumoneda
rpcpassword = pifw1fqxfkdd23n59rcr63sqrfiqkw184uxb0blo
rpcallowip = 127.0.0.1
listen = 1
server = 1
addnode = node1.walletbuilders.com
Next you have to create a file, in the folder where the access to the wallet is (it depends on where you have saved it), which is called mine.bat with the following code:
@echo off
set path_cli =% cd%
cd% cli_path%
echo Press [CTRL + C] to stop mining.
:start
tumoneda-cli.exe generates 1
go start
After the two files are created, open the wallet and once you connect to the node, open the file mine.bat. After approximately 15 minutes, you will start to get the first mining rewards.
To create the .conf and .bat files, open a notepad and paste the code there. Then when saving it, call it tumoneda.conf or mine.bat. Don't forget to change the words "tumoneda" to the real name of your currency.
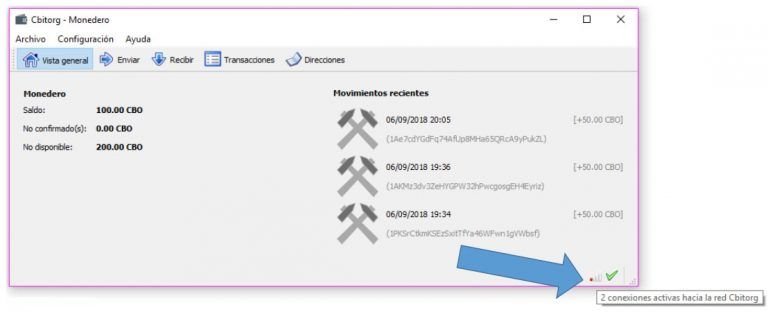
The coins obtained cannot be spent until 5 confirmations have been obtained, as we configure it at the time of creating the Blockchain. Therefore, I advise you to leave the computer mining for a while to mine several blocks and, in that way, you will get the coins that you want (that is called pre-mining a cryptocurrency).

After mining several blocks, you will be able to see how the credit that you already have confirmed appears in "Balance" and in "Not available" the mined credit that is not yet confirmed.
Create a node on a VPS
The best way to give stability to your Blockchain is to install a node in a Virtual Private Server (shortly we will explain in another tutorial how to create a free VPS for a year). In this way, any user who opens the wallet will be able to synchronize it automatically.
As I already have a Windows VPS created, I only have to download the wallet and pass it to the virtual private server.
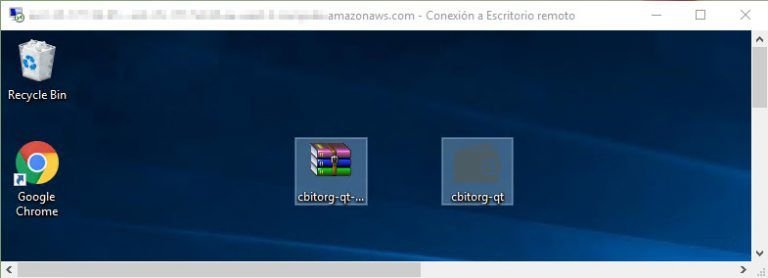
wallet in a vps to create node
With the wallet closed, create the file cbitorg.conf (tucriptomoneda.conf) in the folder «% APPDATA% \ cbitorg \».
Create the conf file
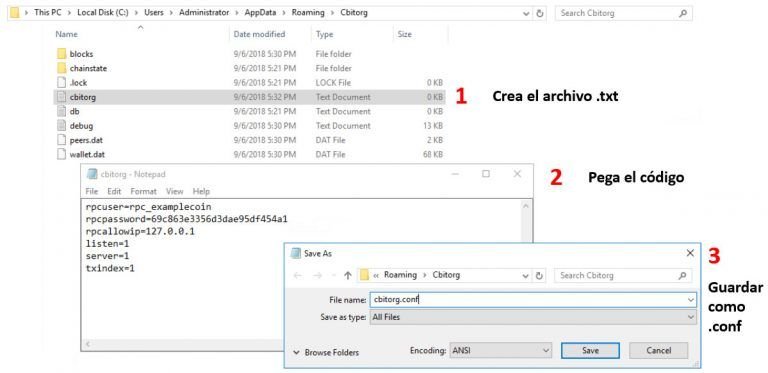
create a .txt file called cbitorg then paste the code below and hit save as cbitorg.conf. Code for the file:
rpcuser = rpc_examplecoin
rpcpassword = 69c863e3356d3dae95df454a1
rpcallowip = 127.0.0.1
listen = 1
server = 1
txindex = 1
Now when you open the wallet on the server it will act as a node without having a computer plugged in all day.
How to get the wallet to recognize the new node?
Now, on the one hand we have the wallet in the VPS that acts as a Node and, on the other hand, the wallet that I have installed on the computer.
For the wallet that I have installed on my computer to recognize the Node I have created, just create a cbitorg.conf file (in the same way as indicated in the previous point) with the following code:
addnode = REPLACE_WITH_YOUR_IP_OR_HOSTNAME
Where it says "REPLACE_WITH_YOUR_IP_OR_HOSTNAME" you must indicate the host or IP of your VPS.
Your Blockchain does not have people mining the transactions and, therefore, if you want to make a transaction you must mine it yourself.
The transaction is made in the same way as it would be done in any other wallet. Just enter the address and the amount. Once you have launched it, it will have to be mined, so that it is included in the blockchain.
To mine the transaction you must open the mining console. The process is the same as that used to mine the first blocks. If you access the transactions tab, you will see how you have sent it and you have earned the commission that you have paid to the miners.
If you want to automate this step, you can install a wallet on a VPS and configure it so that it is always mining. In this way, you will make it easier for all the users of your Blockchain to use it, since it will not be necessary for them to mine the transactions every time they make a payment and, in addition, you will take all the commissions and rewards for the mined blocks until others users start mining.
For example, I have configured the Node that I have created in my VPS so that it is always mining.
Last conclusions
Once you have reached this point in the tutorial "How to create a cryptocurrency" you will have your own cryptocurrency created and working. As a summary, I review the steps to follow:
Create a cryptocurrency in Wallet Builders and configure it.
Download the wallets.
Install a Node on a VPS to avoid hosting it on the Wallet Builders server (they only offer 5 free days).
Install a miner in a VPS and, in this way, you will ensure that the users of your Blockchain do not have to mine their own transactions.
That's how easy it is? No wonder shitcoins are proliferating!