This is the story on how I managed to optimize Webpack build process in many ways, resulting in generated bundle size that’s 12 times smaller than what I started with!
The front-end ecosystem is growing continuously, cool new tools and packages are released constantly. While this is great, it also mean it’s harder and harder to be up-to-date with everything.
Recently I spent a few days working on improving performance of an web app. It’s a rather large app built using Django & Django REST Framework to create APIs and a few ⚛️ React apps that make use of these APIs.
While my performance optimizations were done on both back-end and front-end, in this article I’ll recap the steps I took to improve performance of the front-end part built with React and at the end I’ll draw important conclusions from it.
The problem
As I mentioned in the intro above, the main problem our users experienced was the low performance of the system. Unsurprisingly, the most complaints that we got were from users using mobile phones and mobile Internet connection.
They would complain that page load times were often times uncomfortably long and that there was a noticeable delay when navigating between different views.
The investigation
My immediate bet was that our Webpack-built bundles are too heavy and it takes a lot of time for browser to load them from the server.
After these bundles are loaded, only then React is booted and starts rendering the webpage — which also takes time. This means that user has to wait a long time before anything appears on the page.
This would be most noticeable on initial loads (when there are no cached bundles yet) and on slower network connections (on a mobile Internet connection).
Okay, so that’s the suspicion. Now how do I confirm it?
Webpack Bundle Analyzer
Meet the awesome 📊 Webpack Bundle Analyzer. It’s a command-line tool that allows developers to visualize size of Webpack output files with an interactive zoomable treemap.
It’s great for checking what makes up the size of the bundles, especially for such a visual person that I am. This was a natural starting point for me. I quickly added Bundle Analyzer to the dependencies:
$ yarn add -D webpack-bundle-analyzer
Once the analyzer finished installing, I ran profiling command. It generates stats.json file that stores information about the bundles that Webpack builds.
$ npx webpack --profile --json > stats.json
It took a moment and once the file was generated I was ready to dive into the generated statistics:
$ npx webpack-bundle-analyzer stats.json ./dist
First argument is the stats.json file that was just generated, and the second one is a path to the folder where the built files are outputted by Webpack. This is the dist folder by default.


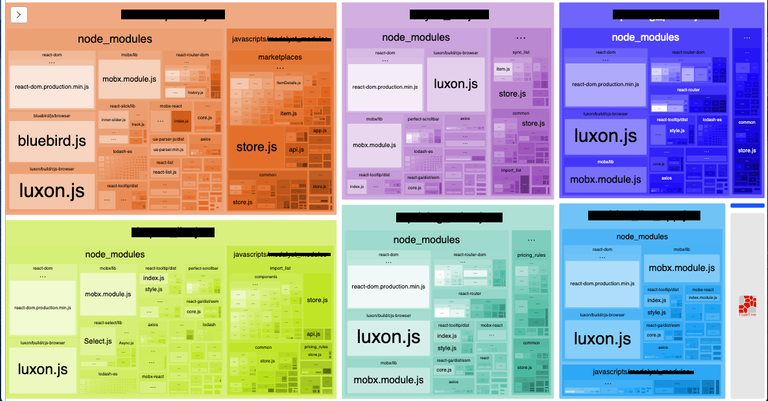
Analyzing the data
As you can see above, the front-end that needs optimization consists of few separate React apps (chunks). Each of them is mounted at a different URL endpoint.
Before we start digesting the graph, let’s look at the file sizes… All bundles weight almost 20 MB! That’s a lot. And the average 2-3 MB for a single app is also way too much — that’s how much the browser will have to load before it even starts rendering anything. React suggests that chunks do excess 250KB.
But why do these chunks even weight so much? We can find out by investigating composition of these files. These are the problems that arise from this investigation and that I will try to handle in this article:
Firstly, the bundled code is not minified for production!
Around 80% of each app is
node_modulesdependencies.The commons package that I mentioned at the start is not rendered into a separate chunk and so its copy is bundled with each app.
Some libraries can be easily replaced with lightweight alternatives, other can be removed altogether.
One of the apps is still bundled, even though it’s no longer used.
Of course, it’s possible and even wise to go on and try to find more issues at some point, but let’s not go over the top with too much at once — let’s see how much can be optimized by dealing with just these five problems!
Step 1: Working with Webpack
First step that I took was to update Webpack configuration and ensure that files are properly minimized for production.
While development code shouldn’t be minified to be easier to 🐛 debug, minimizing production code is a standard procedure that allows to lower the size of generated packages by up to few dozen percent.
Unfortunately, the project was still using Webpack 3. Upgrading it to version 4 took a while and I had to replace few Webpack plugins for Webpack 4-compatible versions. But with that out of the way, I was ready.
I wanted to update to Webpack 4, because from this version it’s no longer necessary to set up minification manually if you make use of the mode configuration option.
This was also applicable in my case, so simply adding --mode=production to the already existing build command did the trick! 🎉
A side note: npm audit
If you’re playing with dependencies anyway, remember to use npm audit as well! This command will report you dependencies that have security vulnerabilities in them.
npm audit fix will try to automatically update these packages to newer minor or patch versions that have these vulnerabilities fixed. This command is generally safe to use, because it will not do any major updates, and minor updates shouldn’t include breaking changes anyway — but you can never be sure.
In my case it managed to automatically fix over 150 serious vulnerabilities and did not break anything! 🎉 That was a long time since the last time anyone updated something, I guess… 🤷♂
Step 2: Replacing and removing dependencies
With the first step completed, we can now go into the code itself. Right away it’s easy to spot few dependencies that can be removed or replaced with better alternatives.
Unused app
One of the app bundles was a no longer used , yet it somehow remained in the code base. I started looking through the rest of the apps and quickly discovered, that there were maybe 2 or 3 files that imported something from this unused app— few simple utility functions.
It makes no sense to keep so much legacy code just because of that. Luckily, it was really simple to move these utilities to common module and replace imports so that they point to the new location.
At this point this unnecessary chunk could be safely removed without consequences. 🎉
jQuery
The other thing that draw my attention right away was this huge word repeating… Yes, I’m looking at you, jQuery!
Unfortunately, simply removing jQuery was no option — there was a lot of code that made have use of it and rewriting it would take days if not more. I started thinking about alternative solutions…
I opened the app in the browser and started analyzing the code server by the server… I quickly discovered, that pages that served these React apps already had jQuery included using good old <script> tag!
jQuery works by adding itself as a property to the object window. This means that in React apps I could remove it completely and instead load it from the window.
// Old imports of jQuery in React apps:
import $ from 'jquery'

// I replaced them with this line:
const $ = window.$
The above method will only work if you ensure that jQuery is loaded **before **the React app. Otherwise window.$ will be undefined.
This small change saved over 100KB on each chunk. Yay! 🎉
Luxon & moment.js
Another thing that I spotted on the initial stats is that both Luxon and moment.js libraries are used — both to create, manipulate and format DateTime instances. It’s a huge mistake to have them both at the same time.
Since Luxon is a more modern and lighter replacement for moment.js (it even is created by the same people), I decided to ditch moment entirely. This required some small changes, like changing moment’s .format() methods to Luxon’s .toFormat(), etc. But all in all, it was relatively easy.
A side note: You should probably think twice before using Luxon or moment.js anyway. These libraries are great and loaded with various features, but truth be: you might not even need them! If you’re simply trying to manipulate and display dates in pretty format, 📆 Day.js might be just enough for you! For more, see this comparison: You don’t need moment.js 👀.
I later replaced Luxon with Day.js as well to save even more.
lodash
The last library that I decided to optimize was lodash. It’s a library full of different utilities delivering modularity, performance & extras. It saves a lot of time for developers, but this time it came with a price…
As seen in the initial graph, entire lodash library is included with each chunk — that’s at least few dozen KB times 6, even though only few helpers were used throughout the app. That’s because the lodash package does not support the 🌳 tree-shaking mechanism and has to be bundled in its entirety.
Fortunately, there’s the lodash-es library to the rescue! It’s the same as original lodash, but repacked as set of ES2015 modules. This means that for every chunk Webpack will be able to only bundle what is in fact used in the code, and not the entire library.
The replacement is as simple as changing your imports to use lodash-es instead of lodash. The rest is just the same, all the exports have the same names as previously.
import _ from 'lodash-es'
To achieve even better results, I combined this with two additional plugins tha allow to minimize bundles even more:
babel-plugin-lodash automatically cherry picks only those lodash modules that are actually used
lodash-webpack-plugin works on top of the previous plugin to minimize modules even more
Regenerating the graph
After removing all of the unnecessary dependencies and replacing others with better alternatives, I generated new graph with Webpack Bundle Analyzer.
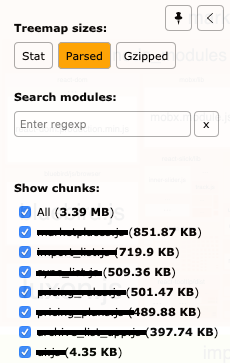
We’re down to just 3.39MB—and we started with 20MB! That means it’s almost 6 times less than what we started with 🎉.
Step 3: Using common chunks
We’ve made great progress so far, but there’s still a huge problem. Let’s look at the graph above and you’ll quickly see a lot of duplicated dependencies. Each app requires react, react-dom, mobx and mobx-react, luxon, lodash-es and so on.
This is problematic, because user’s browser has to download those shared dependencies separately for each app. I might go to one page that will load this super-heavy 100KB dependency, and then go to another page that will load it once again.
Fortunately, we have the Webpack’s SplitChunksPlugin! It’s a great tool for separating those shared dependencies into separate files, so that other chunks can reuse them instead of bundling copies of them.
If you’re lucky, you can use the default behavior of the plugin. It generates a diagram of your app dependencies and automatically chooses how it can be best optimized by splitting it to common chunks. You don’t have to do anything and you get great results.
In my case, however, automatically generating chunks was not an option. That’s because they are created dynamically and can easily change if you modify the original app’s dependencies. If you use plugins like HtmlWebpackPlugin to inject the chunks, that’s not a problem. But in this case, Webpack bundles have to be added manually to templates and if they changed at any point, many other templates would have to be updates as well.
Because of the reasons above, I decided to create common chunks by hand, and to further simplify things, I only created chunks that are reused by all of the apps. This took some time, as I manually analyzed the graph and wrote down the biggest shared dependencies. I came up with this list:
react
react-dom
lodash-es
dayjs
mobx
mobx-react
axios
react-ga
react-tooltip
react-portal
Also, I decided to create a separate chunk for common module, so that it doesn’t get bundled with each app separately. Below is the Webpack configuration that handles creating these chunks:
{
    ...,
    optimization: {
        splitChunks: {
            maxInitialRequests: Infinity,
            minSize: 0,
            cacheGroups: {
                vendors: {
                    name: 'vendors',
                    chunks: 'all',
                    reuseExistingChunk: *true*,
                    test: /[\\/]node_modules[\\/](react|react-dom|lodash-es|dayjs|mobx|mobx-react|axios|react-ga|react-tooltip|react-portal)[\\/]/
                },
                common: {
                    name: 'common',
                    chunks: 'all',
                    reuseExistingChunk: *true*,
                    test: /[\\/]apps[\\/]common[\\/]/
                }
            }
        }
    }
}
As you can see, under the optimization key I added splitChunks config. I overwrite the default maxInitialRequests and minSize values so that Webpack doesn’t try o mess up with my chunks.
Then I declared two cacheGroups: vendors for shared node_modules packages and common for the module of the same name. The most important part there is the test option, which tells Webpack how to decide on what to insert into the chunk. In my case, I just created simple Regexp lookups with the name of the packages that I wanted to be inserted into the chunk.
After this, I only had to update the templates which included React apps. Previously, they would only include the app itself:
<script src="dist/app_chunk.js">
Now they also have to include common chunks, otherwise React app will not load. Also, note the order in which we include these files. vendors are first, because code in common depends on them, and then marketplaces, which depends on both common and vendors.
<script src="dist/vendors.js">
<script src="dist/common.js">
<script src="dist/app_chunk.js">
That’s it! 🎉 I was ready to run Webpack Bundle Analyzer again to see the result.
The result
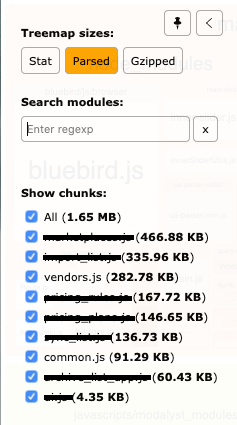
After all these fixes, the total size of all bundles dropped from almost 20MB to… just 1.65MB! This is 12 times lighter than the initial size! 🎉
We started with node_modules taking up around 80% of each app size. Now it’s around 50%, and for few apps it’s even less.
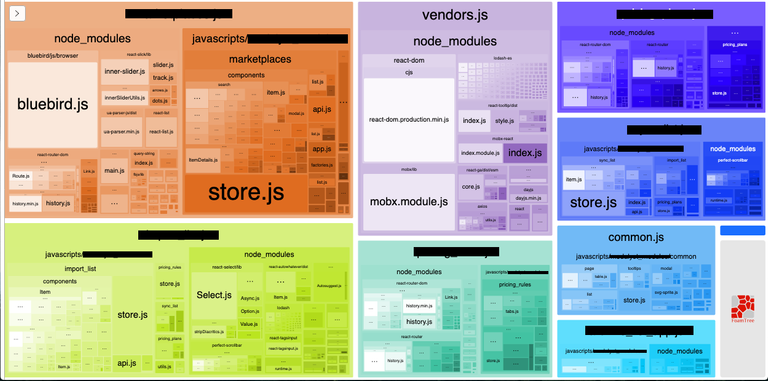
What also matters is that we now have vendors and common chunks, so they only have to be loaded by user once. If other app has to be loaded, it can now use cached vendors and common instead of requesting them again from the server.
Conclusions
As shown in this article, by taking just few simple steps and spending few hours, I was able to optimize bundles created by Webpack by a lot. The overall weight of bundles dropped from 20MB to 1.65MB. Using chunks also allows browsers to better leverage the caching mechanism. This all resulted in a huge performance gain for users of the app.
Also, I think it’s worth noting that the above investigation and optimization was not a 👩🔬 rocket science. The problems that I have listed here were pretty easy to spot once one spends as much as 2–5 minutes looking at the Webpack Bundle Analyzer graphs. It also only took few hours to implement all the optimization that I have described.
Yes, I hear your thoughts:
But why weren’t these steps taken before?
It’s important to also understand how did the project end up in this place? As I mentioned at the start: front-end ecosystem is growing all the time, getting more and more complex. However, the team responsible for the app is mostly consisting of back-end-focused full-stack developers. While they are able to write JavaScript code and extend the existing React apps, they are nowhere near being front-end experts or at least hotheads.
Nowadays, the concept of full-stack developer is becoming less and less important and meaningful. Growing complexity of front-end apps makes it very hard if even possible for a person to expertise in both back-end and front-end technologies at the same time. While it’s important to have some understanding of back-end technologies when you’re a front-end developer and vice versa, this is not the same as being expert in both fields. People who have great command of both the back and front-end are really rare specialists.
This is a trend that’s growing stronger in recent years and I expect this division to extend even more— these days teams have to be built with diversity of skills in mind, consisting of people who specialize in various areas.
* * *
This post was previously published on Medium.com platform back in Feb 2020 under @mciszczon username. It is my intention to go back to publishing similar content, but on Hive instead of Medium.com and as @instytutfi.
I decided to copy the post here as well for the visibility. Stay around for more content to come!
This is quite awesome stuff. Would love to see more of your posts on Hive :)
Thanks for the comment! I wish to drum up Instytut Fi's activities in the coming future, and your comment helps me to believe it makes sense!
Congratulations @instytutfi! You have completed the following achievement on the Hive blockchain and have been rewarded with new badge(s) :
Your next target is to reach 2000 upvotes.
You can view your badges on your board and compare yourself to others in the Ranking
If you no longer want to receive notifications, reply to this comment with the word
STOP