Introduction
Dealing with cryptocurrencies can be very confusing. Somewhat abstract concepts, a whole new set of things to learn, tasks often need multi-step processes to be accomplished. A large variety of networks, wallets, services, many ways to make mistakes and to be scammed into having your wallet drained or your computer compromised.
If you just want to play a web3 game and fund your account to buy some assets, things are often a lot more complicated and confusing than just swipping your credit card or topping up a game account from a money transfer service.
In this post I will explain a few different methods of getting currency ready to spend in Gods Unchained. These methods also work in the reverse order, if you wish to cash out your rewards into other currencies.
Note: Gods Unchained recently announced the migration of all the assets and tokens to the zkEVM network. That will make the information in this post obsolete, although some procedures will be similar. While that doesn't happen, this information is still valid.

Where the funds need to go
Gods Unchained in particular can be extra complicated because the assets exist on the Immutable X Layer-2 (L2) network of the Ethereum mainnet (Layer 1, or L1).
Interacting with the Immutable X network requires an EVM-compatible wallet like MetaMask to sign the transactions, since the L2 still relies on the Ethereum mainnet for security and authentication. However the currencies and game items won't be visible in Metamask or any Ethereum explorer, you will need to use websites that are aware of the L2 network to see your holdings.
The most commonly used websites for this are:
https://immutascan.io/, an L2 transactions explorer. For assets and currencies (tokens).
https://tools.immutable.com/wallet-mainnet/, the official front end for interactions with L2 wallet balances. Clean UI focused on managing tokens on L2. No assets (cards and cosmetics), just funds (tokens).
https://tokentrove.com/collection/GodsUnchainedCards?tab=wallet to see GU cards in your wallet address (after authenticating in the top right corner). You can navigate the site to find your cosmetics as well, but the main thing to do here is actually to buy and sell cards. Of course you can also check your balances here. Token Trove also provides access to the interface for withdrawing and depositing funds too, but more on that later.
https://atomichub.io/explorer/collection-id/imx-mainnet/Gods-Unchained_85edeb25-72c5-ec55-cc92-b91edd5c8817#stats, another marketplace where you can check your funds and assets, but less tailored to the specificities of Immutable X L2 and thus inferior to Token Trove.
https://godsunchained.com/collections, the way to browse your card collection in the official website. Easiest place to see which cards you are missing and how many you own.
https://master.desktop.godsunchained.com/#/game/gu/inventory, open the game launcher as a webpage in any browser and check your collection. Also works for forging, which is great!
One thing to keep in mind is that the Immutable Passport used to login to the game also provides a wallet, ready to use in two different L2 networks:
Immutable X (StarkEx), where Gods Unchained assets and funds are kept
Immutable zkEVM, used for other games
This is a custodial wallet - Immutable controls the private keys for you. You can still use these wallets to buy assets and hold NFTs, but you are not in full control of the address - because you don't have access to the private keys. But it can still be a convenient way for anyone to own assets and balances without having to deal with crypto.
The important point for the purpose of this post though is that currently GU does not scan assets from this wallet into the game, even if you add the address in your profile. So when it comes to transferring funds or buying cards, do not use this address. Always use an address controlled by Metamask or another similar wallet. If you happen to buy cards or transfer funds using the Passport address by mistake, you can transfer everything to your other address via Token Trove, by logging in with the Passport wallet and selecting the 'Send' function in the Profile menu.
So once you understand where the currency needs to land, let's see the ways to get it there, from the most simple to the most complicated.
Simplest solutions for anyone uncomfortable with crypto
The least hassle would be to buy the tokens directly on L2 with some payment system, like a credit card, a bank transfer or a payment service. This would still involve some form of KYC (Know Your Customer), as most countries impose anti-money laundering regulations that require cryptocurrency buyers to always provide identification.
In this situation, the simplest methods would be:
LootRush Buy, via Stripe, PIX (Brazil) or GCash (Philippines);
Immutable Play, via MoonPay.
For more details on each, please scroll down to the appropriate sections.
Mapping the most common routes
Deciding the best approach can be confusing. There are several options and the best choice depends on a number of different factors. So here I provide an overview of the different options to help you decide which one suits your situation the best. You can then scroll down and follow the detailed instructions for each case.
Note: This post has a Table of Contents for easier navigation. If you don't see a 'Post Outline' in the top left corner of the page, reload it.
| Case | Method | Advantages | Disadvantages |
|---|---|---|---|
| Buy crypto directly on L2 with credit card | MoonPay | Quick and convenient; Can buy $GODS directly | High fees; needs KYC |
| Buy crypto directly on L2 with credit card | LootRush Buy | Quick and convenient; low fees | Needs KYC; can't buy $GODS atm |
| Buy crypto on L1 with credit card | Exchange / Gateway | No need for KYC in other payment services; usually very reliable | Still needs KYC; needs several steps to reach L2 |
| Buy crypto on L1 with MetaMask | Multiple payment options available | Funds could be available immediately in your L1 personal wallet address; Supports direct credit to L1 networks with extremely low gas fees | Needs KYC; needs bridging to reach L2; potentially high purchase fees |
| Buy crypto with a money transfer service or from a bank account | Traditional exchange / gateway | Potentially low fees; Doesn't require additional KYC if you are already verified; Fiat on-ramp without credit card | Slow; Multi-step process |
| Buy a lot of $GODS or other tokens | Buy in a CEX | Low fees | Need to bridge $GODS to L2 afterwards |
| Bridge existing $GODS or other tokens on L1 | Contract interaction in ETH L1 | Standard method that always works; Comparatively simple | Need to have $GODS in personal wallet; ETH gas fees can be prohibitive sometimes |
| Bridge directly from Binance account | LayerSwap | Quick, cheap and convenient | Can't swap to $GODS directly; service may not be always available |
| Bridge / swap other tokens from other networks | LayerSwap | Quick, cheap and convenient | Can't swap to $GODS directly; service may not be always available |
| Bridge / swap other tokens from other networks | LootRush Swap | Quick, cheap and convenient; may be able to swap to $GODS directly | Needs KYC; service may not be always available |
| Bridge / swap other tokens from other networks | Orbiter Finance | Quick, very cheap and convenient | Can only bridge ETH or USDC; service may not be always available |
| Token swap within L2 | gods.exchange | Quick and convenient; no KYC required | High fees; low liquidity; occasional outages due to temporary loss of liquidity |
| Token swap within L2 | immutableswap.io | Quick and convenient; no KYC required | High fees; low liquidity; occasional outages due to temporary loss of liquidity |
| Token swap within L2 | LootRush Swaps | Quick and convenient, low fees | KYC required; occasional outages due to temporary loss of liquidity |
Buying with fiat money
MoonPay
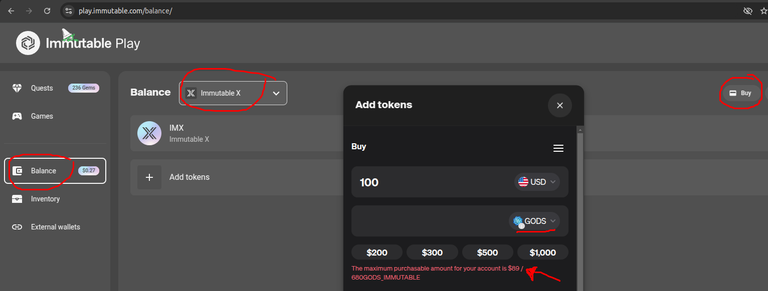
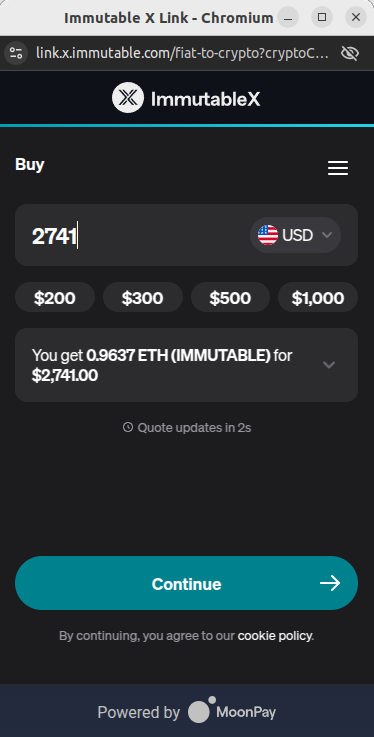
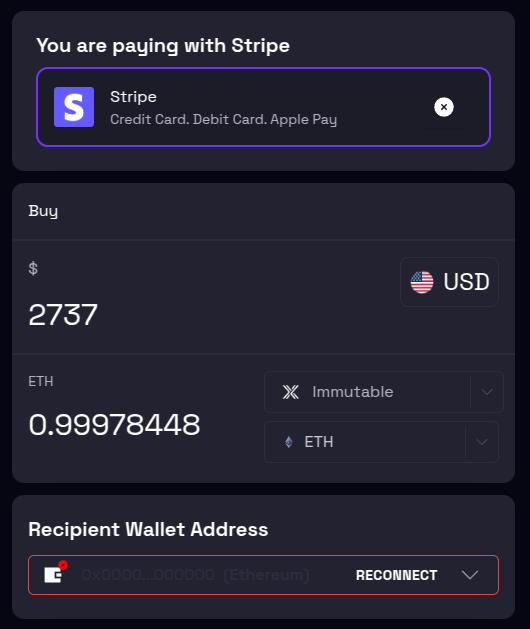
This is the Immutable officially supported method of buying L2 tokens directly with a credit card. You can access this method on Token Trove, the Immutable X wallet frontend or the Immutable Play webpage. The Immutable X wallet frontend uses an older interface that does not allow buying $GODS tokens (only ETH or USDC), but the other two alternatives include the option to buy $GODS directly, although with a rather low limit of under $90.
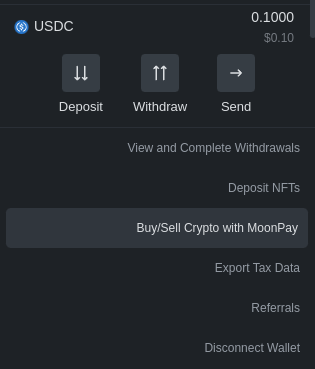
On Token Trove's current UI, after authenticating, open your profile and select the appropriate option.
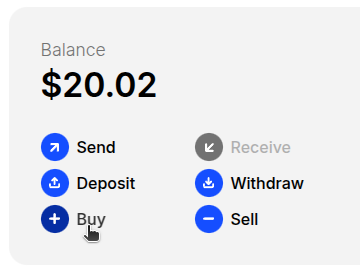
On the official wallet management page, click Buy.
 |  |
|---|
According to my estimates, MoonPay on Immutable will deposit 3.5% less than the current market price, making it probably the most expensive method, but it doesn't require bridging between networks - you will get the cryptocurrency directly on L2.
Via any exchange / gateway accepting fiat
This method varies depending on the exchange and the country you live in, so I cannot provide many details. The objective here is to buy a commonly used cryptocurrency like USDC or ETH to withdraw to your own wallet in a network with cheap transaction fees. The next steps are explained in the bridging section. This could be a very cost-effective way to get $GODS from a bank account, but it involves a few steps and requires careful planning to keep the fees to a minimum in each step.
Via LootRush
LootRush is an NFT rental service that now also offers a number of options for token purchases, including with fiat, via credit card, debit card, Apple Pay, Pix (Brazil), or GCash (Philippines). As with any service involving money, you will have to perform KYC first: a third-party service will need to authenticate photos of a legal identification document and scan your face with your phone camera. They currently don't offer $GODS as destination currency, but this may change in the future - this option has the potential to be the cheapest and most direct on-ramp from fiat to $GODS on L2, with very competitive fees, at least during the current launch phase).
Via MetaMask
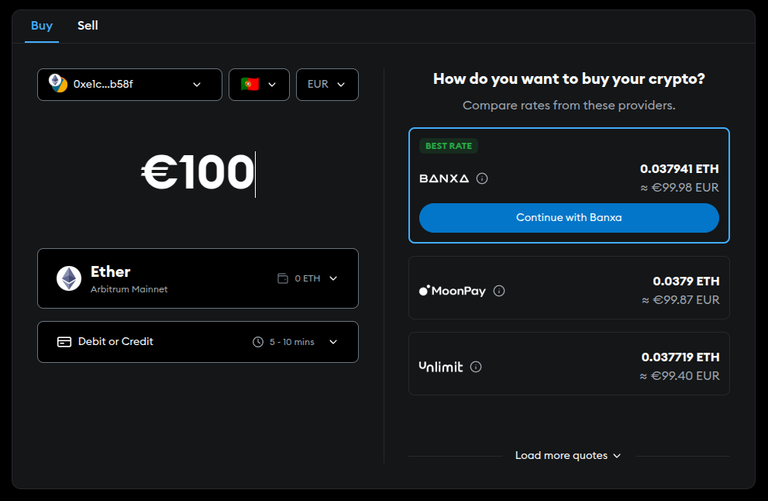
MetaMask supports a wide range of methods for buying and selling cryptocurrencies, including specific options for different countries. There are too many options to list here, and a separate guide would probably be necessary to go through the most popular or cheaper setups. It is still worth a look though.
With MetaMask you are able to purchase cryptocurrencies without going through an exchange / gateway, although you will always need to perform some kind of KYC. You also have the convenience of crediting the funds to a network other than Ethereum, which can mean significantly reduced fees in the bridging step following the purchase. However, you'll need to carefully select a combination of networks and payment methods that do not charge an exorbitant amount of fees.
For bridging options following the purchase see the appropriate section below.
Buying large quantities of $GODS
To buy large quantities of tokens you need a place with a large trading volume and order book. The $GODS token was issued initially as an Ethereum token and is traded as such in all centralized exchanges (CEX) and decentralized exchanges (DEX) that support it. To my knowledge, no exchange supports withdrawals directly to L2, which means you have to either
move the tokens to your personal wallet address on ETH mainnet first and then continue from there, as explained in the next section.
withdraw directly to the address provided by a bridge service, as explained in the bridging section.
According to Coingecko, the best exchanges to buy $GODS are the following CEXes:
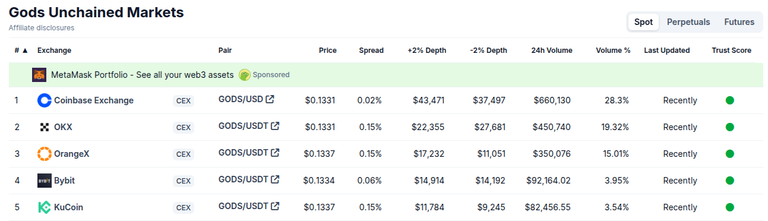
Source
Going by the information in Coingecko and CoinMarketCap, it is also possible to trade in DEXes like SushiSwap and Uniswap, but the volumes are too low to be a really viable option.
Moving tokens directly from your wallet in the Ethereum mainnet to L2
So if you already have $GODS or other tokens like ETH or USDC on L1, or if you are buying large quantities to migrate to L2, this is the most cost-effective and simple way. If Ethereum gas fees are low, this method can result in overall less fees than using a swap service. It involves interacting with a contract that takes your tokens while at the same time a deposit is made on the same wallet address for the same amount on L2.
For small amounts of $GODS, this method is only practical if the L1 gas fees are very low, otherwise there are cheaper methods that involve third-party bridging services, indicated in the section below.
For this direct method, you should again either navigate to your profile settings on Token Trove or use the official wallet frontend I linked earlier. For Token Trove:
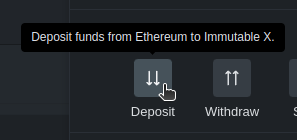
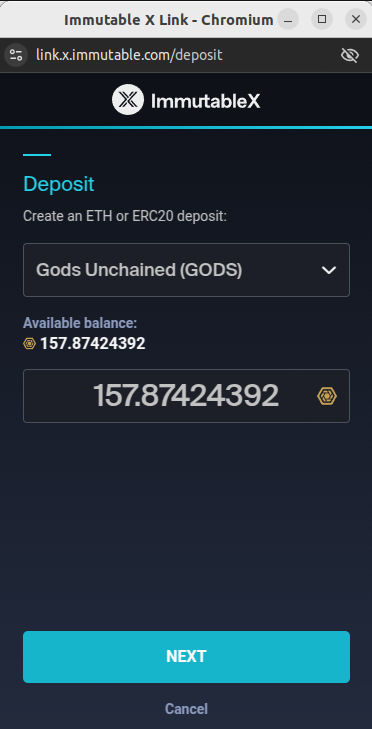
In the case of https://tools.immutable.com/wallet-mainnet/, just click on 'Deposit' to initiate the process:

An Immutable X Link pop-up should appear in either case and then you just fill out the form and follow the instructions. The pop-up is slightly different depending on where you initiate the deposit, but the usage is similar. Here I demonstrate a deposit started with Token Trove. The pop-up will be able to read your L1 balance since you have to be signed in with an address to initiate the deposit.
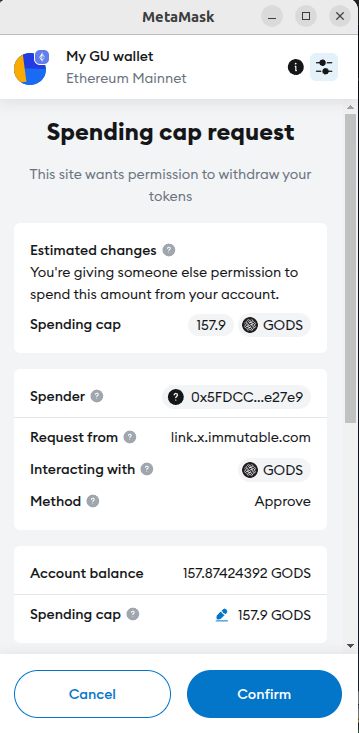
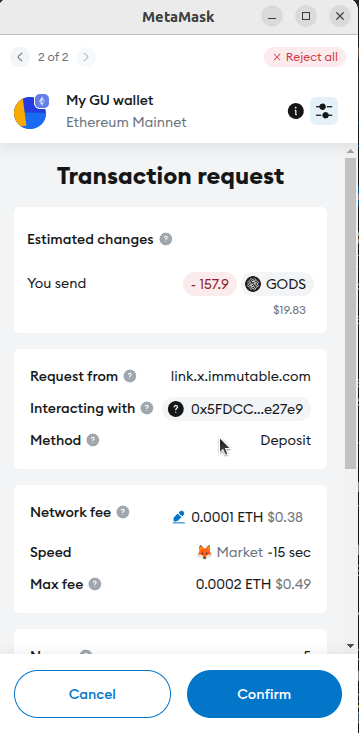
You will have to approve two transactions. The first one is a spending cap request; the second one is the token transfer itself. Subsequent deposits under the cap limit should only require one transaction (the second one).
 |  |
|---|
After the second transaction is approved, the tokens will be transferred immediately to the same address on L2. If for some reason one of the steps fails, you can repeat the process from the beginning and the pop-up will resume at the appropriate step.
In case you need more details or to troubleshoot the process, here is the $GODS contract page and here is the Immutable X: Bridge contract page on EtherScan.


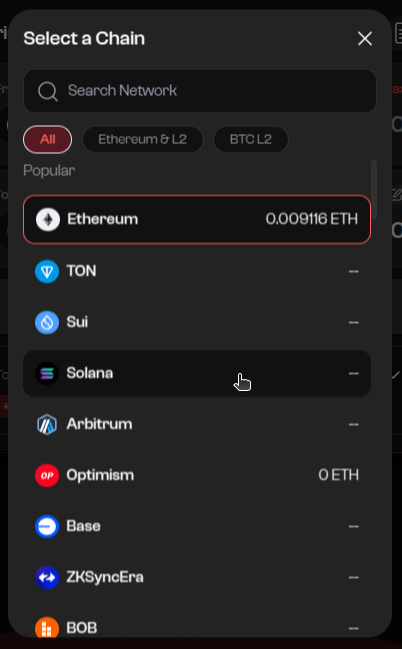
Bridging tokens from other networks to L2
In case you have tokens other than $GODS in exchanges or personal wallets, there are a couple of services that will bridge the tokens for you, while (sometimes) swapping at the same time. This means you don't have to make token conversions before bridging; and some of the services support a wide variety of tokens and networks, so it is extremely versatile. They are also affordable, especially if you are able to make the transfers via a network with very low gas fees (basically other than Ethereum).
LayerSwap
The first option is via LayerSwap. This service has a dedicated option for bridging directly from Binance, a very popular CEX. This can reducee the number of steps, making the process faster and more convenient.
Here I demonstrate a (manual) swap directly from my Binance account to an L2 wallet address, but the same principle applies if your cryptocurrency is in your wallet address in one of their several supported networks. You can use either the LayerSwap website or integrated interface in the Immutable Toolkit website. There is also an official Immutable X guide.
Step 0: Currency swaps don't seem to be currently supported by LayerSwap, so I bought ETH in Binance because that is the currency I would like to receive in L2 (and not USDC for example).
Step 1: Copy to the clipboard the amount of ETH you wish to transfer from Binance
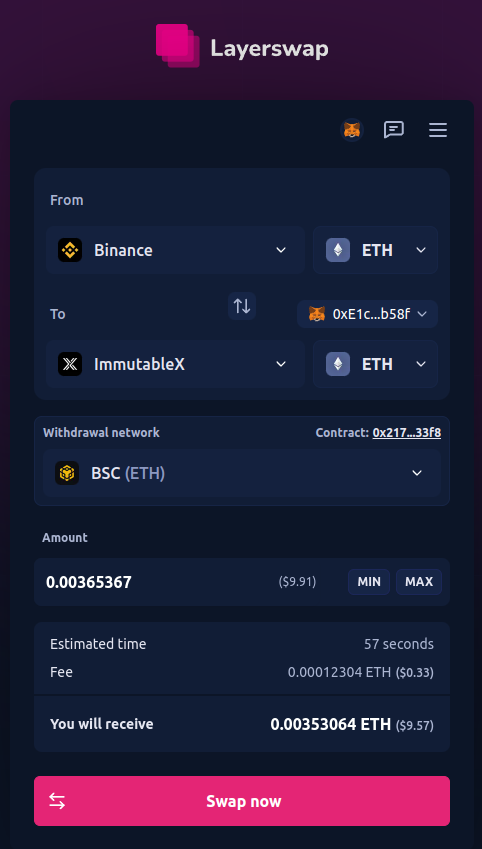
Step 2: Fill out the LayerSwap form, indicating Binance (exchange) as the source, Immutable X as the destination, the network (in this case BSC because Binance charges almost 0 fees), and the amount. Authenticate with your browser wallet extension and select the correct address so that LayerSwap knows where to send the tokens. The form should look similar to this for a ~$10 deposit:
Step 3: Confirm the form and obtain LayerSwap's BSC address. Copy it to the clipboard.
Note: I never tested a swap where the exchange amount was not exactly the same or very close to what LayerSwap is expecting. This means if the Binance (or any other exchange) is charging a withdrawal fee, you probably need to do a simulation on LayerSwap first to get the deposit address and only then you can fill the Binance form to the point where it shows you the final transfer value minus the withdrawal fee, which then you use in LayerSwap in a second procedure.
Or once you have a swap history you can try re-using the settings of a previous swap and obtain the swap address from there.
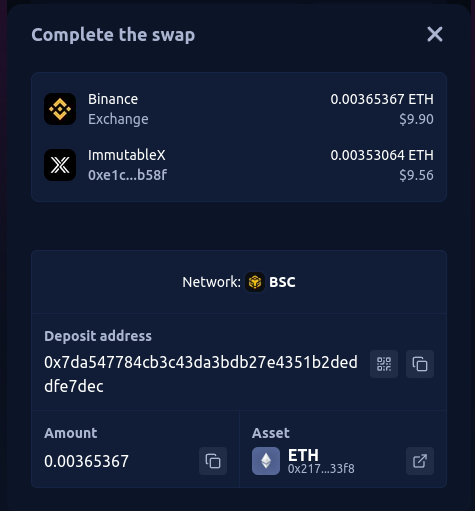
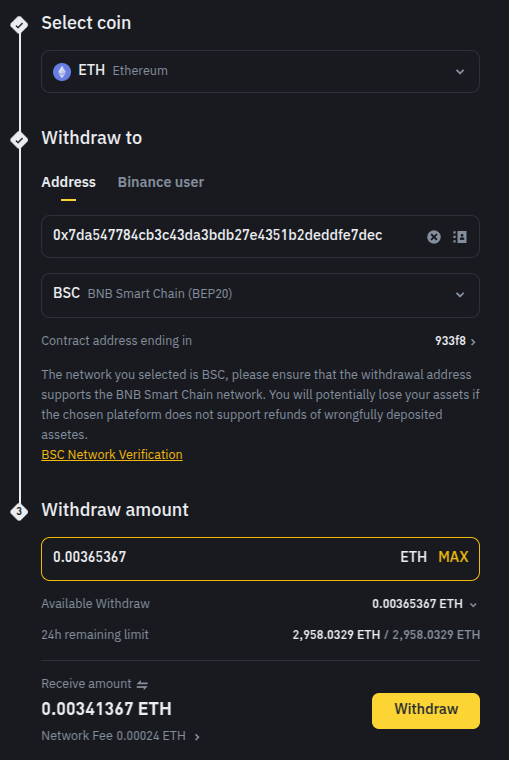
Step 4: Go back to Binance and start a withdrawal. Fill out the form with the destination address you just copied from LayerSwap. Conclude the process. The form should look something like this:
Step 5: The currency is deposited in your L2 wallet. To check the status of the swap in LayerSwap, click on the 3 horizontal bars in the top right corner > Transactions. Click on the latest one and you should get something like this. Notice that there is a discrepancy between the $0.33 indicated as fees and the ~$1 difference between input and output, but that seems to be a conversion error from ETH to USD in the input value on display.

The deposit will show in Immutascan after a few minutes:

LootRush
The second option is to use the swap / bridge service established by LootRush. The same basic principles as for LayerSwap apply, but in this case there is slightly more flexibility in the choice of destination currency in L2. Unfortunately $GODS are not currently available, but this is expected to be a temporary issue.
Note: contrary to LayerSwap, LootRush requires KYC to enable any currency operation.
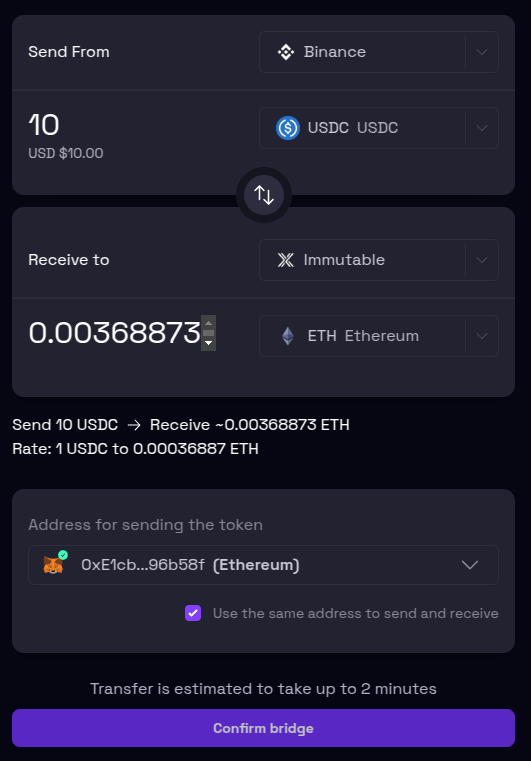
Navigate to https://www.lootrush.com/tokens/swap and fill out the form. In this example, I would be transferring from Binance, but in this case it refers to the BSC network, not the exchange.
Orbiter Finance
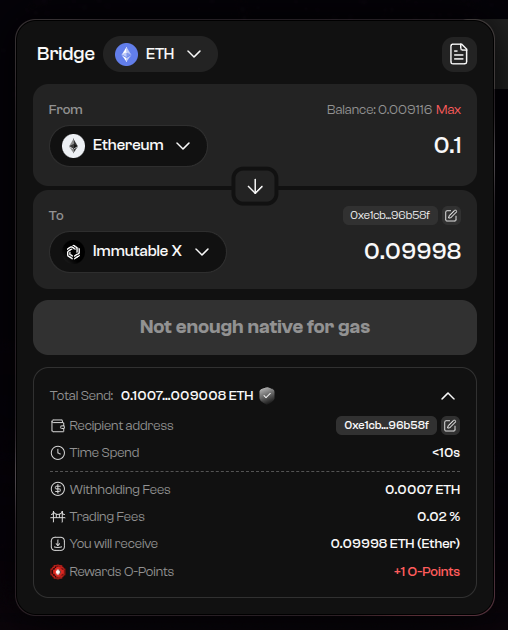
The third option is to use the Orbiter Finance bridge service. With this option you can only bridge ETH or USDC. No swaps. Appears to be cheaper than LayerSwap.
 |  |
|---|
Bridging tokens with any one of these services can be the quickest, cheapest and most convenient method to load a L2 wallet with funds a player may have in cryptocurrency elsewhere. It would also be a good method for transferring cryptocurrency bought with fiat in an exchange / gateway.
Swapping tokens within the Immutable X L2
Once you have tokens on L2 and you wish to swap them for a different token, there are three options. Do pay attention to the service fees, as they can be significantly higher than on traditional exchanges. While transferring funds from another network, it is likely cheaper to transfer ETH directly than for example transfer USDC and then swap to ETH in one of the community exchange services. The liquidity is also limited, which can cause occasional outages, especially during big swings in token prices.
https://gods.exchange/, community exchange service, limited liquidity.
https://www.immutableswap.io/, community exchange service, limited liquidity.
https://www.lootrush.com/tokens/swap?ref=72d14b63, NFT renting service with integrated swaps. This service requires eKYC while the other two do not.
This list should cover the most common methods. If you have questions or you know of other ways, please let me know in the comments!
The rewards earned on this comment will go directly to the people( @agrante ) sharing the post on Reddit as long as they are registered with @poshtoken. Sign up at https://hiveposh.com. Otherwise, rewards go to the author of the blog post.
A great manual! I deposited ETH twice and withdrew IMX once classically by Metamask a couple of years ago. Thought about trying gods.exchange.
I missed this announcement. Something is happening, I'll research. Thanks.
Good to see GU team keeps working. The game is fun and has become home for many of us. Hope it will grow bigger and stronger. Hope we'll have a nice altseason this bull market and GU will raise some serious funds for the development.
Thanks!
Hey, I sent you a Discord DM, could you check?
!PIZZA
Connected! :)
wow you did your homework well, congrats for this big boy!
This one was a lot more work than usual.
@jfa helped as well, with comments and advice.
!PIZZA
Happy to help! 🙂
$PIZZA slices delivered:
@agrante(3/5) tipped @imx.center
agrante tipped x-rain
This method is interesting, I usually use the Swap in LootRush. I send it from a cheap network like RONIN to another that accepts GODS or IMX. That's a low transaction fee.
oh just what I was looking for. Thanks a lot my friend for that tutorial
I was wondering if you could trade me some hive for gods?
I don't have a lot of $GODS atm, sorry. I bought a bunch of cheap FA Legendaries to sell later with my reserves...
But you can still take Hive to an exchange and hop around with the info in this post!