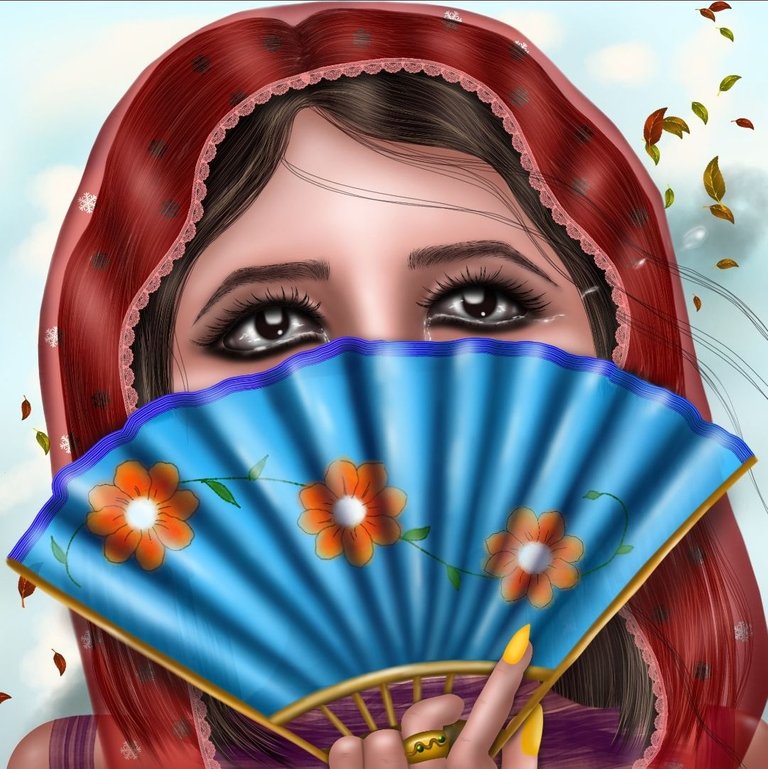
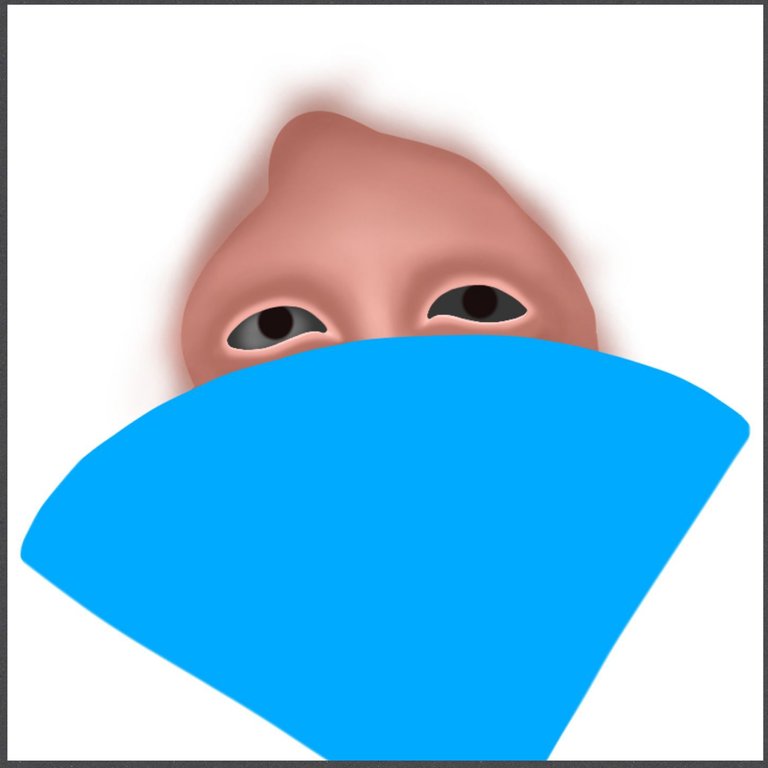
Me gusta dibujar, es una sensación de plenitud cuando vas observando como líneas y trazos planos van cobrando vida. Hoy no les voy a contar la historia detrás de esta imagen que forma parte de la colección “Las ventanas del Alma” y esta inspirada en los ojos, en las miradas de las personas, con ella busco recrear las diferentes emociones que podemos transmitir con nuestros ojos, en vez de eso les contare un poco de cual es el proceso que hago para dibujar los ojos en Ibis Paint X. Quiero agradecer a mi amiga @zuly63 por animarme a hacer este pequeño tutorial sobre mi trabajo.
I like to draw, it is a feeling of fullness when you observe how lines and flat strokes come to life. Today I'm not going to tell you the story behind this image that is part of the collection "Las ventanas del Alma" and is inspired by the eyes, in the looks of people, with it I seek to recreate the different emotions that we can convey with our eyes, instead I will tell you a little of what is the process I do to draw the eyes in Ibis Paint X. I want to thank my friend @zuly63 for encouraging me to do this little tutorial about my work.
Cuando empiezo a dibujar los ojos lo primero que tengo presente es que los ojos no son completamente simétricos y dependiendo de la orientación del rostro la asimetría puede aumentar pero lo más importante es que se vean armoniosos dentro del rostro. En este punto quiero acotar que cada persona tiene sus propias técnicas y métodos para dibujar y hoy quiero mostrarles cual es el mío.
When I start drawing the eyes the first thing I have in mind is that the eyes are not completely symmetrical and depending on the orientation of the face the asymmetry can increase but the most important thing is that they look harmonious within the face. At this point I want to point out that each person has their own techniques and methods to draw and today I want to show you mine.
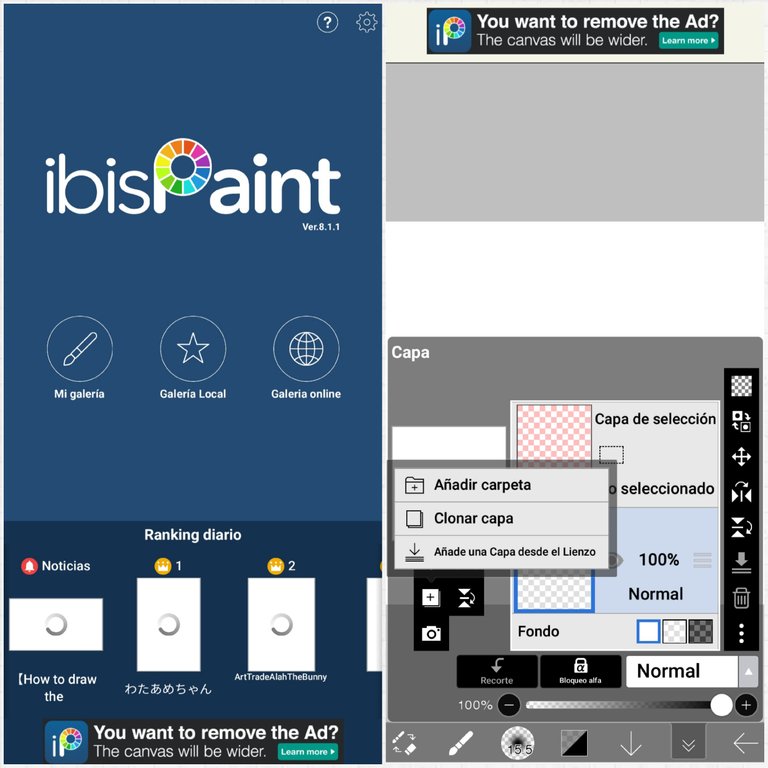
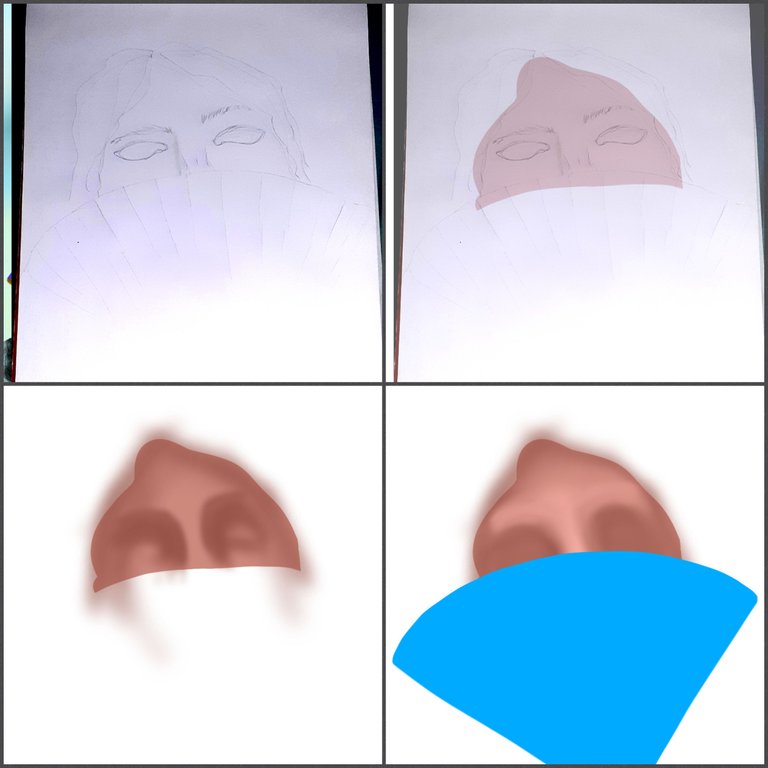
Lo primero que hago es crear mi boceto en mi blog de dibujó, luego sacó una fotografía y la importo a Ibis Paint X que es una aplicación Android para dibujar la cual es perfecta para mi porque hago mis ilustraciones desde mi teléfono celular. En Ibis Paint X creo una primera carpeta donde voy a ir incorporando alrededor de 5 capas.
The first thing I do is to create my sketch in my drawing blog, then I take a picture and import it to Ibis Paint X which is an Android application for drawing which is perfect for me because I do my illustrations from my cell phone. In Ibis Paint X I create a first folder where I will incorporate about 5 layers.
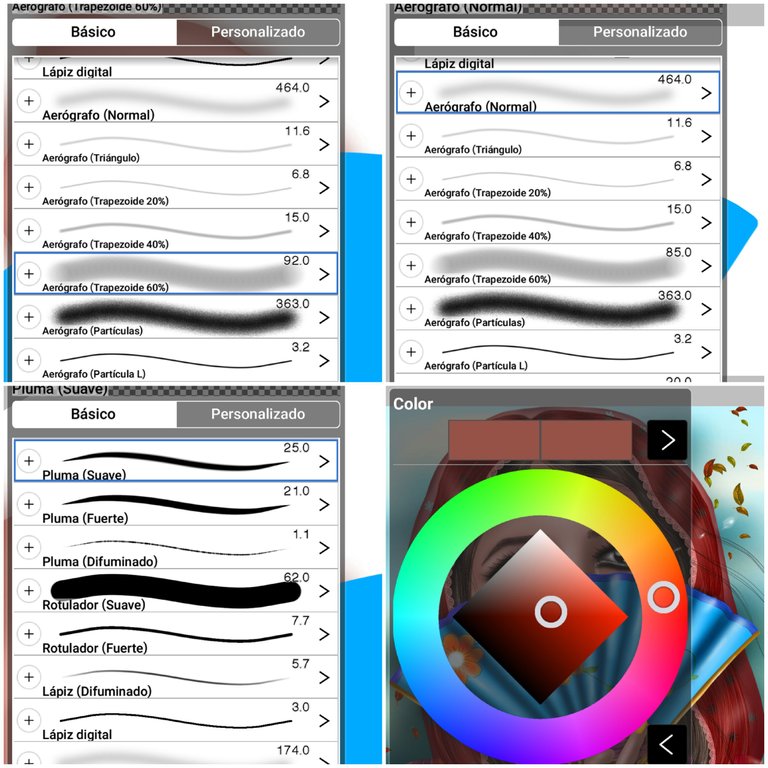
En la primera capa dibujo el fondo sólido con el pincel rotulador suave al 100% de opacidad en el tono de color piel que deseo, en una segunda capa empiezo a realizar un pequeño sombreado e iluminaciones con el pincel aerógrafo normal con opacidad al 50% en una variante del tono que escogí para la piel, es decir me voy al circulo cromático y escojo un color en esa misma gama de colores un poco más oscuro para las sombras y otro más claro para iluminar, así voy creando la cavidad ocular, el tabique de la nariz el contorno del rostro y las facciones.
In the first layer I draw the solid background with the soft marker brush at 100% opacity in the skin color tone that I want, in a second layer I begin to make a small shading and highlights with the normal airbrush brush with 50% opacity in a variant of the tone that I chose for the skin, that is to say I go to the chromatic circle and choose a color in the same color range a little darker for the shadows and a lighter one to illuminate, so I create the eye socket, the septum of the nose, the contour of the face and the features.
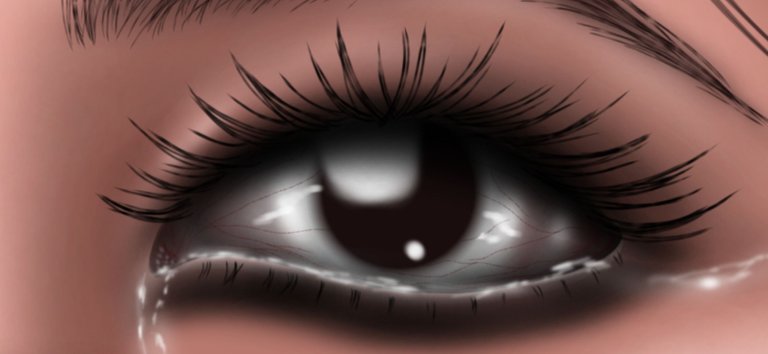
Luego paso a dibujar los ojos, empiezo dibujando la base con la forma del ojo para eso uso el pincel rotulador suave al 100% de opacidad para obtener un color sólido en color gris oscuro, en otra capa, encima de la capa anterior dibujo una línea alrededor de los ojos que se convertirán en los párpados y en el borde de los ojos esta la realizó con el pincel pluma fuerte al 100% de opacidad, esa línea sólida necesito que se vea difuminada, para difuminarla utilizo el pincel aerógrafo (trapezoide 60%) con opacidad al 100% para eliminar la línea marcada del pincel anterior mientras voy expandiendo el borde de la misma, para mezclar correctamente todos los colores uso de nuevo el pincel aerógrafo normal y voy graduando la opacidad para difuminar y mezclar los 2 tonos entre si, veremos un degradado bastante difuminado así voy creando los párpados.
Then I draw the eyes, I start drawing the base with the shape of the eye for that I use the soft marker brush at 100% opacity to obtain a solid color in dark gray, in another layer on top of the previous layer I draw a line around the eyes that will become the eyelids and on the edge of the eyes this was done with the strong feather brush at 100% opacity, this solid line I need it to be blurred, to blur it I use the airbrush (trapezoid 60%) with 100% opacity to eliminate the marked line of the previous brush while I am expanding the edge of it, to mix correctly all the colors I use again the normal airbrush and I am graduating the opacity to blur and mix the 2 tones between them, we will see a quite blurred gradient so I am creating the eyelids.
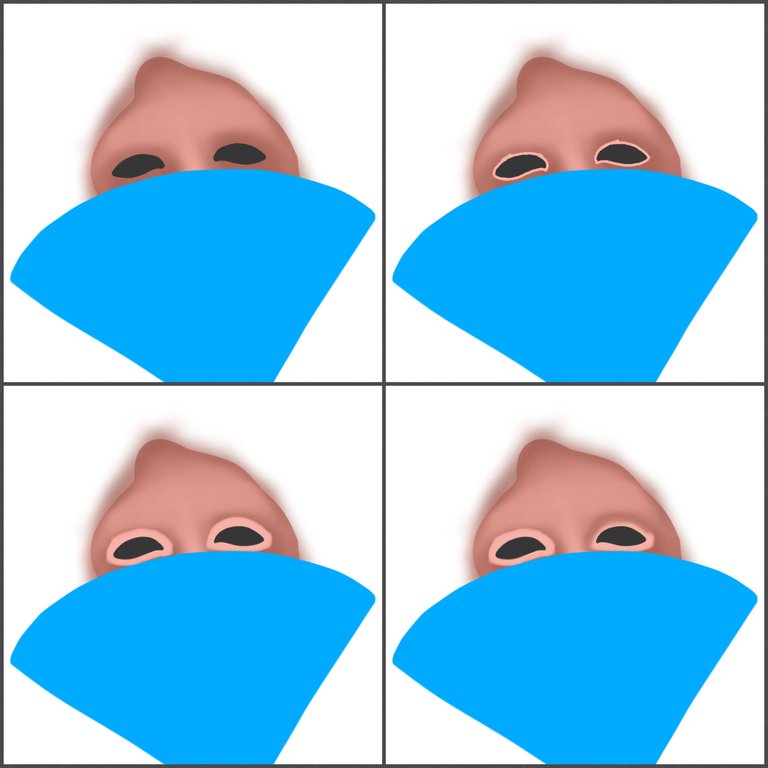
En la siguiente capa voy a darle profundidad al parpado esto lo realizo con un color un poco más oscuro dibujo una líneas con el pincel aerógrafo normal con opacidad al 50% y la dibujo en medio del espacio que hay entre el lugar donde haré las cejas y el ojo allí dibujo una suave línea en forma arqueada para que sea la cavidad de mi párpado móvil.
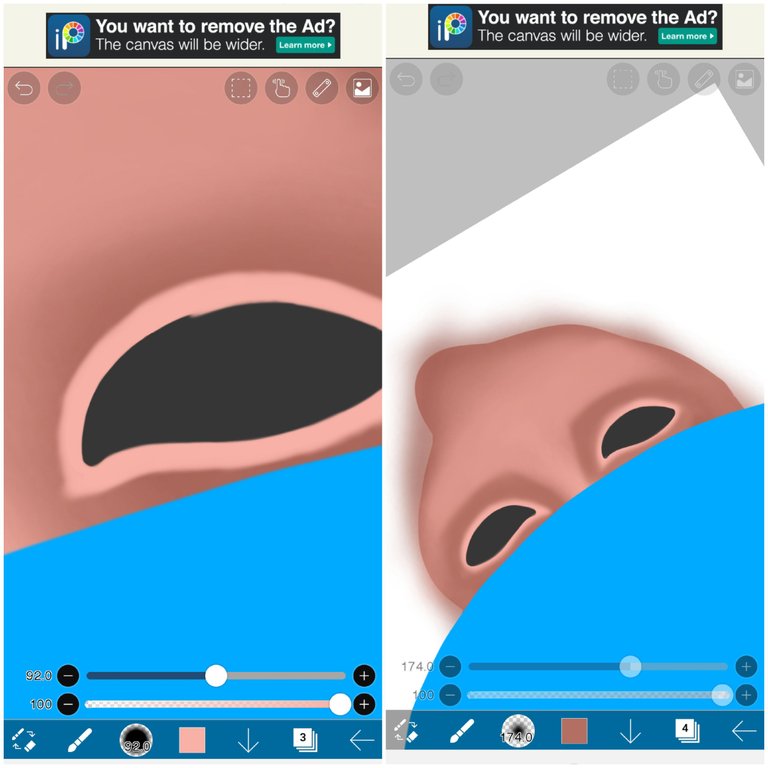
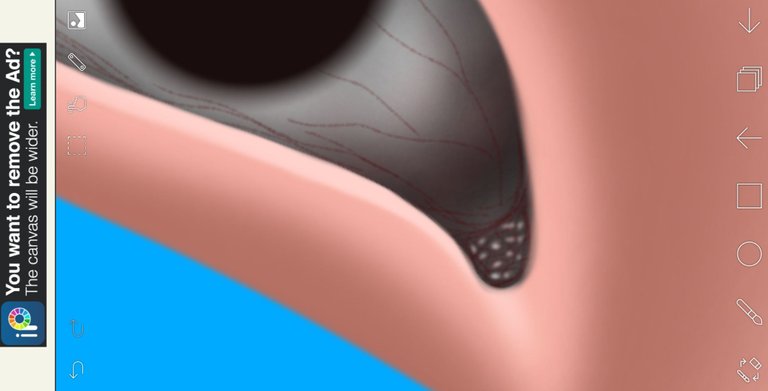
En otra capa por debajo de la capa de los párpados y encima de la base gris de los ojos voy a dibujar una línea con el pincel Pluma suave con opacidad al 100% en la parte inferior e interna del ojo, esta será nuestra línea de agua, usamos este pincel porque el centro es color sólido y los bordes son difuminados suavizando la línea de agua del ojo que por ser un tejido blando no tiene una forma sólida en el rostro, borramos el exceso de la línea de tal forma que nos queda una muy delgada pero definida línea de agua, volvemos a la capa que esta encima de donde hemos estado trabajando la línea de agua y en el borde justo donde se encuentra la línea de agua con el borde inferior del ojo usamos el pincel aerógrafo normal con opacidad de 30% allí vamos dibujar una suave línea en la línea de agua y el borde inferior del ojo hasta el lagrimal, esa zona es un poco más clara y pareciera que es la salida o el camino que recorren las lágrimas al salir🤔
In the next layer I am going to give depth to the eyelid this I do it with a little darker color I draw a line with the normal airbrush with 50% opacity and I pass it in the middle of the space between the place where I will make the eyebrows and the eye there I draw a soft line in an arched shape to be the cavity of my mobile eyelid.
In another layer below the layer of the eyelids and above the gray base of the eyes I will draw a line with the soft feather brush with 100% opacity in the lower and inner part of the eye, this will be our water line, we use this brush because the center is solid color and the edges are blurred softening the water line of the eye that for being a soft tissue does not have a solid form in the face, we erase the excess of the line in such a way that we have a very thin but defined water line, we return to the layer that is above where we have been working the water line and on the edge just where the water line meets the lower edge of the eye we use the normal airbrush with 30% opacity there we will draw a soft line on the water line and the lower edge of the eye to the tear trough, that area is a little lighter and it seems that it is the exit or the path that the tears go out🤔.
Debajo de esta capa creamos otra capa donde haremos el círculo para el Iris del ojo este lo realizó con un solo punto o toque con en rotulador suave con opacidad al 100% con el grosor lo suficientemente ancho para que nos de el tamaño del Iris este jamás toca la línea de agua del ojo siempre dejo un pequeño espacio muy pequeño entre ambos.
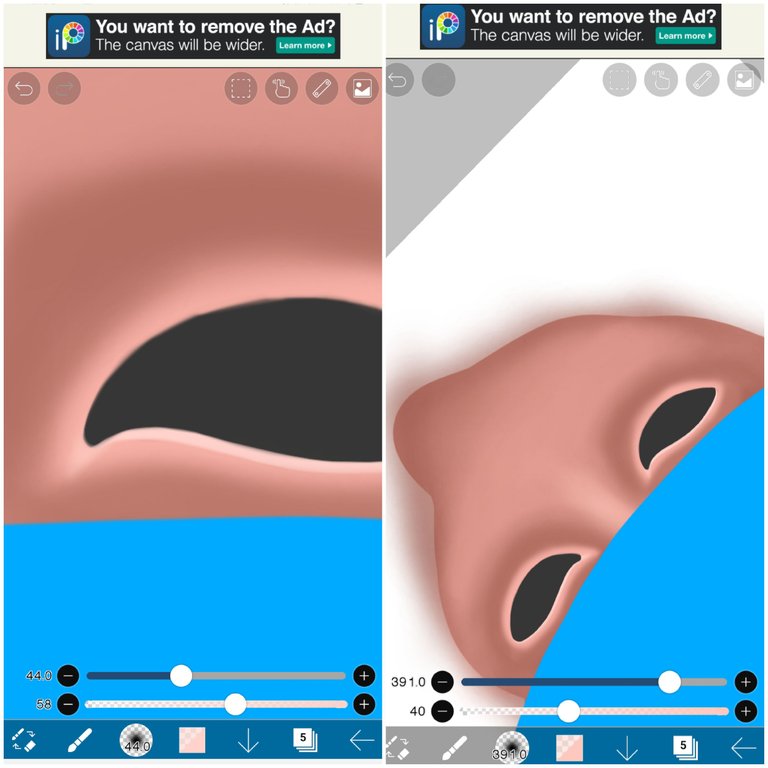
Bajamos a la capa de la base de los ojos donde ya los tenemos dibujados en tono gris oscuro que será nuestro globo ocular. Vamos a buscar un tono de gris más claro y con el pincel aerógrafo normal con opacidad al 50% empezamos a aclarar de forma muy suave con pequeños toques la parte central del globo ocular alrededor del Iris de esta manera vamos a agregar luz al ojo con ese mismo pincel pero ahora en un tono rojo oscuro damos unos pequeños y suaves toques en las esquinas de los ojos, para este paso muy probablemente debamos bajar un poco más la opacidad del pincel.
Below this layer we create another layer where we will make the circle for the Iris of the eye this was done with a single point or touch with a soft marker with 100% opacity with the thickness wide enough to give us the size of the Iris this never touches the water line of the eye I always leave a small space between the two.
We go down to the layer of the base of the eyes where we already have them drawn in dark gray tone that will be our eyeball. We are going to look for a lighter gray tone and with the normal airbrush with 50% opacity we start to lighten very softly with small touches the central part of the eyeball around the Iris in this way we are going to add light to the eye with that same brush but now in a dark red tone we give a few small and soft touches in the corners of the eyes, for this step we should probably lower the opacity of the brush a little more.
Ahora vamos a dibujar los vasos sanguíneos para ello utilizamos el pincel Pluma difuminado con opacidad de 60 o 70% y el grosor muy pequeño procedemos a dibujar unas líneas un tanto desordenada alrededor de los ojos, en el lagrimal y en la parte central de los ojos haciendo pequeñas ramificaciones para dar el aspecto de vasos sanguíneos. Luego para el lagrimal usamos el pincel aerógrafo normal con opacidad al 100% y hacemos unos pequeños puntos blancos de forma desordenada aplicando más fuerza en unos más que en otros. Además vamos a agregar una muy sutil linea con el pincel aerógrafo normal con opacidad al 50% en un tono gris un grado más claro que el de la base para marca la separación del globo ocular del lagrimal.
Now we are going to draw the blood vessels for this we use the feather brush blurred with opacity of 60 or 70% and the thickness very small we proceed to draw some lines somewhat disorderly around the eyes, in the tear and in the central part of the eyes making small ramifications to give the appearance of blood vessels. Then for the tear trough we use the normal airbrush with 100% opacity and we make some small white dots in a disorderly way applying more strength in some more than in others. In addition we are going to add a very subtle line with the normal airbrush with 50% opacity in a gray tone one degree lighter than the base to mark the separation of the eyeball from the tear trough.
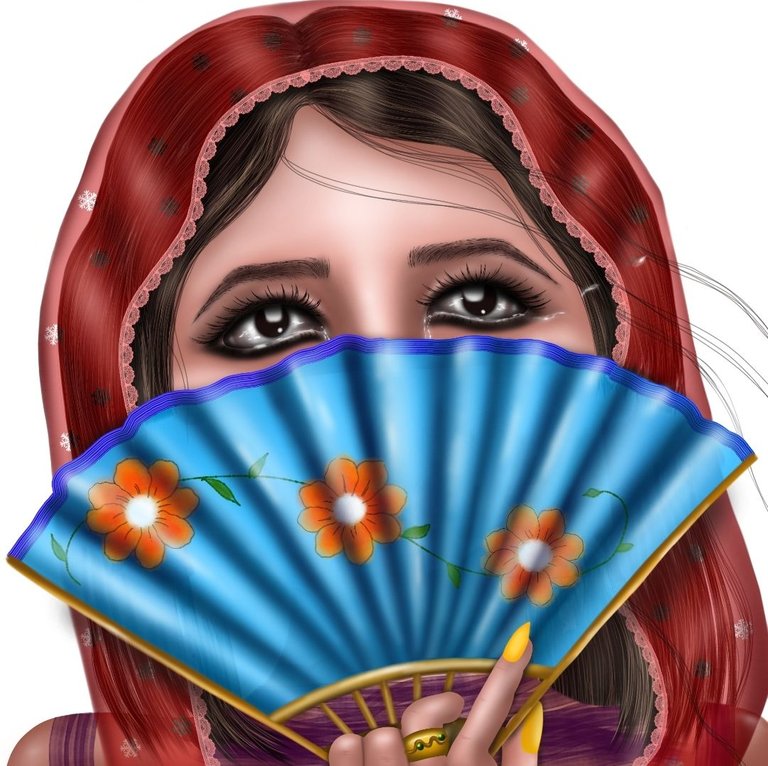
En esta ocasión decidí que el iris fuera marrón oscuro quería unos ojos color café, por lo tanto no vamos a tocar el iris. Creamos otra capa pero esta la pondremos por encima del Iris es hora de agregarle brillo a los ojos para darle ese aspecto húmedo. Volvemos a usar el pincel aerógrafo (trapezoide 60%) con opacidad al 100% en color blanco y un grosor pequeño y dibujamos o bien sea un cuadro un triángulo o lo que consideremos que sea bien como un reflejo y eso lo vamos a dibujar en la parte superior del Iris, allí mismo dentro del Iris vamos a dibujar unos pequeños puntos blancos, seguido a esto con el pincel aerógrafo normal con opacidad al 100% y con el grosor de 2 puntos aproximadamente que nos quede una línea muy delgada vamos a dibujar unas pequeñas líneas prolijas en la parte media del ojos cerca del Iris estas líneas son las que dará el aspecto de humedad al ojo.
This time I decided to make the iris dark brown, I wanted brown eyes, so we are not going to touch the iris. We create another layer but this one we will put on top of the iris it is time to add shimmer to the eyes to give it that wet look. We use again the airbrush (trapezoid 60%) with 100% opacity in white color and a small thickness and we draw either a square or a triangle or whatever we consider to be a reflection and we will draw it on the top of the Iris, right there inside the Iris we will draw some small white dots, followed to this with the normal airbrush with 100% opacity and with the thickness of 2 points approximately that we have a very thin line we are going to draw some small neat lines in the middle part of the eyes near the Iris these lines are the ones that will give the aspect of humidity to the eye.
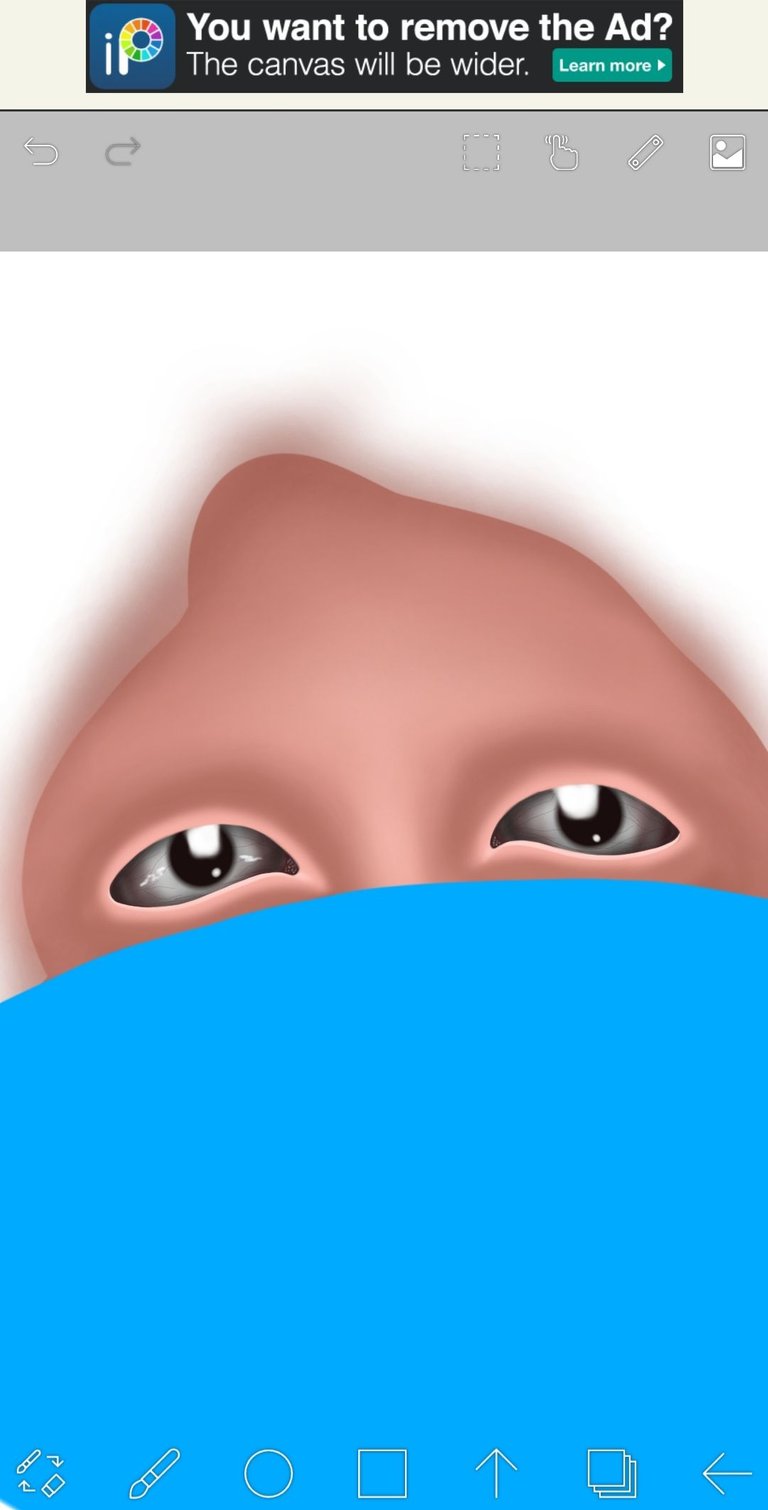
A estas alturas tenemos bien adelantado el ojo vamos a crear otra capa encima de la capa que acabamos de trabajar y vamos a sombrear la parte superior interna del ojo en un color negro con el pincel aerógrafo normal con opacidad al 35%. Para continuar creo otra carpeta encima de todas las anteriores donde añadiré capas para dibujar las pestañas y las cejas. En el caso de este dibujo también añadimos un poco de sombra oscura alrededor del ojo, así como un poco de luz al principio del ojo para simular el párpado superior.
At this point we have well advanced the eye we will create another layer on top of the layer we just worked on and we will shade the upper inner part of the eye in a black color with the normal airbrush with 35% opacity. To continue I create another folder on top of all the previous ones where I will add layers to draw the eyelashes and eyebrows. In the case of this drawing we also add some dark shadow around the eye, as well as some light at the beginning of the eye to simulate the upper eyelid.
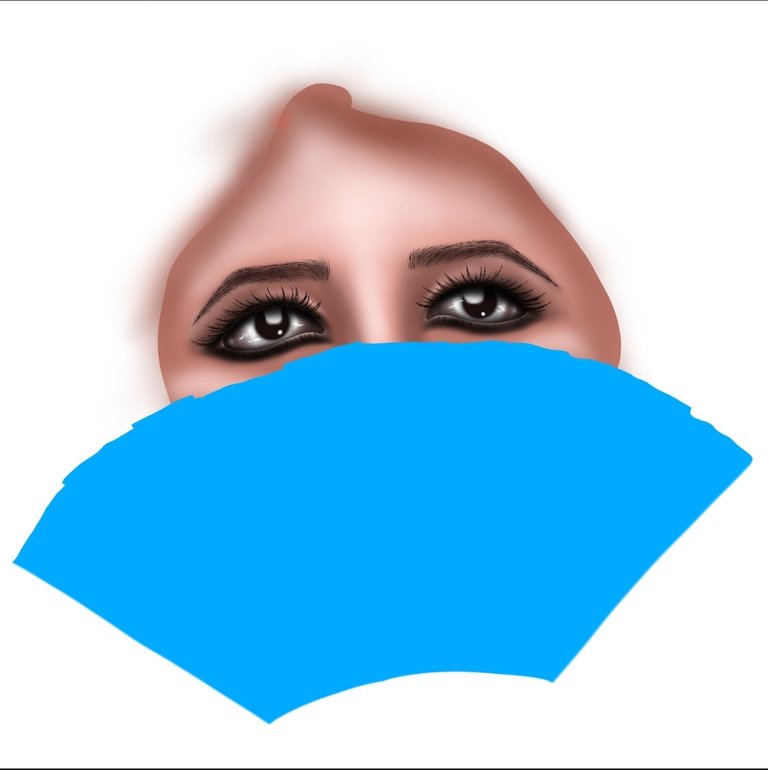
Después continúe dibujando el resto de los elementos de la composición, como fueron el cabello y el velo. Para el cabello utilice el pincel pelo con opacidad al 100% y 60 de grosor en colo marrón muy oscuro encima en otra capa utilice el pincel lápiz difuminado al 100% de opacidad y 3 de grosor en un color beige oscuro con este empecé a dibujar cada hebra del cabello y para finalizar el cabello añadimos una capa más encima de ésta, usamos el pincel aerógrafo normal con opacidad del 65% grosor de un 70 en una tono beige muy claro y pintamos unos pequeños toques de luz en algunas zonas del cabello eso da el aspecto que naturalmente tiene el cabello que brilla y refleja la luz en algunas zonas.
Then continue drawing the rest of the elements of the composition, such as the hair and the veil. For the hair I used the hair brush with 100% opacity and 60 of thickness in a very dark brown color and on another layer I used the blurred pencil brush with 100% opacity and 3 of thickness in a dark beige color and with this I started to draw each strand of the hair and to finish the hair we added one more layer on top of this one, we use the normal airbrush with opacity of 65% opacity and thickness of 70 in a very light beige tone and paint a few small touches of light in some areas of the hair that gives the appearance that naturally has the hair that shines and reflects the light in some areas.
El velo sobre su cabeza fue bastante sencillo de hacer, solo dibujamos con el pincel rotulador suave al 100% de opacidad la forma del velo y luego bajamos la transparencia de la capa. Yo tengo como costumbre crear carpetas y dentro de ellas agregar un máximo de 5 capas para que la aplicación funcione lo bastante rápido, además la experiencia me enseñó a crear cada elemento en una capa ya que al principio por ejemplo dibujaba todo el ojo en una sola capa pero si necesito borrar algo entonces muchas veces borro elementos que no deseo y debo empezar a hacer de nuevo el trabajo.
The veil over her head was quite simple to do, we just drew with the soft marker brush at 100% opacity the shape of the veil and then we lowered the transparency of the layer. I have as a habit to create folders and inside them add a maximum of 5 layers so that the application works fast enough, also the experience taught me to create each element in a layer since at the beginning for example I drew the whole eye in a single layer but if I need to delete something then many times I delete elements that I don't want and I have to start doing the work again.

Como mencioné ésta es parte de mi experiencia personal, no es una regla de como dibujar un ojo o como utilizar Ibis Paint X, simplemente es una pequeña guía para aquellos amigos que han visto mi evolución durante estos 11 meses desde que incursione en el arte digital y me han preguntado en múltiples ocasiones como haces esto o aquello y claro esta para todo aquel que sienta que le puede ser útil. En mis trabajos cuido mucho los bordes, utilizo constantemente la herramienta borrador con el pincel aerógrafo (trapezoide de 60%) ya que me permite ser precisa pero no agresiva al borrar y hace que el borde se vea suave.
Lo más importante que he aprendido durante estos meses es a arriesgarme a probar y a dibujar lo que se me ocurra se que tal vez al principio no me salga perfecto pero lo intento y sigo practicando, para ser honesta paso muchas horas dibujando reviso muy bien los detalles de la ilustración después de que la termino y si veo cosas y detalles que puedo mejorar lo hago, no importa si ya las he publicado, además no siempre tokenizo todos mis trabajos esta pieza por ejemplo aún estoy indecisa si la subiré en Nftshowroom, ¿por qué les comento esto? porque todo trabajo que hagamos es una practica que nos ayudará a mejorar nuestros métodos de dibujo.
As I mentioned this is part of my personal experience, it is not a rule of how to draw an eye or how to use Ibis Paint X, it is simply a small guide for those friends who have seen my evolution during these 11 months since I started in digital art and have asked me on multiple occasions how to do this or that and of course for anyone who feels it can be useful. In my works I take care of the edges, I constantly use the eraser tool with the airbrush (60% trapezoid) because it allows me to be precise but not aggressive when erasing and makes the edge look smooth.
The most important thing I have learned during these months is to take the risk to try and draw whatever comes to my mind, I know that maybe at the beginning it won't be perfect but I try and keep practicing, to be honest I spend many hours drawing, I check very well the details of the illustration after I finish it and if I see things and details that I can improve I do it, it doesn't matter if I have already published them, besides I don't always tokenize all my works, this piece for example I am still undecided if I will upload it in Nftshowroom, why do I tell you this? because every work we do is a practice that will help us to improve our drawing methods.
Al principio observaba el trabajo de otros artista y me decía ahhh okay entonces así es como se hace esto o aquello finalmente entendí una verdad que desde que la empecé a practicar me ha permitido mejorar mucho más rápido y creer en mi: cada persona tiene sus métodos y técnicas para dibujar encuentra el tuyo, el que mejor te funcione solo tienes que pulirlo con la práctica. Con esto no estoy diciendo que no esta bien ver un tutorial claro que si son muy prácticos y aprendemos mucho de ellos yo misma miro muchos tutoriales, lo que quiero decir es que tomes de estos tutoriales lo que te funcione y con todas esas enseñanzas crees un método perfecciónalo y hazlo tuyo.
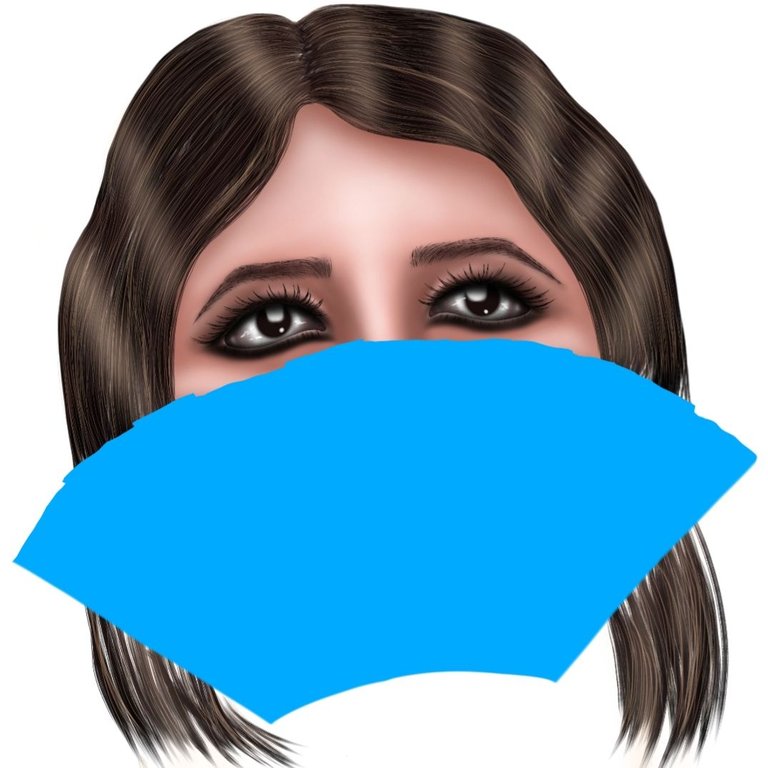
Para este tutorial quise hacer una ilustración bastante sencilla pero con detalles resaltantes como su mirada detrás del abanico que para mi era la parte central del dibujo, está transmite las emociones que quería, misterio, tristeza, melancolía o bueno eso me pareció a mi espero les guste algo más que es importante mencionar es que luego de haber editado el video para esta publicación agregue otros detalles a la ilustración que no se aprecian en el vídeo, esto se debe a que como ya les comenté después que doy por terminado un trabajo vuelvo a revisar muchas veces y corrijo o añado detalles que le darán más vida a la ilustración.
At first I watched the work of other artists and I said ahhh okay then that's how you do this or that finally I understood a truth that since I started practicing has allowed me to improve much faster and believe in me: each person has their methods and techniques to draw find yours, the one that works best for you just have to polish it with practice. With this I am not saying that it is not good to watch a tutorial, of course they are very practical and we learn a lot from them, I myself watch many tutorials, what I mean is that you take from these tutorials what works for you and with all those teachings you create a method, perfect it and make it yours.
For this tutorial I wanted to make a fairly simple illustration but with highlighting details like her look behind the fan that for me was the central part of the drawing, it conveys the emotions I wanted, mystery, sadness, melancholy or well that's what I wanted, melancholy or well that seemed to me I hope you like something else that is important to mention is that after editing the video for this publication I added other details to the illustration that are not appreciated in the video, this is because as I told you after I finish a job I go back to review many times and correct or add details that will give more life to the illustration.
Bueno queridos amigos esto es todo por hoy espero les haya gustado y encuentren práctico este pequeño tutorial en otra ocasión les contare un poco más de como realizó mis ilustraciones.Gracias por visitar mi blog nos vemos pronto.💋
Well dear friends this is all for today I hope you liked it and find this little tutorial practical another time I will tell you a little more about how I made my illustrations.Thank you for visiting my blog see you soon.💋
NFT Showroom
CRIPTOART
GHOSTMARKET
▶️ 3Speak
Tremendo tutorial amiga!! Gracias por compartir tanto aprendizaje. Tomaré notas
Éxito!! 😃💖🙏🏻
Gracias amiga... y bueno gracias por animarme 🤗
Gracias @berlissanoja... Gracias por compartir... Para mi es un continuo aprendizaje...
Es un placer amigo... así es todos estamos aprendiendo día a día.. saludos
Very very detailed tutorial. Wow!
Awwww thanks very much.😉
Me impresionó lo detallado que fue. También uso Ibispaintx y dibujo en mi tlf. Hermosa ilustración, usas pinceles totalmente diferentes a los míos, bueno esa es parte de la individualidad. Muy educativo e informativo, muchas gracias 🖤
Muchas gracias, jejeje trate de ser lo más precisa posible... Ibis Paint es una excelente app para dibujar y bueno cada uno trabaja con los pinceles que se les haga más cómodo jejeje es como dices parte de nuestra hermosa diversidad, gracias por visitar mi blog...🤗
De nada, hiciste un excelente trabajo 😊