Espero que hayan disfrutado mi presentación el día de ayer, agradezco la receptividad que he tenido por parte de ustedes, hoy quiero compartirles el paso a paso de uno de mis dibujos.
Hello friends! I hope you enjoyed my presentation yesterday, I appreciate the receptivity I have had from you, today I want to share with you the step by step of one of my drawings
Paso #1
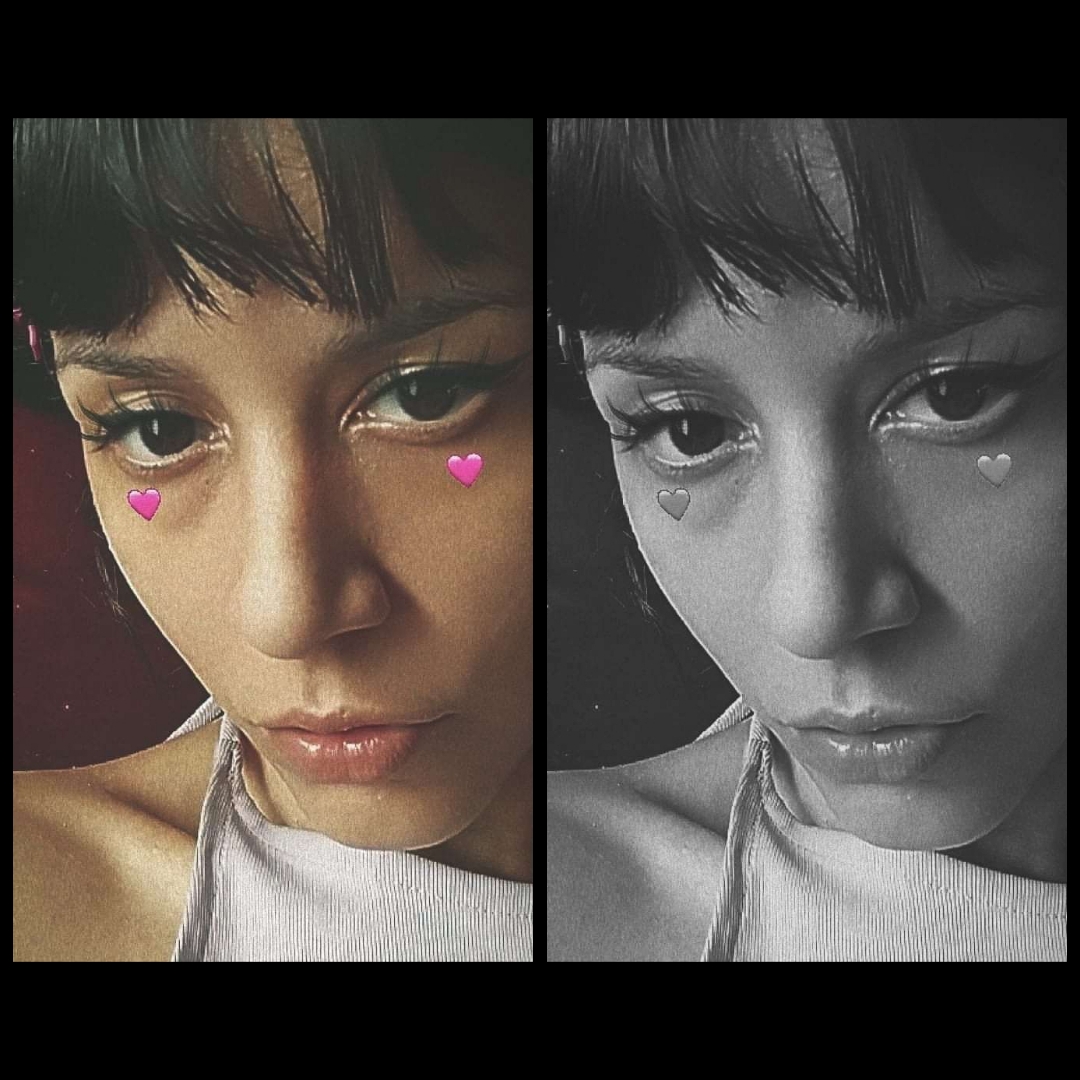
Lo primero que hago es encontrar la imagen que me inspire, en mi caso, suelen ser fotos de amistades o de mi propia autoría
El claroscuro que es el estilo que realizo, consiste en generar contraste entre luces y sombras, utilizandolo de manera adecuada para darle mayor expresividad a la obra de arte en si, como no todas las imágenes que suelen inspirarme tienen este contraste, entonces lo trabajo un poco con algunos programas de edición fotográfica, acentuando sombras e iluminaciones, entendiendo qué debe existir un punto desde donde ingrese la luz, equilibrando con un punto contrario de oscuridad.
También edito esta misma imagen en blanco y negro reservando ambas.
Step #1 The first thing I do is to find the image that inspires me, in my case, they are usually photos of friends or of my own authorship. The chiaroscuro, which is the style I use, consists of generating contrast between lights and shadows, using it in an appropriate way to give more expressiveness to the artwork itself, as not all the images that usually inspire me have this contrast, then I work a little with some photo editing programs, accentuating shadows and lights, understanding that there must be a point from where the light enters, balancing it with an opposite point of darkness. I also edit this same image in black and white reserving both
Paso#2
Una vez realizado esto, sigue plasmar el boceto sobre el papel negro, se pueden utilizar creyones de tonos claros, o tizas para dejar la menor cantidad de marcas posibles, algunos tipos de cartulina, permiten que los trazos con creyones sean borrados, igual recomiendo dibujar de forma ligera para que quede un trabajo final más impecable.
(Tips extra) si dibujas primero sobre una hoja de papel blanco, puedes llenar de tiza la cara opuesta, colocar ésta sobre la cartulina negra y marcar las líneas básicas, de esta manera quedará transferido
Step #2 Once this is done, continue to draw the sketch on the black paper, you can use crayons of light tones, or chalk to leave as few marks as possible, some types of cardboard, allow the strokes with crayons to be erased, I still recommend drawing lightly for a more impeccable final work. (Extra tips) if you draw first on a white sheet of paper, you can fill the opposite side with chalk, place it on the black cardboard and mark the basic lines, in this way it will be transferred to the paper
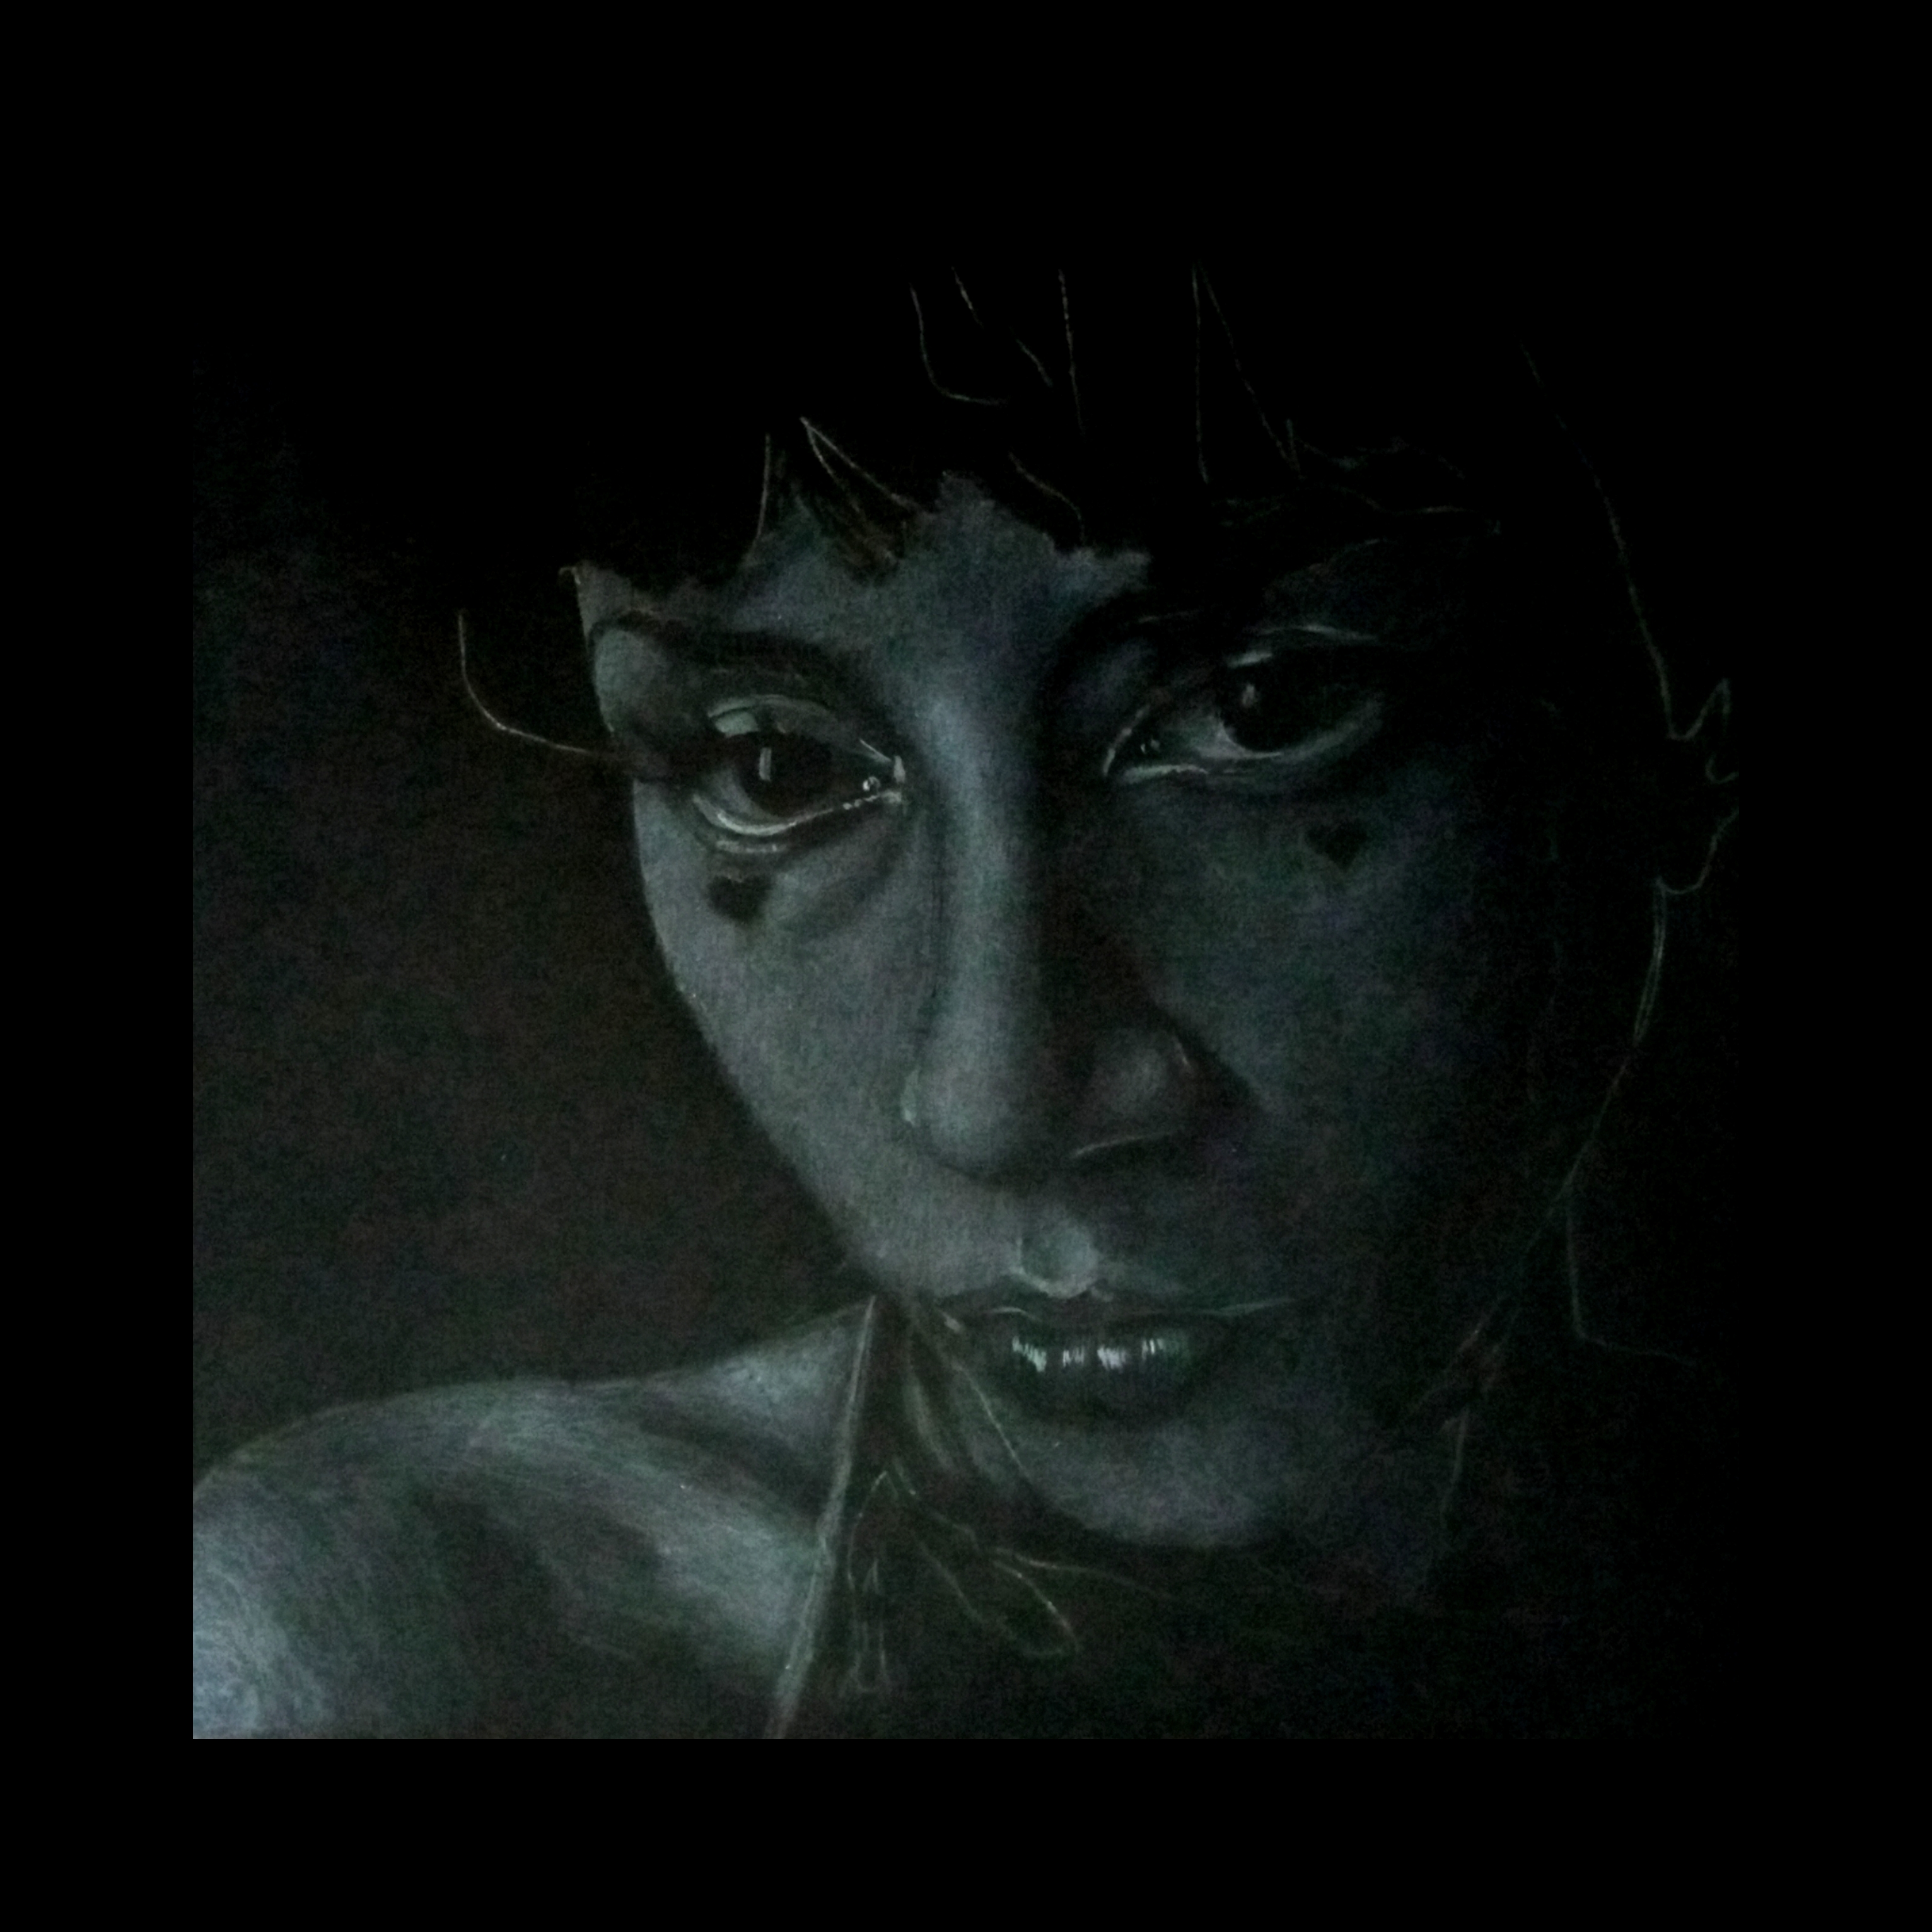
Paso #3
Cuando ya tengo mis líneas guías sobre la hoja, tomo la foto original que edité anteriormente en blanco y negro, y con un creyon blanco acentúo las luces, y degradando a grises en los lugares correspondientes.
Step #3 Once I have my guide lines on the sheet, I take the original photo that I previously edited in black and white, and with a white creyon I accentuate the lights, and degrade to grays in the corresponding places.
Paso#4
Teniendo esta base comienzo a elegir los tonos adecuados para la piel, suelo utilizar trozos de cartulina de reciclaje dónde primero hago pruebas a ver cuál es la más parecida al tono real o al tono que quiero, como notarán en mi caso no me gusta copiar exactamente la imagen original, suelo transformarla un poco según mi instinto me guíe
(Tips extra) hay tonos de piel que son en base a rosas, otros más amarillos, oliva, recomiendo hacer una segunda base de estos tonos en las partes dónde se requieran, y sobre ésta mezclar los "colores piel" más adelante les haré un tutorial de cómo mezclar los tonos con creyones sobre papel negro
Step #4 Having this base I start to choose the right tones for the skin, I usually use pieces of recycled cardboard where I first test to see which is the most similar to the real tone or the tone I want, as you will notice in my case I do not like to copy exactly the original image, I usually transform it a little according to my instinct that guides me. (Extra tips) there are skin tones that are based on pinks, others more yellow, olive, I recommend making a second base of these tones in the parts where they are required, and on this mix the "skin colors" later I will make a tutorial on how to mix the tones with crayons on black paper.
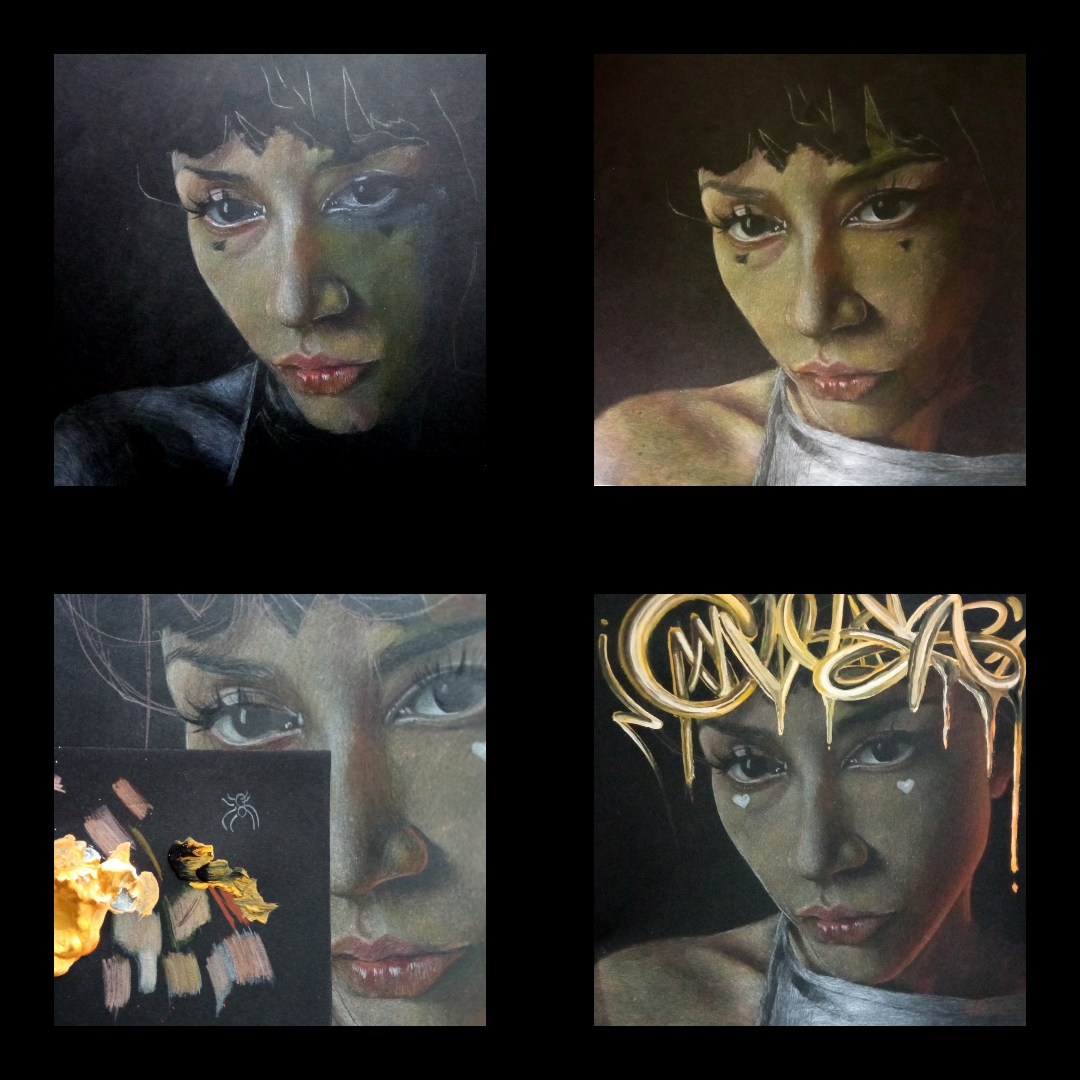
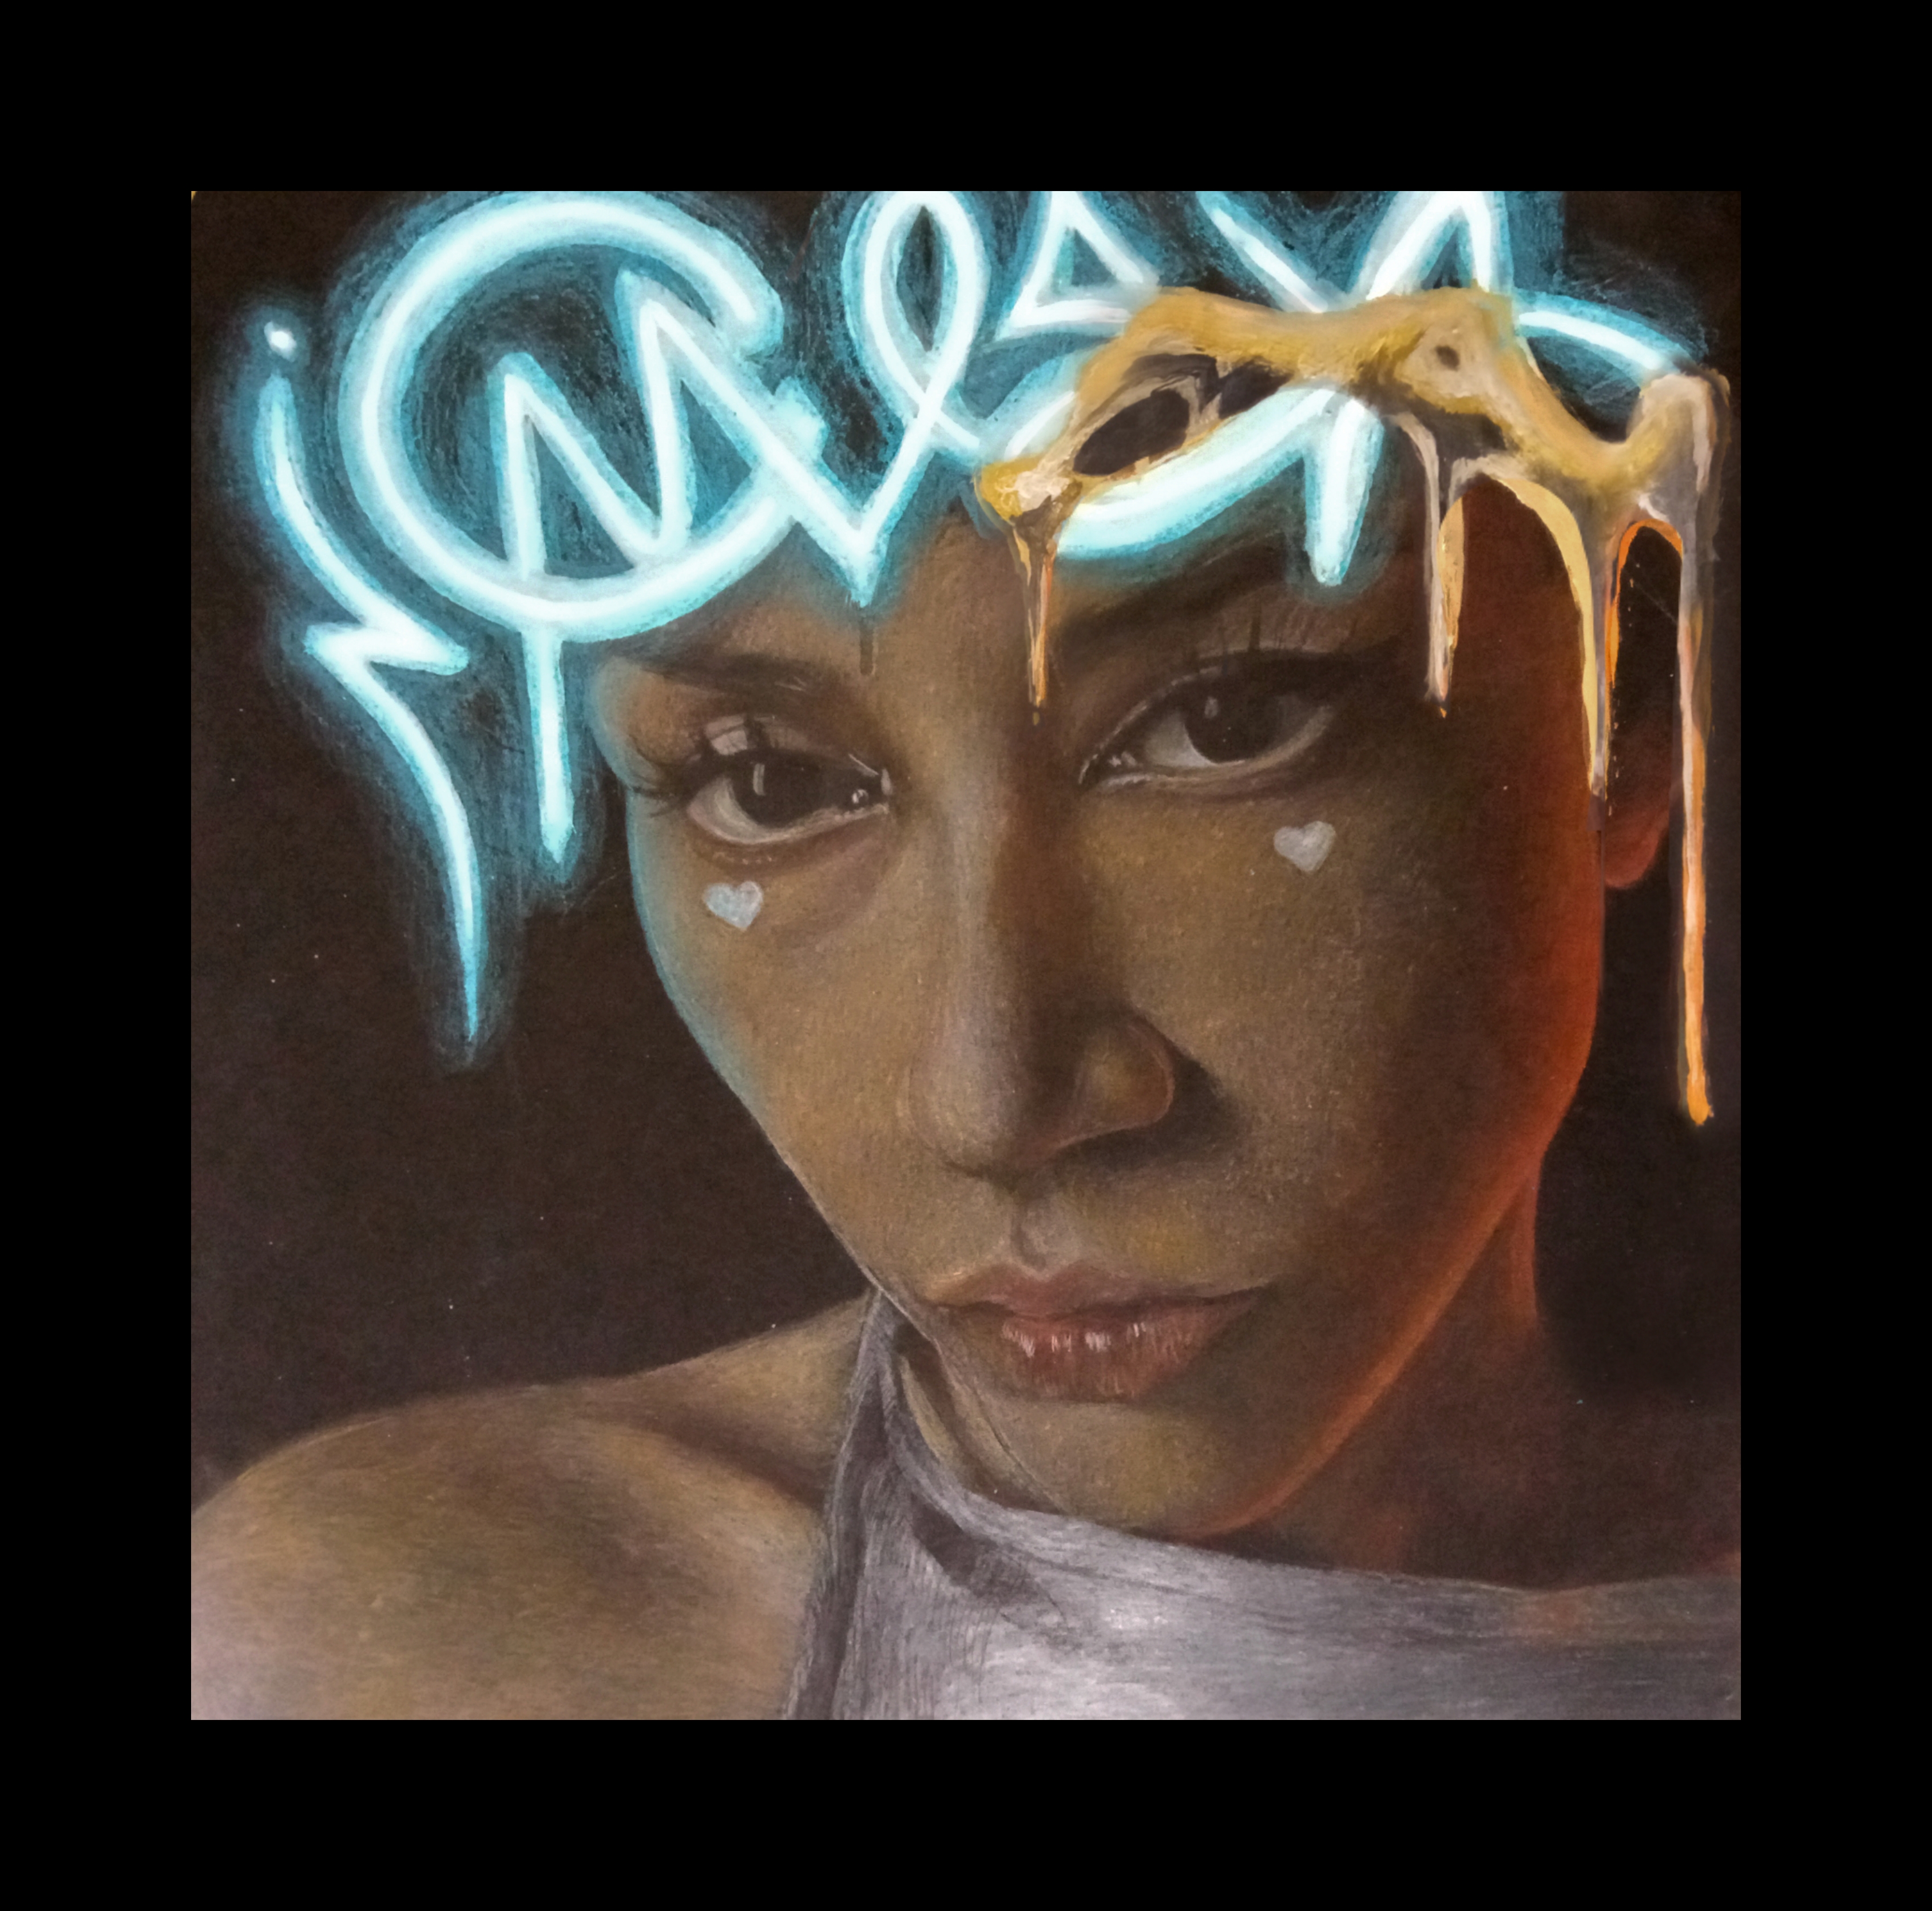
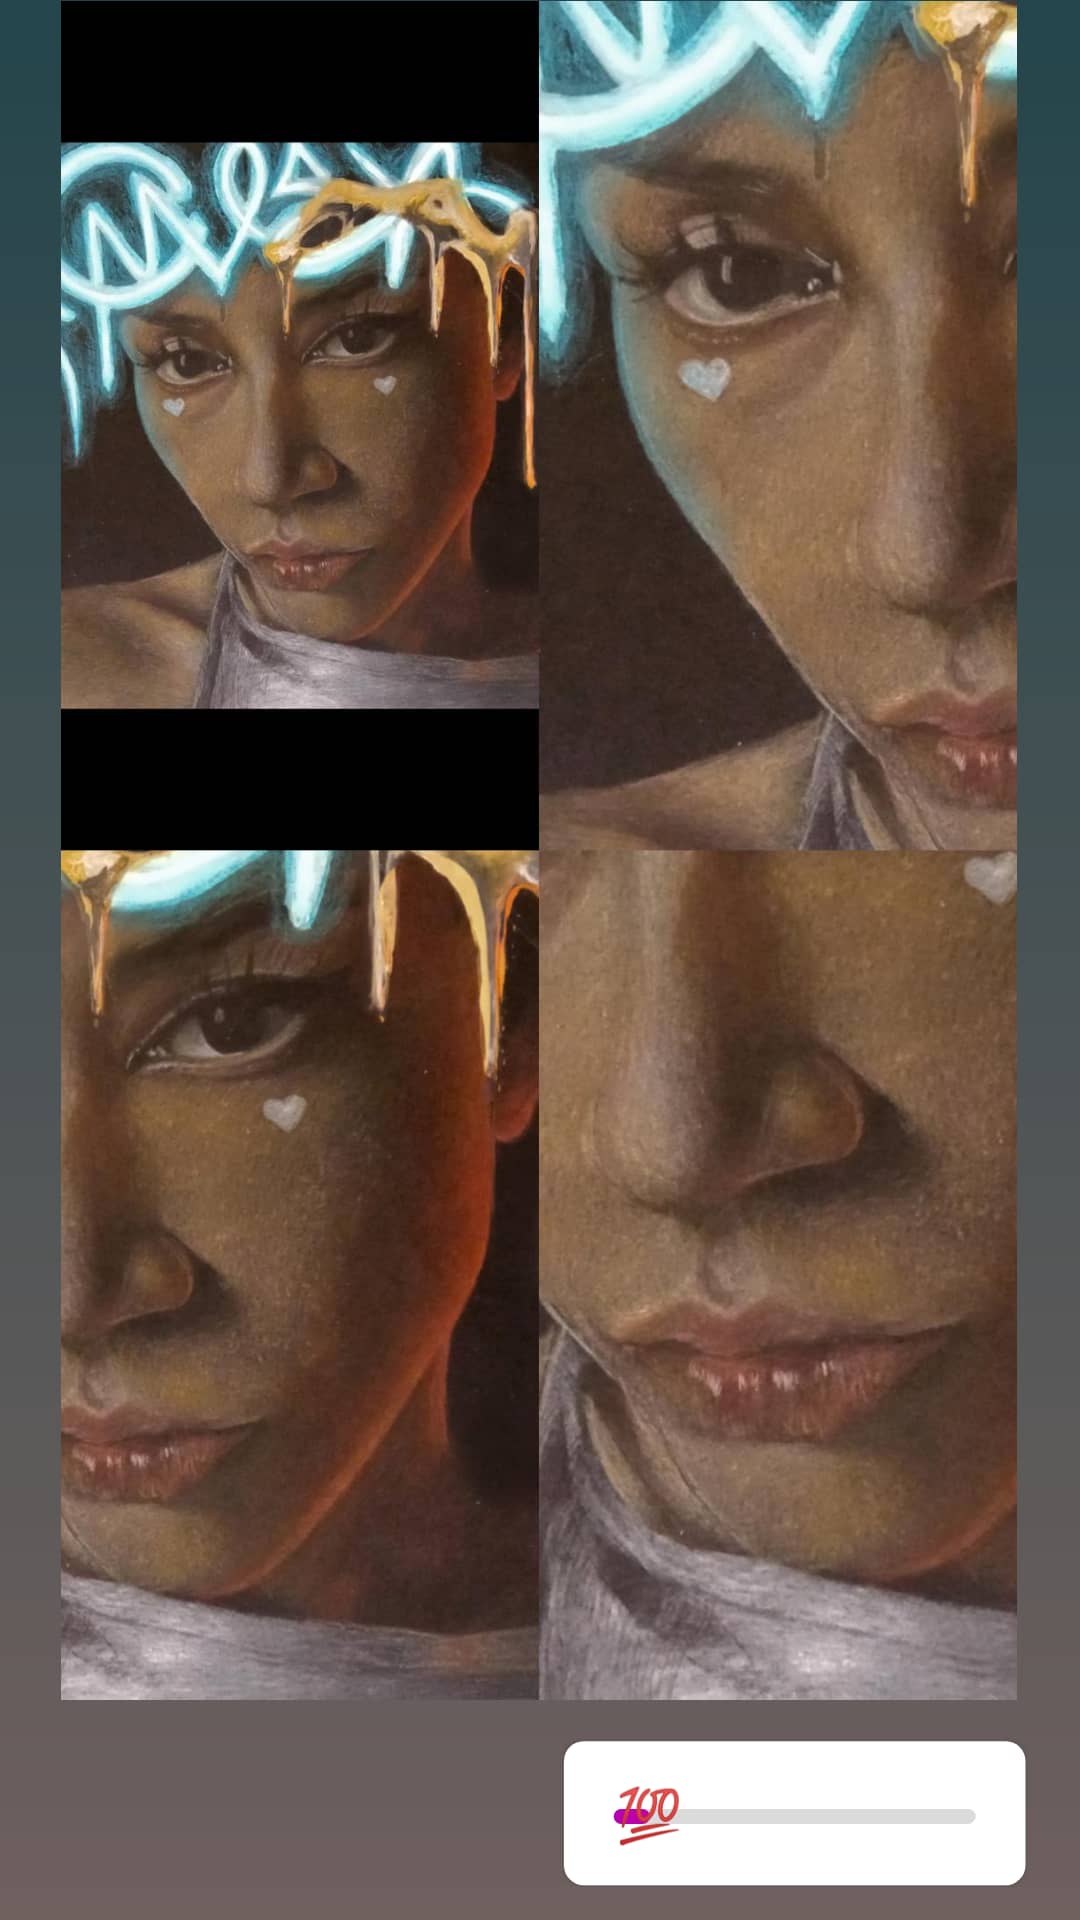
Paso #5
Cuando ya he culminado todo mi dibujo, utilizo un poco de pintura blanca para hacer algunos detalles de luz más acentuados, en el caso de este, la escritura neon, en otros dibujos he utilizado la pintura de otras formas y sobre ella creyones para generar diferentes efectos, en otro post les contaré al respecto.
Step #5 When I have finished my drawing, I use some white paint to make some details of light more accentuated, in the case of this, the neon writing, in other drawings I have used the paint in other ways and on it crayons to generate different effects, in another post I will tell you about it.
Espero que hayan disfrutado de este paso a paso, que les nutra de manera creativa, si queda alguna duda pueden escribirme por aquí o a mi cuenta de Instagram @dan_veron
I hope you enjoyed this step by step, may it nourish you in a creative way, if there are any doubts left you can write me here or to my Instagram account @dan_veron
Excelente explicación y muy bello tu trabajo,te deseo mucho éxito, gracias por compartir tu arte.
Oooh muchas gracias! Espero pueda servir de ayuda a quienes quieran utilizar estas técnicas, muchas gracias por apreciar
Congratulations @danivero! You have completed the following achievement on the Hive blockchain and have been rewarded with new badge(s) :
Your next target is to reach 300 upvotes.
You can view your badges on your board and compare yourself to others in the Ranking
If you no longer want to receive notifications, reply to this comment with the word
STOPCheck out the last post from @hivebuzz:
Support the HiveBuzz project. Vote for our proposal!
Te felicito porque de un arte construyes otra obra de arte. Me encanto restado, y parece un retrato antiguo restaurado.
Oooh muchas gracias por apreciarlo de ese modo, este es el efecto que da dibujar sobre papel negro con las técnicas que utilizo
Muy buen trabajo, de verdad el dibujo esta super brutal. Creo que te falta conocer un poco de Markdown Aqui te dejo unas guias que fueron proporcionadas en la master class:
https://peakd.com/ccc/victoriabsb/coleccion-recursos-de-hive-para-nuevos-y-viejos-usuarios-tutoriales-y-mas
Muchas gracias Luis!!! Bastante oportuna tu sugerencia, un abrazo!!!
No hay de que estamos para apoyarnos.
¡Felicidades! Esta publicación obtuvo upvote y fue compartido por @la-colmena, un proyecto de Curación Manual para la comunidad hispana de Hive que cuenta con el respaldo de @curie.
Si te gusta el trabajo que hacemos, te invitamos a darle tu voto a este comentario y a votar como testigo por Curie.
Si quieres saber más sobre nuestro proyecto, acompáñanos en Discord: La Colmena.