English
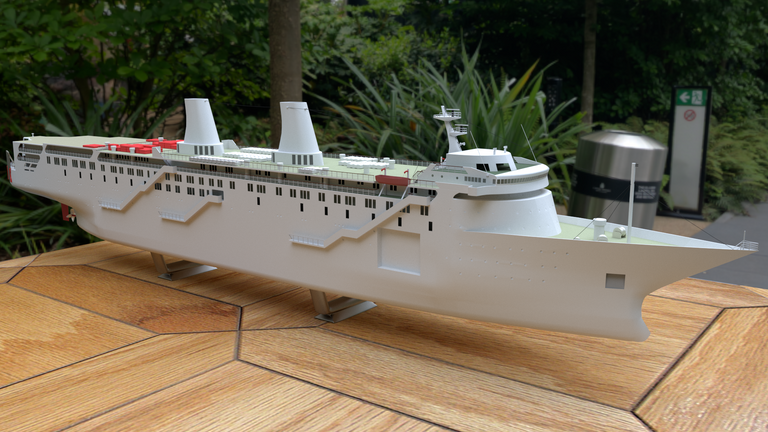
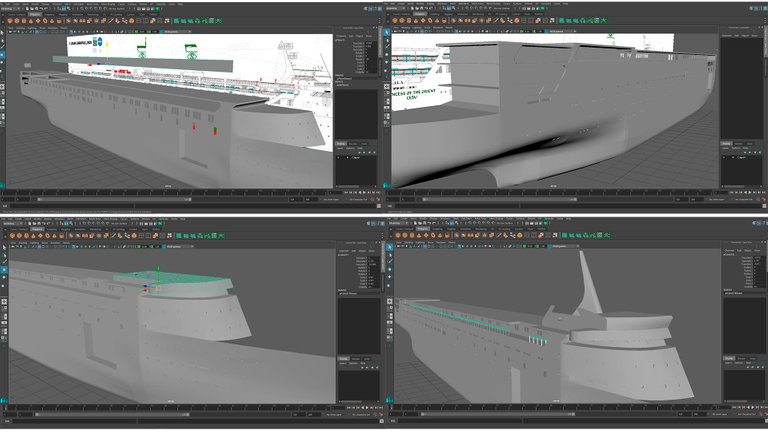
As we had agreed in the last post of this series, we resumed our lessons with the modeling of a ship, the MV Princess of the Orient.
The MV Princess of the Orient was a ferry that completed its last years of service in the Philippine Islands and belonged to the Sulpicio Lines company and due to the elegance of its design it became an emblematic ship in its time. It covered the route between Manila and Cebu and on September 18, 1998, in the midst of stormy weather, it left the port of Manila with some 388 passengers and 102 crew members.
Español
Tal como habíamos quedado en el último post de esta serie reanudamos nuestras lecciones con el modelado de un barco, el MV Princesa de Oriente.
El Princesa o Príncipes de Oriente (MV Princess of the Orient) fue un ferry que cumplió sus últimos años de servicios en las Islas Filipinas y pertenecía a la empresa Sulpicio Lines y debido a la elegancia de su diseño se convirtió en un barco emblemático en su época. Cubría la ruta entre Manila y Cebu y el 18 de septiembre de 1998, en medio de un tormentoso clima partió del puerto de Manila con unos 388 pasajeros y 102 tripulantes.
A few minutes later the disaster began, showing itself with a slight inclination (list) to the left (port side). This problem gradually increased due to the large waves and strong winds, and the cargo (mainly vehicles) was moved by movement and gravity to the port side (left), so the ship was already doomed. Shortly after she completely capsized and ninety minutes later she ended up sinking. 150 people died in the incident. Anyway, you already know that the stories of these boats are not exactly happy. device.
Pocos minutos después comenzó el desastre evidenciándose con una pequeña inclinación (escora) a la izquierda (babor). Este problema se fue incrementando paulatinamente debido a las grandes olas y los fuertes vientos, y la carga (vehículos principalmente) se corrió por el movimiento y la gravedad hacia babor (izquierda) por lo que ya la nave estaba condenada. Poco después volcó completamente y noventa minutos más tarde terminó por hundirse. 150 personas fallecieron en el incidente. En fin ya saben que las historias de estos barcos no son precisamente felices.

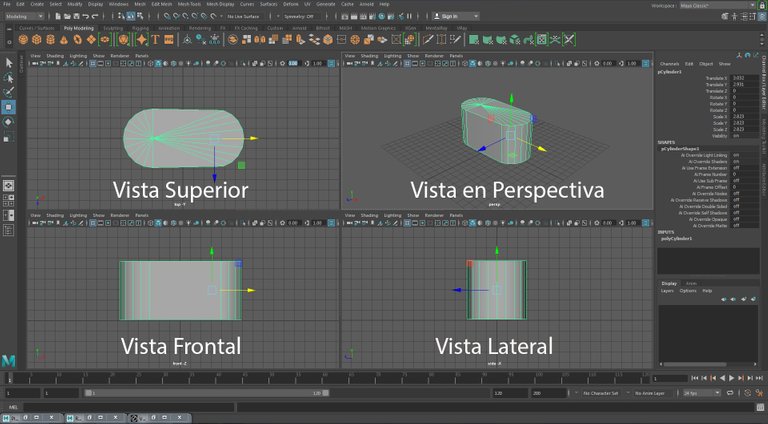
Now, before proceeding to teach you how I modeled this ship, we must delve into some previous notions of 3d modeling. We will start by indicating that 3d means three dimensions and that they can be defined by views: side view of the object (left and right), view from the front (front and back) and view from above (top and bottom) and in a modeling program those dimensions are shown on three screens and an additional one that is the perspective view from where we can see the object freely from any angle.
Ahora bien, antes de proceder a enseñarles como modelé este barco debemos ahondar en unas nociones previas de modelado 3d. Comenzaremos indicando que el 3d significa tres dimensiones y pueden definirse por vistas: vista lateral del objeto (izquierda y derecha), vista desde el frente (frontal y trasera) y vista desde arriba (superior e inferior) y en un programa de modelado esas dimensiones se muestran en tres pantallas y una adicional que es la vista en perspectiva desde donde podemos ver el objeto libremente desde cualquier ángulo.
On the other hand, the modeling tools are the same in all the programs, perhaps in some it will be easier or more difficult to use them, everything will depend on the comfort of the 3d artist with these applications.
And what are these tools?
Por su parte, las herramientas de modelado son las mismas en todos los programas. Quizás en unos será más fácil o más difícil su uso, todo dependerá de la comodidad del artista 3d con dichas aplicaciones.
¿Y cuáles son estas herramientas?
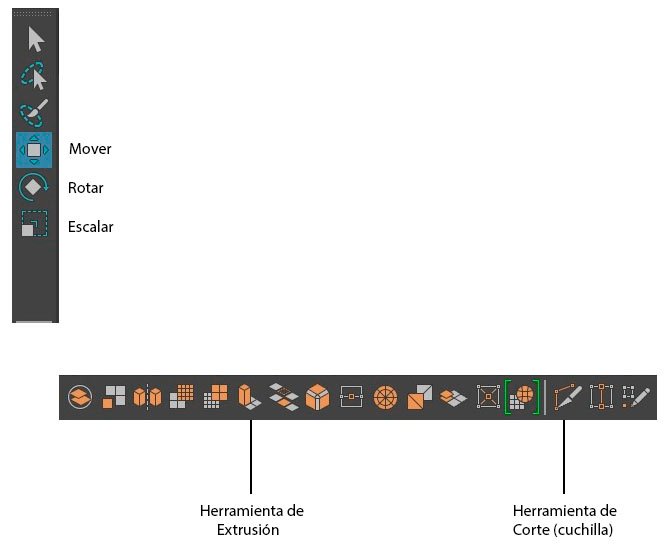
The tools that we most easily come to when we are in a 3d program are the one to move, which is the one we use to drag and place the object in a certain part of the scene or to move or drag a part of the object itself; scale, to increase or decrease the size (warp); y rotate which is used to rotate the object or a part of it. And we have other utensils whose access is not usually as elementary as the ones we have just mentioned, these are: the blade tool that is used to literally cut the object; and the extrusion tool that is used, for example, when you want to create something else from the object itself without deforming it. Of course they are not the only ones but, for now, they will help us to start modeling.
Las herramientas a las que más fácilmente llegamos cuando estamos en un programa 3d son la de mover que es la que utilizamos para arrastrar y colocar el objeto en una parte determinada de la escena o para mover o arrastrar una parte del objeto mismo; escalar, para aumentar o disminuir el tamaño (deformar); y rotar que se usa para girar el objeto o una parte de él. Y tenemos otros utensilios cuyo acceso no suele ser tan elementar como los que acabamos de mencionar, estos son: la herramienta de cuchilla que se utiliza para cortar literalmente el objeto; y la herramienta de extrusión que se emplea, por ejemplo, cuando se quiere crear algo más a partir del propio objeto sin llegar a deformarlo. Por supuesto que no son las únicas pero, por ahora, nos servirán para comenzar a modelar. .
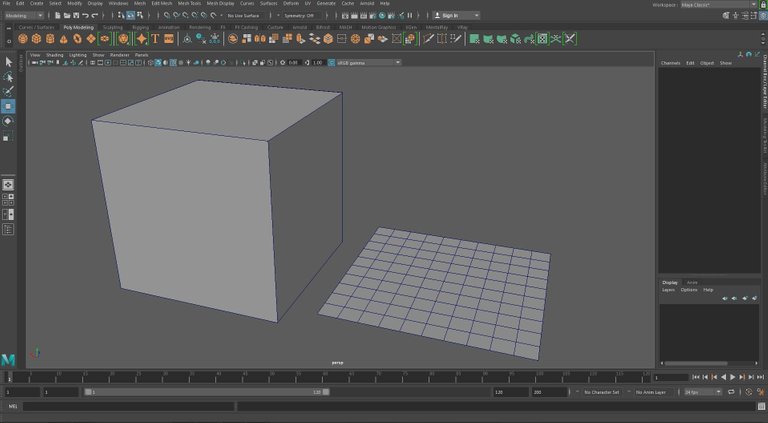 Cubo y Plano (figuras o formas primitivas)
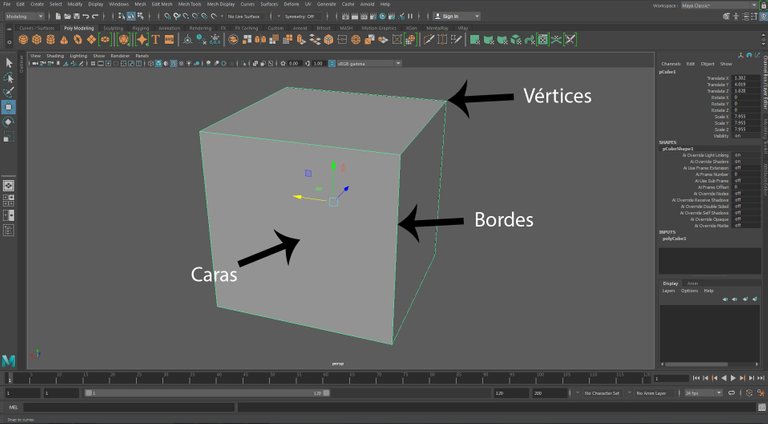
And now we come to the primitive figure (mesh or geometry) from which we are going to start. The modeling process consists of shaping that primitive object. But for this you have to know its properties. Every object is made up of three parts: faces, vertices and edges, the faces could be, for example, the sides of a cube; the vertices, the angles that form two lines (edges); and the edges are the lines that start from a vertex. The following image illustrates what we just said. However, as the object becomes more complex the distinction between faces, edges, and vertices will not be as sharp.
Y ahora llegamos a la figura primitiva (malla o geometría) a partir de la cual vamos a comenzar. El proceso de modelar es darle forma a ese objeto primitivo. Pero para ello hay que conocer sus propiedades. Todo objeto se conforma de tres partes: caras, vértices y bordes, las caras podrían ser, por ejemplo, los lados de un cubo; los vértices, los ángulos que forman dos líneas (bordes); y los bordes las líneas que parten a partir de un vértice. En la siguiente imagen se ilustra lo que acabamos de decir. Sin embargo, a medida que el objeto se hace más complejo la distinción entre las caras, bordes y vértices no se presenta tan definida.
But… And what do we do with these edges, faces and vertices?
Simply to use them to deform, modify or enlarge the mesh (object) to our requirements and for this we need: drag vertices, edges or faces and extrude faces or edges. But for this we must momentarily configure the program to select only vertices, only faces or only edges.
Pero… ¿Y qué hacemos con estos bordes, caras y vértices?
Simplemente utilizarlos para deformar, modificar o agrandar la malla (objeto) a nuestros requerimientos y para ello necesitamos: arrastrar vértices, bordes o caras y hacer extrusiones de caras o bordes. Pero para ello debemos configurar momentáneamente el programa para seleccionar solo vértices, sólo caras o sólo bordes.
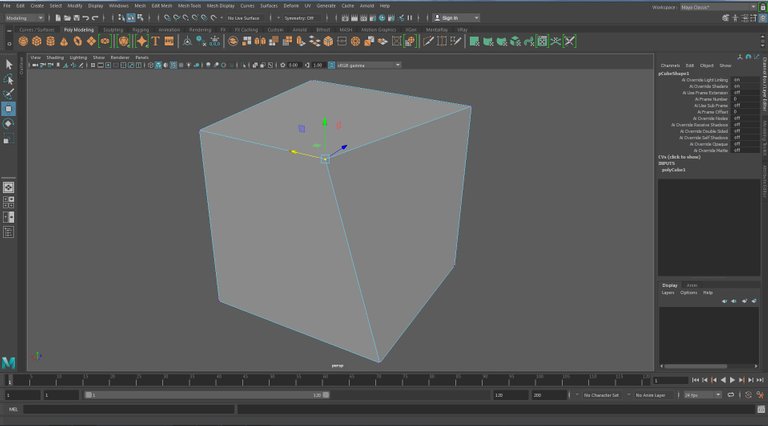 Action of the move or drag tool on a vertex of a cube - Acción de la herramienta de mover o arrastrar sobre un vértice de un cubo
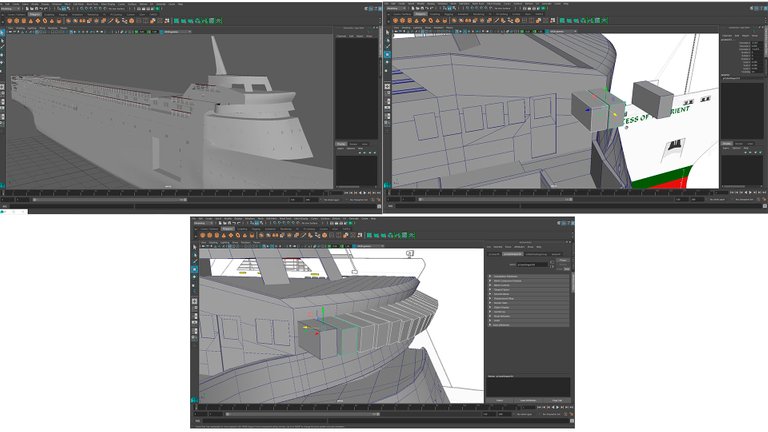
And with these concepts we approach our task. The ideal when modeling an object is to have the real measurements, but this is not always possible and obtaining the complete plans of a ship is not an easy task, but it is likely that we will be lucky enough to get an image (blueprint) that helps us to at least for one of its dimensions, we must assume that a blueprint has the original proportions of the object itself, but in the absence of something better it will be of great help. In this case we have obtained a frontal image of the Princess of the Orient.
Y con estos conceptos nos abocamos a nuestra tarea. Lo ideal al modelar un objeto es disponer de las medidas reales, pero esto no siempre es posible y obtener los planos de un barco no es tarea sencilla, pero es probable que tengamos la suerte de conseguir una imagen (blueprint) que nos sirva al menos para una de sus dimensiones, debemos suponer que un blueprint tiene las proporciones originales del objeto en sí, pero a falta de algo mejor será de gran ayuda. En este caso hemos conseguido una imagen frontal del Princesa de Oriente.
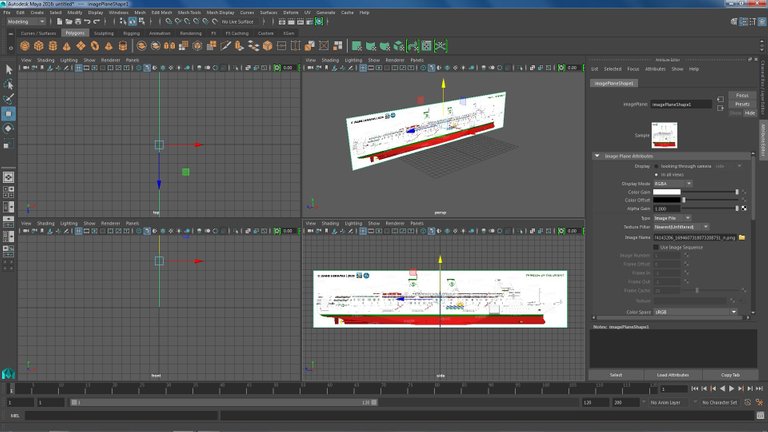
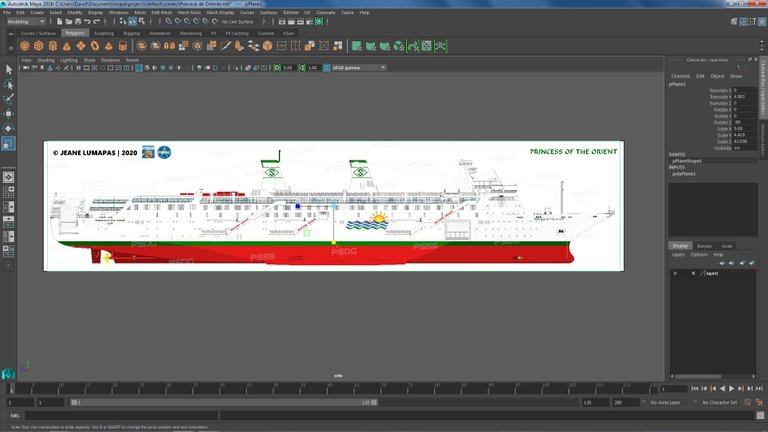
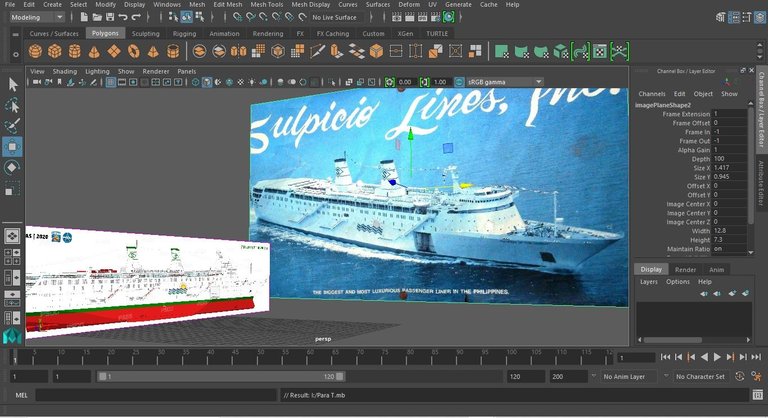
We can also add the real photos that we have of the boat to guide us in what the blueprint does not show.
También podemos agregar las fotos reales que tengamos del barco para irnos guiando en lo que el blueprint no muestra
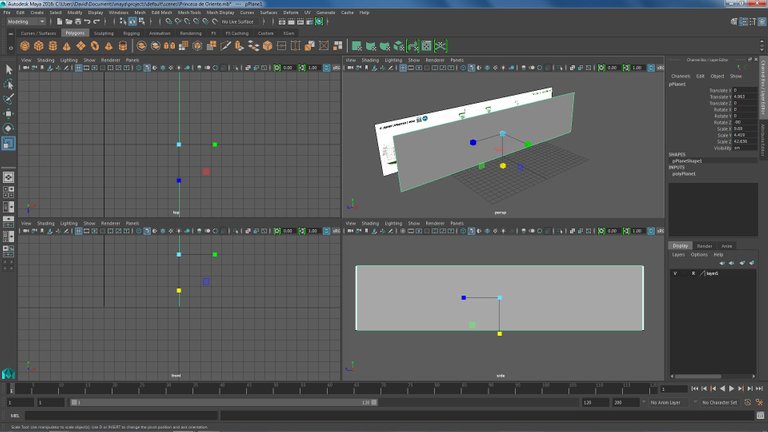
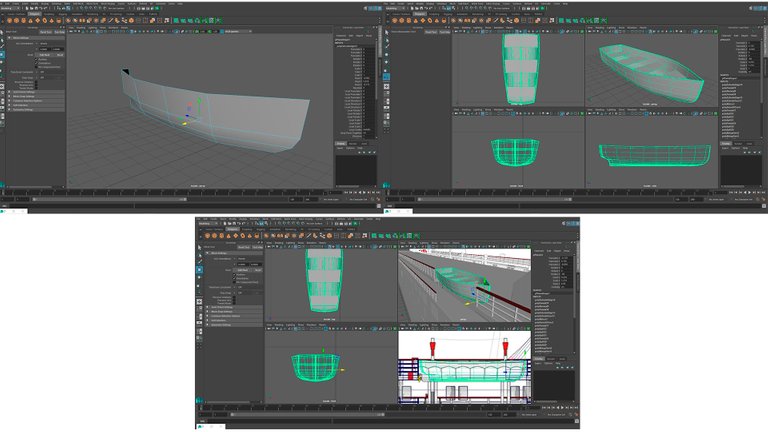
We will work from a plane although it can also be done from a cube. It is noteworthy that we have previously eliminated faces and lines, that is, the subdivisions of the plane, this to be done as we need it.
Trabajaremos a partir de un plano aunque también se puede a partir de un cubo. Es de resaltar que previamente hemos eliminado caras y líneas, es decir, las subdivisiones del plano para irlas haciendo a medida que lo necesitemos.
And without further ado we proceed to the modeling.
Y sin más procedemos al modelado
 And so we are shaping the hull of the ship - Y así vamos dándole forma al casco de la nave
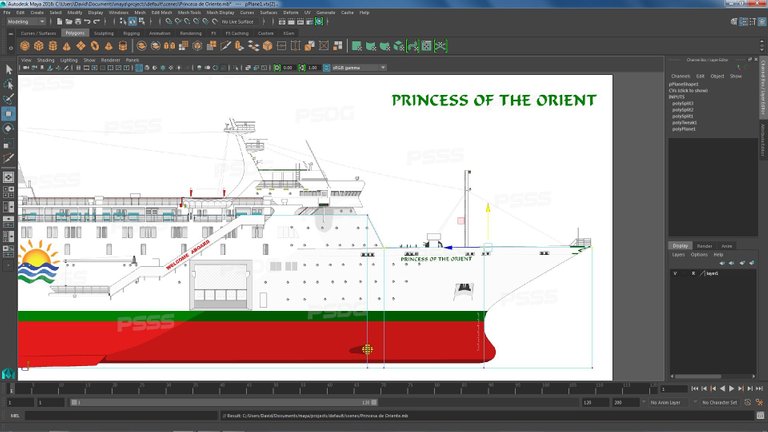 We use transparency to see the blueprint behind the plane - Usamos la trasparencia para ver el blueprint detrás del plano
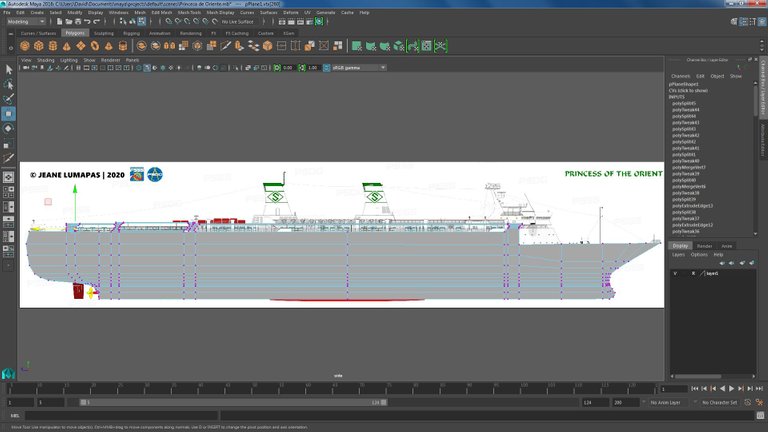 We'll get to this soon after - Poco después llegaremos a esto
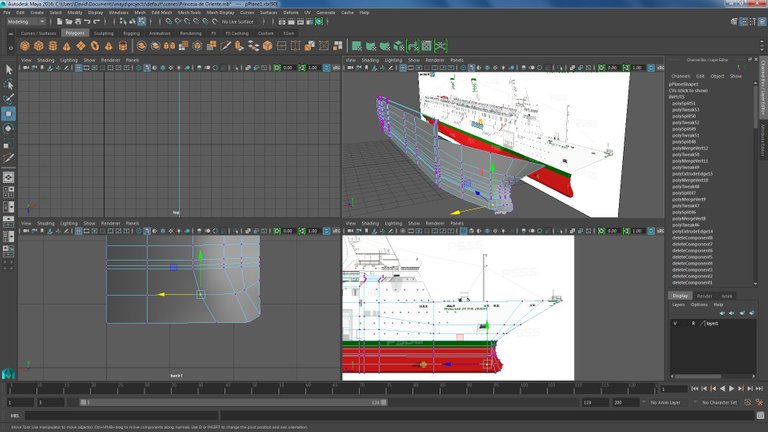 We proceed to give it depth - Procedemos a darle profundidad
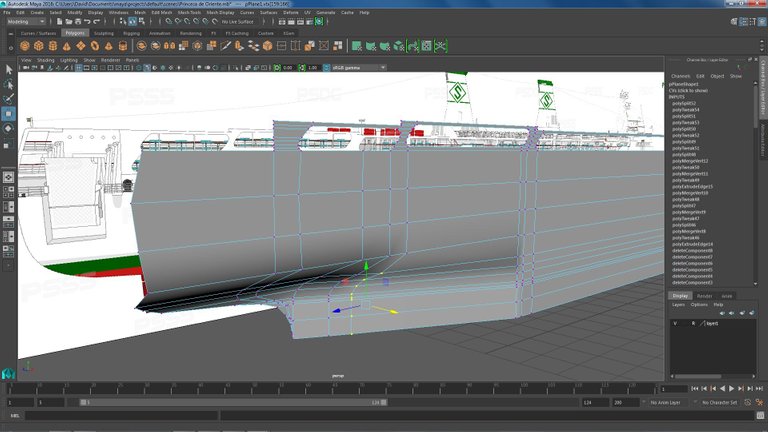

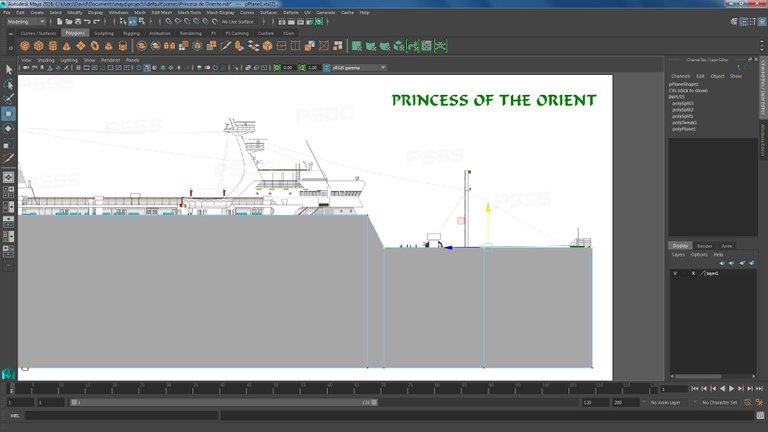
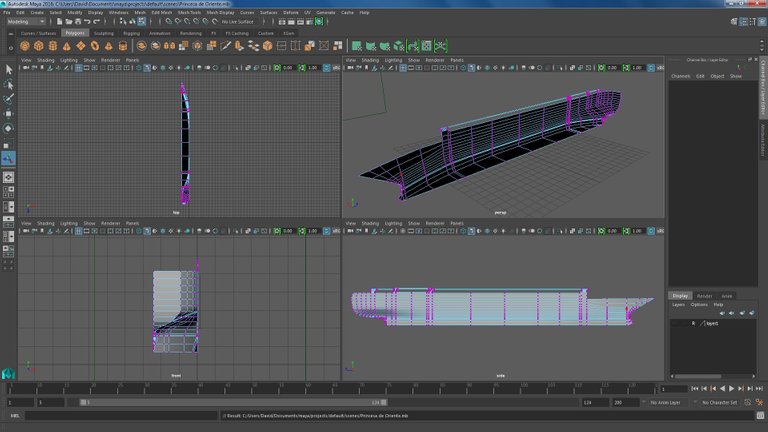 We only need to model the half of the ship, in this case the right side, then we will do a geometry projection to obtain the left side - Sólo necesitamos modelar la mitad del barco, en este caso el lado derecho, luego haremos una proyección de geometría para obtener el lado izquierdo
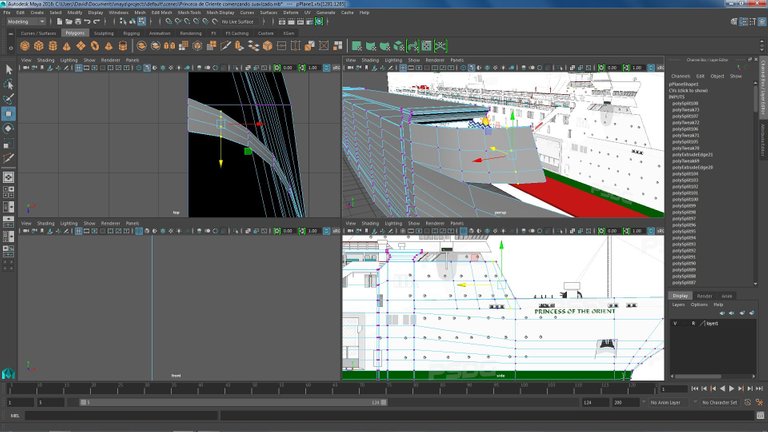
 Making the window cuts - Haciendo los cortes de las ventanas
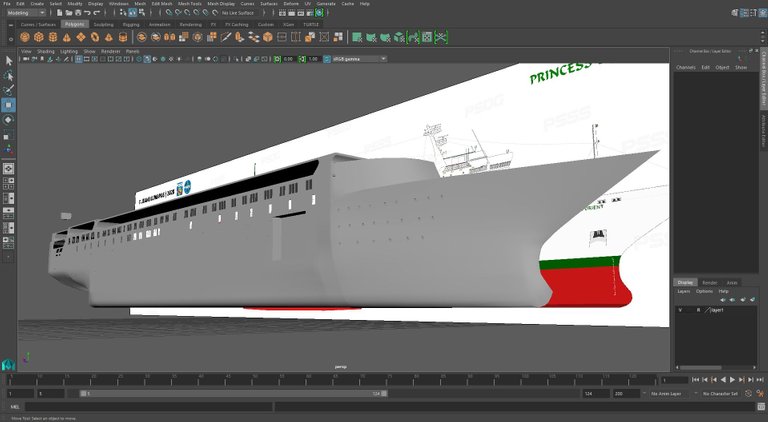
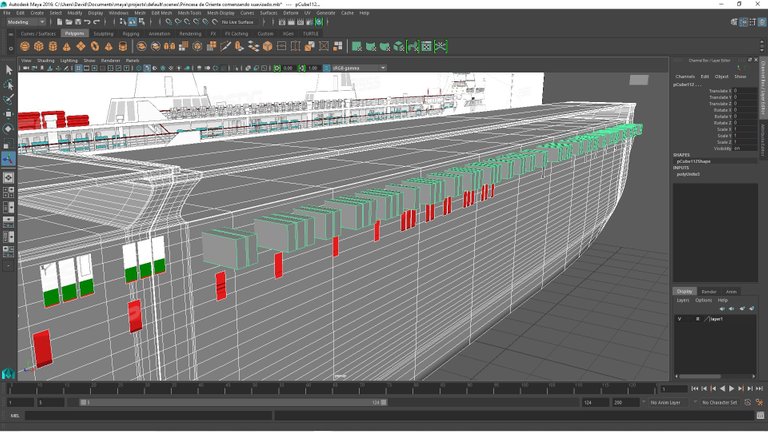
 We proceed with the lifeboat - Procedemos con el bote salvavidas
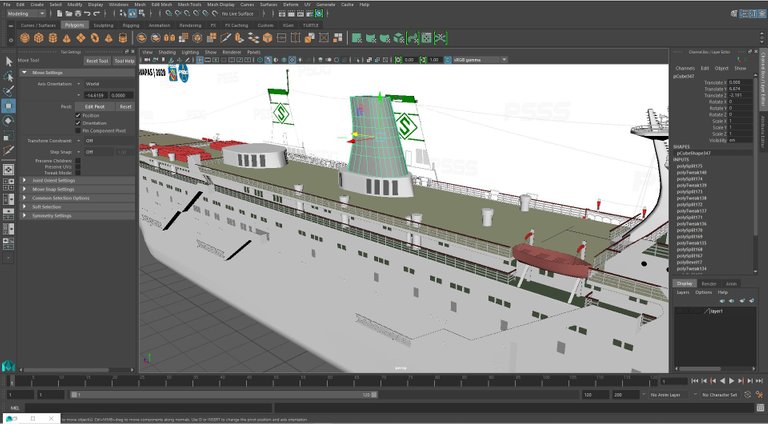
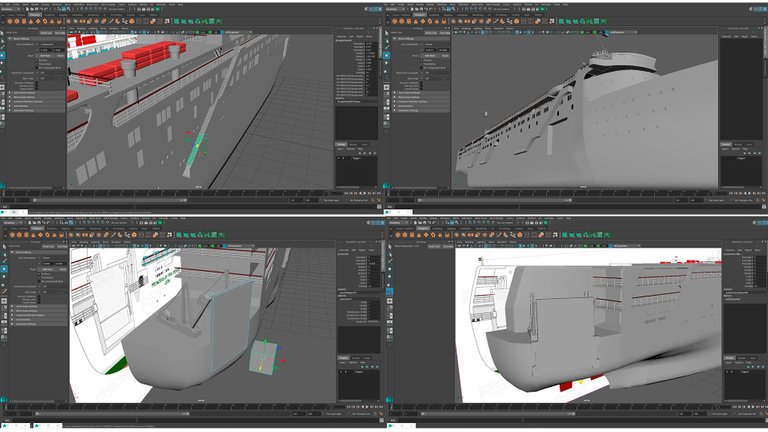 We worked with the catwalks and added some things to the upper deck - Avanzamos con las pasarelas y agregamos algunas cosas a la cubierta superior
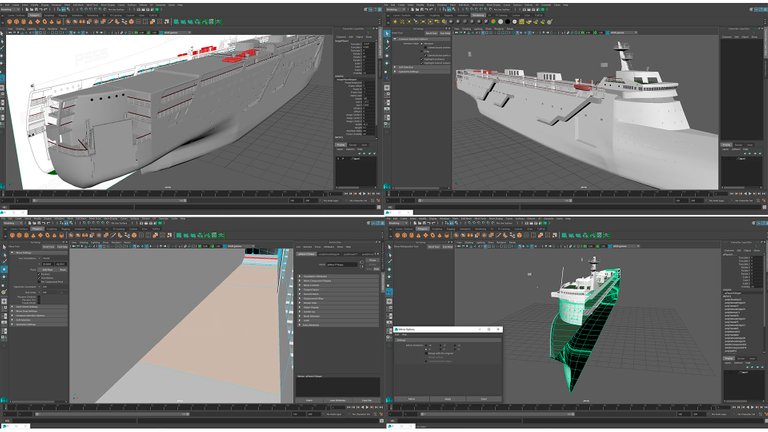 We add some colors and go to the moment of making the projection of the geometry - agregamos algunos colores y pasamos al momento de hacer la proyección de la geometría
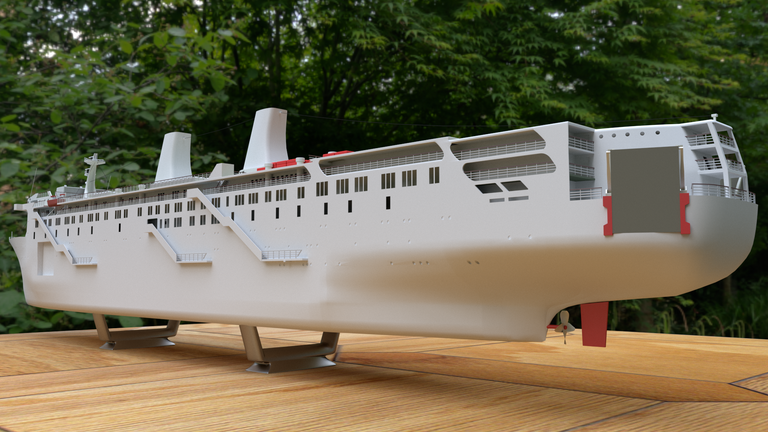
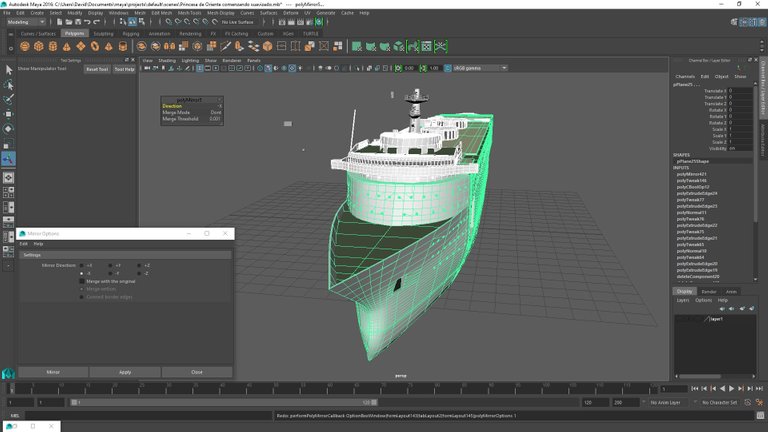 And here we have the complete ship - Y aquí tenemos el buque completo
And so we culminate with the fireplaces and some more details.
Y así culminamos con las chimeneas y algunos detallitos más.
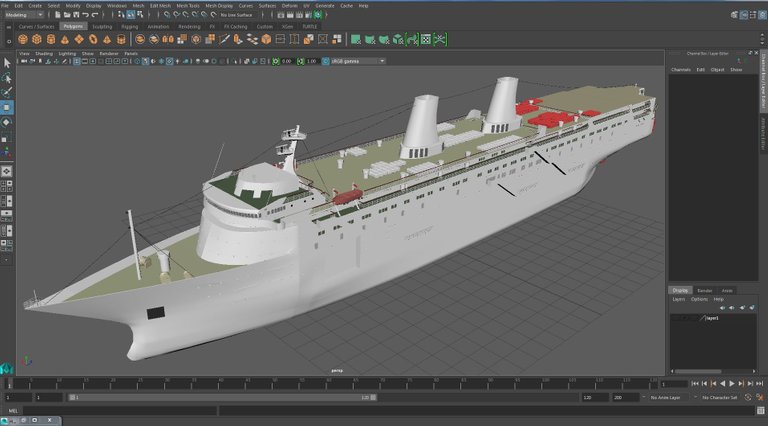
And we have already completed the modeling of the Princess of the Orient. Apparently the ship seems completely finished, but certain aspects are still missing. These details are represented by the colors of the living work (part that is submerged in the high seas), the logo, and the name. But for that we need another procedure other than modeling called texturing and that we will address in the next post.
If you have followed the post so far, I would like to express my deep gratitude and tell you that I am waiting for you in the next publication of the series where we will give the final finish to the Princess of the Orient.
Y ya hemos culminado el modelado del Princesa de Oriente. El buque parece terminado del todo, pero aún faltan ciertos aspectos. Estos detalles están representados por los colores de la obra viva o carena (parte que va sumergida en alta mar), el logo, y el nombre. Pero para eso necesitamos de otro procedimiento distinto al modelado denominado texturización y que abordaremos en el próximo post.
Si han seguido el post hasta aquí les hago notar mi profundo agradecimiento y les invito a la próxima publicación de la serie donde daremos el acabado final al Princesa de Oriente..
Estas recibiendo un voto por parte del proyecto "Sound Music" (@music1sound) y este post fue seleccionado para el reporte de curación diaria. Contáctenos para saber más del proyecto a nuestro servidor de Discord. Si desea delegar HP al proyecto: Delegue 5 HP - Delegue 10 HP - Delegue 20 HP - Delegue 30 HP - Delegue 50 HP - Delegue 100 HP.
Muchas Gracias!!!!!!
¡Excelente trabajo como siempre!
Muchas Gracias, primo!!!!!!!
Su post ha sido valorado por @ramonycajal
Congratulations @exilon! You have completed the following achievement on the Hive blockchain and have been rewarded with new badge(s) :
Your next target is to reach 3250 upvotes.
You can view your badges on your board and compare yourself to others in the Ranking
If you no longer want to receive notifications, reply to this comment with the word
STOPMuy buenos modelos hermano!
Has hecho de algún velero?
Los llamados "Tall ships" en inglés? (no se en español el término.)
Muchas Gracias!!!!! Aun no he intentado con veleros porque la serie de videos para las que modelo estas naves no ha involucrado el accidente de un velero, aunque he pensado en el accidente del barco (Perla Negra) que se usó en Piratas del Caribe, eso me daría la necesidad de modelar un velero, pero como hay tan poca información del hecho no he abordado ese caso.
Ah bueno.. Sería toda una hazaña modelar el perla negra! Seguiré tus posteos.
Sds!
En realidad si, de conseguir mas información sobre el accidente será un hecho. Muchas Gracias por seguir mis post. El próximo post de la serie será de un barco que se hundió en al Canal de la Mancha, peron nada de madera y velas (por ahora), sólo acero puro. Gracias por seguir mis post