English
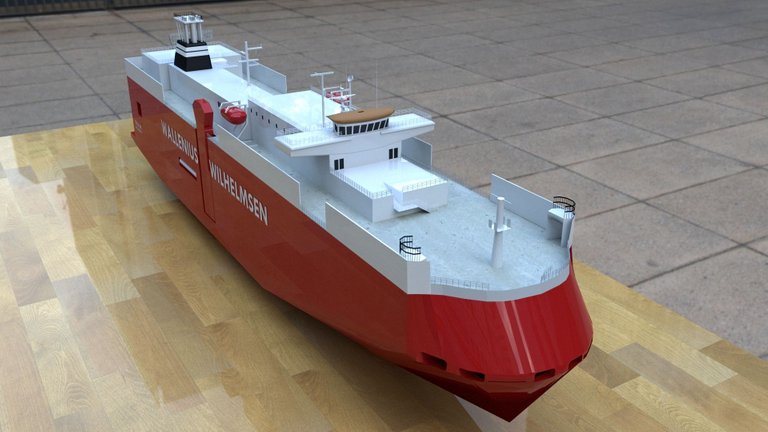
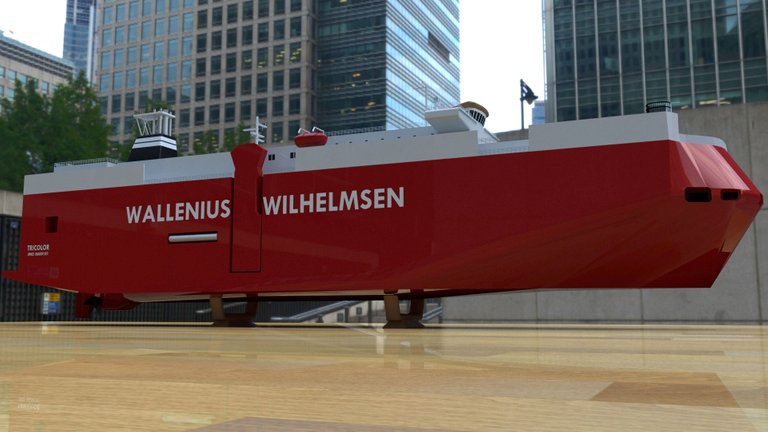
And taking up our post on 3d modeling I present to you this time the MV Tricolor, another of the first ships that I have modeled and with which we will vary a bit the category of ferries or passenger ships that we have presented so far. In the same way we will talk about other ways of lighting a scene or a 3d object.
Español
Y retomando nuestros post sobre modelado 3d les presento en esta oportunidad el MV Tricolor, otro de los primeros barcos que he modelado y con el que variaremos un poco la categoría de ferrys o barcos de pasajeros que hemos presentado hasta ahora. Del mismo modo hablaremos sobre otras formas de iluminación de una escena o un objeto 3d.
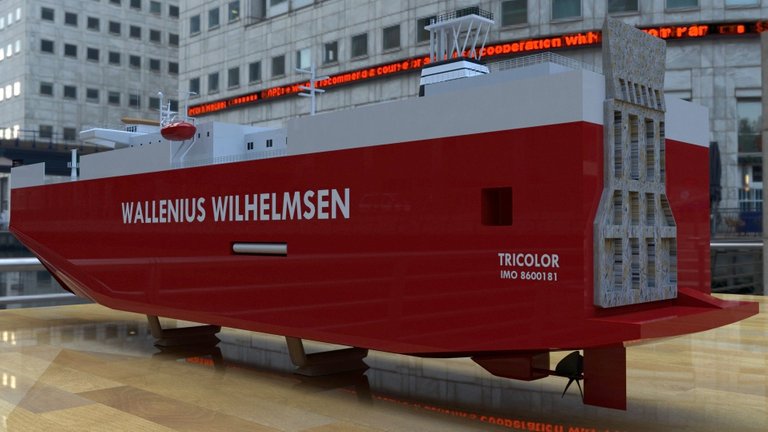
Now, the MV Tricolor was a vehicle transport, but not passenger vehicles, as in the ferries where each passenger can embark with their car, but vehicles that have just come off the production lines to be distributed among the various branches of companies around the world. In fact, the interior of these boats is very similar to a multi-story parking lot like that of shopping centers where cars are parked and secured.
Ahora bien, el MV Tricolor era un transporte de vehículos, es decir, una nave diseñada para trasladar mercancía rodada, pero no los coches de los pasajeros, como en los ferrys donde cada pasajero puede embarcarse con su coche, sino vehículos recién salidos de las líneas de producción para ser repartidos entre las diversas sucursales de las empresas alrededor del mundo. De hecho, el interior de estos barcos es muy similar a un estacionamiento de varios pisos como el de los centros comerciales donde se estacionan y aseguran los coches.
On December 14, 2002 at night and in the middle of a thick fog, the Tricolor left the Port of Zeebrugge in the Netherlands for Southampton in the United Kingdom with a load of about 2,600 luxury cars, of the BMW, SAAP and VOLVO brands for which it had to navigate the congested English Channel.
A few minutes later the ship was in the canal, gradually approaching another freighter that was ahead of it, the Kariba. As she approached the Kariba another ship appeared on the scene, the Clary which was approaching the channel from the left of the Kariba, but with a collision course with it. So while the Tricolor approached the Kariba to overtake it on the right, the Kariba executed an evasive maneuver to avoid the possible collision with a turn to the right (starboard) fatally colliding the Tricolor on the left side (port).
In less than thirty minutes the Tricolor with its precious cargo came to rest on the bottom of the sea, all as a result of the dire decisions made by the captains of the three ships.
I present to you immediately the renders of the other boats involved and that I also had to model for the documentary.
El 14 de diciembre de 2002 en horas de la noche y en medio de una espesa niebla, el Tricolor partía del Puerto de Zeebrugge en Holanda con rumbo a Southampton en el Reino Unido con una carga de unos 2600 coches de lujo, de las marcas BMW, SAAP y VOLVO para lo cual debía navegar el congestionado Canal de la Mancha (Canal Ingles).
Pronto la nave se vio en aguas del paso marítimo mientras se acercaba a otro carguero que iba más adelante, el Kariba. A medida que se aproximaba al Kariba otro buque apareció en escena, el Clary el cual se acercaba al canal por la izquierda del Kariba, pero con el desacierto de que llevaba un rumbo de colisión con este. De manera que mientras el Tricolor se acercaba al Kariba para adelantarlo por la derecha, el Kariba ejecutó una maniobra evasiva para evitar la posible colisión con un giro a la derecha (estribor) colisionando letalmente al Tricolor en el costado izquierdo (babor).
En menos de treinta minutos el Tricolor con su preciosa carga pasó a descansar en el fondo del mar, todo a raíz de las funestas decisiones tomadas por los capitanes de los tres barcos.
Les presento de seguida los renders de los otros barcos involucrados y que también tuve que modelar para el documental.
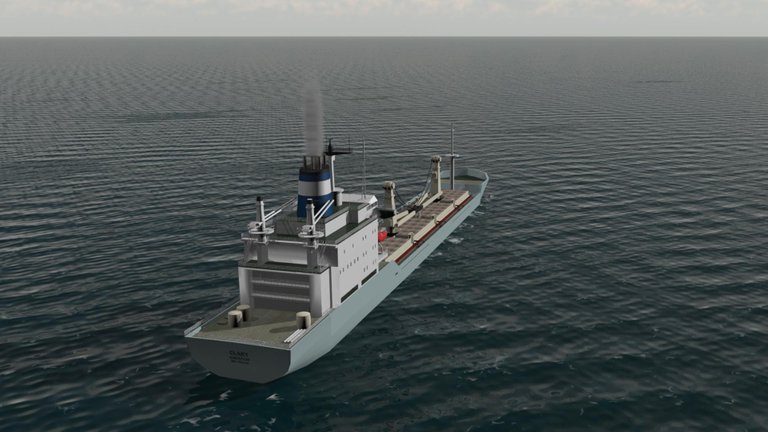
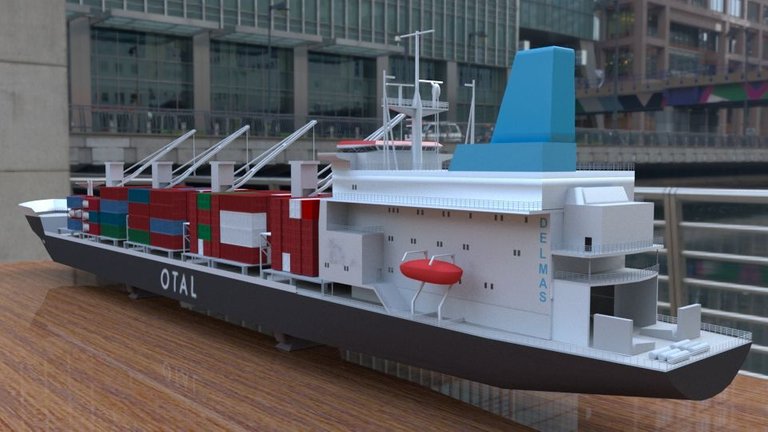 Kariba (buque portacontenedores)
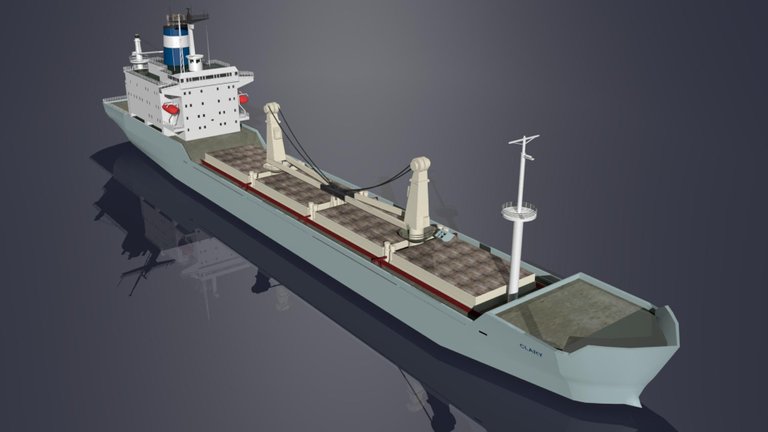
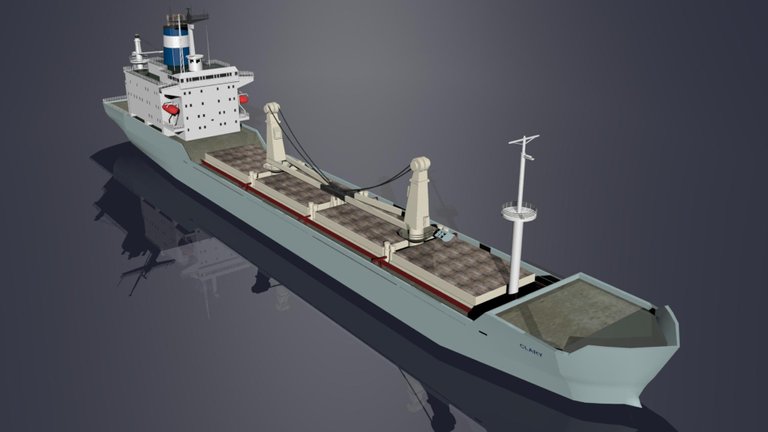
 MV Clary (buque grenelero o bulk carrier)
In the following image I leave you a reconstruction of the accident and where you can see how the Kariba makes its maneuver in the face of the threat of the Clary that approaches and collides with the Tricolor that at that moment was overtaking him on the right. It should be noted, that in actual fact, the Clary was coming further (half a mile away), it was night and there was a thick fog so the boats were not seen among them.
En la siguiente imagen les dejo una reconstrucción del accidente y donde se aprecia como el Kariba hace su maniobra ante la amenaza del Clary que se acerca y colisiona al Tricolor que en ese momento le adelantaba por la derecha. Debe destacarse, que en el hecho real el Clary venía más lejos (media milla de distancia), era de noche y había una espesa niebla por lo que los barcos no se veían los unos a los otros.
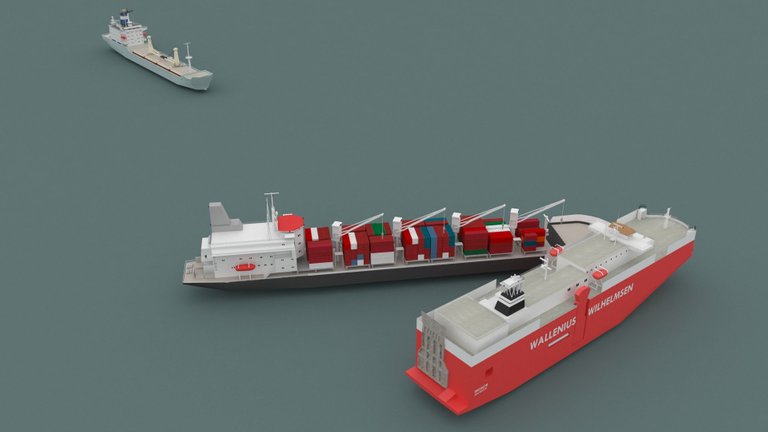 Accident recreation - Recreación del accidente
In addition to telling the sad end of the Tricolor, we will talk about other lighting techniques for a 3d scene.
In previous posts we have dealt with the lighting of a scene with an HDRI image or the light-based image technique and that is the method of the images that illustrate the post. But there are other ways to illuminate a 3d object. Every lighting program has several types of lights to illuminate a scene, in Maya, which is the one we are using, we can find the following:
Ambient light: this is used to illuminate the scene in the same way as the sun itself as such, but with the difference that this sun is not infinite, so while the object moves away from the light the angle of lightning fall is disturbed.
Además de contar la triste final del Tricolor hablaremos sobre otras técnicas de iluminación de una escena 3d.
En post anteriores hemos tratado sobre la iluminación de una escena con una imagen HDRI o la técnica de imagen basada en luz y que es el método de las imágenes que ilustran el post. Pero existen otras formas de iluminar un objeto 3d. Todo programa de iluminación cuenta con varios tipos de luces para iluminar una escena, en Maya que es el estamos utilizando podemos encontrar:
Luz ambiental: esta se utiliza para iluminar la escena de la misma forma en la que lo haría el propio sol como tal, pero con la diferencia de que este sol no se presenta de manera infinita, sino que mientras el objeto se aleja de la luz el ángulo de caída de los rayos se altera.
 Preparing an ambient light - Preparando una luz ambiental
 Ambient light rendering- Render con luz ambiental
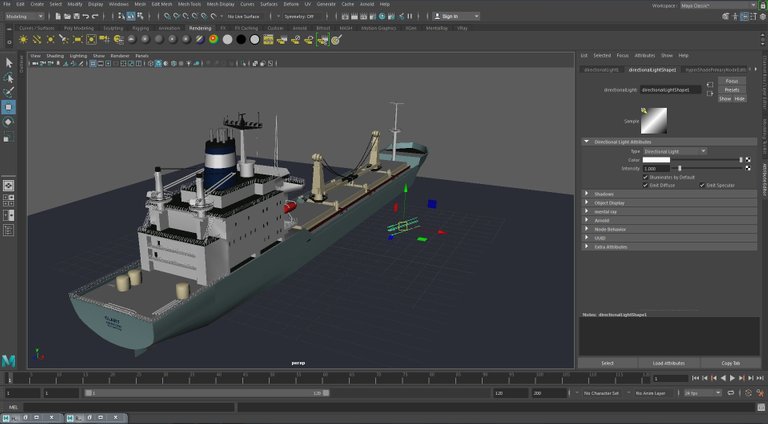
Directional light: this light illuminates the scene in the same way as the sun's rays would, that is, it is a light that simulates illuminating the object from thousands of kilometers away, so the angle of fall on the object or scene will always be the same.
Luz direccional: esta luz ilumina la escena de la misma forma en la que lo harían los rayos del sol, es decir, es una luz que simula iluminar el objeto desde miles de kilómetros de distancia por lo que el ángulo de caída sobre el objeto o escena será siempre el mismo.
 Preparing a direccional light - Preparando una luz direccional
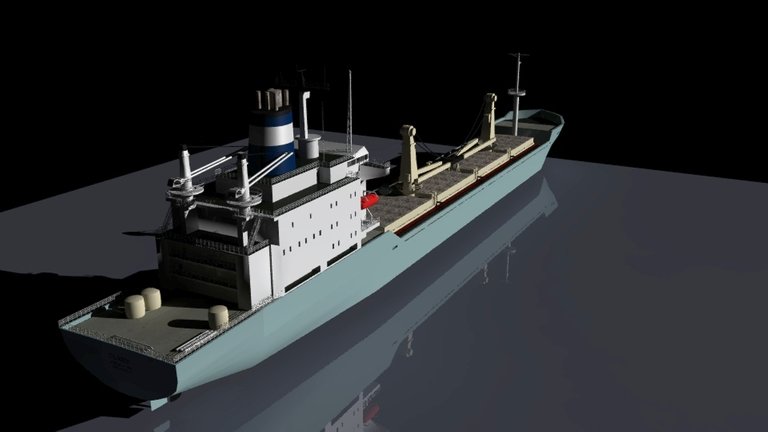 Direccional light rendering- Render con una luz direccional
Spot light: spot light, is the one that illuminates a certain point of the scene, the typical example is the lights that focus specifically on an artist or actor in a theatrical work, in which you do not want to highlight other details that may exist on the scene.
Luz spot: la luz spot, es la que ilumina un punto determinado de la escena, el típico ejemplo lo constituyen las luces que enfocan específicamente a un artista o actor en una obra teatral, en las que no se desea resaltar otros detalles que pueda haber en el escenario.
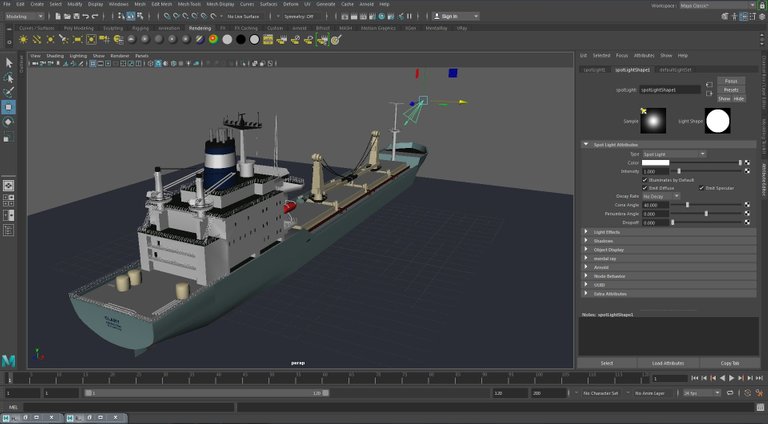 Preparing a spot light - Preparando una spot light
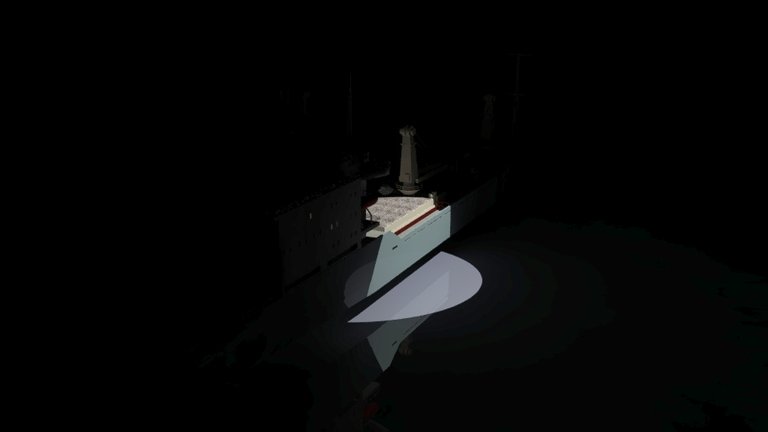 Spot light rendering - Render de una spot light
Point of Light: these are the typical virtual representations of the bulbs and lamps that we use to illuminate the house, and as the name suggests, it is the light that comes from a specific point.
Punto de Luz: estas son las típicas representaciones virtuales de los bombillos y lámparas que utilizamos para iluminar la casa, y como su nombre indica se trata de la luz que proviene de un punto específico.
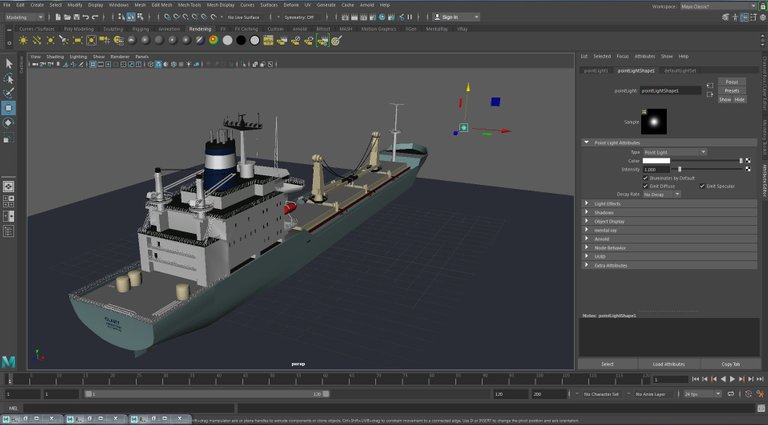 Preparing a point light - Preparando un punto de luz
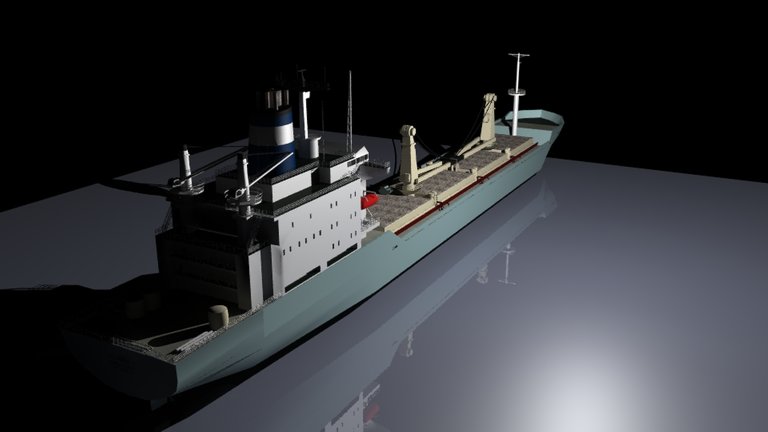 Point light rendering - Render de un punto de luz
Area light: They illuminate an area of the object, but with less precision than spot light, since it expands much more and progressively fades at the points farthest from the light.
Luz de área: Iluminan un área del objeto, pero con menos precisión que la luz spot, ya que se expande mucho más y se difumina progresivamente en los puntos más alejados de la luz.
 Preparing a area light - Preparando una luz de área
 Area light rendering - Render de una luz de área
To achieve optimum illumination with these lights, the use of the scene must be determined, if it is only to take one or some photographs (render) it is likely that we will bet on the highest quality, both with direct light and with bounce light of which we already talked in a previous post, for this we must adjust the render engine so that it addresses all those details with functions such as global lighting and ambient occlusion (Vray and Cinema 4d) or with the finalgather function in mentalray.Of course, each render could take minutes or hours depending on the complexity of the scene (of course, if we have a computer with high resources this time could be much less).
Para lograr un óptimo iluminado con estas luces se debe determinar el uso de la escena, si es sólo para hacer una o algunas fotografías (render) es probable que apostemos por la mayor calidad, es decir, lograr además de la iluminación directa, la iluminación por rebotes de lo cual ya hablamos en un post anterior, para ello debemos ajustar el motor de render para que aborde todos esos detalles con funciones como la iluminación global y la oclusión ambiental (Vray y Cinema 4d ) o con la función finalgather en mentalray. Por supuesto que cada render podría llevarse minutos u horas dependiendo de la complejidad de la escena (por supuesto que si contamos con un ordenador con altos recursos este tiempo podría ser bastante menor).
 Rendering of ship illuminated with two directional lights and applying finalgather(mentalray) - Render del barco iluminado con dos luces direccionales y aplicando finalgather (msntalray)
On the contrary, if we want to make an animation, it is not advisable to achieve all types of lighting in the scene or activate the aforementioned functions in the render engine, since speaking of animations that suppose a minimum of thirty renders per second, we would have eternal rendering processes, lasting weeks or even months.
Por el contrario, si deseamos hacer una animación, no es recomendable lograr todos los tipos de iluminación en la escena ni activar las mencionadas funciones en el motor de render, puesto que hablando de animaciones que suponen un mínimo de treinta renders por segundo, supondría procesos de renderización eternos, de semanas o incluso meses.
 Rendering without finalgather(mentalray) - Render sin finalgather (mentalray)
It is enough to illuminate the scene from all angles with multiple lights. Directional lights give good results combined with each other or with points of light, of course the more lights we add to our scene the longer it will take for our render engine to do the rendering calculations.
In my case, when I animate a ship for my documentaries and apply this technique, with mentalray I obtain renderings with a maximum duration of one minute and twenty seconds per image, of course the ideal is not to exceed one minute. This offers the possibility of obtaining renderings of animations of up to five seconds in length in rendering phases of one or two days without this implying that the computer remains all this time rendering.
Basta iluminar la escena desde todos los ángulos con múltiples luces. Las direccionales dan buenos resultados combinadas entre sí o con puntos de luz, por supuesto que mientras más luces agreguemos a nuestra escena más tardará nuestro motor de render en hacer los cálculos de reenderizado. En mi caso, cuando animo un barco para mis documentales y aplico esta técnica. Con mentalray obtengo renders con duraciones máxima de un minuto con veinte segundos por imagen, por supuesto que lo ideal es que no exceda de un minuto. Esto ofrece la posibilidad de obtener renders de animaciones de hasta cinco segundos de duración en fases de reenderizado de uno o dos días sin que ello implique que el ordenador permanezca todo este tiempo reenderizando.
 Frame of an animation with only two directional lights - Cuadro de una animación con solo dos luces direccionales
In any case, the program must be configured so that the rendering engine does not produce a video of the animation but the individual images that will make it up (Maya and 3dmax only render in images), so they can be rendered in several phases, which would not be possible in a video, then with an editor you can get the video. In short, these are techniques aimed at obtaining the best results in time and quality. And so we finish our post. I hope the information has been helpful to you. In the next post we will address other techniques from the fascinating world of 3d modeling.
En todo caso debe configurarse el programa para que el motor de render no produzca un video de la animación sino las imágenes individuales que lo conformarán (Maya y 3dmax sólo reenderizan en imágenes), así podrán ser reenderizadas en varias cesiones lo que no sería posible en un video, luego con un editor se podrá obtener el video. En fin, se trata de técnicas orientadas a obtener los mejores resultados en tiempo y calidad. Y así terminamos nuestro post. Espero que la información les haya sido de provecho. En la próxima publicación abordaremos otras técnicas del fascinante mundo del modelado 3d.
Se nota que el modelado debe llevar un gran trabajo, me gustaria ver el documental. La investigacion sobre los navios que diste es muy interesante. Saludos!!!
Muchas Gracias por ver y comentar. Por supuesto, el modelado lleva un gran trabajo, pero cuando a uno le gusta no hay nada mejor. Si no me quitan la cabeza por estar compartiendo links de youtube por aquí puedes ver el documental aquí
Su post ha sido valorado por @goya
Estas recibiendo un voto por parte del proyecto "Sound Music" (@music1sound) y este post fue seleccionado para el reporte de curación diaria. Contáctenos para saber más del proyecto a nuestro servidor de Discord. Si desea delegar HP al proyecto: Delegue 5 HP - Delegue 10 HP - Delegue 20 HP - Delegue 30 HP - Delegue 50 HP - Delegue 100 HP.