Español
¡Saludos chicos! El día de hoy vengo con un artículo que creo que puede ser de mucha utilidad para todas esas personas que llegaron a hacer vida en Steemit (como yo) y que hoy en día, buscan una manera de poder retirar sus STEEMS haciendo PowerDown por allá para reinvertir esas criptos en HivePower (HP).
Esta no sé si sea la manera más óptima, pero es una forma bastante buena, medianamente rápida y efectiva de pasar tus STEEMS a HIVE POWER o también poder ahorrar tus STEEMS en divisas (USD) o ahorrar tus STEEMS en BTC, en fin, antes de comenzar con esta guía, vamos a hablar un poco sobre UPHOLD y sobre ORINOCO.IO.
English
Greetings guys! Today I come with an article that I think can be very useful for all those people who started to blog in Steemit (like me) and who today are looking for a way to withdraw its STEEMS doing PowerDown over there to reinvest those cryptos in HivePower (HP).
I don't know if this is the most optimal way, but it is a fairly good, fairly fast and effective way to transfer your STEEMS to HIVE POWER or also to be able to save your STEEMS in foreign currency (USD) or save your STEEMS in BTC, anyway, before starting this tutorial, let's talk a little about UPHOLD and ORINOCO.IO.
¿Qué es UPHOLD? | What's UPHOLD?

Uphold es una plataforma gestora de servicios financieros tales como trading, envío de divisas y criptomonedas o —en resumidas cuentas— es una plataforma que permite el envío seguro, rápido y gratuito de cualquier tipo de moneda (cripto | flat).
Registrarse en esta plataforma es totalmente gratuito y pueden hacerlo haciendo click aquí, lo único que necesitan —para tener mejores beneficios—, es verificar su identidad al subir una foto de ustedes con algún documento que pueda identificarlos (cédula o pasaporte).
Ahora, la pregunta importante, ¿qué vamos a hacer con Uphold? Bien, la idea es que los STEEMS que van a obtener de la plataforma de Steemit, serán enviados a esta plataforma una vez que se hayan creado la cuenta, más adelante —en este mismo post— les explicaré cómo.
Uphold is a financial services manager platform that manages a lot of transactions as trading, sending flat currencies and cryptocurrencies or —in short— it is a platform that allows the safe, fast and free delivery of any type of currency (crypto | flat).
Registering on this platform is totally free and you can do it by clicking here, the only thing you'll need —to have better benefits— is to verify your identity by uploading a photo of you holding a document that can identify you (ID or passport).
Now, the important question here is: what are we going to do with Uphold? Well, the idea is that the STEEMS that you are going to get from the Steemit platform, will be sent to this platform once the account has been created, later —in this same post— I'll explain how.
¿Qué es ORINOCO.IO? | What's ORINOCO.IO?

Ya conocemos la primera plataforma, ahora, esta segunda plataforma debe ser bastante familiar para muchos de los que hicieron vida en STEEMIT; Orinoco.io es una plataforma de cambio (Exchange) que cambiaba STEEMS y SBD en Bolívares en un principio, para los venezolanos, pero que luego, aumentó las posibilidades al aceptar cambio de BTC y EOS.
Para utilizar esta plataforma, entra en el siguiente link, debes registrarte presionando el botón de REGISTRARSE que está arriba a la derecha (botón naranja) y colocar tu información.
Entonces, ¿qué vamos a hacer con Orinoco.io? Simple, esa plataforma nos va a servir como puente (bridge) para trasladar nuestros STEEMS hacia Uphold, en forma de BTC.
¿Cómo haremos eso? Bien, acá están los pasos con detalles.
Ok, we already know about Uphold, now, this second platform must be quite familiar to many of those who created content on STEEMIT; Orinoco.io is a exchange platform that changed STEEMS and SBD in Bolívares at first, for Venezuelans, but later, it increased the possibilities by accepting change of BTC and EOS.
To use this platform, enter the next link, you must register by pressing the REGISTER button at the top right (orange button) and place your information.
So what are we going to do with Orinoco.io? Simple, this platform will serve as a bridge to move our STEEMS to Uphold, in the form of BTC.
How are we going to do that? Okay, here are the steps with details.
Paso 1: Entrar en nuestra cuenta de Uphold | Step 1: Enter in our Uphold account
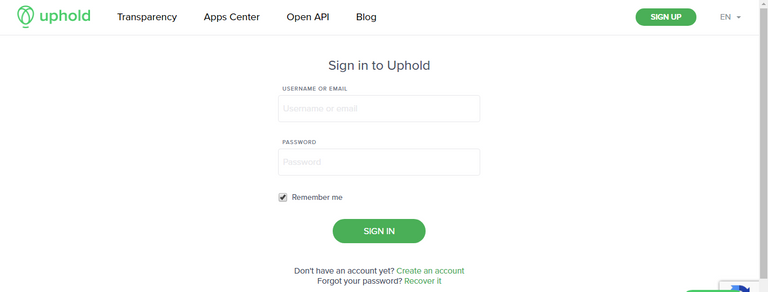
Muy bien, en primer lugar, debemos entrar al siguiente link luego de habernos creado la cuenta, colocamos nuestras credenciales y deberíamos ver algo como esto:
Very well, first of all, we must enter the following link after we have created the account, we put our credentials and we should see something like this:
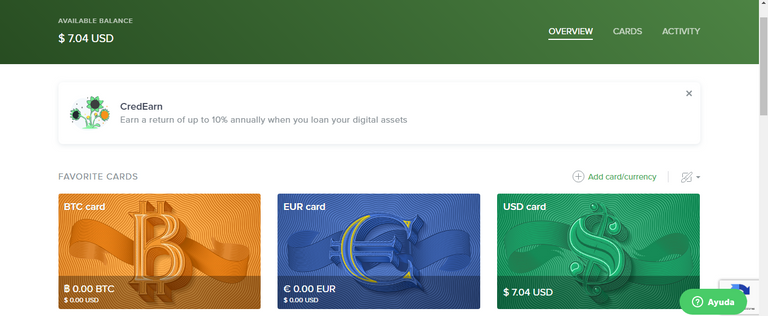
En nuestro «dashboard» dentro de Uphold, podremos ver una variedad grande de tarjetas (ver imagen de arriba), pero ahora, la que vamos a utilizar para este tutorial, será la tarjeta verde (USD card), así que le vamos a dar click a esa tarjeta.
Una vez que le demos click, nos aparecerá lo siguiente:
In our dashboard inside Uphold, we will be able to see a large variety of cards (see image above), but now, the one that we are going to use for this tutorial, will be the green card (USD card), so we are going to click on that card.
Once we click on it, we'll see something like this:
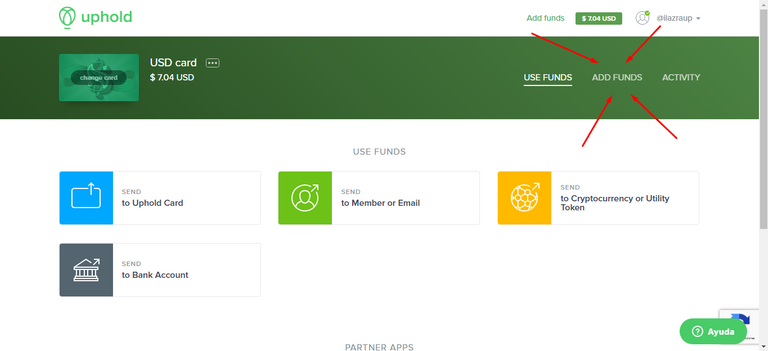
Como queremos es agregar fondos, es decir recibir dinero y no enviar, vamos a darle click a donde dice ADD FUNDS (añadir fondos), y veremos lo siguiente:
Since we want to add funds, that is, receive money and not send, we are going to click where it says ADD FUNDS, and we will see something like this:
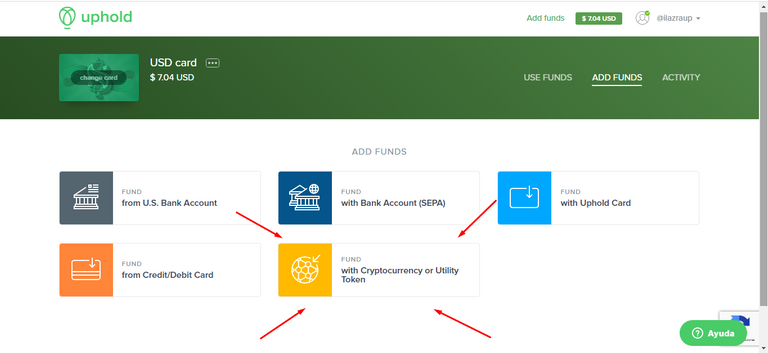
Como queremos recibir una criptomoneda (BTC), vamos a darle click al botón que dice with Cryptocurrency or Utility Token y veremos lo siguiente:
Since we want to receive a cryptocurrency (BTC), we are going to click on the button that says with Cryptocurrency or Utility Token and we will see something like this:
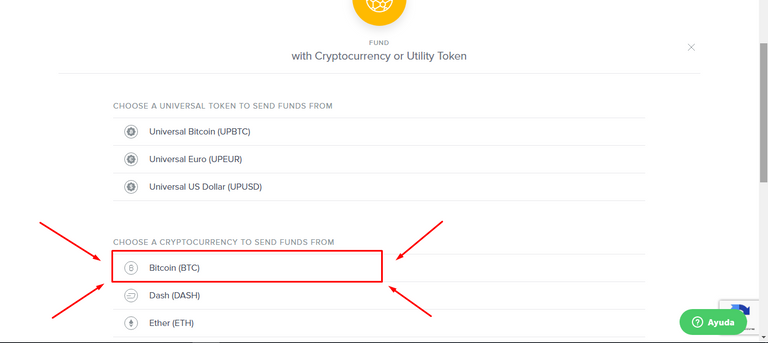
Hay una enorme variedad de criptomonedas y tokens que podemos utilizar para recibir fondos en nuestra tarjeta, pero en este caso, vamos a utilizar el Bitcoin (BTC), así que vamos a seleccionarlo y verán algo como esto:
There is a huge variety of cryptocurrencies and tokens that we can use to receive funds on our card, but in this case, we are going to use Bitcoin (BTC), so we are going to select it and you will see something like this:
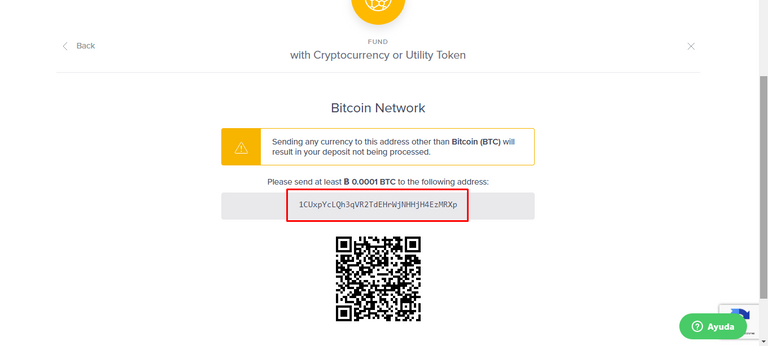
Si es primera vez que van a usar la Wallet de BTC, les pedirá crear una, solo tendrán que darle a un botón de «crear Wallet» y ya, sin mucha complejidad.
Luego de que la tengan, solo tendrán que copiar esa dirección de su wallet y colocarla en un archivo .txt para el siguiente paso:
If it is the first time that you're going to use the BTC Wallet, it will ask youto create one, they will only have to give a "create Wallet" button and that's it, without much complexity.
After you have it, you will only have to copy that address from your wallet and save it in a .txt file for the next step:
Paso 2: Entrar en Orinoco.io | Enter in Orinoco.io

Al entrar en la página de Orinoco.io (pueden hacerlo a través del siguiente enlace), deben darle click a iniciar sesión una vez que ya hayan creado sus cuentas.
Luego, van a realizar el envío de los STEEMS de la siguiente manera:
When entering the Orinoco.io page (you can do it through the following link), you must click log in once you have already have created your account.
Then, you will send the STEEMS as follows:
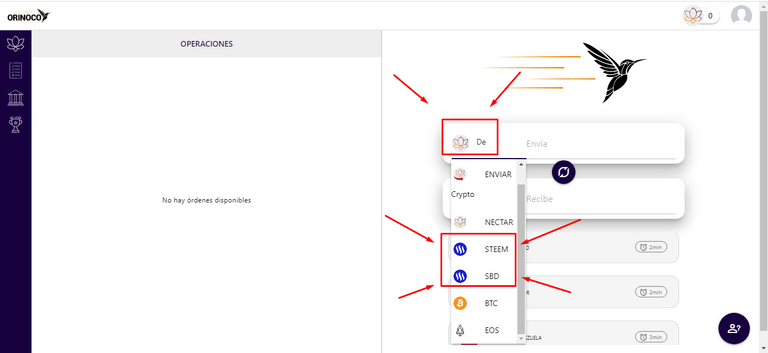
En primer lugar, seleccionamos lo que vamos a enviar, en este caso STEEM o SBD según sea el caso.
First, we select what we're going to send, in this case <bSTEEM or SBD as the case may be.
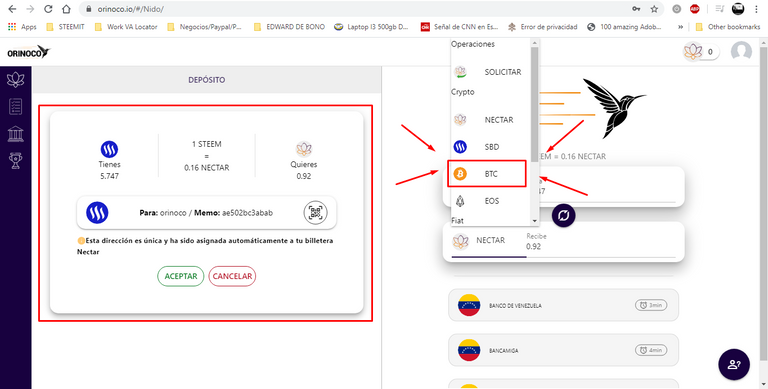
Al seleccionar la primera opción (lo que queremos enviar), nos aparece un cuadro a la izquierda con una vista previa de la transacción para volver a chequear lo que estamos haciendo, además de que nos indica la cuenta en STEEMIT a donde debemos transferir y el memo (super importante copiar y pegar IDÉNTICO el memo en Steemit).
Luego, hay que seleccionar el tipo de moneda que querermos recibir, en este caso es Bitcoin (BTC), así que le damos click y luego nos aparecerá lo siguiente:
When selecting the first option (what we want to send), a box appears on the left with a preview of the transaction to recheck what we are doing, in addition to indicating the account in STEEMIT where we must transfer and the memo (super important to copy and paste IDENTICAL the memo in Steemit).
Then, you have to select the type of currency you want to receive, in this case it is Bitcoin (BTC), so we click on it and then the following will appear:
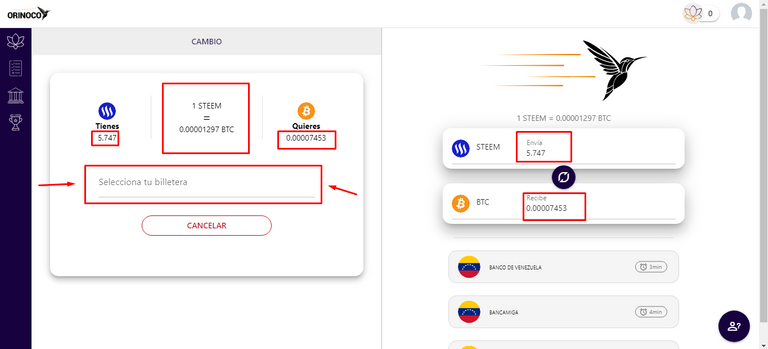
Ahora podemos colocar el monto en STEEM o SBD que queremos enviar y el monto en BTC se va a actualizar automáticamente.
Luego de esto, debemos dirigirnos al cuadro de la izquierda y darle click donde dice «Selecciona tu billetera» para colocar la Wallet que obtuvimos en el paso 1 (Uphold), verán lo siguiente:
Now we can put the amount in STEEM or SBD that we want to send and the amount in BTC will be updated automatically.
After this, we must go to the box on the left and click where it says "Select your wallet" to place the Wallet that we obtained in step 1 (Uphold), you will see the following:
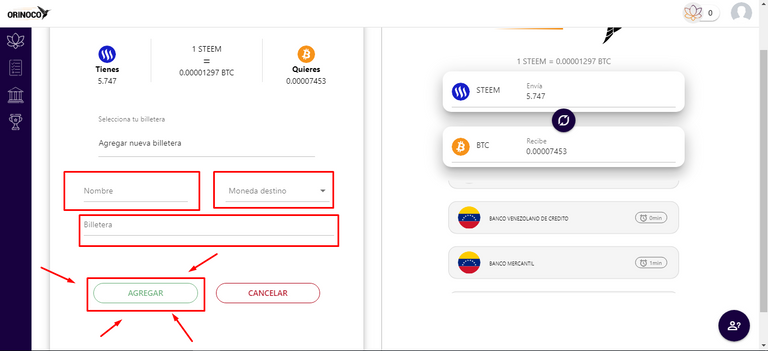
Ahora debemos colocar un Nombre a nuestra Wallet, la Moneda destino (en este caso es BTC) y donde dice Billetera debemos colocar la Wallet que guardamos en el archivo .txt desde el paso 1 (Uphold) y luego apretar el botón Agregar.
Luego veremos algo como esto:
Now, we must put a Name to our Wallet, select the Destination currency (in this case it is BTC) and within the textbox that says Wallet we must place the Wallet that we save in the .txt file from step 1 (Uphold) and then press the Add button.
Then we will see something like this:
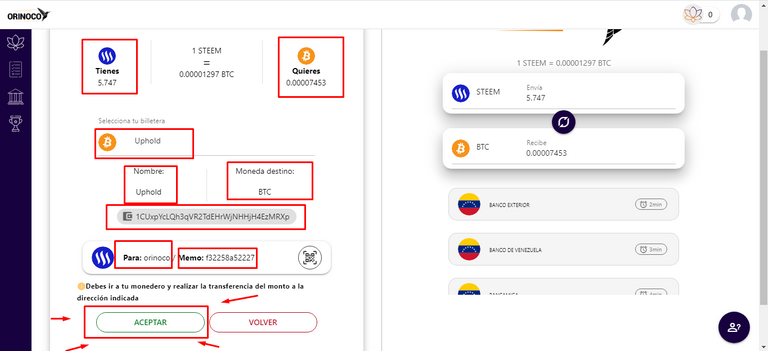
Finalmente, revisamos en el cuadro de la izquierda que todos nuestros datos sean correctos, copiamos el memo para colocarlo en nuestra Wallet de STEEMIT y le damos al botón Aceptar para que la transacción se guarde en la página de Orinoco.
Ellos esperarán que nosotros enviemos los STEEMS para enviarnos los BTC hacia Uphold.
Finally, we check in the box on the left that all our data is correct, we copy the memo to place it in our STEEMIT Wallet and click on the Accept button so that the transaction saved on the Orinoco page.
They will wait for us to send the STEEMS to send the BTCs to Uphold.
Paso 3: Ir a nuestra Wallet de Steemit | Step 3: Go to our Steemit Wallet
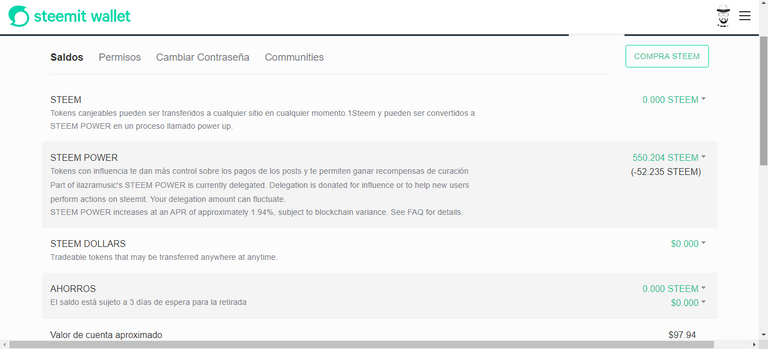
Una vez que entramos a nuestra Wallet, le damos click a Transferir lo que querramos, ya sea STEEM o SBD.
Once we enter our Wallet, we click Transfer what we want, either STEEM or SBD.
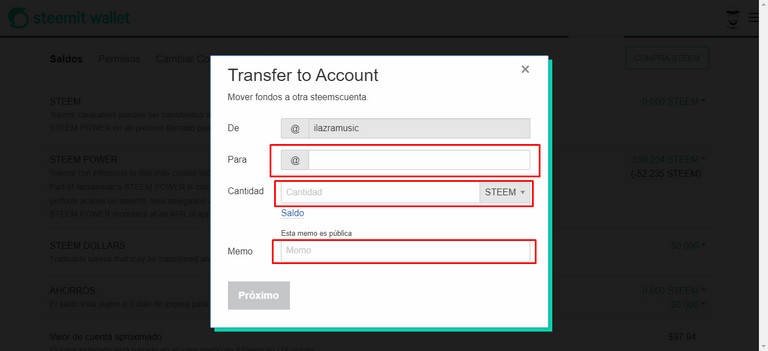
Una vez nos abra la interfaz de transferencia de la Wallet, vamos a colocar la cantidad de STEEM|SBD que queremos enviar, colocamos la cuenta @orinoco y en el memo colocamos el obtenido en el paso 2 (Orinoco.io).
En mi caso, yo envié 40.79 STEEM ayer y acá pueden verlo:
Once the Wallet transfer interface opens, we'll put the amount of STEEM|SBD we want to send, we put the account @orinoco and in the memo we put the obtained in step 2 (Orinoco.io).
In my case, I sent 40.79 STEEM yesterday and here you can see it:

Ahora, si volvemos a la página de Orinoco.io, podemos ver el estado de nuestra transacción, la cual tendrá el mismo monto que hemos utilizado en nuestra Wallet de Steemit, así se ve la mía:
Now, if we go back to the Orinoco.io page, we can see the status of our transaction, which will have the same amount that we used in our Steemit Wallet, this is what mine looks like:
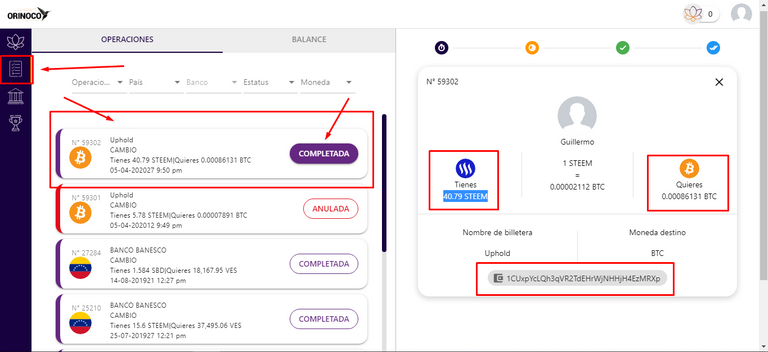
Como verán, ya sale el estado COMPLETADA, aparece el monto que solicité y el monto que envié, además de la Wallet que coloqué para recibir (Wallet de Uphold), entonces, solo nos faltaría ir a Uphold y revisar si todo salió bien.
Nota: Las transacciones en BTC pueden tardar entre 30 minutos y un par de horas, así que hay que tener paciencia.
As you will see, the status COMPLETED already appears, the amount that I requested and the amount that I sent appears, in addition to the Wallet that I placed to receive (Uphold Wallet), then, we would only need to go to Uphold and check if everything went well.
Note: BTC transactions can take between 30 minutes and a couple of hours, so you have to be patient.
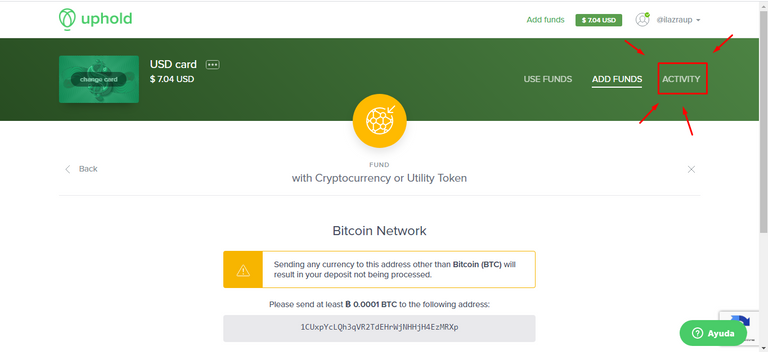
Al volver a Uphold, tenemos que darle click a la pestaña de Activity (Actividad), para ver las últimas transacciones de la cuenta y veremos lo siguiente:
When we return to Uphold, we have to click on the Activity tab to see the latest account transactions and we will see the following:
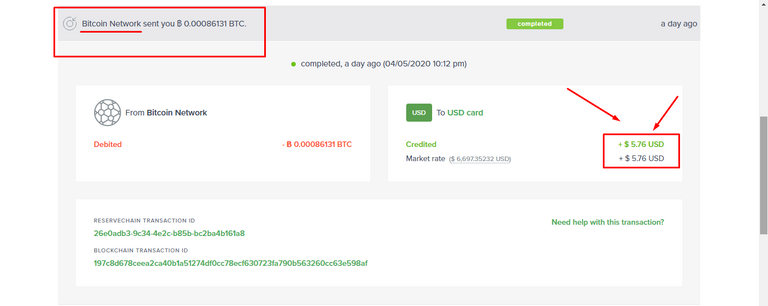
Como verán, ya nos aparece la transacción, esta deberá decir que Bitcoin Network nos envió una cantidad de BTC, esta se acreditará en USD a nuestra tarjeta de Uphold.
Ahora, ¿cómo enviamos esos USD a Hive?
Veamos:
As you will see, the transaction already appears to us, it must say that Bitcoin Network sent us an amount of BTC, this will be credited in USD to our Uphold card.
Now how do we send those USD to Hive?
Let's see:
Paso 4: Enviar los USD por @blocktrades hacia HIVE | Step 4: Send those USD by using @blocktrades to HIVE
@blocktrades es una página donde podemos realizar cambios entre una variedad increíble de criptomonedas, es un excelente exchange, muy rápido y muy confiable.
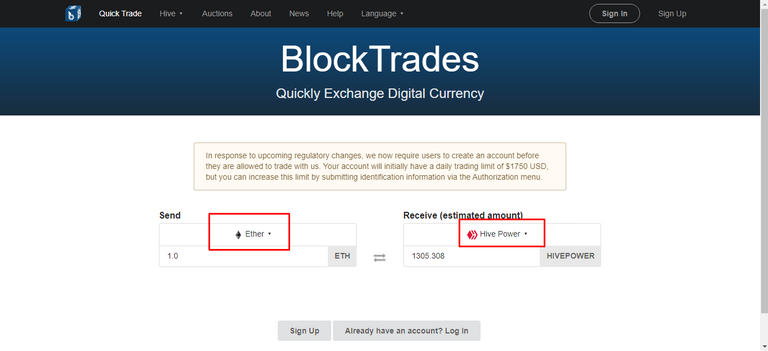
Por supuesto, debes registrarte también en la página, así que solo haz click aquí, luego, nos logueamos y apenas ingresamos en la página podemos ver la calculadora de cambio.
Debemos seleccionar lo que queremos enviar (lado izquierdo) y lo que queremos recibir (lado derecho). En mi caso, yo voy a enviar Ethereum (Ether) y voy a recibir Hive, enviaré 5$ de mi cuenta de Uphold.
Ahora, una vez que seleccionamos lo que queremos enviar y recibir, debemos llenar los siguientes datos:
@blocktrades is a page where we can make changes between an incredible variety of cryptocurrencies, it is an excellent exchange, very fast and very reliable.
Of course, you must also register on the page, so just click here, then, we login and as soon as we enter the page we can see the exchange calculator.
We must select what we want to send (left side) and what we want to receive (right side). In my case, I am going to send Ethereum (Ether) and I'm going to receive Hive, I'll send $ 5 from my Uphold account.
Now, once we select what we want to send and receive, we must fill in the following data:
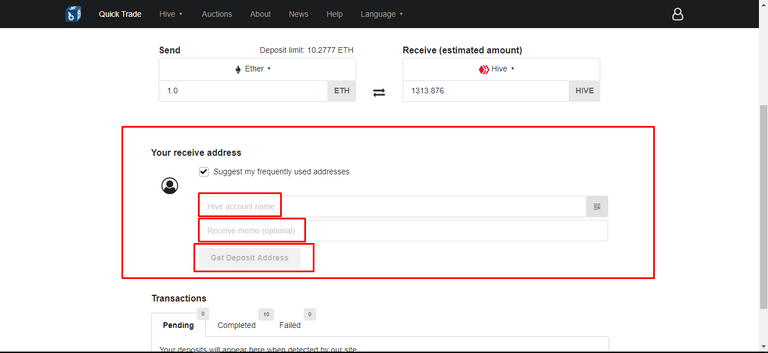
Debemos colocar nuestro nombre de usuario, podemos colocar un memo opcional, en mi caso coloqué «STEEM to HIVE Guide» y le damos click a Get Deposit Address y veremos lo siguiente:
We must put our username, we can put an optional memo, in my case I put «STEEM to HIVE Guide» and we click on Get Deposit Address and then, we will see the following:
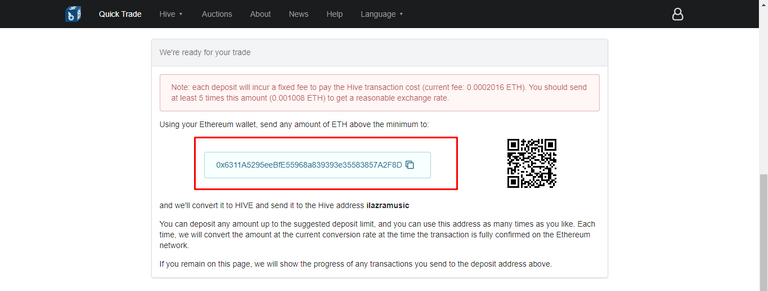
Ahora, lo único que necesitamos, es copiar esa dirección que nos da la página de @blocktrades e ir a Uphold para hacer el envío de los 5$, hacemos lo siguiente:
Now, the only thing we need is to copy that address given by the @blocktrades page and go to Uphold to send the $5, we do the following:
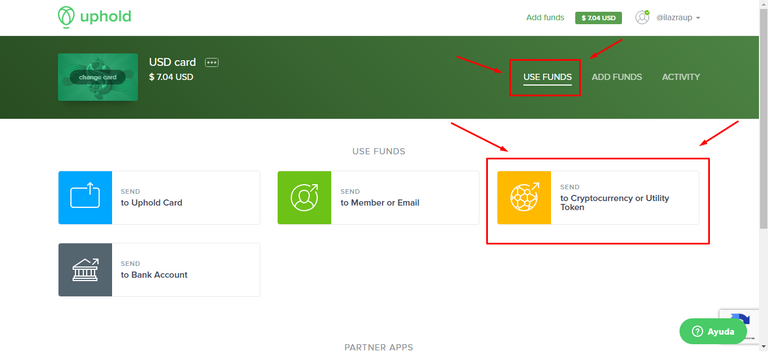
Haremos exactamente lo que hicimos en el paso 1, pero ahora vamos a darle click a la pestaña USE FUNDS y volvemos a darle click a to Cryptocurrency or Utility Token, luego, vamos a elegir lo que queremos enviar, en mi vaso será Ethereum, entonces, veremos lo siguiente:
We will do exactly what we did in step 1, but now we are going to click on the USE FUNDS tab and click again on to Cryptocurrency or Utility Token, then, we will choose what we want to send, in my glass it will be Ethereum, then, we will see the following:
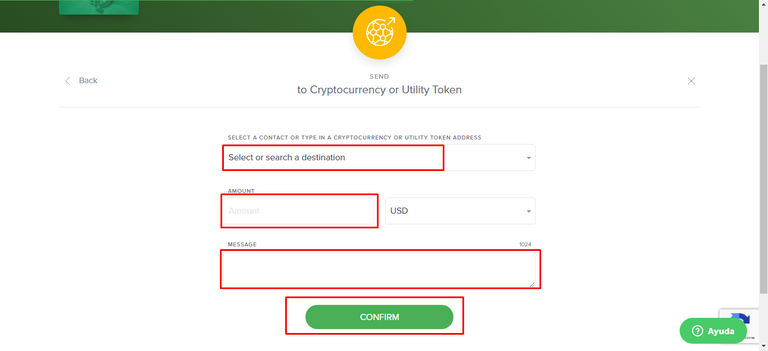
Ahora, solo tenemos que colocar la cuenta o Wallet destino, ahí vamos a colocar la Wallet que copiamos desde la página de @blocktrades, luego colocamos el monto (en USD) a enviar, podemos colocar un mensaje (opcional) y le damos al botón de Confirm.
Now, we just have to put the account or destination Wallet, there we are going to put the Wallet that we copy from the @blocktrades page, then we put the amount (in USD) to send, we can put a message (optional) and we hit the Confirm button.
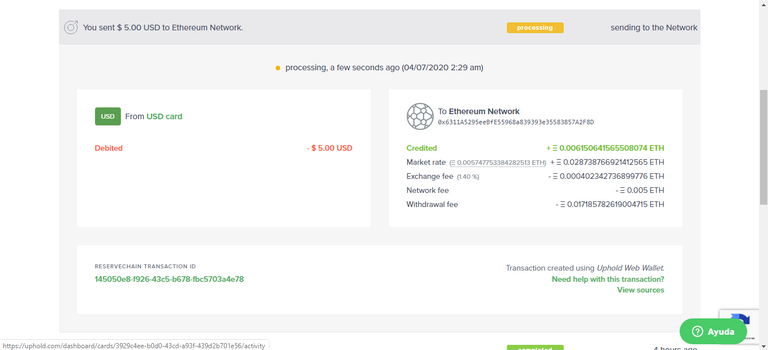
Luego, en la actividad nos saldrá algo así, en mi caso, me sale que envié 5$ a Ethereum Network, y queda el estado de pendiente, una vez que termine la transacción, me llegará una notificación a mi wallet de HIVE que dirá que me enviaron desde @blocktrades una cantidad de HIVE que equivale a esos 5$.
Then, in the activity we'll get something like this, in my case, I get that I sent 5$ to Ethereum Network, and it is the status of pending, once the transaction, a notification will arrive to my HIVE wallet saying that they sent me from @blocktrades an amount of HIVE that is equivalent to that $5.
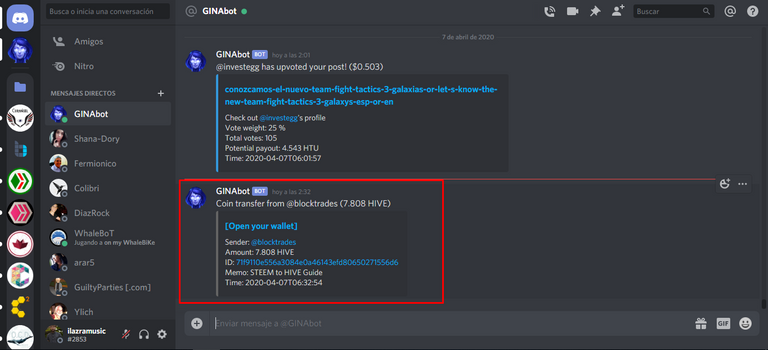
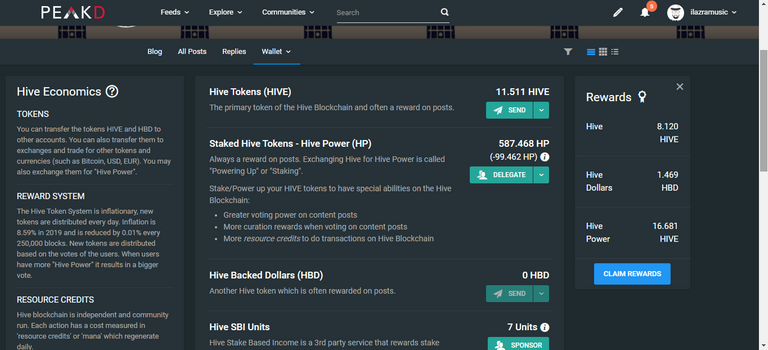
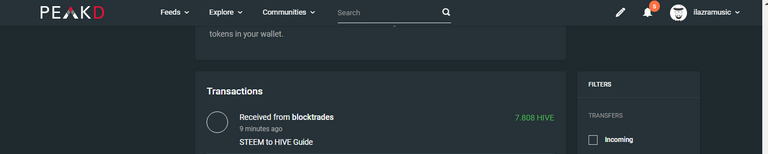
Como pueden ver, me llegó la notificación por Discord de que me enviaron la cantidad de HIVE equivalente a esos 5$ en Ethereum con el memo STEEM to HIVE Guide, ahora, ese HIVE está en mi Wallet como ven en la segunda imagen y ahora puedo hacer lo que quiera, en mi caso, haré Power Up para tener HIVE POWER adicional.
As you can see, I got the notification by Discord that they sent me the amount of HIVE equivalent to those $5 in Ethereum with the memo STEEM to HIVE Guide, now, that HIVE is in my Wallet as you see in the second image and now I can do whatever I want, in my case, I will do Power Up to have additional HIVE POWER.

¡Eso es todo chicos! ¡Muchas gracias por leerme! Espero que disfruten este tutorial, estaré subiendo otros bastante útiles próximamente!
No olviden dejarme un comentario para seguir creciendo.
That's it guys! Thank you very much for reading me! I hope you enjoy this tutorial, I'll be posting other quite useful ones soon!
Don't forget to leave me a comment to continue growing.
¡Felicitaciones!
Te participamos que puedes invertir en el PROYECTO ENTROPÍA mediante tu delegación de HIVE Power y así comenzar a recibir ganancias de forma semanal transferidas automáticamente a tu monedero todos los lunes. Entra aquí para más información sobre cómo invertir en ENTROPÍA.
Apoya al trail de @Entropia y así podrás ganar recompensas de curación de forma automática. Entra aquí para más información sobre nuestro trail.
Puedes consultar el reporte diario de curación visitando @entropia.
Te informamos que el PROYECTO ENTROPÍA ha creado un nuevo servicio, la Creación de cuentas nuevas de Steemit, para más información puedes visitar este enlace.
Atentamente
El equipo de curación del PROYECTO ENTROPÍA
Hey @ilazramusic thank you for posting instructions. I already transfer some steem to hive via blocktrades.
Good content should be rewarded!
@tipu curate
Upvoted 👌 (Mana: 5/10)
Thank you so much for the comment bro! @crazy-andy, I'm just trying to help people to send their STEEMS to HIVE due to the migration of a lot of content creators, especially here in Venezuela (where I live) so, I really appreciate this! Good vibes and Blessings!
No problem, glad to reward quaility content as said. I am sure it will helps our community grow.
Have a great one!
Por acá está mi publicación en Twitter difundiendo mi post: | Here's my post on twitter to make publicity of my new tutorial:
#posh #oc
Muchas gracias por dedicarle a este tema, estoy regresando a la plataforma y veo que se "van a otra xD"
Tenía una duda en la billetera de HIVE, pero al revisar por segunda vez me fijé en las imágenes y todo muy completo, nuevamente, muchas gracias =)
Un Abrazo Optimista