

Hello Hiver’s and Creative Papercraft Community. This is my first time in this community and I am here to share with you a step-by-step guide to a doll drawing I made. The first time I made a doll of this type was because of a tutorial I saw in a video on YouTube. Little by little I continued practicing and drawing until I developed my own drawing style so I could draw dolls from my imagination. Below we'll see the procedure and the materials used.
Materials
🔅Pencil
🔅Eraser
🔅Wooden crayons
🔅Black fine-point marker
🔅Letter-sized paper
Step by Step
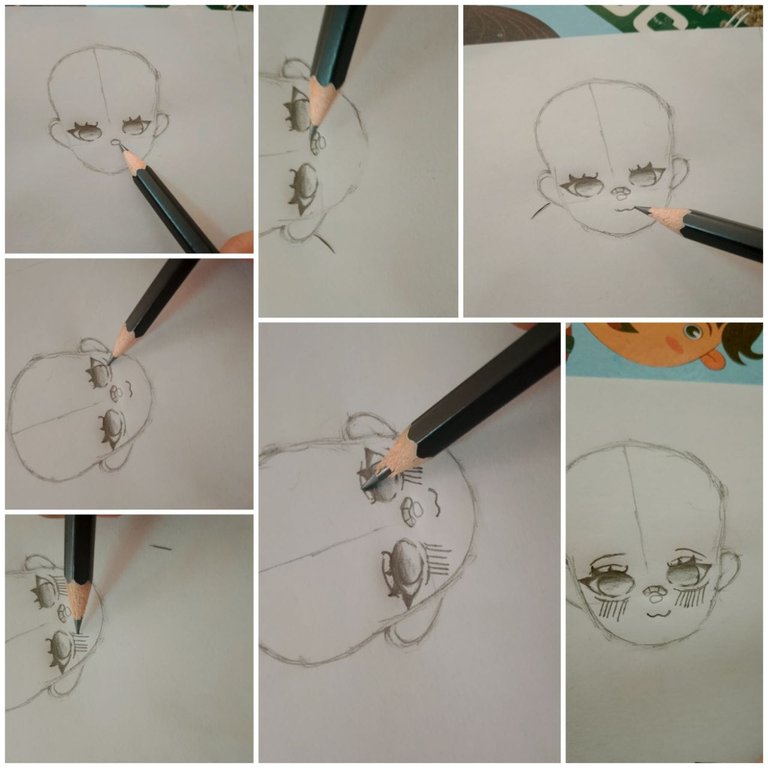
First, take a piece of letter-sized paper and draw a circle. Then, divide the circle in half with a line and draw a 1cm mini-line at one end of the first line. Then, draw two curved lines coming out of the circle on either side to form the doll's head.

Then I made the ears in the shape of half a heart on both sides of the face. I also drew a line connecting the ears to mark where I was going to make the eyes. With this, I decided to erase part of the circle to start drawing the eyes.

Then in the upper corner of the eye I draw a sort of triangle to make the eyelash and fill it in with pencil. I also added three more smaller eyelashes along the top of the eye and filled them in with pencil. Then I drew a curved line inside the eye for the pupil and a gradient with a pencil.

I proceeded to draw a lying oval for the nose and made a band-aid above it. I made the mouth with a kind of double-curved line. Then I made a curved line under the eye and other straight lines for the cheekbones. Now I draw a curved line between the eyelashes and make the eyebrows.
Then I erase the top of the head to make the bangs and make another part of the bangs on the face and make two lines for the neck and other curved lines to make the shoulders.
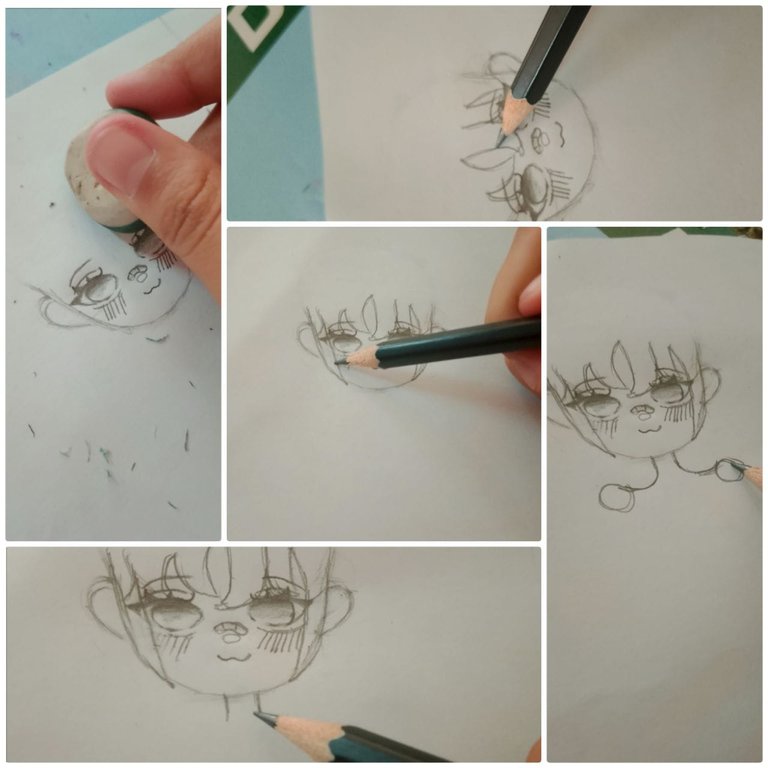
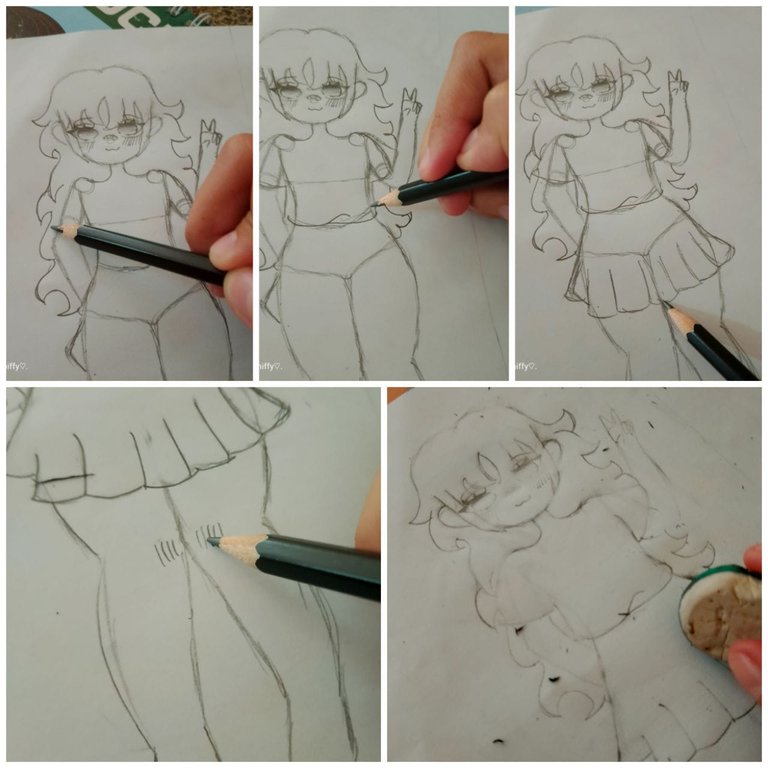
In this part I draw circles to start shaping what will be the shoulders, then I draw a rectangle to form part of the torso, I make two curved lines for the waist and I finish the torso with the shape of the skirt.
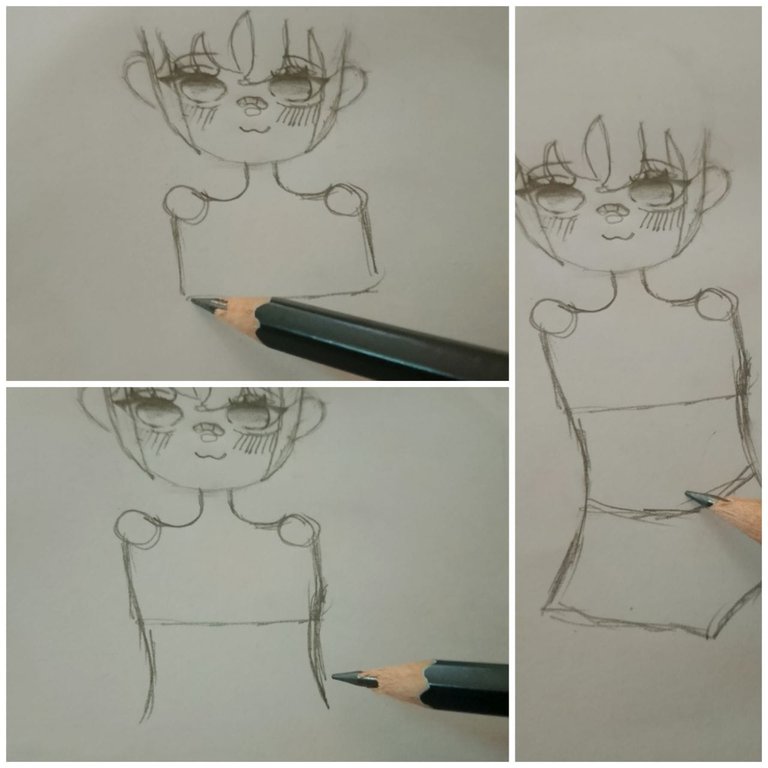
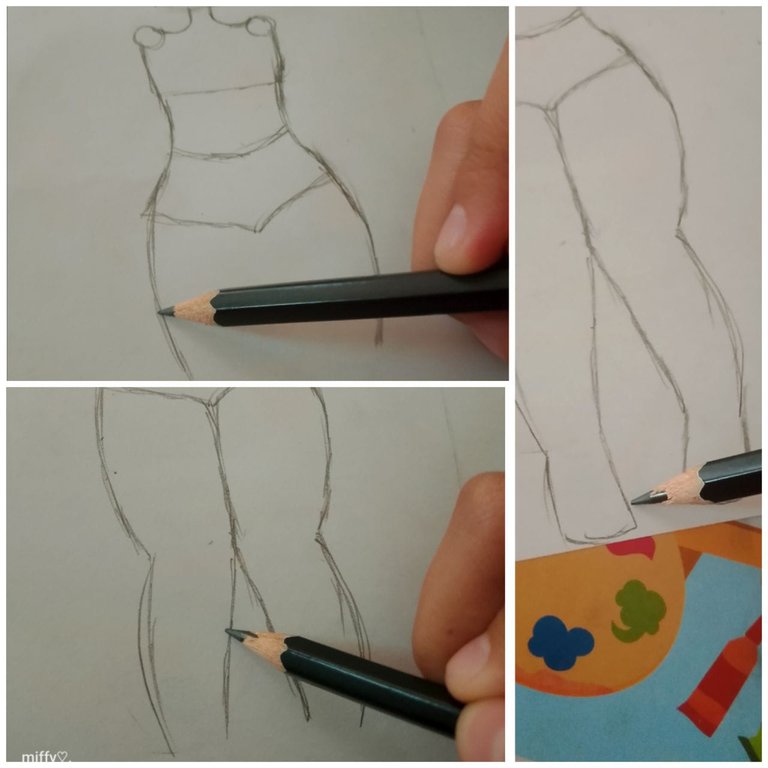
Then I proceed to draw the legs with two curved lines, from there I give it shape, I do the same with the bottom of the legs and I finish making the feet with a kind of rectangle.
Now, I draw the arms using circles and lines, and I place the first arm behind the wrist. For the other arm, I draw two lines from the circle on each side, then draw the hand.

To finish the drawing, I make the hair making several waves, then I make the shirt guided by the doll's body. Below I make the skirt, then I erase some of the lines of the doll's body to leave only what is necessary and proceed to erase the drawing, leaving the marks for coloring.
In this final step, all that's left is to color the drawing. I used the colors of my choice, but you can paint however you like. I helped with the wooden crayons and to outline, I used a fine-tip colored marker. black.
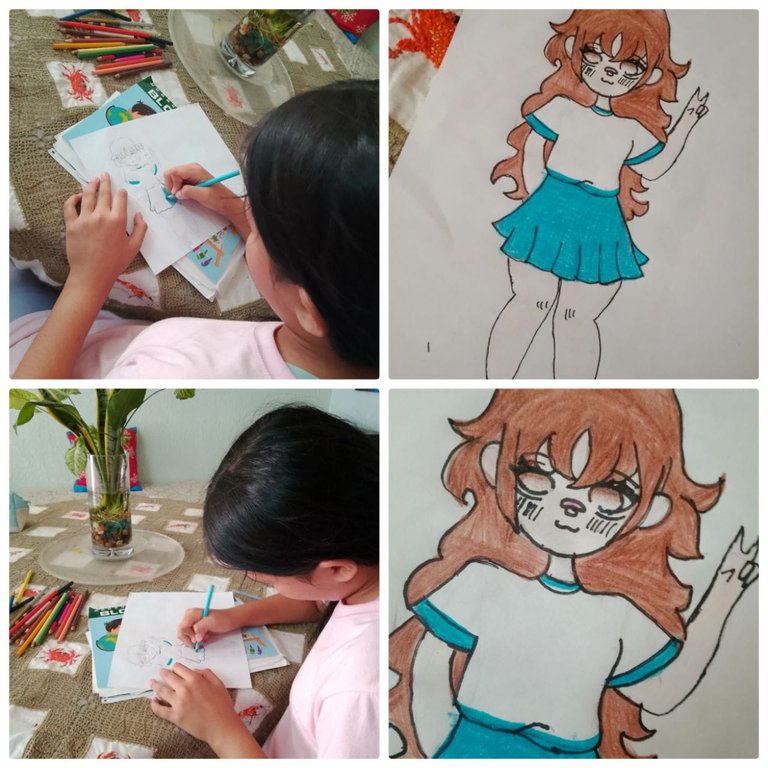
The doll is ready. I really like this style that I've been developing over time. With practice, I've drawn many dolls like this. It's always good to use the lines as a guide at the beginning, especially when making the face. This helps a lot so that one eye isn't higher than the other, and so on. Drawing this type of drawing is now very easy for me, even fast. It used to take longer, but now I do them really quickly, and every time I make a new doll, it has something different; it could be its hair, eyes, or outfit. I hope you like it and try this style of drawing.


Hola Hiver’s y Comunidad Creative Papercraft. Esta es mi primera vez en esta comunidad y vengo a compartir con ustedes en esta oportunidad un paso a paso del dibujo que realice de una muñeca. La primera vez que hice una muñeca de este tipo fue por un tutorial que vi en un video en Youtube, poco a poco seguí practicando, dibujando, hasta desarrollar mi propio estilo de dibujo para poder dibujar las muñecas desde mi imaginación. A continuación veremos el procedimiento y los materiales que se utilizaron.

Materiales
🔅Lápiz.
🔅Borrador.
🔅Creyones de madera.
🔅Marcador punta fina de color negro.
🔅Hoja de papel tipo carta.
Paso a Paso
Primero tome una hoja de papel tipo carta, realice un circulo, luego dividí el circulo con una línea a la mitad e hice una mini línea de 1 cm en uno de los extremos de la primera línea. Luego hice dos líneas curvas saliendo del círculo en ambos lados para formar la cabeza de la muñeca.
Después hice las orejas con la forma de la mitad de un corazón en ambos lados del rostro, también realice una línea que conecta las orejas para marcar donde iba a realizar los ojos, con esto, decidí borrar una parte del círculo, para comenzar a dibujar los ojos.
Luego en la esquina superior del ojo dibujo una especie de triangulo para hacer la pestaña y la relleno con lápiz. También agregue otras tres pestañas más pequeñas por la parte superior del ojo y las rellene con el lápiz. Después realice una línea curva dentro del ojo para hacer la pupila e hice un degradado con lápiz.
Procedo a realizar un ovalo acostado para hacer la nariz e hice una curita encima de la nariz y le hago la boca como una especie de línea con doble curva. Luego hago una línea curva debajo del ojo y otras líneas rectas para hacer los pómulos. Ahora hago una línea curva entre las pestañas y realizo las cejas.
Luego borro la parte de arriba de la cabeza para hacer el flequillo y hago otra parte del flequillo en la cara y hago dos líneas para el cuello y otras líneas curveadas para hacer los hombros.
En esta parte dibuje círculos para comenzar a dar forma a lo que serán los hombros, luego dibujo un rectángulo para formar parte del torso, hago dos líneas curvas para la cintura y termino el torso con la forma de la falda.
Luego procedo a dibujar las piernas con dos líneas curvas, de allí le voy dando forma, hago lo mismo con la parte de debajo de las piernas y termino haciendo los pies con una especie de rectángulo.
Ahora, dibujo los brazos haciendo círculos y líneas y pongo el primer brazo por detrás de la muñeca. Para el otro brazo hago 2 líneas desde el círculo de lado y lado y después hago la mano.
Para ir finalizando con el dibujo, realizo el cabello haciendo varias ondas, luego hago la camiseta guiándome por el cuerpo de la muñeca. Más abajo hago la falda, después borro parte de las líneas del cuerpo de la muñeca para solo dejar lo necesario y procedo a borrar el dibujo dejando las marcas para el coloreado.
En este paso final solo queda darle color al dibujo, utilice los colores de mi preferencia, pero ustedes pueden pintar a su gusto, me ayude con los creyones de madera y para delinear con un marcador de punta fina en color negro.
Ya está lista la muñeca, me gusta mucho este estilo que he ido teniendo con el pasar del tiempo, con la práctica, tengo muchos dibujos de muñecas así. Siempre es bueno guiarse por las líneas al inicio, más que todo para hacer la cara, eso ayuda mucho para que no quede un ojo más arriba que el otro, y así. Hacer este tipo de dibujos ya se me hace muy fácil, hasta rápido, antes tardaba más, pero ahora los hago bien rápido, y cada vez que hago una muñeca nueva tiene algo diferente, puede ser en su cabello, ojos, o en el outfit. Espero que les guste, y puedan intentar realizar este estilo de dibujos.
Todas las fotografías son de mi propiedad - All photographs are my property.
¡Wow! Tienes mucho talento, te quedó muy linda esa muñeca. Felicitaciones.
Holii!,muchas gracias me encanta dibujar este tipo de muñecas desde hace tiempo gracias por tu lindo comentario!!🤗
Tan linda mi niña como te encantan esos dibujos, cada vez los personalizas más, y eso es parte de tu imaginación y creatividad. Que Dios te bendiga hija 🙏🤗🤗🤗
Holii @natica83 me encanta dibujar este tipo de muñecas porque me divierte mucho cuando me aburro y poco a poco voy a aprender un poco más💜💜🤗
Wow! This is super impressive friend. You’re on track, keep practicing consistently and you’ll become a professional someday.
selected by @ibbtammy
Hi, thank you very much. I will try to continue practicing to improve more. Thanks for commenting!
Yo te iba a decir que seguro te tardabas pero al final dices que no! Te quedó muy bonito y eso de trabajar con las líneas es buena idea
Holaaa @matias2010,la verdad que si se me hace fácil dibujarlas pero me toma tiempo igualmente me gusta ver el resultado final del dibujo muchas gracias!!
Welcome, my dear, it's so nice to see you here and to see your beautiful paper drawing. These little dolls take a lot of work to make, each step takes time, but as we always say, the best part is seeing the final result.
Thank you for joining us and being part of our wonderful community, your Creative Papercraft team.
Hello, thank you very much. Each step takes me time, but I like to draw them and see the final result.❤️!!
Congratulations @dariana.vibes! You have completed the following achievement on the Hive blockchain And have been rewarded with New badge(s)
Your next target is to reach 1250 upvotes.
You can view your badges on your board and compare yourself to others in the Ranking
If you no longer want to receive notifications, reply to this comment with the word
STOPThanks You!!
That's great @dariana.vibes! We're excited to see your commitment to Hive! Keep it up!
BTW, our proposal needs your support to continue bringing badges and entertainment to Hive. Please consider supporting it.
All you need to do is to click on the "support" button on this page: https://peakd.com/proposals/331.
Thank you!