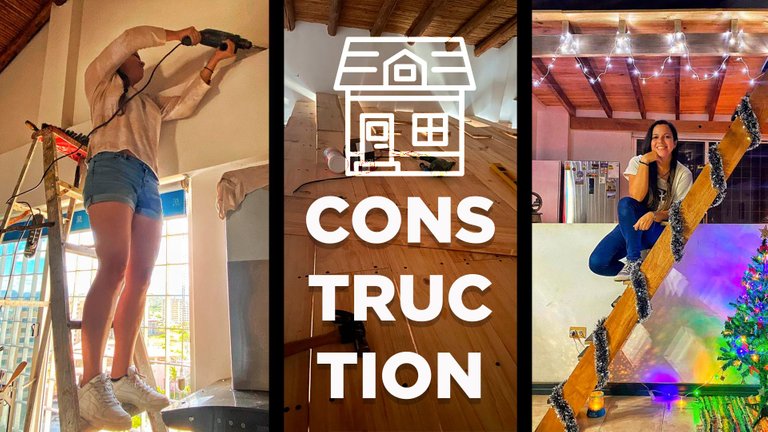
Hello again friends of Hive, I hope you are doing well today.
This time I want to tell you a little bit about the process of building the attic of my apartment.
Let's start from the beginning...
Hola nuevamente amigos de Hive, espero se encuentren muy bien el día de hoy.
En esta oportunidad les quiero contar un poco del proceso de construcción del ático de mi apartamento.
Empecemos desde el principio…
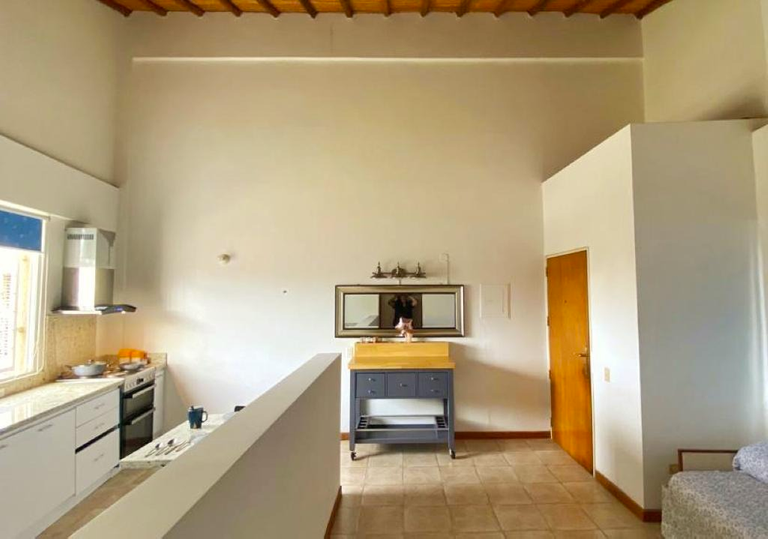
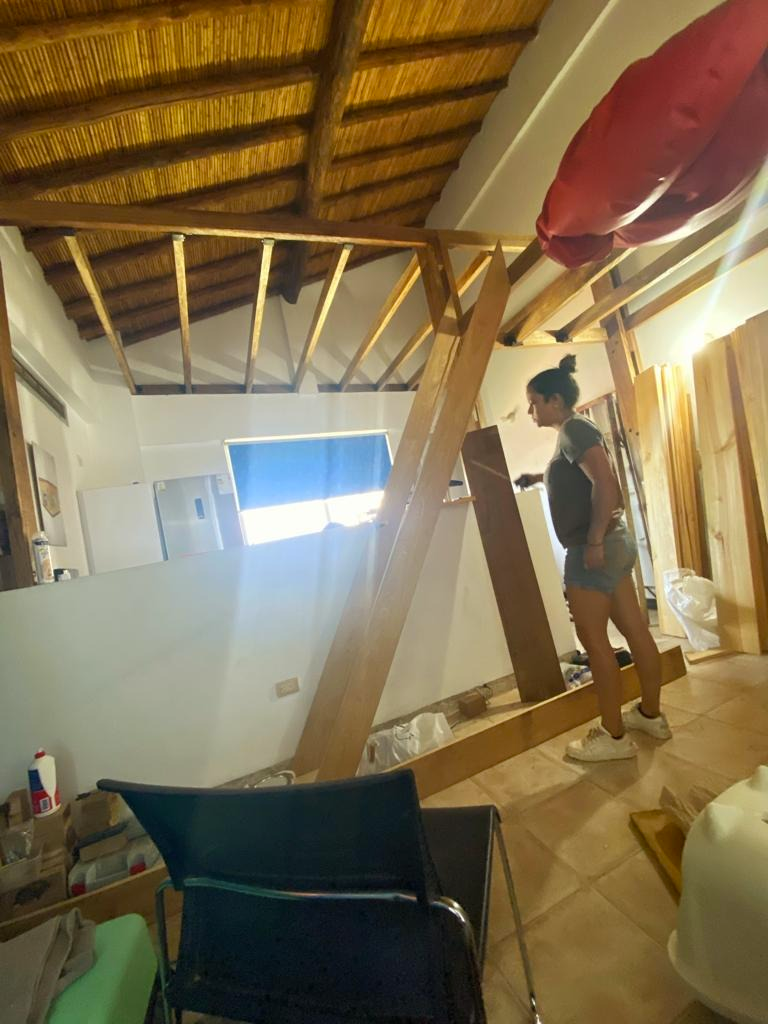
When I arrived at the apartment, one of the things that caught my attention was the great height it had, it is the top floor, because its ceiling reaches a height of almost 5 meters. I immediately thought: we definitely have to take advantage of all this space, surely any of you would have thought the same thing. So I got down to work (literally).
First I started with the ideas, what I wanted to put in that second level. There, among so many ideas, 2 important needs came up: the first one was that if visitors came, I needed to accommodate them somewhere without bothering or inconveniencing them; and the second one, I needed a space to place the computer and the desk. With that, I could start designing.
Cuando llegué al apartamento, una de las cosas que me llamó la atención era la gran altura que tenía, es el último piso, porque lo que su techo llega a una altura de casi 5 metros. Enseguida pensé: definitivamente hay que aprovechar todo este espacio, seguramente cualquiera de ustedes hubiese pensado lo mismo. Así que me puse manos a la obra (literalmente).
Primero inicié con las ideas, qué era lo que deseaba poner en ese segundo nivel. Ahí, entre tantas ideas, surgieron 2 necesidades importantes: la primera era que si llegaba visita, necesitaba alojarlos en algún lado sin incomodarme ni incomodarlos; y la segunda, necesitaba un espacio para colocar la computadora y el escritorio. Ya con eso, podía empezar a diseñar.
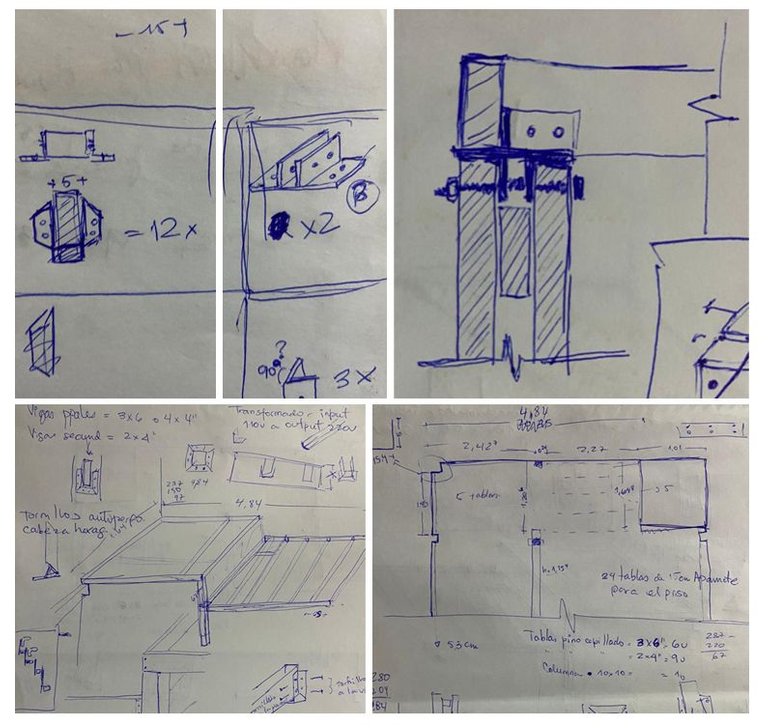
Then, I grabbed a notebook and started to draw lines, when I had my sketch ready, I sat down at the computer and started to project it in a much more orderly way and with the real measurements. To convince myself that I was doing something functional and that I was really going to like it, I drew it in 3D so I could also draw each piece so that when I cut the wood, it would be exact.
Luego, agarré un cuaderno y comencé a lanzar rayas, cuando ya tenía mi boceto listo, me senté en la computadora y empecé a proyectar ya mucho más ordenado y con las medidas reales. Para convencerme que estaba haciendo algo funcional y que realmente me iba a gustar, lo dibujé en un 3D y así también podía dibujar cada pieza para que al momento de cortar la madera, me quedaran exactas.

When I finished the 3D I took out the amount of wood, screws, glue, tools and all the material I was going to need, I took my sheet to the store where they sell everything and they gave me the budget. Obviously apart from the fact that I wanted to build it myself, knowing that I would save a lot of money, motivated me even more.
Al terminar el 3D saqué la cantidad de madera, tornillos, pega, herramientas y todo el material que iba a necesitar, llevé mi hoja a la tienda donde venden todo y me dieron el presupuesto. Obviamente aparte que quería yo misma construirlo, el saber que me ahorraría mucho dinero, me motivaba más aún.
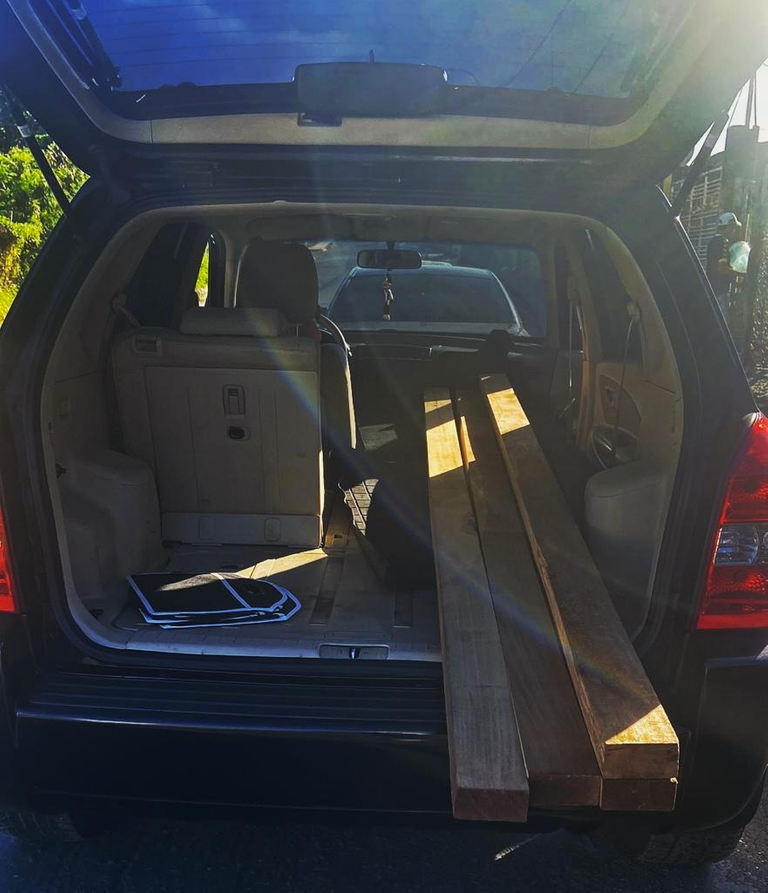
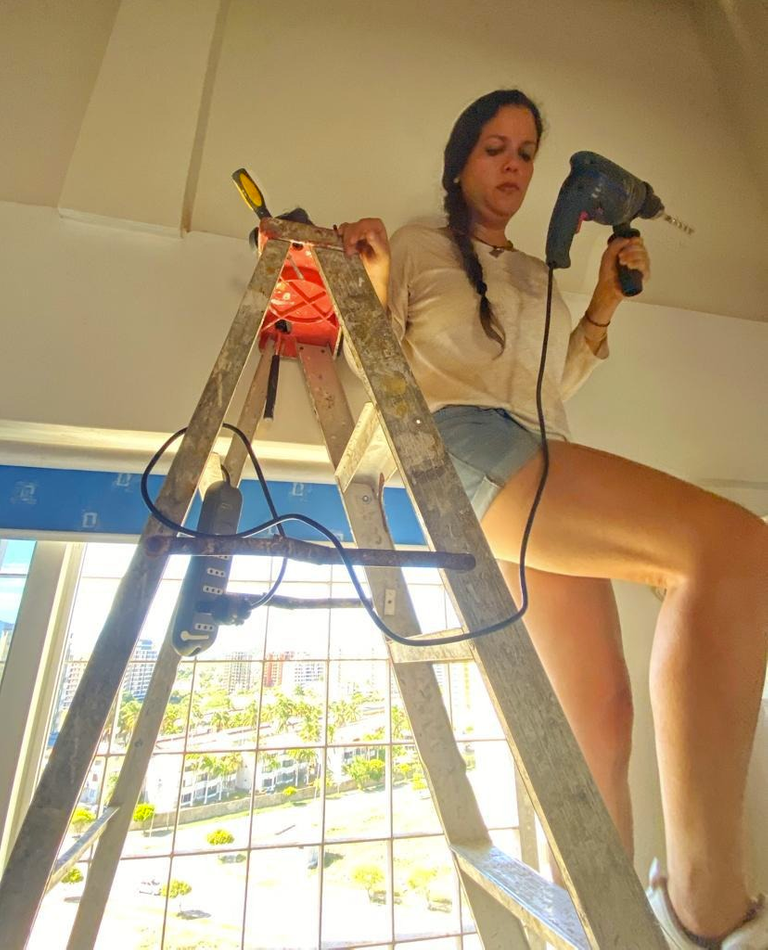
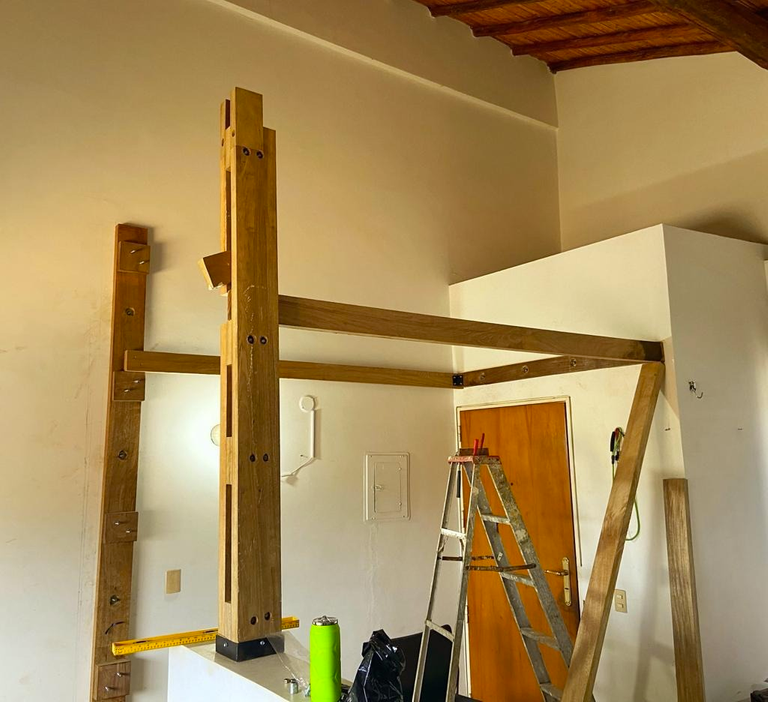
After buying everything, I started the hard work. To lift the boards that didn't fit through the elevator 9 floors was not easy work, I don't think even Crossfit had ever tired me so much. Once I had all the material at home, I started to select the pieces for each side, beams, columns, and floors.
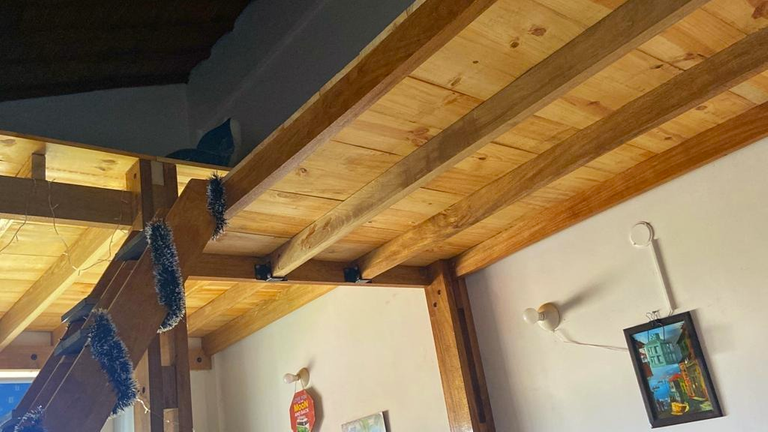
For the structure, I used a wood called Apamate, which is ideal for the island's climate, with a lot of humidity and saltpeter. For the floor, I used pine, which is quite light but resistant.
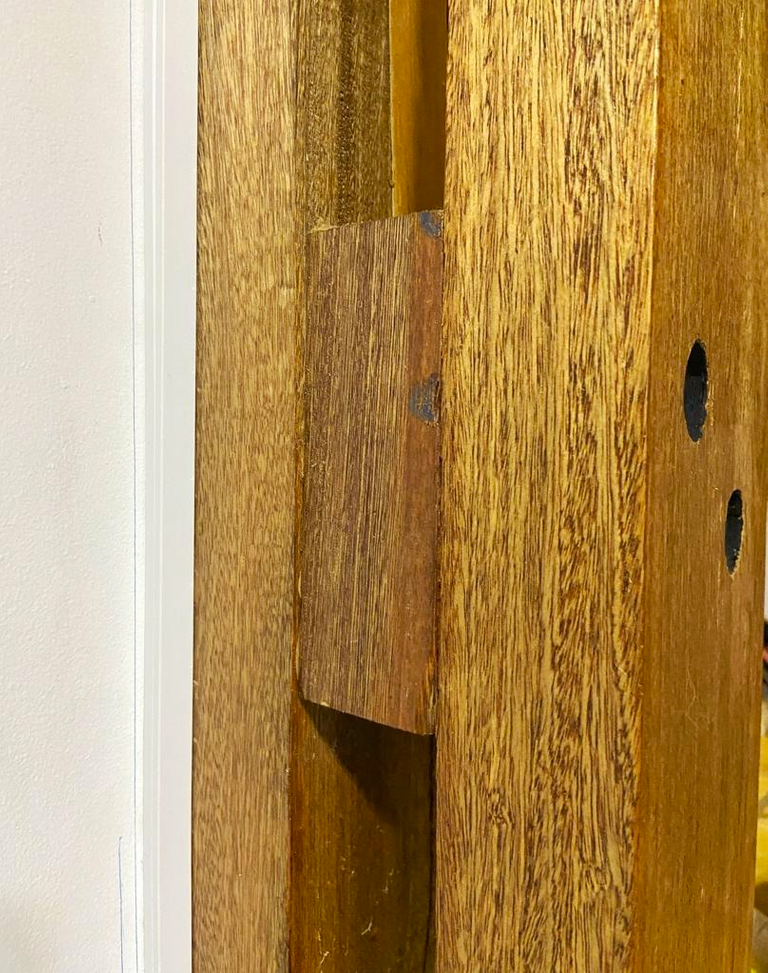
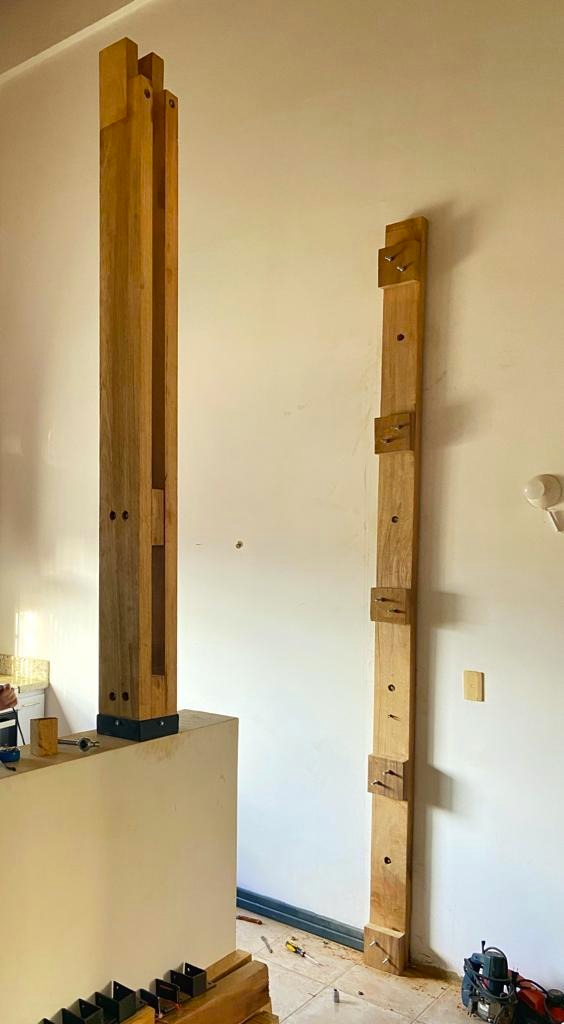
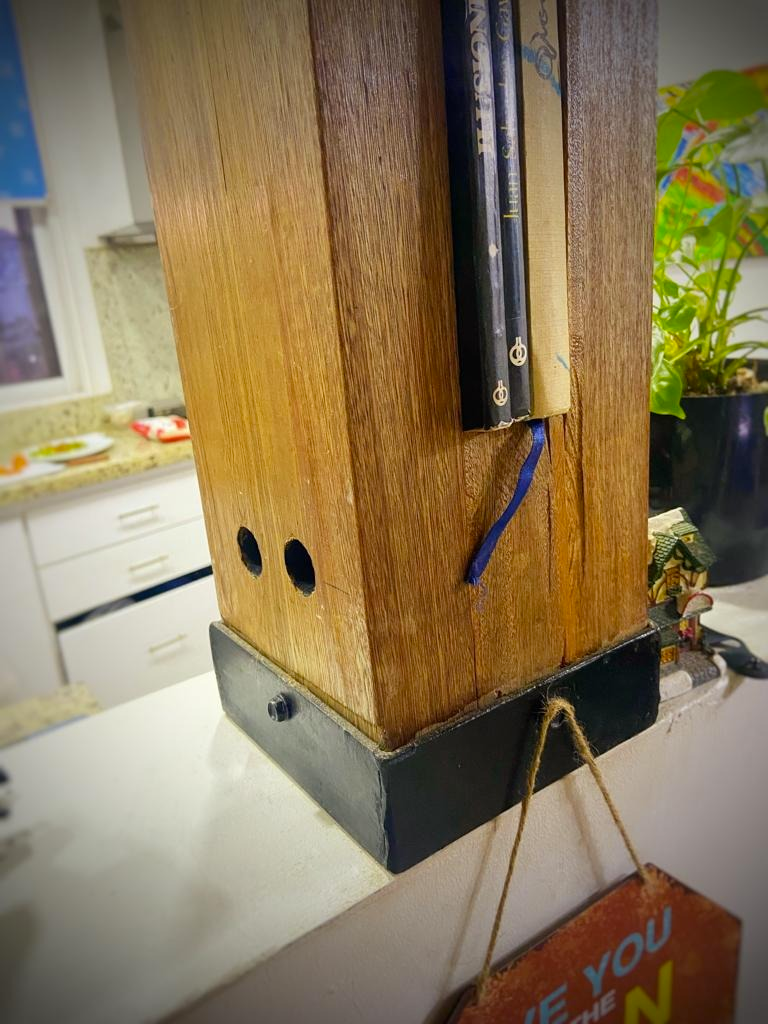
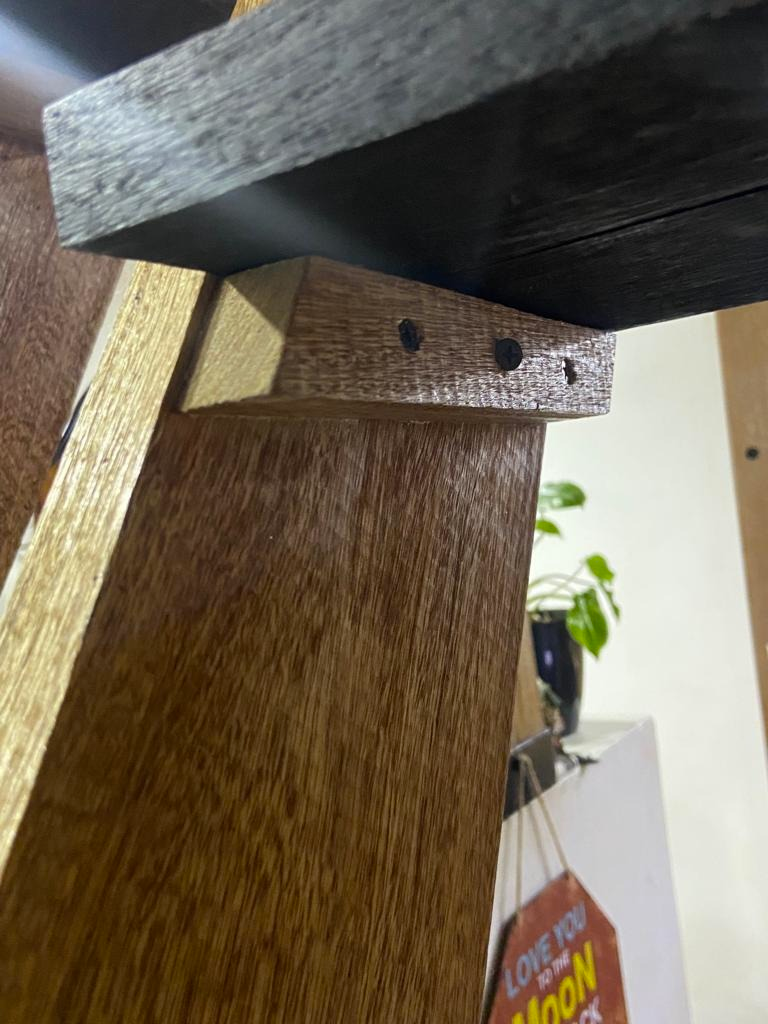
For the columns I used a design that was ideal for what I wanted, light and would help me a lot to assemble everything, something like a "tetris". Its system consists of placing a smaller piece of wood between two boards, fixed by a screw with thread.
Luego de comprar todo, comencé el trabajo pesado. Subir las tablas que no entraban por el ascensor 9 pisos no fue trabajo fácil, creo que ni Crossfit me había cansado tanto. Al tener todo el material en casa, empecé a seleccionar las piezas que iban para cada lado, vigas, columnas, y los pisos.
Para la estructura, utilicé una madera llamada Apamate, que es ideal para el clima de la Isla, con mucha humedad y mucho salitre. Para el piso, utilicé Pino, que es bastante liviano pero resistente.
Para las columnas utilicé un diseño que era el ideal para lo que quería, livianas y me ayudarían mucho para armar todo, algo así como un “tetris”. Su sistema consiste en colocar un pedazo de madera más pequeño entre dos tablas, fijados por un tornillo con rosca.
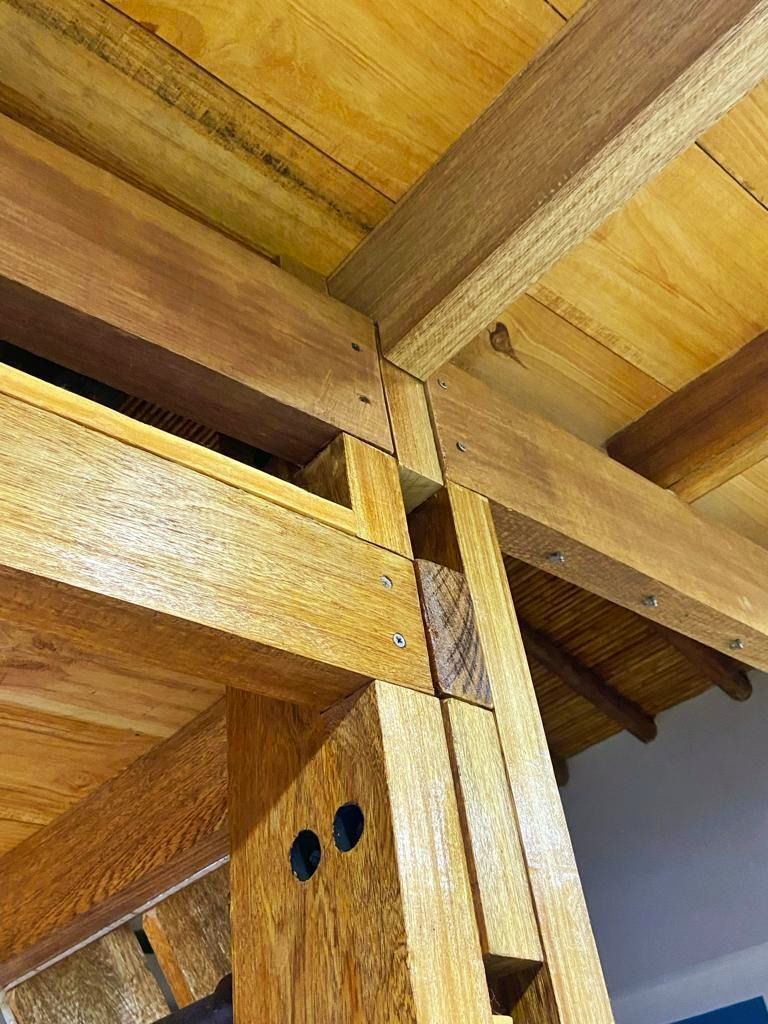
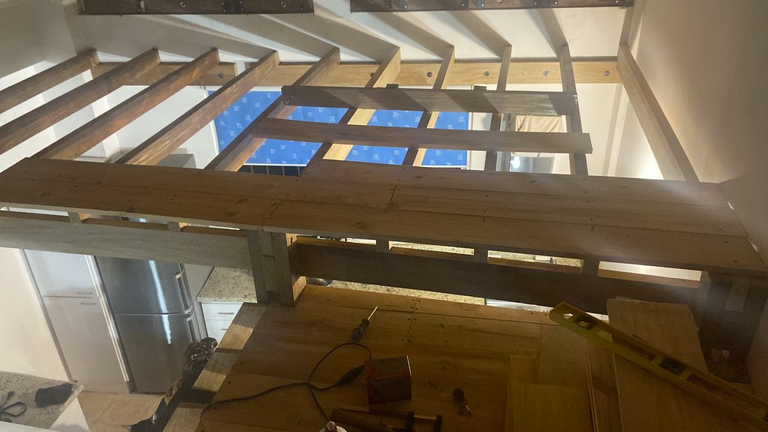
The columns on the walls I fixed with 1/2" ramplug and the one in the center I fixed to the floor with a piece of iron that serves as a union. And at the top it is level and well fixed because the whole structure is closed on the 4 sides. To hold beam to beam, on one side the smaller ones rest on a larger mother beam, and on the other side, they are held with some iron "U" that I had a blacksmith make.
Las las columnas en las paredes las fijé con ramplug de 1/2” y la del centro la fijé al piso con una pieza de hierro que sirve de unión. Y arriba queda nivelada y bien fija porque toda la estructura queda cerrada por los 4 lados. Para agarrar viga con viga, en un lado reposan las más pequeñas sobre una viga madre más grande, y en otro lado, están agarradas con unas “U” de hierro que mandé a hacer con un herrero.
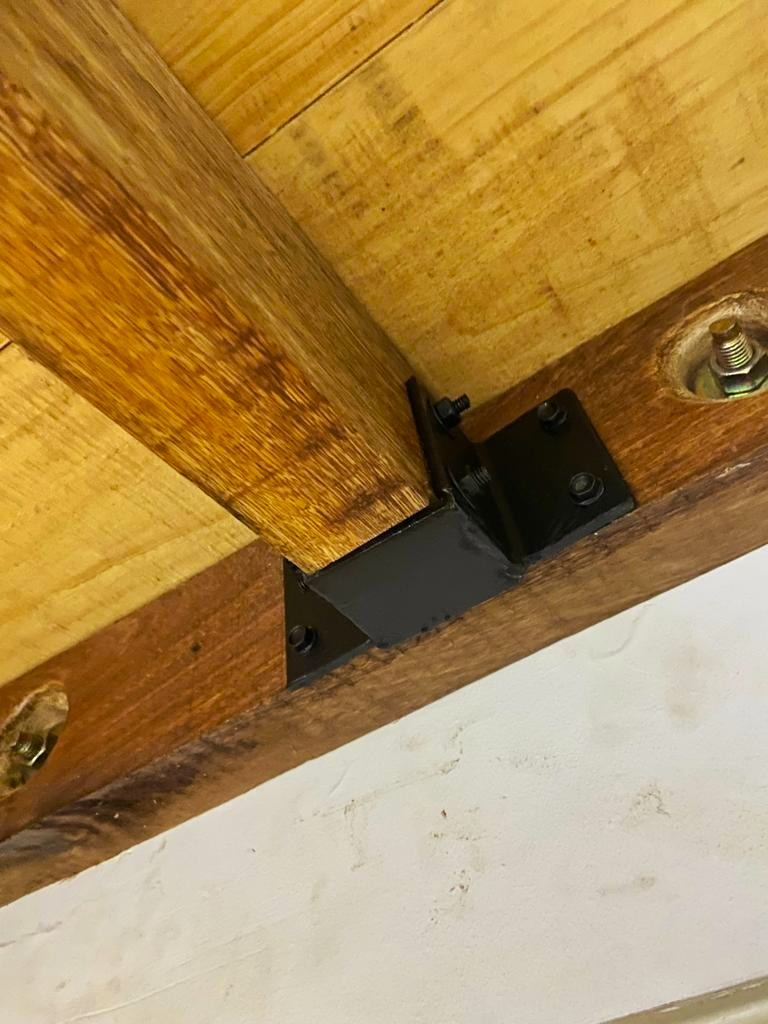
Cada viga están colocadas entre 40 y 50 cm de separación, esto es algo que por mis conocimientos a lo largo del tiempo he aprendido. Las medidas son de 5x10cm y las vigas madres son de 5x20cm.
Luego de fijarlas con tornillos para madera de 2” con su respectivo pegamento (pega blanca), procedí a pintarlas con Barniz Marino. Un tip, es que con este tipo de revestimiento, no se debe usar sellador, porque sino se despegaría el barniz enseguida.

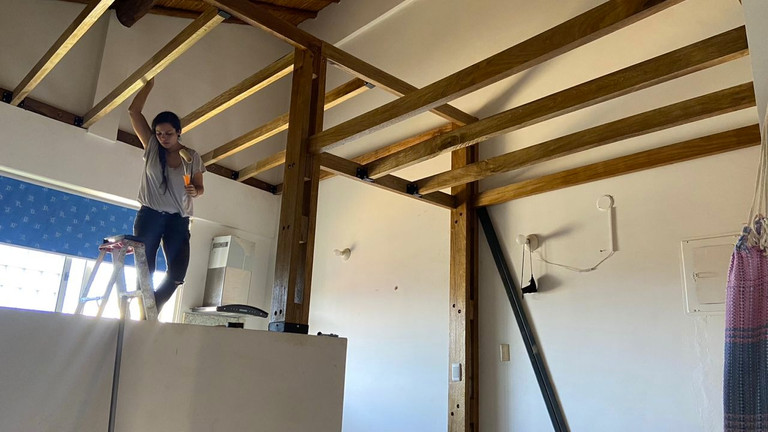
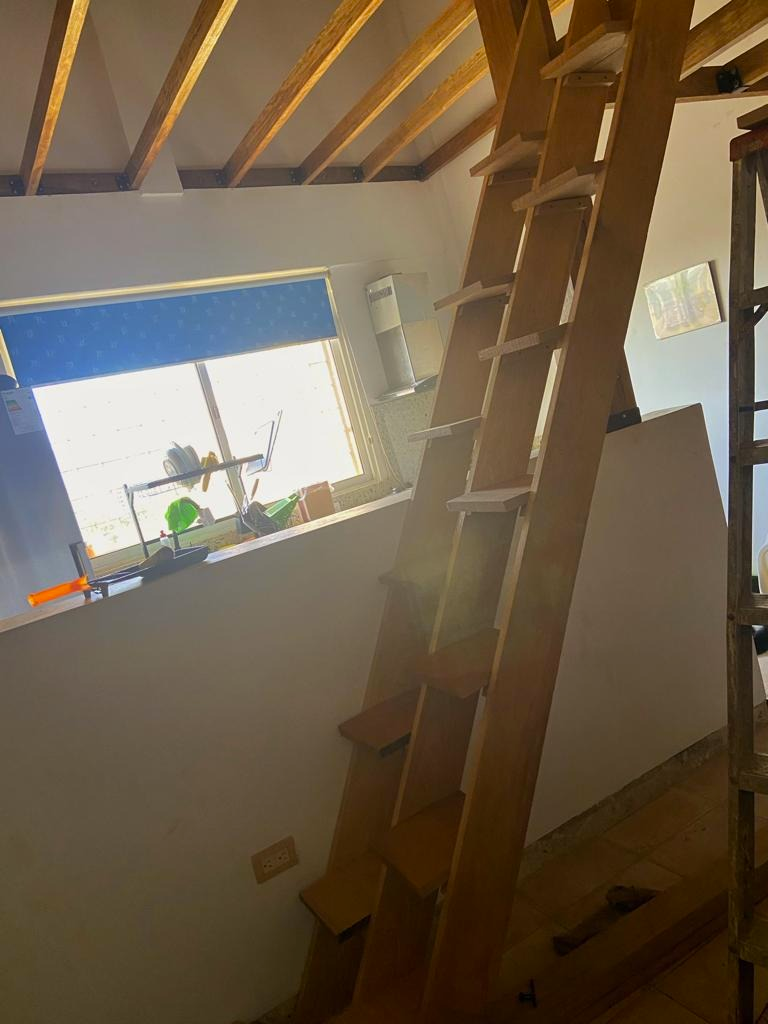
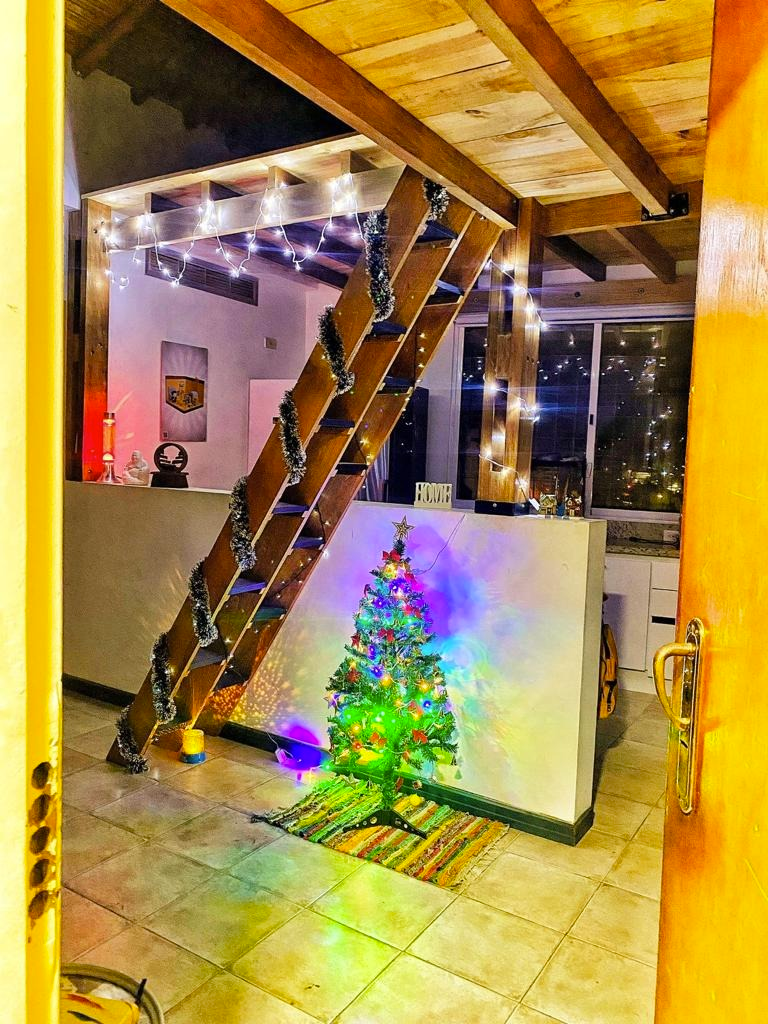
The staircase was the most exciting thing to do, I looked for ideas and in the end I decided on a design called: "compensated staircase", which is a staircase that saves space more than anything horizontal, since the space I had was very small and a normal staircase was not going to fit. Its functionality is very particular, since each foot goes on each step on the side that corresponds to it. It is ideal for these small spaces and the final result is spectacular. The steps or as we call it in architecture, the "footprint" was made in apamate wood and each board was fixed with pieces of wood attached to the main structure of the staircase. Although it may not look like it, you can go up and down the stairs without any problem, it's just a matter of habit.
La escalera fue lo más emocionante de hacer, busqué ideas y al final me decidí por un diseño llamado: “escalera compensada”, que es una escalera que ahorra espacio más que todo horizontal, ya que el espacio que tenía era muy reducido y una escalera normal, no me iba a caber. Su funcionalidad es muy particular, ya que cada pie va en cada escalón en el lado que le corresponda. Es ideal para estos espacios pequeños y el resultado final es espectacular. Los escalones o como lo llamamos en arquitectura, la “huella” fue hecha en madera apamate y cada tabla la fijé con trozos de madera fijados a la estructura principal de la escalera. Aunque no parezca, puedes subir y bajar de frente la escalera sin problema, solo es cuestión de costumbre.

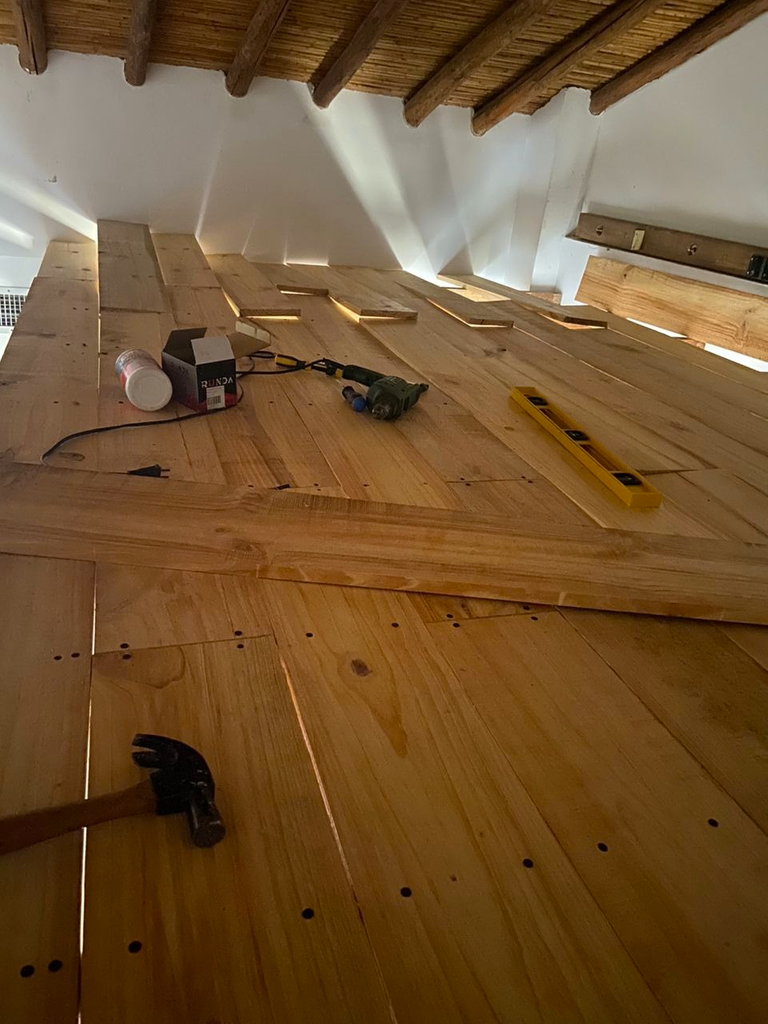
After finishing this procedure, came the most exciting part for me besides making the staircase, and that was to place the pine floor, since this meant that the project was already very advanced and was reaching the goal.
For this, I was measuring, and cutting piece by piece, I was presenting them and left them in place, when I had them all ready and presented, I began to fix them with 2" screws and wood glue. Then all that was left was to sand and varnish.
Al terminar este procedimiento, vino la parte más emocionante para mí aparte de hacer la escalera, y era colocar el piso de Pino, ya que esto significaba un proyecto ya muy avanzado y que estaba llegando a la meta.
Para esto, iba midiendo, y cortando pieza por pieza, las iba presentando y las dejaba en su lugar, al tenerlas todas listas y presentadas, comencé a fijarlas con tornillos de 2” y pegamento para madera. Luego solo faltaba lijar y barnizar.

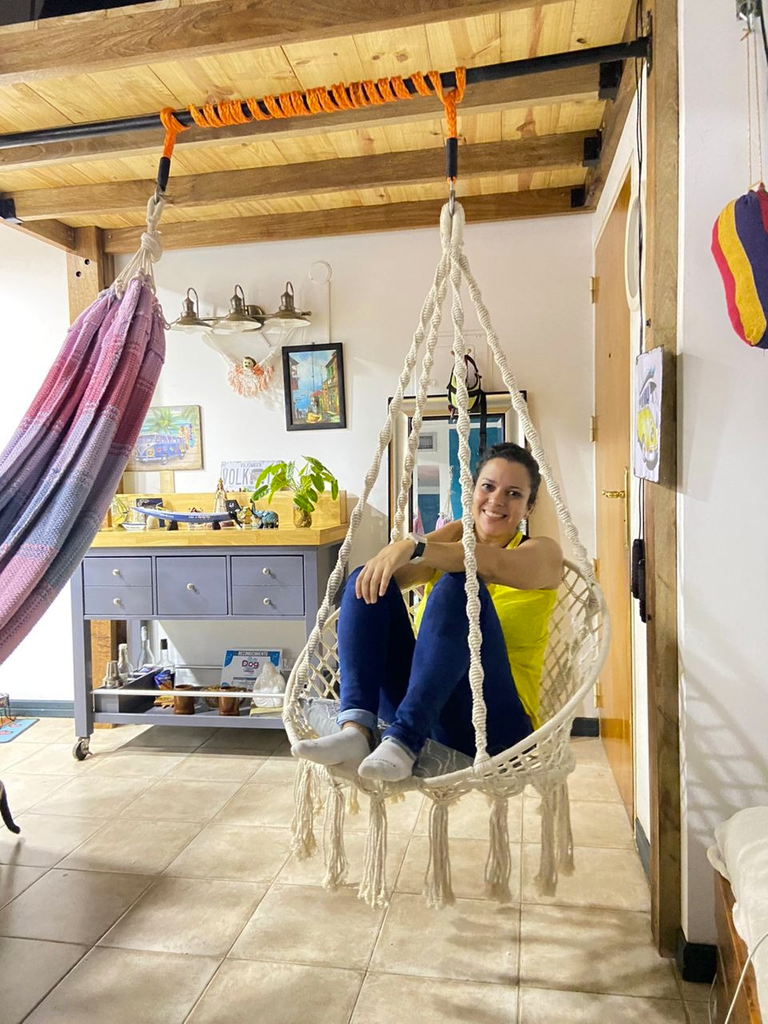
Finally, there were only details to add, such as the hanging chair that I wanted for a long time, and I managed to devise a system to hang it and watch TV comfortably, a hammock that I can pick up and place whenever I want to use it and lights to decorate the space in the most cozy way possible.
Thank you very much for reading and I hope you enjoyed this process as much as I did.
Por último, solo faltaban detalles que agregar, como la silla colgante que la quería desde hace mucho tiempo, y logré ingeniarme un sistema para colgarla y poder ver la televisión cómodamente, una hamaca que puedo recoger y colocar cada vez que la quiera usar y luces para adornar el espacio de una manera lo más acogedora posible.
Muchas gracias por leer y espero hayan disfrutado tanto como yo de este proceso.
All photos and text in this publication are my own, using the translator DeepL and Photoshop as editing tool.
Todas las fotos y texto de esta publicación son de mi autoría, utilizando el traductor DeepL y como herramienta de edición Photoshop.
Congratulations @lifeblue! You have completed the following achievement on the Hive blockchain And have been rewarded with New badge(s)
Your next target is to reach 200 upvotes.
You can view your badges on your board and compare yourself to others in the Ranking
If you no longer want to receive notifications, reply to this comment with the word
STOPCheck out our last posts:
Thanks guys of @hivebuzz
All good @lifeblue! You're a real Hive pro! Onward to that new goal!
Wow, it really looks amazing, what a great way to use all that space, I have always dreamed of having a room with a second floor in that style, I love small places but arranged in this way, congratulations!
Thanks for your comment! surely at some point you will have that room that you want so much and it will look great on you @edmanuelwild
I really love how you maximize the space! The idea and execution is simple, neat, yet very functional. Congratulations on a job well done. How long did it take to finish this project?
¡Me encanta cómo maximizas el espacio! La idea y la ejecución es simple, ordenada, pero muy funcional. Felicitaciones por un trabajo bien hecho. ¿Cuánto tiempo tomó terminar este proyecto?
Hola @indayclara, gracias por tu comentario! Me tomó 2 meses realizarla. Con más ayuda seguramente hubiese sido menos, pero se logró el objetivo. Saludos
Hi @lifeblue, that's very impressive how you built your own attic, I've just moved home recently and been watching lots of videos of people building and decorating their home to get inspiration.
By the way, Hive is a social platform as well as a blogging one. Since you've joined, you haven't made a single comment, neither in response to people who has commented on your post, or to other people's post. Perhaps you would want to consider engaging with the community to widen your network and exposure so you can get more support for your content in the long run. It will be worth it!!!
@livinguktaiwan hello! Thanks for your comment. Yeah, I'm getting a little bit of a grasp on how Hive works, still new to all of this. But little by little I will become more familiar with it. I also looked for ideas, but in the end you end up giving the personal touch yourself. Greetings and that you can do something great!
Congratulations @lifeblue! Your post has been a top performer on the Hive blockchain and you have been rewarded with this rare badge
You can view your badges on your board and compare yourself to others in the Ranking
If you no longer want to receive notifications, reply to this comment with the word
STOPCheck out our last posts:
Thanks guys of @hivebuzz
You're on your way to becoming a Hive legend! Keep up the fantastic work @lifeblue.
I like your attic. You really have the skill to make your apartment look more beautiful than before.
!DIY
Hi @missleray Thank you! yes, now it looks wider and more modern! Thanks for your comment
You can query your personal balance by
!DIYSTATS@missleray Thank you very much, I'm glad my post was helpful
It looks creative :)
Oh thanks! ❤️ @vladlau89