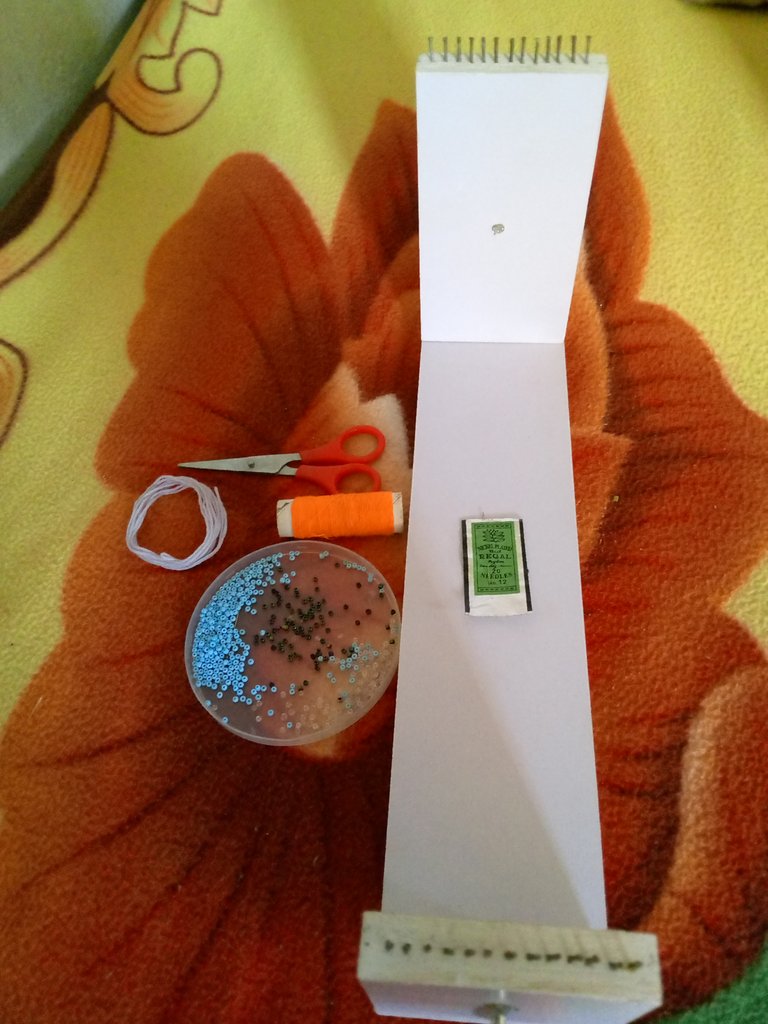
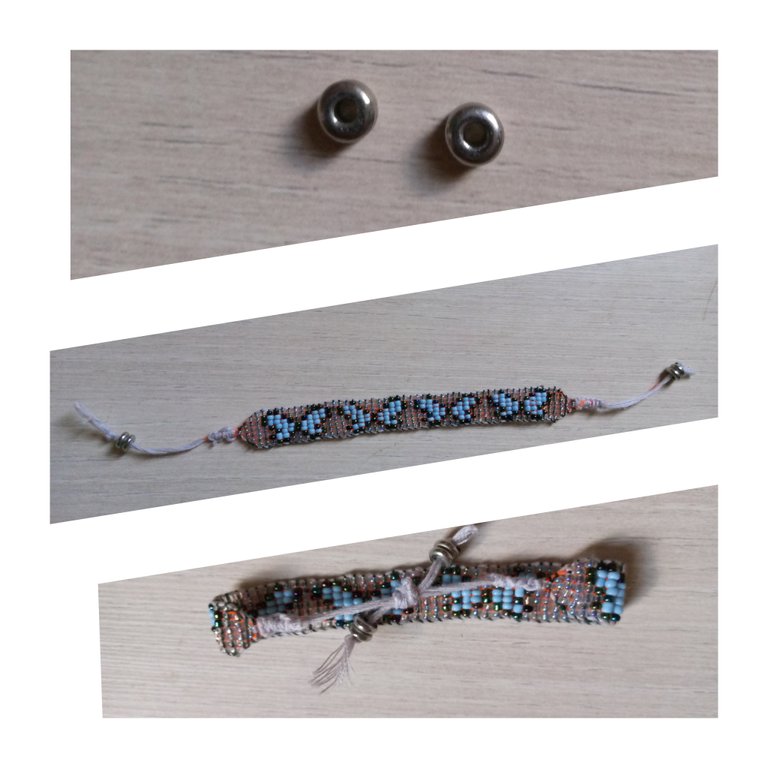
MATERIALES UTILIZADOS
- Telar de Madera
- Mostacillas Azul Cielo
- Mostacillas Transparente
- Mostacillas Negras Tornasol
- Hilo de poliéster Color Naranja
- Hilo poliéster Color Verde Oscuro
- 100cm Hilo Macrame
- Aguja para Mostacillas
- 2 separadores
- Tijeras
🦋🦋 A continuación les estare presentando el paso a paso realizado para la creación de esta hermosa pulsera de mariposas 🦋🦋
Diseño
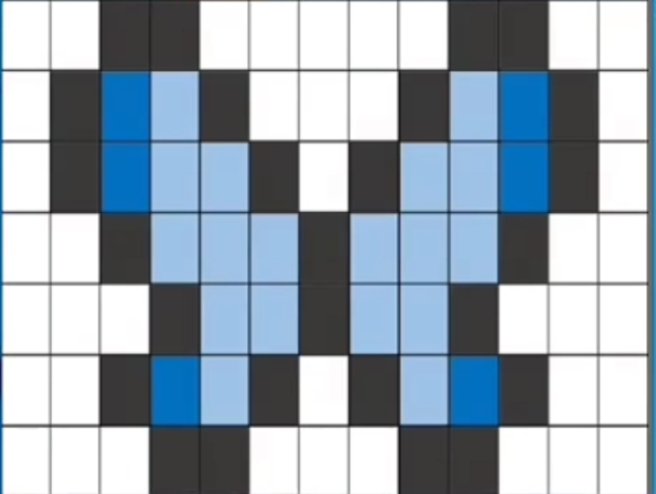
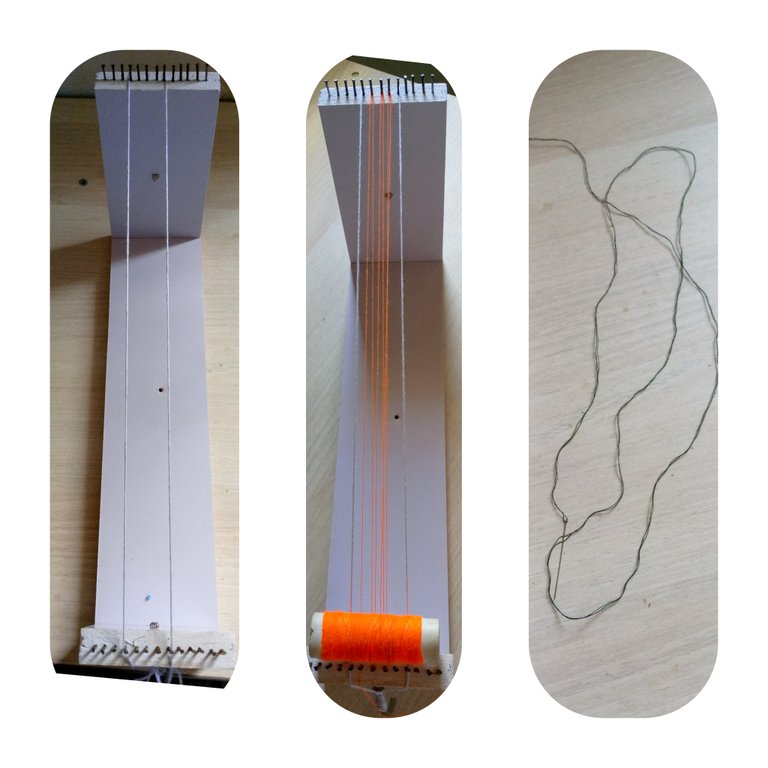
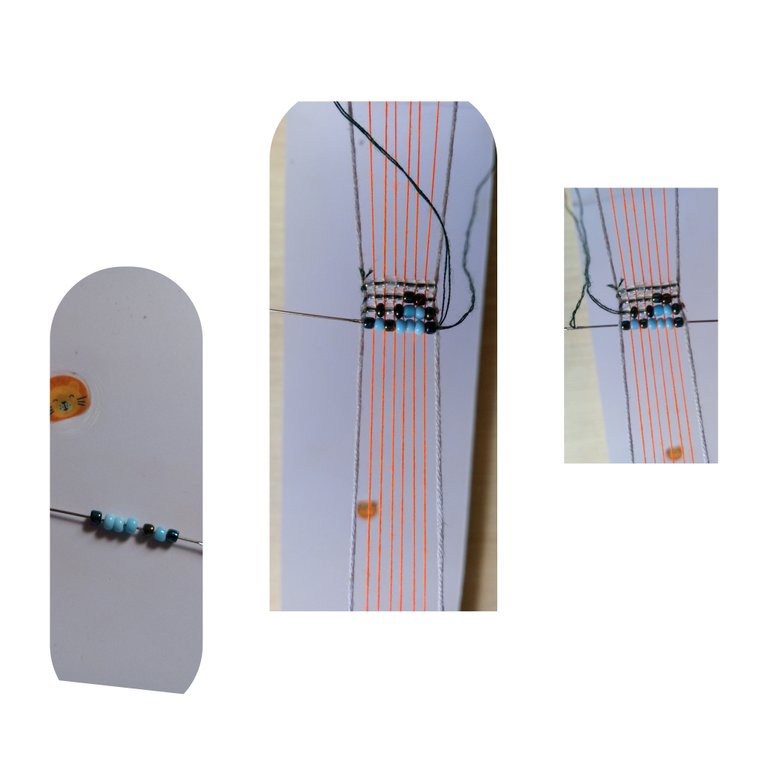
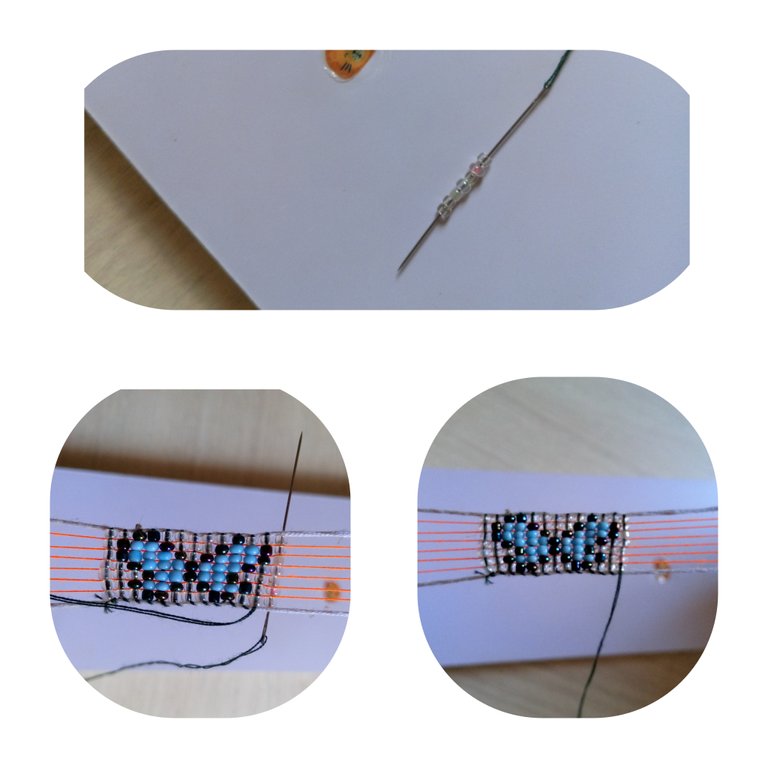
Lo primero que haremos sera tomar 70cm de Hilo macrame y lo llevaremos al telar, contaremos 2.5cm,es decir, dejaremos un espacio de 5 clavitos. Luego tomaremos el hilo de poliéster y llenaremos los espacios del telar que dejamos, serian 6 en totales. Despues tomaremos el hilo verde oscuro y vamos a introducirlo en la aguja y comenzaremos a realizar nuestro trabajo.
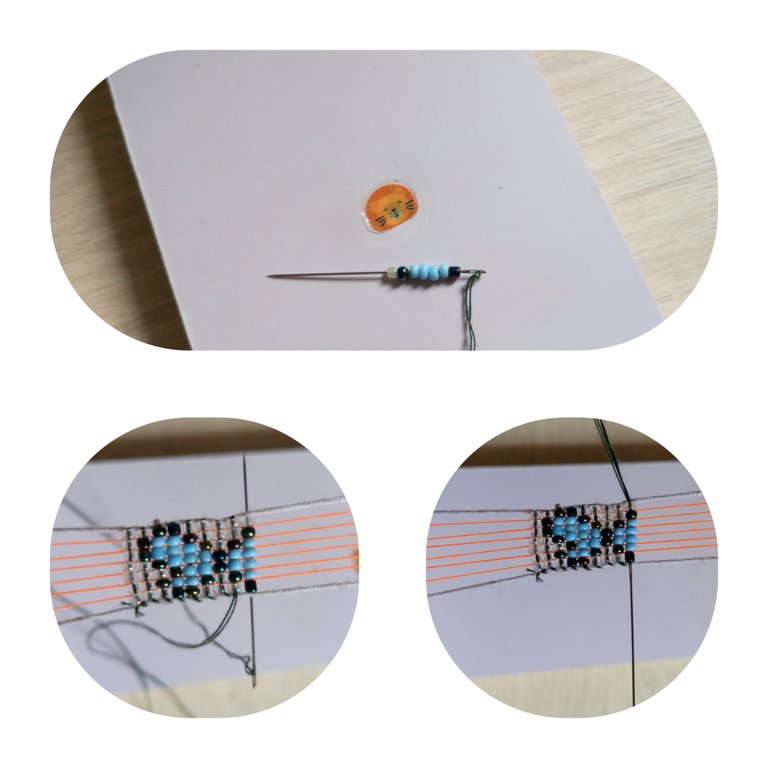
Comenzamos nuestro hermoso diseño haciendo un nudo simple en uno de los hilos macrame, Tomando 7 Mostacillas transparentes y con la ayuda del dedo vamos a posicionarla en cada hilo, luego pasamos la aguja con el hilo por la parte superior de las mostacillas para asi tirar del hilo para que nos queden ajustadas.
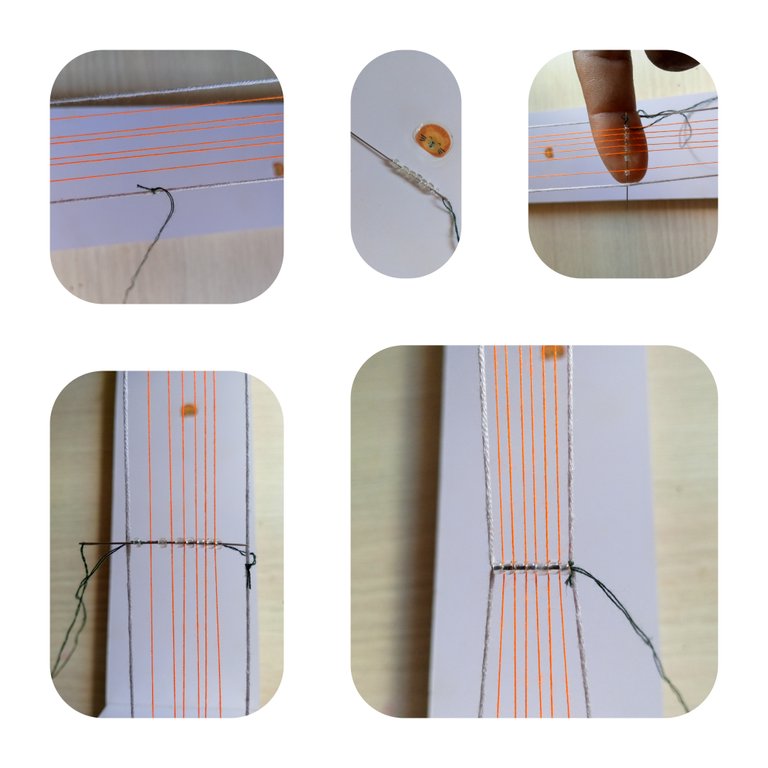
Vamos a tomar 4 mostacillas transparentes, luego 2 mostacillas negra tornasol y una transparente, de la misma manera vamos posicionarlas en los hilos y luego pasar la aguja por las mostacillas.
De la misma manera vamos a introducir una mostacilla transparente, una Negra tornasol, una transparente y otra negra, luego 2 mostacillas azules y una negra.
Vamos a colocarlas en la posición del telar, para luego introducir la aguja por la parte posterior, tiramos de ellas para ir apretando.
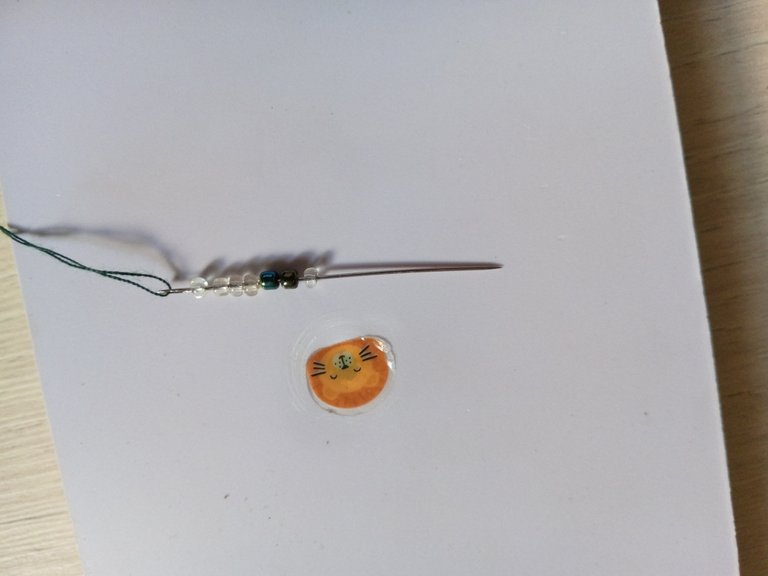
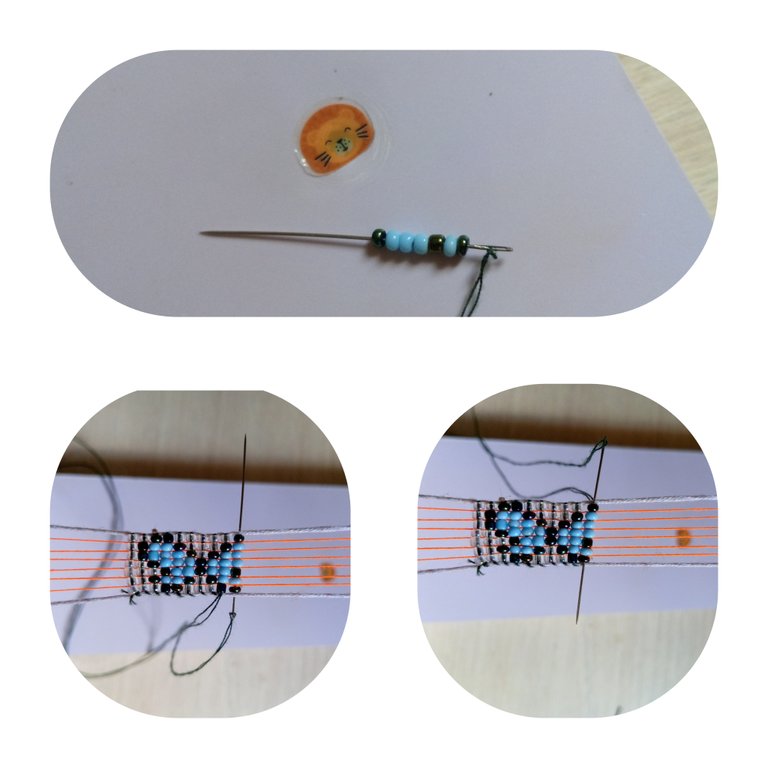
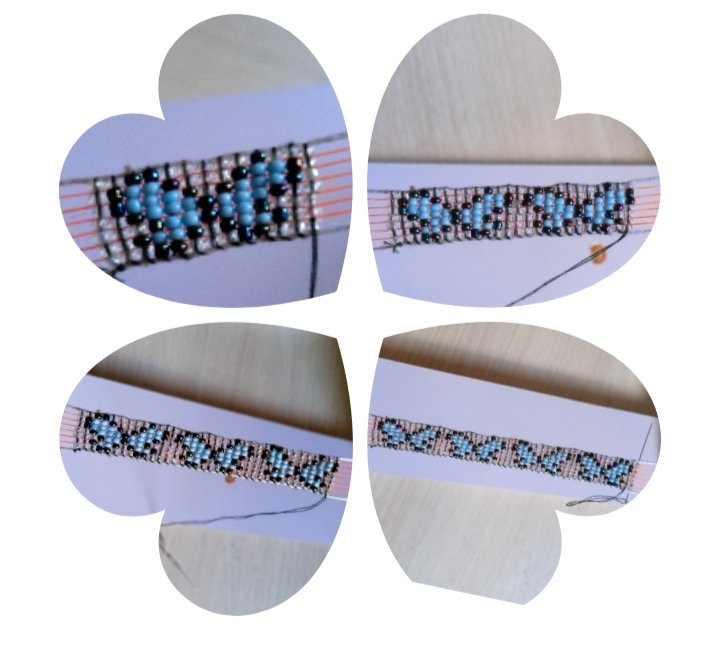
tomando 1 mostacilla negra tornasol y luego una azul, tomaremos una mostacilla negra y luego 3 azules y por último una mostacilla de color negro tornasol, seguiremos el mismos procedimiento de los anteriores, posicionamos las mostacillas para pasar la aguja por la parte de arriba.
Para este paso vamos a colocar una mostacilla negra luego cuatro mostacillas de color azul después una negra tornasol y por último una transparente, luego posicionaremos las mostacillas para para introducir la aguja por la parte superior.
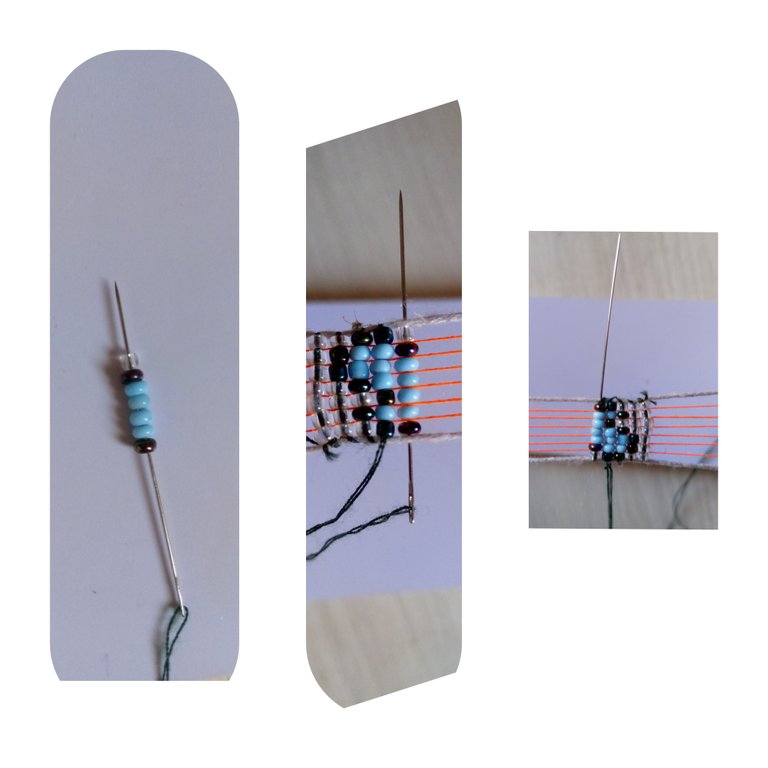
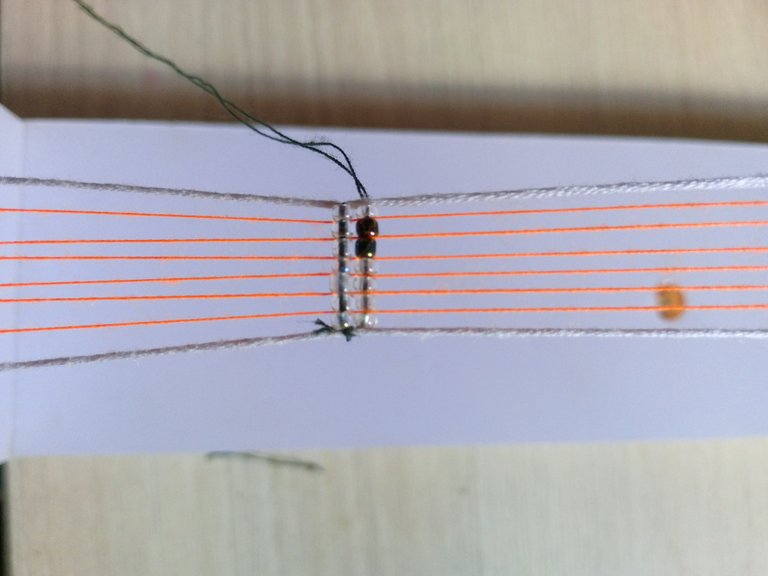
Seguimos con el proceso para armar nuestra hermosa pulsera al estilo Miyuki, tomamos una mostacilla transparente, una negra tornasol, seguimos con dos mostacillas azules, una negra y luego 2 mostacillas transparentes, de igual manera posicionamos la mostacilla y pasamos nuestra aguja por la parte de arriba.
Ahora tomaremos dos mostacillas transparentes luego 2 negras tornasol y por último tres mostacillas transparentes, seguimos el mismo proceso posicionando las mostacillas y por la parte de arriba pasamos nuestra aguja, y así terminamos a la primera ala de nuestra hermosa mariposa.
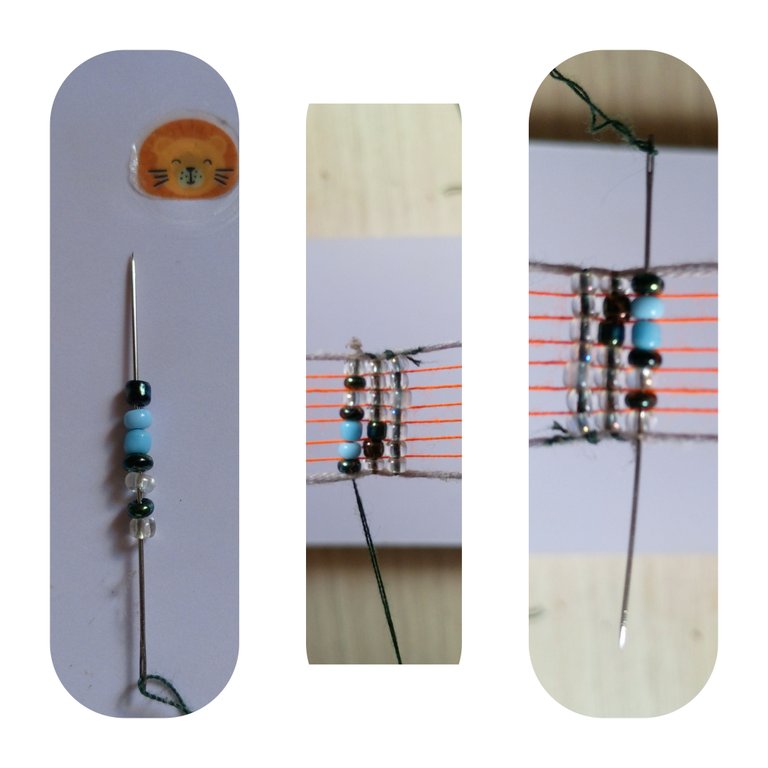
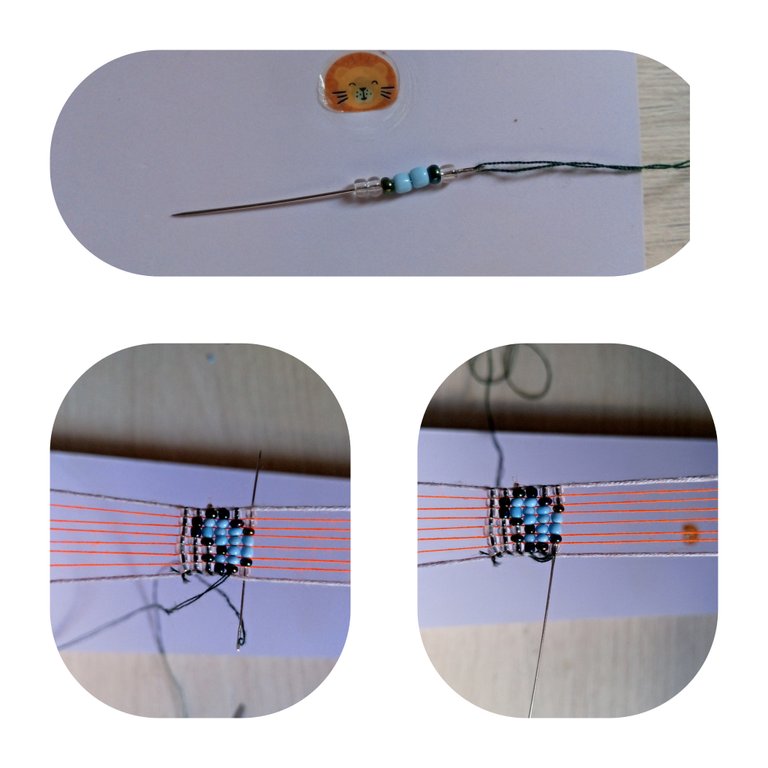
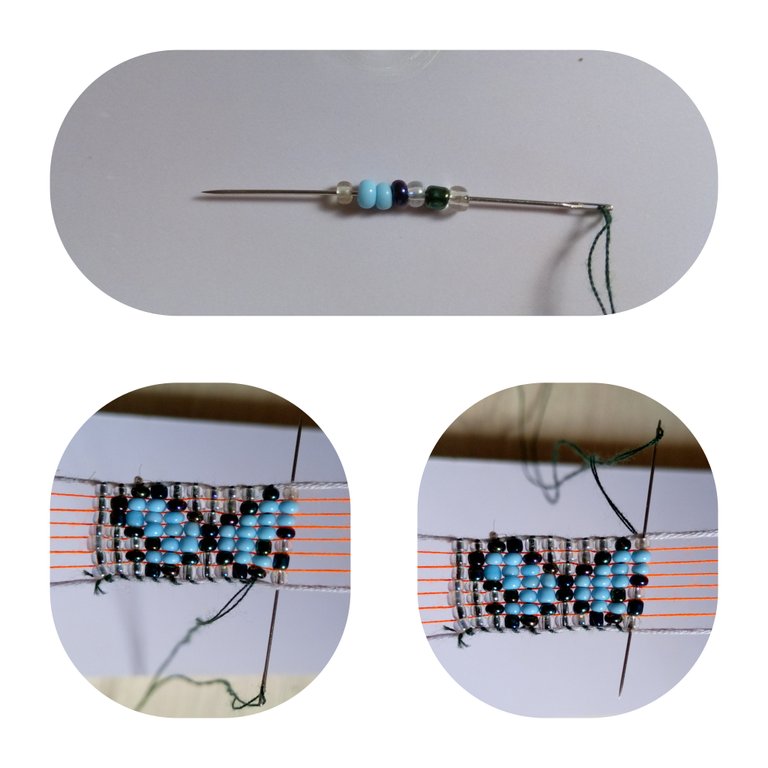
Vamos con la continuación de nuestra hermosa mariposa, colocaremos una mostacilla transparente, una negra tornasol seguidamente 2 mostacillas azules una negra y 2 transparentes, posicionamos la mostacilla para introducir la aguja por la parte superior de la mostacilla.

Introduciremos una mostacilla negra tornasol, cuatro de color azul, luego una negra y por último una mostacilla transparente, la mostacilla y pasamos nuestra aguja por la parte superior, es el mismo proceso en todos los pasos solo que cambian la posición de las mostacillas.
Vamos a introducir una mostacilla negra una azul y otra negra, luego tres azules y por último una negra tornasol, seguidamente posicionamos la mostacillas para luego pasar nuestra aguja por cada mostacilla en la parte superior.
Introducimos una mostacilla transparente una negra tornasol otra transparente y otra negra, luego dos mostacillas azules y una transparente, repetimos el mismo proceso posicionaremos la mostacillas y luego pasamos nuestra aguja por la parte de arriba.
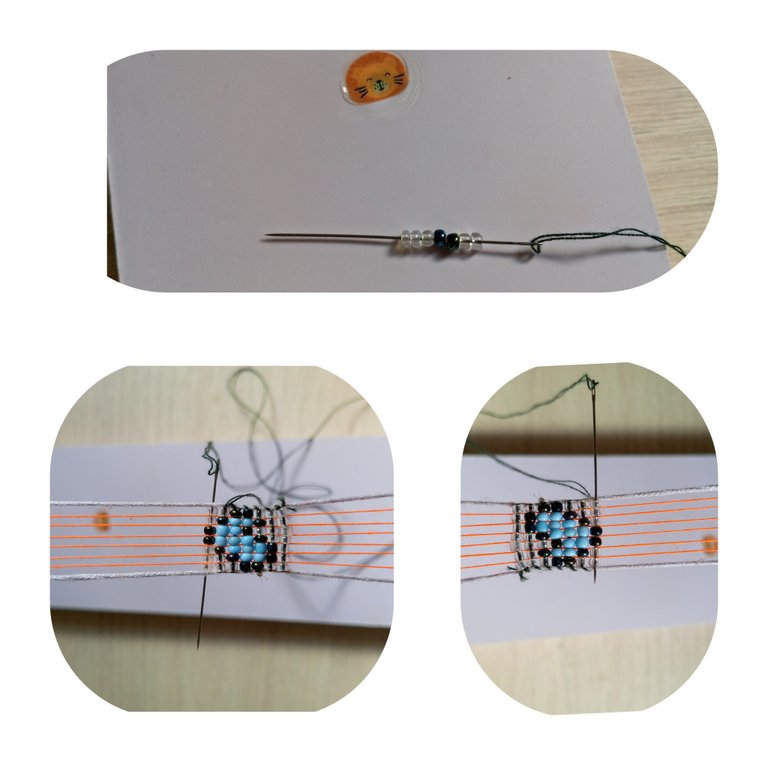
Seguidamente introducimos cuatro mostacillas transparentes luego dos negras tornasol y una transparente, volvemos a repetir el mismo procedimiento posicionamos la mostacilla e introducimos la aguja por la mostacilla de la parte superior para tener nuestra hermosa mariposa terminada.
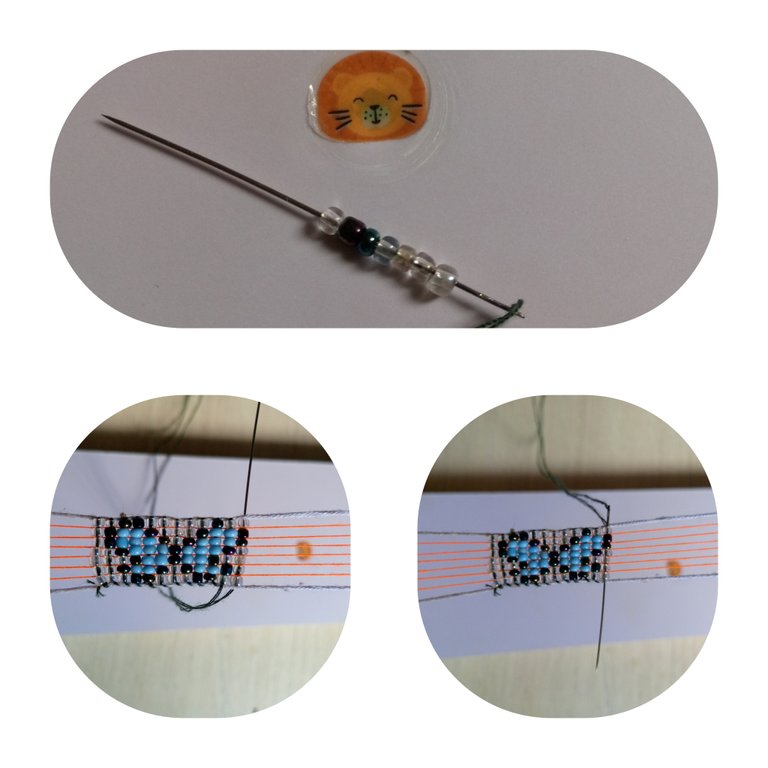
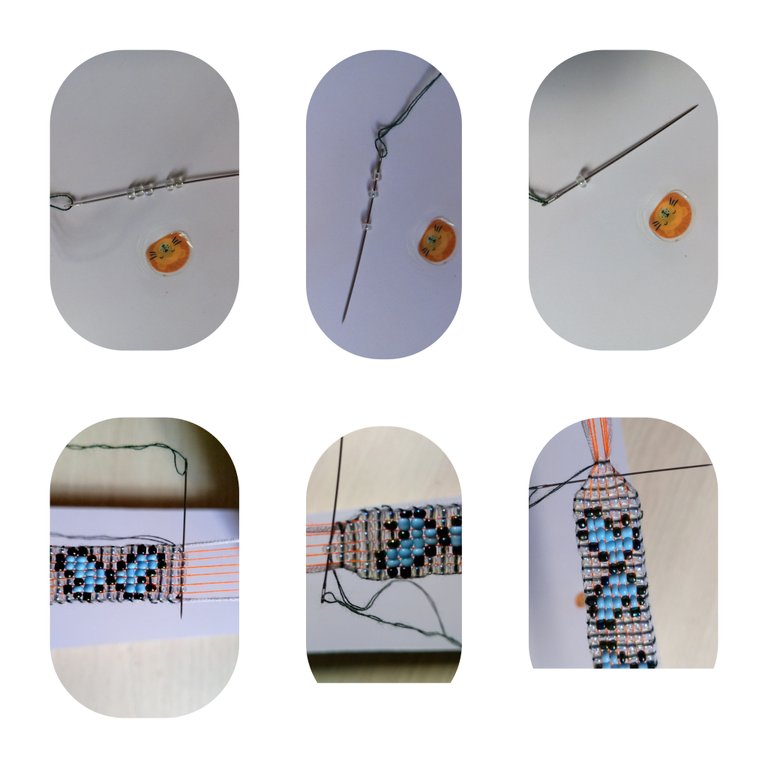
Para separar nuestra hermosa mariposa vamos a introducir siete mostacillas transparente, vamos a posicionar la mostacilla y luego por la parte superior introducimos nuestra aguja, de igual manera tiramos del hilo para ajustar y quedara lista.
Vamos a repetir el mismo proceso paso por paso hasta tener el largo deseado o las mariposas que queramos, en mi caso hice cinco de estas hermosas mariposas.
Para hacer las terminaciones de nuestra hermosa pulsera de mariposa lo que haremos será: tomaremos cinco mostacillas transparente posicionaremos en el medio de las 7 que introducimos anteriormente y de igual manera pasamos la aguja por encima de las mostacillas para ajustar, luego tomamos tres mostacillas y repetiremos el mismo paso, seguidamente tomamos una mostacilla , de la misma manera vamos a posicionarla y introducimos la aguja por encima para de igual manera ajustar, lo que nos quedaría será cortarle el hilo excedente y hacer el mismo procedimiento en la otra parte de la pulsera.
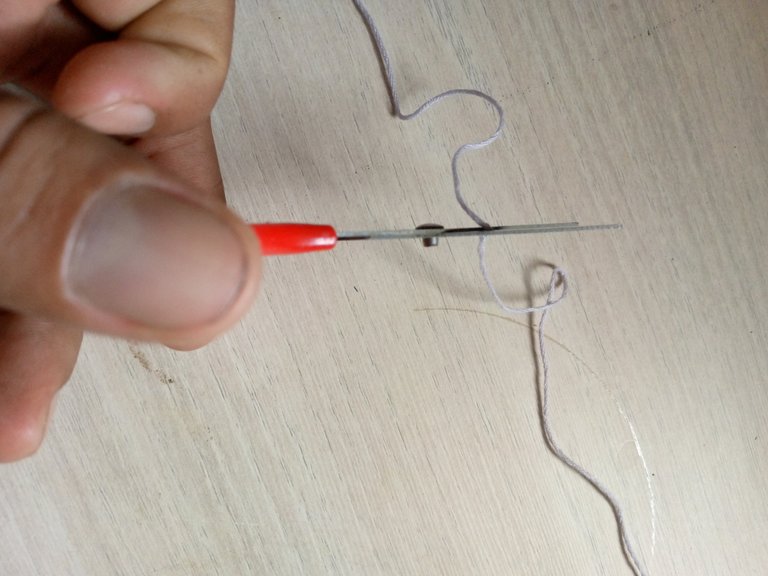
Ahora vamos a tomar los 30 cm de hilo macramé y cortamos en 3 partes de 10 cm cada uno, para luego hacer nudos planos y hacer bonitas terminaciones, estos nudos son muy sencillos, en proximas publicaciones les mostrare como realizarlos, haremos lo mismo en los 2 extremos de nuestra hermosa pulsera.
Después de haber cortado los hilos de poliéster, vamos a introducir los separadores en cada extremo aseguramos con nudos simples para que no se salgan, luego cruzamos los hilos de macrame y con los 10 cm de hilo macrame haremos varios nudos planos. Y asi tendríamos listo nuestra hermosa pulsera de mariposas.
Asi terminamos este bonito proceso, fue un poco largo, pero cumpli el objetivo de explicarles paso por paso la realización de esta hermosa pulsera, también les comento que fue exitoso el Telar realizado en casa, deberian animarse a realizarlo.
Espero y sea de su ayuda este post que he realizado con mucho cariño y dedicación para todos ustedes, deseo un fin de semana con mucha armonía y lleno de bendiciones, saludos para todos mis queridos compañeros. Hasta la próxima! Bendiciones
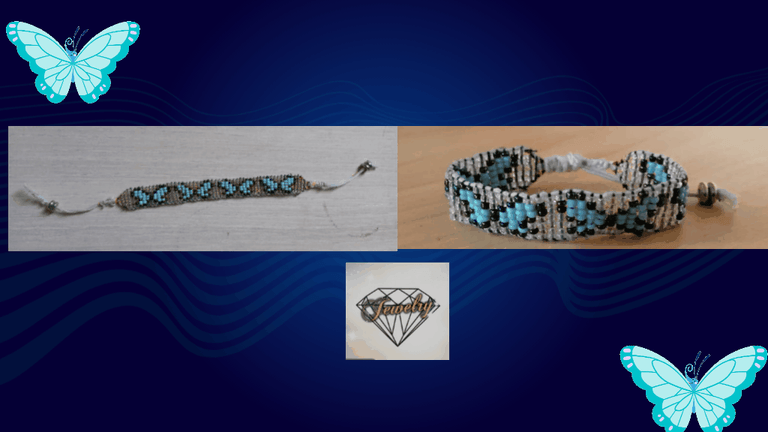
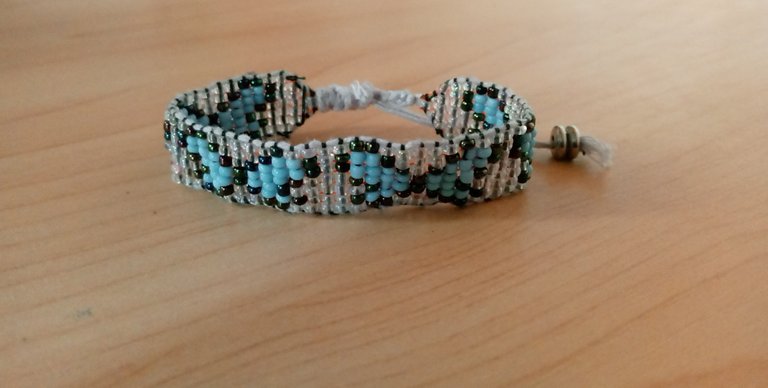
Resultado final
Las imágenes son de mi propiedad y fueron tomadas por mi teléfono tecno spark Go 2023.
Traductor Utilizado:Deepl traductor
Las imágenes son editadas mediante la aplicación editor de fotos canva
MATERIALS USED
- Wooden Loom
- Sky Blue Beads
- Transparent Beads
- Tornasol Black Beads
- Polyester Thread Color Orange
- Polyester thread Dark Green
- 100cm Macrame Thread
- Needle for beads
- 2 separators
- Scissors
🦋🦋 Below I will be presenting the step by step process for the creation of this beautiful butterfly bracelet 🦋🦋
Design
The first thing we will do is to take 70cm of macrame thread and take it to the loom, we will count 2.5cm,that is, we will leave a space of 5 pins. Then we will take the polyester thread and fill the spaces left on the loom, 6 in total. Then we will take the dark green thread and we will introduce it in the needle and we will begin to make our work.
We begin our beautiful design by making a simple knot in one of the macrame threads, taking 7 transparent beads and with the help of the finger we will position it in each thread, then we pass the needle with the thread through the top of the beads to pull the thread so that they are tight.
We are going to take 4 transparent beads, then 2 black litmus beads and one transparent bead, in the same way we are going to position them on the threads and then pass the needle through the beads.
In the same way we are going to introduce a transparent bead, a black litmus bead, a transparent bead and a black bead, then 2 blue beads and a black bead.
We are going to place them in the position of the loom, and then introduce the needle through the back, we pull them to tighten them.
taking 1 black iridescent bead and then a blue one, we will take a black bead and then 3 blue ones and finally a black iridescent bead, we will follow the same procedure of the previous ones, we position the beads to pass the needle through the top.
For this step we are going to place a black bead, then four blue beads, then a black iridescent bead and finally a transparent bead, then we will position the beads to insert the needle through the top.
We continue with the process to assemble our beautiful Miyuki style bracelet, we take a transparent bead, a black iridescent bead, we continue with two blue beads, a black bead and then 2 transparent beads, in the same way we position the bead and pass our needle through the top.
Now we will take two transparent beads, then 2 black litmus beads and finally three transparent beads, we follow the same process positioning the beads and passing our needle through the top, and so we finish the first wing of our beautiful butterfly.
Let's go with the continuation of our beautiful butterfly, we will place a transparent bead, a black iridescent bead, then 2 blue beads, one black and 2 transparent, we position the bead to introduce the needle through the top of the bead.
We will introduce a black litmus bead, four blue beads, then a black bead and finally a transparent bead, the bead and pass our needle through the top, it is the same process in all the steps just change the position of the beads.
We are going to introduce a black bead, a blue and a black bead, then three blue beads and finally a black iridescent bead, then we position the beads and then pass our needle through each bead at the top.
We introduce a transparent bead, a black litmus bead, another transparent bead and another black bead, then two blue beads and one transparent bead, we repeat the same process to position the beads and then we pass our needle through the top part.
Next we introduce four transparent beads then two black litmus beads and one transparent bead, we repeat the same procedure again, we position the bead and introduce the needle through the bead at the top to have our beautiful butterfly finished.
To separate our beautiful butterfly we are going to introduce seven transparent beads, we are going to position the bead and then through the top we introduce our needle, in the same way we pull the thread to adjust and it will be ready.
We will repeat the same process step by step until we have the desired length or the butterflies we want, in my case I made five of these beautiful butterflies.
To make the endings of our beautiful butterfly bracelet what we will do will be: we will take five transparent beads we will position in the middle of the 7 that we introduced previously and in the same way we pass the needle over the beads to adjust, then we take three beads and repeat the same step, then we take a bead, in the same way we will position it and introduce the needle over it to adjust in the same way, what we have left is to cut the excess thread and do the same procedure in the other part of the bracelet.
Now we are going to take the 30 cm of macrame thread and cut into 3 parts of 10 cm each, then make flat knots and make beautiful endings, these knots are very simple, in future publications I will show you how to make them, we will do the same at the 2 ends of our beautiful bracelet.
After having cut the polyester threads, we are going to introduce the separators at each end and secure them with simple knots so that they do not come off, then we cross the macrame threads and with the 10 cm of macrame thread we will make several flat knots. And so we would have ready our beautiful butterfly bracelet.
So we finished this beautiful process, it was a little long, but I fulfilled the goal of explaining step by step the realization of this beautiful bracelet, I also tell you that the loom made at home was successful, you should be encouraged to do it.
I hope this post I have made with much love and dedication for all of you, I wish you a weekend with much harmony and full of blessings, greetings to all my dear colleagues. See you next time! Blessings
Final result
Images are my property and were taken by my tecno spark Go 2023 phone.
Translator Used:Deepl translator
Images are edited using canva photo editor application.
Yay! 🤗
Your content has been boosted with Ecency Points, by @afrofat1.
Use Ecency daily to boost your growth on platform!
Looks so colourful and pretty. Nicely
Thank you very much, blessings
Verro chamo tienes muchísima imaginación y paciencia para hacer esas cositas, quedó muy lindo y se ve elegante, además que lo explicas todo muy a detalle, excelente, muchas gracias por eso!
Jeje, gracias amiga, siempre me ha gustado dedicarme y hacer las cosas bien, siempre a la orden 🫡
Como siempre lo digo, eres espectacular en todo lo que haces. Éxitos siempre. ❤️✨️
Orgullosa de ti siempre
Gracias @divergente1, siempre agradecido contigo por el apoyo, gracias por ser mi mentor. 💖
Hola. Feliz noche.
El resultado de tu proyecto se ve genial. La forma de mariposa 🦋 quedó bien definida. Me alegra que gs tengas el telar para trabajar está técnica.
Saludos.
Muchas gracias por apreciar mi trabajo, bendiciones
Sin duda este diseño se las trae, hiciste un gran trabajo y una.miy buena explicación a detalle, increíble resultado.
Muchas gracias, siempre dando lo mejor para todos ustedes, bendiciones
Definitivamente, tienes que tener mucha paciencia para realizar este tipo de trabajo, te felicito de verdad, te quedo muy bien, y sabes como hacer paso a paso, requiere mucha concentración, el éxito, saludos.
Muchas gracias, me gusta dedicarme a realizar las cosas, paciencia es mi segundo nombre jeje, gracias amiga por apreciar mi trabajo bendiciones
Congratulations @afrofat1! You have completed the following achievement on the Hive blockchain And have been rewarded with New badge(s)
Your next target is to reach 4750 upvotes.
You can view your badges on your board and compare yourself to others in the Ranking
If you no longer want to receive notifications, reply to this comment with the word
STOPCheck out our last posts:
@afrofat1 Que Belleza 😍! Quiero una de esas 🥰, mi insecto favorito 🦋, Felicidades hermoso trabajo 🤗
Me alegra que le haya gustado, está a la orden, jeje bendiciones
Ha quedado bellísima está pulsera, me encanta, excelente trabajo 👍
Muchas gracias amiga, bendiciones para ti.
Que bonito. La técnica es hermosa y el diseño de mariposas que elegiste es magnífico.
Exquisito trabajo..
Muchas gracias amiga, bendiciones
Wow debes enseñarme hacer eso jajaja .. saludos amigo, Dios bendiga tus manos