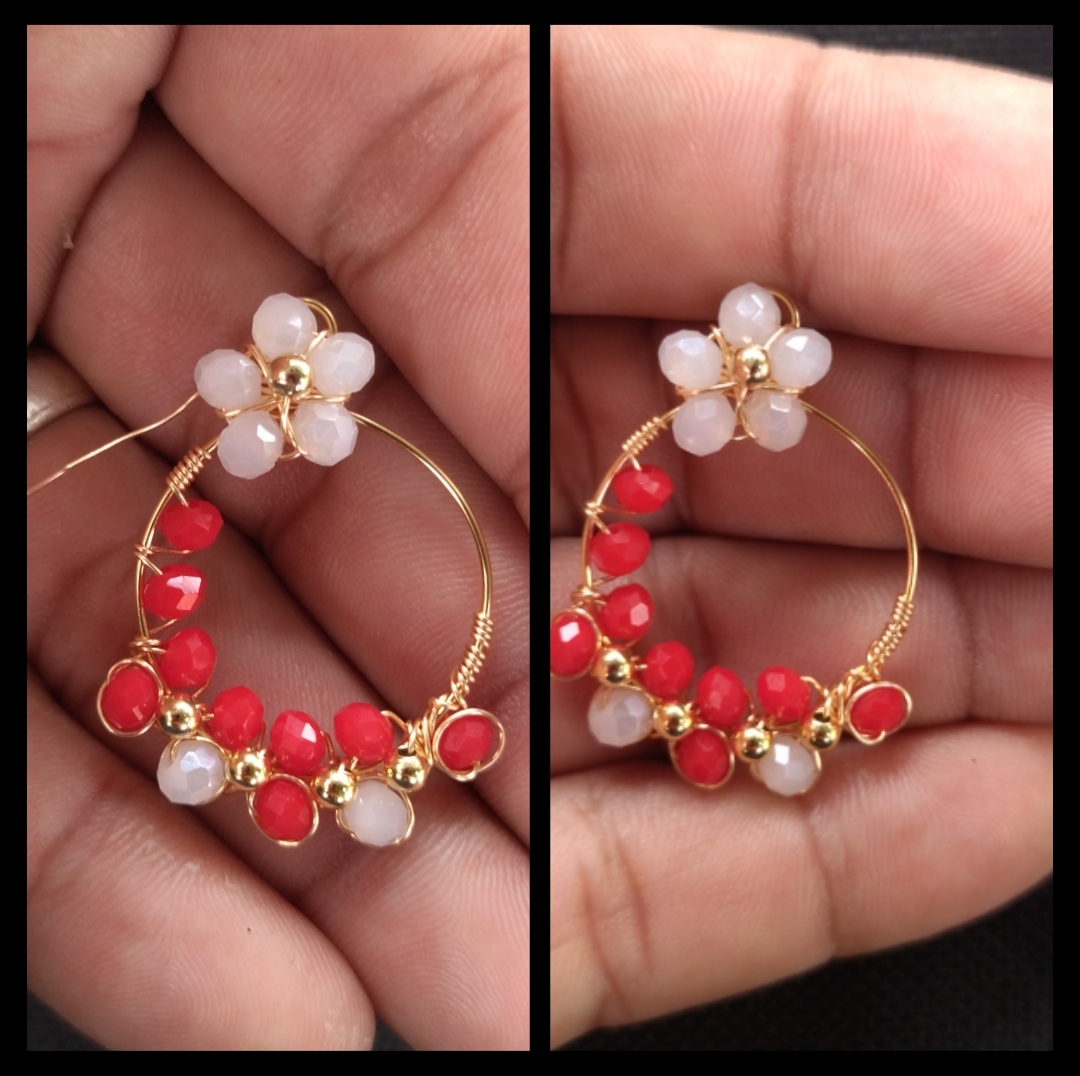
It's time to seduce our girls, earrings made with wire and stones.
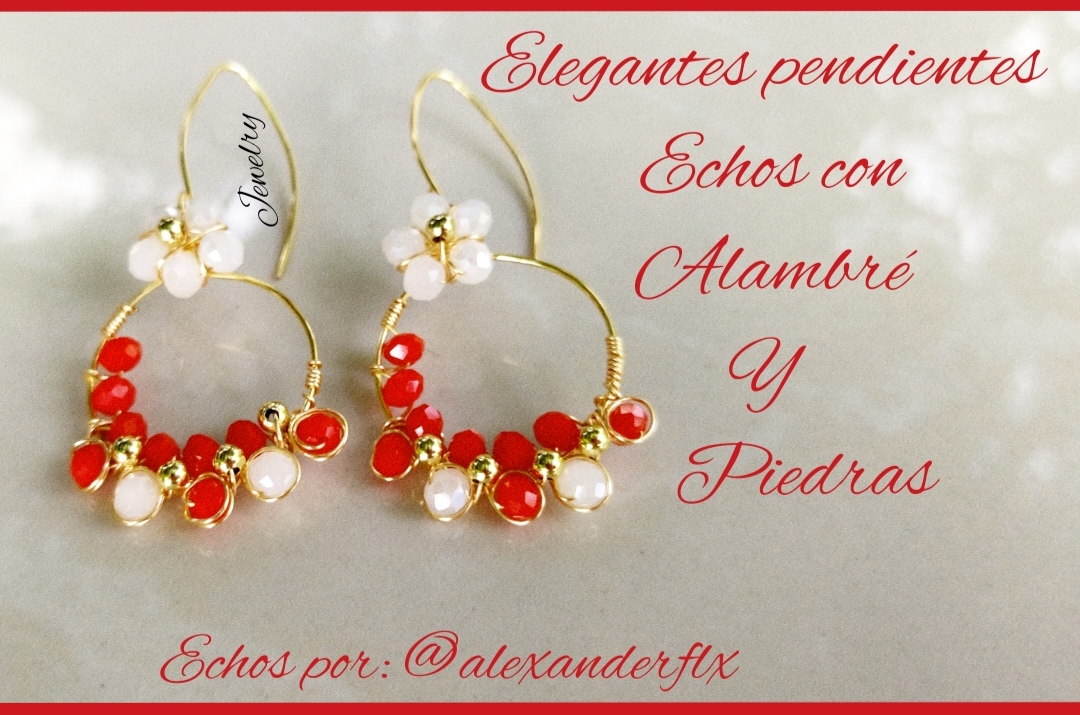
Hola feliz noche para todos espero se encuentren bien, la noche de hoy quiero compartir con ustedes unos elegantes pendientes echos con alambre y piedras, estor hermosos pendientes mucha personalidad son pendientes muy elegante el rojo y el blanco son colores muy especiales el rojo la sangre y el blanco la pureza son un poco grande pero lo mejor es que son colgantes y eso los hace más elegante espero que a las chicas les guste están echo especial mente para todas las chicas que hacen vida en esta hermosa comunidad #jewelry espero esté a su nivel están echo con mucho cariño, bueno sin más que decir pasaremos al paso a paso .
Hello, happy night to all, I hope you are well, tonight I want to share with you some elegant earrings made with wire and stones, beautiful blinds, earrings with a lot of personality, red and white are very elegant earrings, red are very special colors blood and white purity are a bit big but the best thing is that they are pendants and that makes them more elegant I hope the girls like them they are made especially for all the girls who make life in this beautiful community #jewelry I hope you are at their level they are made with a lot of love, well without further ado we will go step by step.
What do we need.
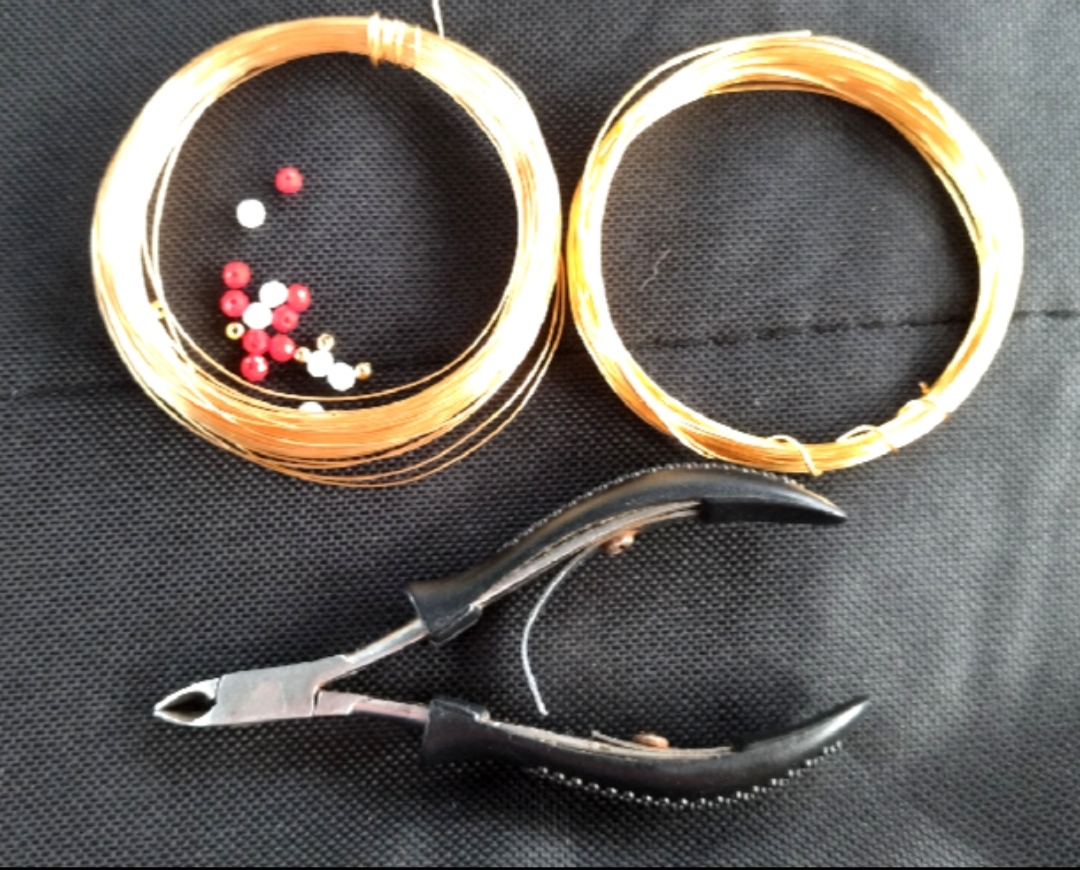
- piedras de bisutería
- alambre para bisutería calibre 22 y calibre y 26
- pinzas
jewelry stones
22-gauge and 26-gauge jewelry
tweezers
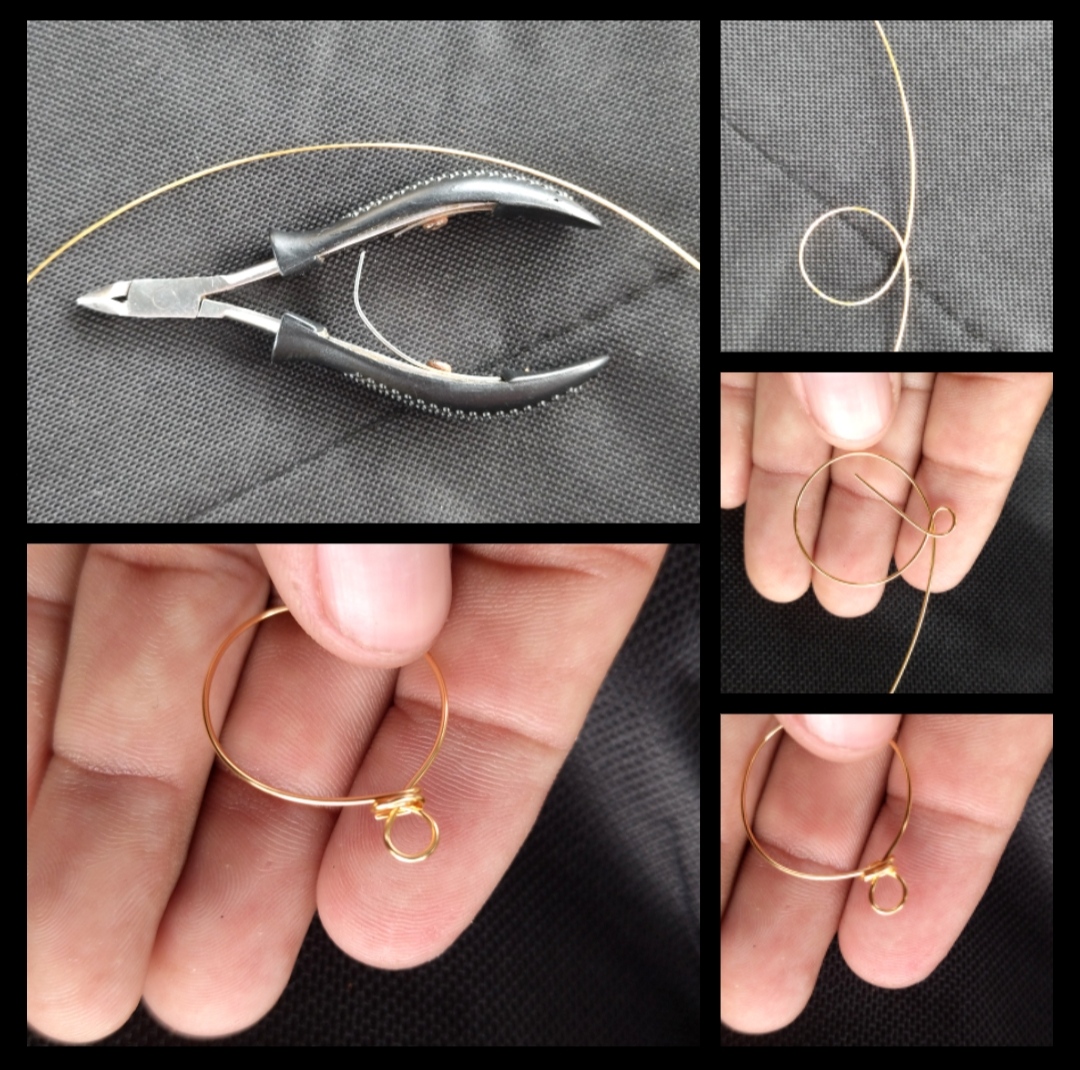
Paso 1: Para nuestro primer paso tomaremos nuestra pinza y cortaremos un trozo de alambre calibre veintidós ya teniendo el trozo de alambre aremos un redondo si el redondo no les queda bien les recomiendo buscar algo redondo como un embase de perfume o un marcador luego de terminal con el redondo tomaremos uno de los dos trozo de alambre y aremos un redondo mucho más pequeño luego cortamos el exceso del alambre con el que hicimos el redondo pequeño y con el otro alambre le daremos una la vueltas al rededor del redondo pequeño cortamos el exceso nuevamente y ya tenemos nuestro primer paso🤗 .
Step 1: For our first step, we will take our pliers and cut a piece of twenty-two gauge wire. Once we have the piece of wire, we will make a round one. If the round one does not fit well, I recommend looking for something round like a perfume bottle or a marker. after finishing with the round we will take one of the two pieces of wire and we will make a much smaller round then we cut the excess of the wire with which we made the small round and with the other wire we will give it one lap around the small round we cut the excess again and we already have our first step🤗 .
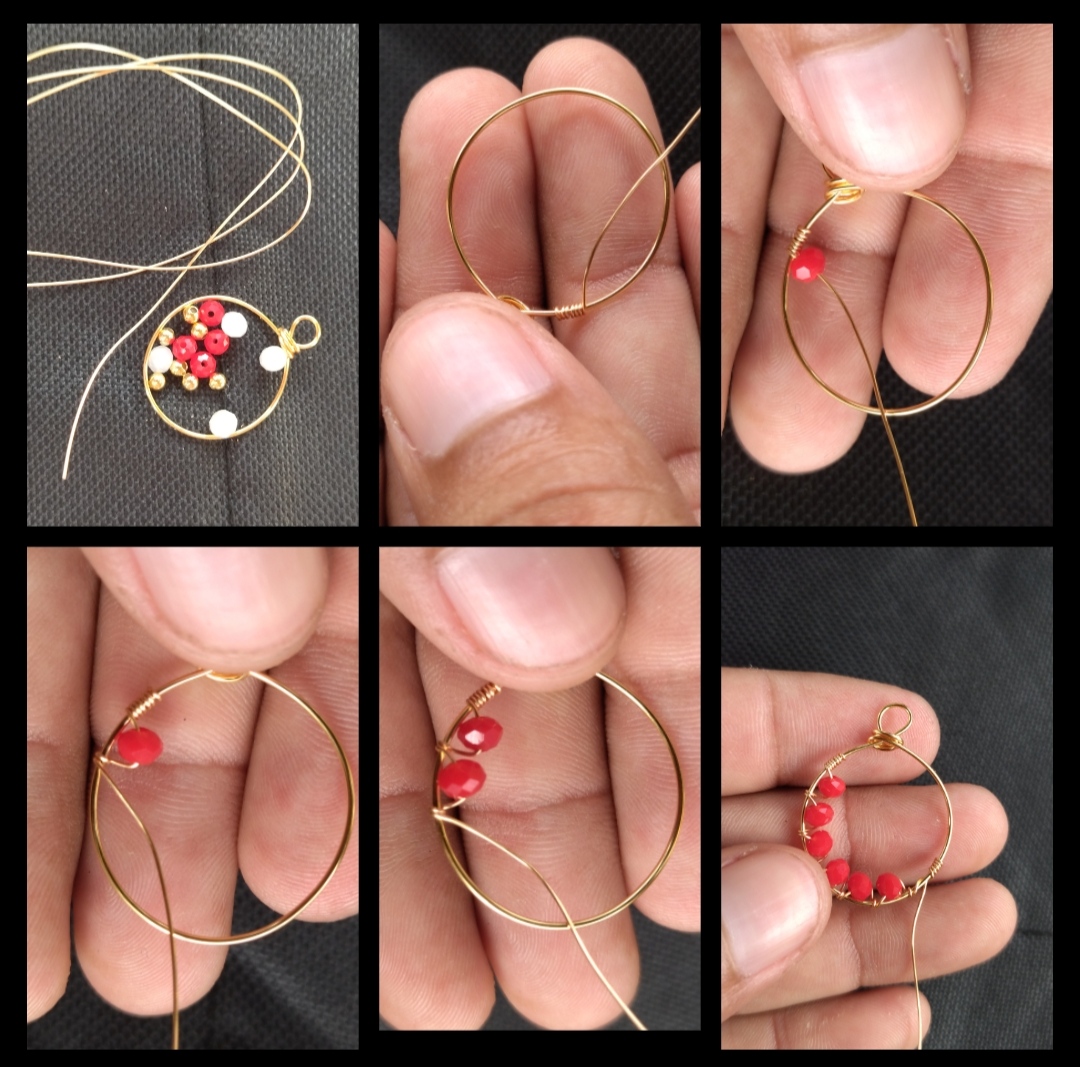
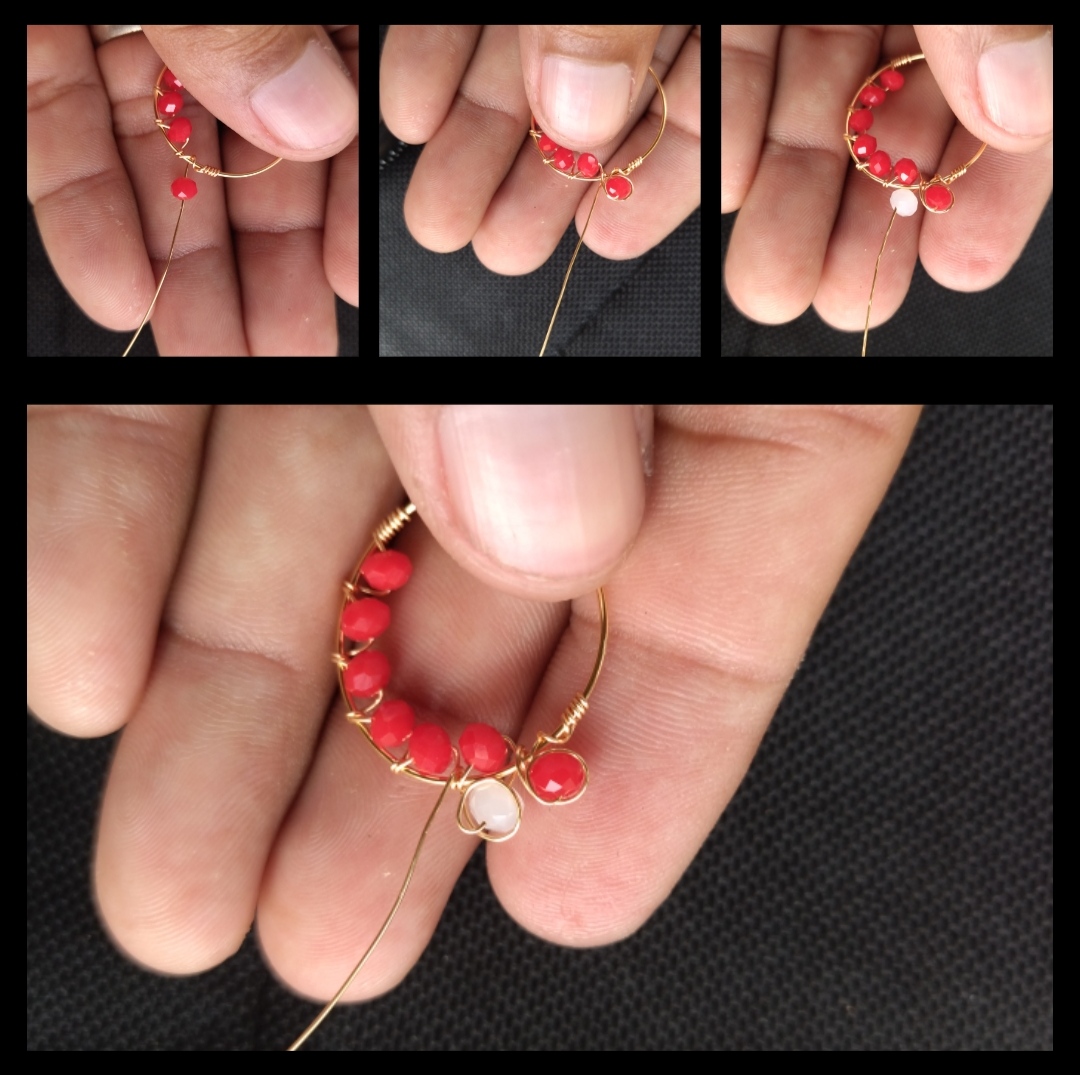
Paso 2: Para nuestro segundo paso cortaremos un trozo de alambre calibre veintiséis les recomiendo cortar un trozo de alambre un poco largo de cincuenta centímetros esto es para no tener empate o disminuir los empate mi ntrad menos empate tenga mejor luego de cortar el alambre tomaremos nuestra argolla y entorchamos un poco la punta del alambre luego metemos una piedra roja y le damos dos vuelta para asegurar luego metemos otra piedra y aseguramos y así asta tener seis piedras rojas al final le damos varias vuelta para asegurar esa parte luego nos regresamos con el mismo alambre pero primero metemos una piedra roja y damos una vuelta al rededor de la misma luego le damos unas vueltas a el alambre asegurando la de la base y seguiremos metiendo piedra y haciendo lo mismo estás piedras quedarán por debajo de las otras piedras y como pueden ver yo elegí meter una piedra roja y una blanca pero ustedes pueden elegir como hacer el suyo .
Step 2: For our second step we will cut a piece of twenty-six gauge wire I recommend cutting a piece of wire a little fifty centimeters long this is to avoid a tie or reduce the tie my ntrad less tie has better after cutting the wire we will take our ring and twist the end of the wire a little then we put a red stone and turn it twice to secure then we put another stone and secure and so on until we have six red stones at the end we turn it several times to secure that part then we return with the same wire but first we put a red stone and we go around it then we give a few turns to the wire securing the one at the base and we will continue putting stone and doing the same these stones will be below the other stones and as you can see i chose to put a red and a white stone but you can choose how to make yours.
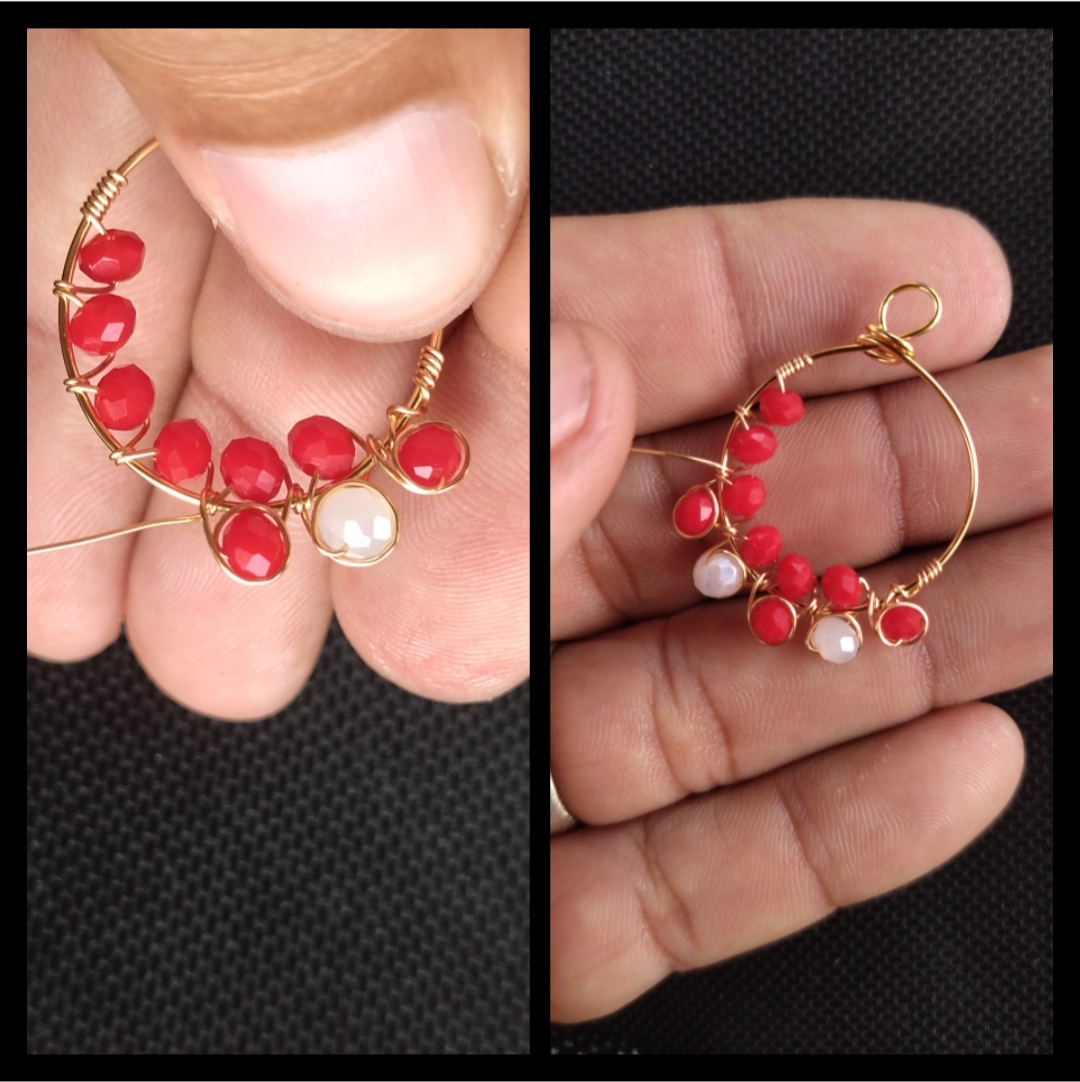
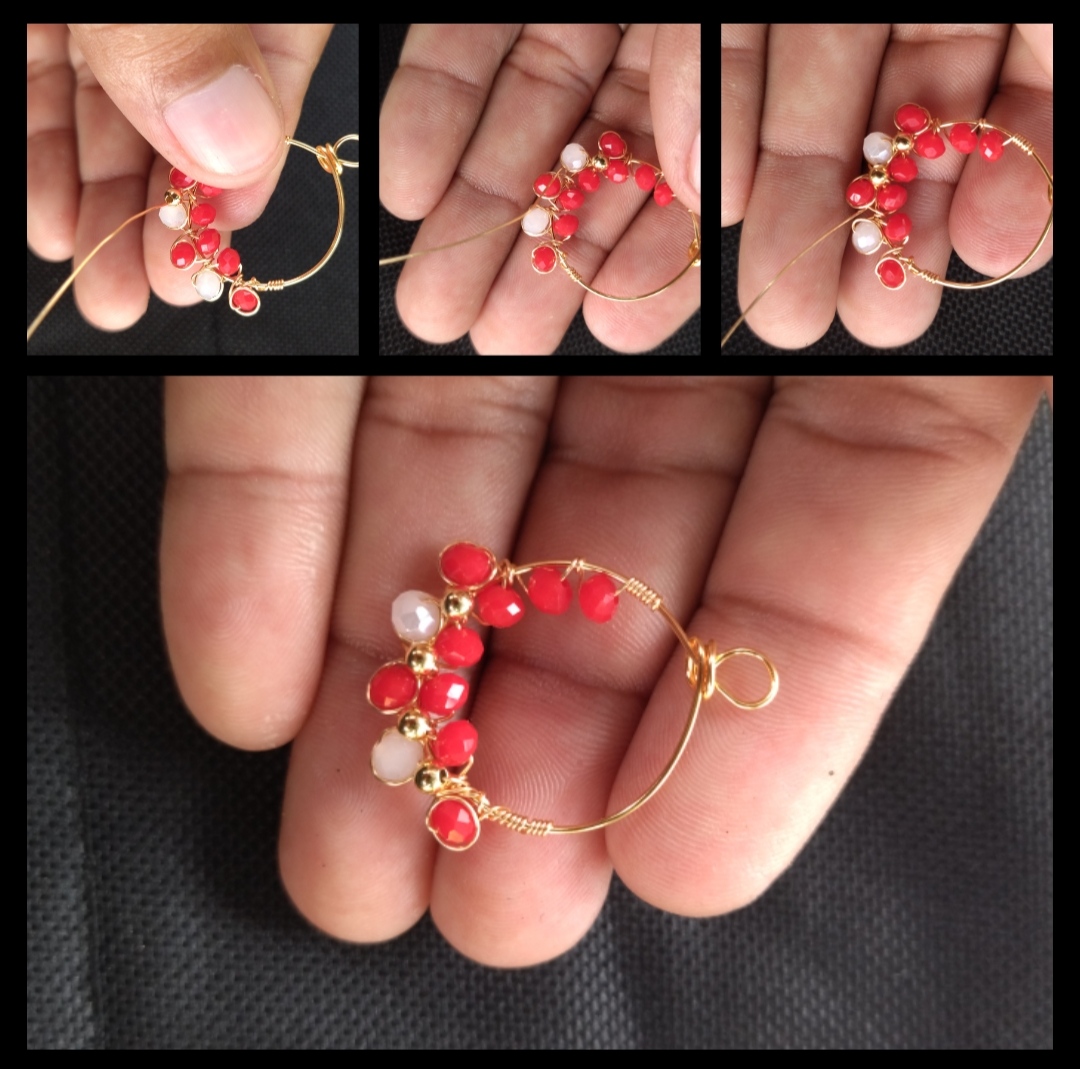
Paso 3: Bueno ya estamos en nuestro tercer paso este paso es un poco fácil ya que seguiremos poniendo piedra y también seguimos trabajando con el mismo alambre calibre veintiséis, en este paso meteremos unas piedras Doradas como les dije seguiremos trabajando con el mismo alambre por eso les dije que cortaran un trozo de alambre largo, seguimos meteremos una piedra dorada en medio de las otras piedras le damos una vuelta para asegurar y seguimos metiendo la otra también la ponemos en medio de las otras piedras y así asta tener las cuatro piedras Doradas al final le damos varias vuelta a el alambre para asegurar y listo ya tenemos todas las piedras de abajo bien seguras .
Step 3: Well we are in our third step this step is a bit easy since we will continue to put stone and we will also continue working with the same twenty-six gauge wire, in this step we will put some Golden stones as I told you we will continue working with the same wire, that's why I told them to cut a long piece of wire, we will continue to put a golden stone in the middle of the other stones, we will turn it around to make sure and we continue putting the other one, we will also put it in the middle of the other stones and so on until we have all four Golden stones at the end we turn the wire several times to secure and ready we have all the stones below very secure.
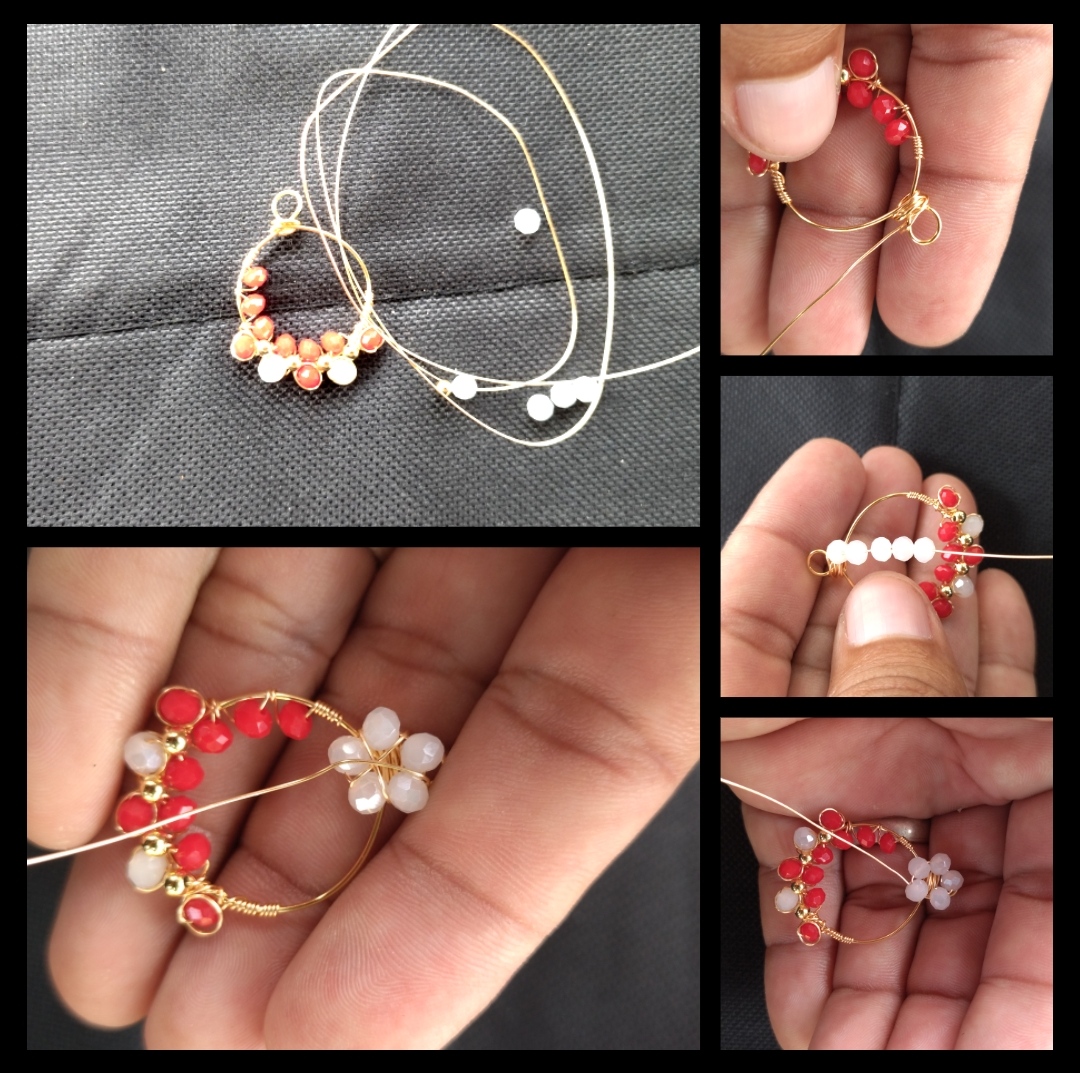
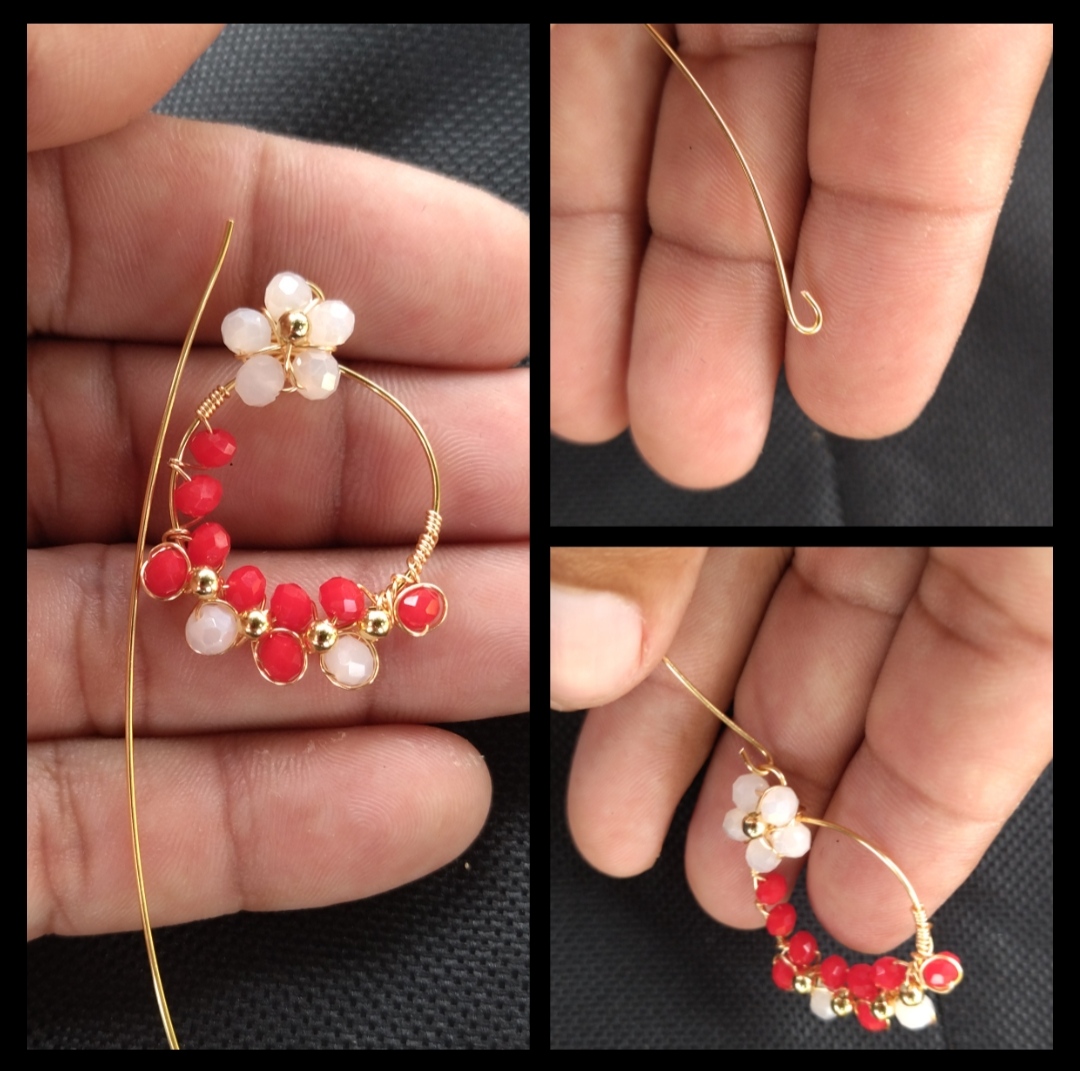
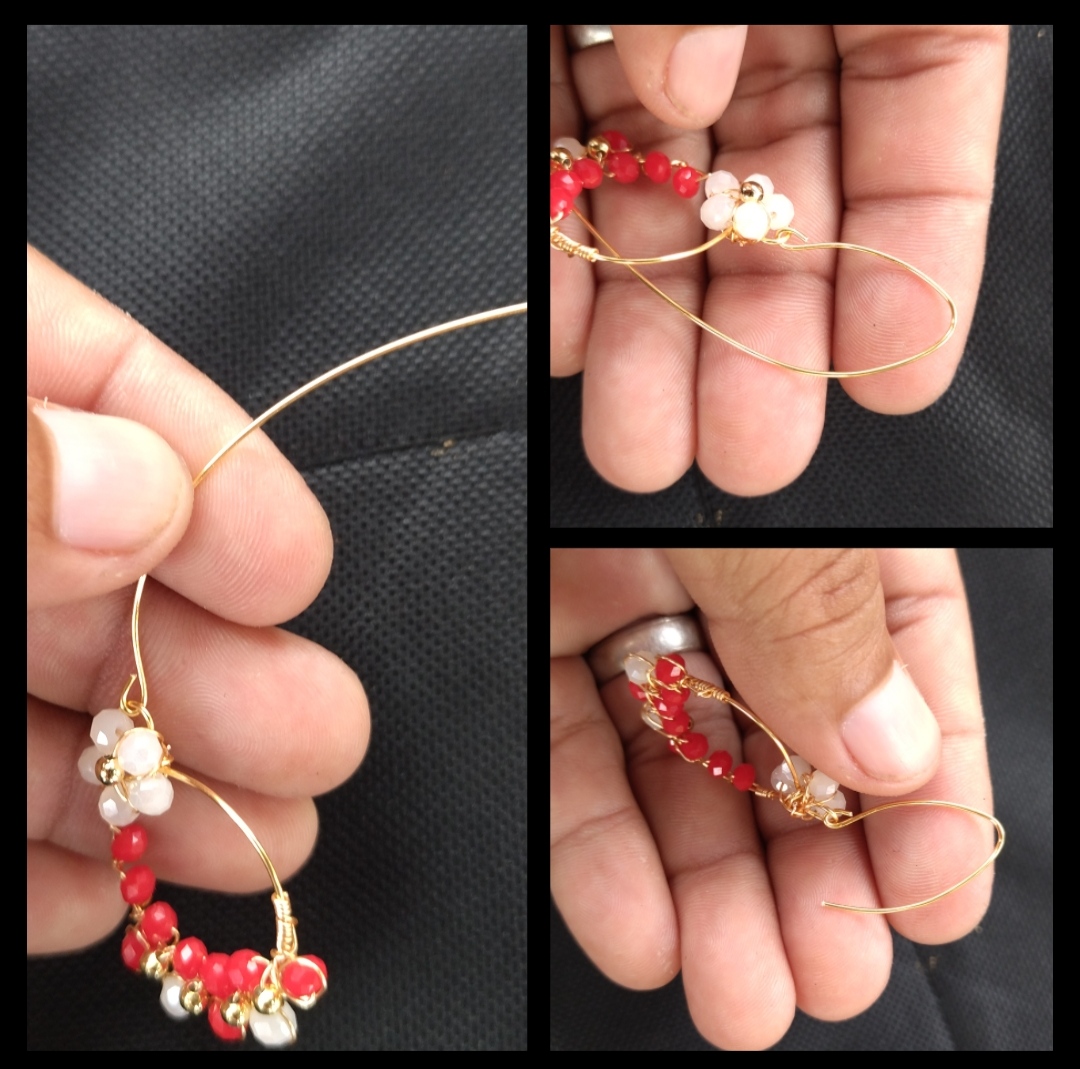
Paso 4: En este paso le vamos a dar los últimos paso a nuestro zarcillos la verdad están quedando muy bien en este paso cortaremos un trozo de alambre calibre veintiséis y la entorcharemos un poco justo en medio del redondo pequeño y el grande apretamos muy bien para que no se suelte y fijemos bien la pieza luego meteremos sinco piedras blanca luego le damos vuelta tratando de hacer un redondo después pasaremos el alambre por el medio de las piedras pero tomando también la base del zarcillos no se les olvide apretar muy bien para terminal con la flor le pondremos una piedra dorada en medio le damos unas vueltas para asegurar todo y listo con nuestro zarcillos ahora aremos el gancho para el canco cortamos un trozo de alambre calibre veintidós y aremos un pequeño redondo en la punta enganchamos el zarcillo y cerramos el redondo luego doblamos un poco el alambre después doblamos hacia abajo cortamos el exceso y listo ya tenemos unos hermosos y elegantes pendientes espero les guste están echo con mucho cariño bueno fue un placer será asta la próxima
Step 4: In this step we are going to take the last steps to our tendrils, the truth is that they are looking very good in this step we will cut a piece of twenty-six gauge wire and we will twist it a little right in the middle of the small round and the large round we tighten very well so that it does not come loose and we fix the piece well then we will put five white stones then we will turn it trying to make a round then we will pass the wire through the middle of the stones but also taking the base of the tendrils do not forget to press very well to finish with the flower we will put a golden stone in the middle we will give it a few turns to secure everything and that's it with our tendrils now we will make the hook for the canco we will cut a piece of twenty-two gauge wire and we will make a small round in the tip we hook the tendril and we close the round then we bend the wire a little then we bend down we cut the excess and ready we already have some beautiful and elegant earrings I hope you like this I made it with much love, well it was a pleasure, see you next time
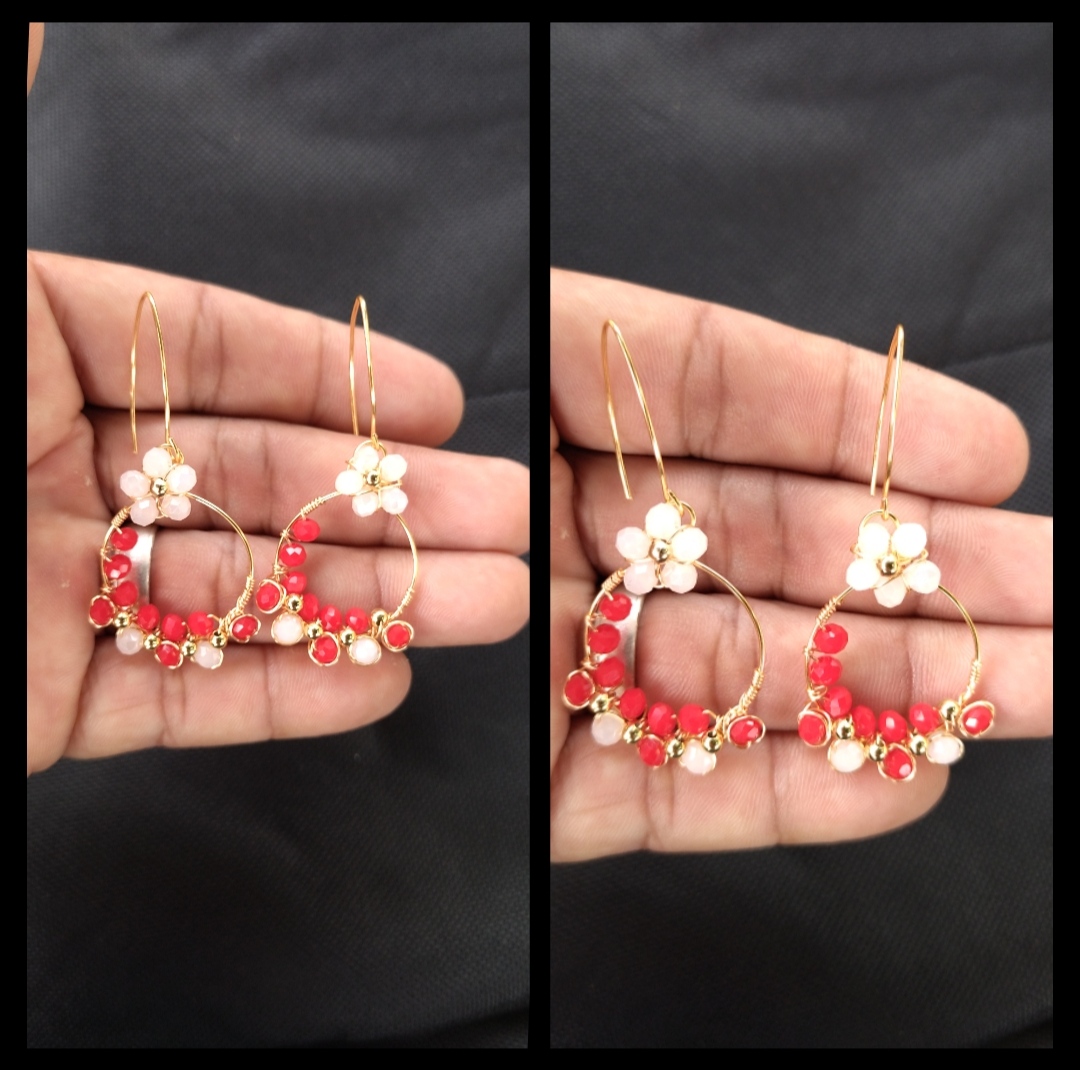
listo nuestros hermoso zarcillos , espero que a las damas les guste, fue un gusto compartir con ustedes .
Ready our beautiful earrings, I hope the ladies like it, it was a pleasure to share it with you.
Todas las Fotos son de mi autoría y fueron tomadas con mi Celular Redmi 9T
All Photos are my authorship and were taken with my Redmi 9T Cellphone
~~~ embed:1592902540450201601 twitter metadata:NzQ1NzY3Njc5fHxodHRwczovL3R3aXR0ZXIuY29tLzc0NTc2NzY3OS9zdGF0dXMvMTU5MjkwMjU0MDQ1MDIwMTYwMXw= ~~~
The rewards earned on this comment will go directly to the people( @lisbethseijas, @urun ) sharing the post on Twitter as long as they are registered with @poshtoken. Sign up at https://hiveposh.com.
Están bellísimos y muy sencillos de hacer 👍. Me encanta tu trabajo ❤️
Hola, buenos días, que bueno que te gustaron la verdad son muy fáciles de hacer, siempre será un gusto compartir con ustedes 🍓🍓🍓🍓😍😍😍😍🌹🌹🌹❤️❤️❤️❤️❤️❤️ feliz día.
Espectacular par de zarcillos amigo @alexanderflx el color y la combinación es espectacular, es muy bonito ver ese paso a paso que nos enseñas, se ve tan sencillo de realizar, gracias por ello.
Hola, feliz día espero te encuentres bien si los colores son muy bonito, bueno el paso a paso siempre trato de hacerlo lo más sencillo posible, en realidad son muy fáciles de hacer que bueno que te gustaron 🤗🤗🤗😍😍😍😍😍😍🌹🌹🌹🌷🌹🌹❤️❤️❤️😍😍😍😍😍😍😍😍😍
Bello trabajo amigo te felicito 👏👏. Saludos 🤗
Hola gracias por visitarme, pero quiero decirte que tú cintillo quedo muy lindo disculpame por no comentarte, estoy trabajando con mi teléfono y la señal de datos no es buena pero te quede muy lindo te felicito.👸👸👸👸👸👸👸👸👸👸👸🌹🌹🌹🌹🌹🌹🌹🌹😍😍😍😍😍😍🍓🍓🍓🍓🍓🍓🍓
Congratulations @alexanderflx! You have completed the following achievement on the Hive blockchain and have been rewarded with new badge(s):
Your next target is to reach 500 replies.
You can view your badges on your board and compare yourself to others in the Ranking
If you no longer want to receive notifications, reply to this comment with the word
STOPCheck out the last post from @hivebuzz:
Support the HiveBuzz project. Vote for our proposal!
Hola amigo, tu trabajo es excelente me gustó mucho, una acotación es que en tu título colocas echo y es hecho de hacer. Saludos
Hola muchas gracias 😔 por corregirme😍😍😍😍😍😍😍😍😍😍😍😍👸👸
Totalmente enamorada. Son tan románticos esos aretes pero a la vez seductores con el bello color rojo. Muy muy bellos.
Exitos.
Hola que bueno saber que te gusto, si la verdad el rojo es un color muy seductor y a su vez muy romántico muchas gracias por tu visita es un gusto ver tu comentario 😍😍🌹😍😃😊😊❤️👸👸👸👸😍😍😍
Que preciosura de zarcillos @alexanderflx 🥰🥰 me encantó la flor del final aunque todo el diseño en general te quedó hermoso 💕 un saludito amigo y feliz día!!!🍓🍓🌹😸
Hola, feliz noche, esa flor es un toque muy lindo que bueno que te gusto de esa misma manera puedes hacer unos pero tendrías que usar un alambre más grueso pero te aseguro que te quedarán muy bonitos, gracias por visitarme.❤️❤️👸👸👸👸👸👸👸👸👸🌹🌹🌹😍😍😍😍🍓🍓🍓🍓🍓🍓🍓
ME encantó tu blog, bien explicado y el registro fotográfico me encantó, gracias por compartirlo, este diseño de aros está súper lindo y elegante... Suerte
Hola feliz día 😘 gracias por visitar mi blog y se siento muy feliz al saber que te gusto, muchas gracias por tu visita ♥️♥️♥️♥️♥️♥️🍓🍓🍓🍓🍓🍓🍓🍓🍓🍓👸👸👸👸👸👸👸😍😍😍🌸