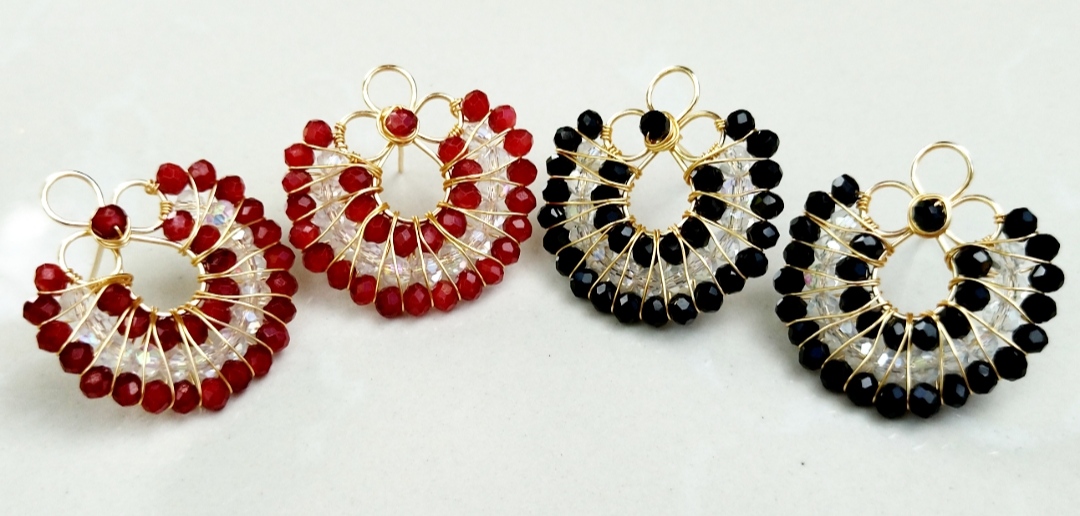
It's time to make the girls fall in love, beautiful tendrils (DAISY ISLAND)
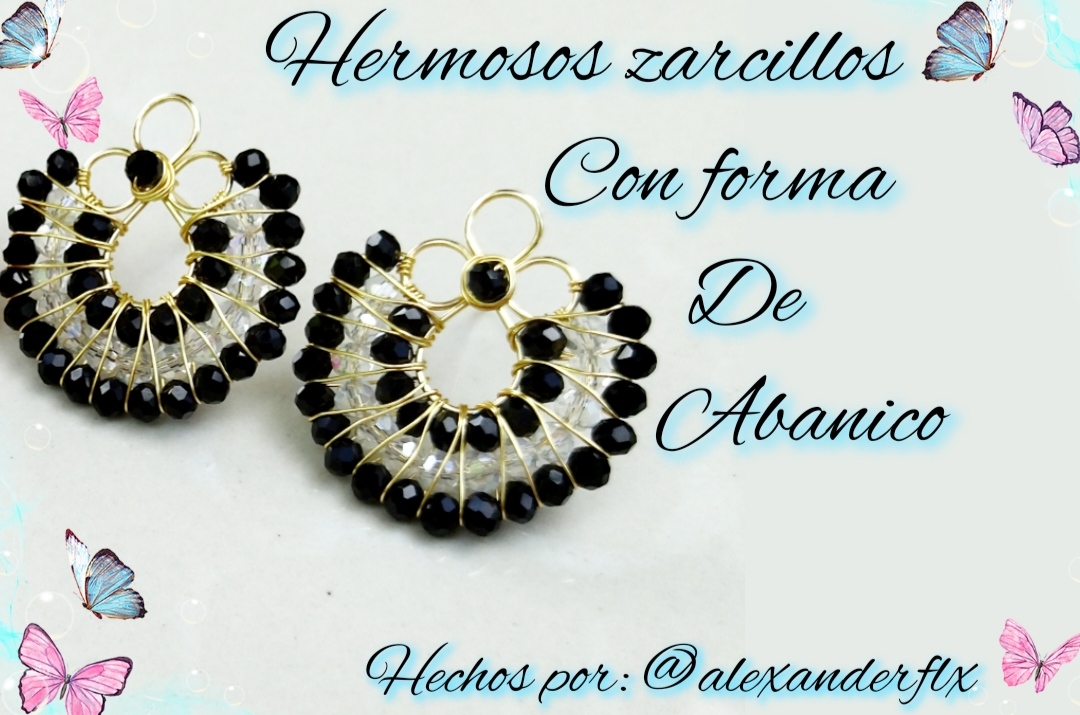
Hola a todos espero la estén pasando bien también espero que todas las chicas la Allan pasado bien el 14 me imagino que le regalaron muchas flores 🌹💕 jajaja, bueno esta noche quiero compartir con ustedes la elaboración de unos pendientes muy pero muy lindo 😍 los hice de muchos colores vino tinto, negros y muchos colores más estos pendientes son muy fáciles de hacer y lo podemos hacer de varios tamaño estos son un poquito grande o como le digo a mis clientes están echos para ustedes chicas, como siempre utilizando la técnica de alambrismo y dando lo mejor de mi los materiales son muy pocos la verdad casi siempre utilizo los mismo materiales pero ya ven podemos hacer muchas cosas con un material la limitación la ponemos nosotros pero en este caso no podemos limitarnos siempre debemos seguir construyendo joyería para las chicas , bueno sin más que decir pasaremos al paso a paso espero sea de su agrado y también que sea muy entretenido mi tutorial besos💕💕🌹😉♥️👌👍😊☺️🍓🍓🍓🍓
Hello everyone, I hope you are having a good time, I also hope that all the girls in Allan had a good time on the 14th. I imagine that they gave her many flowers 🌹💕 hahaha, well tonight I want to share with you the preparation of some very, very cute earrings 😍 I made them in many colors, red wine, black and many more colors. These earrings are very easy to make and we can do them in various sizes. They are a little big or, as I tell my clients, they are made for you girls, as always using the technique of wire rope and giving the best of me the materials are very few the truth is that I almost always use the same materials but you see we can do many things with one material we put the limitation but in this case we cannot limit ourselves we must always continue building jewelry for the girls, well without further ado we will go step by step I hope you like it and also that my kisses tutorial is very entertaining💕💕🌹😉♥️👌👍😊☺️🍓🍓🍓🍓
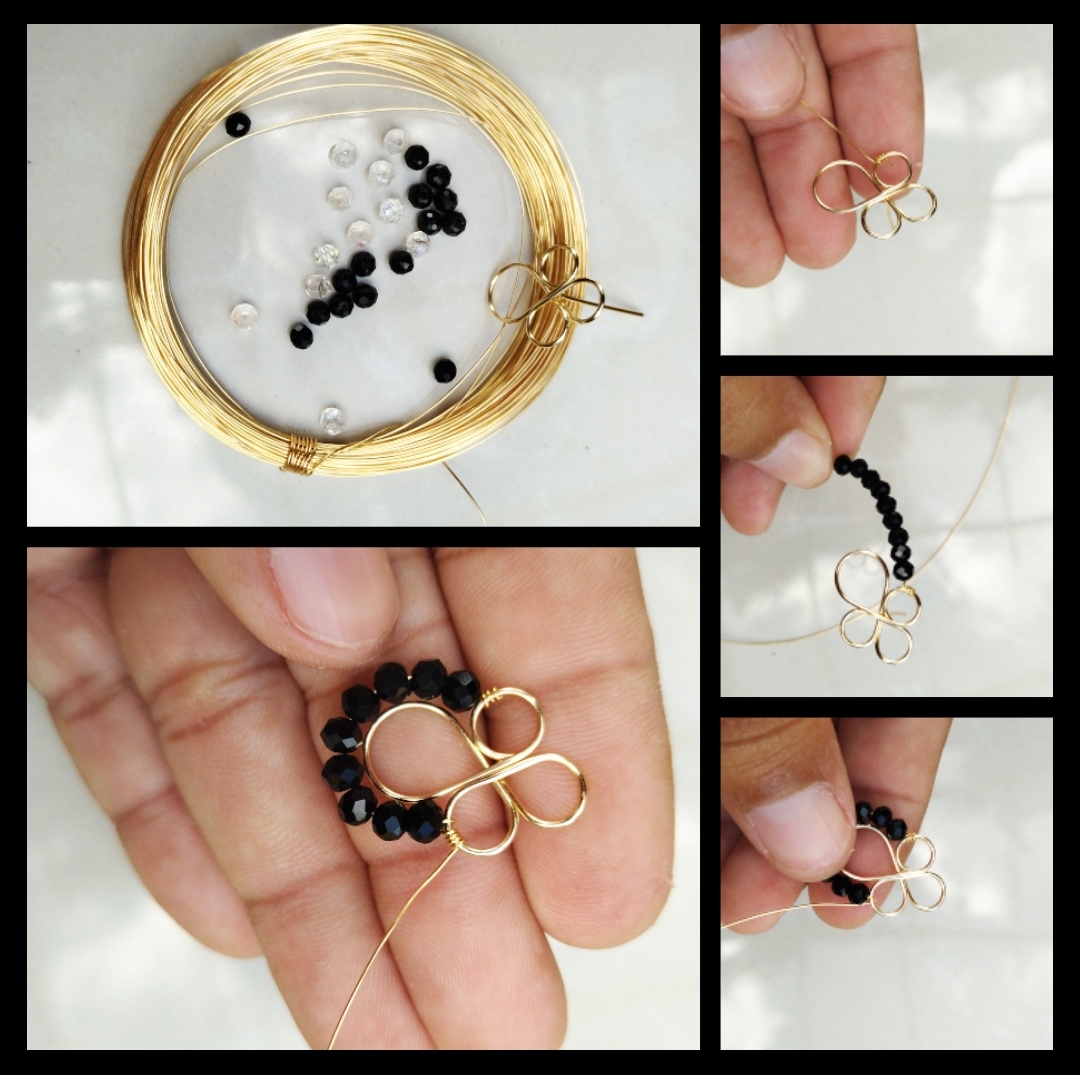
What do we need.
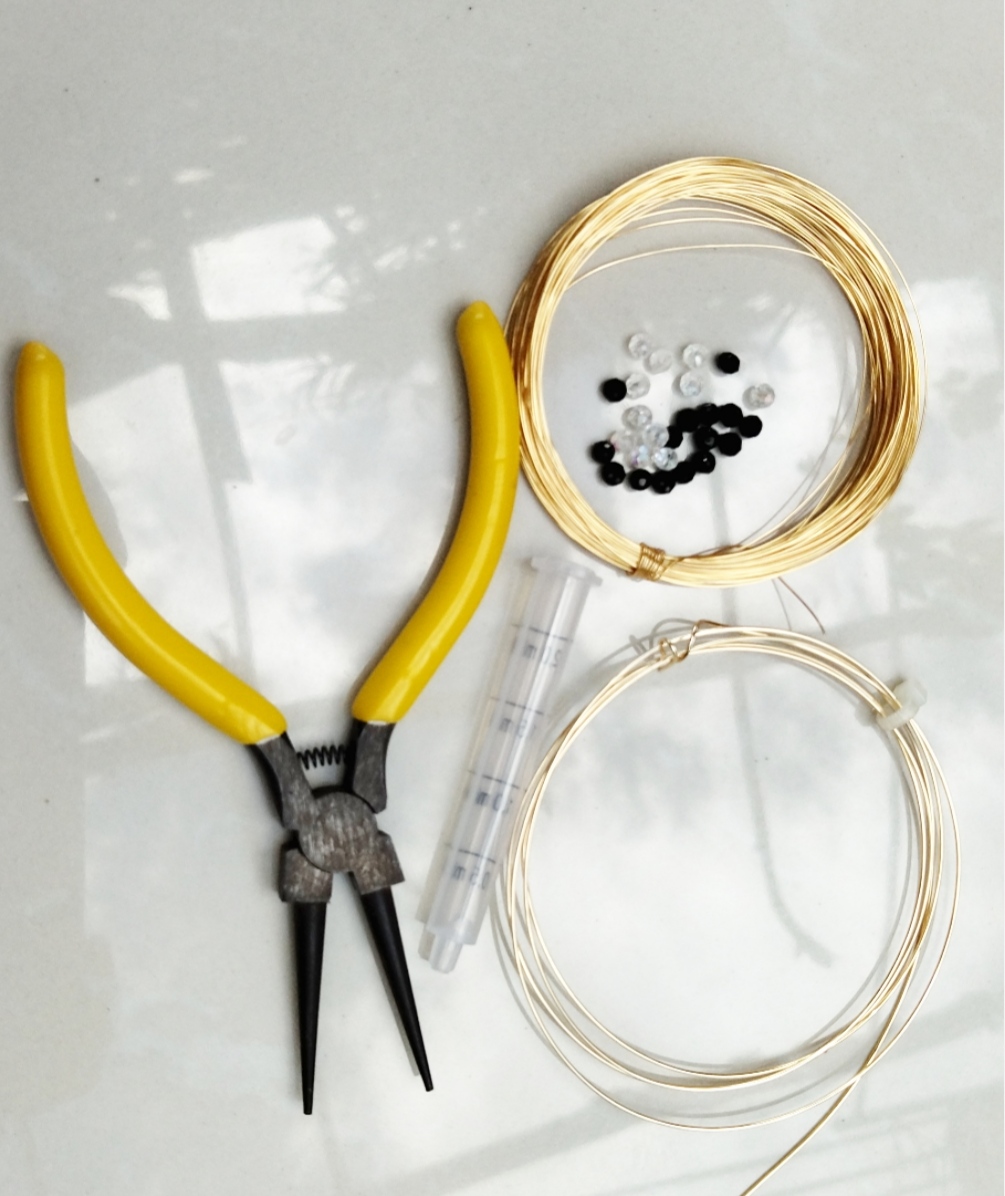
- Cristales
- alambre para bisuteria calibre 20 y 26
- pinzas
- inyectadora
Red crystals
20 and 26 gauge wire for jewelry
tweezers
injector
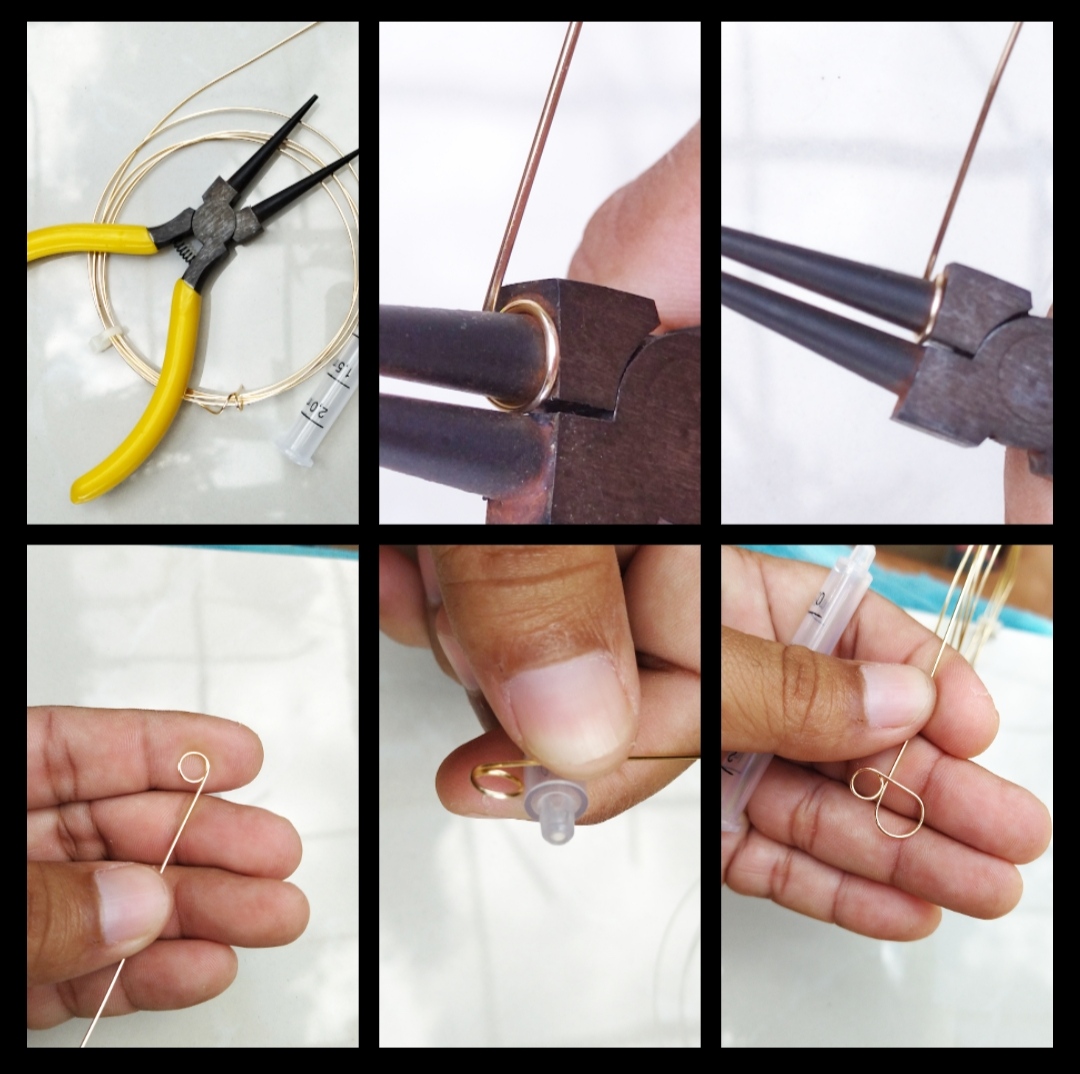
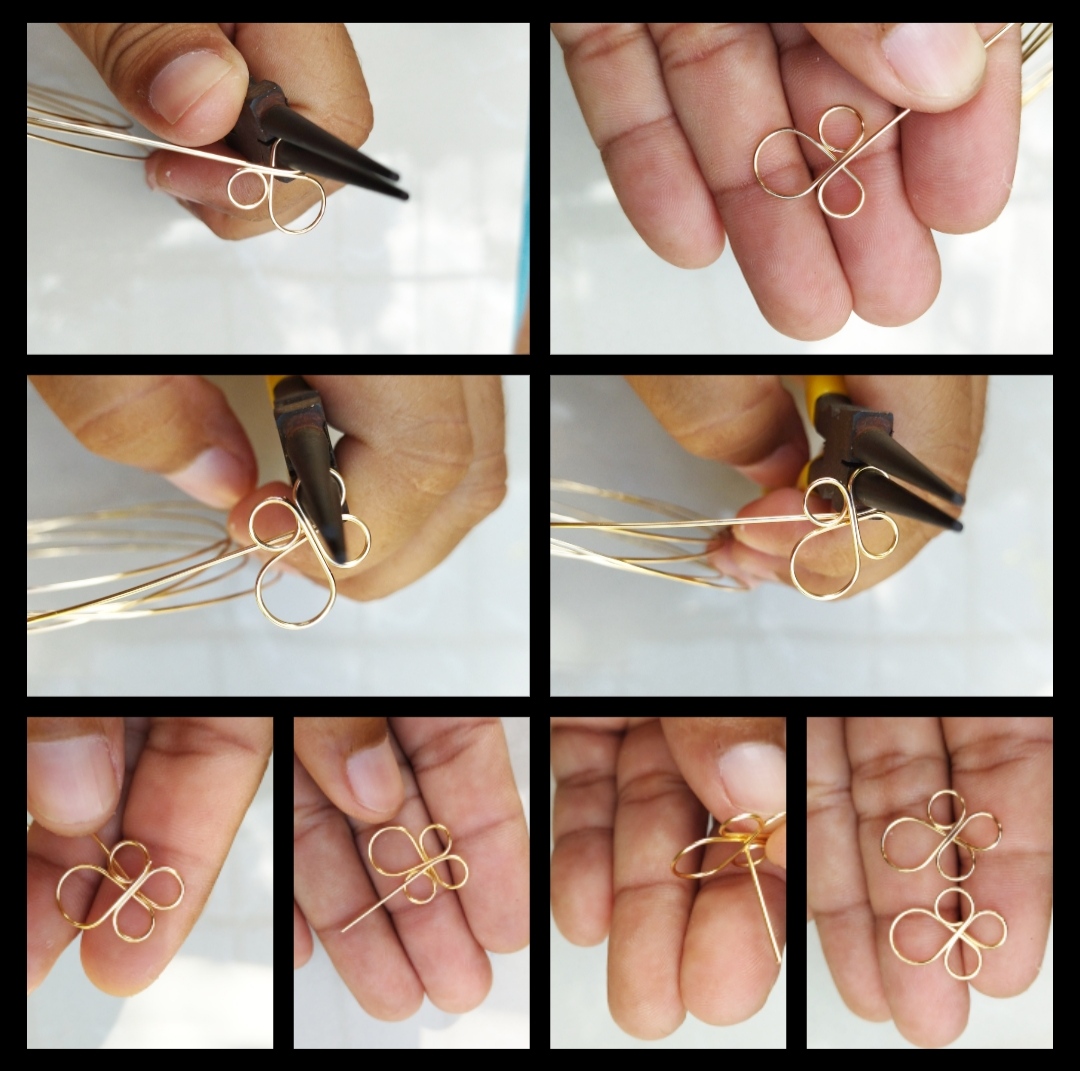
Paso 1: Para empezar debemos tomar pinzas alambre calibre veinte y una inyectadora pequeña primero aremos un redondo con lo último de nuestras pinzas debemos hacerlo con mucho cuidado para no dañar el alambre luego de hacer el redondo con la inyectadora aremos otro redondo pero como pueden ver este es un poco más grande también tengan encuentra por donde paso el alambre si lo paso por el frente de la pieza o por la parte de atrás a que se debe esto si lo hacemos como queramos los alambre chocarán y no se verá bien ok ahora volvemos a tomar nuestra pinza y aremos otro redondo del otro lado como pueden ver ahora paso el alambre por la parte de adelante de la pieza ahora con la misma pinza aremos un último redondo que quedará en medio de los dos redondo pequeño como pueden ver son tres redondo pequeño y uno grande lo último que aremos será doblar justo en el medio el alambre para poder hacer el palito para meter en la oreja de las chicas super fácil la primera pieza 😃👍👌😉☺️
Step 1: To start we must take twenty-gauge wire pliers and a small injector first we will make a round with the last of our pliers we must do it very carefully so as not to damage the wire after making the round with the injector we will make another round but As you can see, this is a little bigger. Also, find where I pass the wire if I pass it through the front of the piece or through the back, what is this due to? If we do it as we want, the wires will collide and it will not look good. ok now we take our pliers again and we will make another round on the other side as you can see now I pass the wire through the front part of the piece now with the same pliers we will make a last round that will be in the middle of the two small round as you can see There are three small round ones and one large one. The last thing we will do is bend the wire right in the middle to be able to make the stick to put the first piece in the girls' ears super easy 😃👍👌😉☺️
Paso 2: Bueno ya tenemos la primera pieza ahora nos dedicaremos a adornar esa pieza como la adornaremos tomaremos alambre calibre veintiséis y cristales negros y transparente los transparentes son tornasol Ya teniendo esto nos pondremos manos a la obra, primero aseguramos la punta del alambre en uno de los redondo que tenemos a los lados preferencia el redondo del lado izquierdo el primer redondo luego de asegurar muy bien meteremos unas piedras negras yo metí exactamente nueve piedras pero quizás ustedes agan el r dondo grande más pequeño o más grande eso no importa sólo deben de tener en cuenta de que las piedras lleguen al otro extremo de la pieza luego de meter esas piedras damos varios vuelta para asegurar en el otro extremo y volvemos a tener otras piedras pero estás van hacer las transparentes vamos al otro lado de la pieza y aseguramos nuevamente dando unas vueltas a el alambre y así asta tener tres líneas dos negras y unas transparentes no vamos a cortar el alambre .
Step 2: Well, we already have the first piece, now we will dedicate ourselves to decorating that piece, how we will decorate it, we will take twenty-six gauge wire and black and transparent crystals, the transparent ones are iridescent. Wire in one of the rounds that we have on the sides, preferably the round on the left side. The first round, after securing it very well, we will insert some black stones. I put exactly nine stones, but perhaps you will make the large round smaller or larger, that does not matter. You just have to keep in mind that the stones reach the other end of the piece. After inserting those stones, we turn several times to secure at the other end and we have other stones again, but these are going to make the transparent ones, we go to the other side of the piece. and we secure again by turning the wire a few times and thus until we have three lines, two black and one transparent, we are not going to cut the wire.
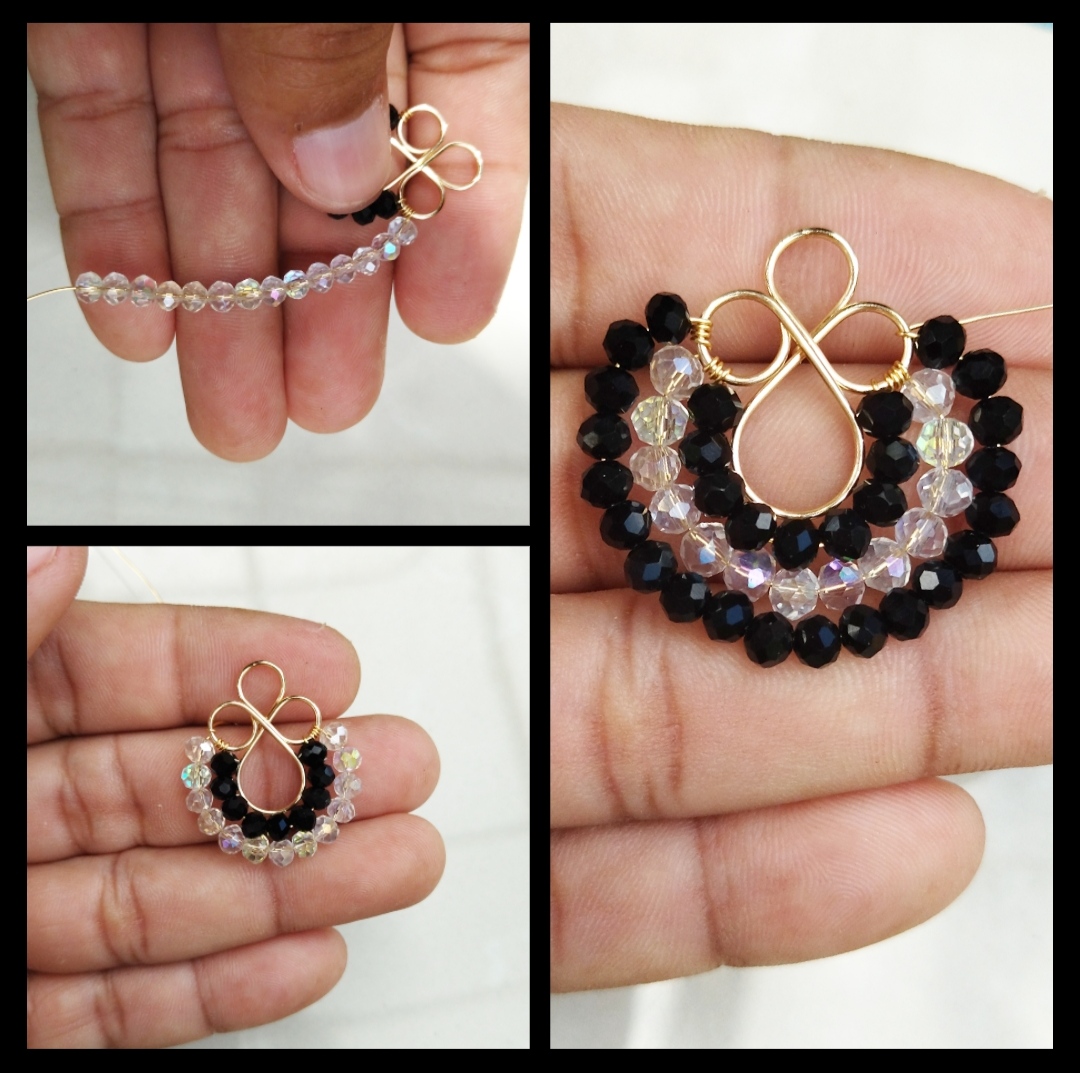
Paso 3: tercer paso en este tercer paso seguiremos trabajando con el alambré calibre veintiséis está ves le daremos un toque especial a nuestra pieza vamos a ir metiendo el alambre en medio de las piedras como podemos ver en la foto es super fácil este paso pero debemos hacerlo con mucho cuidado para no deformar la forma del abanico este paso nos ayudará a unos las tres líneas de piedras que tenemos ya que si no lo hacemos las líneas tomarán la forma que ellas quieran sin embargo con este alambre que le estamos pasando estamos asegurando las tres líneas haciendo de ellas una solo pieza al final cortamos el exceso de alambre y listo 😃👍👌🍓
Step 3: third step in this third step we will continue working with the twenty-six gauge wire this time we will give a special touch to our piece we are going to insert the wire in the middle of the stones as we can see in the photo this is super easy step but we must do it very carefully so as not to deform the shape of the fan this step will help us about the three lines of stones that we have because if we do not do it the lines will take the shape that they want however with this wire that we are passing we are securing the three lines making them a single piece at the end we cut the excess wire and that's it 😃👍👌🍓
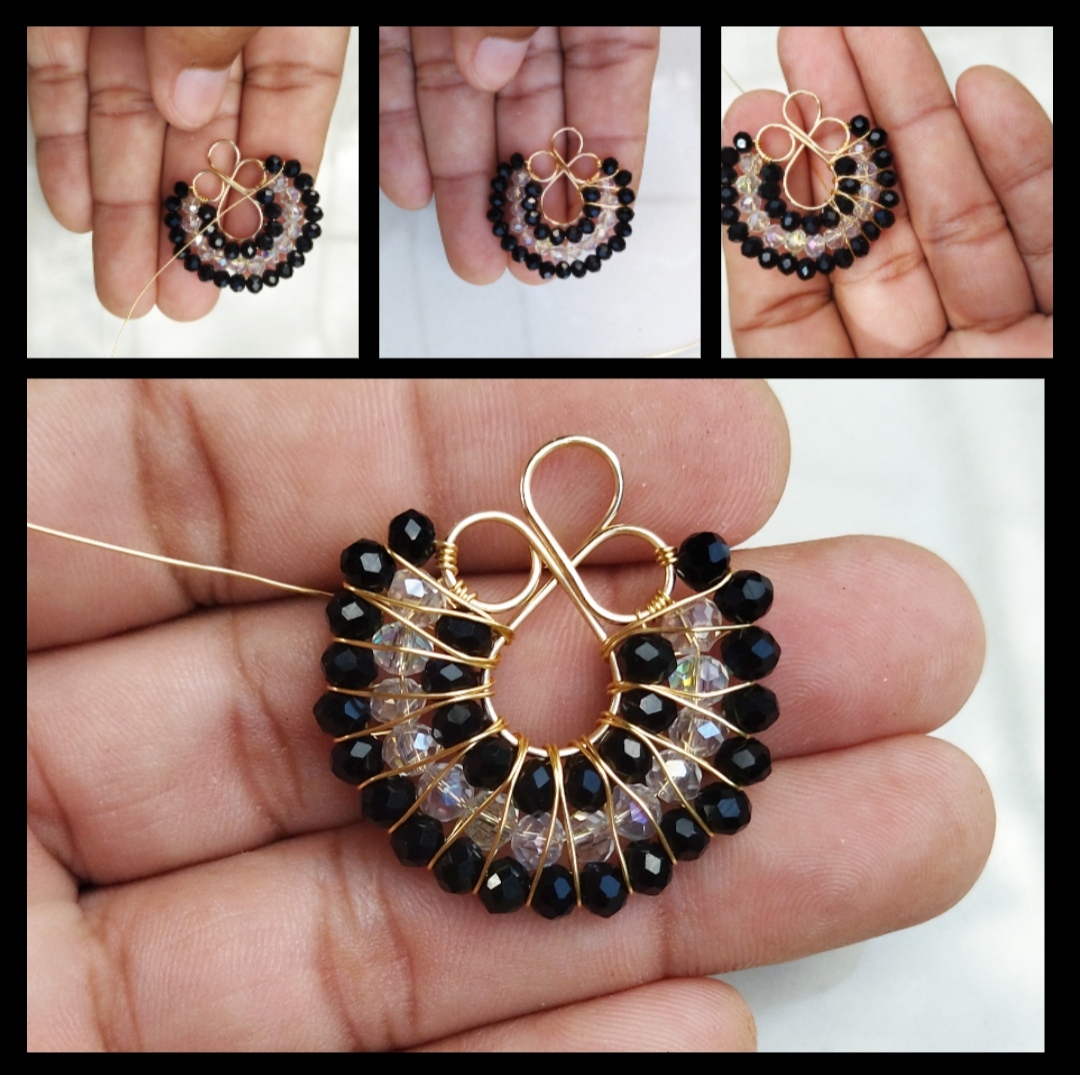
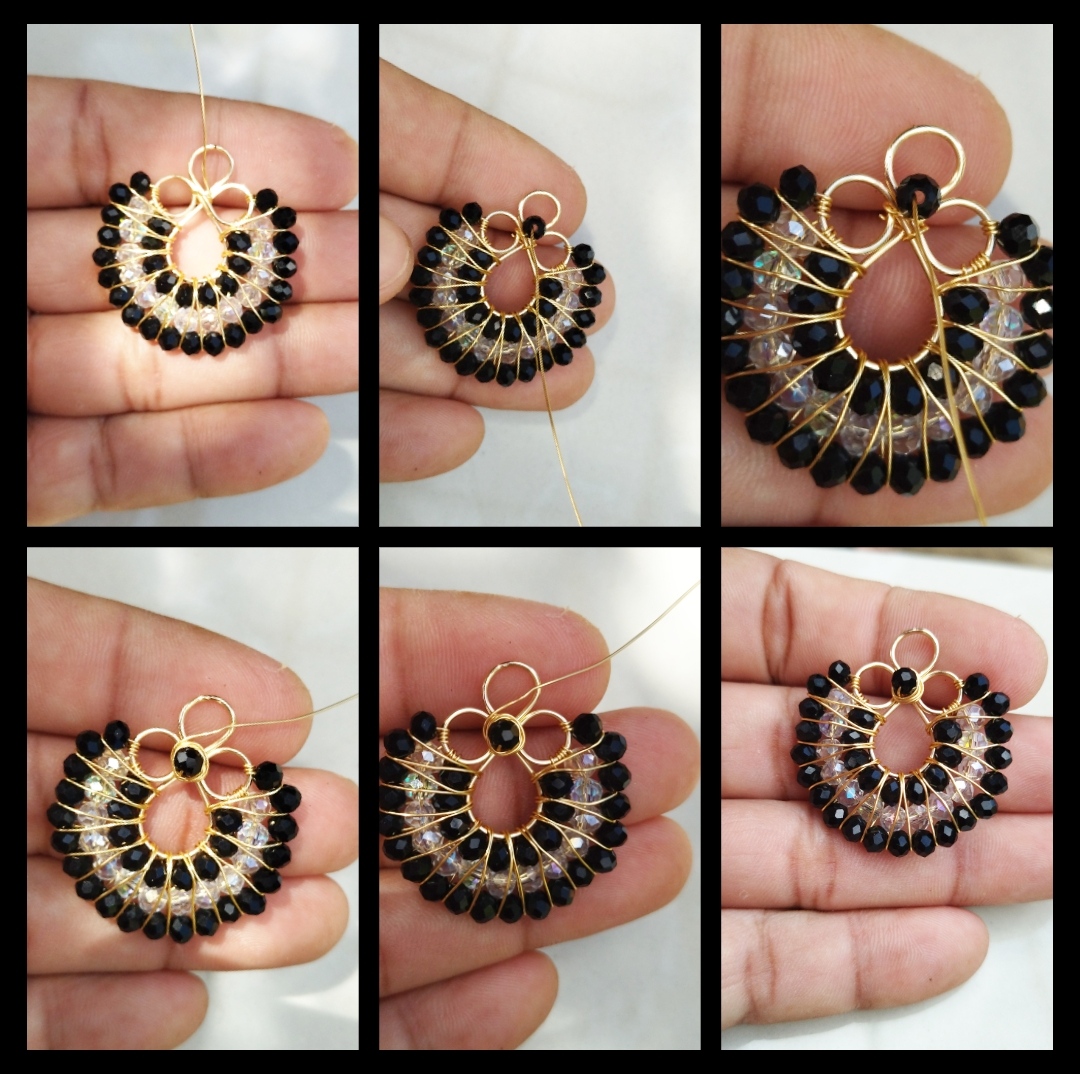
Paso 4: Bueno ya casi terminamos espero les allá explicado muy bien pasará este último paso pero no menos importante terminaremos de adornar nuestra pieza tomaremos un trozo de alambre calibre veintiséis y un cristal negro también puede ser una transparentes no importa puede ser a su gusto, tomamos la punta del alambré y la aseguramos justo en medio de la primera pieza aprietos un poquito para que nos quede bien justa luego de asegurar metemos nuestra piedra y le damos varias vueltas al rededor de la piedra para adornar un poco cortamos el exceso y listo ya tenemos unos hermosos zarcillos con forma de abanico , buenos espero la Allan pasado bien con este tutorial también espero les allá gustado 😃👍👌🍓☺️😉😊♥️🌹🌹🌹
Step 4: Well, we're almost done. I hope I've explained it well, this last step will pass, but no less important, we'll finish decorating our piece. your liking, we take the tip of the wire and secure it right in the middle of the first piece, tighten a little so that it fits us just right, after securing, we insert our stone and we turn it several times around the stone to decorate a little, we cut the excess And that's it, we already have some beautiful fan-shaped tendrils, I hope Allan has a good time with this tutorial, I also hope you liked it there 😃👍👌🍓☺️😉😊♥️🌹🌹🌹
listo nuestros hermosos pendientes , espero que a las damas les guste, fue un gusto compartir con ustedes .
our beautiful earrings are ready, I hope the ladies like it, it was a pleasure to share with you.
Todas las Fotos son de mi autoría y fueron tomadas con mi Celular Redmi 9T
All Photos are my authorship and were taken with my Redmi 9T Cellphone
Tus trabajos en alambrismo son preciosos, el negro en combinación con el dorado es muy lindo, la forma esta genial.
Hola feliz noche, muchas gracias es muy bueno saber que te gustaron los pendientes♥️🌹 si la verdad el dorado del alambre resalta muy bien con el color negro, muchas gracias por visitarme es un placer para mí 🌹🌹🌹🌹♥️♥️♥️🍓🍓🍓🍓👌☺️💕
!discovery 35
💕💕👍🍓🍓🍓🍓🍓🍓🍓🍓🍓🍓🍓🍓🍓♥️🌹🌹🌹🌹🌹🌹🌹🌹🌹🌹🌹gracias ☺️
This post was shared and voted inside the discord by the curators team of discovery-it
Join our community! hive-193212
Discovery-it is also a Witness, vote for us here
Delegate to us for passive income. Check our 80% fee-back Program
Thank you for sharing this post on HIVE!
Your content got selected by our fellow curator rezoanulvibes & you just received a little thank you upvote from us for your great work! Your post will be featured in one of our recurring compilations which are aiming to offer you a stage to widen your audience within the DIY scene of Hive. Stay creative & HIVE ON!
Please vote for our hive witness <3
These are magnificently elegant!
😍
Kudos to your creativity!
Hola muchísimas gracias es un gusto para mí saber que le gustaron los pendientes, que tenga feliz noche 👍
Bellísimos, Me encantan @alexanderflx eh aprendído mucho con tus tutoriales, incluso e diversificado mis piezas!! Enorme Gracias 🤗 eres excelente.
Hola feliz noche que gusto saber que te gusto y meda muchísimo más gusto saber que as aprendido algo con mis tutoriales, muchísimas gracias por tu visita ♥️♥️♥️♥️♥️♥️♥️♥️♥️♥️