It's time to seduce our girls, earrings made with wire and stones.
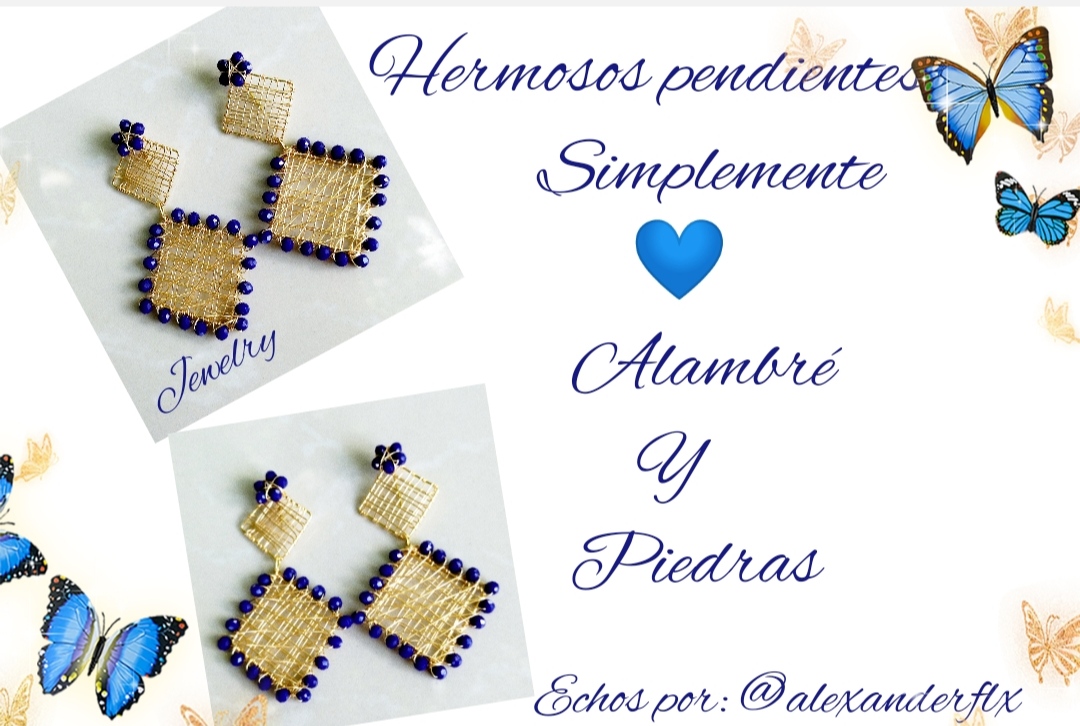
Hola feliz noche espero se encuentren bien y no la estén pasando mal como yo les cuento que estamos nuevamente en ahorro de energía eléctrica en estos momento nos están quitando seis hora de energía lo único malo es nos quitan la luz en la noche así que se podrán imaginar pero bueno, la noche de hoy quiero compartir unos hermosos pendientes colgantes son muy lindos un poco grande para algunas de nuestras chicas pero estoy seguro que a otras les gusta mucho los pendientes grandes igual estos pendientes son para todas, les cuento que están echo para una noche elegante como le acabo de decir son un poco grande pero muy elegantes su color es muy llamativo azul rey me gusta mucho ese color como pueden ver son dos piezas con la misma forma pero una de ellas se puede a su gusto por eso le digo que son pendientes colgantes es mi opinión sé que hay muchas opiniones😉 bueno espero les guste y que tengan una feliz noche 👗💙👸👸🍓.
Hello, happy night, I hope you are well and you are not having a bad time, as I tell you that we are once again saving electricity, right now they are taking six hours of energy away from us, the only bad thing is they take away the light at night like this that you can imagine but well, tonight I want to share some beautiful dangling earrings they are very nice a little big for some of our girls but I am sure that others like big earrings a lot, these earrings are for everyone, I tell you that they are made for an elegant night as I just told you they are a bit big but very elegant their color is very striking royal blue I really like that color as you can see they are two pieces with the same shape but one of them can be customized by I tell you that they are dangling earrings, it's my opinion, I know there are many opinions😉 well, I hope you like it and have a happy night 👗💙👸👸🍓.
What do we need.
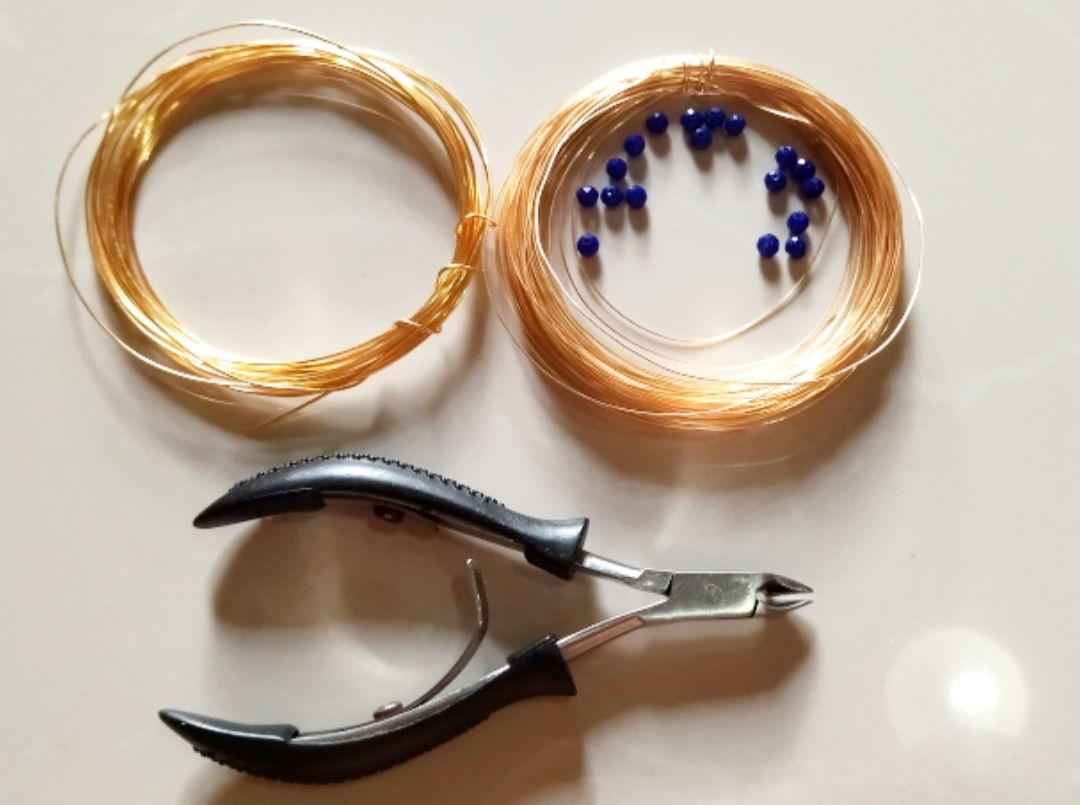
- piedras de bisutería
- alambre para bisutería calibre 22 y calibre y 26
- pinzas
jewelry stones
22-gauge and 26-gauge jewelry
tweezers
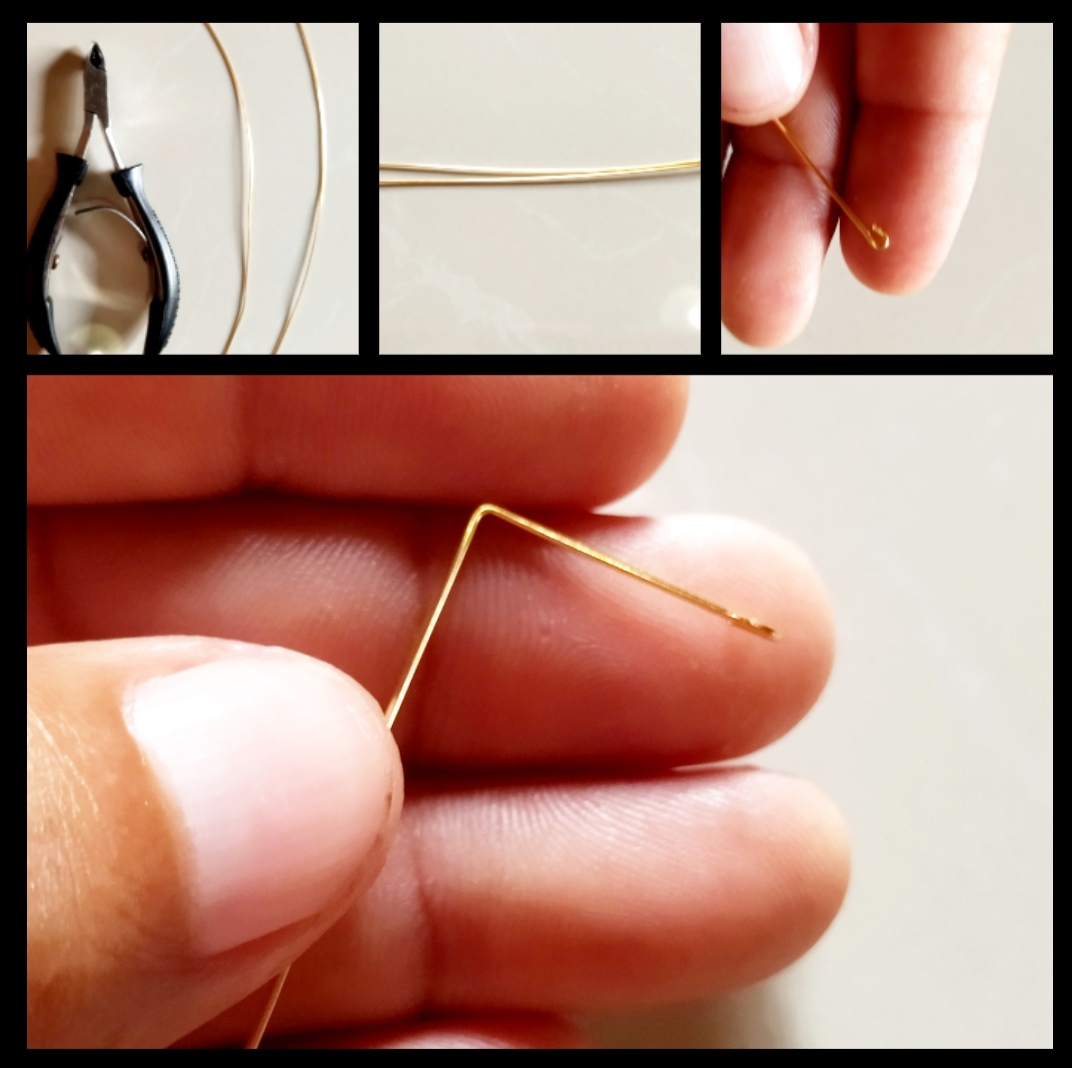
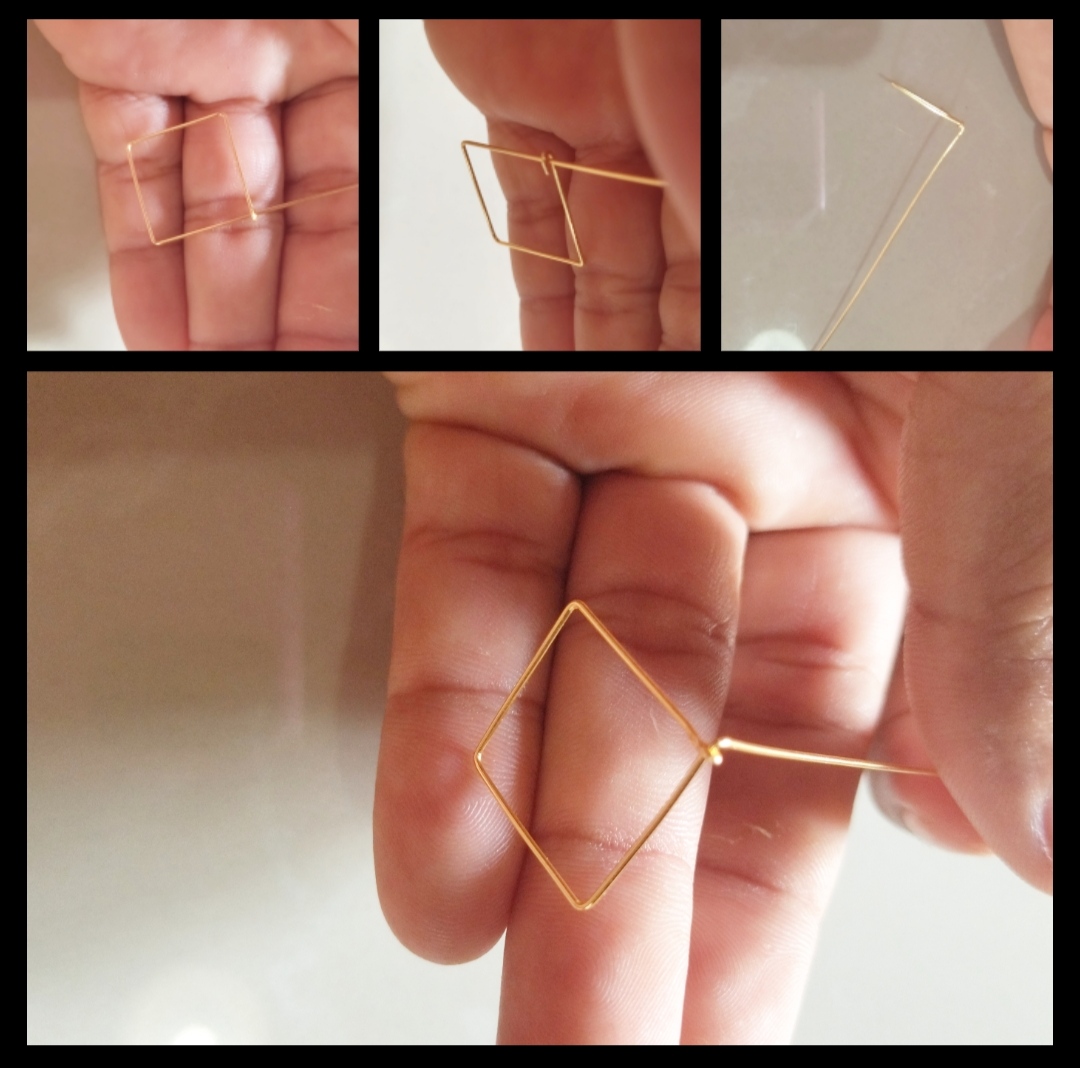
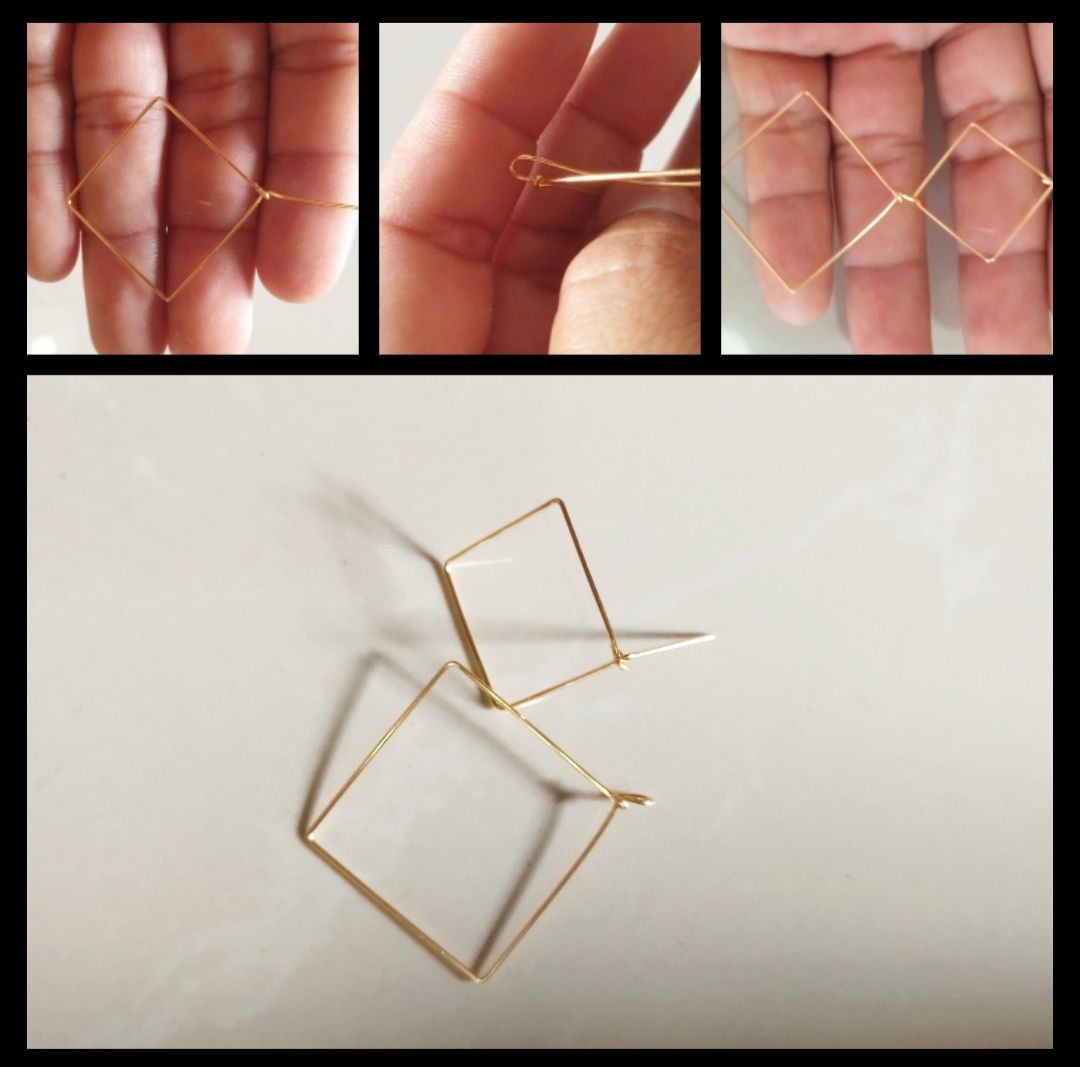
Paso 1: Bueno chicas para empezar con nuestros pendientes debemos cortar dos trozo de almabre calibre veintidós lcon estos alambre aremos dos cuadrados uno más pequeño que el otro le explico cómo primero debemos hacer una u en la punta del alambre luego doblamos los cuatro lado del mismo tamaño si quieren pueden utilizar algún objeto cuadrado o pueden utilizar una regra y ir midiendo yo lo hice a la vista para para que quede mejor les recomiendo utilizar una de los dos objeto luego de tener los cuatro lados iguales el último alambre lo meteremos en medio de U que hicimos al principio apretamos o cerramos la U para que no se nos mueva luego doblaremos el resto del alambre hacia atrás para el segundo paso cuadrado aremos todo igual menos el final al final del segundo cuadrado debemos doblar el alambre hacia arribo no hacia atrás luego hacemos una U pero mirando hacia abajo cortamos el exceso de alambre y listo ya tenemos los cuadrado😉 .
Step 1: Well, girls, to start with our earrings, we must cut two pieces of twenty-two gauge wire. With these wires, we will make two squares, one smaller than the other. I will explain to you how first we must make a u at the end of the wire, then we bend the four side of the same size if you want you can use some square object or you can use a ruler and measure it I did it at sight so that it looks better I recommend using one of the two objects after having the four equal sides we will put the last wire in the middle of the U that we made at the beginning we tighten or close the U so that it does not move then we will bend the rest of the wire backwards for the second square step we will make everything the same except the end at the end of the second square we must bend the wire upwards no backwards then we make a U but looking down we cut the excess wire and voila we have the squares😉 .
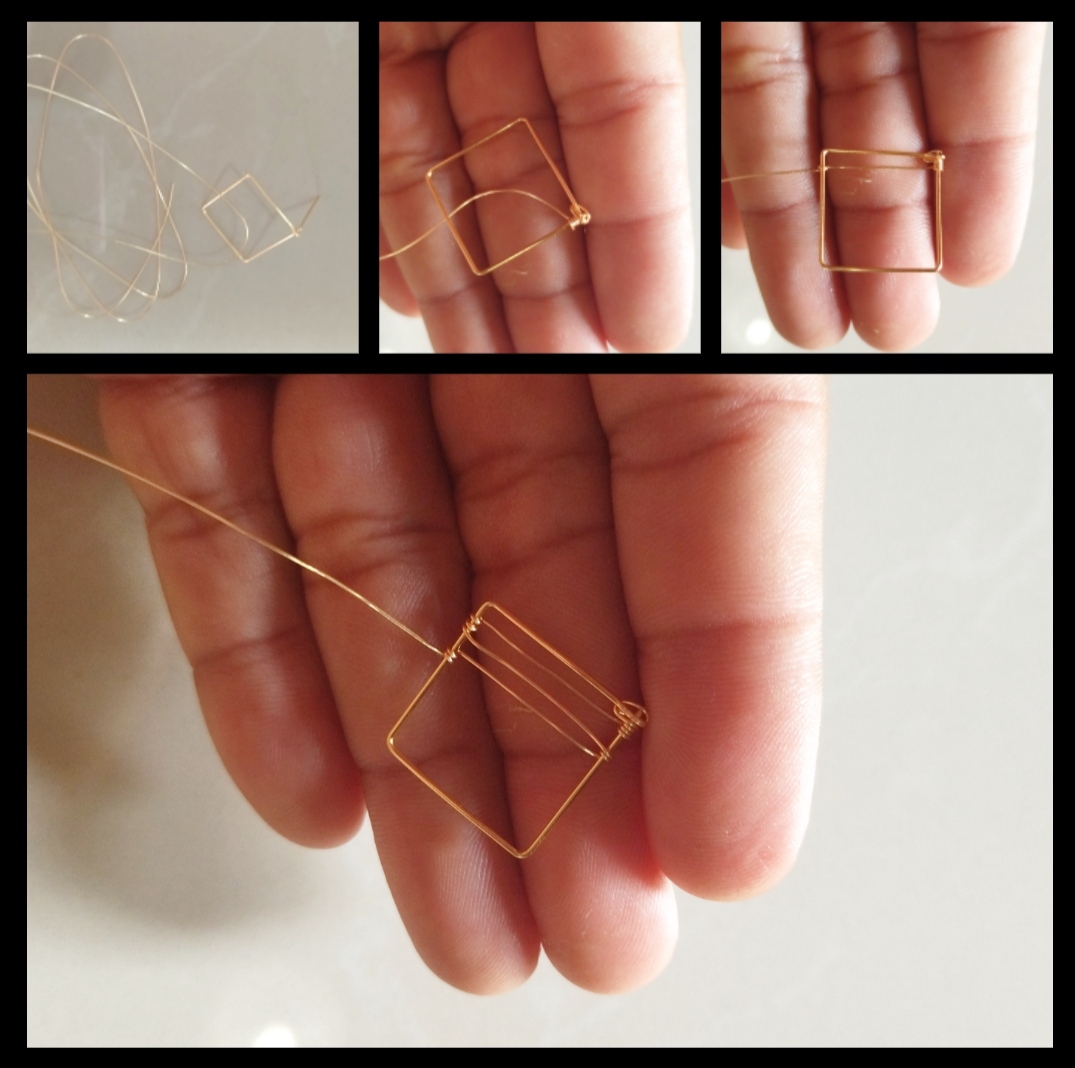
Paso 2: Para nuestro segundo seguiremos trabajando con nuestro cuadra para este paso cortaremos un trozo de alambre calibre veintiséis tratemos de cortar un trozo largo para no empatar el almabre, luego entorcharemos un poco la punta del alambre en nuestra base yo en este caso lo doble donde está la U que hicimos en el paso anterior luego le damos dos vueltas a el alambre en un extremo del cuadrado luego nos iremos al otro lado del cuadrado le damos dos vuelta a el alambre para asegurar y nos regresamos y así asta terminar luego aremos lo mismo pero con los otros dos extremo del cuadrado y así nos quedará los alambre cruzado de igual manera aremos con el cuadrado grande les digo algo muestras más alambre le pongamos nos quedarán mejores así que sin miedo jajajaja😉.
Step 2: For our second we will continue working with our block for this step we will cut a piece of twenty-six gauge wire we will try to cut a long piece so as not to tie the wire, then we will twist the tip of the wire a little in our base and in this in case we fold it where the U is that we made in the previous step then we turn the wire twice at one end of the square then we will go to the other side of the square we turn the wire twice to secure and we return and so on until we finish then we will do the same thing but with the other two ends of the square and so we will have the crossed wire in the same way we will do with the big square I tell you something more wire samples we will put it will be better so without fear hahahaha😉.
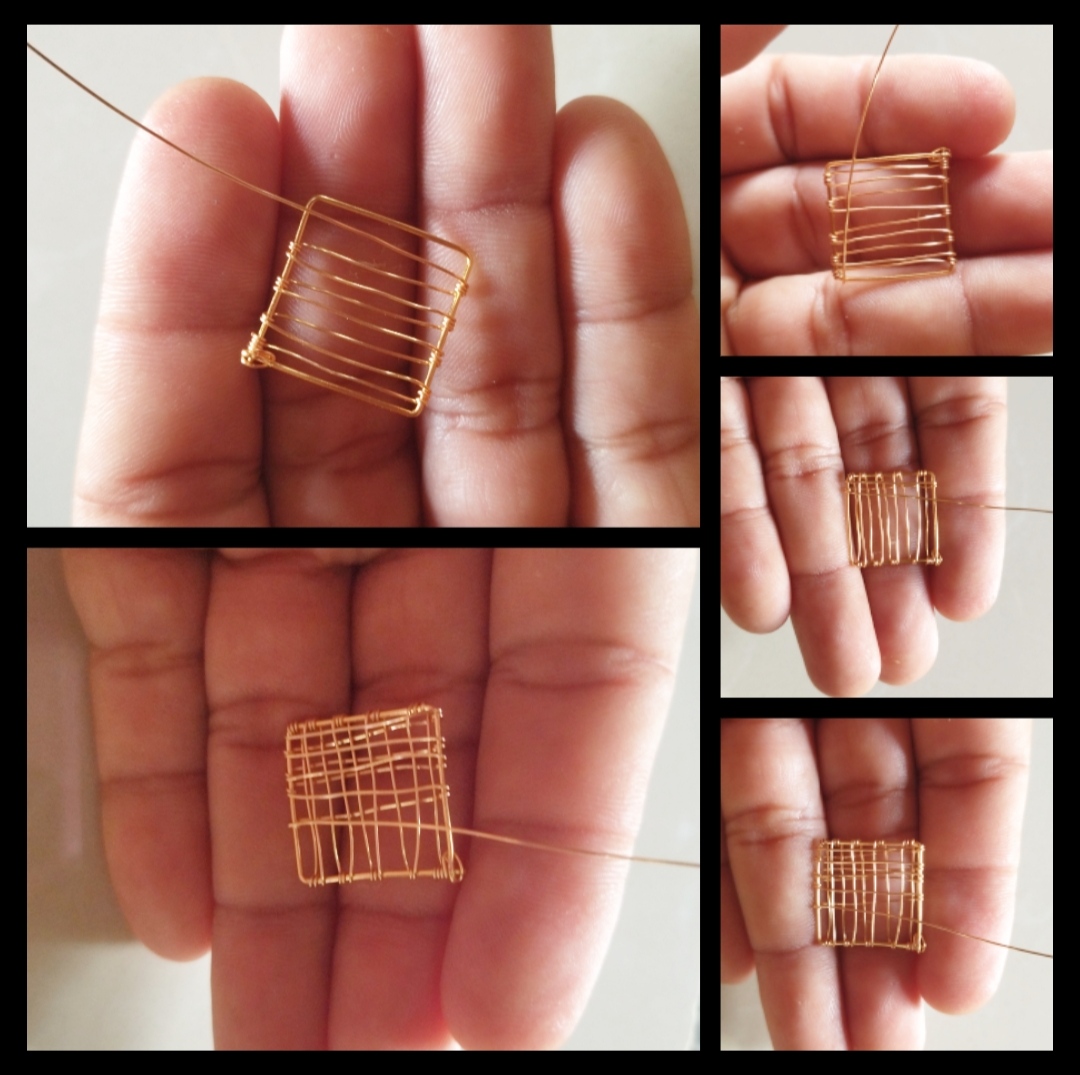
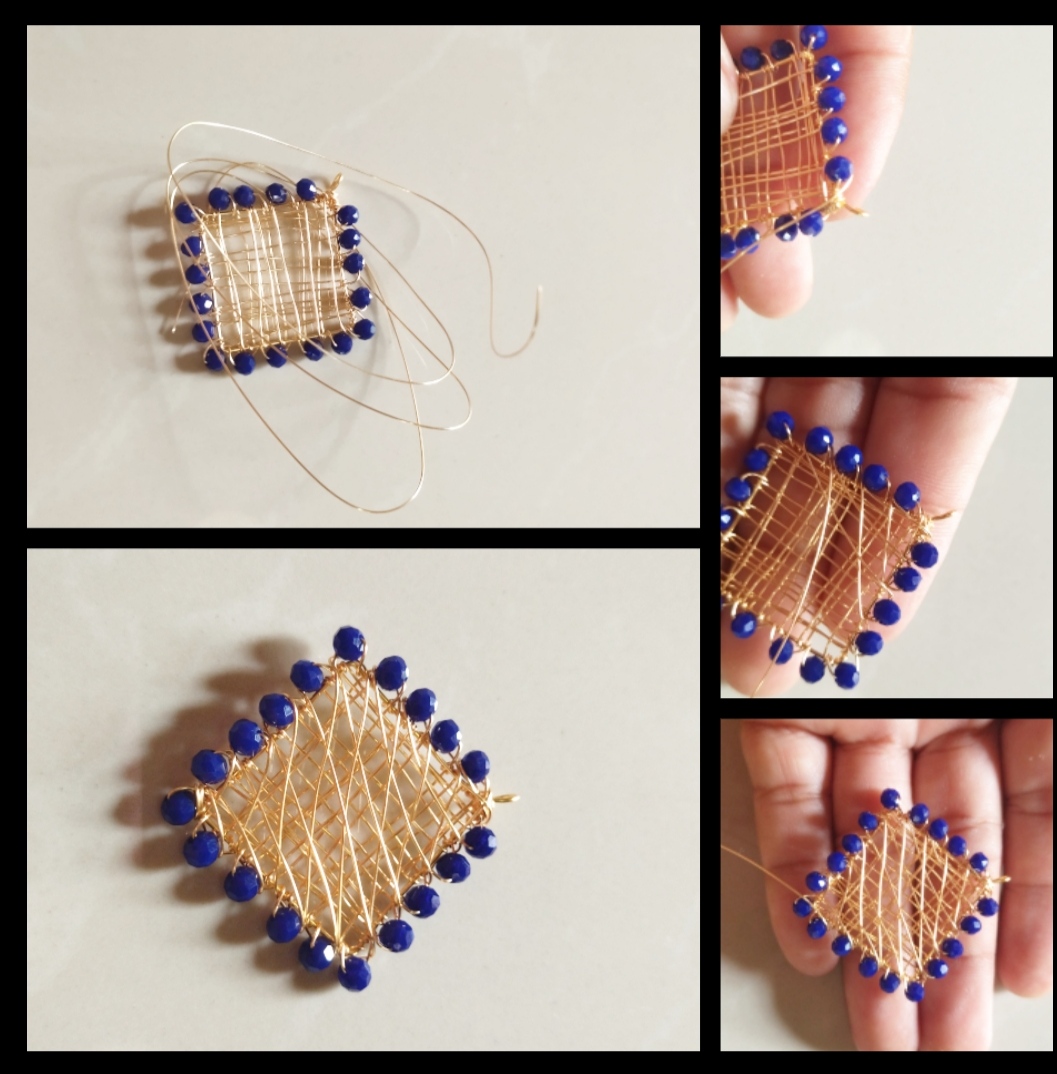
Paso 3: Bueno chicas como ya pueden ver en nuestro segundo paso ya tenemos los dos cuadramos con bastante alambre ahora le pondremos un poco de color tomaremos unas piedras azules y poco de alambré calibre veintiséis amaramos la punta del alambre a nuestra base siempre utilizo la para amarar el alambre la parte donde dejamos el empate luego de asegurar el alambre metemos una piedra azul para asegurar esa piedra solo debemos pasar la punta del alambre por el medio de los alambre que tenemos en nuestro cuadrado tratando siempre de tomar la base y así vamos metiendo piedra por piedra asta llegar donde empezamos este paso solo lo aremos con el cuadrado grande porque para el pequeño te emos otros planes luego de tener todas las piedras tomaremos otro trozo de alambre del mismo calibre volvemos amarar el alambre en el mismo lugar y luego aremos zigzag ♾️♾️ pasando el alambre por detrás de las piedra y listo .
Step 3: Well girls, as you can see in our second step we already have the two squared off with a lot of wire now we will put a little color on it we will take some blue stones and some twenty-six gauge wire we will tie the end of the wire to our base always I use the to tie the wire the part where we leave the tie after securing the wire we put a blue stone to secure that stone we just have to pass the tip of the wire through the middle of the wires that we have in our square always trying to take the base and So we are putting stone by stone until we reach where we started this step. We will only do it with the large square because for the small one we will have other plans. After having all the stones, we will take another piece of wire of the same caliber. We tie the wire again in the same place and then we will zigzag ♾️♾️ passing the wire behind the stones and that's it.

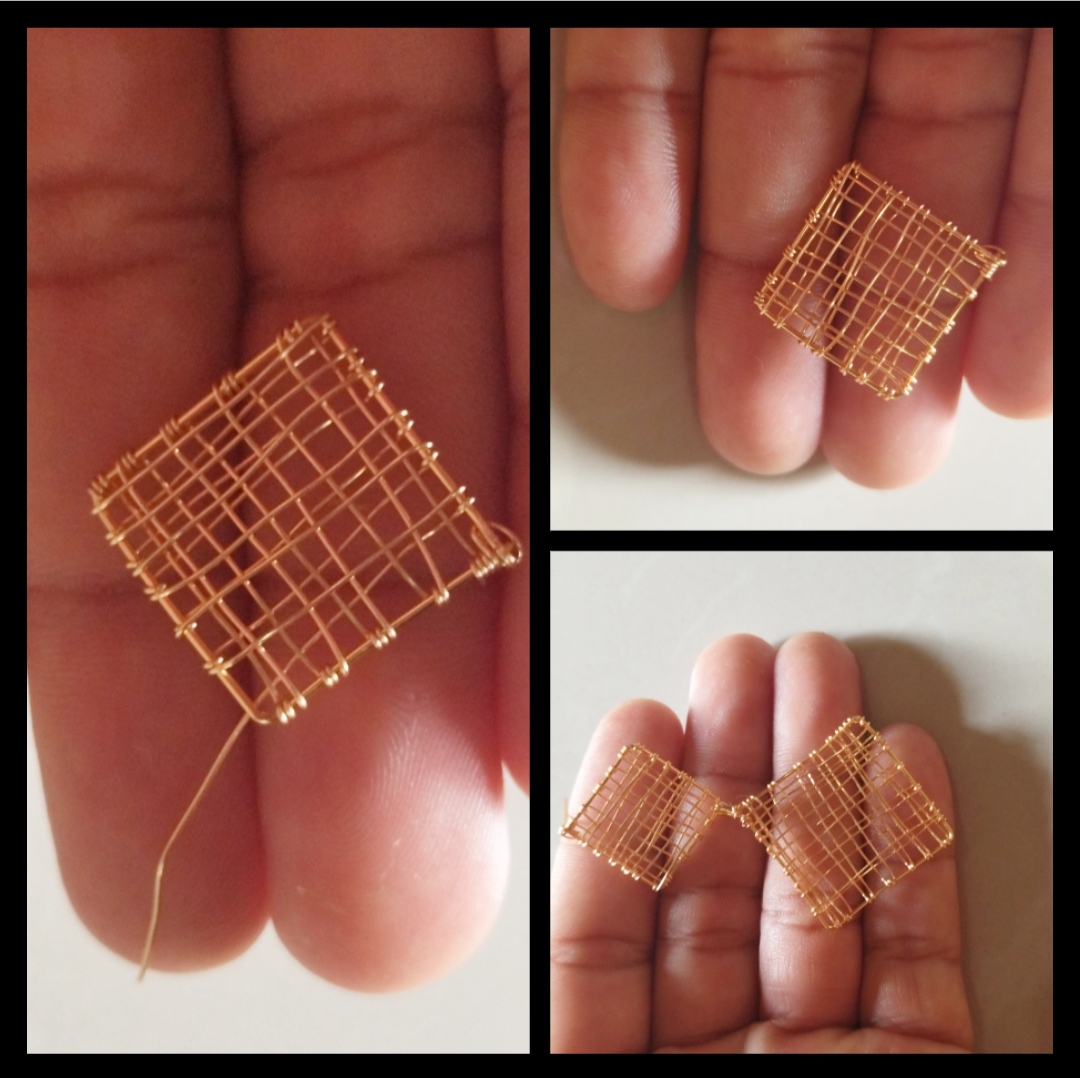
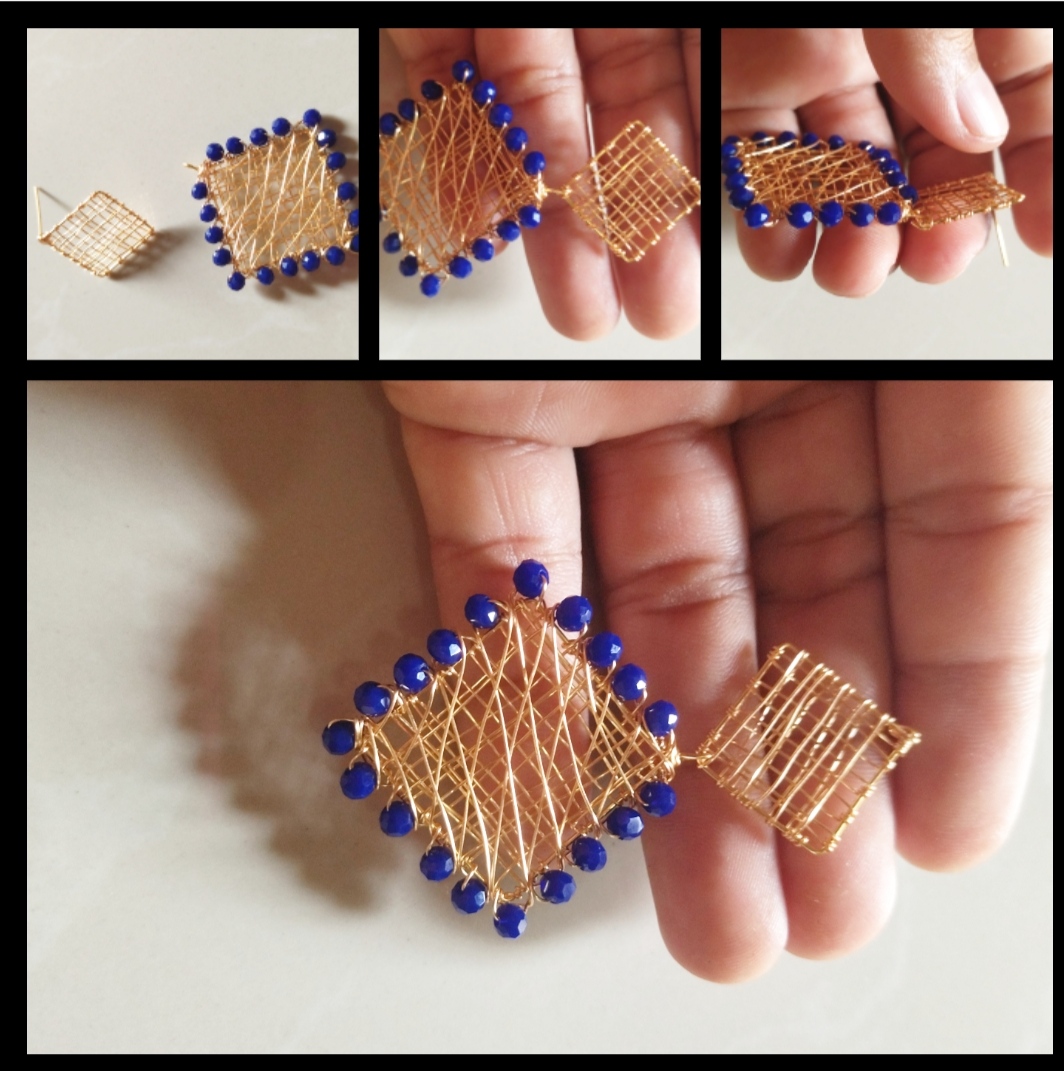
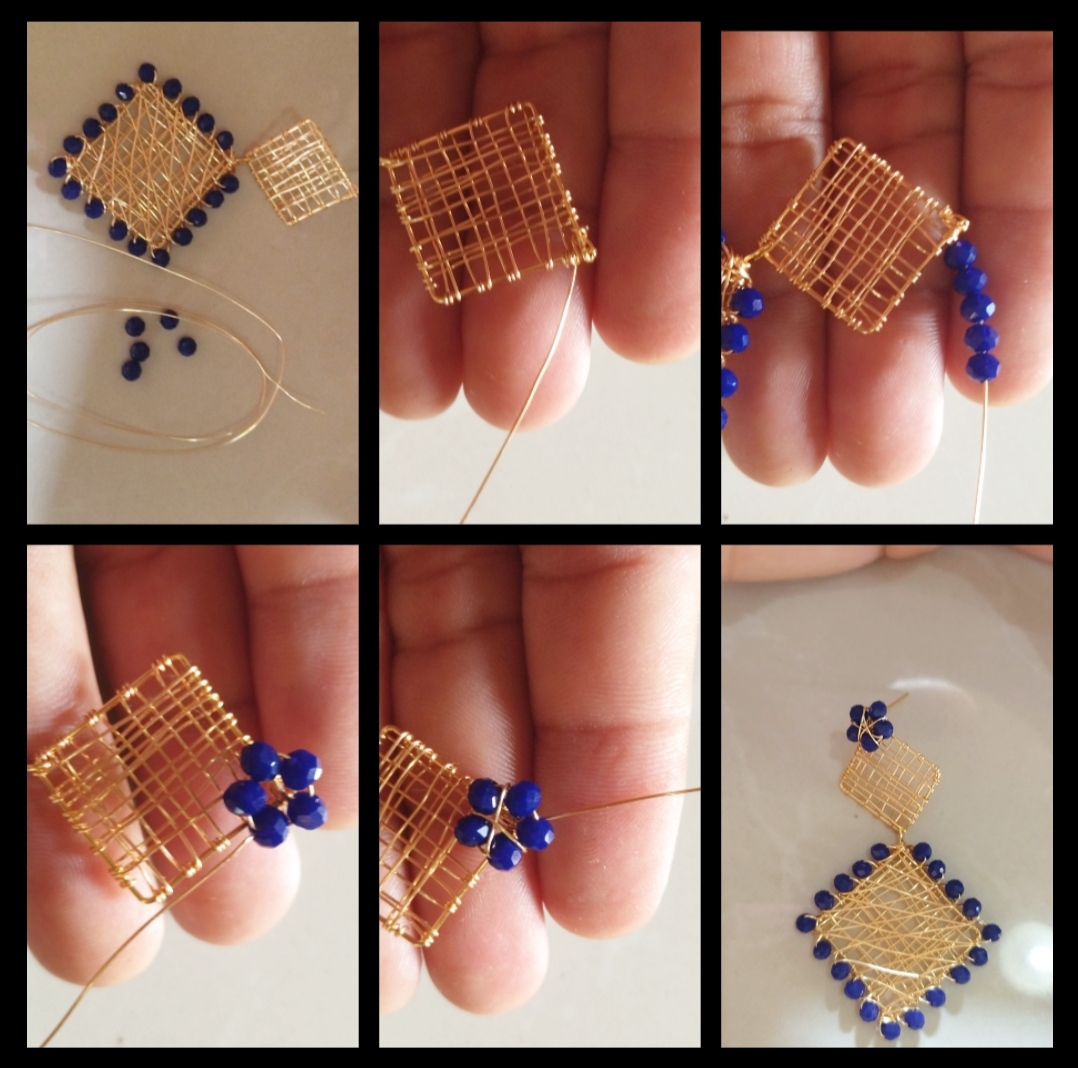
Paso 4: Bueno ahora sí nos toca lo más fácil para este paso pegaremos las dos piezas como las pegamos recuerdan que a nuestro segundo cuadro le hicimos una U mirando hacia bajo bueno esa U la enganchamos en la otra pieza y para asegurar esa pieza solo debemos cerrar es U solo pegar la punta del alambre no cerrar todo porque si no el pendiente perderá movilidad y eso no lo queremos bueno como pueden ver ya tenemos las dos piezas juntas ya hacen una solo pieza pero le falta algo a nuestro cuadrado pequeño a ese cuadrado le aremos una flor pequeña colo la aremos cortaremos un trozo de alambre calibre veintiséis y lo amarraremos en la punta de nuestro cuadrado apretamos muy bien metemos sinco piedras azules hacemos un redondo y pasa el sobre por el medio de las piedras agarrando el cuadrado así nos quedará la flor pegada al pendiente apretamos muy bien eso nunca debe faltar cortamos el exceso de alambre y listo, bueno chicas será para la próxima espero les gusten sé que son un poco grande 😉🍓🍓👸👸👸👸👸👗👗💙♥️♥️♥️🌹🌹🌹🌹😍😍😍😘😘😘
Step 4: Well, now it's the easiest thing for us. For this step, we will glue the two pieces as we glued them. Remember that we made a U in our second frame looking downwards, well, we hooked that U in the other piece and to secure that The only part we have to close is U, just paste the tip of the wire, do not close everything, because if not, the earring will lose mobility and we do not want that, well, as you can see, we already have the two pieces together, they already make a single piece, but something is missing from our small square. to that square we will make a small flower, we will make it we will cut a piece of twenty-six gauge wire and we will tie it to the end of our square we press very well we put five blue stones we make a round and pass the envelope through the middle of the stones holding the square this way the flower will be stuck to the earring we press very well that should never be missing we cut the excess wire and that's it, well girls it will be for the next one I hope you like them I know they are a bit great where 😉🍓🍓👸👸👸👸👸👗👗💙♥️♥️♥️🌹🌹🌹🌹😍😍😍😘😘😘
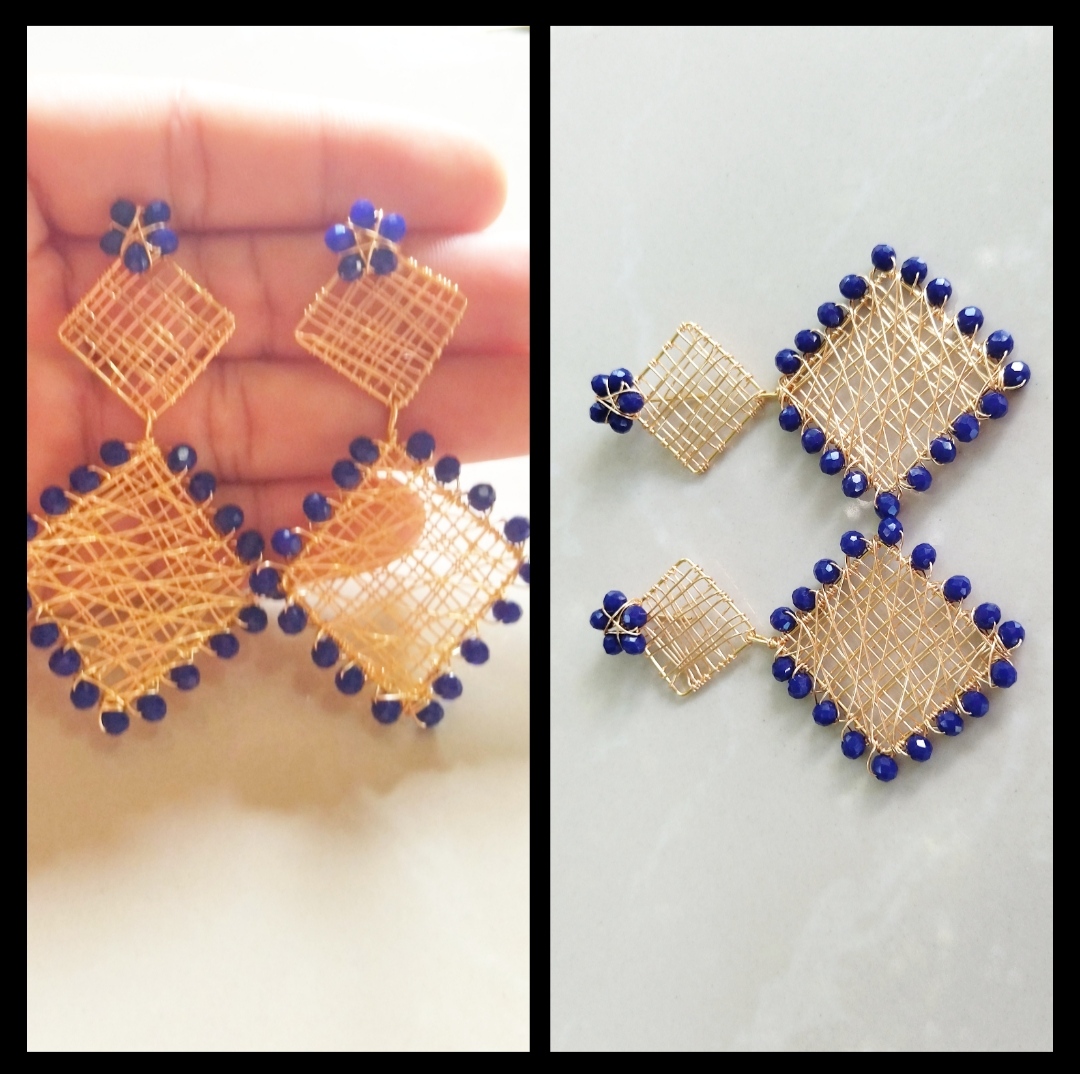
listo nuestros hermoso zarcillos , espero que a las damas les guste, fue un gusto compartir con ustedes .
Ready our beautiful earrings, I hope the ladies like it, it was a pleasure to share it with you.
Todas las Fotos son de mi autoría y fueron tomadas con mi Celular Redmi 9T
All Photos are my authorship and were taken with my Redmi 9T Cellphone
Otra hermosa pieza, se ve muy lujosa y lo haces ver tan fácil, pero sabemos que tus manos y gran son tienen todo q ver en este excelente resultado final.
Gracias por compartir tus conocimientos, son muy valiosos
Un abrazo 🤗🤗
Hola feliz día espero te encuentres bien si la verdad lo hice con esa intención para una noche especial y por eso son un poco grandes me gustaría que alguien los usé para ver cómo se miran en una chica. Gracias por visitarme siempre será un gusto compartir con ustedes.🌹🌹🌹🌹🌹
The rewards earned on this comment will go directly to the people sharing the post on Twitter as long as they are registered with @poshtoken. Sign up at https://hiveposh.com.
Has sido votado por
PROYECTO ENLACE
'Conectando Ideas y Comunidades'
PROYECTO ENLACE es un proyecto de curación de habla hispana enfocado en recompensar contenido de calidad y apoyar autores en su proceso de crecimiento en HIVE.
Creemos y apostamos por el futuro de esta gran plataforma, y estamos muy emocionados de poder hacerla crecer junto a esta comunidad. Así que te invitamos a usar nuestra etiqueta ENLACE y estar atento a todas las actividades que tenemos preparadas y que estaremos publicando en breve.
¿QUIERES AUTOMATIZAR TUS GANANCIAS DE CURACIÓN? SE PARTE DEL PROYECTO ENLACE APOYANDO A NUESTRO TRAIL EN HIVE.VOTE INGRESA AQUÍ PARA CONOCER LOS DETALLES.
¿QUIERES INVERTIR ENLACE? DESCUBRE COMO HACERLO Y GENERAR INGRESOS DE FORMA SEMANAL MEDIANTE TU DELEGACIÓN DE HP AQUÍ TE EXPLICAMOS COMO.
Te invitamos a participar en nuestro servidor de Discord: https://discord.gg/3S9y7BbWfS
Atentamente
EQUIPO ENLACE 2022
Hola.
Te quedó precioso este juego de aretes. Me gusta mucho como se ve el tejido dentro del triángulo. Bonito diseño 👏
Excelente tutorial amigo @alexanderflx nos encanta estos zarcillos que nos muestras hoy,ver como le das la forma es maravilloso, gran trabajo 👏
Hola, que bueno saber que estoy haciendo un buen trabajo, gracias por visitarme siempre será un gusto compartir con ustedes,🌹🌹🌹🌹🌹🌹🌹🌹🌹🌹🌹🌹🌹🌹
Bonitos zarcillos amigo. Felicidades!
Hola muchas gracias 😊😊😊😊
Bueno @alexanderflx, bellos , hermosos, preciosos ya no son calificativos para elogiar tus creaciones, que trabajo tan bien realizado, me gustó bastante y alabo tu creatividad, saluditos.
Hola gracias muchas gracias es un gusto que una dama me regale tan hermosas palabras, la verdad todos mis pendientes,cadenas, pulsera están echos especialmente para ustedes las mujeres que bueno que te gustaron muchas gracias besos😍😘😘😘🥰🥰🥰😍👍👍👍👍💙💙
Wao amigo están bellísimos super elegantes y de mi color favorito el Azul intenso, me encanta tu técnica y la forma en que trabas el alambre... Sigo aprendiendo contigo ☺️. Suerte y feliz día
Hola, espero estés bien que bueno que acerté con tu color favorito, es super fácil de hacer, que bueno que mis post son de utilidad para ustedes gracias.🍓🍓🍓🍓🍓🍓🍓❤️❤️❤️❤️❤️❤️❤️❤️🍓🍓🍓🍓♥️♥️♥️♥️♥️♥️🍓🌹🌹🌹🌹🌹🌹🌹🌹🌹🌹
Me gusta como titulas este tutorial, debo decir que de simple no tienen nada ajajaj, se ve con un acabado super prolijo, aunque es de pocos pasos el tutorial lograr ese acabado requiere de precisión.
Hola, feliz día no te preocupes de verdad son muy fáciles de hacer, de verdad son muy pocos pasos??? Necesito tu opinión 🍓🍓🍓🍓🍓🥰🥰🥰🌹🌹🌹🌹♥️♥️♥️♥️♥️
Demasiado bellísimos @alexanderflx realmente estoy aprendiendo a crear con alambre! Y tú eres un maestro excelente... Esta pieza me a gustado muchooo
Hola meda mucho gusto saber que estás aprendiendo a trabajar con alambre y que mis publicaciones son de utilidad para ti gracias por visitarme feliz día ♥️♥️♥️♥️♥️♥️♥️♥️♥️♥️♥️♥️♥️♥️♥️♥️♥️♥️♥️♥️♥️