| Let's make an easy bracelet with flat knots. | Hagamos una pulsera fácil con nudos planos. |
|---|---|
The technique of making flat knots is one of the simplest, most practical and also one of the most popular techniques for making jewelry pieces with threads. When I walk around the social networks looking for material to inspire me I come across many pieces where the flat knot is used either as part of the framework or for the closure of the piece, and I think that the main reason to use this type of knots is because of its sliding aspect as it allows us to open and close, even adjust the size of the work done. In my opinion, this is the most decorative and functional knot when making bracelets of thread, leather, macramé and any other material that can be knotted. | La técnica de hacer nudos planos es una de las más sencillas, prácticas y también más populares para hacer piezas de joyería con hilos. Cuando me paseo por las redes sociales mirando material que me sirva de inspiración me encuentro con muchas piezas donde se usa el nudo plano ya sea como parte del entramando o para el cierre de la pieza, y pienso que la principal razón para usar este tipo de nudos es por su aspecto deslizante ya que nos permite abrir y cerrar, incluso ajustar el tamaño del trabajo realizado. En mi opinión, este es el nudo más decorativo y funcional a la hora de hacer pulseras de hilo, cuerina, macramé y cualquier otro material que se pueda anudar. |

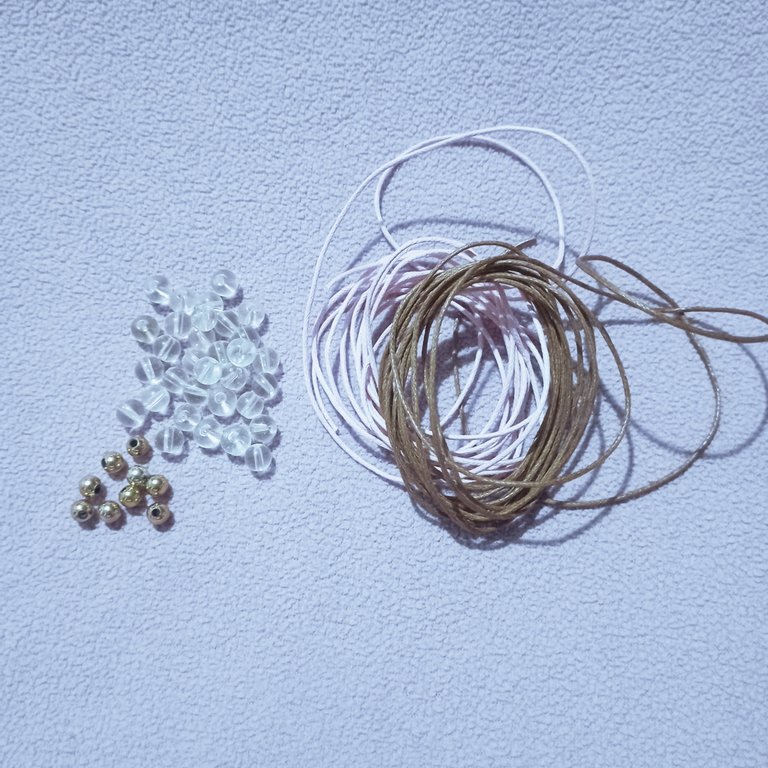
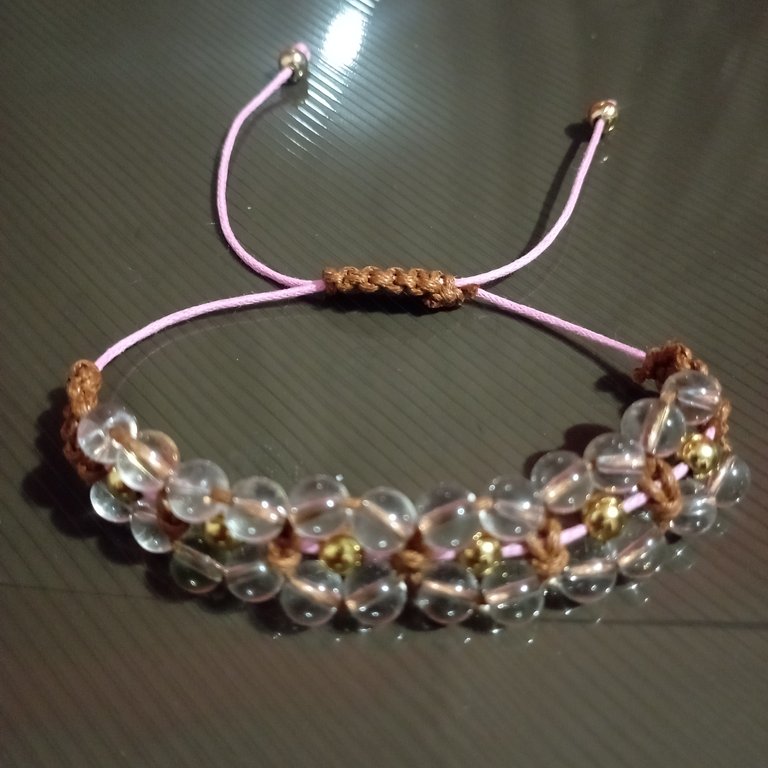
Today I made a bracelet with waxed thread in two colors that I really liked. Waxed thread is not one of my favorite materials because you can't seal the knot using the lighter technique because it has no synthetic material, so you run the risk of the knot coming apart when you cut off the excess. It is a cotton thread, of pure fiber only that comes with a wax that gives it some firmness and a very nice shine and although I don't use it very often when I saw a caramel colored one in the store I couldn't resist buying a piece as well as a pink one that I thought made a very good combination. I took it home and as I bought it impulsively, I didn't buy any stone or bead to work it. I didn't have any leftover materials that would look good, except for my clear murano. I didn't mind the idea of working with them since they were my favorite stones and I still had a good amount left. Without further ado, I set out to take advantage of them and now I tell you how the process went. The materials are: | Hoy realicé una pulsera con hilo encerado de dos colores que me gustaron mucho. El hilo encerado no es de mis materiales favoritos ya que no se puede sellar el nudo usando la técnica del encendedor porque no tiene nada de material sintético, por eso se corre el riesgo de que el nudo se desarme al cortar el excedente. Es un hilo de algodón, de pura fibra solo que viene con una cera que le da algo de firmeza y un brillo muy bonito y aunque no lo uso con mucha frecuencia cuando ví en la tienda uno de color caramelo no pude resistir comprarme un trozo al igual que uno rosa que me pareció hacían muy buena combinación. Me lo llevé a casa y como lo compre impulsivamente, no compre ninguna piedra o cuenta para trabajarlo. No tenía entre mis sobrantes de materiales algo que quedará bien, excepto mis muranos transparentes. No me molestó la idea de trabajar con ellos ya que de mis piedras predilectas y todavía me quedaba una buena cantidad. Sin más, me dispuse a aprovecharlas y ahora les cuento cómo fue el proceso. Los materiales son: |
Materials:
70 centimeters of caramel-colored waxed thread.
30 centimeters of pink waxed thread.
24 clear murano crystals without cuts.
8 balls of 3mm.
Materiales:
70 centímetros de hilo encerado color caramelo.
30 centímetros de hilo encerado color rosa.
24 cristales de muranos transparentes sin cortes.
8 balines de 3mm.
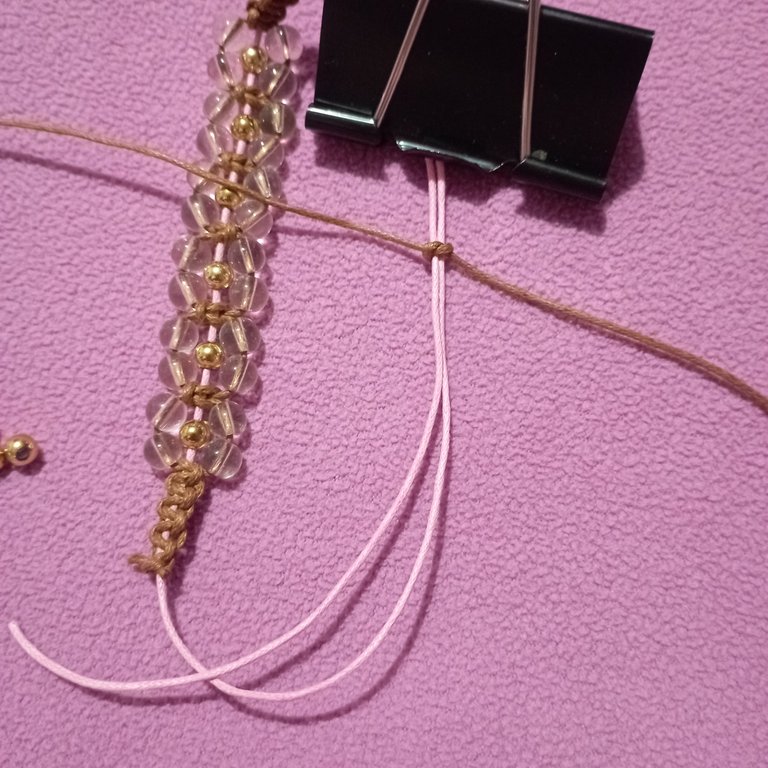
The process, believe me #jewelry friends, is the easiest thing in the world, but this is what it's all about, making things easy, but with wonderful results and a look that no one would think is very low cost and done in a simple way. Once we have put the pieces in, we attach the pink thread to a hook to hold papers. | El proceso, creanme amigos de #jewelry, es lo más fácil del mundo, pero de esto se trata, hacer cosas fáciles, pero con resultados maravilloso y de una apariencia que nadie pensaría que es de muy bajo costo y que se hace de manera sencilla. Una vez que hemos medido los hilos sujetamos el hilo rosa con un gancho para sujetar papeles. |
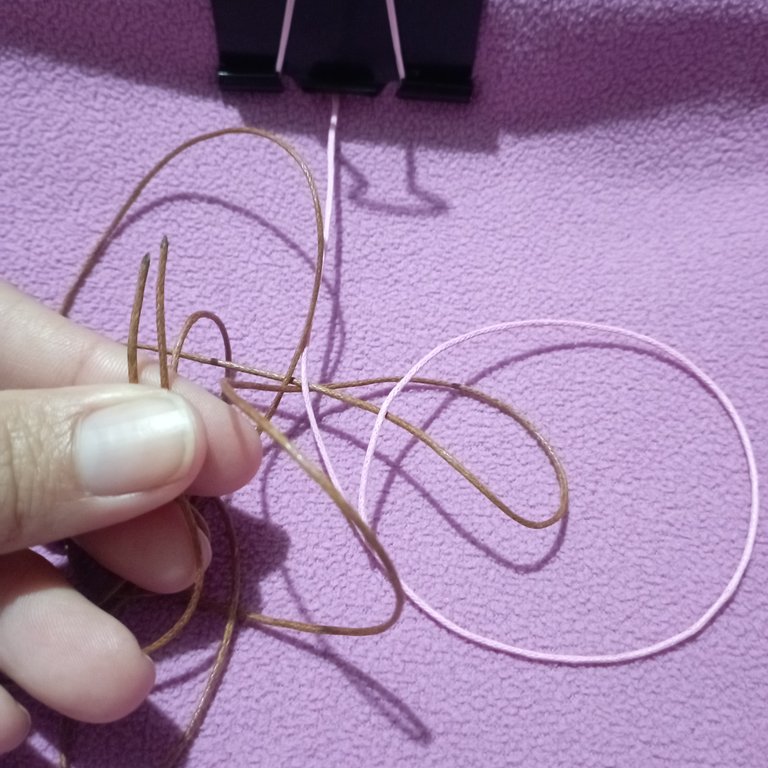
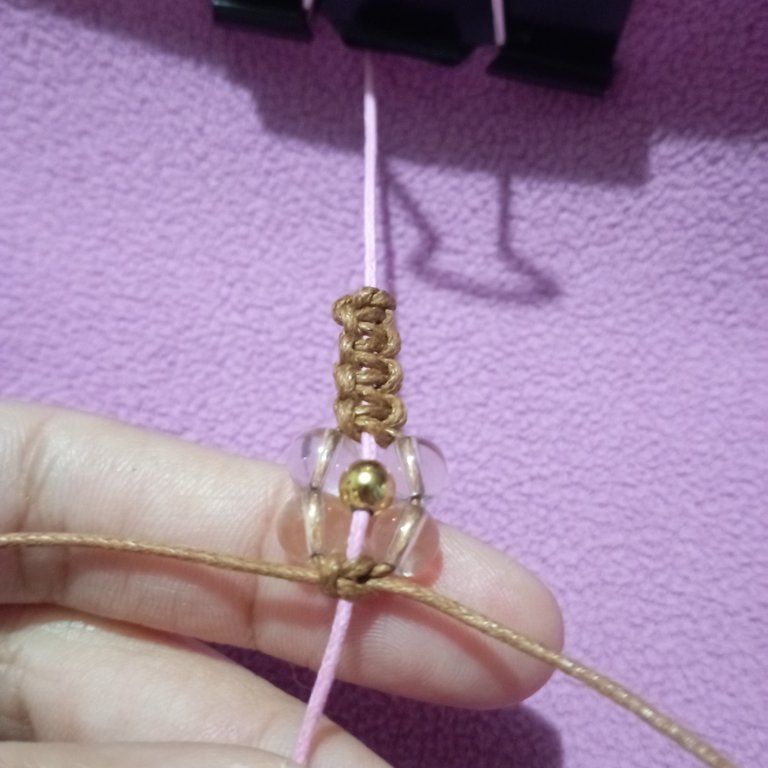
We leave approximately 8 centimeters of ends to work the clasp and that distance we apply the first knot. To do this we pass the caramel colored thread behind the pink thread and place half of it. We cross the ends in front forming an X and adjust. | Dejamos aproximadamente 8 centímetros de extremos para trabajar el cierre y esa distancia aplicamos el primer nudo. Para ello pasamos el hilo color caramelo por detrás del hilo color rosa y ubicamos la mitad de este. Cruzamos las puntas por el frente formando una X y ajustamos. |
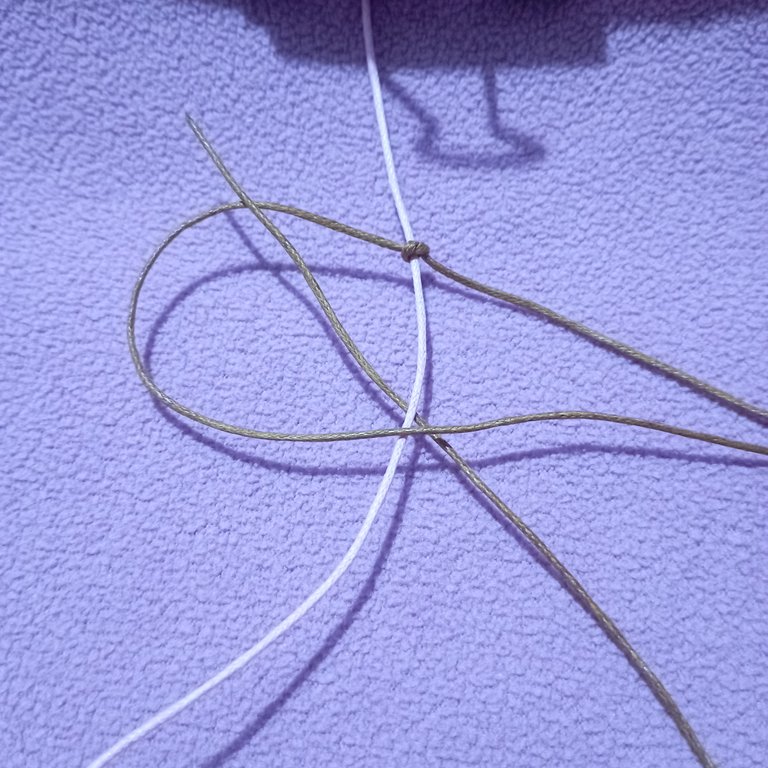
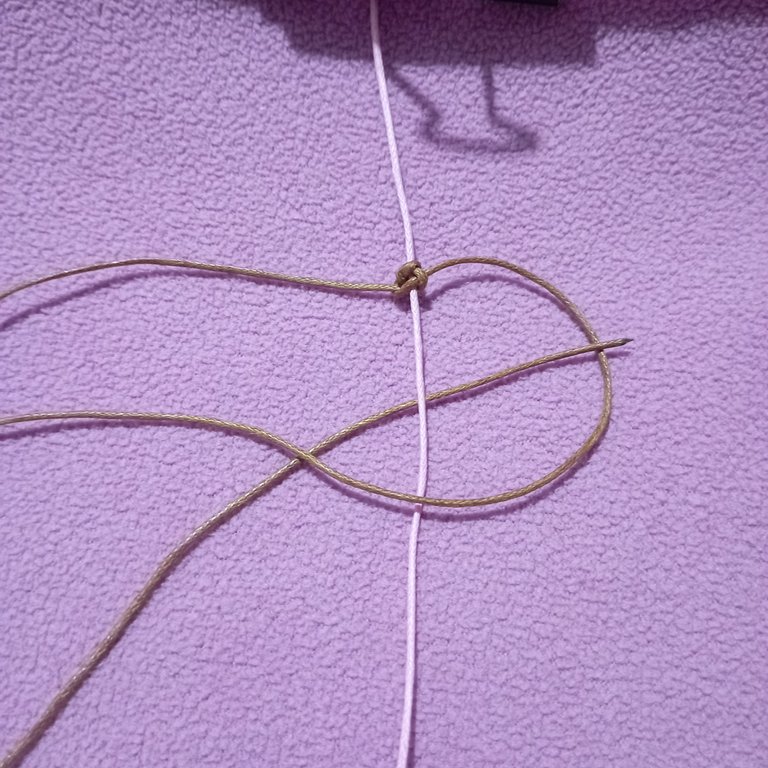
Now we work with the first flat knot. We pass the left strand in front of the pink thread forming a curve and the right strand we pass it over the left strand and behind the pink thread bringing it to the front, that is to say, the right strand has to pass through the space formed between the pink thread and the left strand. The first flat knot is now assembled. For the second knot we start with the right strand and repeat the process. We must intersperse the threads each time we start the next knot. If we have started with the right, the next one will be with the left and so on. | Ahora sí trabajamos con primer nudo plano. Pasamos la hebra de la izquierda por delante del hilo rosa formando una curva y la hebra de la derecha la pasamos por encima de la hebra izquierda y por detrás del hilo rosa trayéndola hacia el frente, es decir, la hebra derecha ha de pasar por el espacio que se forma entre el hilo rosa y la hebra izquierda. Ya armamos el primer nudo plano. Para el segundo nudo empezamos con la hebra derecha y repetimos el proceso. Debemos ir intercalando los hilos cada vez que iniciamos el siguiente nudo. Si hemos empezado con la derecha, el siguiente será con la izquierda y así sucesivamente. |
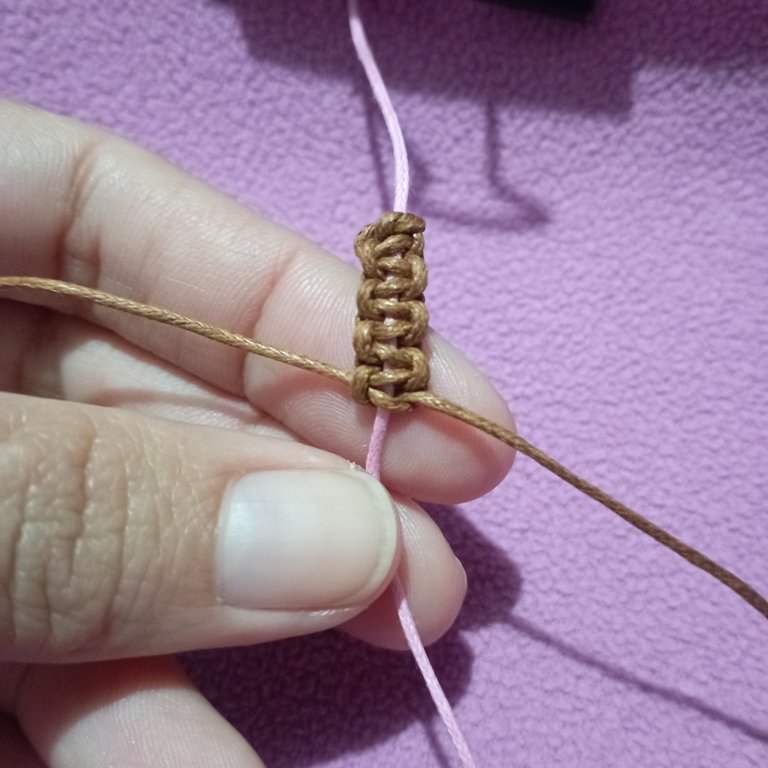
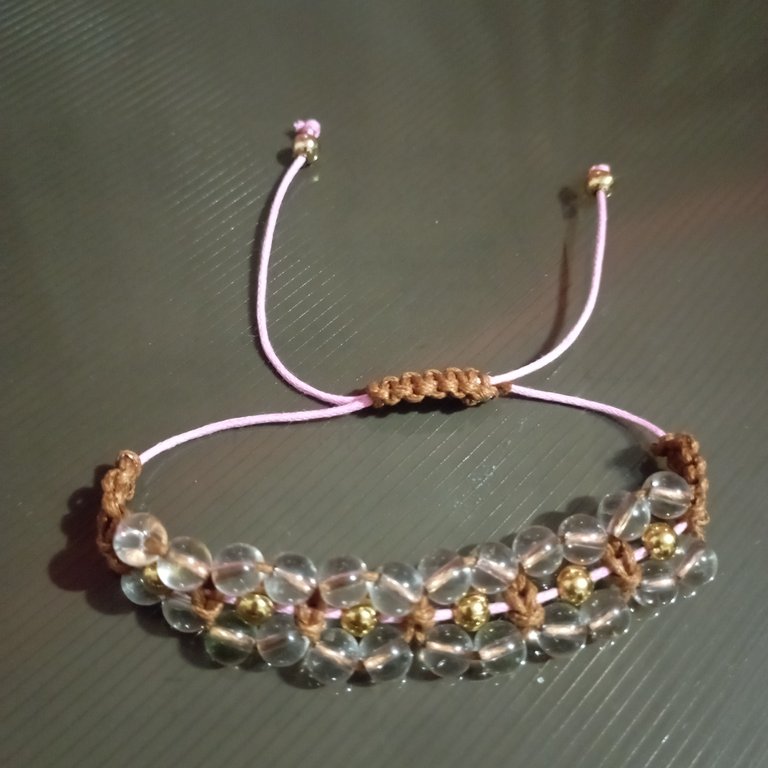
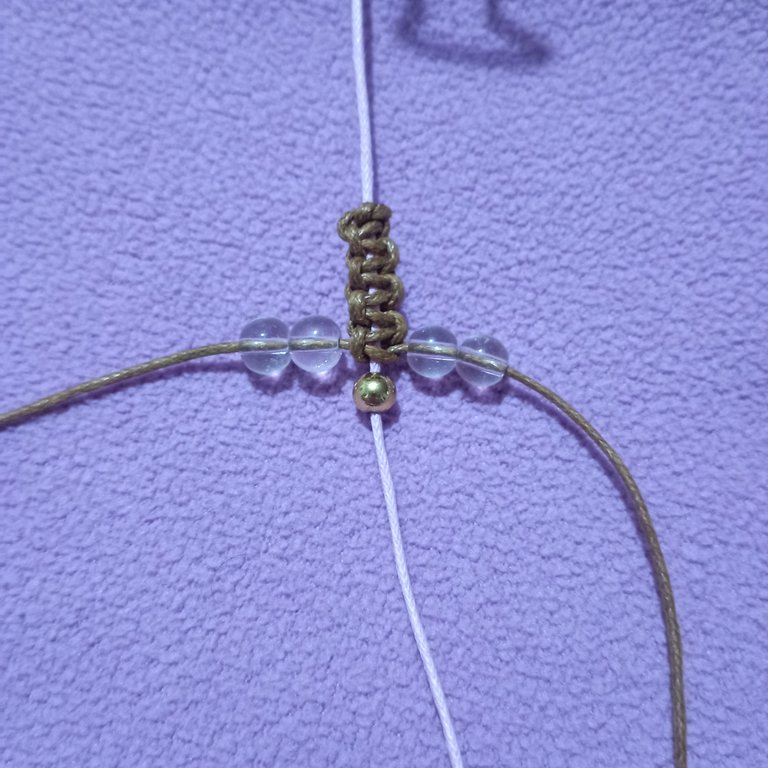
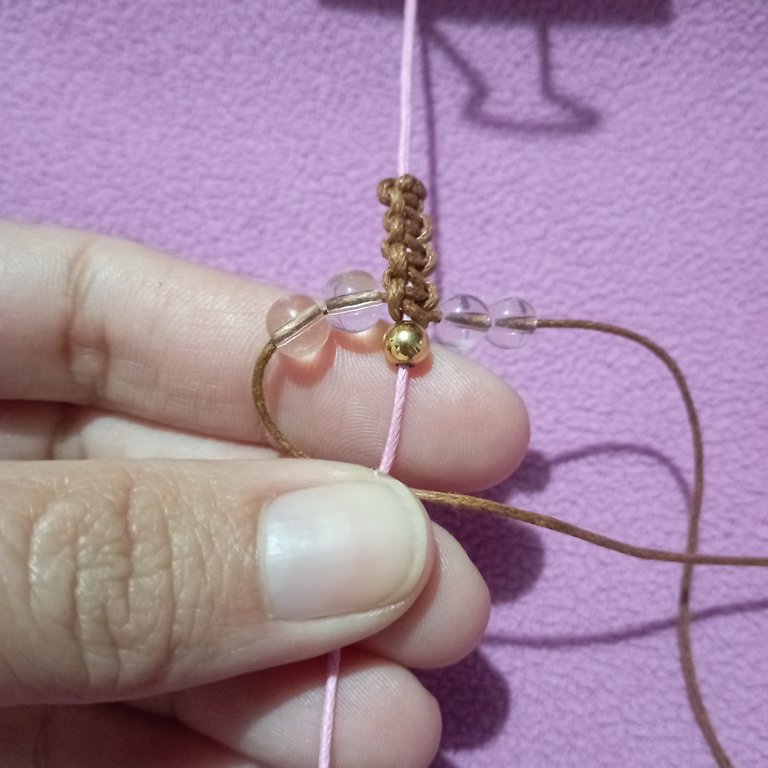
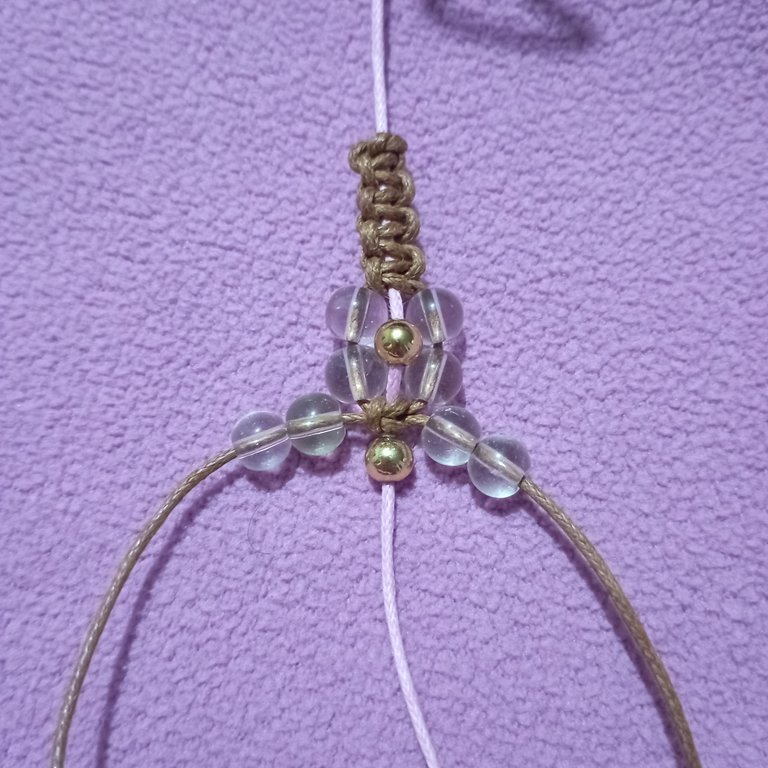
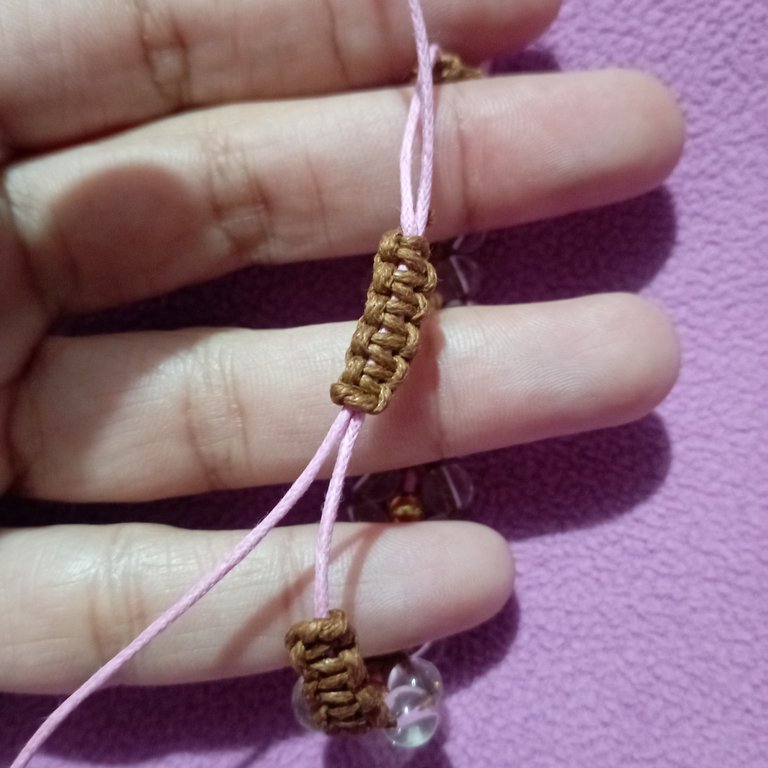
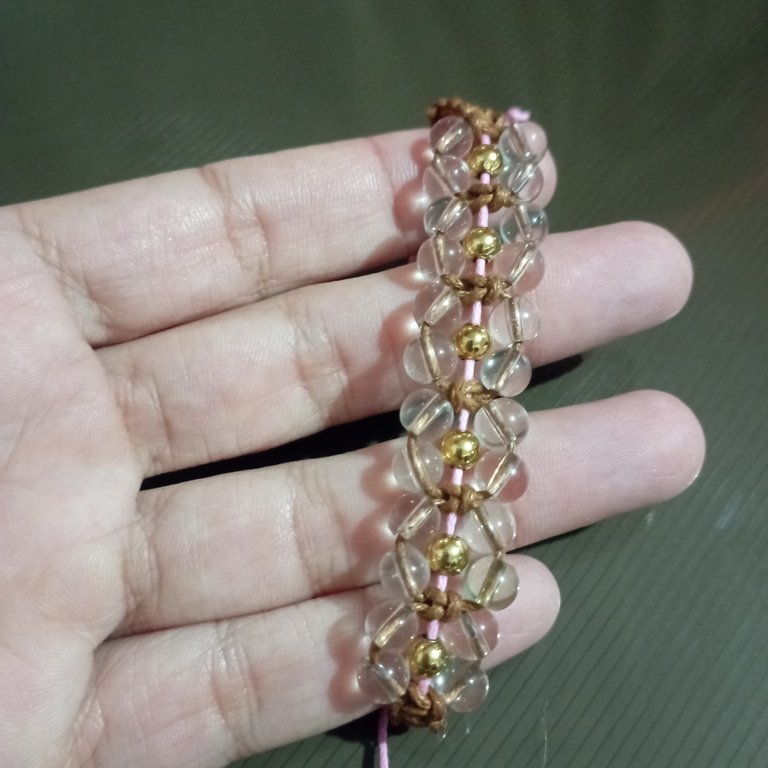
We tie 8 flat knots and start passing the beads. We place two Murano beads on each side and a ball on the pink thread. We make a flat knot making sure that it fits very well the beads that we have previously introduced. The whole process is repeated until completing the 24 murano beads. That is, 6 links of 4 murano beads with a ball in the center and separated by a flat knot. | Cometamos 8 nudos planos y empezamos a pasar las cuentas. Colocamos dos cuentas de Murano de cada lado y un balín en el hilo rosa. Hacemos un nudo plano procurando que éste ajuste muy bien las cuentas que hemos introducido previamente. Todo el proceso se repite hasta completar los 24 muranos. Esto es, 6 eslabones de 4 muranos nos un balín en el centro y separados por un nudo plano. |
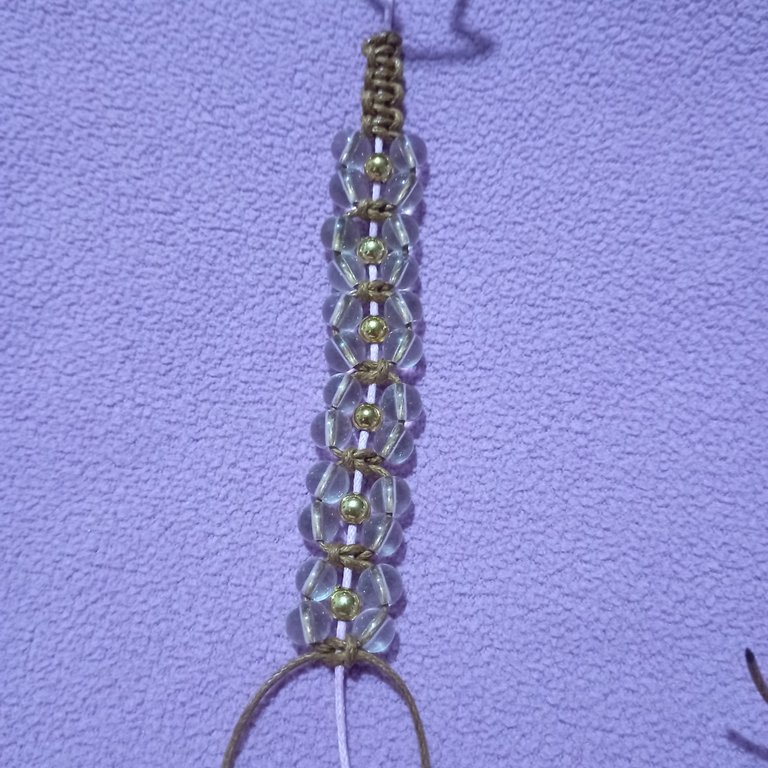
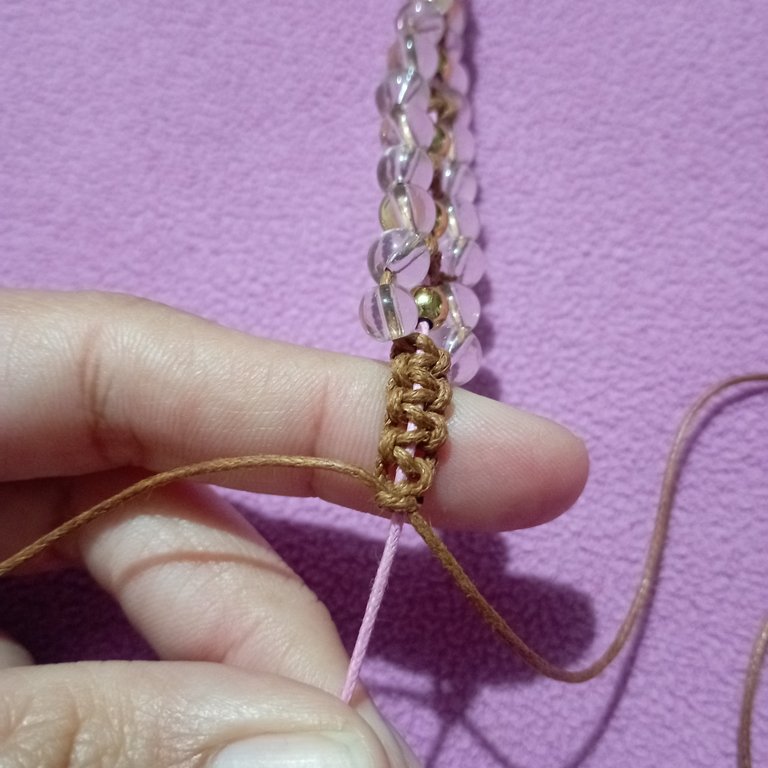
When we get to place all the pieces, we make 8 flat knots as we started the bracelet and finish cutting the excentende. As I mentioned at the beginning this thread can not be burned with the ignition to secure the knots, in this sense what we can do to prevent them from falling apart is to look very well and cut well to raz to have a neat finish. The last thing to do is to overlap the ends of the pink thread in opposite directions and if we need it, we help ourselves with the hook to step on papers and tie with 12 flat knots. We finish off the ends with a ball and an ordinary knot. | Al llegar a colocar todas las piezas, realizamos 8 nudos planos tal como empezamos el brazalete y terminamos cortamos el excentende. Como les mencionaba al principio este hilo no puede ser quemado con el encendido para asegurar los nudos, en este sentido lo que podemos hacer para evitar que se desarmen es aparentar muy bien y cortar bien al raz para que tenga un acabado prolijo. Lo último por hacer el sobreponer los extremos del hilo rosa en sentidos opuestos y si lo necesitamos nos ayudamos con el gancho para pisar papeles y amarramos con 12 nudos planos. Rematamos las puntas con un balín y un nudo corriente. |
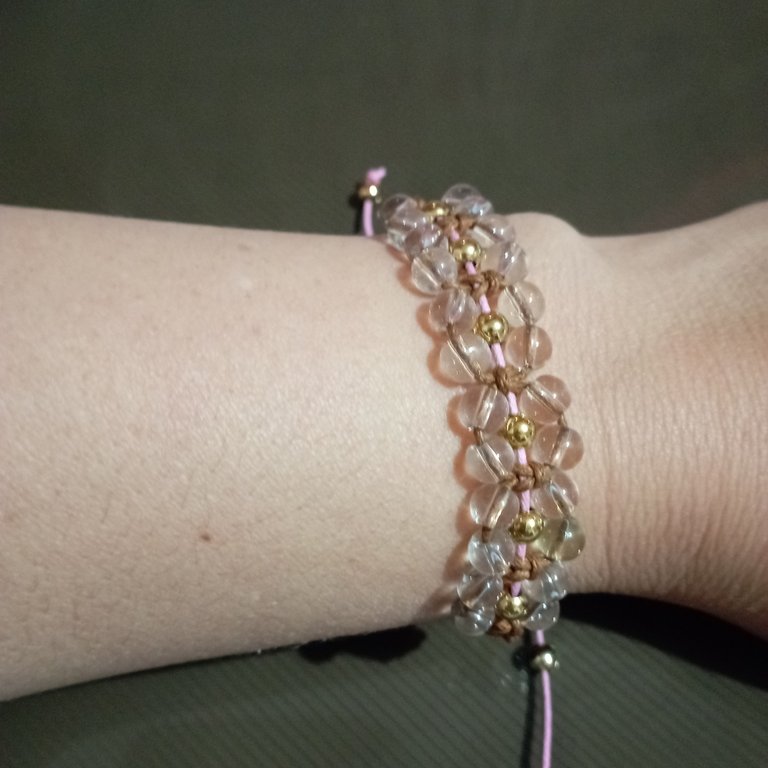
The result of this bracelet, easy and practical is beautiful. I think the beads do most of it. I love these little crystals. They reflect light beautifully and with the colors they complement each other very well. I hope you like it dear #jewelry community. It is an honor to share it with you. Bye Bye. | El resultado de este brazalete, fácil y práctico es hermoso. Creo que las cuentas hacer la mayor parte. Amo estos pequeños cristales. Reflejan la luz de manera hermosa y con los colores se complementan muy bien. Espero que les guste querida comunidad #jewelry. Es un honor compartirlo con ustedes. Chao Chao. |

Imágenes editadas en: itshot
Fotos tomadas con Redmi 10
Images edited in: itshot
Photos taken with Redmi 10

The rewards earned on this comment will go directly to the people( @kristal24 ) sharing the post on Twitter as long as they are registered with @poshtoken. Sign up at https://hiveposh.com.
Te quedó muy hermosa tu pulsera amiga, me encanta el hermoso detalle de los cristales, le dieron un toque super delicado... Muchas gracias por compartir, te deseo un feliz martes! @artsugar
Gracias querida. Estos cristales se han convertido en uno de mis favoritos. Reflejan la luz de una manera única. Me gustan mucho.
Gracias por hacerme saber tu apreciación.
Abrazos
https://leofinance.io/threads/@virgilio07/re-leothreads-2bzj59e49
The rewards earned on this comment will go directly to the people ( @virgilio07 ) sharing the post on LeoThreads,LikeTu,dBuzz.