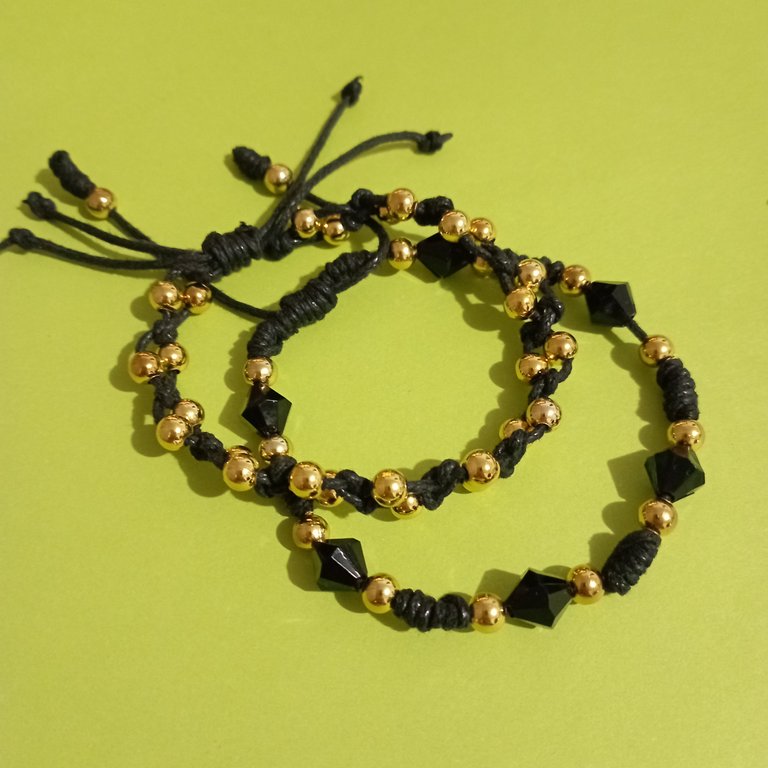

| Set of bracelets with torchon and franciscan knots. | Set de pulseras con nudos torchon y franciscano. |
|---|---|
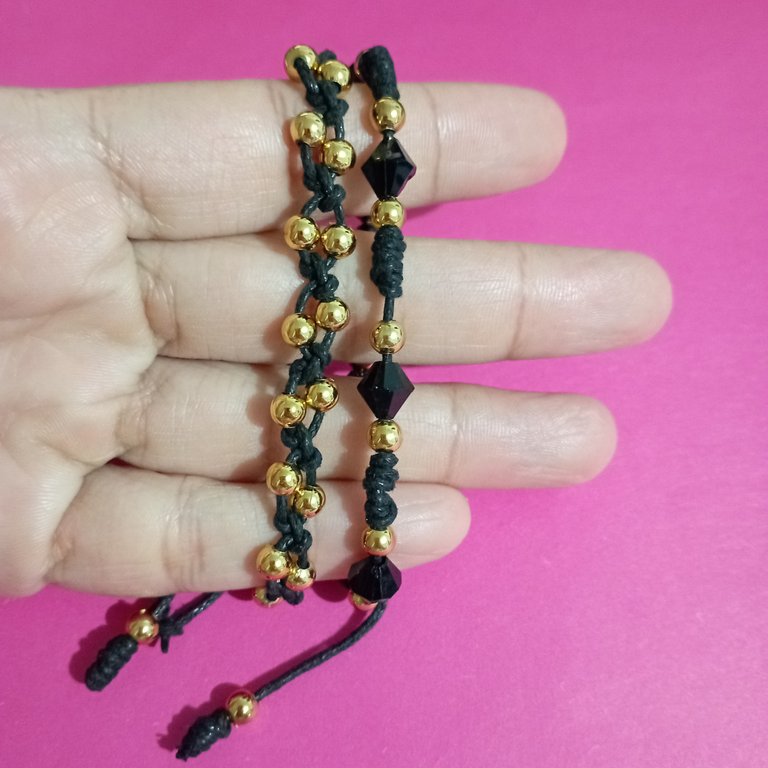
| <div class="text-justify"Hello my dear #jewelry friends. It is a pleasure to be with you and today I want to show you this set of simple style bracelets made with waxed thread, golden balls and black murano, but as I mentioned they are simple bracelets but what I want to show you are two basic knots that are very useful when making our projects. One is the Franciscan knot which is the one that is made from a spiral and with the help of a straw. The other is the torchon knot with two threads going around the opposite thread and vice versa. But don't worry, it's not complicated at all and if you have any doubts, I'll give you all the details later on: | Hola mis queridos amigos de #jewelry. Es un placer estar con ustedes, hoy quiero mostrarles este set de pulseras de estilo sencillo hechas con hilo encerado, balines dorados y cristales muranos negros, pero como ya les he mencionado son pulseras sencillas pero lo que quiero mostrarles son dos nudos básicos que son de gran utilidad al momento de elaborar nuestros proyectos. Uno es el nudo franciscano que es el que se elabora a partir de un espiral y con la ayuda de un pitillo o sorbete. El otro es el nudo torchón con dos hilos dando una vuelta alrededor del hilo opuesto y viceversa. Pero no se preocupen, no es nada complicado y si les queda duda, más adelante les voy a dejar cada detalle: |
The materials used are:
2 meters of black waxed thread.
Golden pellets.
Black Murano.
Los materiales usados son:
2 metros de hilo encerado color negro.
Balines dorados.
Muranos negros.
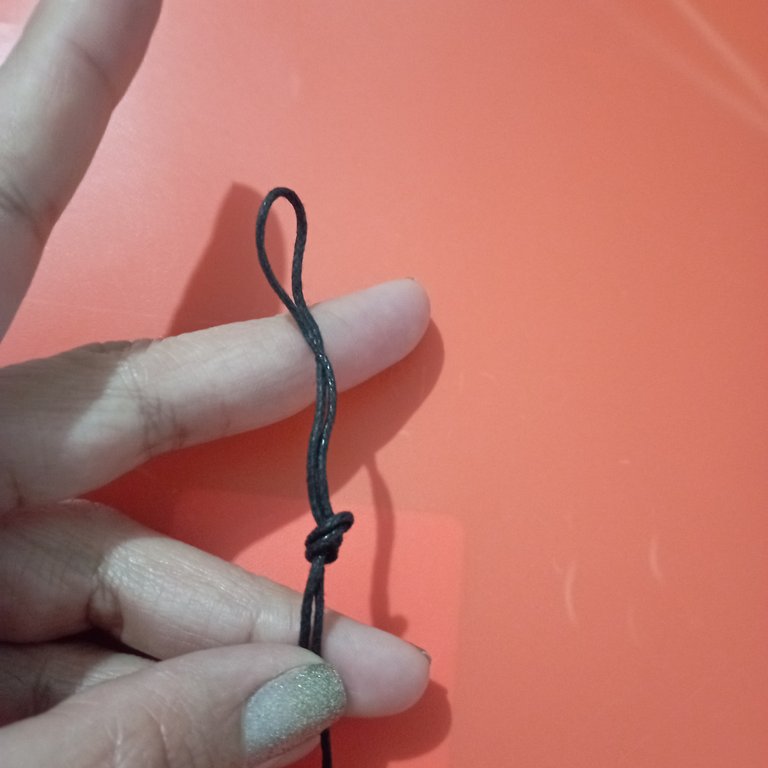
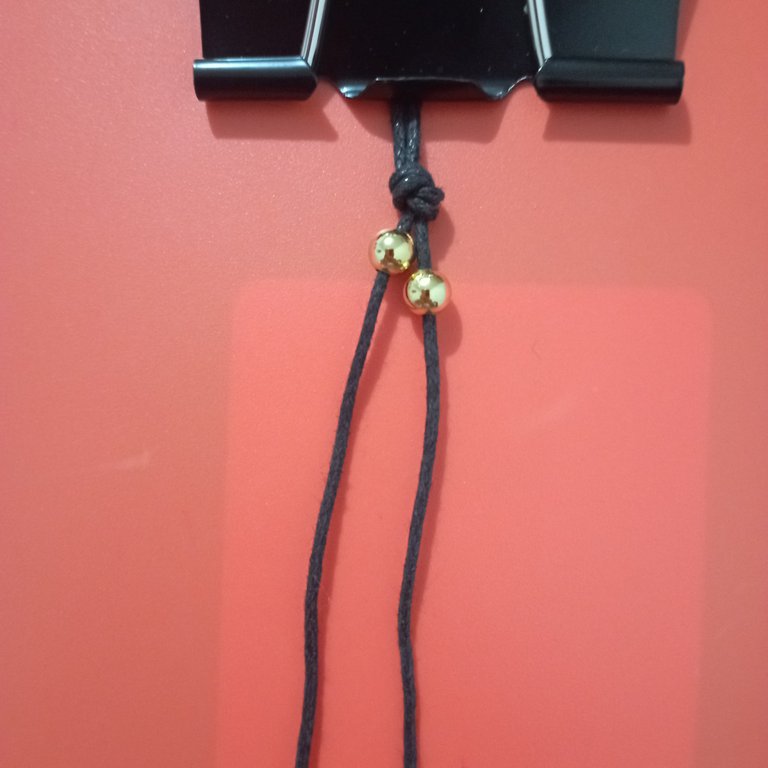
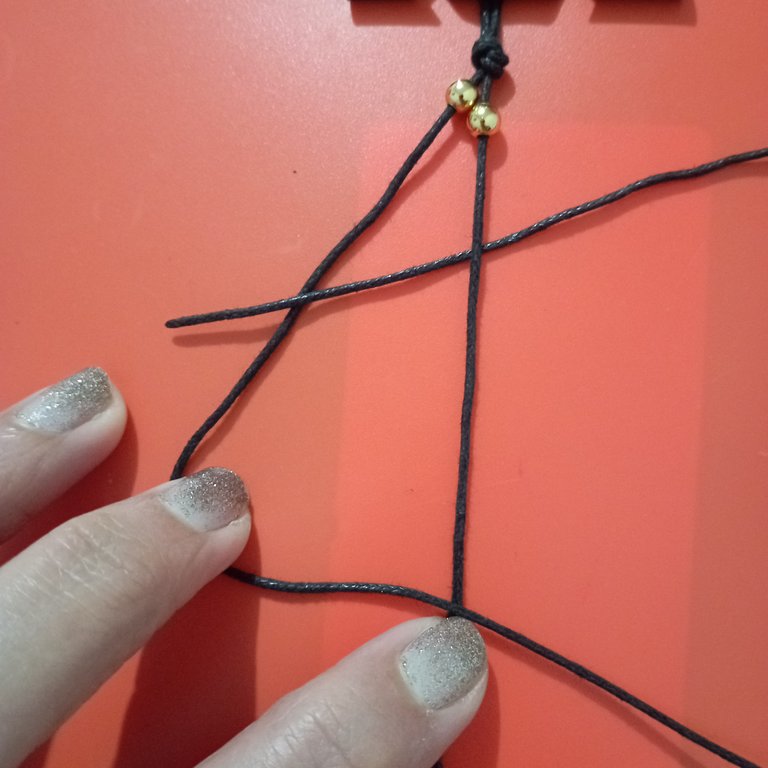
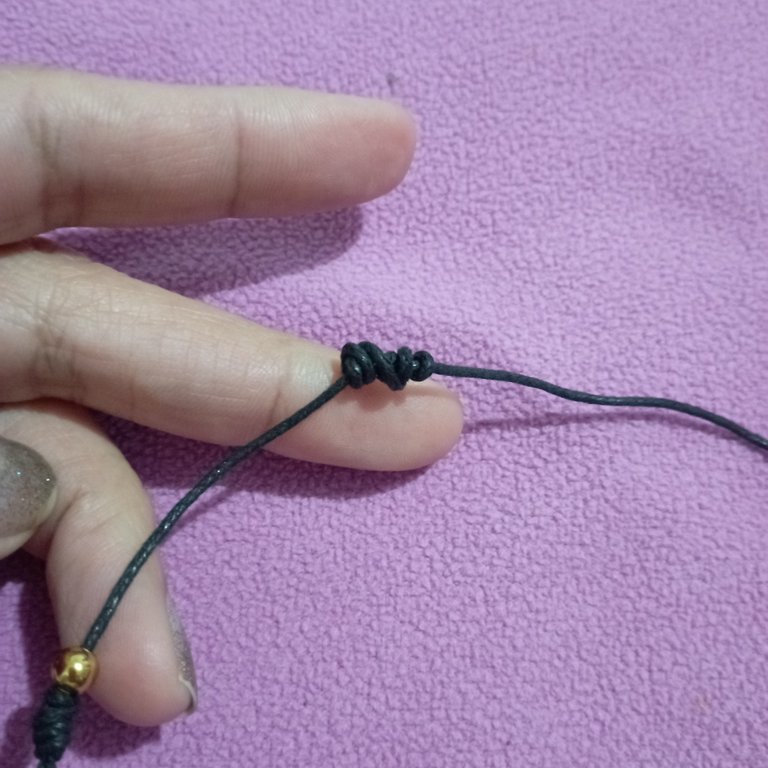
To make the first bracelet we will make the torchon knot. We cut a one meter thread and join the ends to find the middle, and we make a simple knot at 7 centimeters from the end. | Para hacer la primera pulsera realizaremos el nudo torchón. Cortamos un hilo de un metro y unimos los extremos para encontrar la mitad, y hacemos un nudo simple a 7 centímetros del extremo. |

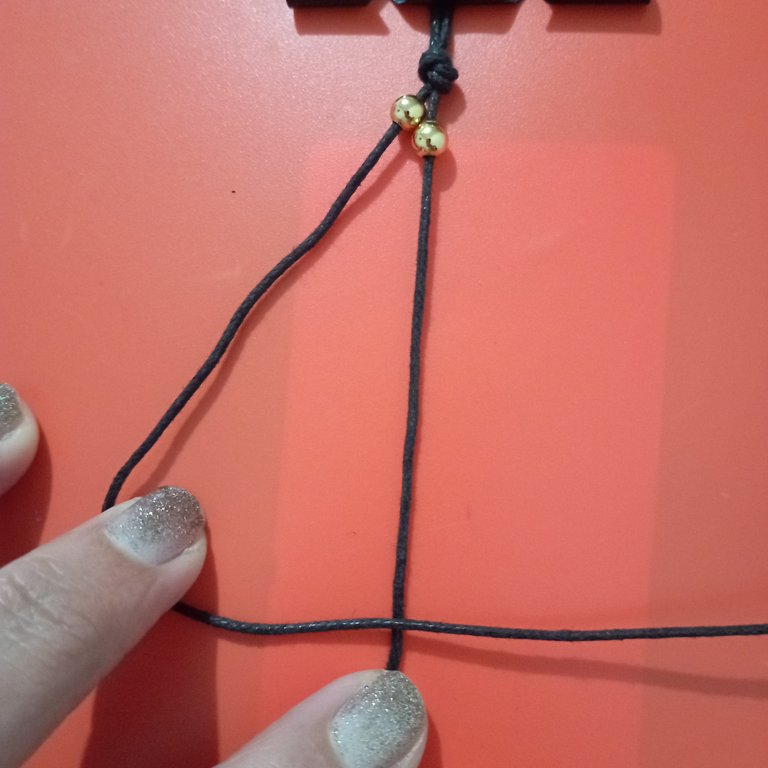
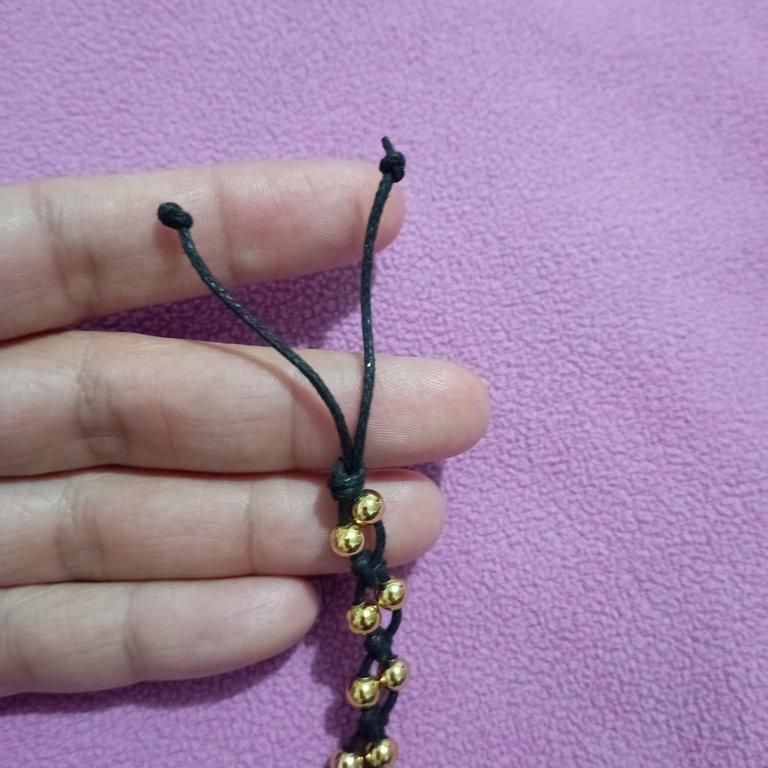
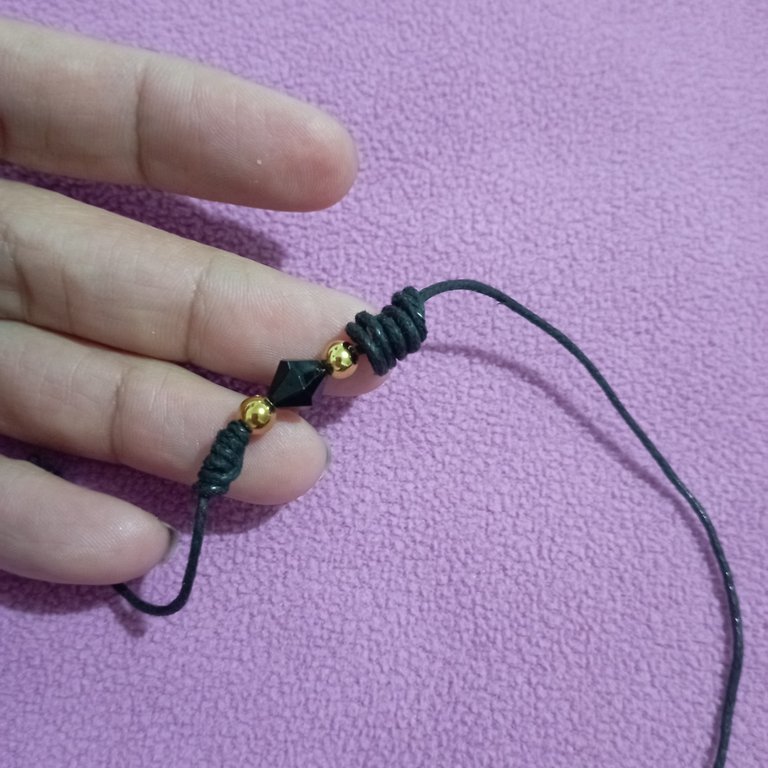
The next thing is to introduce a ball at each end and it is time to make the torchon knot. This knot consists of two parts, we take the left end and make a 4 shape, pass the tip behind the other thread, bring it forward and tighten. Now the second part of the knot, we take the right end and make the same shape, but on the opposite side, passing the thread behind the opposite thread, forward and tighten, as in the image. Something that we must not forget is to start each new knot, always on the same side of the thread that we have started; in this case on the left side. This beautiful knot looks like the figure of number 8. | Lo siguiente es introducir un balín en cada extremo y llegó el momento de hacer el nudo torchón. Este nudo consta de dos partes, tomamos el extremo izquierdo y hacemos una forma de 4, pasamos la punta por detrás el otro hilo, lo traemos hacia adelante y apretamos. Ahora la segunda parte del nudo, tomamos el extremo derecho y hacemos la misma forma, pero del lado contrario, pasando el hilo por detrás del hilo opuesto, hacia adelante y apretamos, tal como en la imagen. Algo que no debemos olvidar es comenzar cada nuevo nudo, siempre del mismo lado del hilo que hemos empezado; en este caso del lado izquierdo. Este bonito nudo queda con la figura de numero 8. |
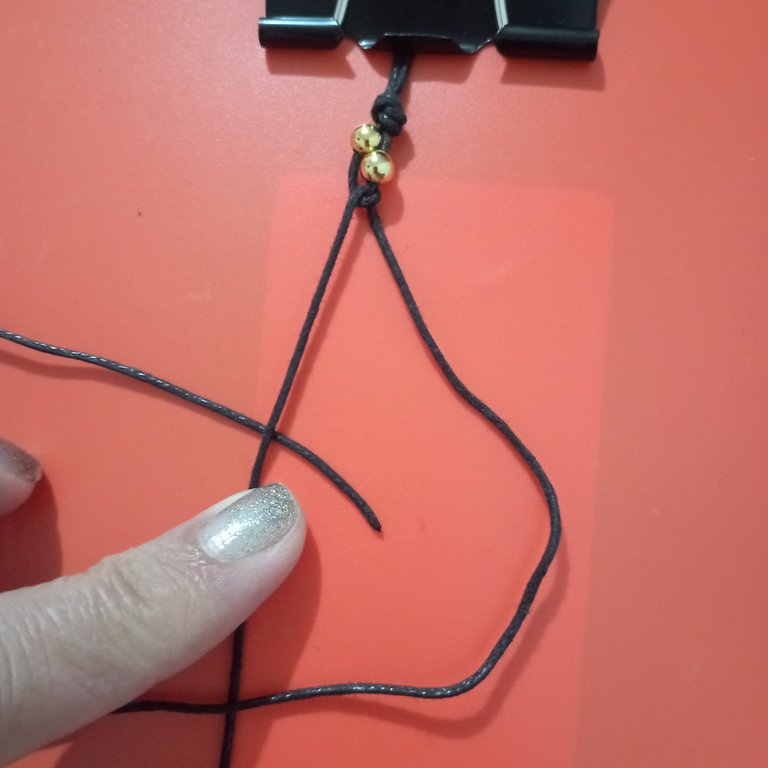
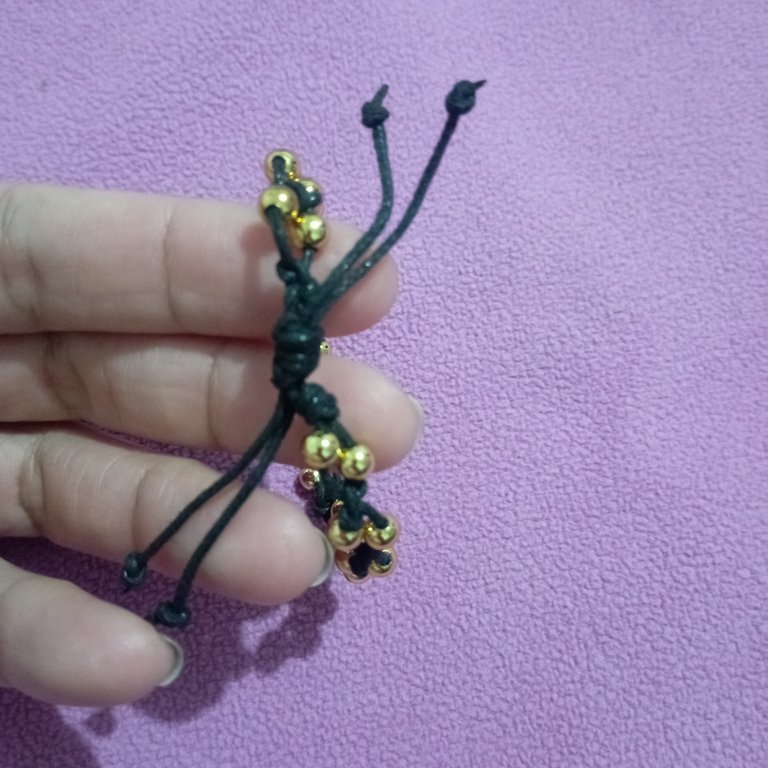
All that remains is to go forward along the entire length until we complete the length we need. Close with a slider and finish off the ends with simple knots. | Solo queda ir avanzando a todo lo largo hasta completar en largo que necesitemos. Cerramos con uno corredizo y rematamos los extremos con nudos simples. |
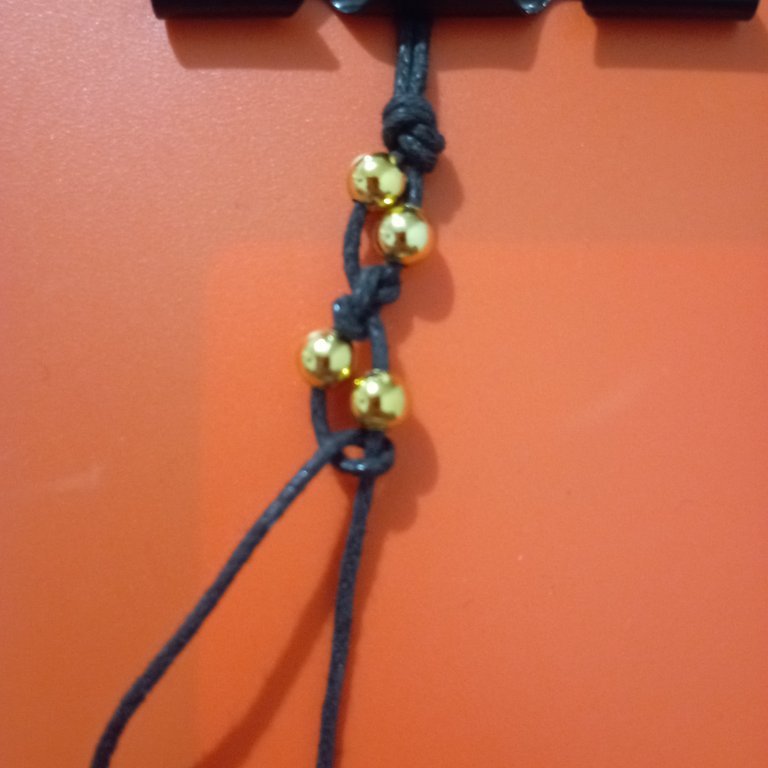
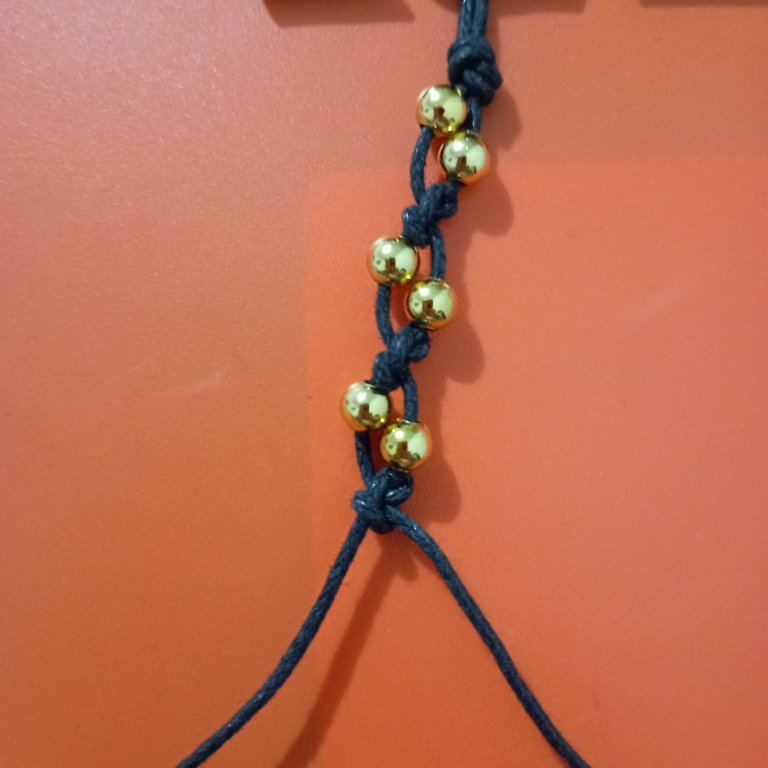
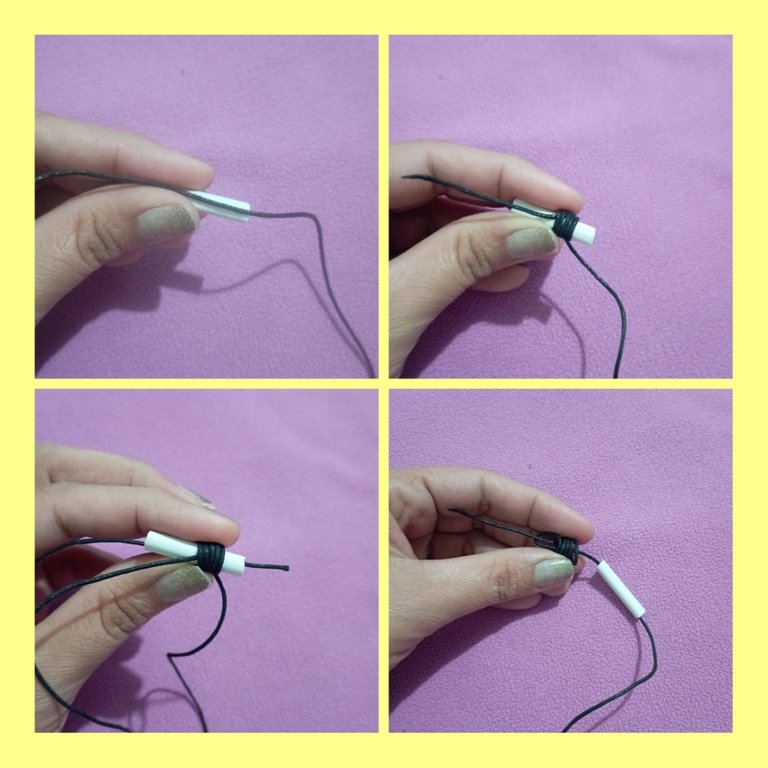
Now we go with the Franciscan knot, for this we are going to use a sorbet, or rather a small piece, maybe about 5 centimeters. We use 1 meter of thread, we place the thread on top of the straw, working from left to right, we take the longest part and make a spiral of six turns around the straw and pass the tip of the end inside the straw from left to right. Now we introduce a golden ball and we have made one of the ends. We measure 7 centimeters from there and we make another Franciscan knot, it may be that the first time we make the knot does not look so nice, but we must adjust the knot little by little and go accommodating the spirals to be aesthetically well. | Ahora vamos con el nudo franciscano, para ello vamos utilizar un sorbete, o mejor dicho un pequeño trozo, quizás unos 5 centímetros. Usamos 1 metro de hilo, colocamos el hilo encima del sorbete, trabajando de izquierda a derecha, tomamos la parte más larga y hacemos un espiral de seis vueltas alrededor del sorbete y pasamos la punta del extremo por dentro del sorbete de izquierda a derecha. Ahora introducimos un balín dorado y hemos realizado uno de los extremos. Medimos 7 centímetros a partir de allí y realizamos otro nudo franciscano, puede ser que la primera vez que hacemos el nudo no nos quede tan bonito, pero hay que ajustando el nudo poco a poco e ir acomodando los espirales para quede estéticamente bien. |
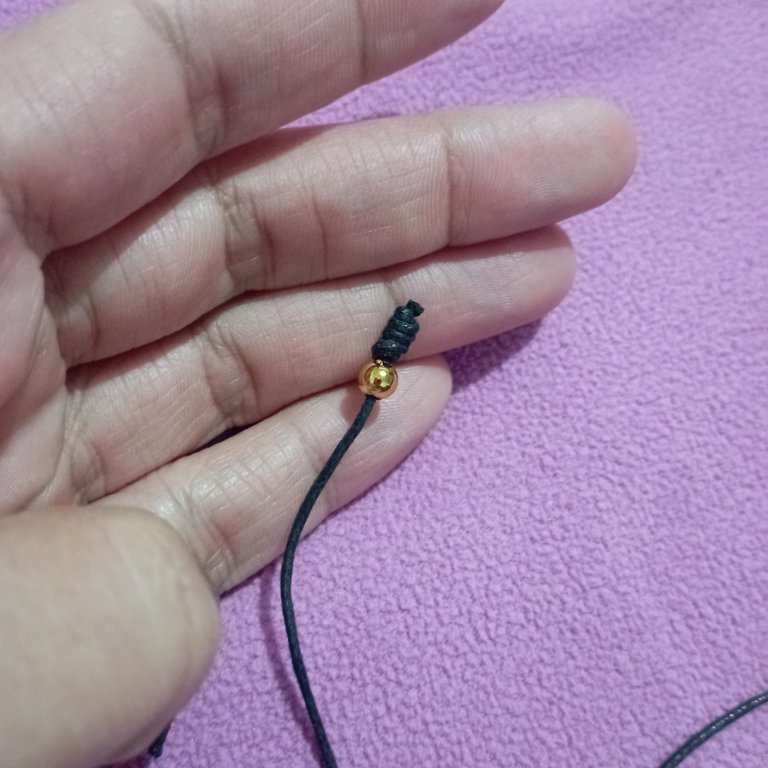
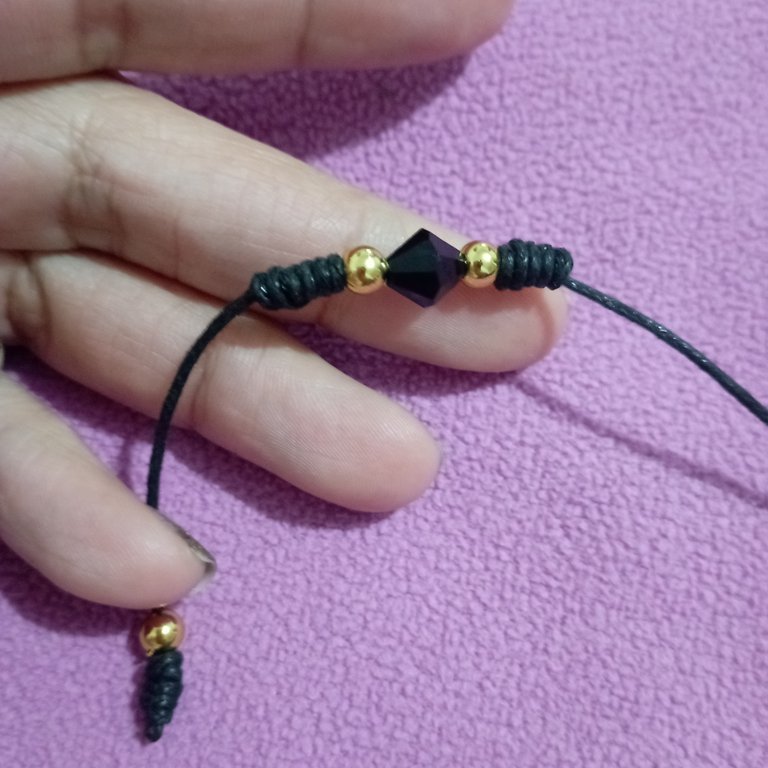
We introduce a bead, a murano and another bead and then another Franciscan knot well attached to the beads so that the stones do not move. We continue along the entire length of the bracelet until we get to where we want. To close the bracelet we make a Franciscan knot. We make the last knot to finish off the other end of the thread and cut the excess. | Introducimos un balín, un murano y otro balín y seguidamente otro nudo franciscano bien pegado a las cuentas de manera que no se muevan las piedras. Seguimos a todo lo largo de la pulsera hasta llegar a dónde deseamos. Para cerrar la pulsera hacemos un nudo franciscano. Hacemos el último nudo para rematar el otro extremo del hilo y cortamos el excedente. |
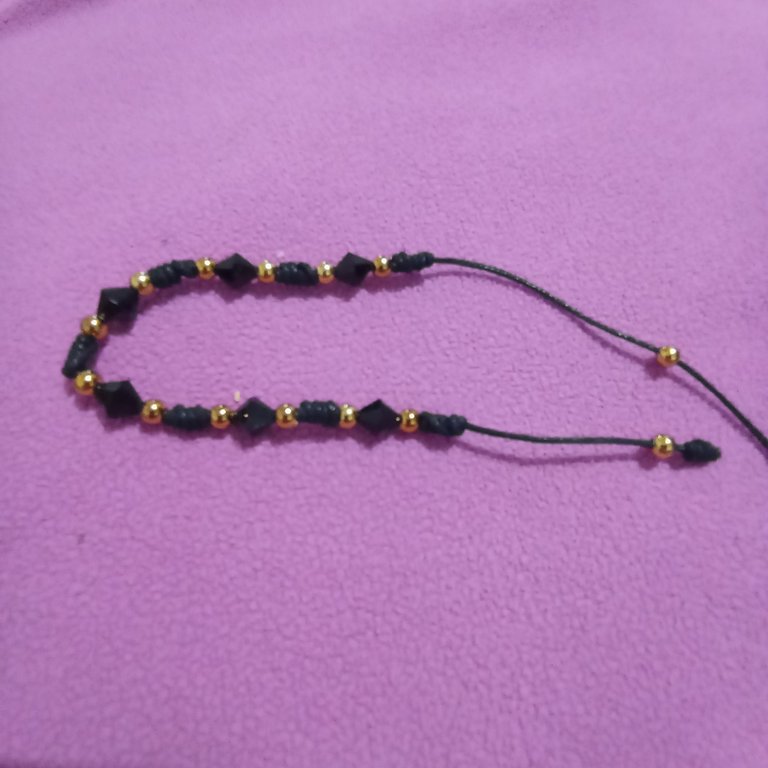
With these two simple but beautiful designs I have shared with you two basic knots to make bracelets and chokers. I had already applied these knots but I didn't know they had these names so personally it has been useful for me to learn the technical names of these knots. I hope you like it. Bye Bye. | Con estos dos sencillos pero bonitos diseños les he compartido dos nudos básicos para hacer pulseras y chokers. Estos nudos ya los había aplicado pero no sabía que tenían estos nombres asi que en lo personal me ha servido aprender los nombres técnicos de estos nudos. Espero les guste. Chao Chao. |

Imágenes editadas en: itshot
Fotos tomadas con Redmi 10
Images edited in: itshot
Photos taken with Redmi 10

I am very grateful for the support. My good wishes to the team.
That is a really beautiful bracelets. They sell same here. Has shiny buttons and all.
Nice work
Oh yeah!!. It would be a good option to start a small business, there are a wide variety of designs.
I really appreciate your comment and visit.
Greetings.
Thank you for sharing this post on HIVE!
Your content got selected by our fellow curator stevenson7 & you just received a little thank you upvote from us for your great work! Your post will be featured in one of our recurring compilations which are aiming to offer you a stage to widen your audience within the DIY scene of Hive. Next time make sure to post / cross-post your creation within the DIYHub community on HIVE and you will receive a higher upvote ;) Stay creative & HIVE ON!
Please vote for our hive witness <3
Nos encanta como quedó la cultura con el nuevo torchon y los balines que siempre le dan vida, además de los cristales, es una pulsera que seguro usaría para todo, pues es versátil y muy bonita, gran tutorial amiga @artsugar
☺️☺️☺️
Oh!!. Que alegría que les guste. Cuánto agradezco el comentarios.
Muchos éxitos es mi deseo para la comunidad.
🙏
Que belleza los dos diseños están hermosos amiga! Me encanta la combinación del negro y dorado..
Gracias mi querida amiga. Que alegría que te gustara.
Muchas bendiciones
Holaaaa feliz tarde, muy linda tu pulsera y muy fácil de hacer me gusta mucho cómo se mira el dorado de las piedras.👍👍👍🍓🍓🍓♥️♥️♥️♥️♥️♥️
Muchísimas gracias.por el comentario y el apoyo.
Bendiciones 🙏
Honestly, it seems to me a delicate and very practical piece, in addition to the fact that the black tone goes with everything or at least that's what my girlfriend says, it would be a perfect gift for this coming Christmas season. excellent design
Well yes... black goes with everything. I would make a nice design for your girlfriend, it would be a pleasure.
Thanks for your kind comment.
Saludos.