ENGLISH VERSION
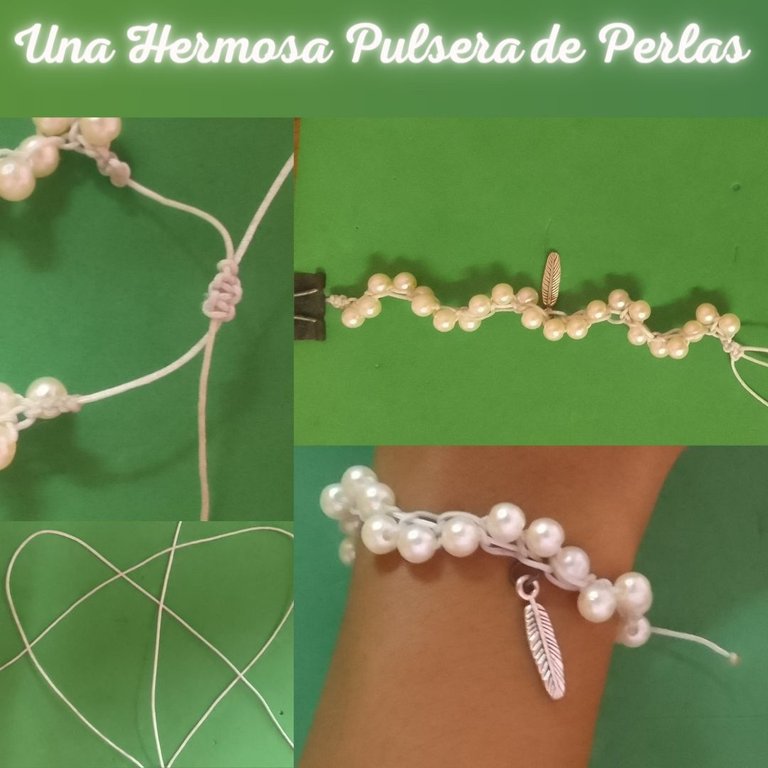
Hello everyone, today I have the pleasure of publishing again in this community and this time I do it with a new craft, a pearl pressing, very easy and simple to do.
MATERIALS
To make this pulsation we only need white Chinese thread, white pearls and a pendant. I already know how to put one in the shape of a feather.
FIRST STEP
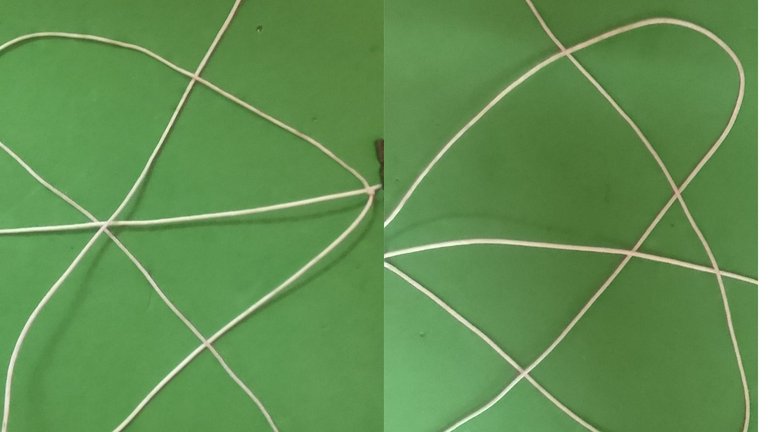
The first thing we are going to do is take the white thread and place a 20 cm piece as the central thread, leaving 5 cm on one side and 5 cm on the other on the sides. We only want the 10 cm that we have left in the center with another thread. . 30 cm white we are going to tie it at the top of the bracelet to start weaving. We are going to tie a knot in such a way that we have 15 cm left on one side and 15 cm on the other. We press firmly so that it does not move and we can begin weaving.
SECOND STEP
We will take the right thread and we will pass it over the central thread leaving a small opening after this we will take the thread from the left side we will pass it over the thread on the right side that remains on the left side then we will pass it under the thread center and finally we are going to take it out through the opening what we did on the right side we press and that is the first step of our flat knot we will do the same with the left side we will take the left thread and we will pass it over the central thread leaving a small opening then we will take the right side we will pass it over the left thread that is towards the side after this we will pass it right under the central thread and we will take it out through the opening that we had made we tighten and our flat knot is done and We perform this procedure once again
THIRD STEP
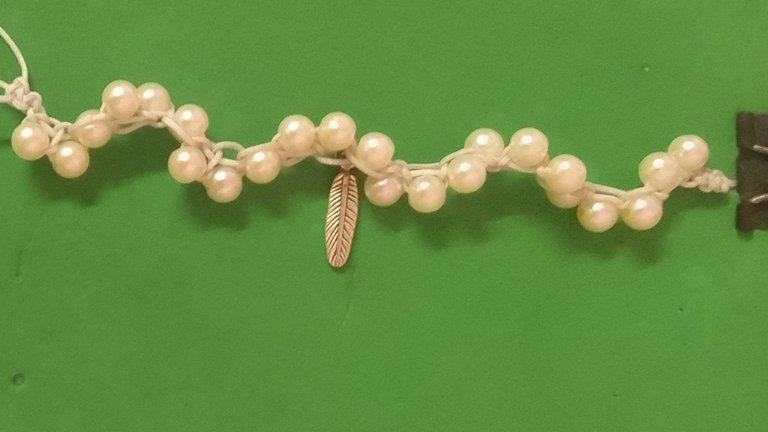
The next thing will be to place the pearls. We are going to take a white pearl and we are going to pass it through the thread that is on the left. We are going to make a flat knot with the previous procedure. Then we are going to take another pearl but this time we will pass it through the thread. center we will do the same we will make a flat stitch to fix it we will take another white Pearl again and we will place it this time on the right side we will make another flat knot to fix it finally we will place another Pearl in the center again and we will fix it with a flat knot we will place as many others pearls more in the same way following the same pattern then we will place the pendant in my case I decided that it would be a feather after having placed the pendant we repeat the same procedure with the pearls making sure to put the same amount of pearl as on the other side to that the bracelet fits us evenly.
FOURTH STEP
To close the pulsate design we are going to make four flat knots again as at the beginning using the same procedure.
FIFTH STEP
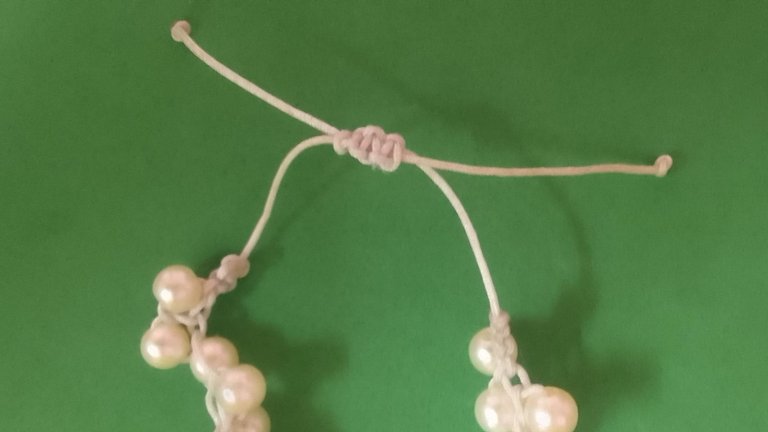
To close, we will place the 5 CM that we had left over in each corner in the shape of a cross and with another piece of white thread we will pass it under the cross which would be our central thread and we will again make two flat knots with the same previous procedure we will take the right side and we will pass it over the cross that would be our central threads leaving a small space on the right side then we will take the thread from the left side and we will pass it over the thread that is in the left side that belongs to the right side then we will pass it under our Cross or our central threads and we will take it out through the small opening we will do the same with the left side we will pass it over the central threads leaving a small space then we will take the right side and we are going to pass it over the left thread that is on the right side then under our central threads in the shape of a cross and we will take it out through the space we left on the left side. We tighten and our flat knot is now forming our closing
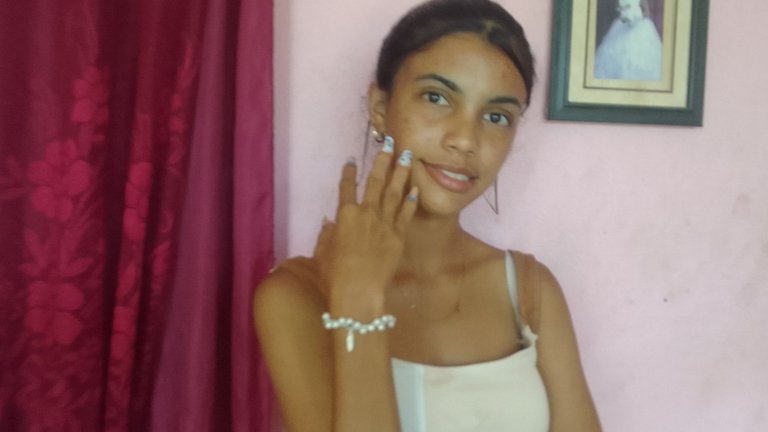
THIS WAS THE RESULT OF MY WORK I HOPE YOU LIKE IT AS MUCH AS I DO. I JUST LEFT TO WISH YOU ALL A HAPPY DAY
The photos were taken by my Samsung Galaxy A 03 Core phone and edited in canva
The text was translated by Deepl
VERSIÓN EN ESPAÑOL
Hola a todos hoy tengo el placer de publicar nuevamente en esta comunidad y esta vez lo hago con una nueva manualidad una pulsa de perlas muy fácil y sencillo de hacer
MATERIALES
Para realizar esta pulsa solo necesitamos hilo chino blanco perlas blancas y un dige yo ya sé de poner uno en forma de pluma
PRIMER PASO
Lo primero que vamos a hacer es tomar el hilo blanco y colocar un pedazo de 20 cm como hilo central dejando a los lados 5 cm de un lado y 5 cm del otro tejeremos solamente los 10 cm que nos quedan en el centro con otro hilo blanco de 30 cm vamos a amarrarlo en la parte superior de la pulsera para comenzar a tejer. Le vamos a hacer un nudo de tal forma que nos quede 15 cm de un lado y 15 cm del otro apretamos fuerte para que no se mueva y ya podemos comenzar el tejido.
SEGUNDO PASO
Tomaremos el hilo derechos y lo vamos a pasar por encima del hilo central dejando una pequeña abertura luego de esto tomaremos el hilo del lado izquierdo lo vamos a pasar por encima del hilo del lado derecho que queda del lado izquierdo luego lo pasaremos por debajo del hilo central y por último lo vamos a sacar por la abertura qué hicimos en el lado derecho apretamos y ya está el primer paso de nuestro nudo plano haremos lo mismo con el lado izquierdo tomaremos el hilo izquierdo y lo vamos a pasar por encima del hilo central dejando una pequeña abertura luego tomaremos el lado derecho lo pasaremos por encima del hilo izquierdo que queda hacia el lado derecho después de esto lo vamos a pasar por debajo del hilo central y lo sacaremos por la abertura que habíamos hecho apretamos y ya está nuestro nudo plano y realizamos este procedimiento una vez más.
TERCER PASO
Los siguientes será colocar las perlas vamos a tomar una perla blanca y la vamos a pasar por el hilo que se encuentra en la izquierda vamos a realizar un nudo plano con el procedimiento anterior luego vamos a tomar otra Perla pero esta vez la pasaremos por el hilo central haremos lo mismo le realizaremos un punto plano para fijarla tomaremos nuevamente otra Perla blanca y la colocaremos esta vez en el lado derecho realizaremos otro nudo plano para fijarla por último colocaremos nuevamente otra Perla en el centro y la fijaremos con un nudo plano colocaremos otras cuántas perlas más de la misma manera siguiendo el mismo patrón luego colocaremos el dige en mi caso yo decidí que fuera una pluma después de haber colocado el dige repetimos el mismo procedimiento con las perlas asegurándonos de poner la misma cantidad de perla que en el otro lado para que nos quede pareja la pulsera.
CUARTO PASO
Para cerrar el diseño de la pulsa vamos a volver a realizar cuatro nudos planos como al principio utilizando el mismo procedimiento.
QUINTO PASO
Para el cierre colocaremos los 5 CM que nos sobraron en cada esquina en forma de cruz y con otro pedazo de hilo blanco lo vamos a pasar por debajo de la cruz la cual sería nuestro hilo central y vamos a realizar nuevamente dos nudos planos con el mismo procedimiento anterior tomaremos el lado derecho y lo vamos a pasar por encima de la cruz que sería nuestros hilos centrales dejando un pequeño espacio en el lado derecho luego tomaremos el hilo del lado izquierdo y lo vamos a pasar por encima del hilo que se encuentra en el lado izquierdo que pertenece al lado derecho luego lo pasaremos por debajo de nuestra Cruz o nuestros hilos centrales y lo sacaremos por la pequeña abertura haremos lo mismo con el lado izquierdo la vamos a pasar por encima de los hilos centrales dejando un pequeño espacio luego tomaremos el lado derecho y le vamos a pasar por encima del hilo izquierdo que se encuentra en el lado derecho luego por debajo de nuestro hilos centrales en forma de cruz y lo sacaremos por el espacio que dejamos en el lado izquierdo apretamos y ya está nuestro nudo plano formando nuestro cierre
ESTE FUE EL RESULTADO DE MI TRABAJO ESPERO QUE LES GUSTE TANTO COMO A MÍ. SOLO ME QUEDA DESEARLES A TODOS UN FELIZ DÍA
Las fotos fueron tomadas por mi teléfono Samsung Galaxy A 03 Core y editadas en canva
El texto fue traducido por Deepl
Such simple and beautiful bracelet. Well done
Thanks
https://reddit.com/r/blogs/comments/1cqhq9o/ua_hermosa_pulsera_de_perlas/
The rewards earned on this comment will go directly to the people( @heidy08 ) sharing the post on Reddit as long as they are registered with @poshtoken. Sign up at https://hiveposh.com.
Amiga que bonita te quedó, buen trabajo ☺️
Gracias amiga 😊😊🪷
Hermosa Pulcera, mis felicitaciones 🌹🌷🌼🪷🥀🪻🌻🌸💮💐🌺☘️
Gracias 🪷💐🌺🌹🌸🌷
Excelente trabajo , me gusta mucho el adorno
Gracias 😊🌹
Congratulations @heidy08! You have completed the following achievement on the Hive blockchain And have been rewarded with New badge(s)
Your next target is to reach 3250 upvotes.
You can view your badges on your board and compare yourself to others in the Ranking
If you no longer want to receive notifications, reply to this comment with the word
STOPCheck out our last posts:
Preciosa pulsera, cada vez quedan más lindas.
Gracias mami 🥰🥰
Simple and beautiful dear