Hello everyone, today I have the pleasure of publishing again from this beautiful #Jewelry community and this time I do it with a simple and beautiful pearl choker that I made to give to my little sister
MATERIALS
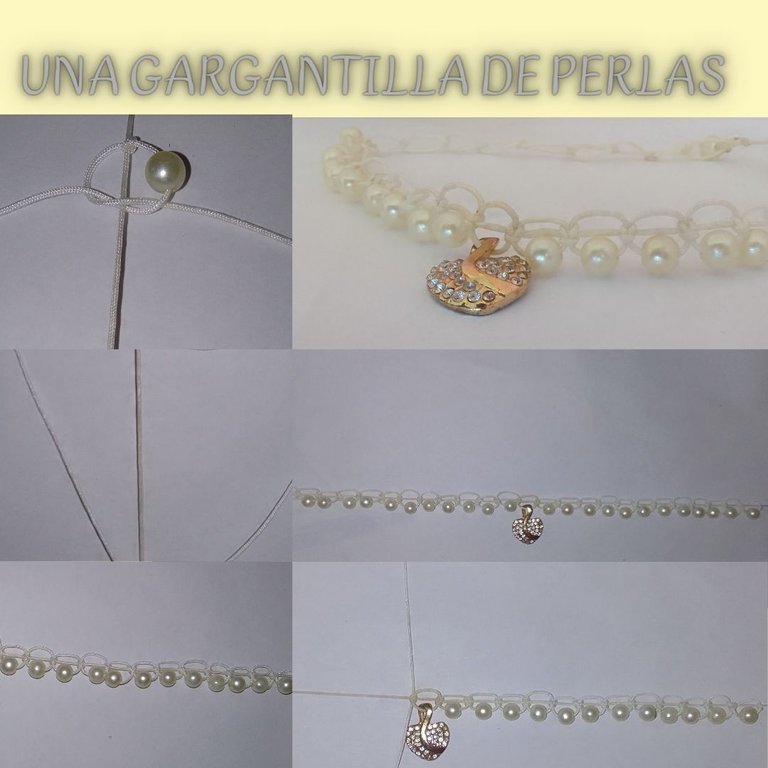
It is very simple and easy to make. To make it, you only need white Chinese thread, 25 white pearls and a heart dige.
FIRST STEP
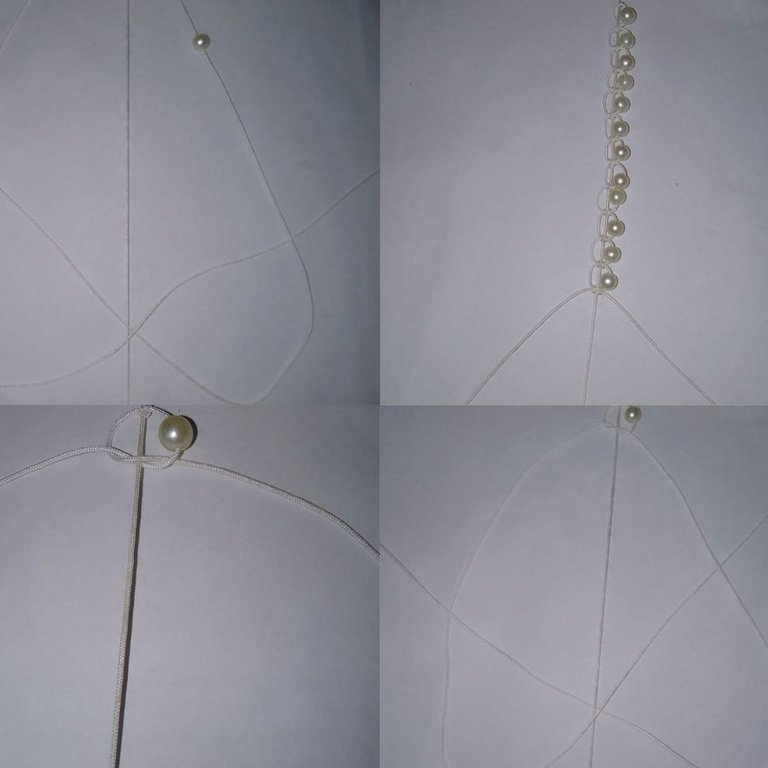
The first thing we are going to do is take a piece of white Chinese thread approximately 15 or 20 cm long and we are going to place it in such a way that it does not move and is well stretched, leaving approximately 3 04 cm on one side, then we are going to take another piece of white Chinese thread of approximately 60 cm and we are going to tie it to our central thread, which is the 15 or 20 cm piece that we placed at the beginning. We are going to tie it in such a way 30 cm from each side of our central thread.
SECOND STEP
Now we start weaving, we are going to take a pearl and we are going to pass it through the 30 cm of thread that we had left from the right thread, then we are going to pass the right thread over the central thread, keeping a part of our thread on the left side, then with The 30 cm from there, what remains on the left side of the center we are going to pass over the end that was on the right side, then under the central thread and we take it out through the space on the right side, we press in such a way that they left a small space As if it were a bubble then we will repeat this procedure but with the left side we are going to take the left side and we are going to pass it over the central thread and we will have one end of the thread on the right side we will take the thread from the right side of the central thread and we are going to go over that end on the left side that was then below the central thread and we are going to take it out again through the space that was left on the left side. This time press yes completely without moving the space that We left it in the first bubble-shaped knot. Always making sure that the pearl remains in the bubble-shaped space.
THIRD STEP
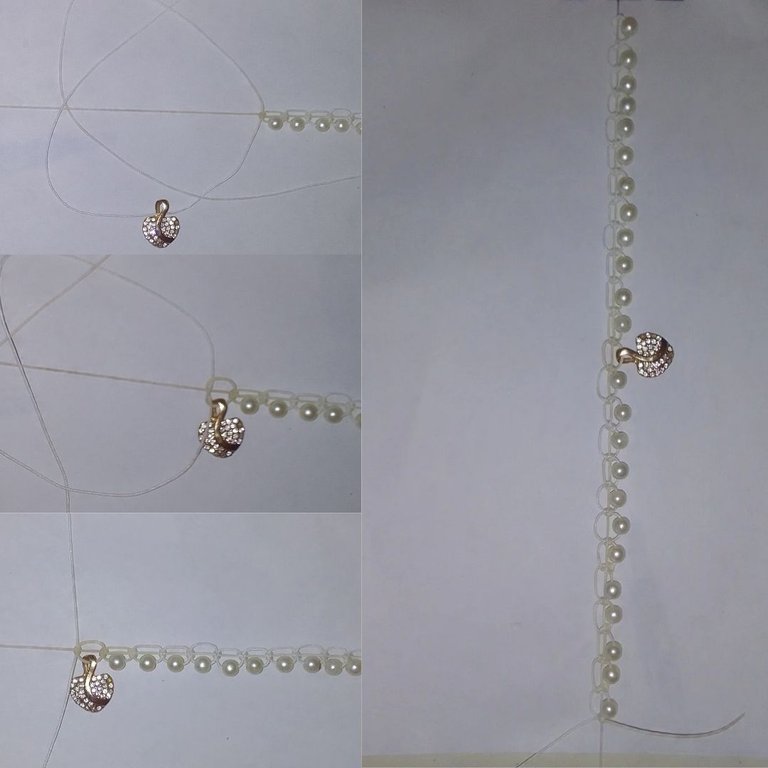
We repeat this procedure 11 more times and then we will place the dige, mine is heart-shaped but you can choose it to your liking. We will place the pendant in the same way that we place the pearls, we will take the right side and we will spend the day then we will pass the thread on the right side where our DJ is above the central thread, leaving a space on the left side then the thread from the left side we are going to pass it over the right one that was left on that side we will pass it again under the central one and we are going to take it out through the space that was left on the right side we are going to press slowly so that the bubble does not come out and be careful that he says he stays inside the bubble. To finish the pearl choker we are going to repeat the first procedure, we will place 12 more pearls in the same way as in the first step.
FOURTH STEP
To finish the choker we are going to make a closure with the 3 or 4 cm that we left at the beginning on one side. We are going to make a new section of the fabric. We are going to pass a pearl and then we will tie another knot making sure that the Pearl does not move. On the other side of the fabric in the last bubble we are going to take another piece of thread of approximately 20 cm and we are going to pass it through the last bubble, leaving 10 cm on each side. Then we will make a knot but without reaching the bubble, leaving another small bubble. We will make another knot so that the bubble we made does not come loose and we will continue making small bubbles in this same way until the thread runs out and it will make the closure of my pearl choker.
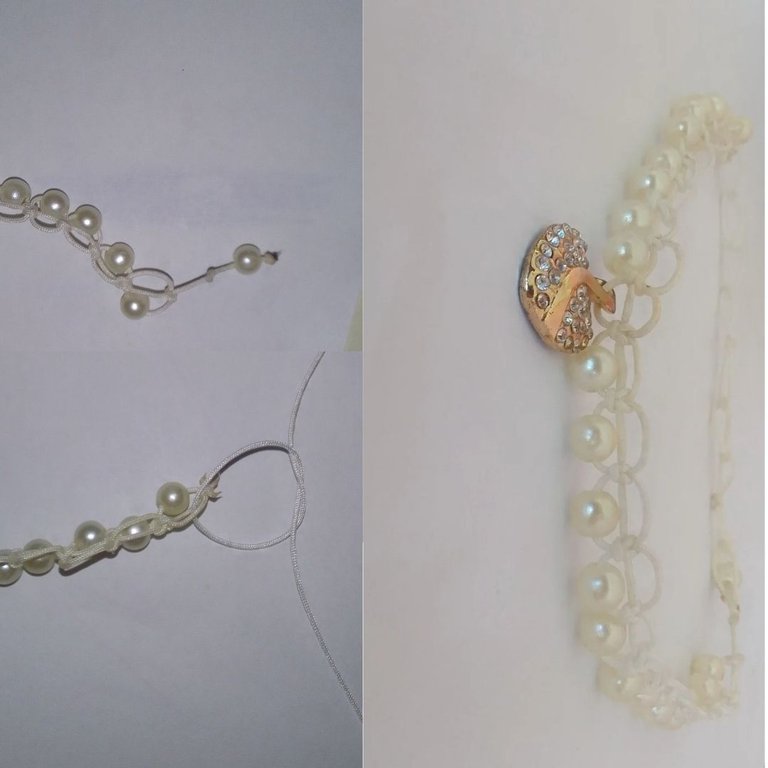
This was the result of my work, I hope you like it. Just wishing you all a happy day
The photos were taken by my Samsung Galaxy A 03 Core phone and edited in canva
The text was translated by Deepl
VERSIÓN EN ESPAÑOL
Hola a todos hoy tengo el placer de publicar nuevamente en esta hermosa comunidadde #Jewelry y esta vez lo hago con una sencilla y hermosa gargantilla de perlas qué hice para regalarle a mi hermana menor
MATERIALES
Es muy sencilla y fácil de hacer para hacerla solo se necesita hilo chino blanco 25 perlas blancas y un dige de corazón.
PRIMER PASO
Lo primero que vamos a hacer es tomar un pedazo de hilo chino blanco de aproximadamente unos 15 o 20 cm y lo vamos a colocar de tal manera que no se mueva y quede bien estirado dejando de un lado aproximadamente 3 o 4 cm luego vamos a tomar otro pedazo de hilo chino blanco de aproximadamente 60 cm y lo vamos a amarrar a nuestro hilo central que es el pedazo de 15 o 20 cm que colocamos al principio vamos a amarrarlo de tal forma que queden 30 cm de cada lado de nuestro hilo central.
SEGUNDO PASO
Ahora sí comenzamos a tejer vamos a tomar una perla y la vamos a pasar por los 30 cm de hilo que nos quedaron del lado derecho luego vamos a pasar el hilo derecho por encima del hilo central quedándonos una parte de nuestro hilo derecho del lado izquierdo luego tomamos el hilo del lado izquierdo del hilo central y lo vamos a pasar por encima del extremo que quedó del lado derecho luego por debajo del hilo central y lo sacamos por el espacio del lado derecho apretamos de tal manera que dejaron un pequeño espacio Como si fuese una burbuja luego repetiremos este procedimiento pero con el lado izquierdo vamos a tomar el lado izquierdo y lo vamos a pasar por encima del hilo central y nos va a quedar un extremo del hilo en el lado derecho tomaremos el hilo del lado derecho del hilo central y vamos a pasar por encima de ese extremo del lado izquierdo que nos quedó luego por debajo del hilo central y lo vamos a sacar nuevamente por el espacio que nos quedó en el lado izquierdo apretamos esta vez sí completo sin mover el espacio que nos quedó en el primer nudo en forma de burbuja.Siempre asegurándonos de que la perla quede en el espacio en forma de burbuja.
TERCER PASO
Repetimos este procedimiento 11 veces más y luego colocaremos el dige el mío es en forma de corazón pero ustedes pueden elegirlo a su gusto. El dige lo colocaremos de la misma manera que colocamos las perlas vamos a tomar el lado derecho y vamos a pasar el día luego pasaremos el hilo del lado derecho en donde está nuestro dige por encima del hilo central quedando un espacio en el lado izquierdo luego el hilo del lado izquierdo lo vamos a pasar por encima del derecho que quedó de ese lado le pasaremos nuevamente por debajo de la central y lo vamos a sacar por el espacio que nos quedó en el lado derecho vamos a apretar lentamente para que no salga la burbuja y con cuidado de que él dige quede dentro de la burbuja. Para terminar la gargantilla de perlas vamos a repetir el primer procedimiento colocaremos 12 perlas más de la misma forma que en el primer paso.
CUARTO PASO
Para terminar la gargantilla vamos a hacerle un cierre con los 3 o 4 cm que dejemos al principio de un lado vamos a hacerle un nudo apartado del tejido vamos a pasar una perla y luego le haremos otro nudo asegurándonos de que la Perla no se mueva. Del otro lado del tejido en la última burbujitas vamos a tomar otro pedazo de hilo de aproximadamente 20 cm y lo vamos a pasar por la última burbuja quedándome de cada lado 10 cm luego haremos un nudo pero sin llegar a la burbuja quedándonos así otra pequeña burbuja haremos otro nudo para que no se safe la burbuja que hicimos y seguiremos haciendo pequeñas burbujas de esta misma forma hasta que se termine el hilo y este va a hacer el cierre de mi gargantilla de perlas.
Este fue el resultado de mi trabajo espero que les guste. Solamente me queda desearles a todos un feliz día
Las fotos fueron tomadas por mi teléfono Samsung Galaxy A 03 Core y editadas en canva
El texto fue traducido por Deepl
The rewards earned on this comment will go directly to the people( @heidy08 ) sharing the post on Reddit as long as they are registered with @poshtoken. Sign up at https://hiveposh.com.https://reddit.com/r/blogs/comments/1cvn0ns/una_garantía_de_perlas/
Lindo trabajo, las perlas siempre adornan mucho. Además tiene mucho más valor porque fue realizado para tu perla más linda, tu hermana. Dios las mantenga siempre unidas. Las amo.
Gracias mami 🥰🥰
Se ve muy bonita la gargantilla con el tejido, las perlas siempre dan ese gran toque, muy hermoso trabajo.
Gracias 😊💐🌹🪷💐🌺🌷🌺
Un lindo y tierno trabajo, nos encanta como fuiste reinando el tejido poco a poco y que no es totalmente cerrado, el dije central le da un hermoso toque.
Gracias 😊💐🌹
Hermoso trabajo 🌹🌷🌼🥀💐💮🌸🌻☘️😍
Gracias 😊💐🌷🌺🌹🪷🌺
!discovery 35
This post was shared and voted inside the discord by the curators team of discovery-it
Join our Community and follow our Curation Trail
Discovery-it is also a Witness, vote for us here
Delegate to us for passive income. Check our 80% fee-back Program
Quedó demasiado hermosa y elegante. Me gustó mucho cómo explicaste cada paso de manera sencilla, muy comprensible para poder hacer una ✨
Congratulations @heidy08! You have completed the following achievement on the Hive blockchain And have been rewarded with New badge(s)
Your next target is to reach 4000 upvotes.
You can view your badges on your board and compare yourself to others in the Ranking
If you no longer want to receive notifications, reply to this comment with the word
STOP