ENGLISH VERSION
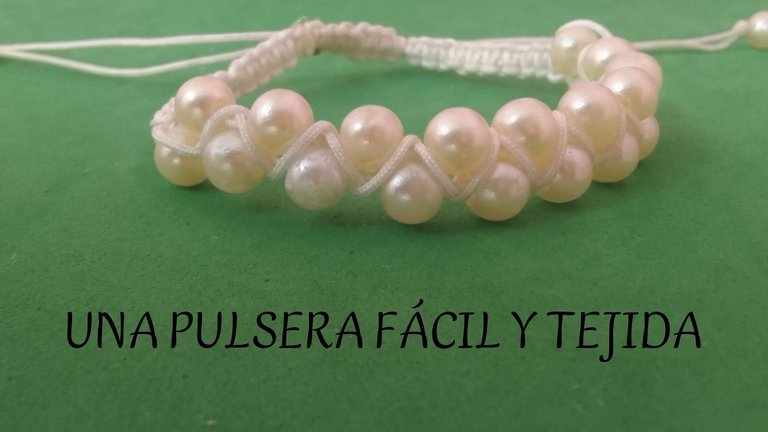
Hello everyone, today I have the pleasure of posting again in this #Jewelry community and this time I do it with a very easy way to make a woven pearl bracelet.
MATERIALS
For this we are going to need a meter of white Chinese thread 12 white pearls (this depends on the size you want it)
We are going to take the meter of Chinese thread and we are going to cut it into 3 parts: 1 of 10cm, one of 30cm and one of 60cm.
FIRST STEP
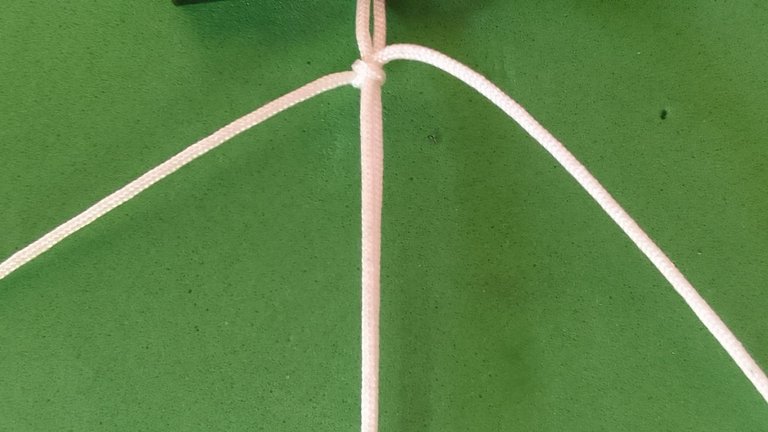
We will take the 30 cm piece of thread and fold it in half, leaving two pieces of 15 cm and we will put it in the stretched center with the 60 cm piece of thread, we will pass it under the stretched 30 cm thread and secure them Once it is in the center, we will tie a knot, leaving 30 cm of white Chinese thread on the right and 30 cm of white Chinese thread on the left. With everything in place, we will begin to knit.
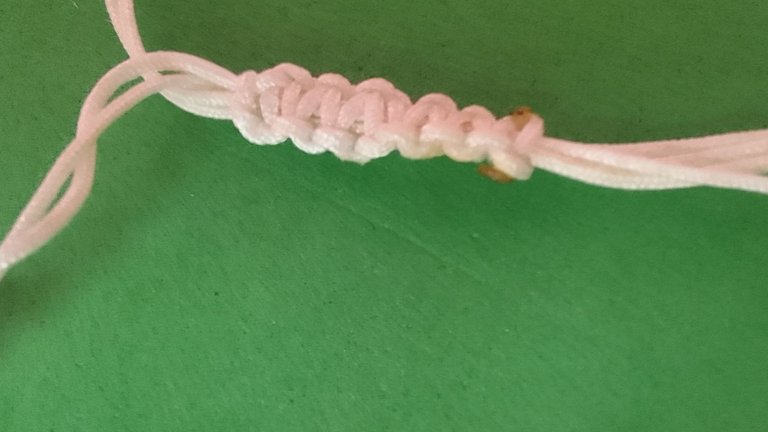
SECOND STEP
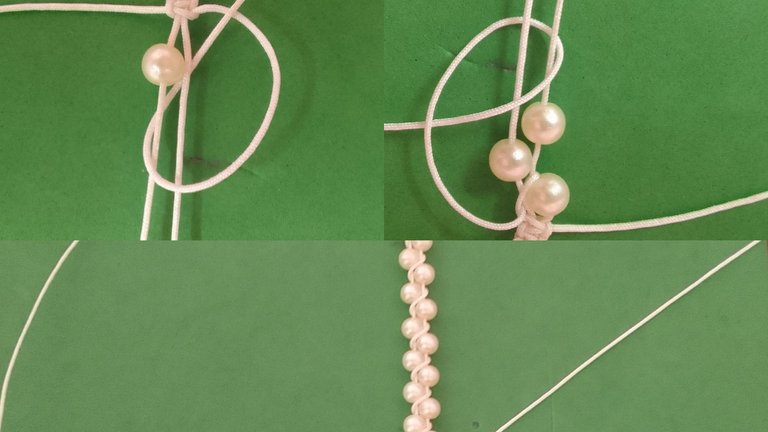
We take the 30 cm of white thread that is on the right and we are going to pass it, leaving a space above the central thread with the 30 cm of white Chinese thread that is on the left, we are going to pass it over the Chinese thread of the right passing it under the central thread and we take it out through the space that was left on the right. We repeat this procedure but this time with the left side we are going to take the thread from the left side and we are going to pass it over the central thread and with We are going to pass the thread on the right over the left thread below the central thread and we take it out through the space that was left on the left side. We tighten it and our flat knot is done. We will do several repetitions until we reach approximately five or six knots.

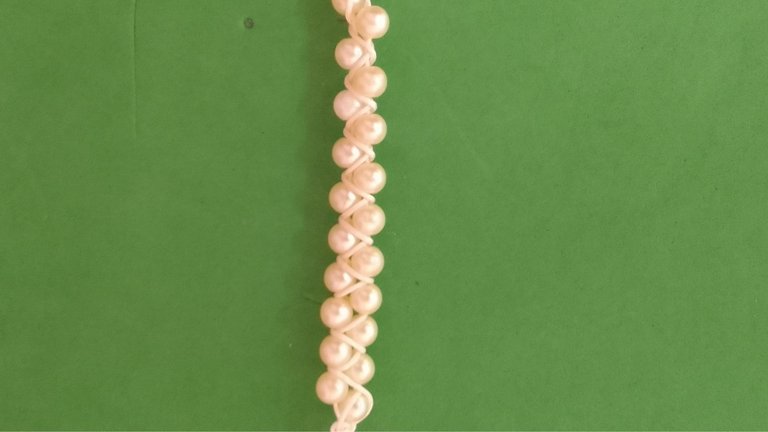
THIRD STEP
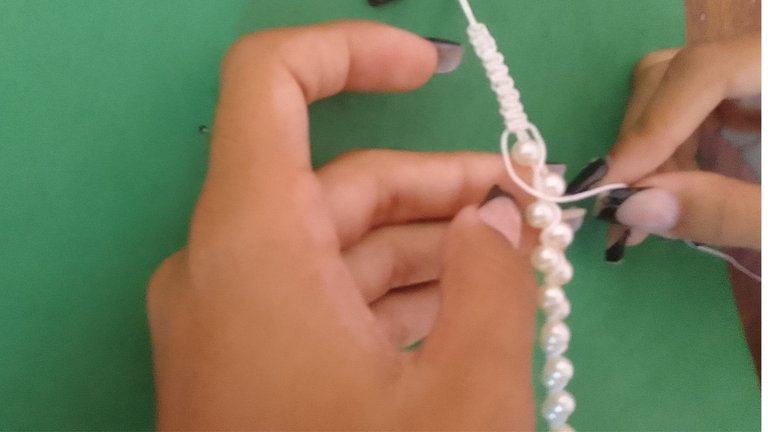
To make the part of the woven pearls, we are going to place 10 pearls on the central threads, five on each side. With the thread that is on the left, we are going to begin to tangle it between the 10 pearls after having twisted the thread on the left in all of them. For the pearls we will carry out the same procedure with the thread that is on the right. And we tie a knot to fix

FOURTH STEP
To finish our pulsa we are going to knit again as we did at the beginning with the flat knot procedure, we take the thread that is on the right and we are going to pass it over the central thread with the thread that is on the left we are going to Pass it over the right thread below the central thread and take it out through the space on the right. We carry out this procedure again with the left thread. We pass it over the central thread, leaving a space with the right thread. We pass it over it. of the left thread below the central thread and we take it out through the space we left on the left. We repeat this procedure several times until we have tied five or six knots, the same amount that we did on the other side.
To make the closure of our pulse we are going to take the two ends of the central thread that we left unwoven, we are going to place it in the shape of an Below the two threads forming an We pass the left thread over the right thread below the central threads and take it out through the space on the right. We repeat this same procedure with the left side. We take the left side and we pass it over the central ones. The right thread passes it over. We go over the left side below the central threads and take it out through the space we left on the left side. We repeat this procedure once again and our closure is done.
This was the result of my work, I hope you like it. I just have to wish you all a happy day.

The photos were taken by my Samsung Galaxy A 03 Core phone and edited in canva
The text was translated by Deepl
VERSIÓN EN ESPAÑOL
Hola a todos hoy tengo el placer de publicar nuevamente en esta comunidad de #Jewelry y esta vez lo hago con una forma muy fácil de hacer una pulcera tejida con perlas.
MATERIALES
Para esta vamos a necesitar un metro de hilo chino blanco 12 perlas blancas (esto depende del tamaño que la quieras)
Vamos a tomar el metro de hilo chino y vamos a cortarlo en 3 partes 1 de 10cm una de 30cm y una de 60
PRIMER PASO
Tomaremos el pedazo de hilo de 30 cm y lo doblamos a la mitad quedándonos hacia dos pedazos de 15 cm y lo pondremos en el centro estirado con el pedazo de hilo de 60 cm lo vamos a pasar por debajo del hilo de 30 cm estirado y asegurándolos de que quede en el centro le haremos un nudo quedándonos así 30 cm de hilo chino blanco a la derecha y 30 cm de hilo chino blanco a la izquierda con todo puesto en su lugar comenzaremos a tejer.
SEGUNDO PASO
Tomamos Los 30 cm de hilo blanco que se encuentran a la derecha y lo vamos a pasar dejando un espacio por encima del hilo central con Los 30 cm de hilo chino blanco que se encuentra a la izquierda lo vamos a pasar por encima del hilo chino de la derecha pasando este por debajo del hilo central y lo sacamos por el espacio que quedó en la derecha repetimos este procedimiento pero esta vez con el lado izquierdo vamos a tomar el hilo del lado izquierdo y lo vamos a pasar por encima del hilo central y con el hilo de la derecha lo vamos a pasar por encima del hilo izquierdo por debajo del hilo central y lo sacamos por el espacio que nos quedó en el lado izquierdo apretamos y ya está nuestro nudo plano haremos varias repeticiones hasta alcanzar aproximadamente cinco o seis nudos
TERCER PASO
Para hacer la parte de las perlas tejidas vamos a colocar por los hilos centrales 10 perlas cinco de cada lado con el hilo que se encuentra en la izquierda vamos a comenzar a enredarlo entre las 10 perlas después de haber enredado el hilo de la izquierda en todas las perlas realizaremos el mismo procedimiento con el hilo que se encuentra en la derecha.Y hacemos un nudo para fijar
CUARTO PASO
Para terminar nuestra pulsa vamos a volver a tejer como lo hicimos al principio con el procedimiento del nudo plano tomamos el hilo que se encuentra en la derecha y lo vamos a pasar por encima del hilo central con el hilo que se encuentra en la izquierda vamos a pasarlo por encima de lo de la derecha por debajo del hilo central y lo sacamos por el espacio de los derechos realizamos este procedimiento nuevamente con el hilo izquierdo lo pasamos por encima del hilo central dejando un espacio con el hilo de la derecha lo pasamos por encima del hilo de la izquierda por debajo del hilo central y lo sacamos por el espacio que dejamos en la izquierda. Repetimos este procedimiento varias veces hasta haber hecho cinco o seis nudos la misma cantidad que hicimos del otro lado
QUINTO PASO
Para hacer el cierre de nuestra pulsa vamos a tomar los dos extremos de hilo central qué dejamos sin tejer lo vamos a colocar en forma de x y con los 10 cm de hilo blanco que habíamos separado al principio vamos a tejer el nudo plano lo vamos a pasar por debajo de los dos hilos formando una x vamos a hacer un nudo para fijar y no se mueva del lugar y comenzamos a tejer con el hilo derecho lo vamos a pasar por encima de los hilos centrales que serían los que están en forma de x y con el hilo izquierdo lo pasamos por encima del hilo derecho por debajo de los hilos centrales y lo sacamos por el espacio que hay en la derecha repetimos este mismo procedimiento con el lado izquierdo tomamos el lado izquierdo lo pasamos por encima de los centrales el hilo derecho lo pasamos por encima del lado izquierdo por debajo de los hilos centrales y lo sacamos por el espacio que dejamos en el lado izquierdo repetimos una vez más este procedimiento y ya está nuestro cierre
Este fue el resultado de mi trabajo espero que les guste . Solo me queda desearles a todos un feliz día
Las fotos fueron tomadas por mi teléfono Samsung Galaxy A 03 Core y editadas en canva
El texto fue traducido por Deepl
Te quedó muy bonita la pulsera, me gusta mucho en ese color blanco, luce muy delicada y hermosa.
Feliz dia!
Gracias 😊😊💐
https://reddit.com/r/blogs/comments/1cg0se9/una_pulsera_fácil_y_tejida/
The rewards earned on this comment will go directly to the people( @heidy08 ) sharing the post on Reddit as long as they are registered with @poshtoken. Sign up at https://hiveposh.com.
Congratulations @heidy08! You have completed the following achievement on the Hive blockchain And have been rewarded with New badge(s)
Your next target is to reach 3000 upvotes.
You can view your badges on your board and compare yourself to others in the Ranking
If you no longer want to receive notifications, reply to this comment with the word
STOPCheck out our last posts:
Linda pulsera tejida a macrame y las perlas se ven lindas como sabe las perlas no pasa de moda y son muy elegante.
Gracias 😊🌹🌹
Linda pulsera, estas hecha toda una artesana mi reina, felicidades.
Gracias mami 🥰🥰
Hermoso trabajo , felicidades 🌹🌷🌸💮🥀🥀🌻🌺💐🌼☘️