(ESP)
Hello everyone, I hope you are feeling very well, full of well-being. Today I stop by @jewelry, to show a very simple and beautiful step by step. This time inspired by the beautiful girls, who brighten our homes. I will show you a very simple step by step how to make a headband, which you will surely like and will make you feel very pampered and pretty. Ideal to use anytime, anywhere. I have made this one in particular, to make a gift, in the next few days. For them, use useful material and a great touch of jewelry. So the invitation is to follow me until the end, everyone is welcome to my blog.
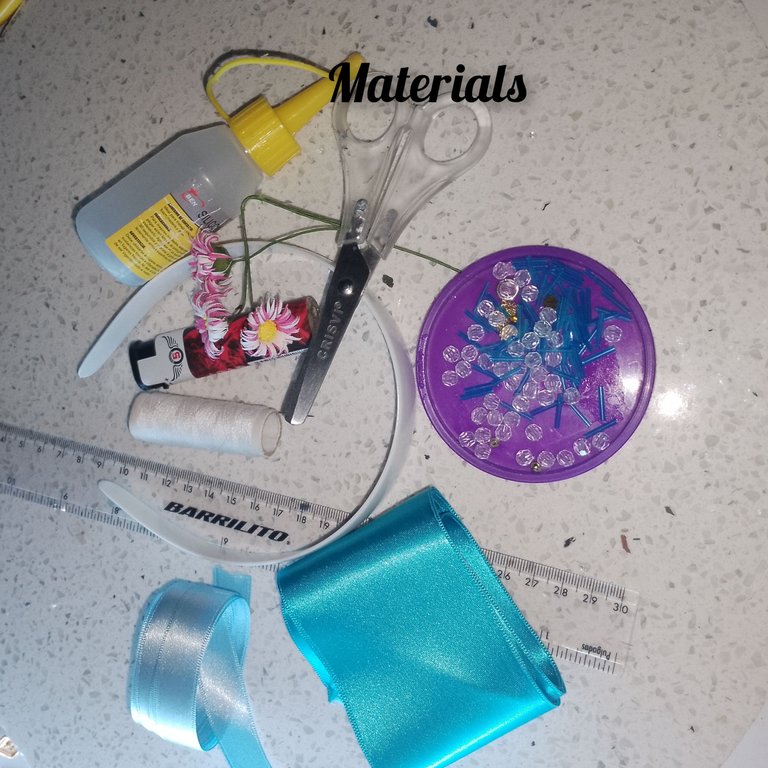
Materials:
. Blue silk ribbon 6cm wide.
. Thin blue ribbon.
. Plastic headband.
. Crystals.
. Blue eclairs.
. Needle and thread.
. Glue.
. Marking rule.
. Pins.
. Yeskero.
. Scissors . Miniature fuchsia flowers.
Steps:
1.) I mark with the ruler 4.5cm high on the thick tape, and make 8 doubles, to avoid these I can place pins. After marking, with the scissors I cut and separated each piece, I will need eight pieces of ribbon of equal size for each flower.
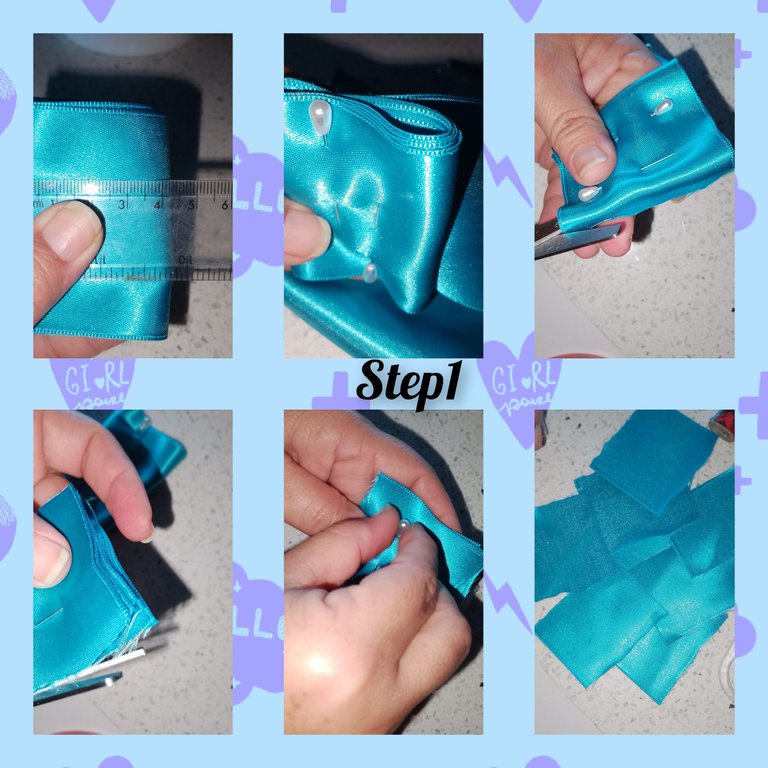
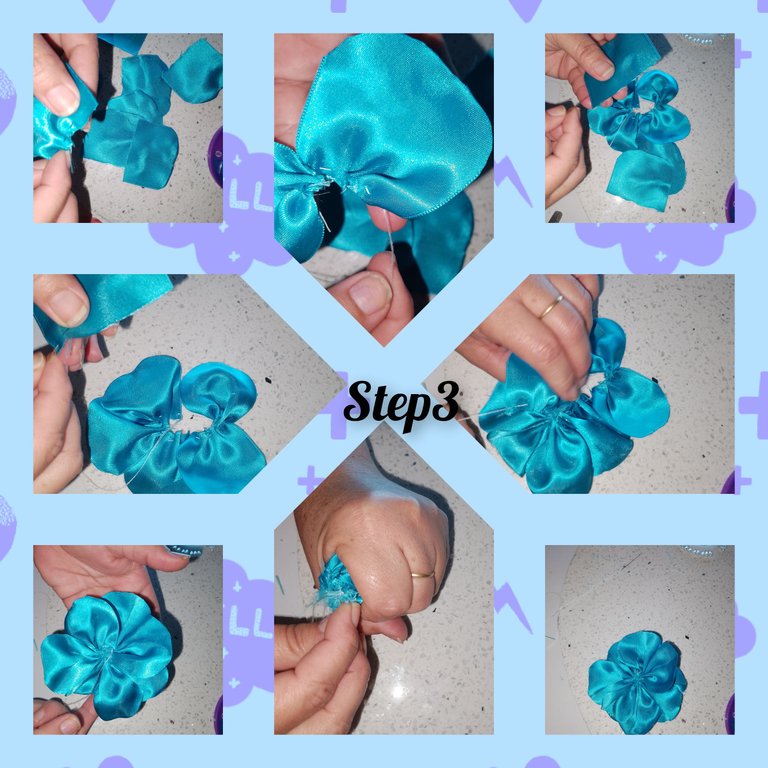
2.) ready the pieces or pieces of tape, I round one of the ends and place a little fire, in the part cut from the tape, then I start to put a little fire, with the tinderbox on the bottom, of This way I give more shape to each of the petals.
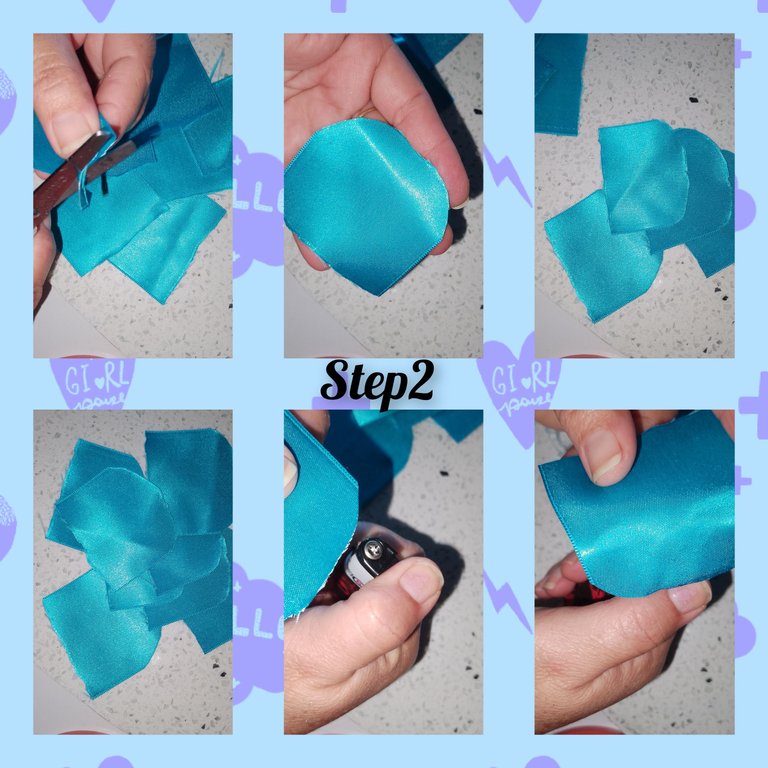
3.) With the needle and thread, I begin to stitch, not so far apart on each petal on the straight side, in this way one followed by the other, I put together 8 petals, winged the thread a little and joined them to form a nice and delicate flower. I finish off the back of the flower, cut the thread, and place a little fire.
4.) I put a little glue in the center of the ribbon flower and put the commercial mini flower.
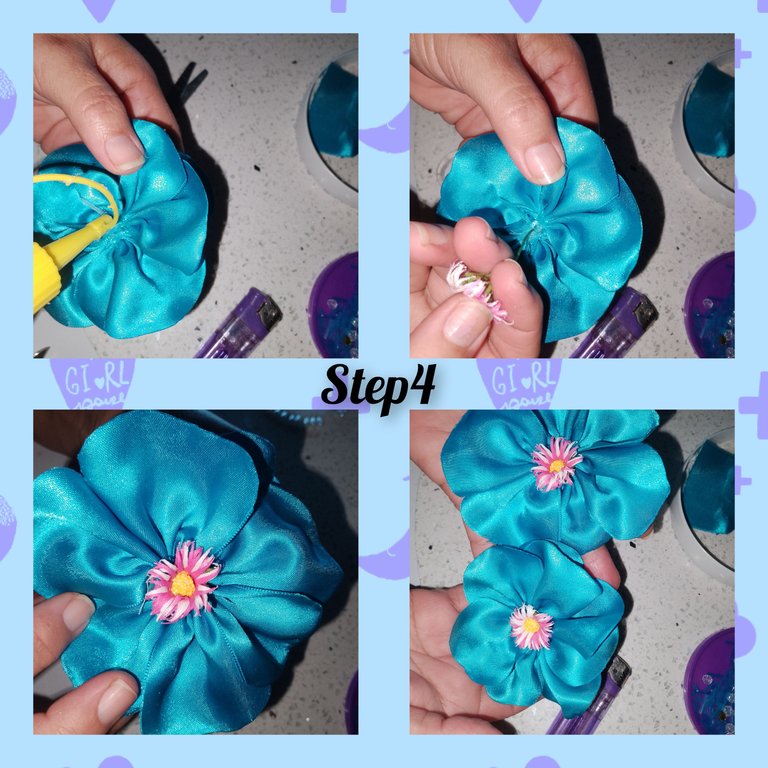
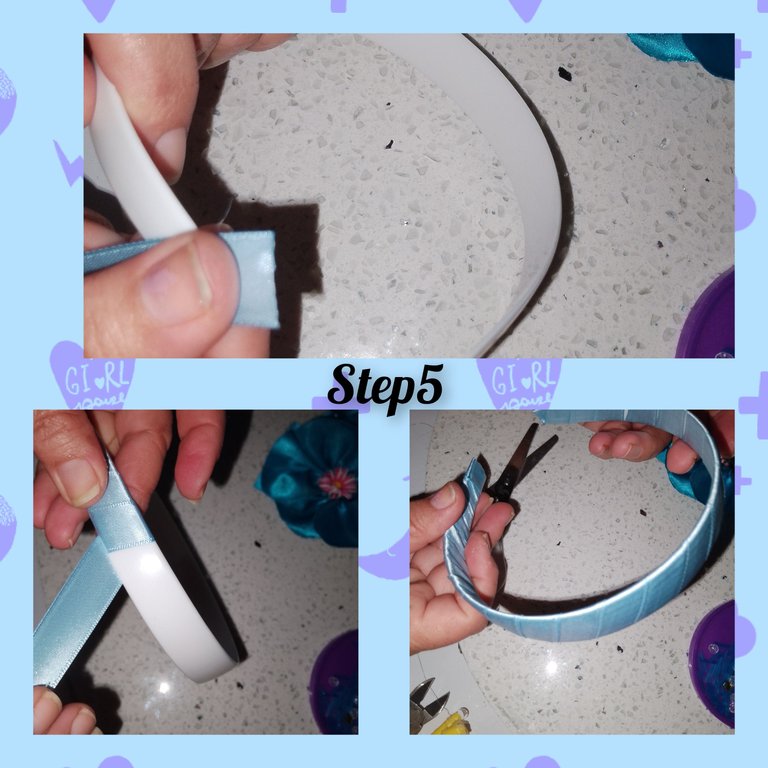
5.) I place glue on one of the ends of the plastic band, and begin to cover it with the smaller size tape, until I reach the other end, where I put glue again. I must be careful to give enough price to the tape, since I do not recommend placing glue, but only on the ends.
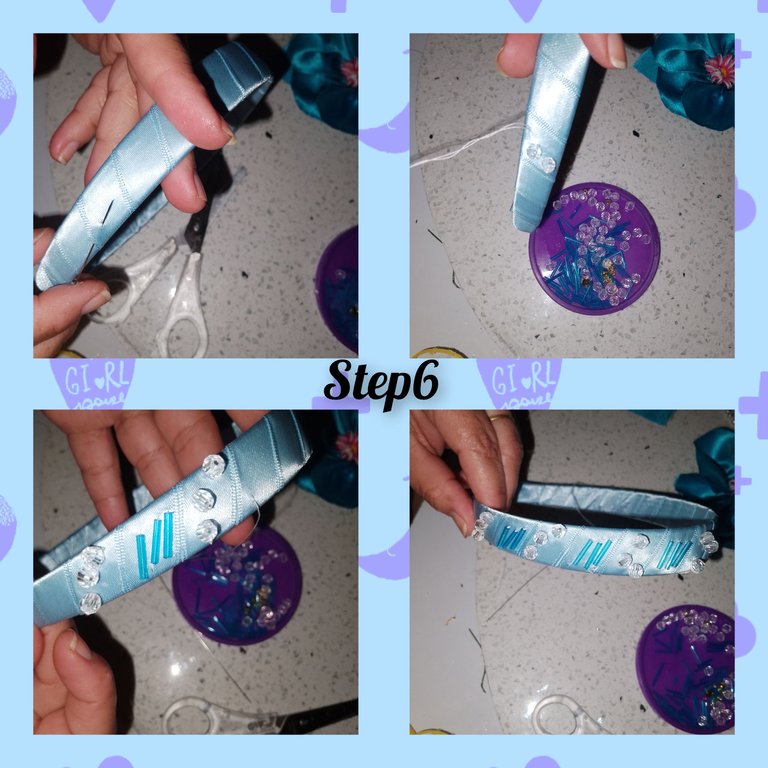
6.) Once the headband is lined, I place myself on one of its sides, and in the fourth space of tape, I insert the needle with thread, and I begin gluing three crystals, in the next space, beads, so I repeat, until I have placed, four spaces with glass and three with beads.
7.) Up to this point, I must be located a little more than the central part of the headband. Now, I applied glue and glued one flower, followed by the other, I continue with the needle,and inside the ribbon, I move to the next side, count from the end to the flower, four spaces and place two spaces of crystals, separated by two of beads. I finish off and cut the thread.
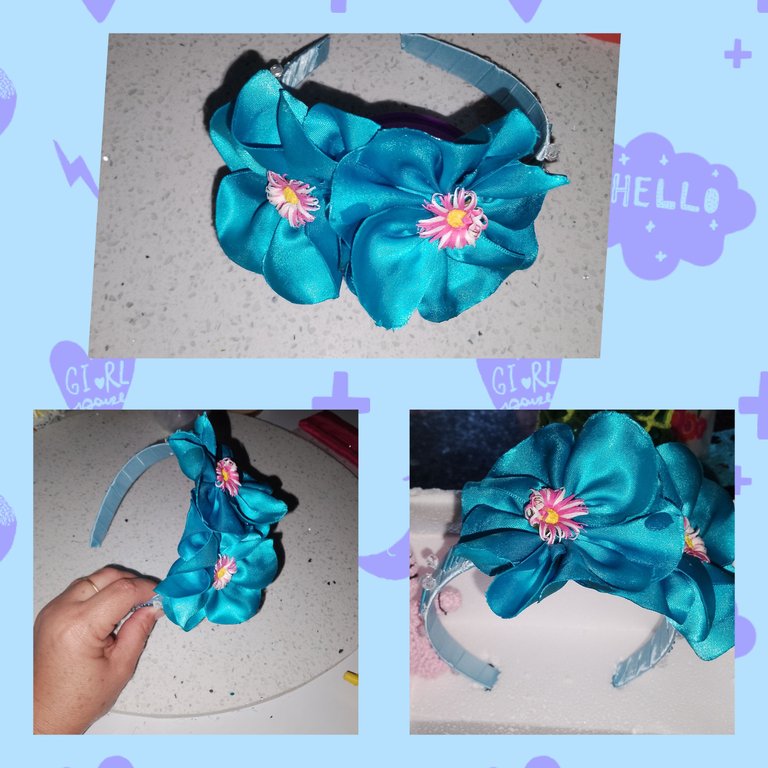
. All photos are property.
Use incollage.
. Use gif videos to show both sides of the headband and better appreciate it.
. Use language translator.
Very grateful for following me to the end. It will be until a next opportunity.
(ENG)
Hola a todos, espero se encuentren muy bien, llenos de mucho bienestar. Hoy paso, por @jewelry, para mostrar un muy sencillo y bonito paso a paso. Está vez inspirada en las hermosas niñas, que alegran nuestros hogares. Les mostraré un muy sencillo paso a paso de coma realizar un cintillo, que de seguro les gustará y las harán sentirse muy consentida y lindas. Ideal para usar en cualquier momento y lugar. Este en especial, lo he realizado, pae hacer un regalo, en los próximos días. Para ellos utilice material de provecho, y un gran toque de bisutería. Así que la invitación es a seguirme hasta el final, bienvenidos sean todos a mí blog.
Materiales:
. Cinta de seda color azul de 6cm de ancho.
. Cinta delgada color azul.
. Cintillo plástico.
. Cristales.
. Canutillos de color azul.
. Aguja e hilo.
. Pegamento.
. Regla para marcar.
. Alfileres.
. Yeskero.
. Tijeras
. Flores fucsia miniaturas.
Pasos:
1.) marco con la regla 4.5cm de altura sobre la cinta gruesa, y hago 8 dobles, para evitar estos se pueden coloco alfileres. Luego de marcado, con las tijeras corto y separó cada pieza, necesitaré, par cada flor ocho pedazos de cinta de igual tamaño.
2.) listo los pedazos o trozos de cinta, redondeo uno de los extremos y coloco un poco de fuego, en la parte cortada a la cinta, luego comienzo a poner un poco de fuego, con el yeskero por la parte de abajo, de esta forma doy más forma a cada uno de los pétalos.
3.) Con la aguja con hilo, comienzo a dar puntadas, no tan separados a cada pétalo en la parte recta, de esta forma uno seguido de el otro, junto 8 pétalos, aló un poco el hilo y los unió para formar una linda y delicada flor. Remato por la parte de atrás de la flor, corto el hilo, y coloco un poco de fuego.
4.) Coloco un poco de pegamento en el centro de la flor de cinta y pongo la mini flor comercial.
5.) coloco, pegamento en uno de los extremos de el cintillo plástico, y comienzo a cubrirlo con la cinta de menor tamaño, hasta llegar, a el otro extremo, dónde nuevamente pongo pegamento. Debo ser cuidadosa en ir dando suficiente precio a la cinta, ya que no recomiendo colocar pegamento, sino solo en los extremos.
6.) forrado el cintillo, me ubico en uno de sus lados, y en el cuarto espacio de cinta, introduzco la aguja con hilo, y comienzo pegando tres cristales, en el siguiente espacio, canutillos,así repito, hasta haber colocado, cuatro espacios con cristales y tres con canutillos.
7.) Ya hasta este punto, debo estar ubicada, en un poco más de la parte central de el cintillo. Ahora, aplicó pegamento y pego una flor, seguida de la otra, sigo con la aguja, y por dentro de la cinta, me desplazo hasta el siguiente lado, cuento desde el extremo hasta la flor, cuatro espacios y coloco dos espacios de cristales, separados por dos de canutillos. Remato y corto el hilo.
. Todas las fotos, son de propiedad.
Use incollage.
. Use videos gifs, para poder mostrar ambos lados de el cintillo, y poder apreciar mejor.
. Use traductor lenguaje.
Muy agradecida me haya seguido hasta el final. Será hasta una próxima oportunidad.
Hermoso, resalta mucho el azúl ☺️
Ay que belleza, eso está súper delicado. Pues claro que la afortunada de ese obsequio se va a sentir .uy contenta y coqueta.
Gracias 😊...Eso espero
aha that looks beautiful, thanks for sharing.