Very good morningt I wish all of you my dear friends, I hope it is a day full of great success and infinite blessings, once again I pass through this great community @jewelry, showing you a very simple and useful tutorial, which consists of only four (4 ) steps, this time it is about How to make Elegant Hanging Earrings, ideal to make us look beautiful and radiant, at parties, cocktails, or simply on any special occasion, where we need to highlight our image and elegance. I wish you like it and put it into practice, I assure you that the result is great, and very satisfactory, now without further ado, I explained below how I did it.
Muy buen día deseo a todos ustedes mis queridos amigos, espero sea un día lleno de mucho éxito e infinitas bendiciones, de nuevo paso por esta gran comunidad @jewelry, mostrándoles un muy sencillo y útil tutorial, el cual consta de tan solo cuatro (4) pasos, está vez se trata de Cómo hacer unos Elegantes Aretes Colgantes,ideales para hacernos lucir bellas y radiantes, en fiestas, cócteles, o simplemente en cualquiera ocasión especial, dónde se necesite resaltar nuestra imagen y elegancia. Deseo les guste y pongan en práctica, les aseguro que el resultado es genial, y muy satisfactorio, ahora sí sin más le explicó a continuación, cómo lo hice.
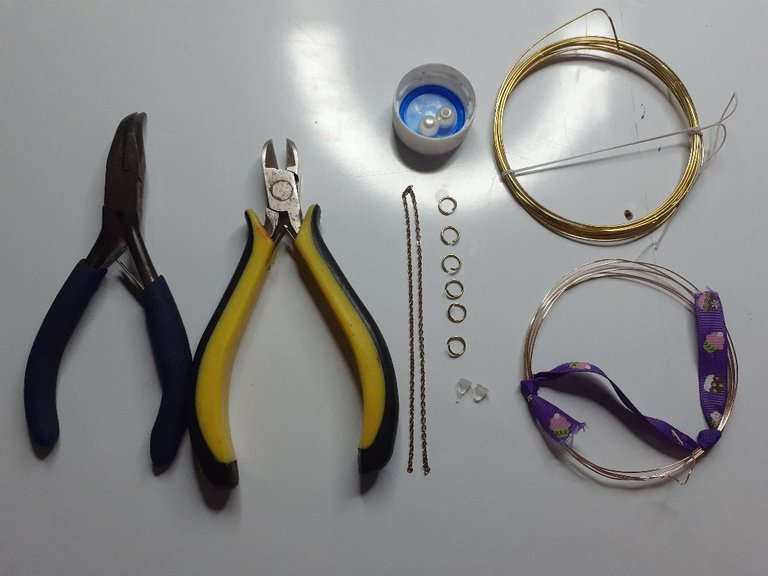
Materials/Materiales.
. wire n18
. 20cm gold chain
. Preformed wire hoops.
. Medium white pearl.
. jewelry tweezers
. Clear rubber ear studs./
. Alambre n18
. 20cm de cadena dorada
. Aritos de alambre previamente formados.
. Perla color blanco mediada.
. Pinzas de bisutería
. Pasadores para zarcillos de goma transparentes.
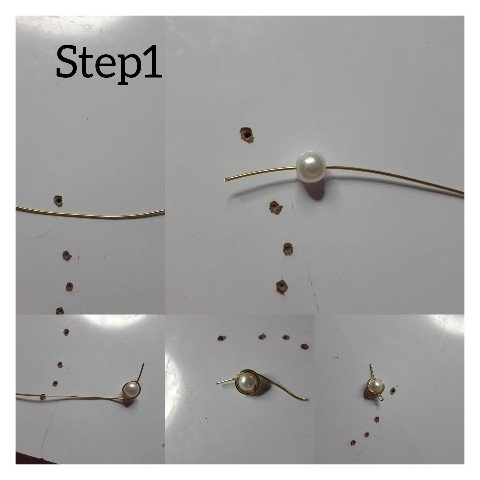
Steps/ Pasos.
1.) Start by cutting the 8cm n18 wire, with the help of the pickaxe, after this I put it through the hole of the pearl, passing through it and leaving 1.5cm, this will be used as the pin of the earring, and with the rest of the wire I will give several turns around the pearl to finish this step, I make a small earring./
1.) Inicio cortando el 8cm alambre n18, con ayuda de la piqueta, luego de estro meto por el orificio de la perla,traspasandolo y dejando 1.5cm, este sera utilizado como el pin del arete, y con el resto de el alambre daré varias vueltas por el alrededor de la perla para terminar este paso, hago un pequeño arito.
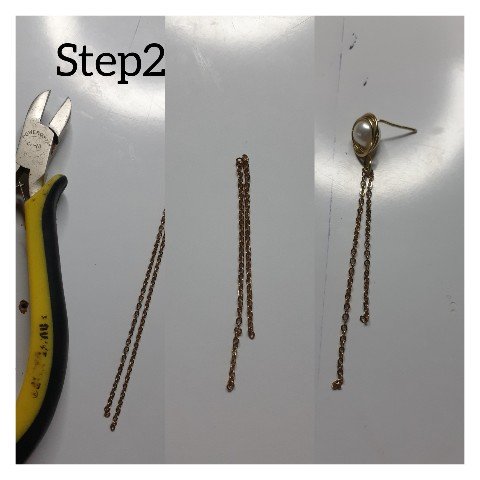
2.) I take in this step the 20cm of gold chain and fold it to cut it into equal parts, to be used in the following steps.
2.) Tomo en este paso los 20cm de cadena dorada y doblo para cortar en partes igual,Para luego ser usada en los pasos siguientes.
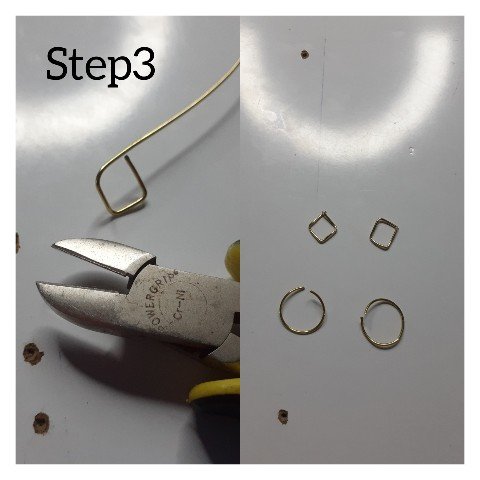
3.) I cut pieces of wire and formed figures, two small squares and two round ones, with the help of the tools, I will unite the ends, leaving the figures completely closed. These will be two different figures for each earring, that is, one round and one square.
3.)corto pedacitos de alambre y formó figuras, dos cuadradas pequeñas y dos redondas, con ayuda de las herramientas, unire las puntas, quedando completa mente cerrada las figuras. Estás serán dos figuras diferentes para cada arete, es decir una redonda y un acuadrada.
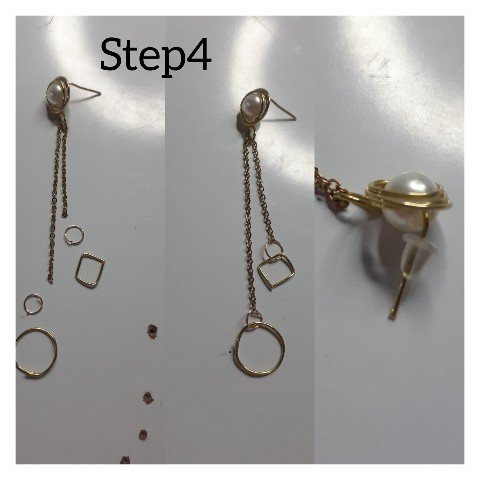
4.) In this step, I take the 10 cm chain and insert inside the small earring, made at the end of step number one, do not tie or pay attention so that it has mobility, then in the ends of the chain, I will put in each end a ring, of those indicated in the list of materials used and then I put the figures formed in the previous step, then I close with the help of the clamp. And I will place the pin, to finish the rubber lock, which will be the one that secures and adjusts the earring to the ear, of whoever wears it.
4.) En este paso,tomo la cadenita de 10 cm e introduzco por dentro del pequeño arito, hecho al final de el paso número uno,no atare o fíjate para que está tenga movilidad, luego en las puntas de la cadena , meteré en cada extremo un aro, de los señalados en la lista de materiales usados y luego meto las figuras formada en el paso anterior, seguidamente cierro con ayuda de la pinza. Y colocaré al pin, para finalizar el trancador de goma, que será el que de seguridad y ajuste el arete a la oreja, de quién lo valla luciendo.
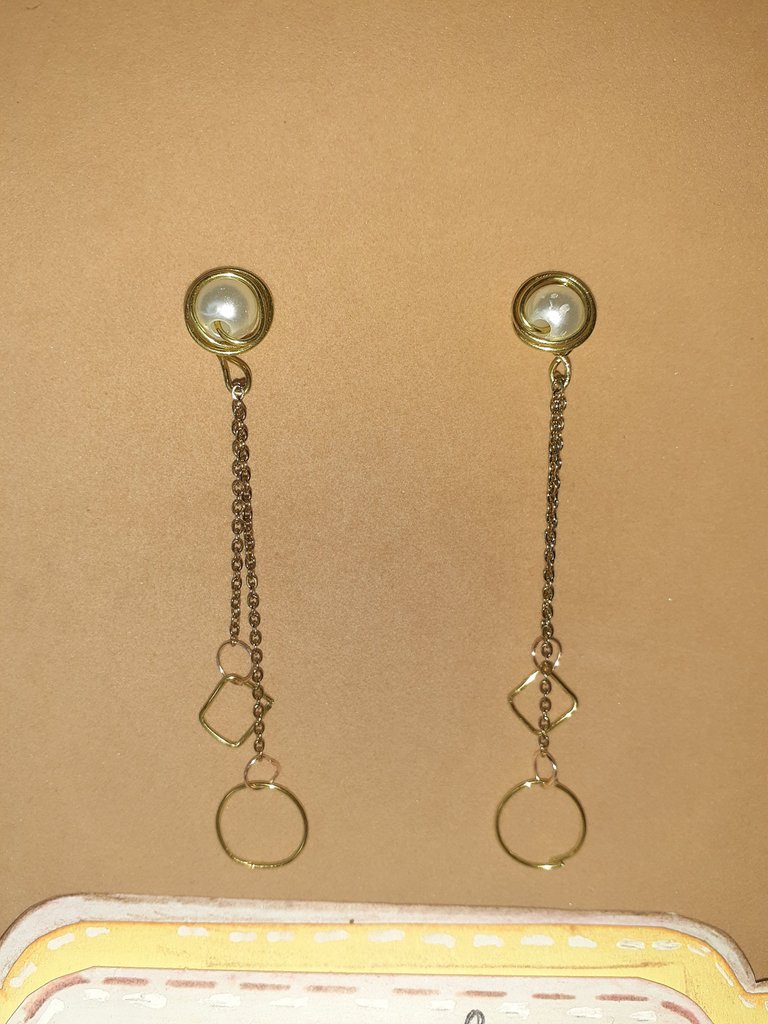
It is important then, to repeat the steps, in a very punctual way to make the next earring, and in this way complete the pair. You could make any changes or adjustments that you consider, for them if not creators par excellence, for example, it seemed very good to me to leave mobility to the chain to decide whether to carry the figures together or one longer than another, you could decide at once this./
Es importante entonces, repetir los pasos, de manera muy puntual para hacer el siguiente arete,y de esta forma completar el par. Tu podrías hacer algún cambio o ajuste que consideres, por ellos sino creadores por excelencia, por ejemplo a mí me pareció muy bien dejar movilidad a la cadena para decidir si llevar las figuras juntas o una más larga que otra, usted podría de una vez decidir esto.
. All photos are my property, taken with my smartphone.
. Use the InShot app for a step-by-step demo of today's project
. Use google translate.
The cover photo was edited on canva./
. Todas las fotos son de mí propiedad,btomadas con el teléfono inteligente.
. Use la aplicación InShot,para la demostración de el paso a paso, de el proyecto de hoy
. Use traductor Google.
. La foto de portada fue editada en canva.
As always it was a great pleasure to come to show you my most recent project, I am grateful that you have visited me, your comments will be of vital importance in each of my publications. See you soon my dear friends./
Como siempre fue un gran placer, venir a mostrarles mi más reciente proyecto, agradecida en que me hayas visistado, tu comentarios será de vital importancia en cada una de mis publicación. Será hasta pronto mis queridos amigos.
¡Felicidades! Esta publicación obtuvo upvote y fue compartido por @la-colmena, un proyecto de Curación Manual para la comunidad hispana de Hive que cuenta con el respaldo de @curie.
Si te gusta el trabajo que hacemos, te invitamos a darle tu voto a este comentario y a votar como testigo por Curie.
Si quieres saber más sobre nuestro proyecto, acompáñanos en Discord: La Colmena.
Amiga @katiuskamata que lindos zarcillos, nos encanta la forma que les has dado, sin elegantes y para cualquier ocasión, y el contraste de forma lo hace lucir hermoso 💚 gran trabajo 👏
Muchas gracias cariño, como siempre agradecida por tu bien comentario,e alegro te haya gustado..