(ENG)
Hello everyone, I am pleased, to be once again with all of you, on this occasion, motivated, by the initiative of the Women's Month, in @jewelry. For my entrance, I have made a beautiful accessories, to give to a very good friend, lover of the novel and creative accessories. To do this, and used the techniques of wire, jewelry and crochet. I stop, to invite @linita, @creacionesLys and @pacienciia. Now I invite you to follow me and thus be able to show the creative process.

Used materials:
. Threads for knitting, white and green.
. Skein to weave, purple color.
. Needle to weave.
. Wires (thin and thick).
. Pearls N6 white color.
. Golden pearls N6.
. Glue.
. Jewelry tweezers.
. Scissors.
. Tops for earrings.
Steps to follow.
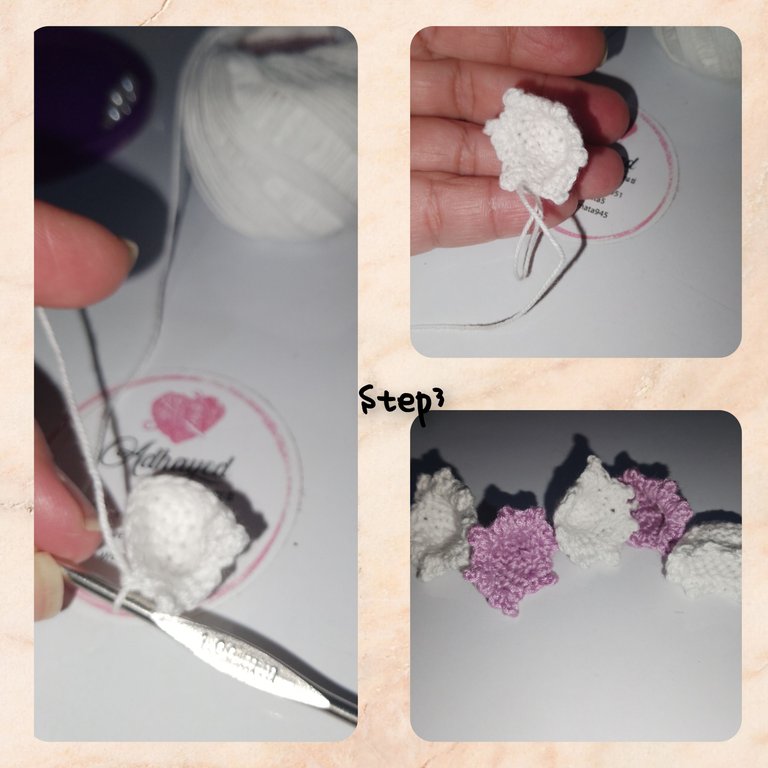
1.) Using the white thread, start, making a magical ring, within the six media and close. I take a next turn and weigh, six increases, to obtain, twelve media points, continuous and weigh three laps of twelve media points, each. In this way, it reached the necessary size for the delicate cocoon.
2.) Keep weaving, and on this time, weave, a two -point account in the same place, I raise two points chains, I introduce into the second half point, weigh two half points in the same place of the previous one, I leave a space and I repeat, in this way, I weigh the entire route. Leaving a delicate shape to the edge of El Capullo. I repeat the process to weave, several capullos.
3.) With the green thread, I lift seven points chains, I return to the fifth point, introducing into the following chains I take the thread and then I take out in pairs, I lift a chain point, and I repeat on the next side. Giving shape to a small leaf, weighing without cutting the thread seven points chains and I repeat.
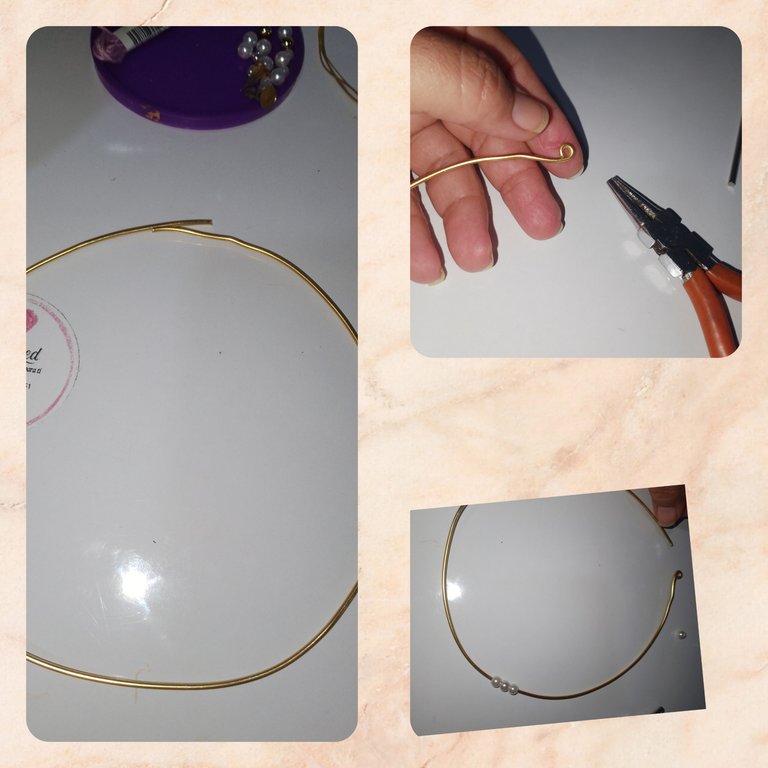
4.) Short a piece of thick wire, taking my neck as a measure, at one end I make an arito, I introduce three pearls.
5.) To start assembling the necklace, short pieces of thin wire, bend in equal parts, I introduce a pearl, I give a few laps to fix the pearl, and focusing the cocoon, in its inner part, I take the next side of El Capullo. After that, I put the hojitas at the bottom, followed by a new pearl. I turn to the wire and attempt the cocoon in the pendant, turning with the residual wire.
6.) I repeat once again, this process for the white cocoon, and for the purple that will go in the center, in the center place, a golden pearl. Always separating the three pearls. Finally, with the tweezers I will make a small hook at the next end, which introduced into the arito of the previous one, will givesecurity.
8.) For the earrings, I repeat the process of El Capullo, but with the residual wire, gatar a pearl, applied a stitch of glue to the topic and hit at the bottom of El Capullo.
. All photos are from me property.
. Use colorless.
. Use language translator.
Grateful as always, for your visit to me blog. Congratulations to the participants, in this initiative of the month, celebrating Women's Day. And hold the hand with all of them, receive my sincere congratulations. See you soon.
(Esp)
Hola a todos, me complace, estar una vez más con todos ustedes, en esta ocasión, motivada, por la iniciativa de el mes de la mujer, en @jewelry. Para mí entrada, he realizado un hermoso ser de accesorios, para regalar a una muy buena amiga, amante de los accesorios novedosos y creativos. Para ello, e usado las técnicas de alambrismo, bisutería y crochet. Hago un alto, para, invitar a @linita, @creacioneslelys y @pacienciia. Ahora sí les invito a seguirme y así poder mostrar el proceso creativo.
Materiales usados:
. Hilos para tejer, color blanco y verde.
. Madeja para tejer, color morado.
. Aguja para tejer.
. Alambres (delgado y grueso).
. Perlas n6 color blanca.
. Perlas doradas n6.
. Pegamento.
. Pinzas de bisutería.
. Tijeras.
. Topitos para aretes.

Pasos a Seguir.
1.) usando el hilo de color blanco, inicio, haciendo un anillo mágico, dentro de el seis medios puntos y cierro. Doy una siguiente vuelta y tejo, seis aumentos, para obtener, doce medios puntos, continuo y tejo tres vueltas de doce medios puntos, cada una. De esta manera, alcanzó el tamaño necesario para el delicado capullo.

2.) Continuo tejiendo, y en est oportunidad, tejere, una cuenta de dos medios puntos en el mismo lugar, levanto dos puntos cadenas, introduzco en el segundo medio punto, tejo dos medios puntos en el mismo lugar de el anterior, dejo un espacio y repito, de esta manera, tejo todo el recorrido. Dejando una delicada forma a el borde de el capullo. Repito el proceso para tejer, varios capullos.
3.) Con el hilo de color verde, levanto siete puntos cadenas, me devuelvo a el quinto punto,introduciendo en las siguientes cadenas voy tomando el hilo y luego voy sacando en pares, levanto un punto cadena, y repito en el siguiente lado. Dando forma a una pequeña hoja, tejo sin cortar el hilo siete puntos cadenas y repito.

4.) Corto un trozo de alambre grueso, tomando como medida mi cuello, en uno de los extremos hago un arito, introduzco tres perlas.
5.) para comenzar a armar el collar, corto trozos de alambre delgado, doblo en partes iguales, introduzco una perla, doy algunas vueltas entre sí para fijar la perla, y centrando el capullo, en su parte interior, saco por el siguiente lado de el capullo. Luego de ello, coloco en la parte inferior las hojitas, seguido de una nueva perla. doy vuelta a el alambre y ato el capullo en el colgante, dando varias vueltas con el alambre residual.

6.) Repito una vez más, este proceso par los capullo de color blanco, y para el morado que irá en el centro, en el centro colocare, una perla doradas. Siempre separando los con tres perlas. Para finalizar, con las pinzas haré un pequeño gancho en el siguiente extremo, que introducido en el arito de el anterior, dará seguridad.

8.) Para los aretes, repito el proceso de el capullo, Pero con el alambre residual, engarzar una perla, aplicó una puntada de pegamento a el tópico y pego en la parte inferior de el capullo.

. Todas las fotos son de mí propiedad.
. Use incollage.
. Use traductor lenguaje.
Agradecida como siempre, por su visita a mí blog. Felicidades a los participantes, en esta iniciativa del mes, celebrando el día de la mujer. Y tomada de la mano con todas ellas, reciban mis más sinceras felicitaciones. Hasta pronto.
Amiga, está precioso tu collar con distintas técnicas y texturas, gracias por compartirlo✨
Gracias cariño, que bueno le haya gustado.
A lovely way to celebrate Women's Day with the stylish accessories. Great work.
Gracias 😊, que bueno saber su opinión y apoyo ..
¡Qué preciosos te quedaron los capullos! Me encantó este set de accesorios 😃 bellísimo.
Gracias por la invitación 😊
Gracias @creacioneslelys, que bueno te hayan gustado... abrazos
Te ha quedado muy lindo este modelo amiga, me gustan los colores y la forma de las flores que le diste, la perla en el centro le da un toque especial, es un lindo regalo para homenajear a las mujeres, que pases un muy feliz día de la mujer 💞
Está muy bonito este juego de accesorios que nos dejas para conmemorar el día de la mujer.
Te luce muy bonitos...
!discovery 30
This post was shared and voted inside the discord by the curators team of discovery-it
Join our Community and follow our Curation Trail
Discovery-it is also a Witness, vote for us here
Delegate to us for passive income. Check our 80% fee-back Program
Your friend should be happy receiving this wonderful accessory. The flower 🌺 is another good thing.
Great. These accessories are very cute and descent.