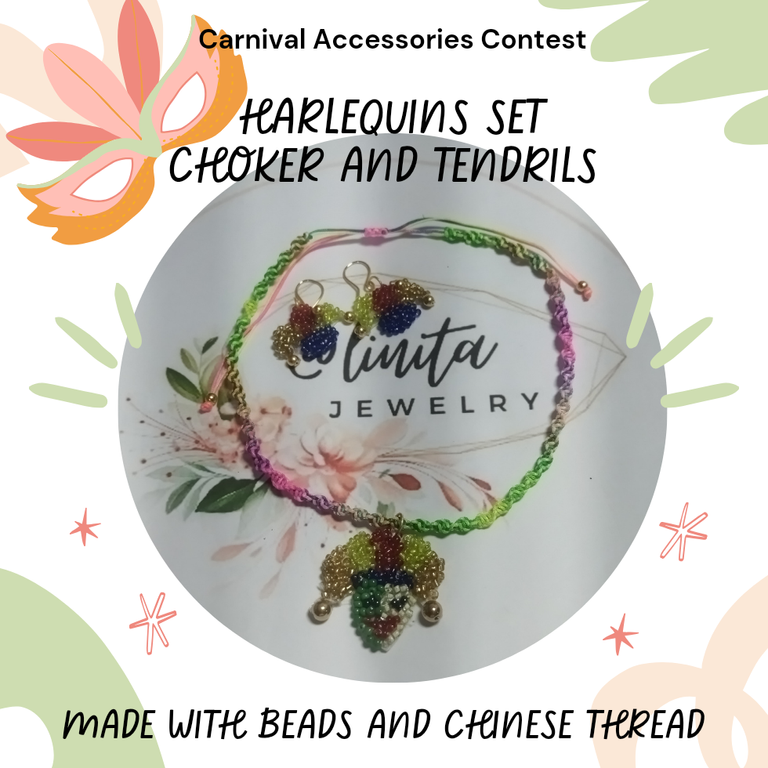
WELCOME TO MY BLOG
Hellooooo, hellooooooo! Greetings and my respects to the jewelry creators. Carnival is one of the most colorful festivities celebrated in some countries around the world. The most famous are those of Rïo de Janeiro, in Brazil. Their floats and costumes surprise more than one of the locals and visitors. One of my biggest dreams is to be able to go celebrate them there. But those from my country, Venezuela, are not far behind. In Maturín, we celebrated 4 days in a row of comparsas, very colorful and enlivened by calypso groups, steel bands and many floats and costumes.
What is most striking about the costumes is the variety of jewelry that the participants wear, from necklaces, earrings, tiaras, bracelets, among others, to give a lot of personality to the costumes. I love the bright, bold colors and the ingenuity of the creators.
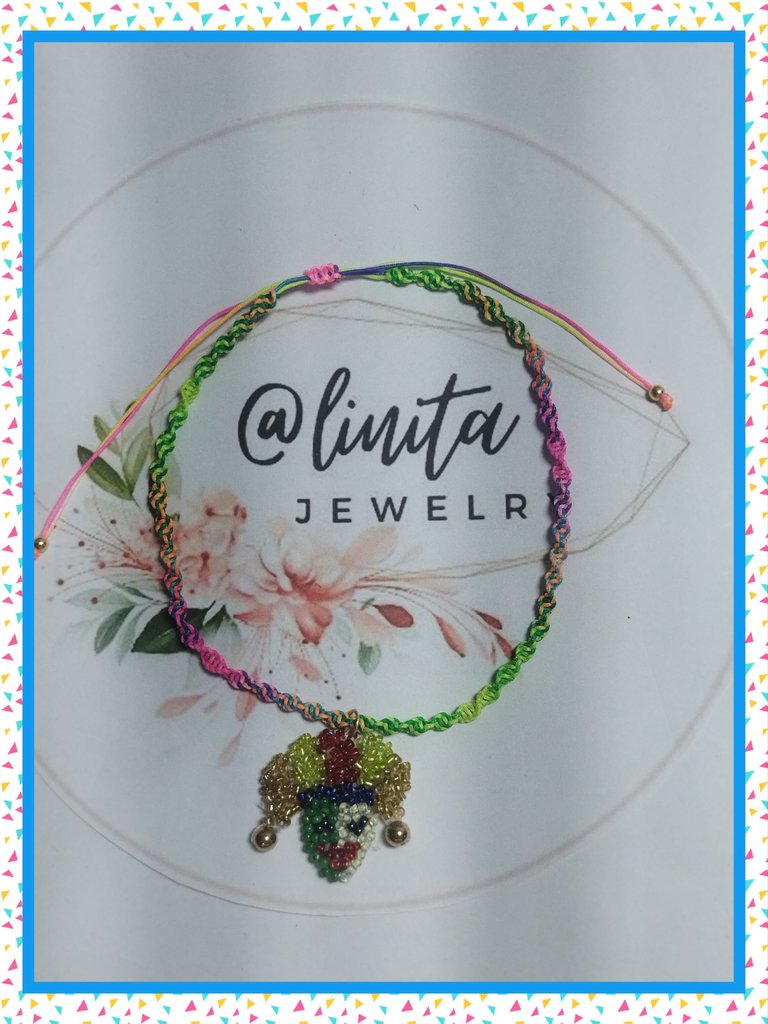
The #jewelry community launches this contest alluding to these holidays which I join with a simple game of choker and earrings with one of the most representative icons of the carnival such as the Harlequins. For its preparation I used low-cost materials that can be reused in the next parties. I hope you like it.
BIENVENIDOS A MI BLOG
¡Holaaaa, holaaaaa! Saludos y mis respetos a los creadores de bisutería. El Carnaval es una de las festividades más coloridas que se celebran en algunos países del mundo. Los más famosos los de Rïo de Janeiro, en Brasil. Su carrozas y disfraces dejan sorprendidos a más de uno de los lugareños y visitantes. Uno de mis más grandes sueños es poder ir a celebrarlos por allá. Pero los de mi país Venezuela, no se quedan atrás. En Maturín, celebramos 4 días seguidos de comparsas, muy coloridas y amenizadas por grupos de calipso, steels bands y muchas carrosas y disfraces.
Lo que más llama la atención de los vestuarios es la variedad de bisutería que usan los participantes, desde collares, zarcillos, tiaras, pulseras entre otros para darle mucha personalidad a los disfraces. Me encantan los colores brillantes y llamativos y la ingenuidad de los creadores.
La comunidad de #jewelry lanza este concurso alusivo a estas fiestas la cual me sumo con un sencillo juego de choker y zarcillos con uno de los ícono más representativos del carnaval como lo son los Arlequines. Para su elaboración utilicé materiales de bajo costo y que pueden ser reutilizados en las próximas fiestas. Espero les guste.
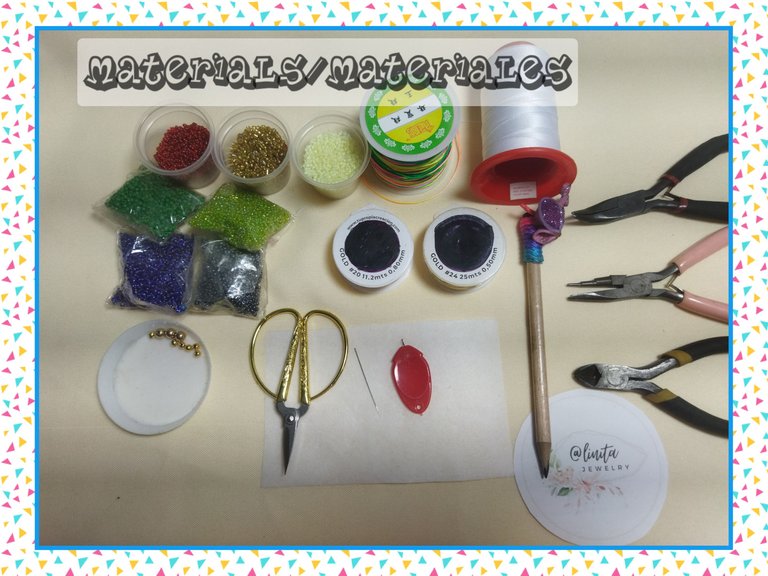
MATERIALS
- Multicolored Chinese yarn
- Wire #20
- White upholstery thread
- Mustaches, various colors
- 6 mm and 4 mm blades
- Fabric pellon or pellon
- Graphite pencil
- Scissors
- Sewing needle #11
- Measuring tape
- Table and jewelery tongs
- Lighter
MATERIALES
- Hilo chino multicolor
- Alambre #20
- Hilo de tapicería blanco
- Mostacillas, colores variados
- Balines de 6 mm y 4 mm
- Tela pelón o pellon
- Lápiz de grafito
- Tijera
- Aguja de coser #11
- Cinta métrica
- Tabla y pinzas de bisutería
- Encendedor
STEP BY STEP // PASO A PASO
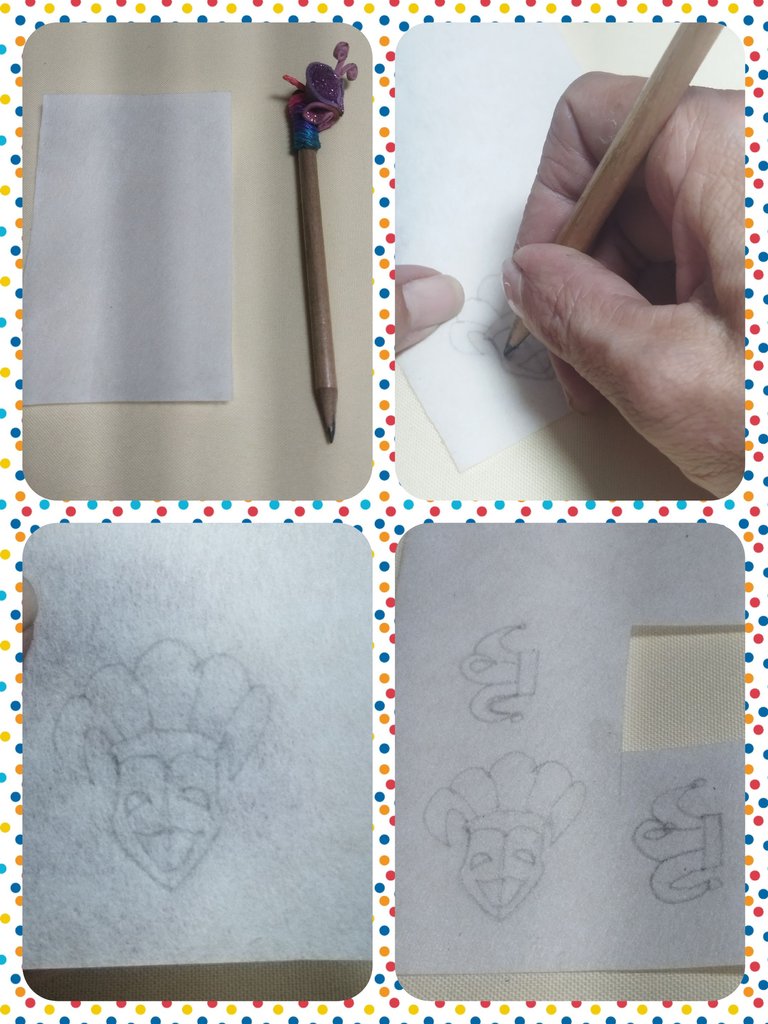
APPLICATION FOR CHARM AND EARRINGS
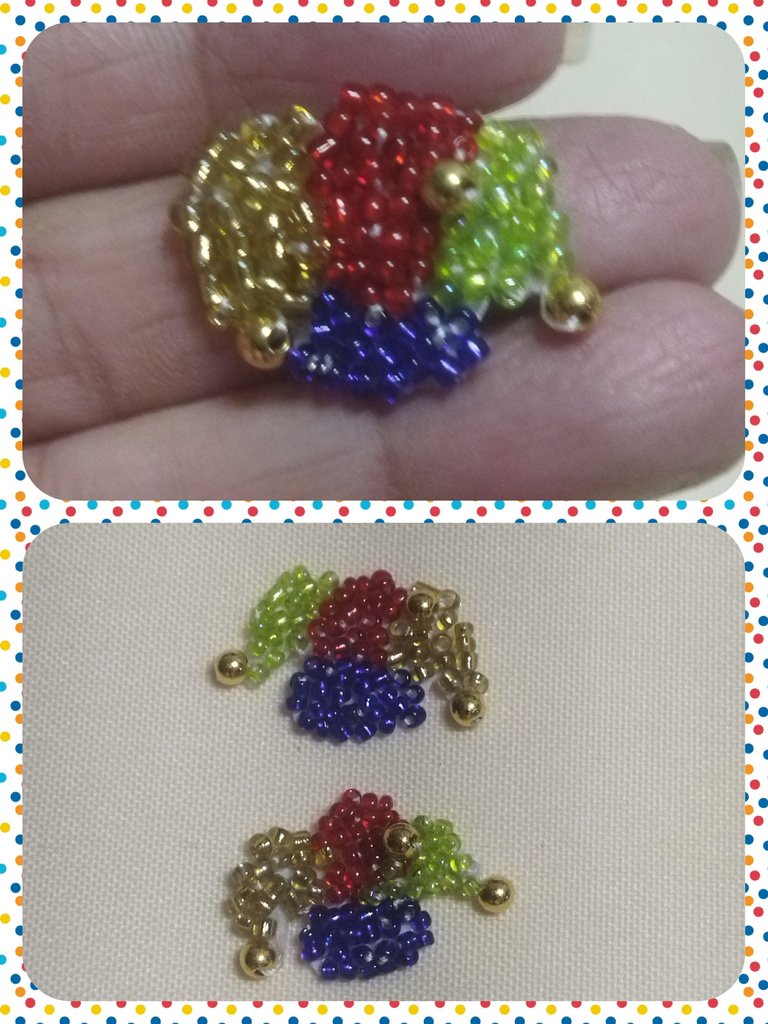
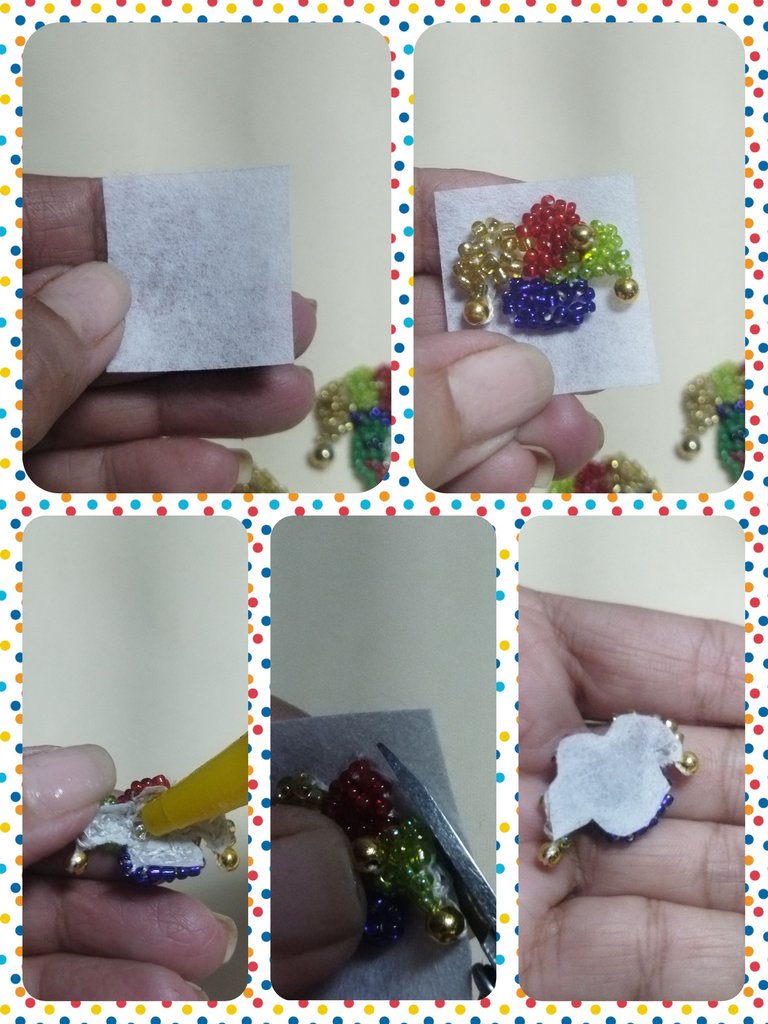
To make the appliques I drew a harlequin on the pelón fabric for the pendant and two harlequin hats for the earrings.
APLIQUE PARA DIJE Y ZARCILLOS
Para realizar los apliques dibujé en la tela pellón un arlequín para el dije y dos sombreros de arlequín para los zarcillos.
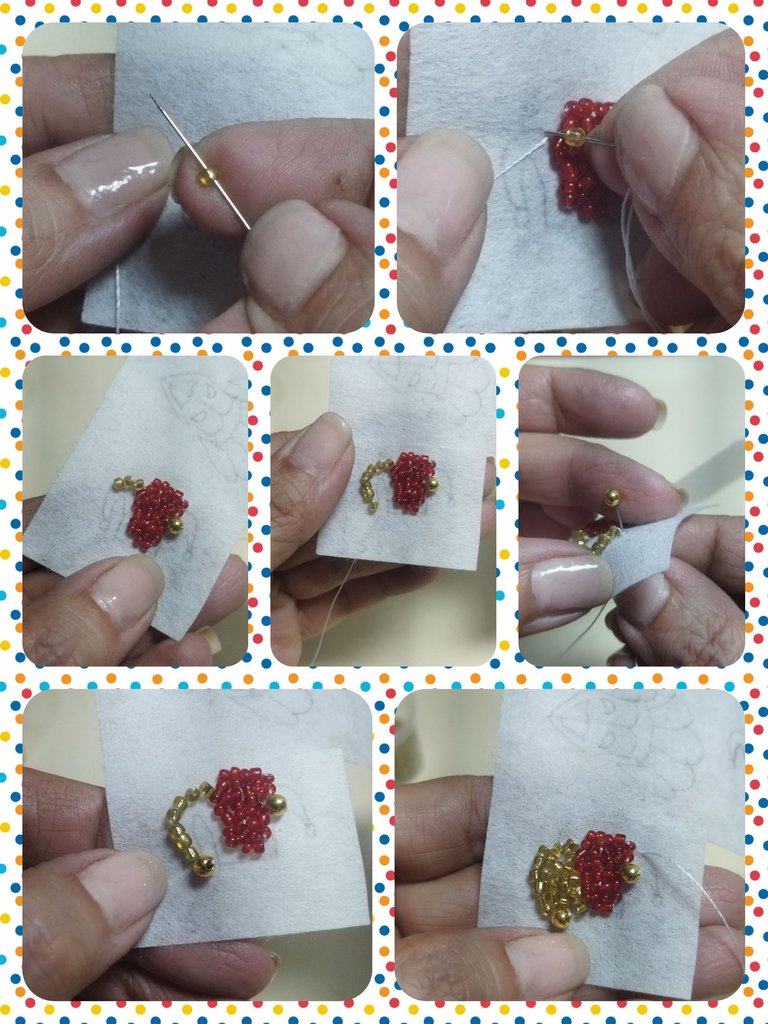
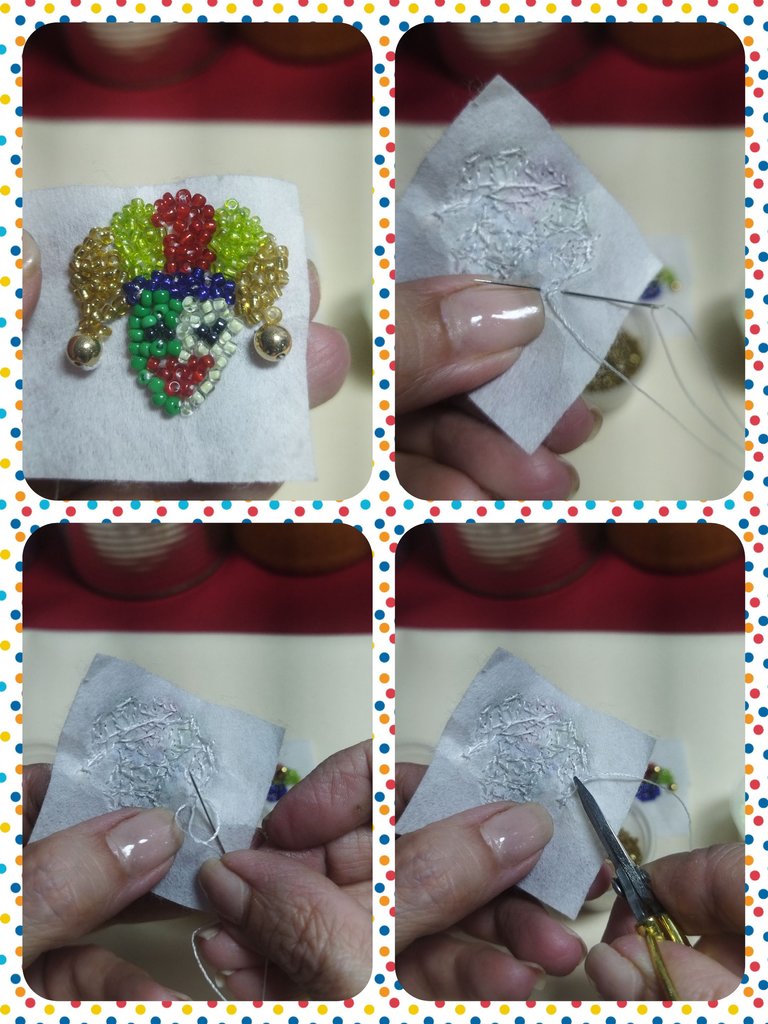
With the needle and tapestry thread I filled in the drawings using different colors of beads for each sector of the harlequin hats.
Starting with the color red, we introduce the needle through the back of the drawing and place a red bead, we pass the needle under it again.
Con la aguja y el hilo de tapicería realicé el relleno de los dibujos utilizando diferentes colores de mostacillas para cada sector de los sombreros de arlequín.
Comenzando con el color rojo, introducimos la aguja por la parte posterior del dibujo y colocamos una mostacilla roja, pasamos nuevamente la aguja por debajo.
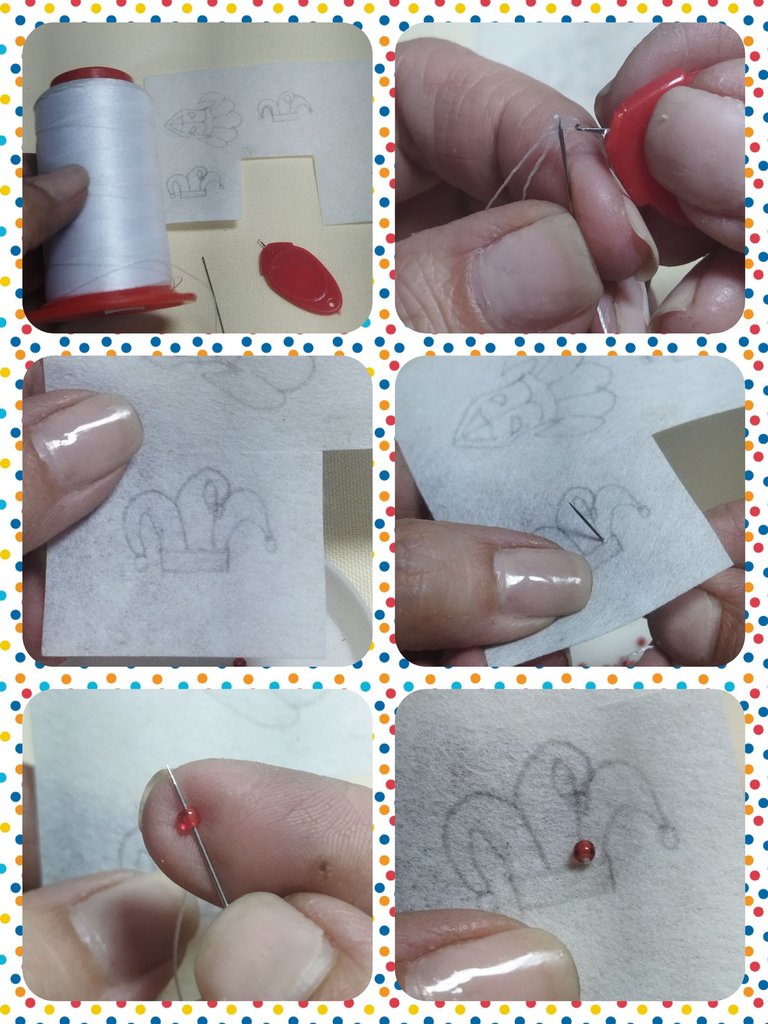
Next we repeat the process with another bead, one next to the other until all the space is filled. Then we take a 6 mm pellet and place it on the tip of the embroidery.
Seguidamente repetimos el proceso con otra mostacilla, una al lado de la otra hasta rellenar todo el espacio. Luego tomamos un balín de 6 mm y lo colocamos en la punta del bordado.

We place the needle in the next space to fill and take the yellow beads and in the same way we fill and place a 4 mm pellet at the end.
We repeat the process on the other side using green beads and at the end we place the 4 mm pellet.
Situamos la aguja en el siguiente espacio a rellenar y tomamos las mostacillas amarillas y de la misma forma rellenamos y colocamos un balín de 4 mm al finalizar.
Repetimos el proceso del otro lado utilizando mostacillas verdes y al finalizar colocamos el balín de 4 mm.
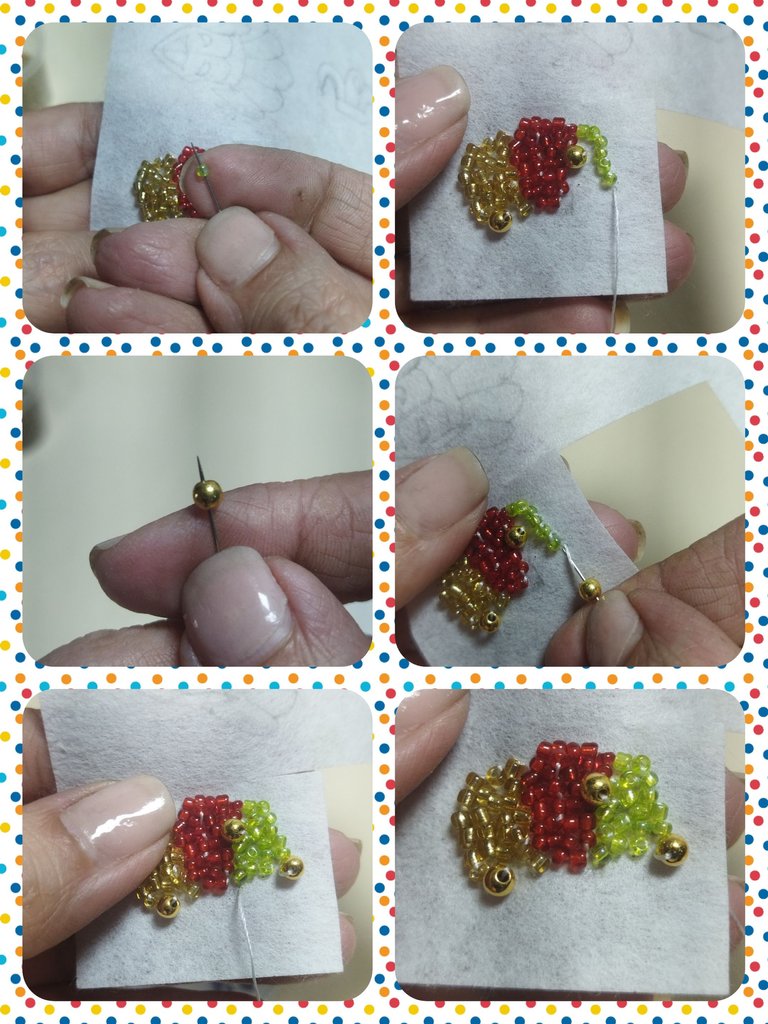
We finish the design with the blue bead, with this we will make the hat band. It is a quick and very easy process, since we are only going to fill the drawn spaces with the beads that we select.
Finalizamos el diseño con la mostacilla azul, con ésta realizaremos la banda del sombrero. Es un proceso rápido y muy fácil, ya que sólo vamos a rellenar los espacios dibujados con las mostacillas que seleccionemos.
Once the embroidery is finished, on the back we make a very strong finish so that the threads do not come loose.
Now very carefully we cut the excess fabric, trying not to cut the threads and make sure it sticks well.
Finalizado el bordado, por la parte de atrás realizamos un remate bien fuerte para que no se suelten los hilos.
Ahora con mucho cuidado cortamos el sobrante de la tela procurando no cortar los hilos y que quede bien pegado.
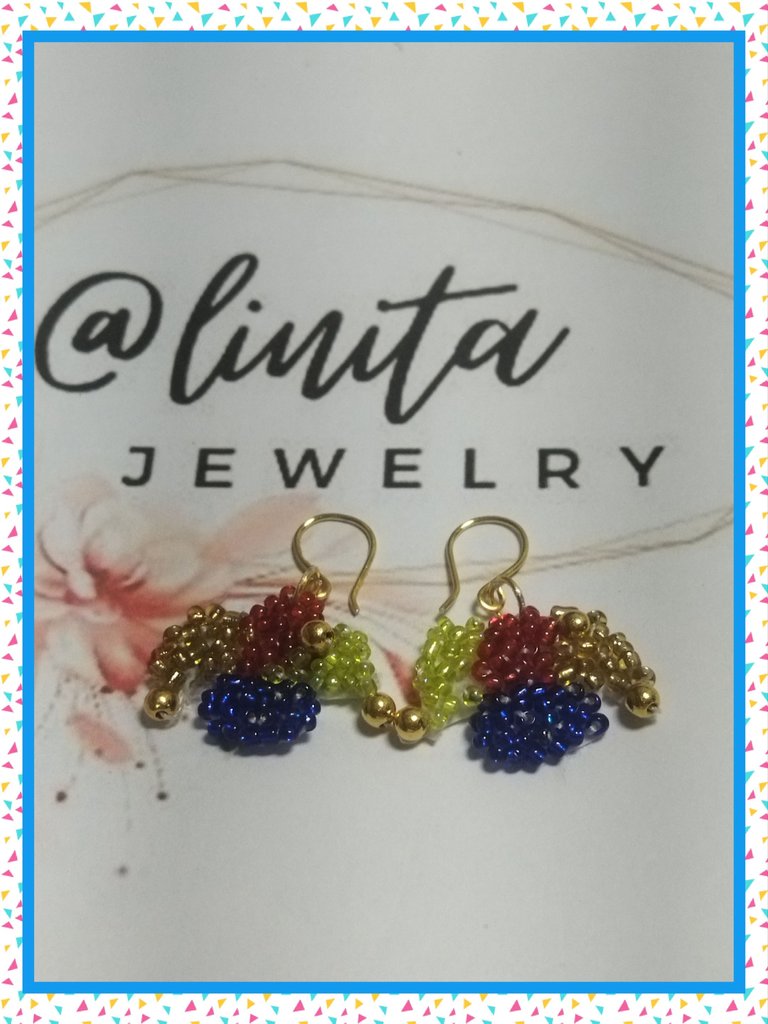
We make the other appliqué for the tendrils, trying to make them as similar as possible.
Realizamos el otro aplique para los zarcillos, tratando que queden lo más parecido posible.
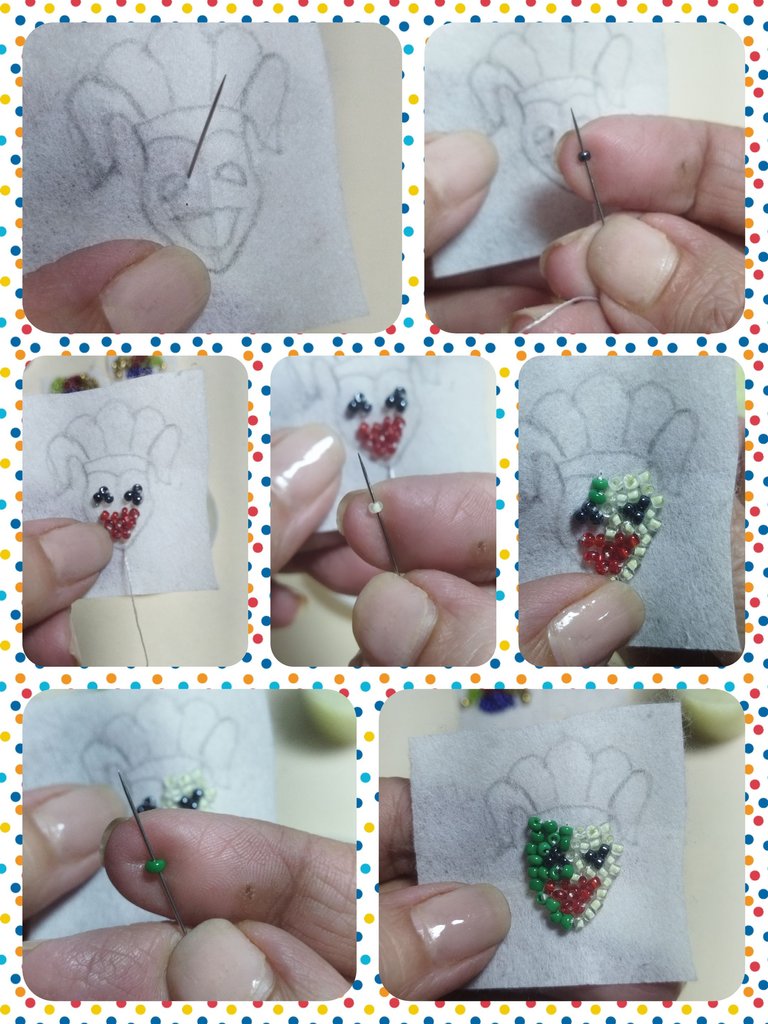
APPLICATION FOR CHARM
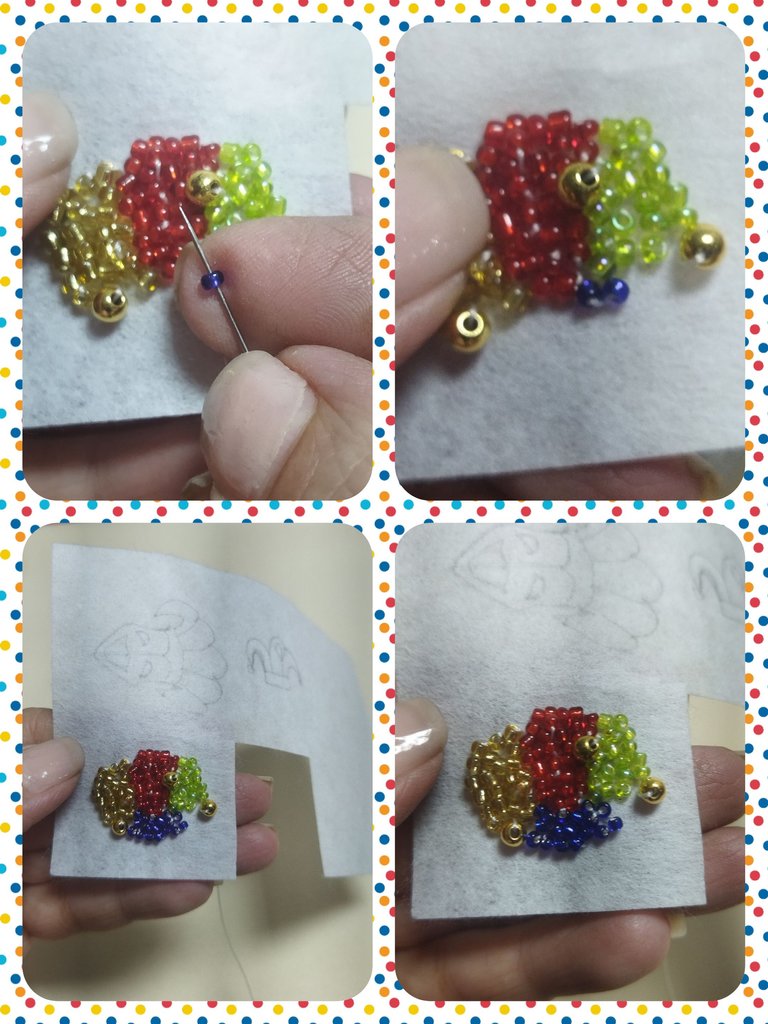
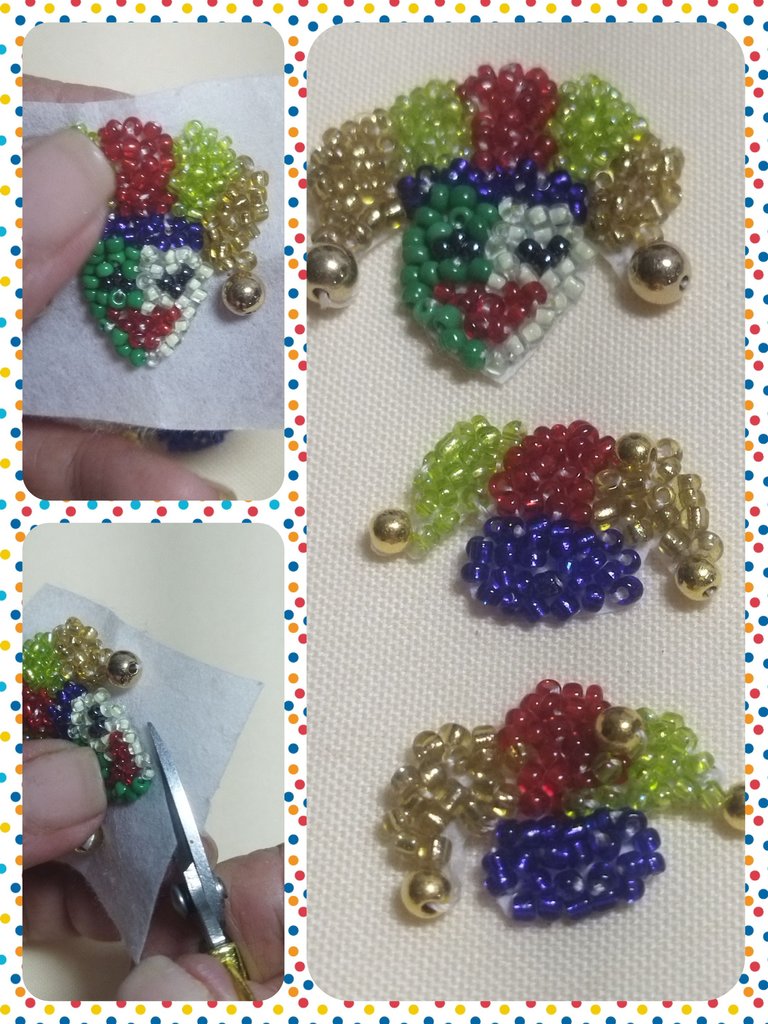
To make the pendant, we will basically carry out the same process as the tendrils, with the difference that this is the complete face of the harlequin.
We will start by filling in the eyes and mouth.
Then we continue filling the face halfway, with yellow beads on the right side and with leaf green beads on the left side.
APLIQUE PARA DIJE
Para realizar el dije, básicamente realizaremos el mismo proceso que el de los zarcillos, con la diferencia que este es la cara completa del arlequín.
Comenzaremos rellenando los ojos y la boca.
Luego continuamos el relleno de la cara a mitad, con mostacillas amarillas la parte derecha y con mostacillas verde hoja la parte izquierda.
With blue beads, we embroider the ribbon of the hat, then with the red beads we continue the embroidery of the hat.
Con mostacilla azul, bordamos la cinta del gorro, luego con la mostacilla roja continuamos el bordado del sombrero.
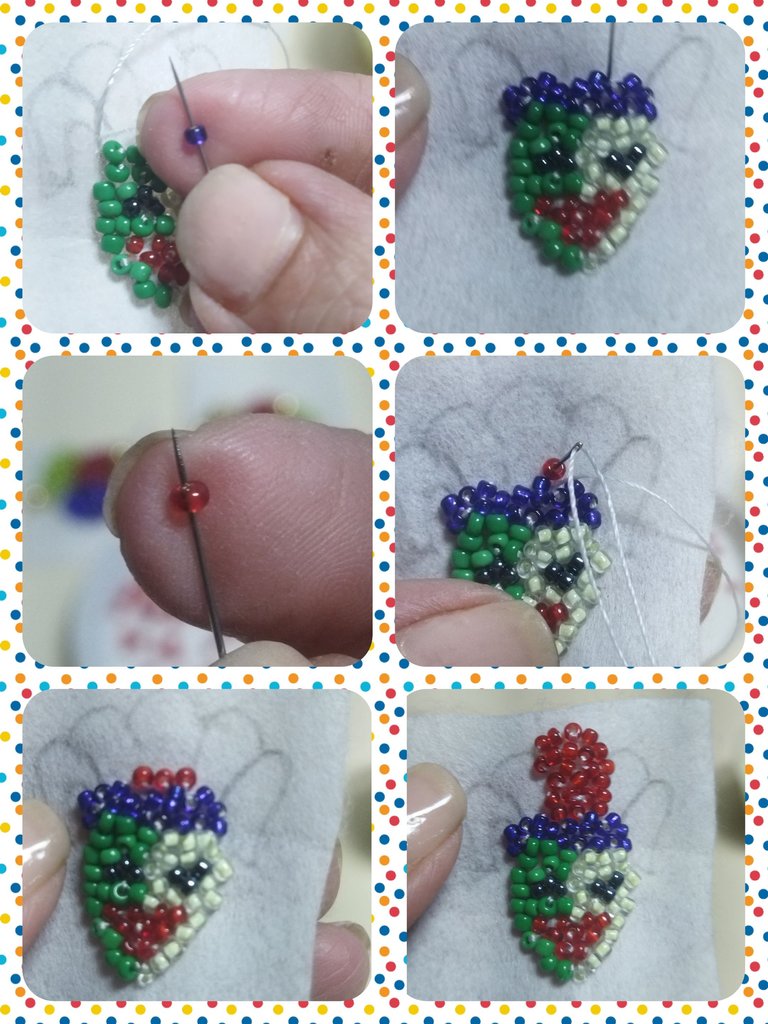
Now we move on to embroidering the right side of the harlequin, filling the space next to the red one with green beads and then with yellow beads. Finishing with a 6 mm pellet.
We repeat the embroidery respecting the colors of the other side of the hat.
Ahora pasamos a bordar el lado derecho del arlequín, rellenando el espacio al lado del rojo con mostacilla verde y luego con la amarilla. Finalizando con un balín de 6 mm.
Repetimos el bordado respetando los colores del otro lado del sombrero.
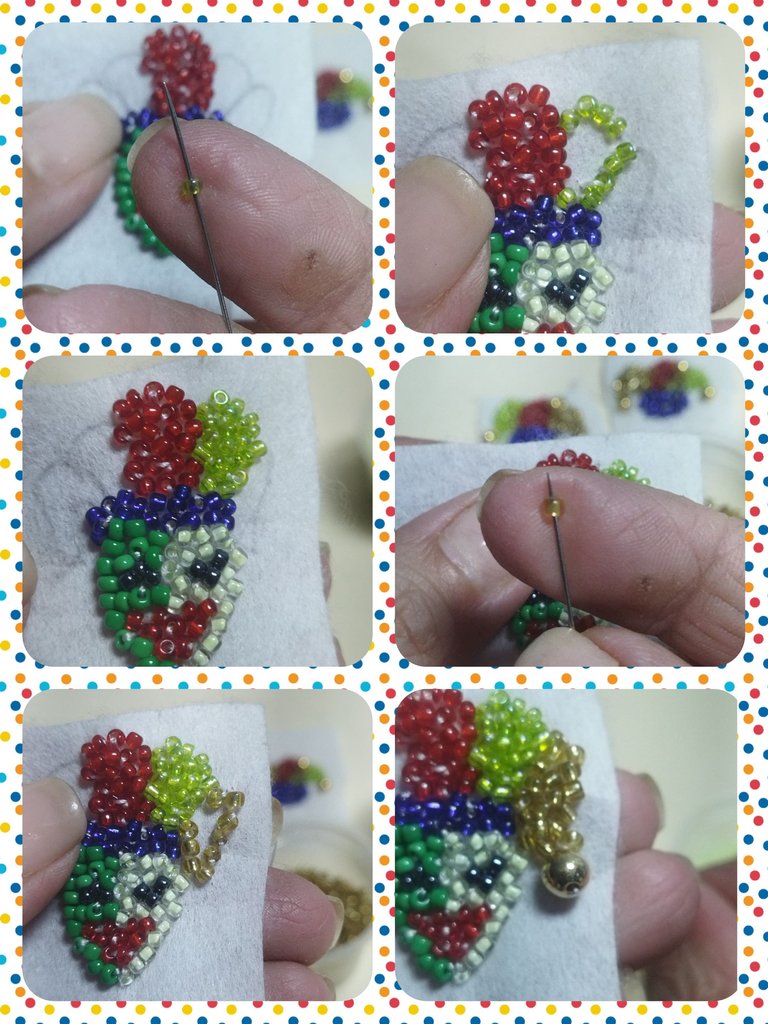
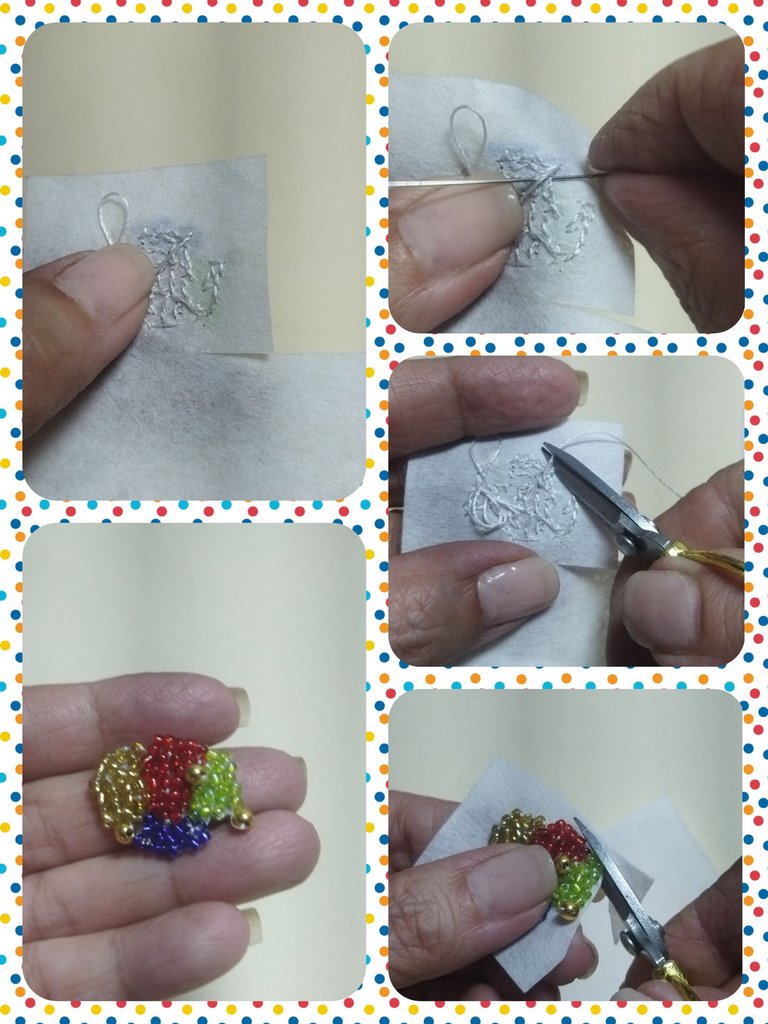
We finish the applique by making a double finish on the back of the embroidery. We cut the rest of the Pellon fabric outside the design.
Finalizamos el aplique realizando un remate doble por la parte trasera del bordado. Cortamos el resto de la tela pellon al margen del diseño.
With a piece of the same Pellon fabric we are going to cover the seam on the back of the design. We glue the design to the fabric with glue and cut off the excess again.
Con un retazo de la misma tela pellon vamos a tapar la costura de atrás del diseño. Pegamos el diseño en la tela con pegamento y cortamos nuevamente el exceso.
And now we have the appliques ready. Now to form the tendrils and the necklace.
Y ya tenemos listo los apliques. Ahora a formar los zarcillos y el collar.
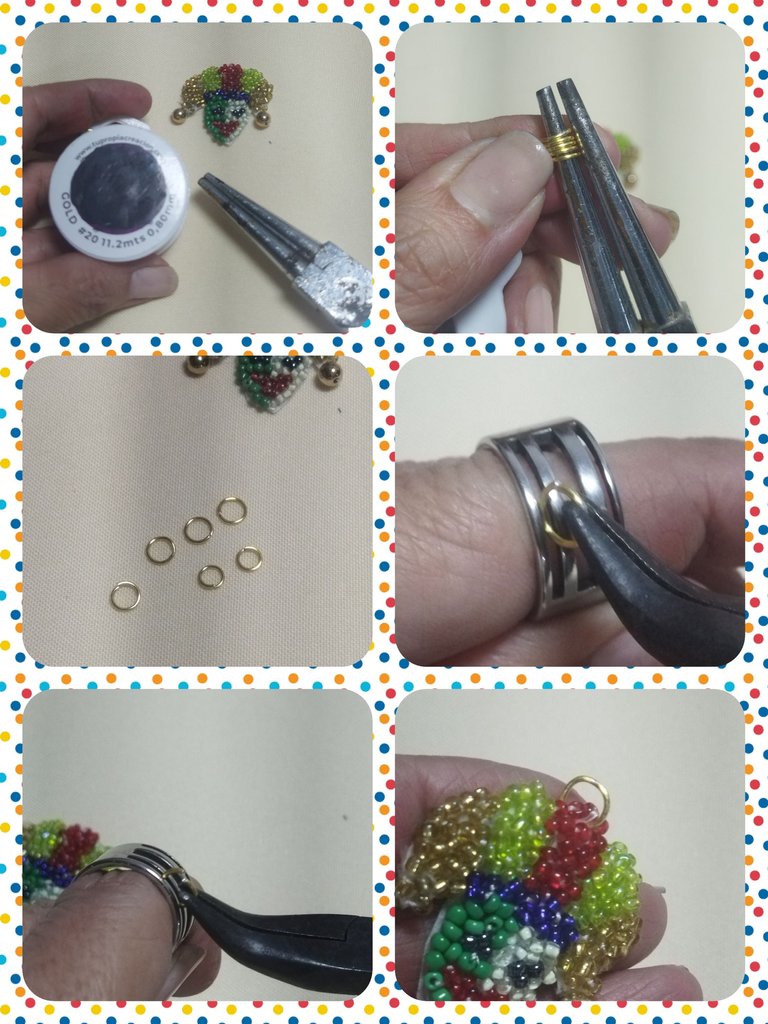
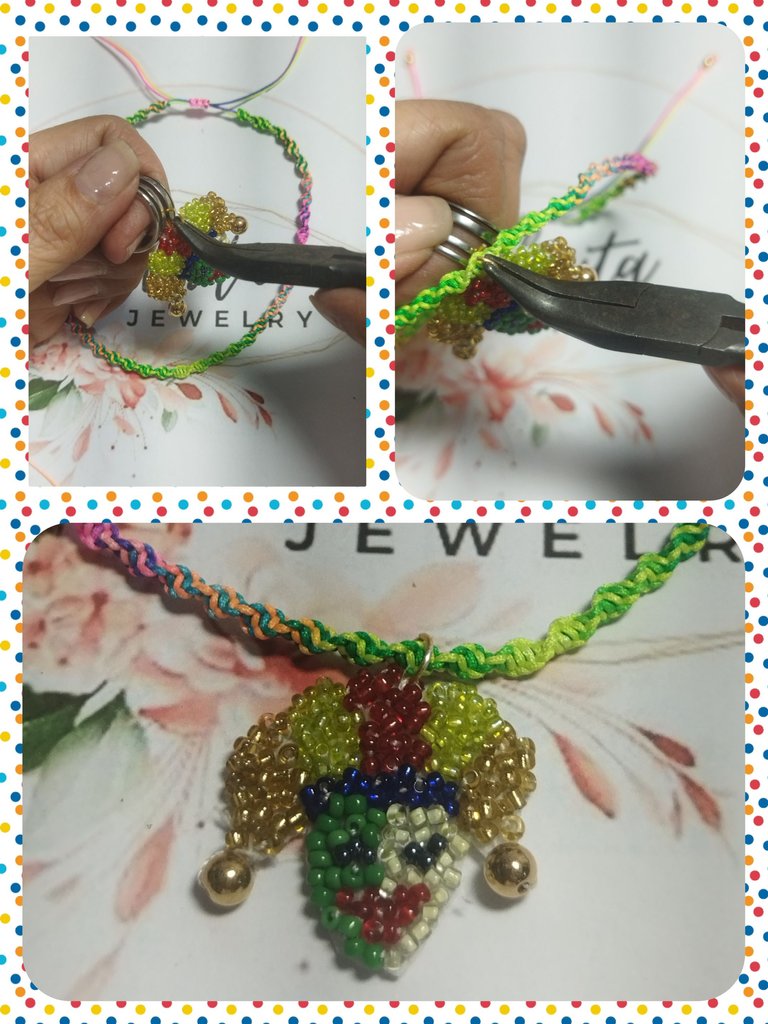
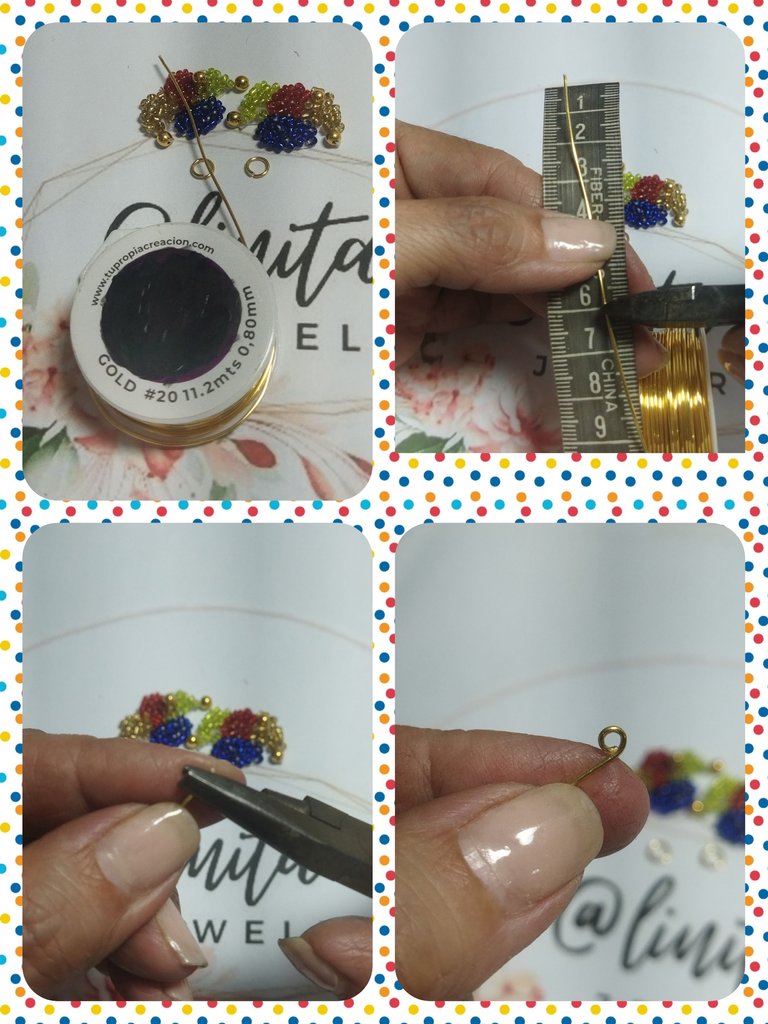
WIRE RINGS
To make the hoops or rings we are going to use #20 wire and a conical clamp. We make several turns in the desired thickness of the clamp and with the cutting clamp we chop the rings.
AROS DE ALAMBRE
Para realizar los aros o argollas vamos a utilizar alambre #20 y una pinza cónica. Realizamos varios giros en el grosor deseado de la pinza y con la pinza de corte picamos los aros.
We take a ring and with the clamp and the ring we open it and then we introduce it through the upper part of the harlequin, trying to make the perforation a little deep so that it does not break.
Tomamos una argolla y con la pinza y el anillo abrimos y luego la introducimos por la parte superior del arlequín, tratando que la perforación quede un poco profunda para que no se rompa.
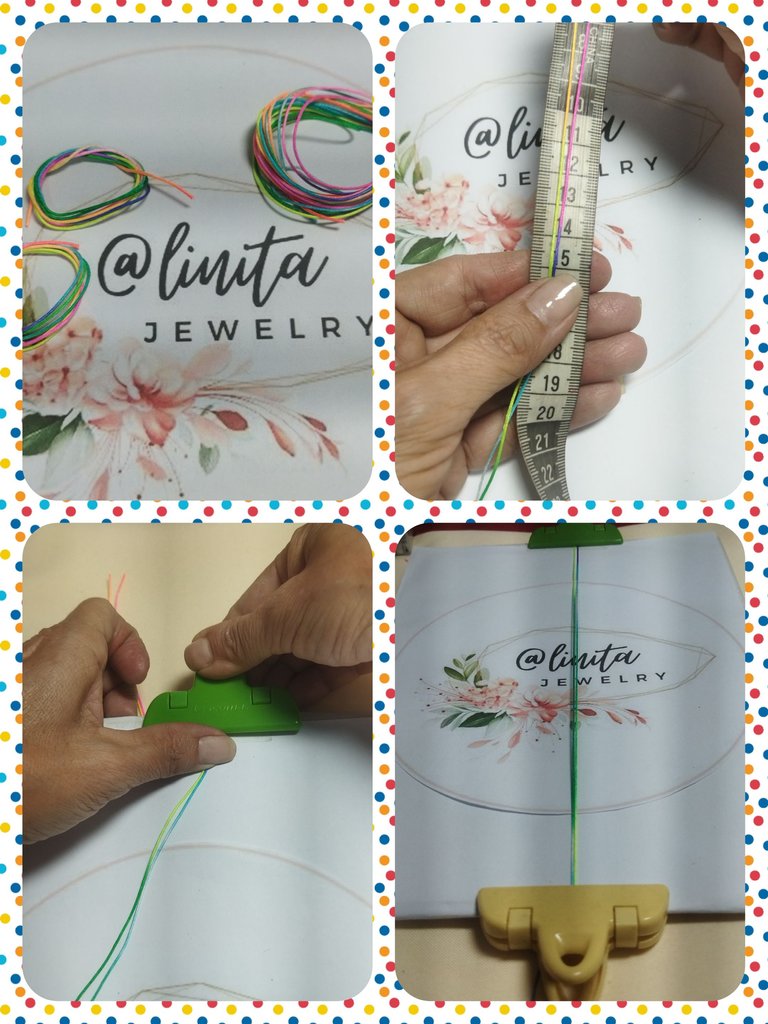
CHOKER MULTICOLOR
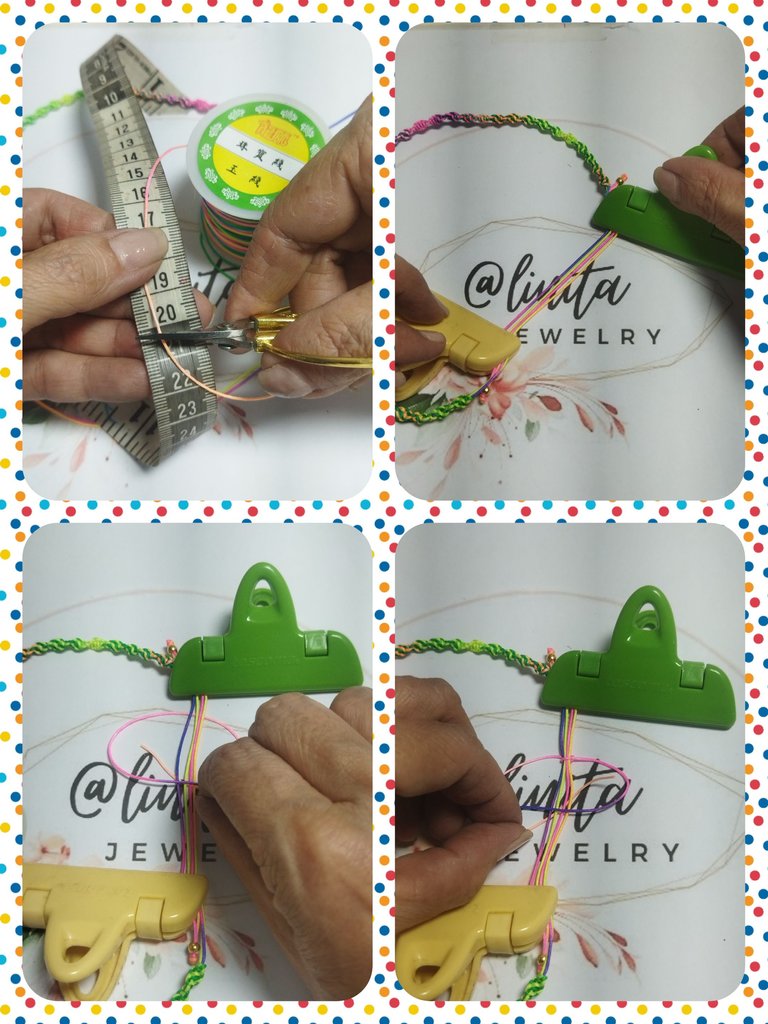
To make the choker I used 1 mm multicolored Chinese thread and made spiral-type macramé weaving, which consists of making flat knots but on only one side.
For this fabric we are going to use 2 strands of 60 cm and 1 of 3 meters.
- We take the two 60 cm strands and join them so that they are even. Then we measure 15 cm to begin weaving. We take it to the board and in the 15 cm that we measured we place the clamp and at the bottom of the board we hold it with another clamp so that the threads remain warm.
CHOKER MULTICOLOR
Para la realización del choker utilicé hilo chino de 1 mm multicolor y realicé el tejido macramé tipo espiral que consiste en realizar nudos planos pero de un solo lado.
Para este tejido vamos a utilizar 2 hebras de 60 cmm y 1 de 3 mts.
- Tomamos las dos hebras de 60 cm y unimos que queden parejas. Luego medimos 15 cm para comenzar a realizar el tejido. Llevamos a la tabla y en los 15 cm que medimos colocamos la pinza y en la parte de abajo de la tabla sujetamos con otra pinza que los hilos queden templados.
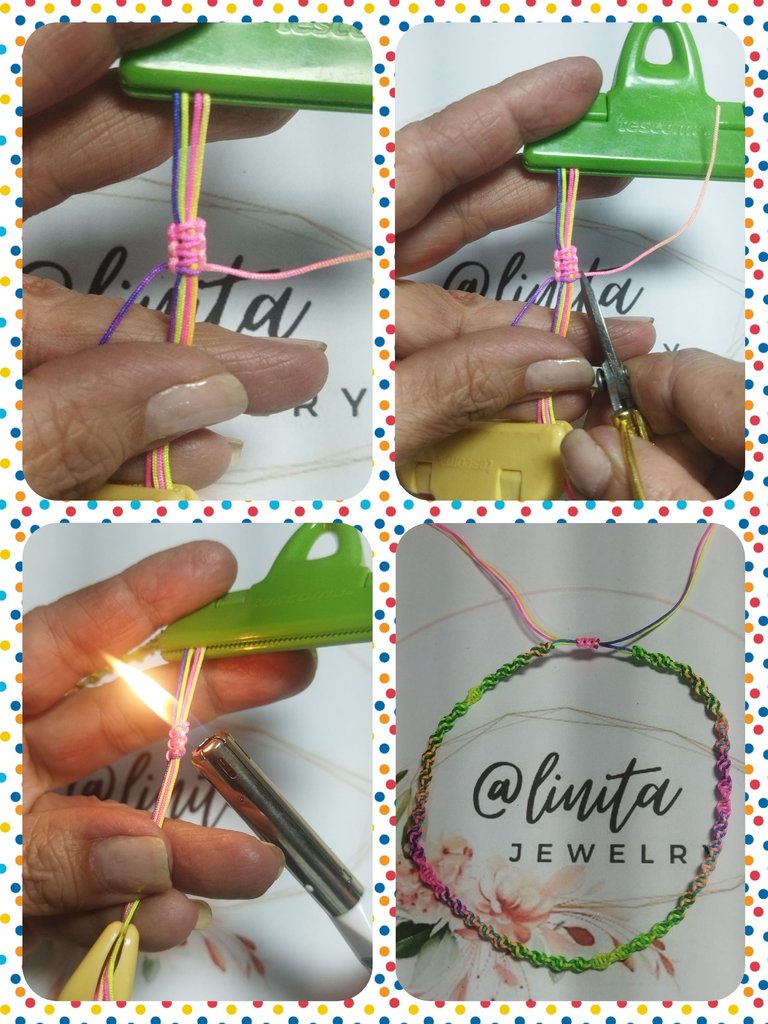
Now we take the 3 meter thread and fold it in half. We pass under the base threads, which are attached to the board, and begin to tie the flat knot.
We make a kind of 4 with the thread on the left side, then we pass the thread on the right side over it and pass the end of the thread just below the intersection of the threads. We adjust and form the knot.
Ahora tomamos el hilo de 3 mts y doblamos a la mitad. Pasamos por debajo de los hilos base, que están sujetos a la tabla y comenzamos a realizar el nudo plano.
Realizamos una especie de 4 con el hilo del lado izquierdo, luego pasamos el hilo del lado derecho por encima y el extremo de la hebra la pasamos justo por debajo de la intersección de los hilos. Ajustamos y formamos el nudo.
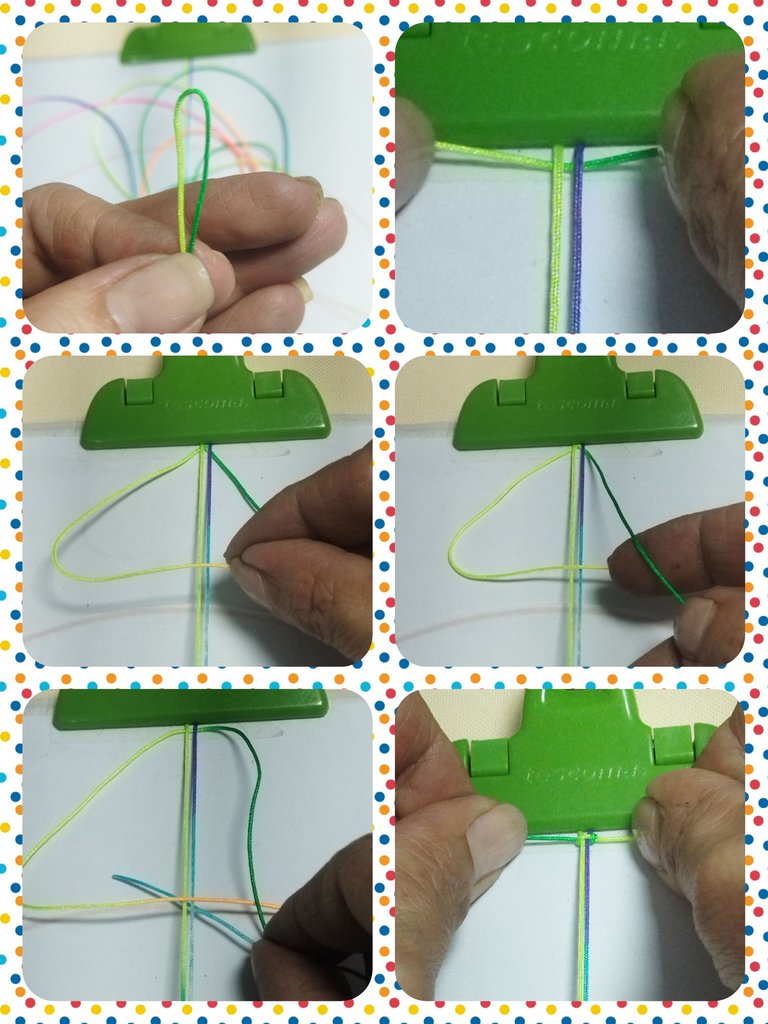
We repeat the same process as many times as necessary. As we tie the knot, the fabric forms a kind of spiral. When it becomes difficult for us to tie the knot, what we will do is rotate the fabric until the work becomes easier.
Repetimos el mismo proceso cuantas veces sea necesario. A medida que vamos realizando el nudo, el tejido va formando una especie de espiral. Cuando se nos haga difícil realizar el nudo lo que haremos será girar el tejido hasta que se nos facilite la labor.
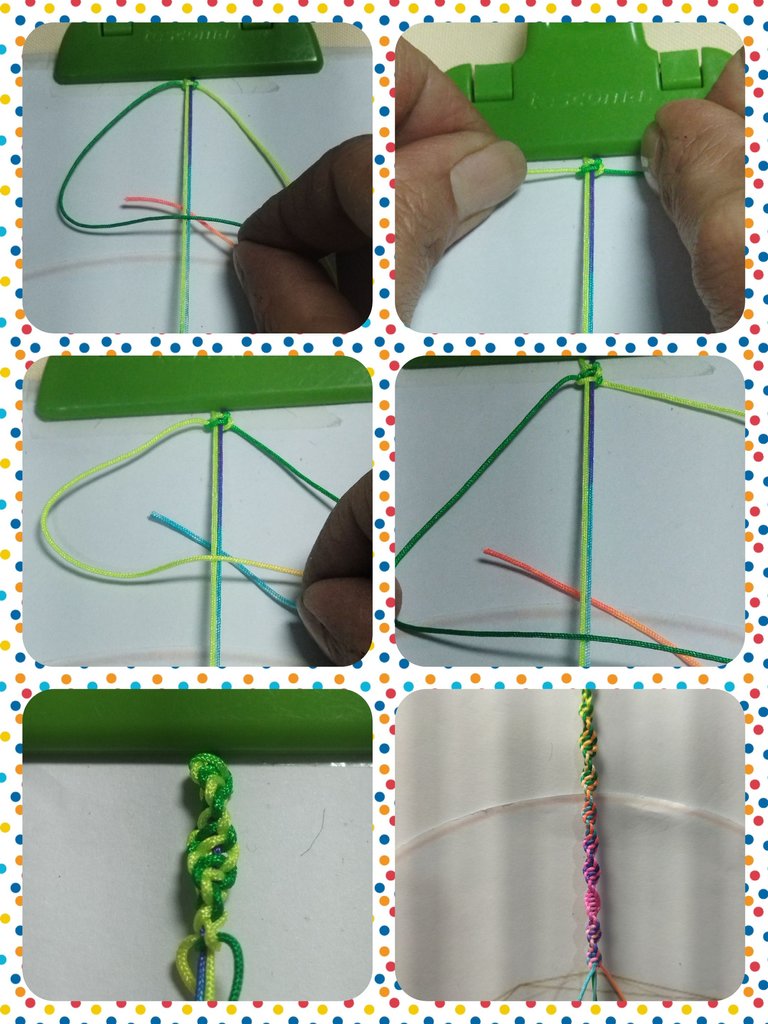
Once we reach 32 cm of fabric, we cut the outer threads and keep the two base threads, which are the central ones, and we seal them.
Una vez que alcanzamos 32 cm de tejido, cortamos los hilos exteriores y conservamos los dos hilos base, que son los centrales y sellamos.
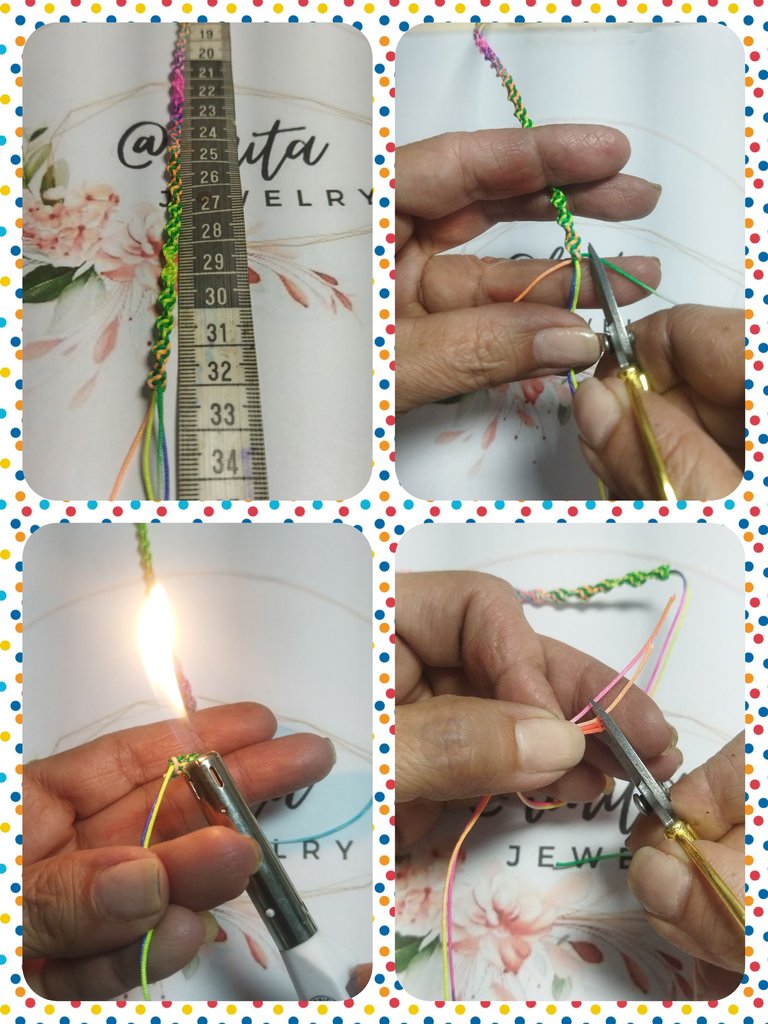
We make the needle point at the ends of the threads and place a 4 mm pellet at each of the ends, we make a knot, cut and seal.
Realizamos la punta aguja en los extremos de los hilos y colocamos un balín de 4 mm en cada uno de los extremos, realizamos un nudo, cortamos y sellamos.
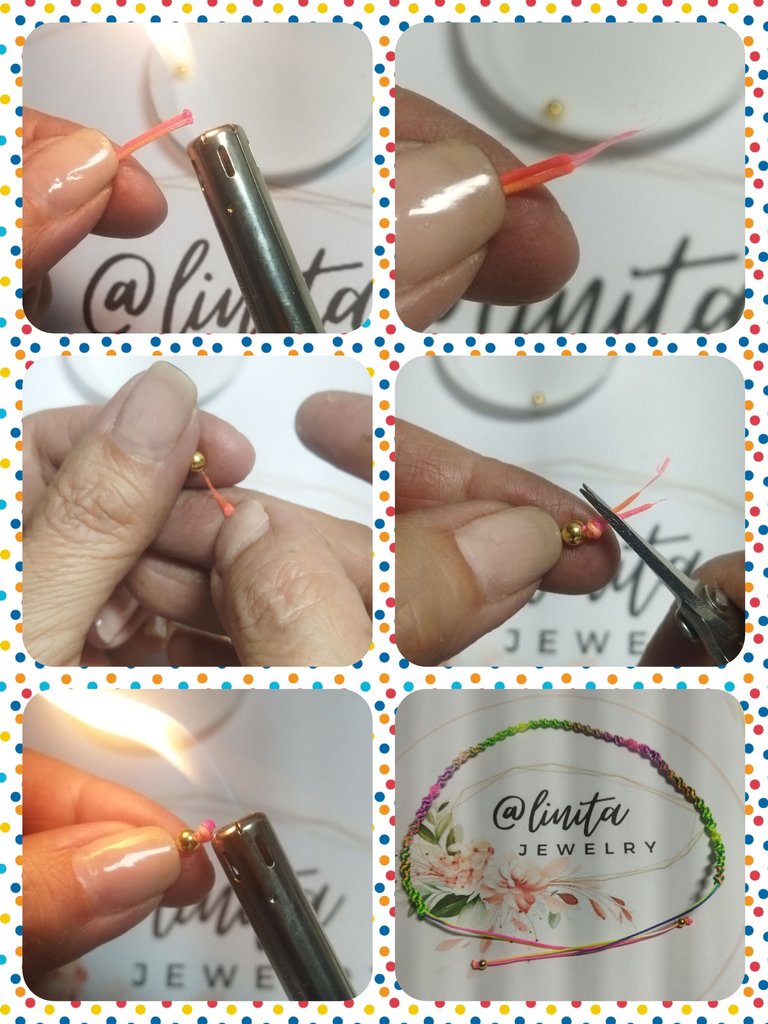
We make an adjustable knot, forming 3 complete flat knots at the junction of the ends. We cut and seal.
Realizamos un nudo ajustable, formando 3 nudos planos completo en la unión de los extremos. Cortamos y sellamos.
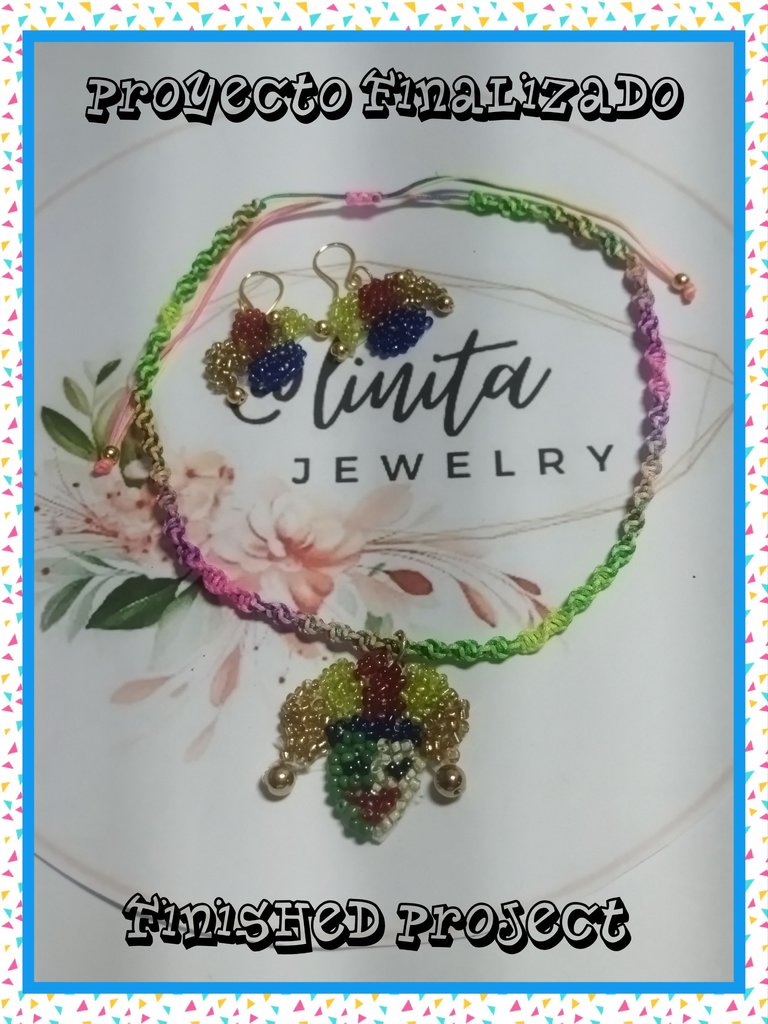
We take the harlequin pendant and place it in the choker and that's it.
Tomamos el dije de arlequín y lo colocamos en el choker y listo.
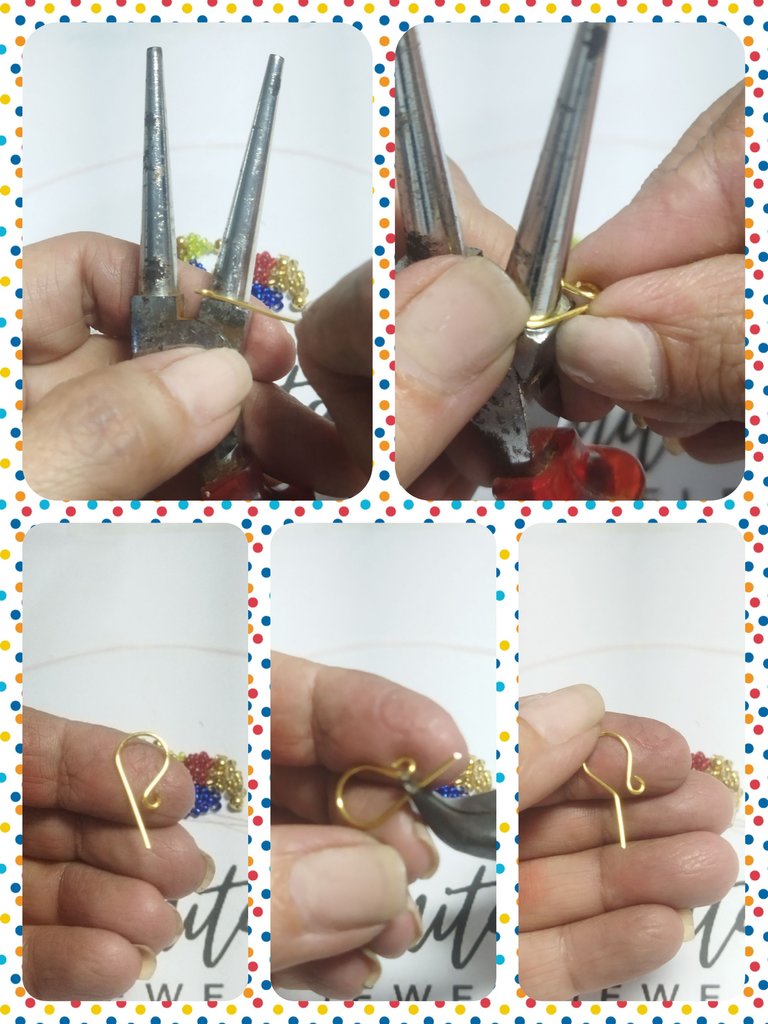
TENDRILLOS
With the #20 wire and the conical and cutting pliers we make the hooks for the tendrils.
We take 6 cm of wire and make a ring of approximately 1 mm at one end.
ZARCILLOS
Con el alambre #20 y las pinzas cónicas y de corte realizamos los anzuelos para los zarcillos.
Tomamos 6 cm de alambre y realizamos un aro de 1 mm aproximadamente en un de los extremos.
Now we take the end where we made the ring to the widest part of the conical clamp and make a 340º turn to form the hook.
We make a small 45º bend with the flat clamp.
Ahora llevamos el extremo donde realizamos el aro a la parte más ancha de la pinza cónica y realizamos un giro de 340º para formar el anzuelo.
Realizamos un pequeño doblez de 45º con la pinza plana.
We make the other hook and with the measurement of the previous one we cut the excess wire so that both hooks are of equal size.
Hacemos el otro anzuelo y con la medida del anterior realizamos el corte del alambre sobrante para que ambos anzuelos queden de igual medida.
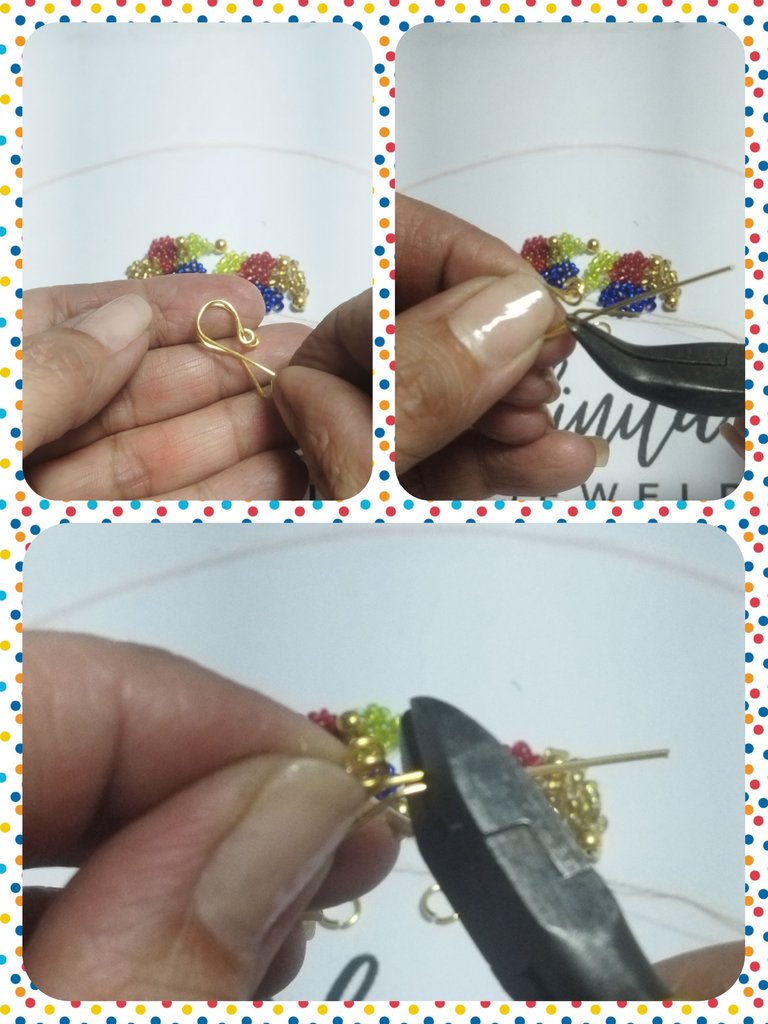
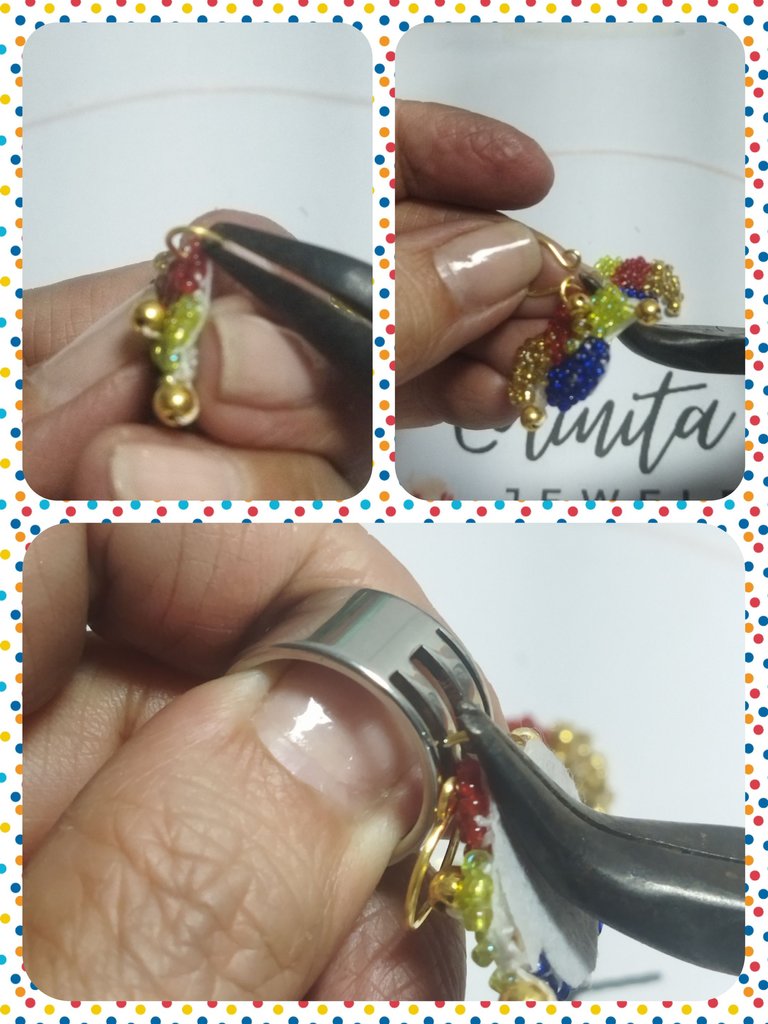
We place the hoop on the appliqués of the hats, followed by the hooks and we have already formed the tendrils.
Colocamos el aro en los apliques de los sombreros, seguido de los anzuelos y ya hemos formado los zarcillos.
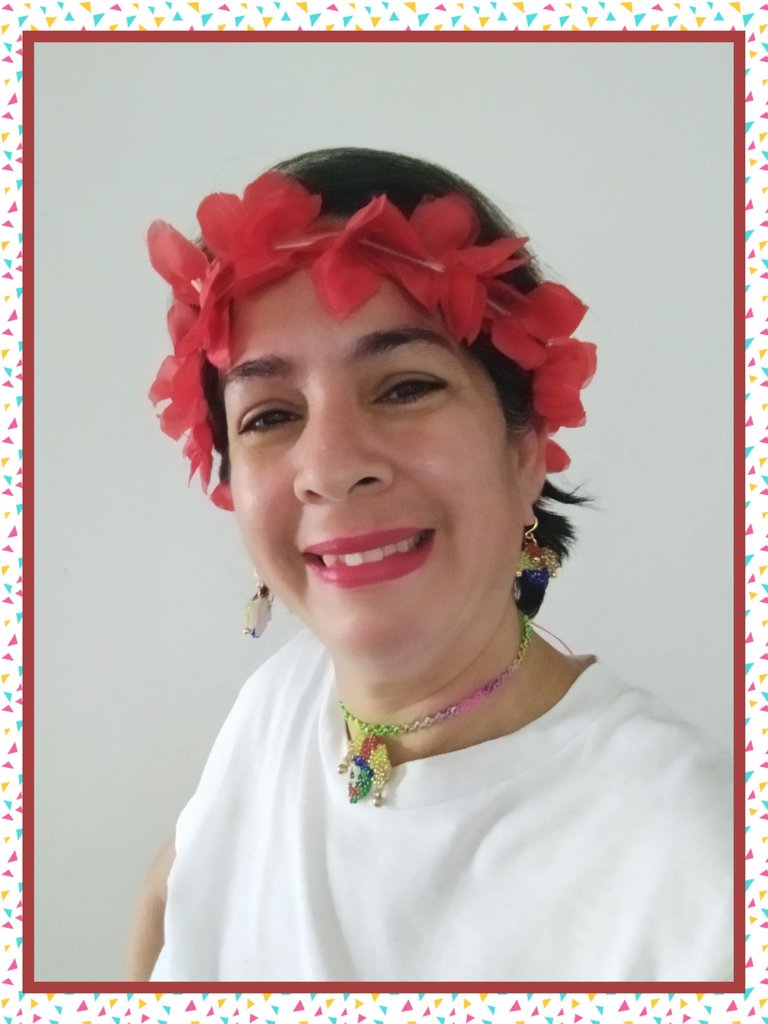
A very colorful game to show off in the parades or at any gathering where we celebrate the carnival festivities. I hope you like it. I invite @vicmito74, @agathalara and @aarolita to participate in this colorful contest.
Un juego muy colorida para lucir en las comparsas o en cualquier reunión donde celebremos las festividades carnestolendas. Espero les guste. Invito a @vicmito74 , @agathalara y @aarolita a participar en este colorido concurso.

Hermoso y gran trabajo @linita
!discovery 50
Muchas gracias ☺️☺️🫂🫂
This post was shared and voted inside the discord by the curators team of discovery-it
Join our Community and follow our Curation Trail
Discovery-it is also a Witness, vote for us here
Delegate to us for passive income. Check our 80% fee-back Program
Hola. Me da mucho gusto ver con detalles el paso a paso de tu proyecto, la verdad es que hacer esta figura de 🃏 arlequín te llevó bastante tiempo y dedicación. Se te ven muy lindos. Suerte 🍀
Gracias, lleva algo de dedicación pero es muy fácil hacerlo. Aprecio tu comentario.
The choice of beads is quite amazing to say the least.
Thanks, a simple project with cheap materials
Muy hermosa trabajo amiga saludos y suerte en el concurso ❤️
Gracias por tus buenos deseos. Igualmente para ti. Saludos 😁
Esto ha quedado hermoso, me encanta el hilo chilo tornasol es precioso. Ese nudo plano en espiral se ve muy bonito y e arlequín tambien.
Muy lindo quedo este collar. Felicidades!
Hermosa técnica que nos presentas amiga @linita, nos encanta la creatividad que has empleado, hiciste un lindo trabajo.
Te deseamos mucho éxito en él concurso 🎊🎉🎭