WELCOME TO MY BLOG
Throughout the month of February we celebrate the Day of Love and Friendship. My daughters are my greatest love, but like everyone, we are born and grow up and each one has to find their own path. We train our children to fly with their own wings, at least it has been my greatest task since I became a mother, to make my daughters people with their own criteria, without emotional dependence or rather without attachment, because each one has the right to choose your partner and enjoy the best moments, while the relationship lasts and if it is for a long, long time, better. My daughters are already at that stage, falling in love and experimenting with what it is to have partners, with my best advice and always counting on my support, but always letting them be, because there is no better learning than the empirical one.
Today's publication is dedicated to them, to the love of a couple, to the first crush, to those noble feelings that are born from our first love, to which we give our hearts hoping that it will be eternal and although many times, it is not as we dream it, always We keep the hope that it will be forever. In these times, when love has become secondary, because the material prevails above all, it is good to always try to make love predominate, even with small details, although I have always thought that a kiss, a hug, a caress say much more than a luxurious gift, if what you receive afterwards is indifference or mistreatment.
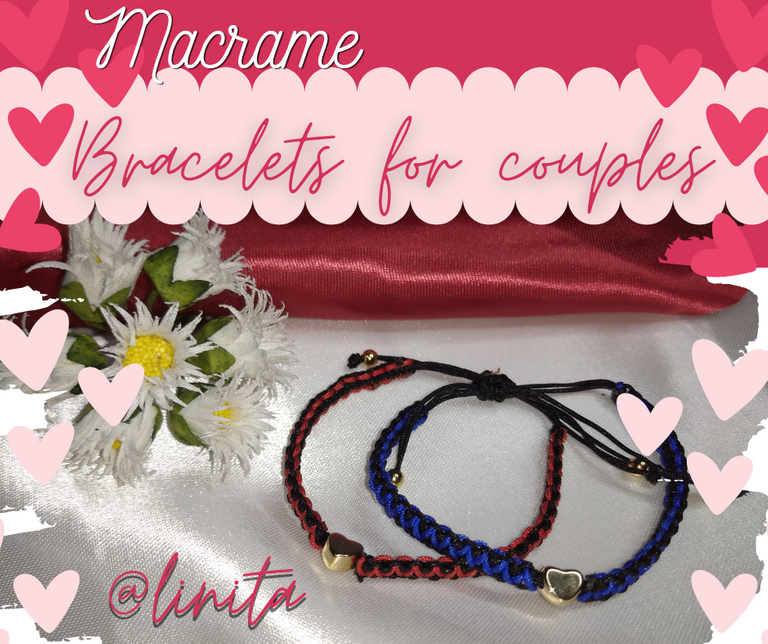
These bracelets are intended for two people who love each other, my eldest daughter has asked me to make them for her and her boyfriend and they have the meaning of the union of two hearts that are united by a very powerful bond "LOVE".
BIENVENIDOS A MI BLOG
Durante todo el mes de febrero celebramos el Día del Amor y la Amistad. Mis hijas son mi mas grande amor, pero como todos, nacemos y crecemos y cada quien tiene que buscar su propio camino. Formamos a nuestros hijos para que vuelen con sus propias alas, por lo menos ha sido mi más grande labor desde que soy madre, hacer de mis hijas unas personas con criterio propio, sin dependencia emocional o mejor dicho sin apego, porque cada quien tiene el derecho de escoger a su pareja y disfrutar de los mejores momentos, mientras dure la relación y si es por mucho, mucho tiempo, mejor. Ms hijas ya están en esa etapa, de enamoramiento y la experimentación de lo que es tener parejas, con mis mejor consejos y contando siempre con mi apoyo, pero siempre dejándolas ser, porque no hay mejor aprendizaje que el empírico.
La publicación de hoy está dedicada a ellos, al amor de pareja, al primer enamoramiento, a esos sentimientos nobles que nacen de nuestro primer amor, al que entregamos nuestro corazón esperando que sea eterno y aunque muchas veces, no es como lo soñamos, siempre guardamos la esperanza que sea para siempre. En estos tiempos, que el amor ha pasado a ser secundario, porque se impone lo material ante todo, es bueno siempre tratar de que predomine el amor aunque sea con pequeños detalles, aunque siempre he pensado que un beso, un abrazo, una caricia dicen mucho más que un lujoso regalo, si después lo que recibes es indiferencia o malos tratos.
Estas pulseras están destinadas a dos personas que se quieren, mi hija mayor me ha pedido que se las haga a ella y a su novio y tienen como significado la unión de dos corazones que están unidos por un vínculo muy poderoso "EL AMOR".
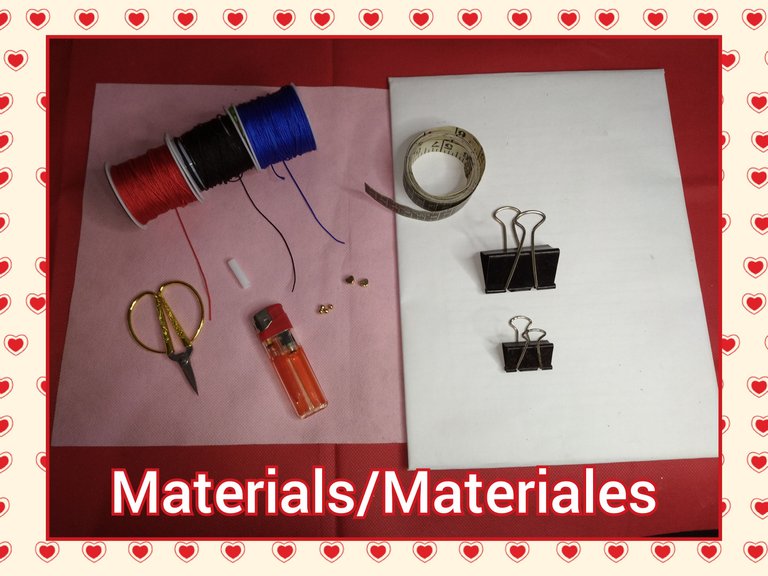
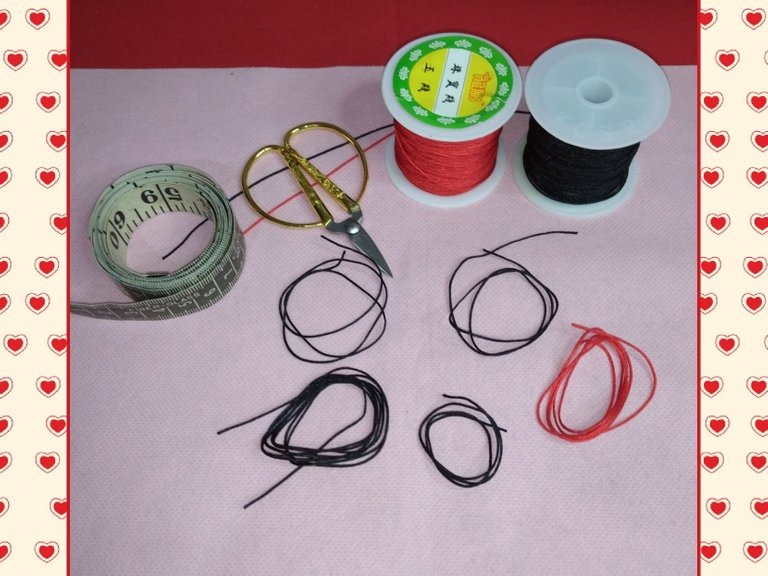
MATERIALS
- Chinese threads 0.1 mm red, blue and black
- Heart dividers
- Gold field pellets
- Scissors
- Lighter
- Table and hooks
- Piece of straw
MATERIALES
- Hilos chino 0,1 mm rojo, azul y negro
- Separadores de corazón
- Balines de gold field
- Tijera
- Encendedor
- Tabla y ganchos
- Trozo de pitillo o popote
STEP BY STEP // PASO A PASO
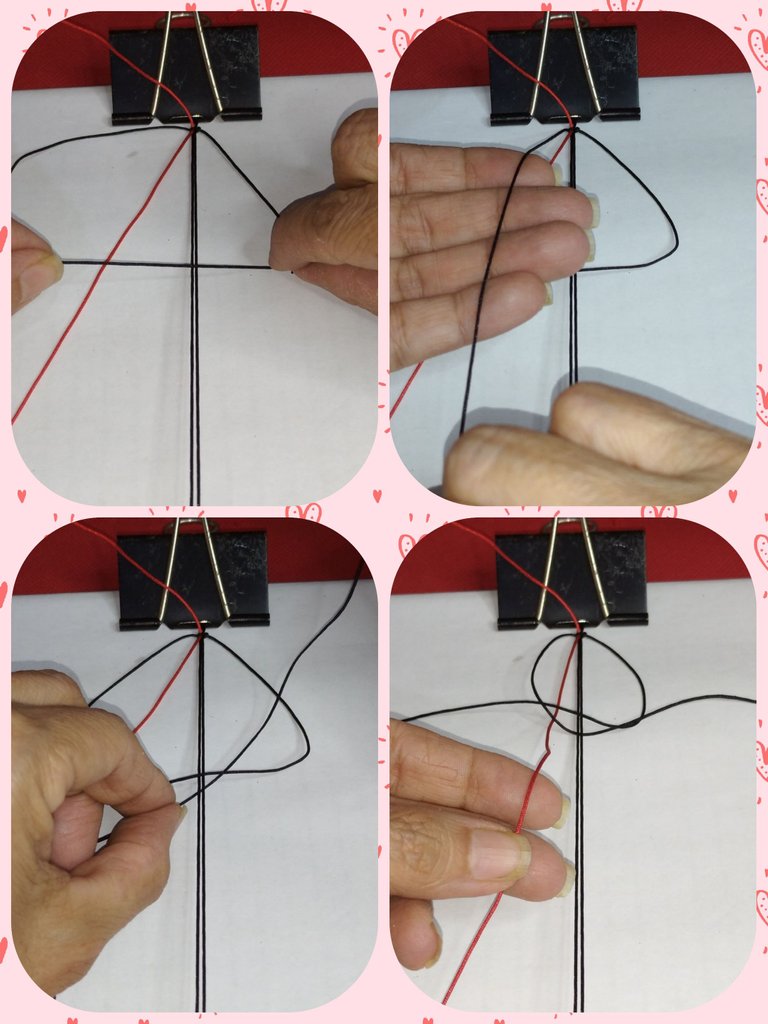
To make the first bracelet we are going to need 2 pieces of black Chinese thread of 40 cm each, 1 piece of 100 cm of black color, 2 pieces of 60 cm of red color or one of 20 cm for the closure of the bracelet.
Para realizar la primera pulsera vamos a necesitas 2 trozos de hilo chino de color de negro de 40 cm cada uno, 1 trozo de 100 cm de color negro, 2 trozos 60 cm de color rojo u uno de 20 cm para el cierre de la pulsera.
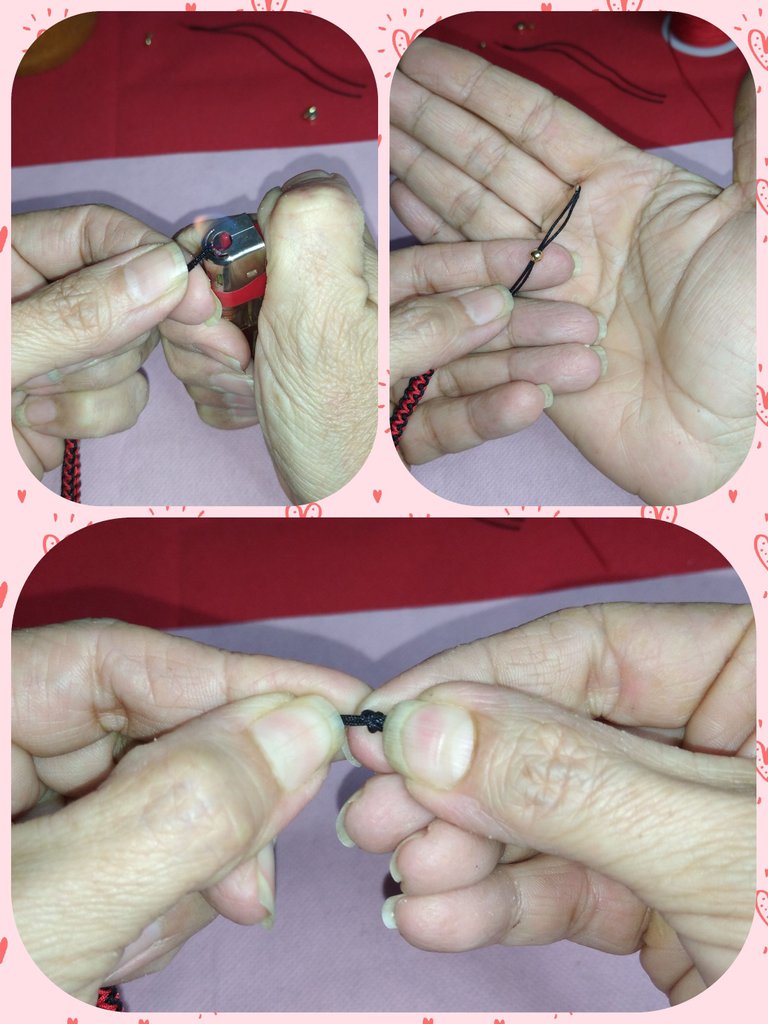
Tomamos los de 40 cm y unimos, medidos 7 cm y a esa medida colocamos en la tabla y sujetamos con los ganchos por ambos extremos.
Tomamos los hilos de 40 cm y unimos, medidos 7 cm y a esa medida colocamos en la tabla y sujetamos con los ganchos por ambos extremos.

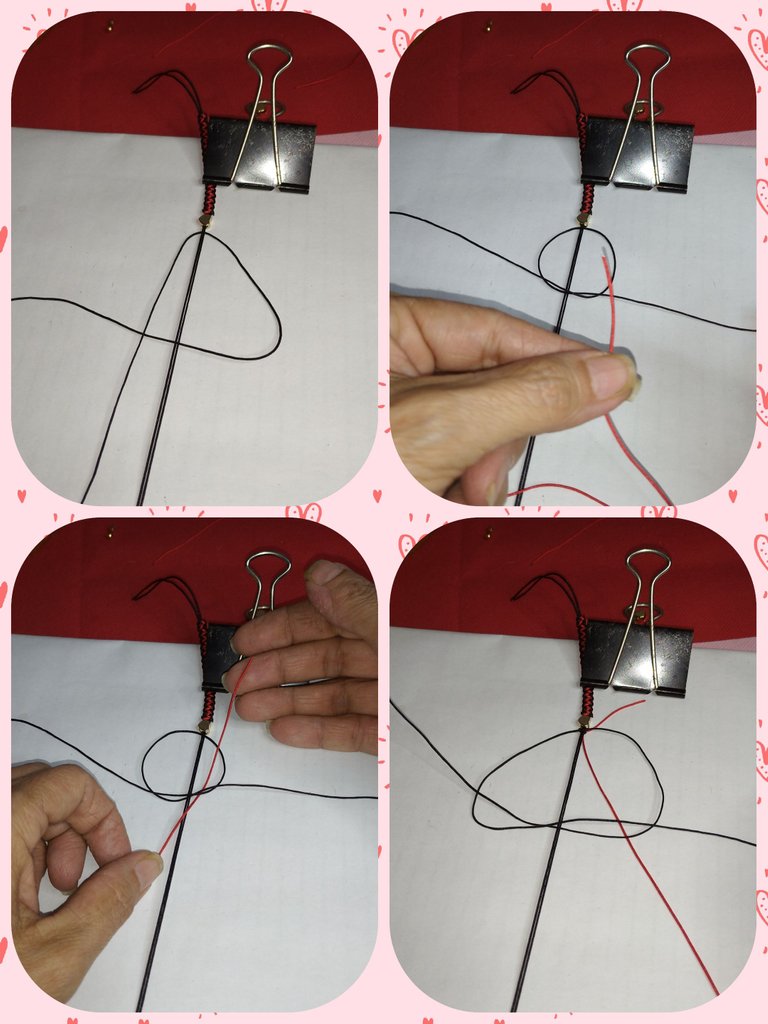
We take the thread of 80 cm and pass under the ones that we have on the table. We match the ends and start working with a flat knot.
Without closing the knot, we take the red thread and pass it under the first part of the flat knot on the left side and pull, leaving 3 cm long before tightening the knot.
Tomamos el hilo de 80 cm y pasamos por debajo de los que tenemos en la tabla. Emparejamos las puntas y comenzamos trabajando con un nudo plano.
Sin cerrar el nudo, tomamos el hilo rojo y lo pasaremos por debajo de la primera parte del nudo plano del lado izquierdo y halamos dejando 3 cm de largo antes de ajustar el nudo.
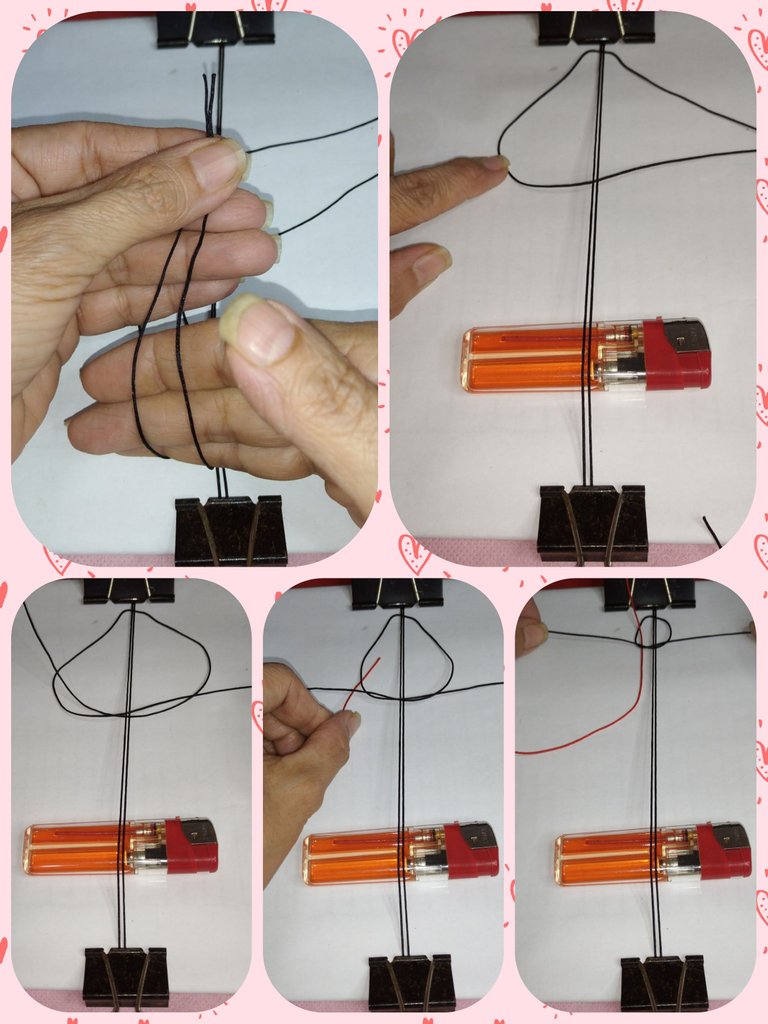
We make another flat knot above the red thread (that is, the red thread must be below the black ones) and on the opposite side to the previous one without closing completely.
Realizamos otro nudo plano por encima del hilo rojo (es decir, el hilo rojo debe quedar debajo de los negros)y del lado opuesto al anterior sin cerrar completamente.
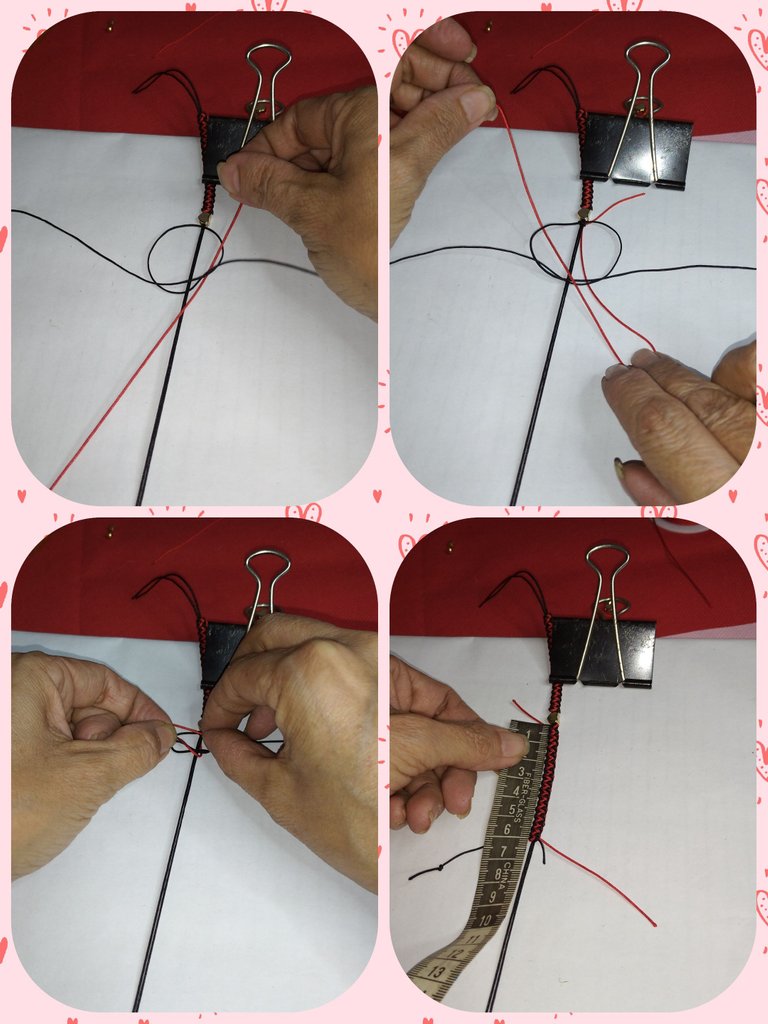
We take the tip of the red thread and we will pass it through the space formed on the right side of the knot, then we take the remaining tip of 3 cm and we also pass it through the same space. Then we adjust the knot, pulling both threads, both the red and the black ones as we adjust.
Tomamos la punta del hilo rojo y la pasaremos por dentro del espacio formado del lado derecho del nudo, luego tomamos la punta sobrante de 3 cm y también la pasamos por el mismo espacio. Luego ajustamos el nudo, halando ambos hilos, tanto los rojos como los negros a medida que vayamos ajustando.
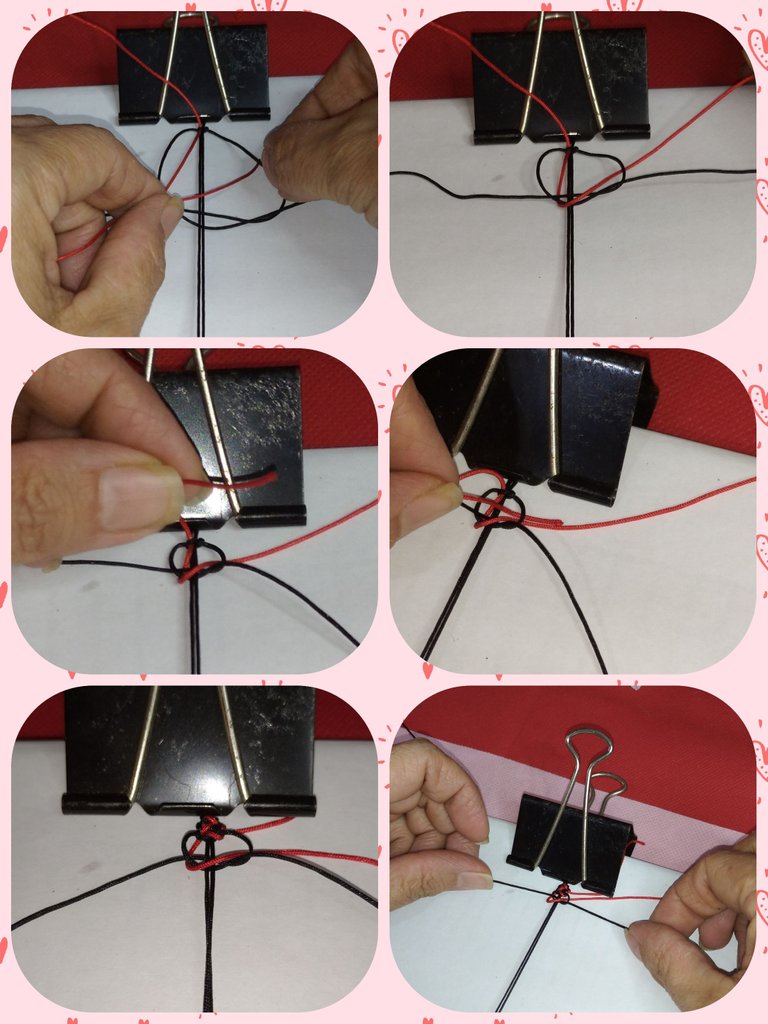
We make another flat knot in the same way as the previous one and introduce the red thread through the space on the left side and close.
Realizamos otro nudo plano de la misma forma que el anterior e introducimos el hilo rojo por el espacio del lado izquierdo y cerramos.
We will do the same procedure as in the previous steps until we obtain 6 cm of tissue. Remove from the table and cut the excess threads. We seal with the lighter.
Haremos el mismo procedimiento de los pasos anteriores hasta obtener 6 cm de tejido. Retiramos de la tabla y cortamos los hilos excedentes. Sellamos con el encendedor.
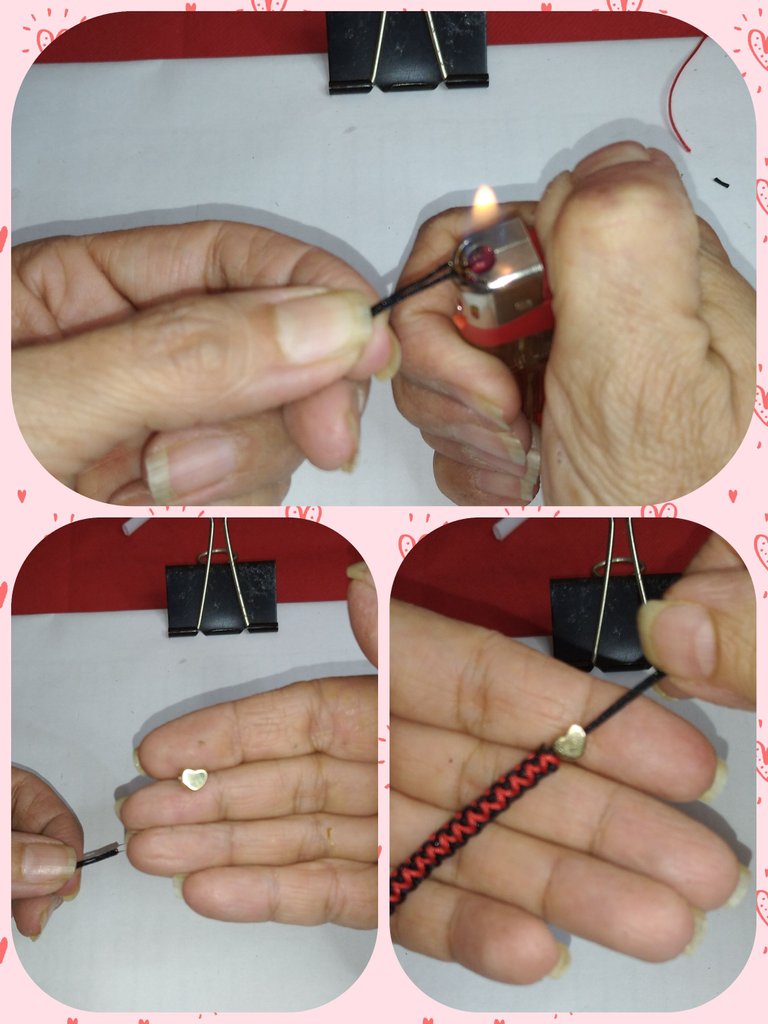
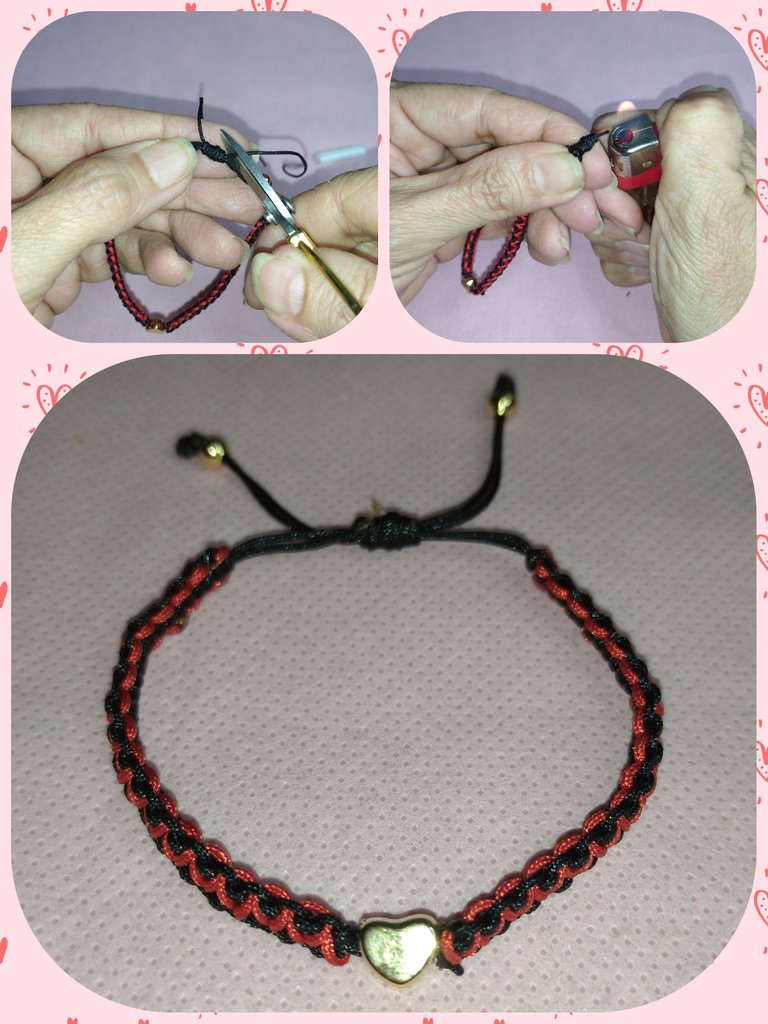
To place the heart separator we will make fine points with the lighter at the non-woven end of the bracelet and introduce it through the separator.
Para colocar el separador de corazón haremos unas puntas finas con el encendedor en el extremo sin tejido de la pulsera e introducimos por el separador.
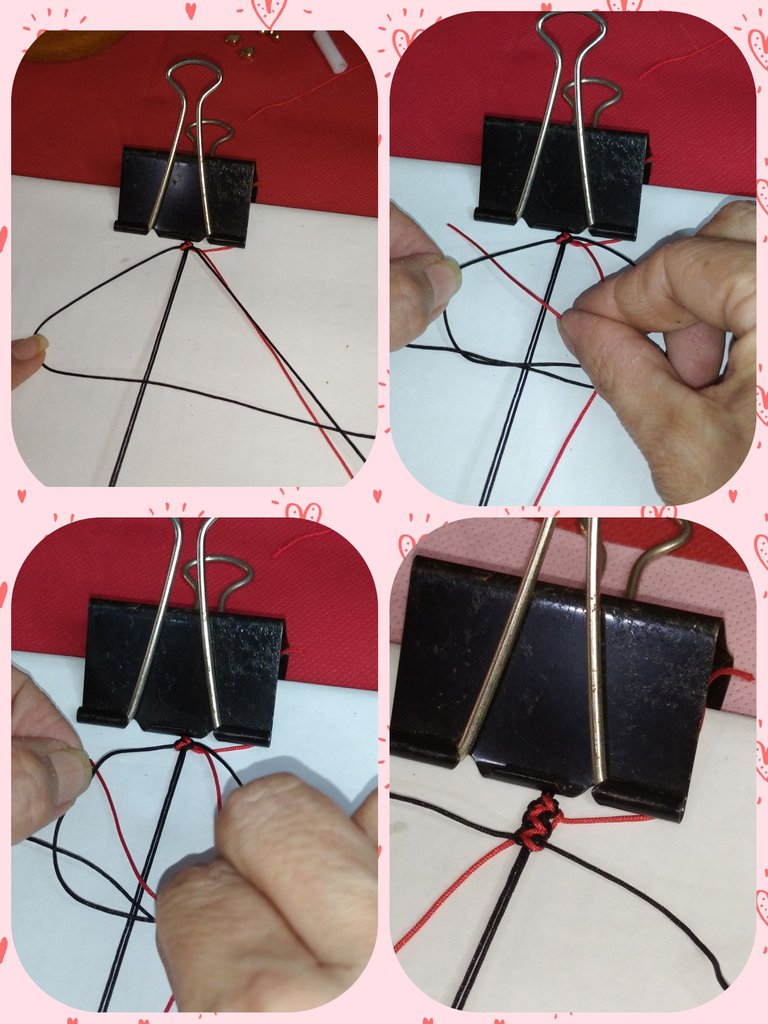
We put the bracelet back on the work table and from the heart we start the weaving again. Taking into account that we must start on the opposite side to the one we started the first part, so that the figures that the fabric forms coincide and create harmony.
We begin by making a flat knot on the right side with the black thread left over from the previous fabric, then we introduce the 50 cm red thread and tighten. And we continue with the weaving repeating the previous steps until completing 6 cm of weaving, equal to the side that we have already woven.
Colocamos nuevamente la pulsera en la tabla de trabajo y a partir del corazón comenzamos nuevamente el tejido. Tomando en cuenta que debemos comenzar del lado contrario al que comenzamos la primera parte, para que las figuras que forma el tejido coincidan y cree armonía.
Comenzamos haciendo un nudo plano del lado derecho con el hilo negro sobrante del tejido anterior, luego introducimos el hilo rojo de 50 cm apretamos. Y continuamos con el tejido repitiendo los pasos anteriores hasta culminar 6 cm de tejido, igual al lado que ya hemos tejido.
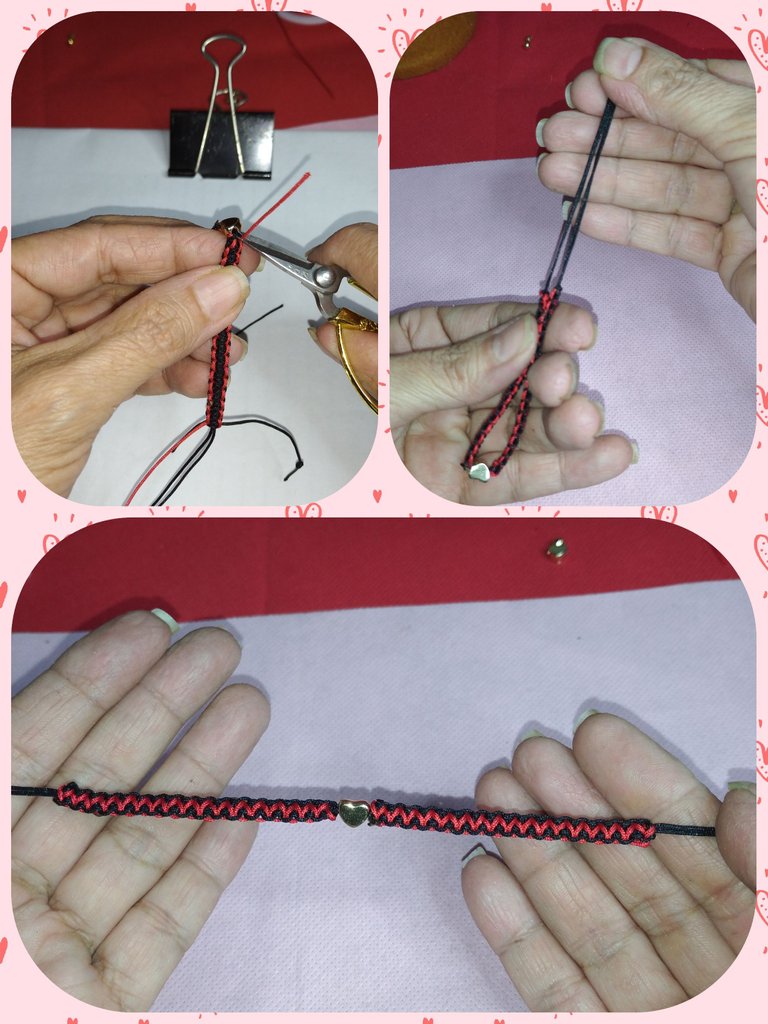
We even out both sides and trim the threads so that they are the same size.
Emparejamos ambos lados y recortamos los hilos de modo que queden del mismo tamaño.
We make a point with the lighter at each end of the threads and introduce the pellets, tie and seal.
Hacemos punta con el encendedor en cada extremo de los hilos e introducimos los balines, anudamos y sellamos.
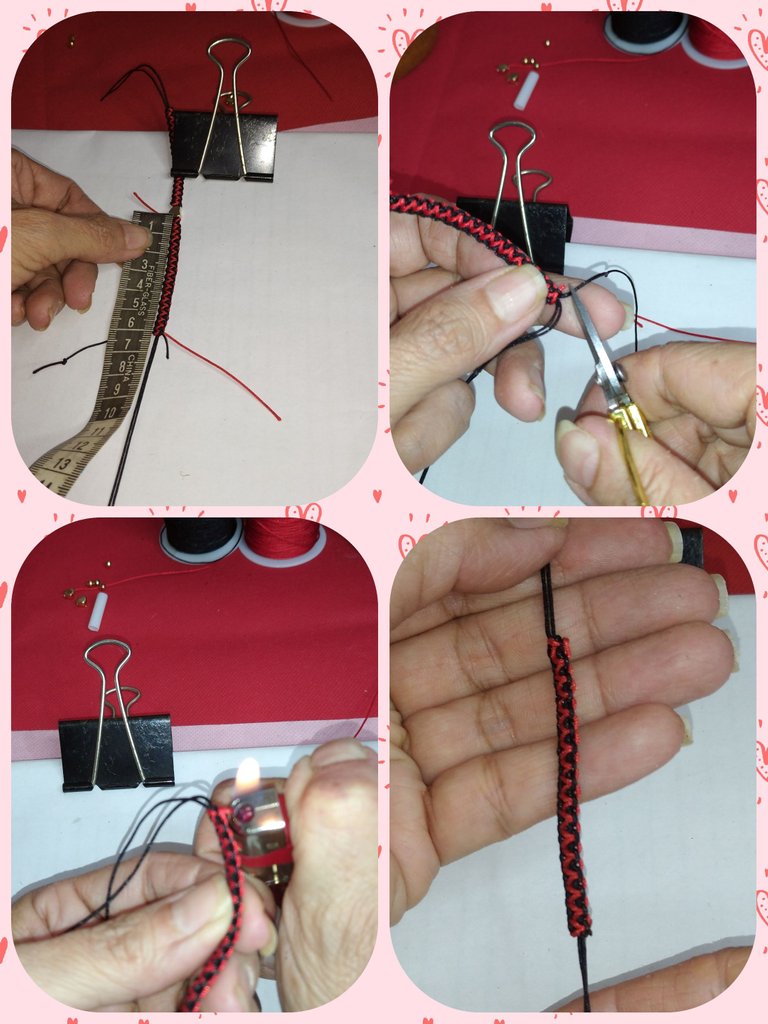
To secure the bracelet we will make a Franciscan knot on the union of the threads of the bracelet. We close the bracelet so that the threads are at the same distance. We place the piece of cigarette and make the Franciscan knot. We remove the cigarette and adjust the knot so that it is tight because it will not serve to open and close the bracelet and adjust it to the size of the wearer's wrist.
Para asegurar la pulsera haremos un nudo franciscano sobre la unión de los hilos de la pulsera. Cerramos la pulsera de manera que los hilos queden a la misma distancia. Colocamos el trozo de pitillo y realizamos el nudo franciscano. Sacamos el pitillo y ajustamos el nudo de manera que quede bien apretado porque éste no servirá para abrir y cerrar la pulsera y ajustarla al tamaño de la muñeca del portador.

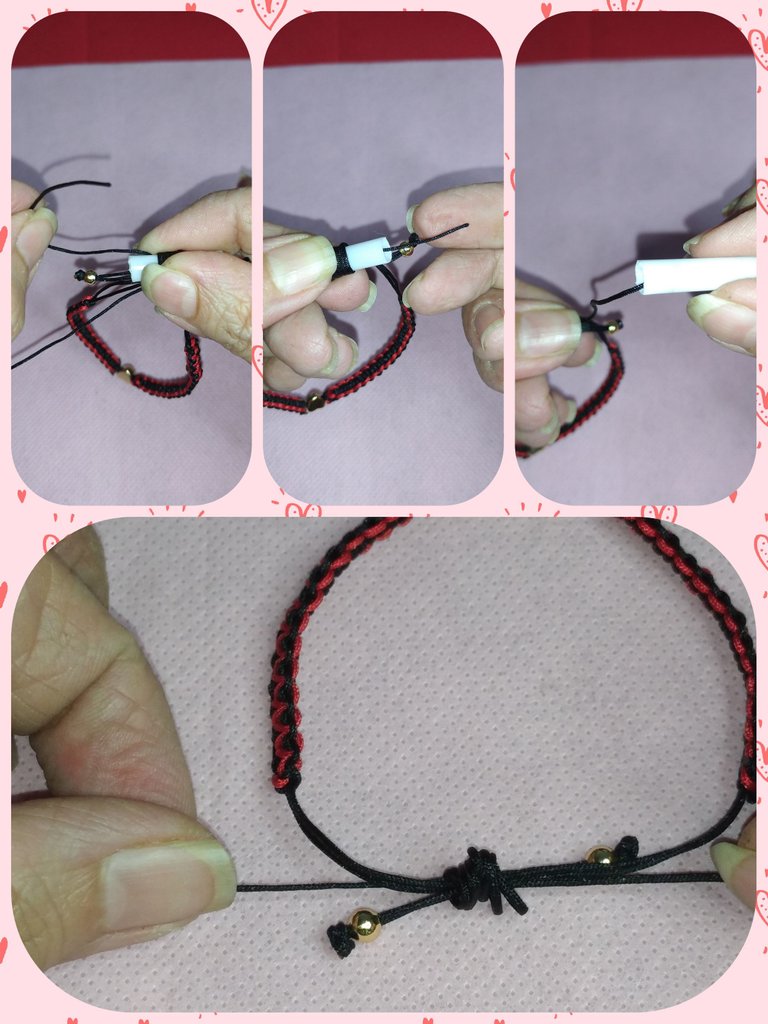
We cut the excess threads and seal to finish the first bracelet.
Cortamos los hilos sobrantes y sellamos para terminar la primera pulsera.
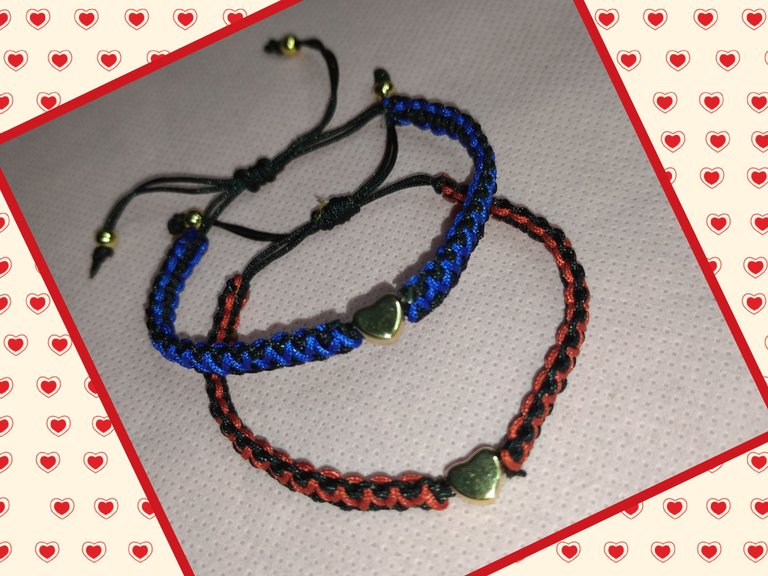
We make the other bracelet but we are going to change the red thread for the blue thread to make the pair and we proceed to carry out all the previous steps.
And so we have made some bracelets for couples, representing that union that each one demonstrates in the best way. These bracelets are very fashionable among the boys and not very boys. Currently we can see couples holding hands, wearing the same clothes and also among their outfits wearing beautiful bracelets that identify them as a couple. I hope this bracelet fulfills its purpose and my daughter's partner likes it. See you next time.
Realizamos la otra pulsera pero vamos a cambiar el hilo rojo por el hilo azul para hacer la pareja y procedemos a realizar todos los pasos anteriores.
Y así hemos realizado unas pulseras para parejas, representando esa unión que cada uno demuestra de la mejor manera. Estas pulseras están muy de moda entre los chamos y no muy chamos. Actualmente podemos ver parejas tomados de la mano, vistiendo con las mismas ropas y también entre sus atuendos luciendo lindas pulseras que los identifican como pareja. Espero que esta pulsera cumpla su cometido y le guste a la pareja de mi hija. Nos vemos en la próxima.

The rewards earned on this comment will go directly to the people( @mariajcastro28 ) sharing the post on Twitter as long as they are registered with @poshtoken. Sign up at https://hiveposh.com.
Me gusta mucho tu técnica, por eso el resultado es muy limpio y prolijo. La presentación también es muy linda.
Saludos.
Muchas gracias, aprecio mucho tu comentario 😁🤗
En lo personal este tipo de pulseras me gustan mucho por su acabado casual, además para este mes con la celebración de San Valentín quedan estupendas, gracias por compartir tu tutorial amiga.
Muy bonitas 🤩 me gusta mucho el tejido macramé que usaste. Las pulseras de parejas se han puesto muy de moda actualmente. La verdad es que es muy romántico hacer este tipo de regalos. 😍😄😍
Excelente el paso a paso!!! Felicidades 🎈
Si es muy lindo ver las parejas que se identifican con su vestuario. Hasta para las fiestas se está usando mucho está moda.