WELCOME TO MY BLOG
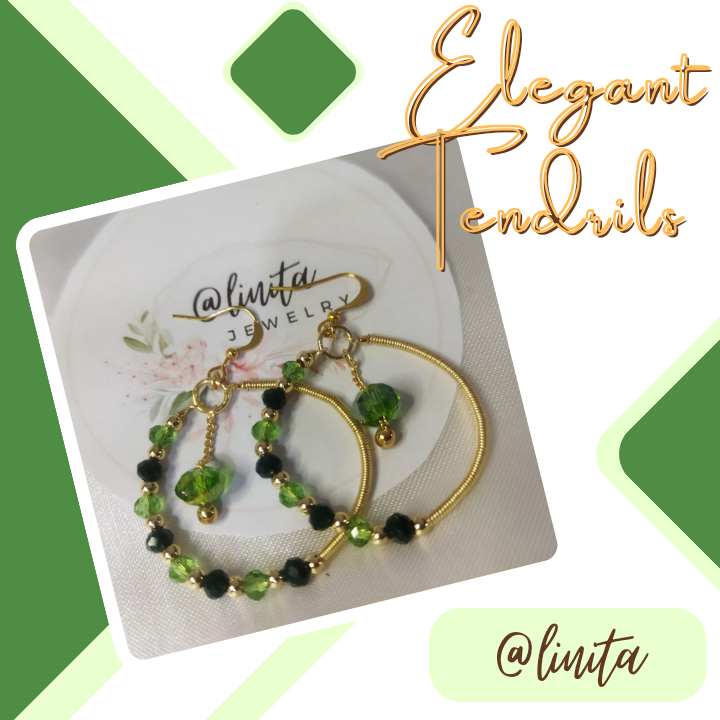
Hellooooo, hellooooooo! Greetings and my respects to the jewelry creators. On this occasion I want to share with you a model of tendrils that I made with the wire technique. Working with wire is a very nice task, I love this technique. The bad thing is that it abuses my fingers a lot and sometimes they even bleed but I don't care when the result is beautiful. These tendrils were made with coiling and green crystals. Green represents hope, rebirth, spring. We all need green in our lives and we can materialize them through our accessories.
I will also share with you how I manually create what is known in jewelry as coiling. Coiling is nothing more than wire, of whatever gauge you want, coiled until you get a spring. There are tools to make this rolling look perfect, but we can also do it manually. With coiling we can make countless accessories.
BIENVENIDOS A MI BLOG
¡Holaaaa, holaaaaa! Saludos y mis respetos a los creadores de bisutería. En esta oportunidad quiero compartirles un modelo de zarcillos que realicé con la técnica de alambrismo. Trabajar con alambre es una tarea muy linda, me encanta está técnica. Lo malo es que me maltrata mucho mis dedos y algunas veces hasta sangrar pero no me importa cuando el resultado es hermoso. Estos zarcillos fueron elaborados con coiling y cristales verdes. El verde representa la esperanza, el renacer, la primavera. Todos necesitamos verdes en nuestras vidas y podemos materializarlos a través nuestros accesorios.
También les compartiré cómo elaboro manualmente lo que es conocido en bisutería como coiling. El coiling no es más que el alambre, del calibre que quieras,enrollado hasta conseguir un resorte. Existen herramientas para que este enrollado quede perfecto, pero también podemos hacerlo manualmente. Con el coiling podemos hacer infinidades de accesorios.
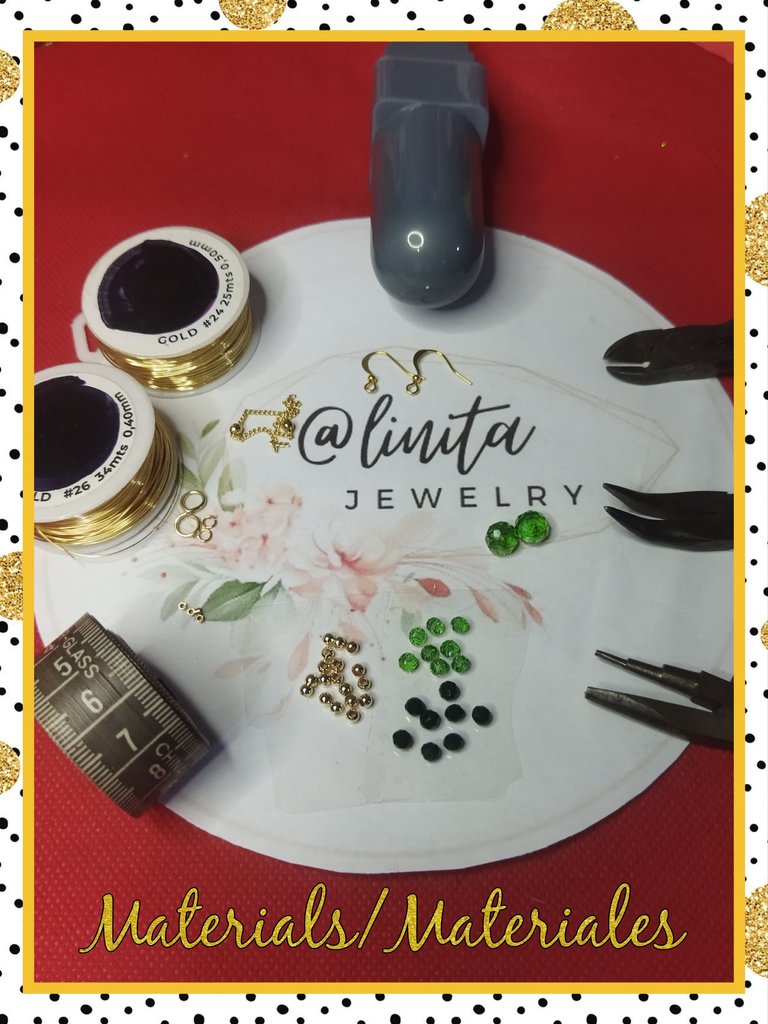
MATERIALS
- Wire #26 and #24
- 4 mm Czech crystals, dark matte green and translucent light green.
- 8mm green crystals
- Chain with pellets
- 3 mm pellets
- 5mm and 1mm hoops
- Hooks for tendrils
- 1mm staples
- Tape measure
- Jewelry tweezers
MATERIALES
- Alambre #26 y #24
- Cristales checo 4 mm, verde mate oscuro y verde claro traslúcido.
- Cristales verdes de 8 mm
- Cadena con balines
- Balines de 3 mm
- Aros de 5 mm y 1 mm
- Anzuelos para zarcillos
- Grapas de 1 mm
- Cinta métrica
- Pinzas de bisutería
STEP BY STEP // PASO A PASO
COILING PREPARATION
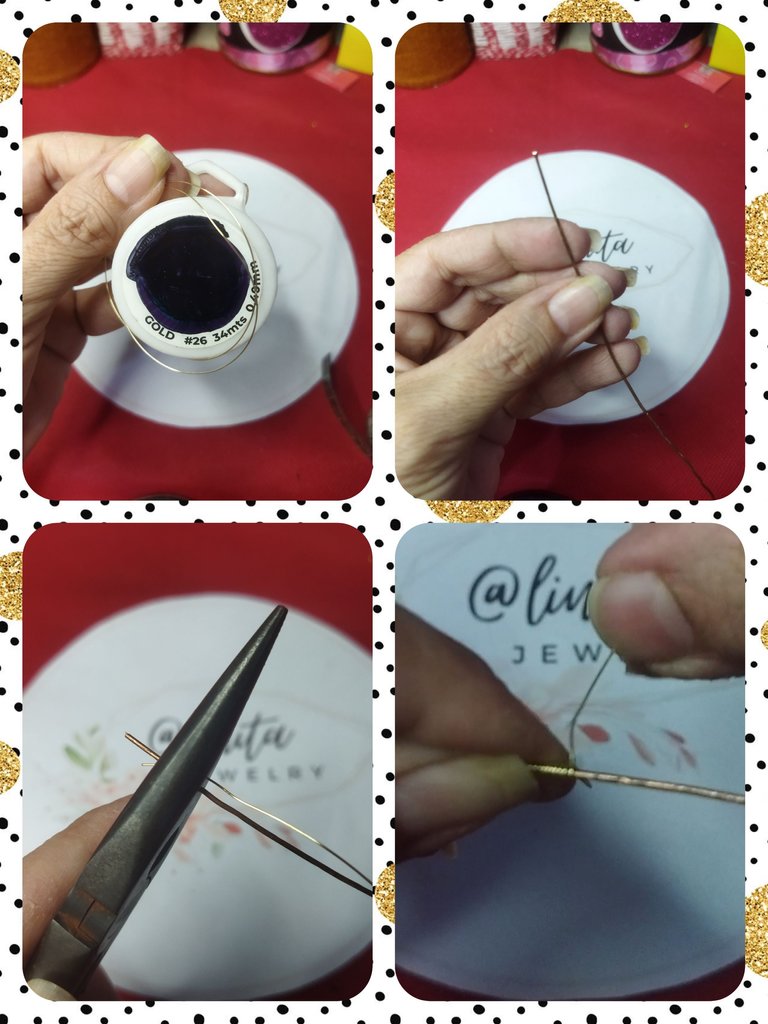
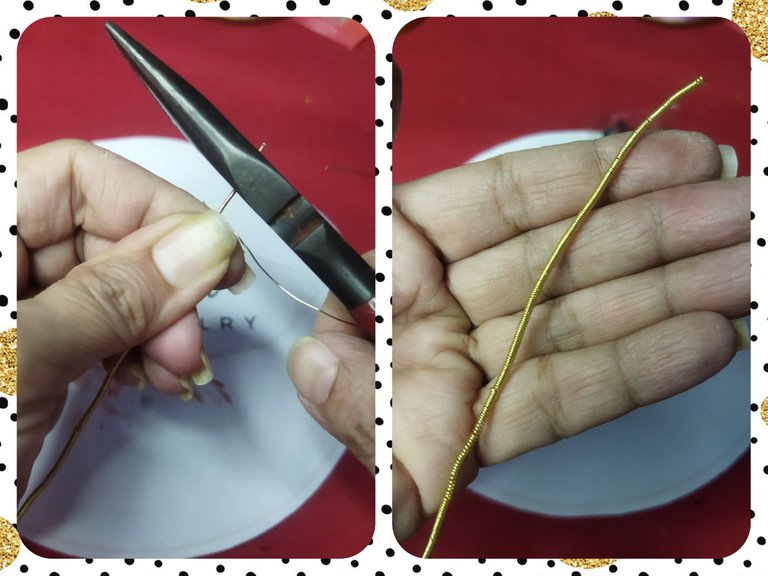
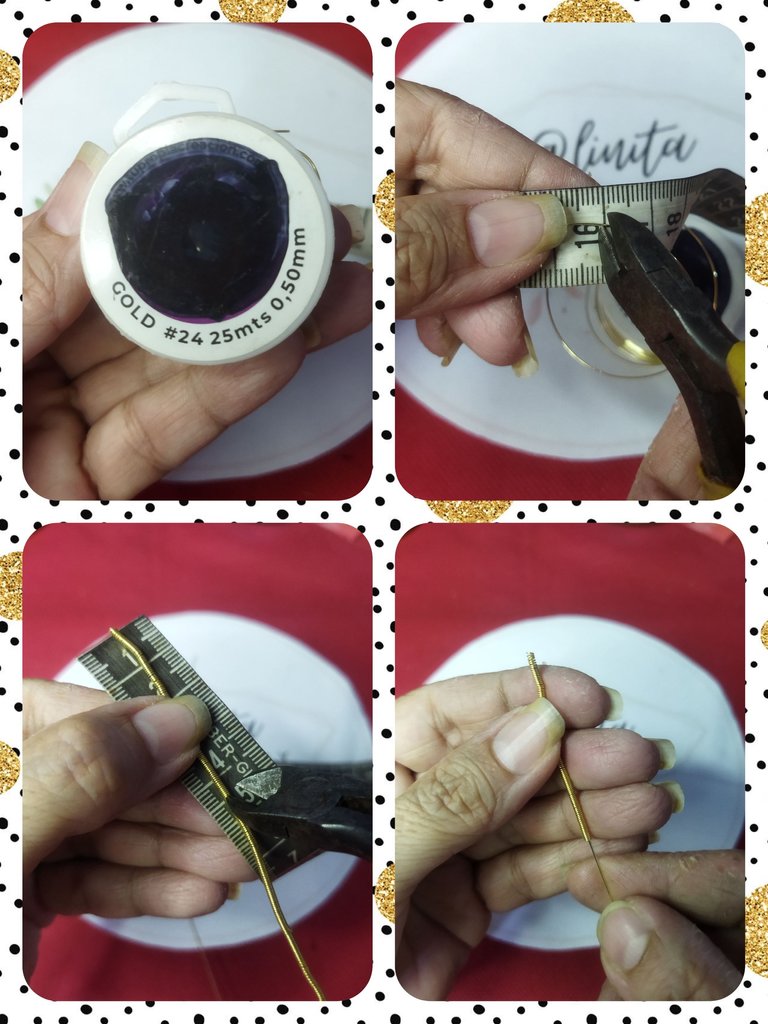
We can do the coiling with the wire of any caliber we want. Yes indeed. The thicker it is, the harder it is to roll. We are going to need a cylindrical object depending on the thickness we want our coiling. I will use a copper wire approximately 2 mm thick and #26 wire for winding.
We take both wires with the clamps and hold them tightly with a clamp so that they do not move and we begin to roll. Once we have a considerable measurement we can remove the clamp and continue rolling. If the spiral is formed with a lot of separation, we can squeeze or push with our fingers until we reach the desired amount.
ELABORACIÓN COILING
El coiling lo podemos realizar con el alambre del calibre que deseemos. Eso si. mientras más grueso, es más difícil de enrollar. Vamos a necesitar un objeto cilíndrico dependiendo del grosor que queramos nuestro coiling. Yo usaré un alambre de cobre de 2 mm de grosor aproximadamente y para el enrollado alambre #26.
Tomamos ambos alambres con la pinza y sostenemos fuerte con una pinza para que no se muevan y comenzamos a enrollar. Una vez que tenemos una medida considerable podemos retirar la pinza y continuamos enrollando, si el espiral se va formando con mucha separación, podemos ir apretando o empujando con los dedos hasta alcanzar la cantidad deseada.
PREPARATION OF THE TENDERLES
To make these tendrils we are going to use 16 cm of #24 wire and 4.5 cm of the coiling that we already made previously. Then we introduce the wire through the coiling.
ELABORACIÓN DE LOS ZARCILLOS
Para elaborar estos zarcillos vamos a utilizar 16 cm de alambre #24 y 4,5 cm del coiling que ya hicimos anteriormente. Luego introducimos el alambre por el coiling.
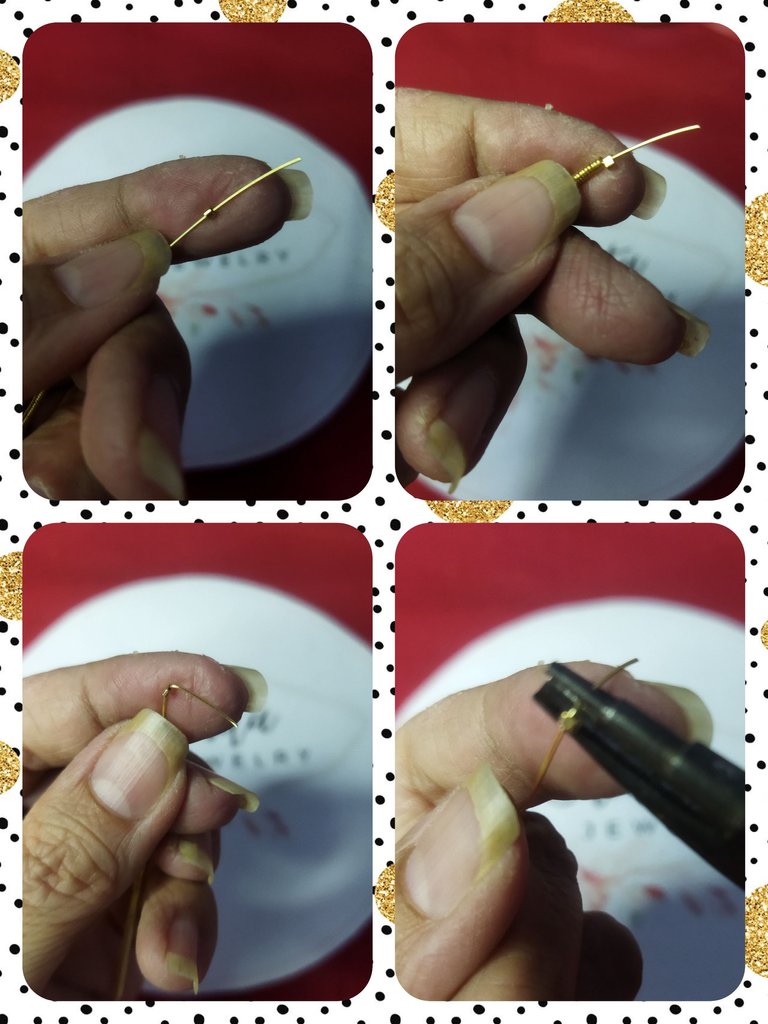
We place a staple leaving 2 cm of distance on the wire and secure it tightly. We make a 90º double and with the conical clamp we are going to make a ring of approximately 2 mm.
We cut the excess wire and with the flat pliers we straighten it so that it is at the level of the staple.
Colocamos una grapa dejando 2 cm de distancia en el alambre y aseguramos fuerte. Hacemos un dobles de 90º y con la pinza cónica vamos a realizar un aro de 2 mm aproximadamente.
Cortamos el exceso de alambre y con la pinza plana enderezamos que nos quede al nivel de la grapa.

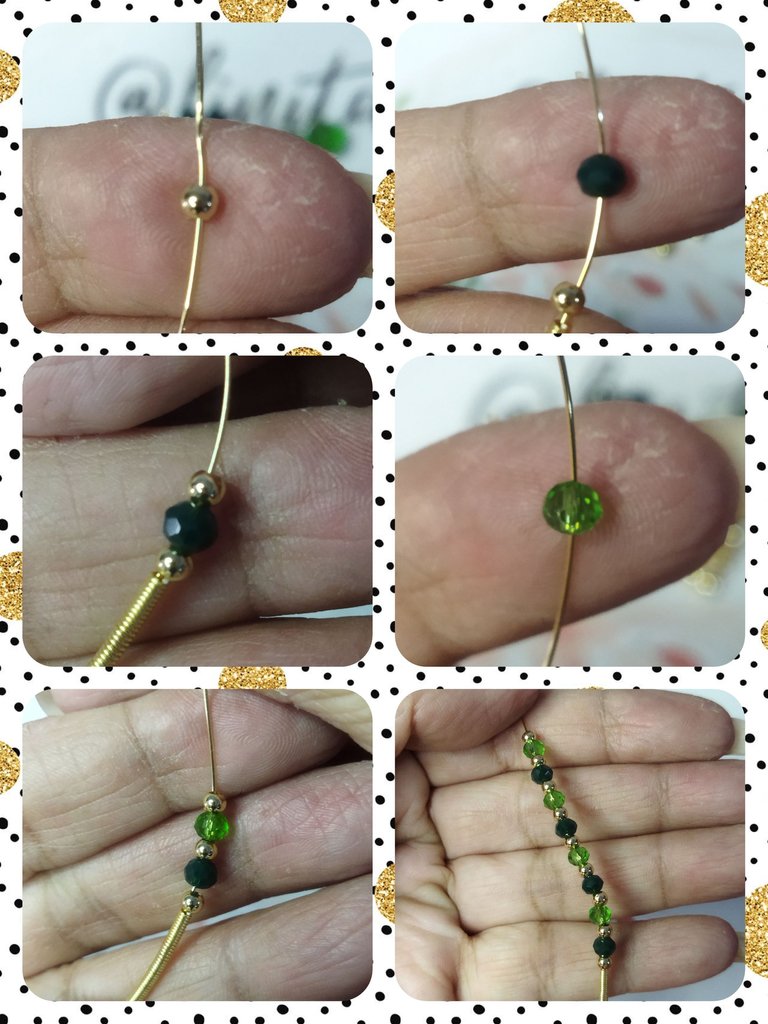
Now at the other end, where there are no staples and only the coiling is there, we begin to form the rest of the tendril.
We begin to introduce a pellet, a 4 mm matte green glass, a pellet, a 4 mm translucent green glass and a pellet. We repeat 3 more times, until completing 4 series. In total we must have 9 pellets, 4 matte green crystals and 4 translucent green crystals.
Ahora por el otro extremo, donde no hay grapas y sólo está el coiling comenzamos a formar el resto del zarcillo.
Comenzamos a introducir un balín, un cristal verde mate de 4 mm, un balin, un cristal verde traslucido de 4 mm y un balin. Repetimos 3 veces mas, hasta completar 4 series. En total debemos tener 9 balines, 4 cristales verde mate y 4 cristales verde traslucido.
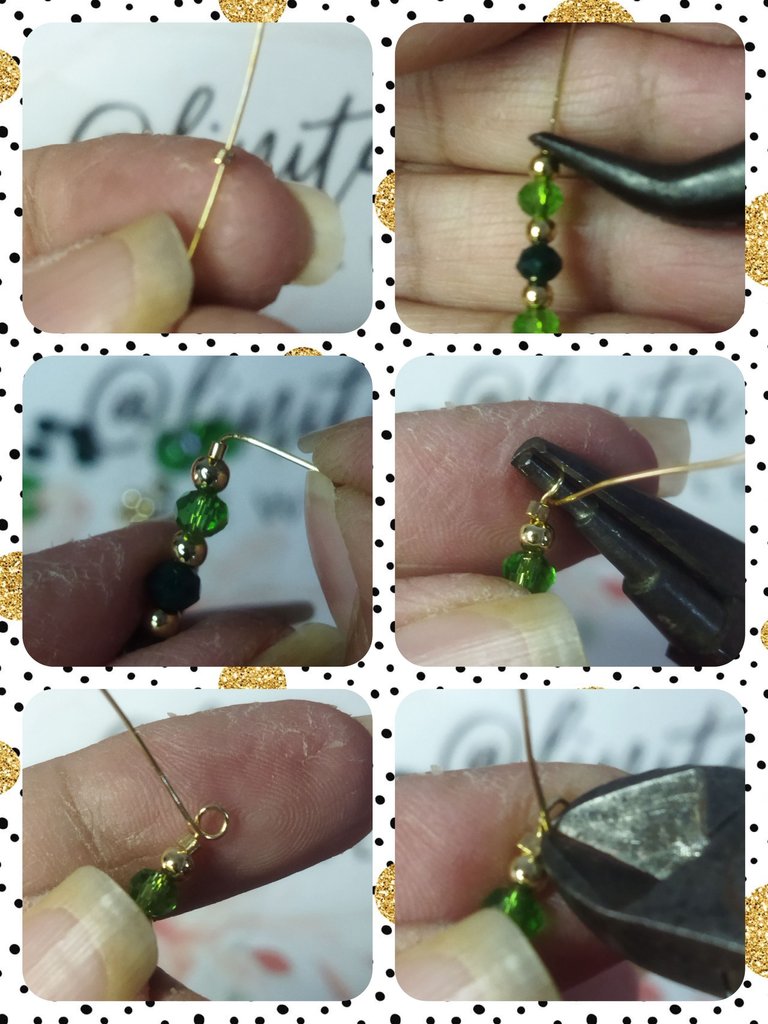
To close the design we place a staple well attached to the last ball and tighten. Then we make a 2 mm ring and cut the excess wire.
Para cerrar el diseño colocamos una grapa bien pegada al último balín y apretamos. Luego realizamos un aro re 2 mm y cortamos el exceso de alambre.
For the central detail we are going to cut the chain below the ball and measure 2.5 cm long and cut.
Para el detalle central vamos a cortar la cadena por debajo del balín y medimos 2,5 cm de largo y cortamos.
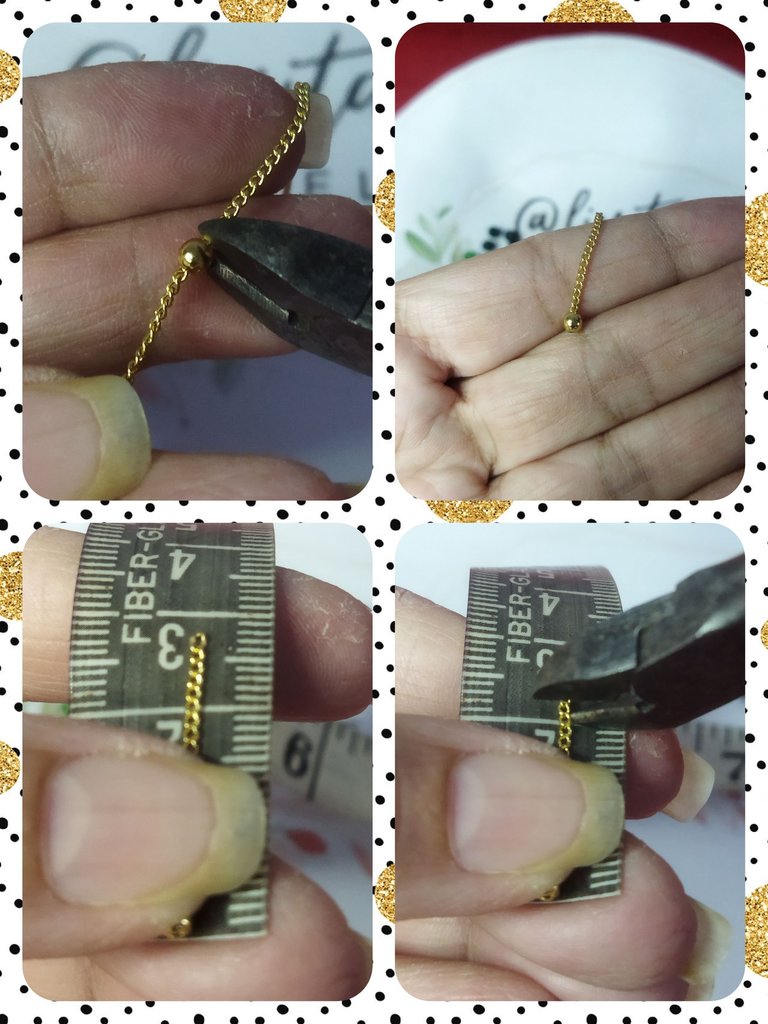
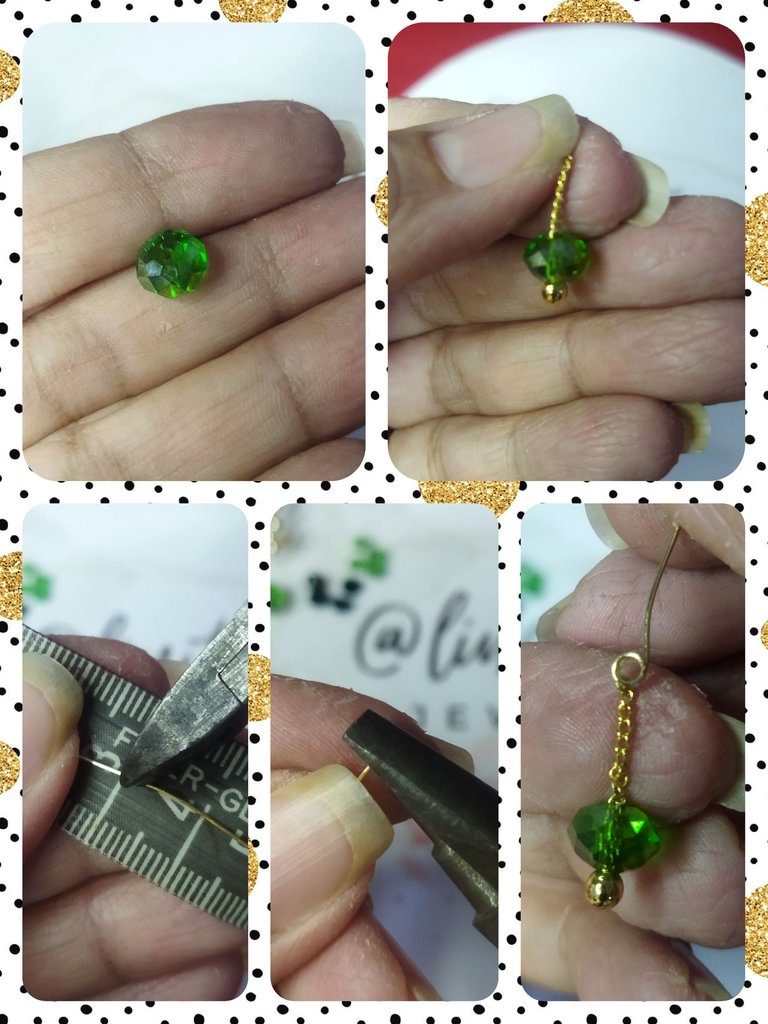
We take the 8 mm glass and we are going to insert it through the chain. Next, we cut 3 cm of #24 wire and pass it through the last link of the chain and make a ring of approximately 2 mm.
Tomamos el cristal de 8 mm y lo vamos a introducir por la cadena. Seguidamente cortamos 3 cm de alambre #24 y lo pasamos por el último eslabón de la cadena y realizamos una argolla de 2 mm aproximadamente.
We take the 5 mm hoop and we are going to introduce the chain, then we will stop the design of the earring, each end on each side of the hoop and we close.
Tomamos el aro 5 mm y vamos a introducir la cadena, luego pararemos el diseño del zarcillo, cada extremo por cada lado del aro y cerramos.
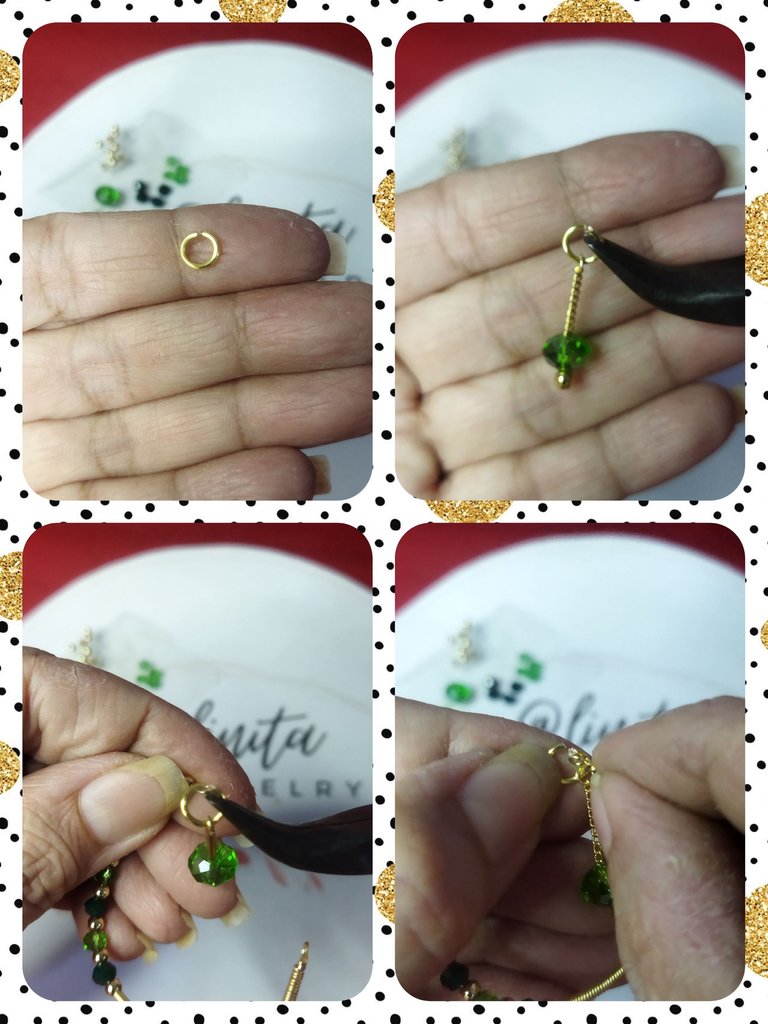
Now we take the other 2 mm ring and pass the hook through and then insert it into the 5 mm ring of the design.
Ahora tomamos el otro aro de 2 mm y pasamos el anzuelo para luego ser insertado en la argolla de 5 mm del diseño.
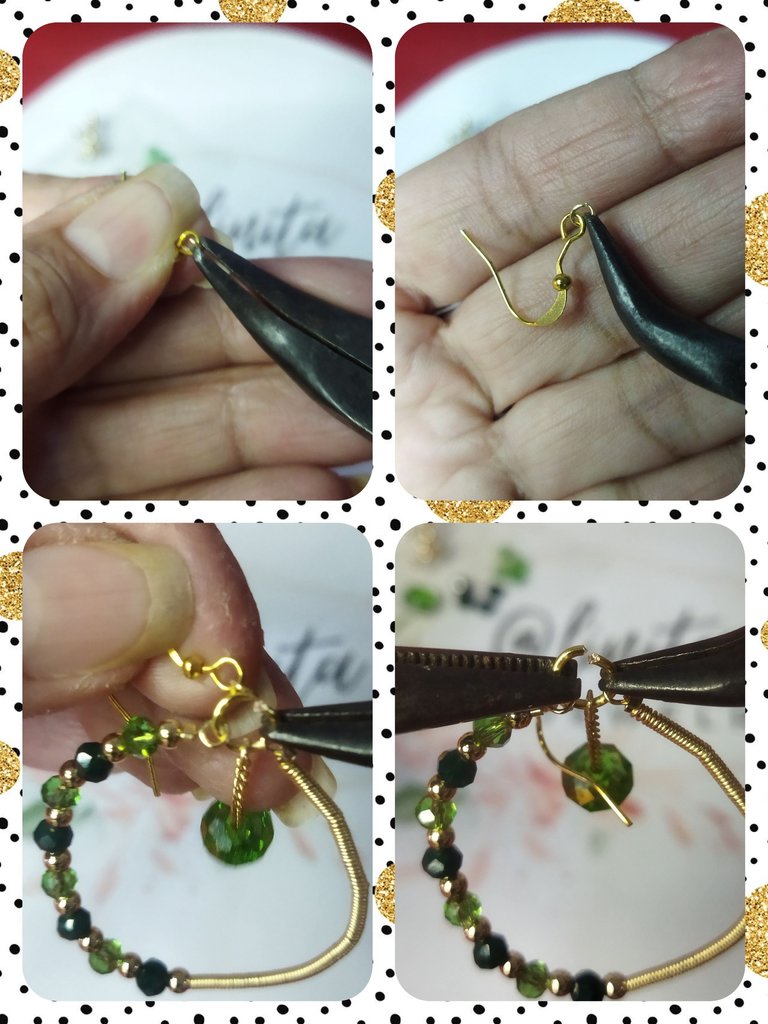
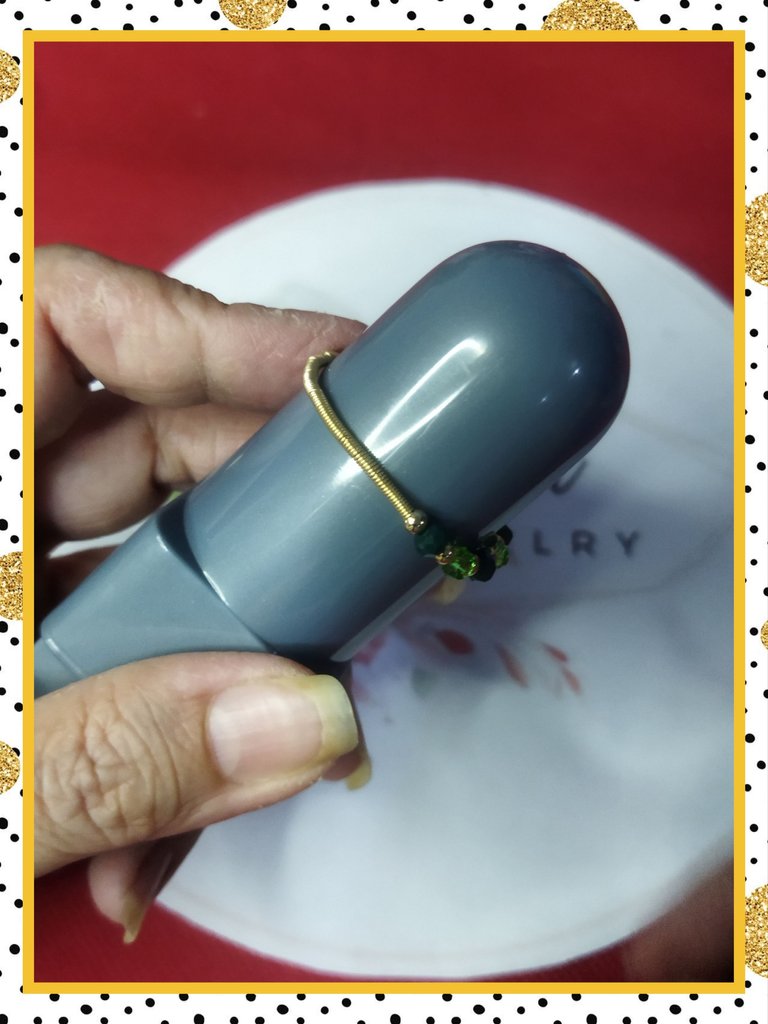
Finally we will give it a circular shape with the round mandrel or any circular object that fits the circumference of the tendril.
Por último le daremos forma circular con el mandril redondo o cualquier objeto circular que se ajuste a la circunferencia del zarcillo.
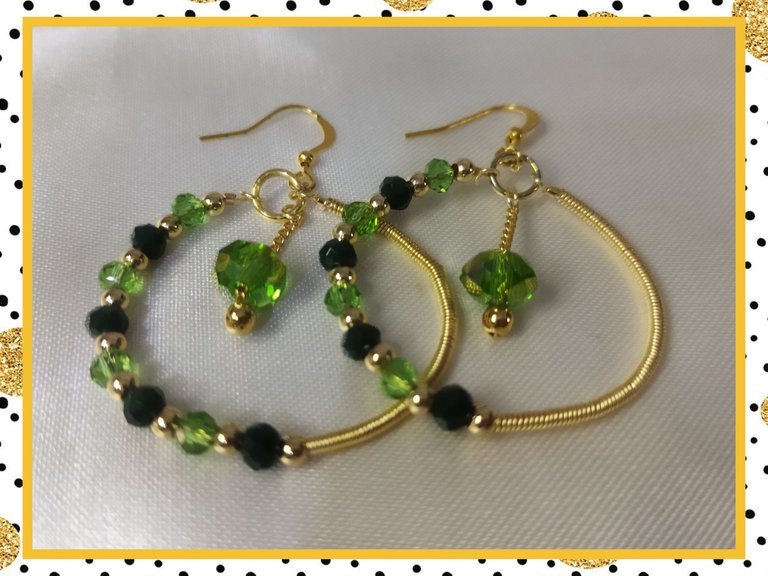
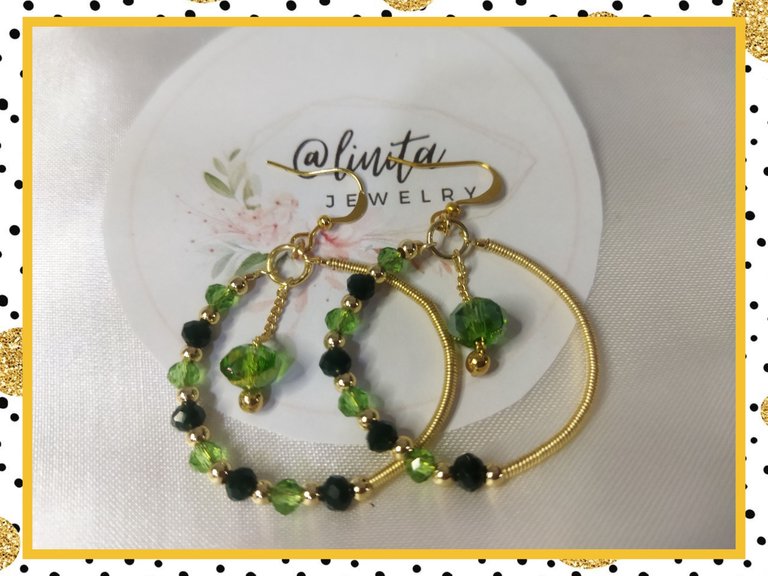
The combination of the coiling plus the crystals and the golden shine of the beads make an elegant and very precious piece. I hope you like it. See you next time.
La combinación del coiling más los cristales y el brillo dorado de los balines, hacen una pieza elegante y muy preciosa. Espero que te guste. Nos vemos en la próxima.

Pues ha valido la pena cada pinchazo ya que has elaborado unos aretes preciosos.
Cuando algo nos apasiona, no importa si terminamos con ampollas en las manos, siempre vale ese esfuerzo extra, cada gota de sudor y hasta de sangre como lo mencionas, jajajaja.
Buen trabajo.
Hermana @linita estoy sin palabras para expresarte lo bien que te ha quedado esta creación. El color verde fue elegido por mí para usar en este año. Porque todos queremos verdes en nuestra vida 🤑 ja ja fue lo que pensé. Pero sí, usando este tipo de accesorios atraeremos la buena vibra y siempre habrá esperanzas de lograr lo que queremos.
Sobre esta técnica que mencionas, me pareció fascinante, el lado del arete donde se ve el resorte me encantó 😍
Adicional todo el post quedó de lujo 🎉 (a excepción del mal corte que hizo el editor de doble columna)
Para rematar 🥰 te ves muy linda luciendo los aretes.
De 10/9,5 Felicidades. 🎉🥰😍🤑🙋💐👍💖😄🫂👀😚
Muchas gracias. Necesitamos llenarnos de mucha esperanza y optimismo. Saludos.
The final result is a unique and elegant piece of jewelry that would be perfect for a variety of occasions. Well done, keep it up.
Muchas gracias 😁/
Thank you very much 😁
Excelente y bello trabajo. Quedaron demasiado lindos y elegantes esos zarcillos. El color verde siempre resaltando. Gracias por compartir esa bonita obra. 🌹💐🌻🌺🌷
Me alegro que te haya gustado. Gracias por comentar. Saludos.
Teha quedado hermoso 💚 😍 el resultado es increíble esas argollas te quedan muy bonitas, nos encanta el trabajo en alambre, si te daña las manos trata de usar guantes o algo que te proteja, no queremos que sangres, pero el resultado valió la pena 🤩.
Me encanta trabajar con alambre pero mis manos son muy delicadas y por nada se cortan pero trabajar con guantes no es lo mismo. Pierdes la sensibilidad y limita un poco el movimiento. Siempre trato de mantenerlas hidratas cuando voy a trabajar con alambre para mitigar un poco el daño. Gracias por tu apreciación. Saludos.
It looks perfect, you did great job 🙌🏼
It is a very rewarding job when you see the finished piece. Thank you very much for your comment. Greetings
@linita Hermoso y elegante definitivamente, gracias por compartir tu creación, Saludos 😊,un abrazote 🤗
Me encantaron, mi color favorito, se parecen a mi. Gracias por compartir amiga.
Muy bonitos aretes!
Gracias ☺️