WELCOME TO MY BLOG
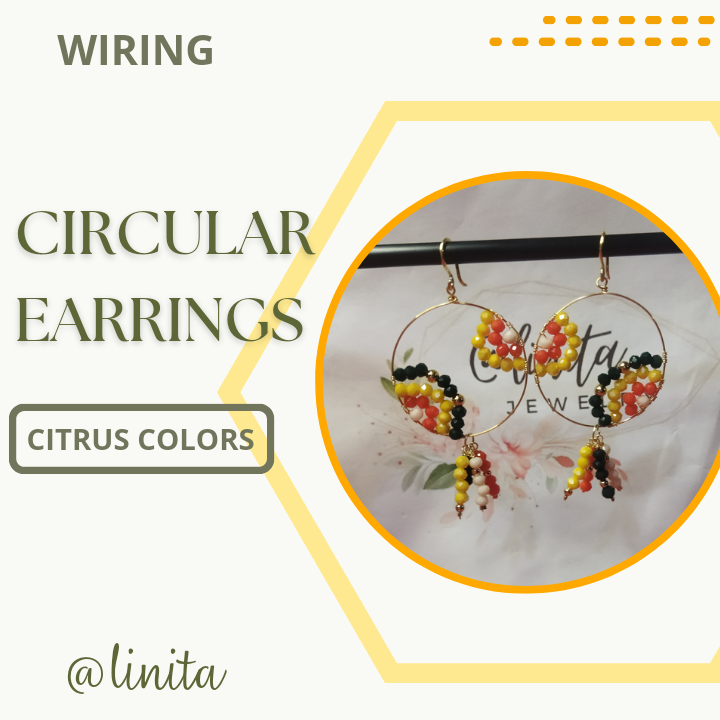
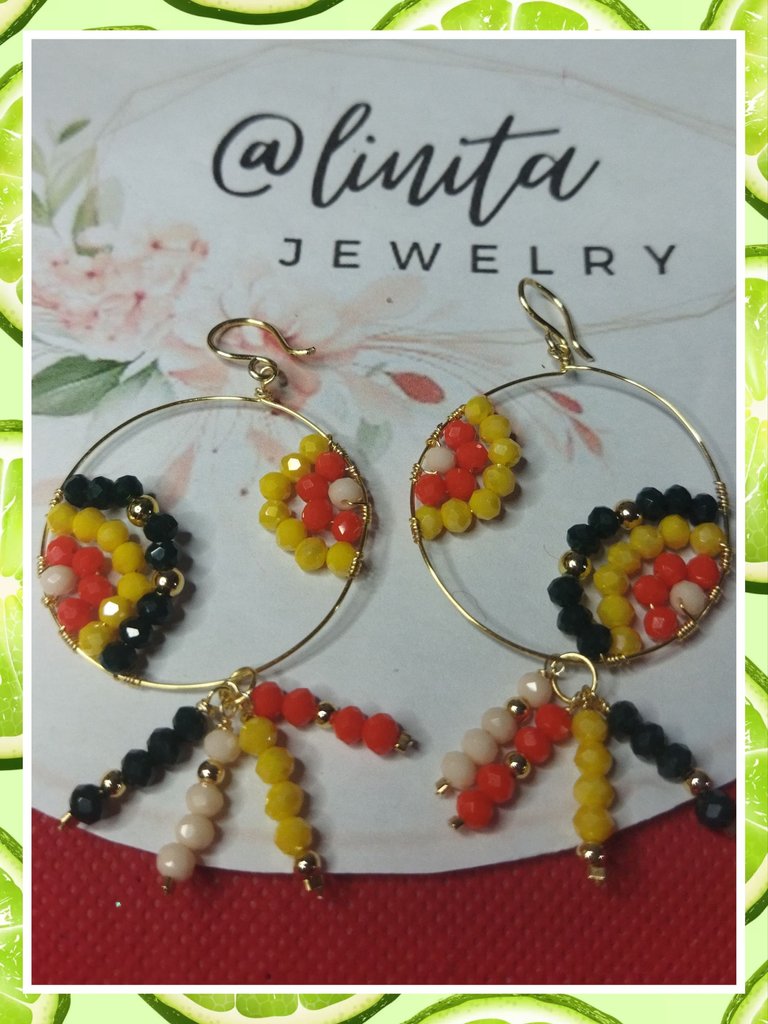
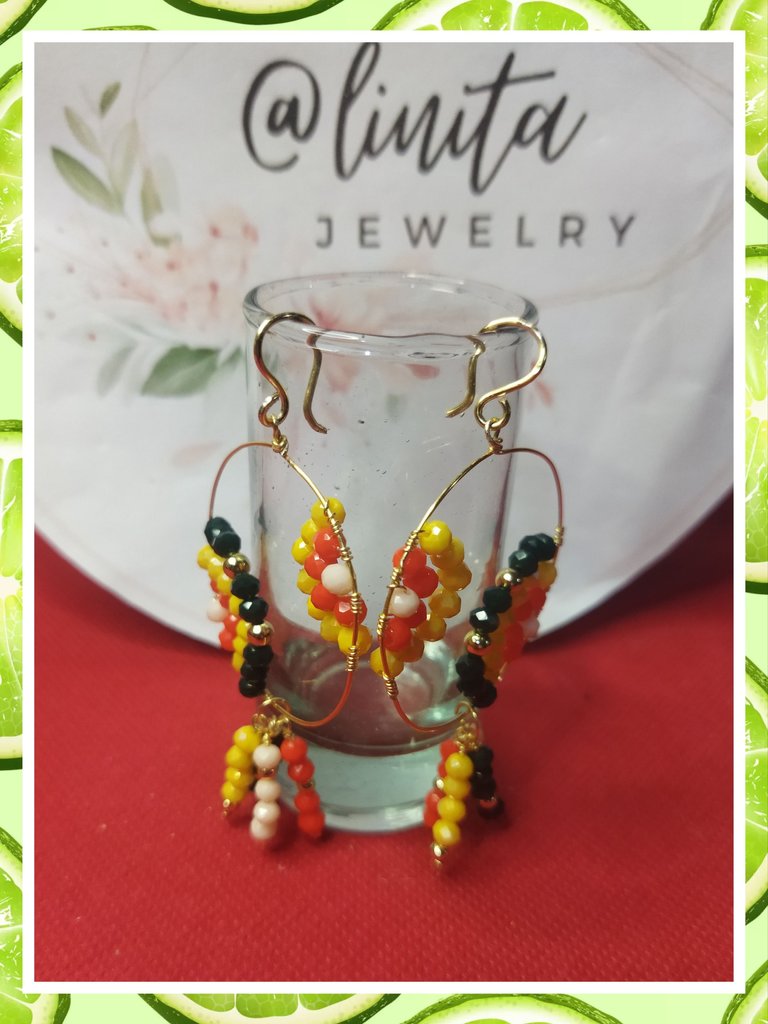
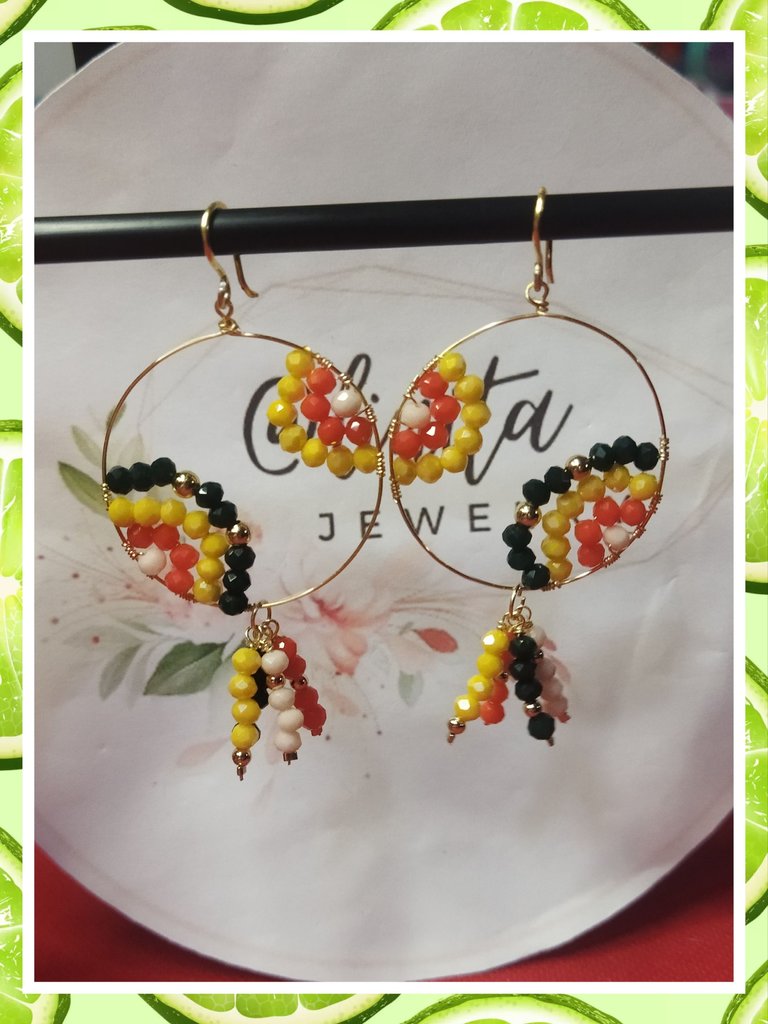
Hellooooo, hellooooooo! Greetings and my respects to the jewelry creators. Long earrings are back in trend. Without a doubt, it is the earrings that make us look feminine and give that touch of glamor and elegance to our face.
Generally, long earrings look spectacular on people who have round faces, as they stylize the shape of the face, making it look a little slimmer. However, on people with long necks, they also look beautiful but the earrings should be wide and for people who have a square face, the ideal is for the earrings to be circular in shape, as they help soften the lines of the face. making it look less boxy. So if you like long earrings, these are some of the tips you should take into account.
My face is long and my neck is a little long, and these earrings that I am sharing with you today have the characteristics to stylize my face. And the selection of colors chosen especially to combine with that nondescript outfit that in no way could attract attention, but the earrings will undoubtedly make you stand out among everyone.
BIENVENIDOS A MI BLOG
¡Holaaaa, holaaaaa! Saludos y mis respetos a los creadores de bisutería. Está nuevamente en tendencia los aretes largos. Sin duda alguna, son los aretes los que hacen luzcamos femeninas y dan ese toque de glamour y elegancia a nuestro rostro.
Generalmente, los aretes largos lucen espectaculares en las personas que tienen la cara redonda, ya que estiliza la forma del rostro haciéndolo ver un poco más esbelto. Sin embargo, en las personas con el cuello largo, también quedan preciosos pero los aretes deben ser anchos y para las personas que tienen la cara cuadrada, lo ideal es que los aretes sean de forma circular, ya que ayudan a suavizar las líneas del rostro haciéndolo lucir menos cuadrado. Así que si te gustan los aretes largos estos son algunos de los tips que debes tomar en cuentas.
Mi rostro es alargado y mi cuello es un poco largo, y estos aretes que les comparto hoy reúne las características para estilizar mi rostro. Y la selección de los colores escogidos especialmente para combinar con ese oufit anodino que de ninguna forma podrías llamar la atención, pero que sin duda, los aretes te harán resaltar entre todas.
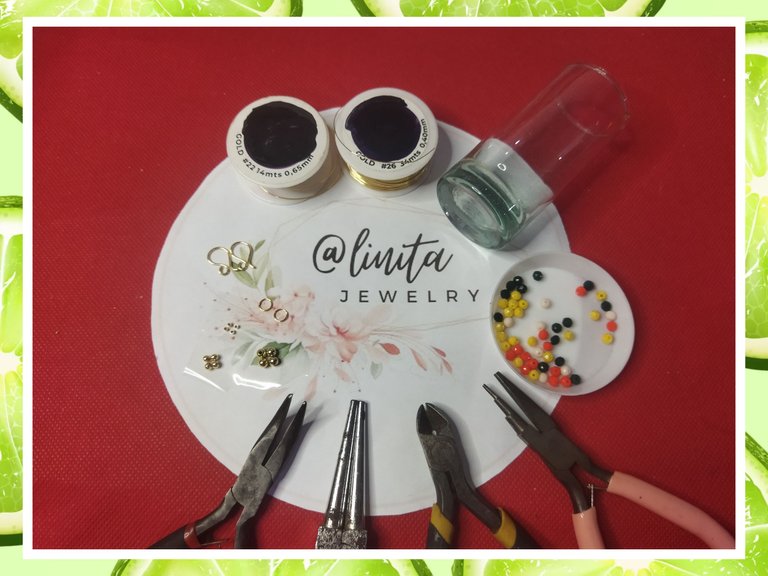
MATERIALS
- Wire #22 and #26
- Pair of earring hooks
- 4mm crystals (cream, orange, yellow and green)
- 5 mm hoops
- 4 mm and 2 mm pellets
- Jewelry staples
- Jewelry tweezers (cutting, flat, curved, conical.
- Cylindrical object that adapts to the size of the earring.
MATERIALES
- Alambre #22 y #26
- Par de anzuelos para aretes
- Cristales de 4 mm (crema, naranja, amarillo y verde)
- Aros de 5 mm
- Balines de 4 mm y 2 mm
- Grapas de bisutería
- Pinzas de bisutería (corte, plana, curva, cónica.
- Objeto cilíndrico que se adapte al tamaño del arete.
STEP BY STEP // PASO A PASO
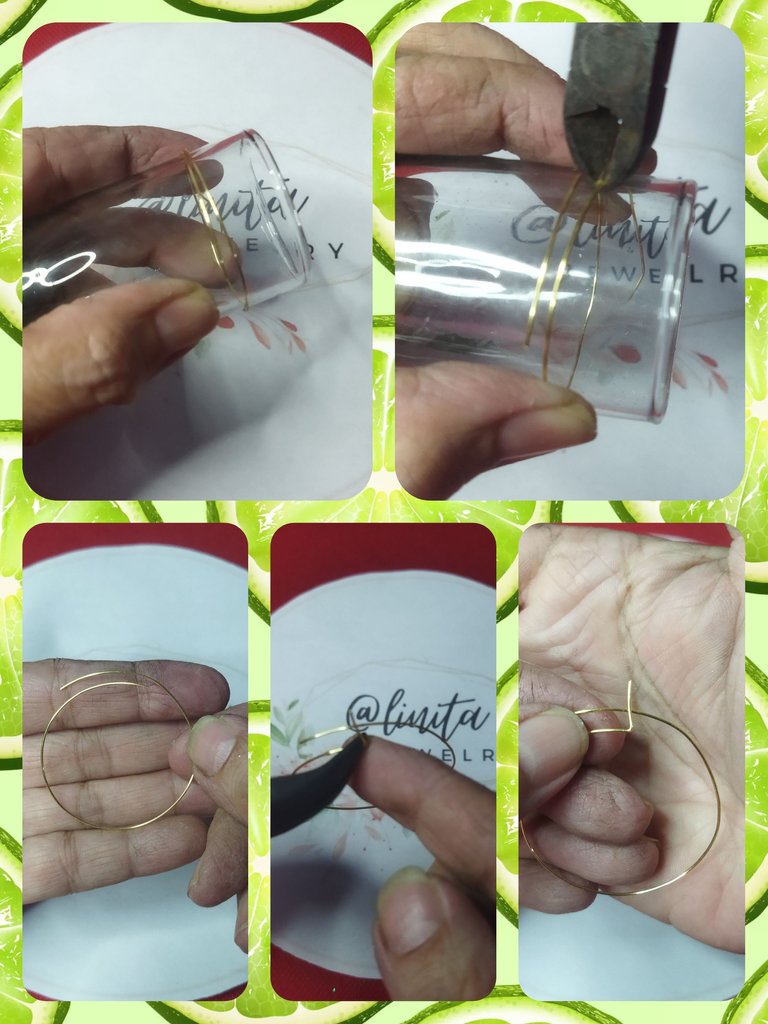
STEP Nº 1
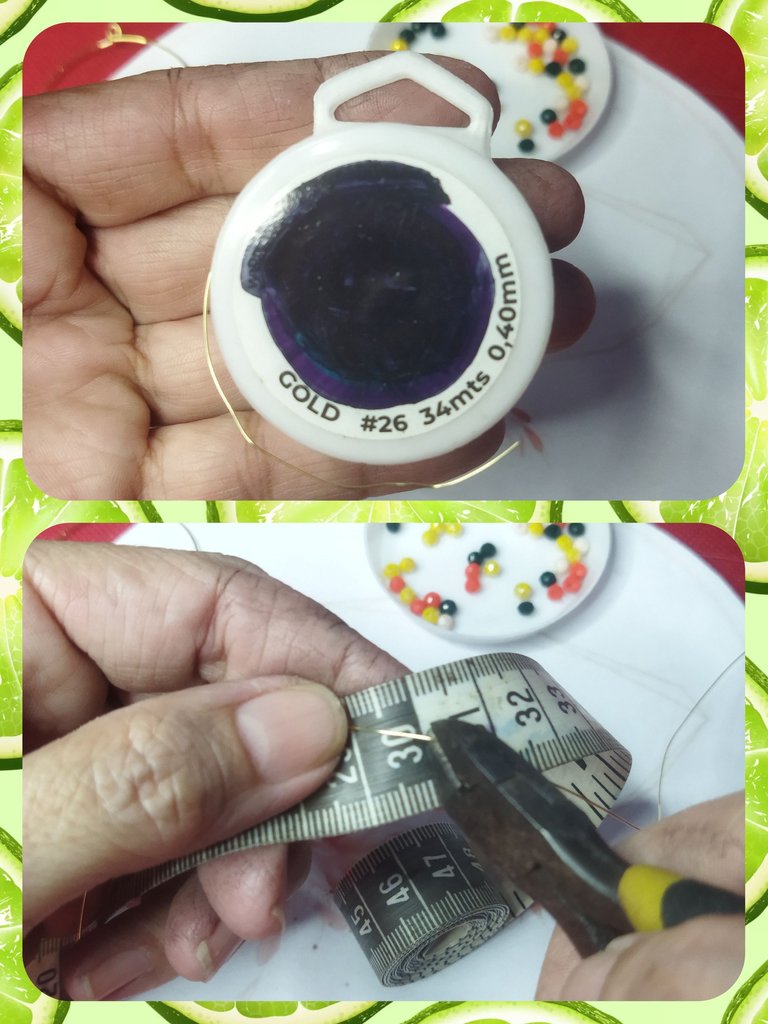
We start by making the round base for the earring. In a cylindrical object with a diameter of 3 cm we place the #22 wire. We cut leaving an additional 1.5 cm on each side.
With the flat clamp we make a 90º bend starting at 1.5 cm, which we leave extra at one of the ends and we make a 2 mm ring with the conical clamp and cut the excess wire.
PASO Nº 1
Comenzamos realizando la base redonda para el arete. En un objeto cilíndrico de 3 cm de diámetro colocamos el alambre #22. Cortamos dejando 1.5 cm adicional de cada lado.
Con la pinza plana realizamos un doblez de 90º a partir de 1.5 cm que dejamos adicional en uno de los extremos y realizamos un argolla de 2 mm con la pinza cónica y cortamos el exceso de alambre.
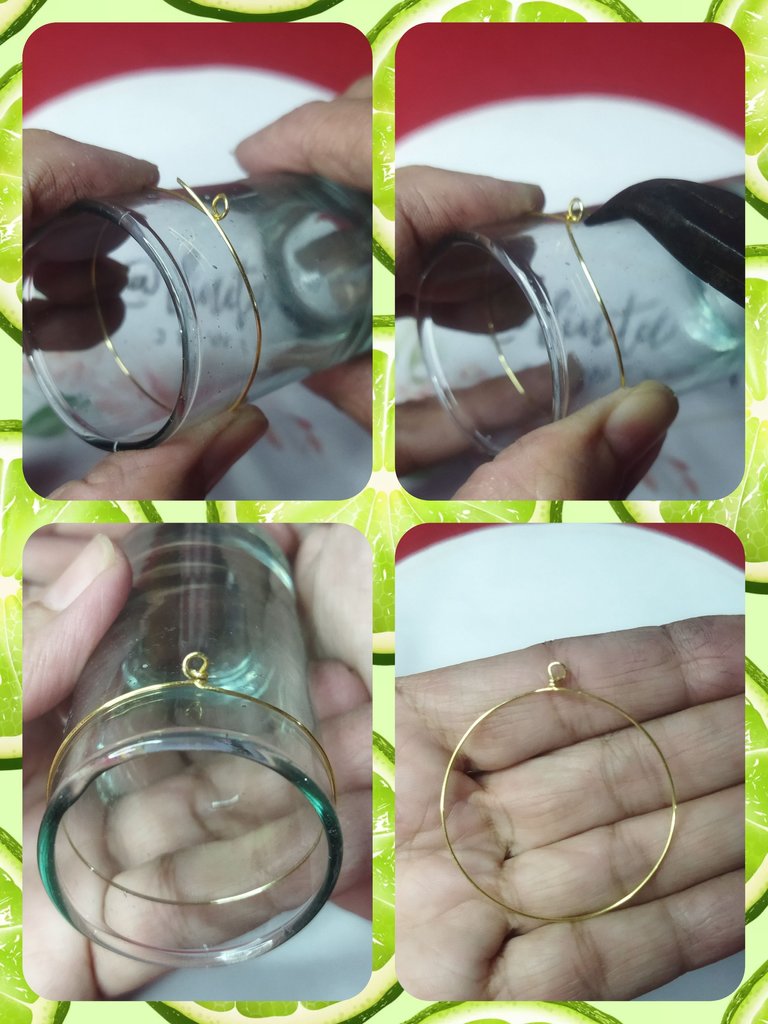
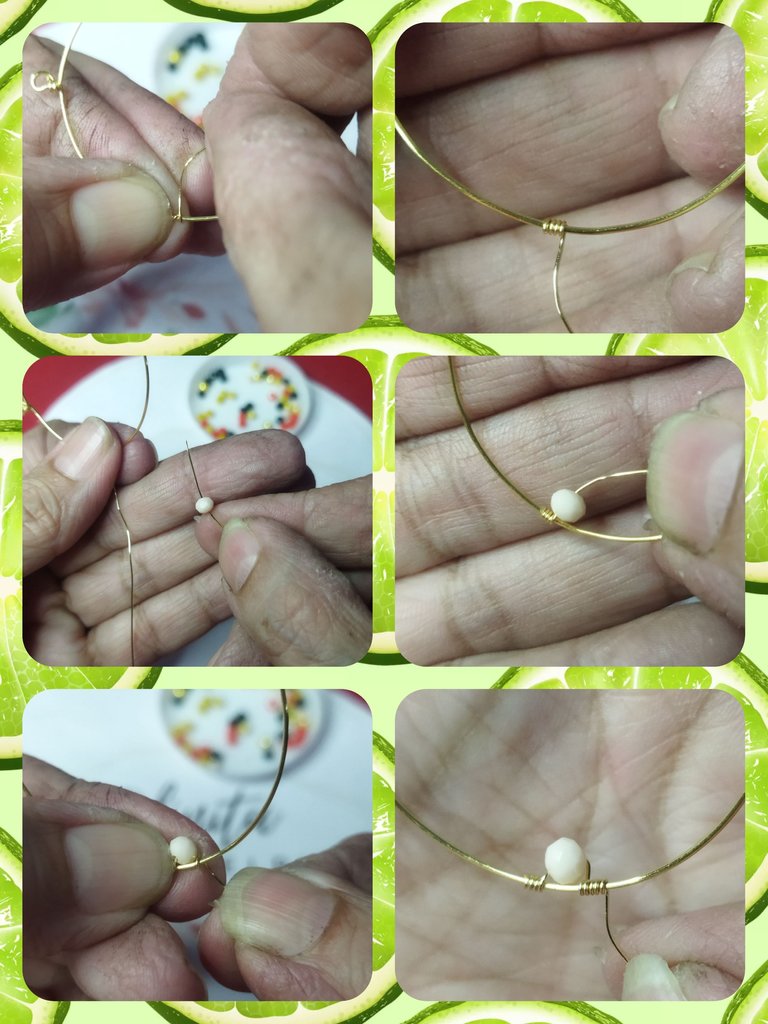
STEP Nº 2
We fix the wire well in the cylinder and with the clamps we are going to make a rosary knot around the ring. With the flat pliers we adjust the wire so that the tip is not sharp.
PASO Nº 2
Fijamos bien el alambre en el cilindro y con la pinza vamos a realizar un nudo de rosario alrededor de la argolla. Con la pinza plana ajustamos el alambre para que no quede la punta filosa.
STEP Nº 3
Once the base of the earring is made, we cut 30 cm of #26 wire with which we will crimp the crystals.
PASO Nº 3
Una vez realizada la base del arete, cortamos 30 cm de alambre #26 con el que realizaremos en engarce de los cristales.
STEP Nº 4
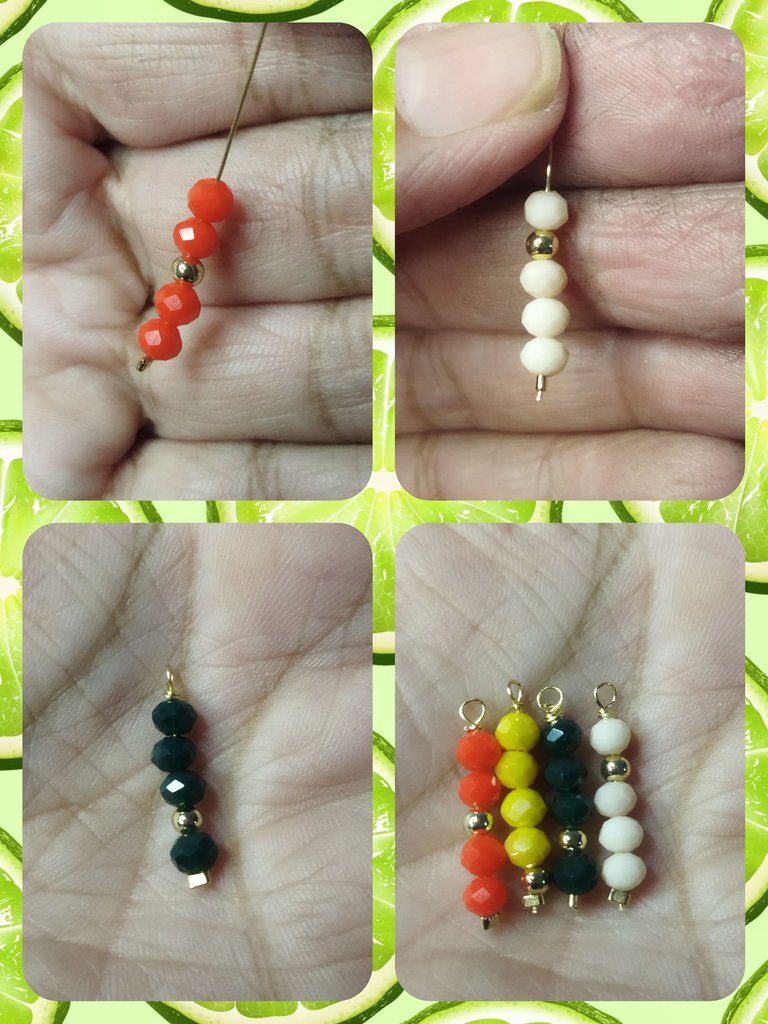
We will begin by making 4 turns with the wire on the left side of the base, 4.5 cm from the base ring, we introduce a 4 mm cream-colored crystal, adjust and make 4 very tight turns to position the crystal.
PASO Nº 4
Comenzaremos realizando 4 giros con el alambre en el lado izquierdo de la base, a 4.5 cm a partir de la argolla de la base, introducimos un cristal de 4 mm color crema, ajustamos y realizamos 4 giros más bien apretados para posicionar el cristal.
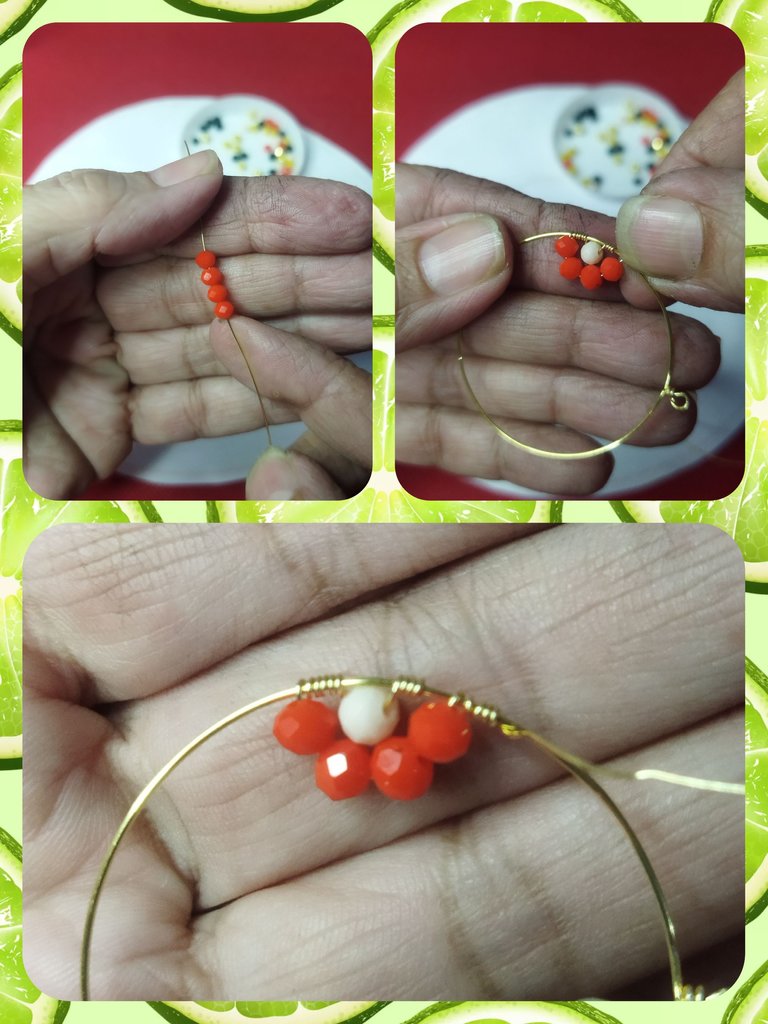
STEP Nº 5
Next, we take 4 4 mm orange crystals and we will pass them around the first crystal, hold it very tightly and make four more turns to adjust. These twists must be very tight so that the crystals do not move.
PASO Nº 5
Seguidamente, tomamos 4 cristales de 4 mm color naranja y lo pasaremos alrededor del primer cristal, sostenemos bien fuerte y realizamos cuatro giros más para ajustar. Estos giros deben ser bien apretados para que los cristales no se muevan.
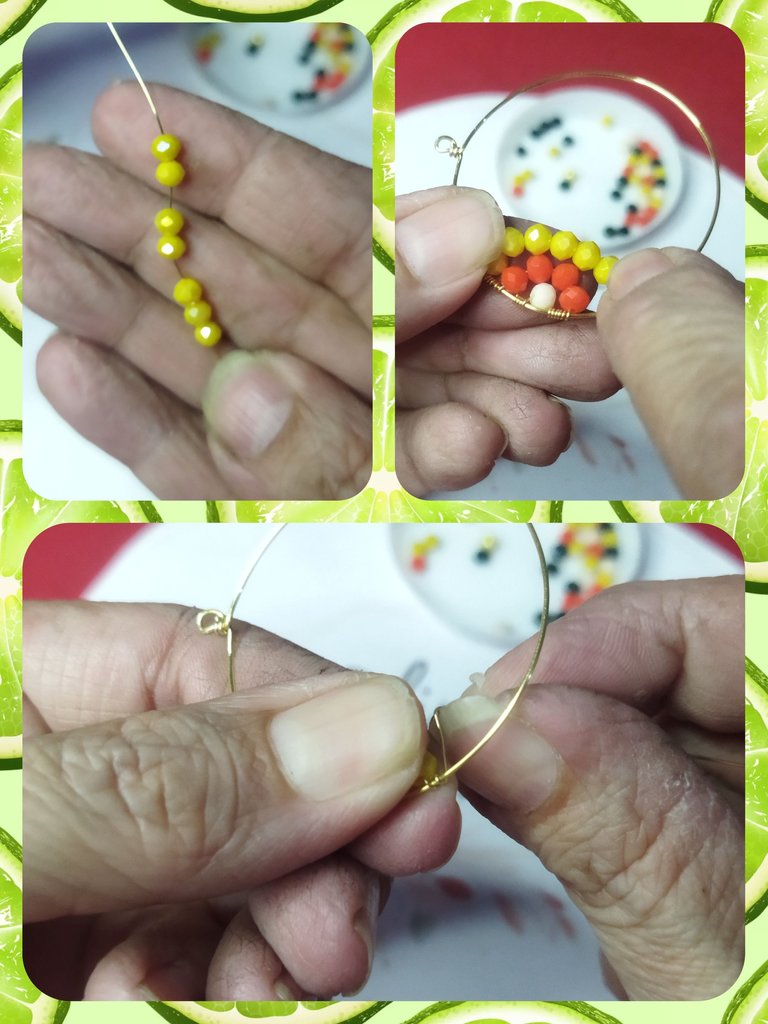
STEP Nº 6
Now we take 7 yellow crystals and perform the same previous step. We position ourselves on the orange crystals, adjust well and make 4 turns.
PASO Nº 6
Ahora tomamos 7 cristales amarillos y realizamos el mis paso anterior. Posicionamos sobre los cristales naranja, ajustamos bien y realizamos 4 giros.
STEP Nº 7
And finally, we take 3 green crystals, a 4 mm pellet, 2 green crystals, a pellet and 3 green crystals. We surround the yellow crystals and adjust with the wire making 5 tight turns.
PASO Nº 7
Y por último, tomamos 3 cristales verde, un balín de 4 mm 2 cristales verdes, un balín y 3 cristales verdes. Rodeamos los cristales amarillos y ajustamos con el alambre realizando 5 giros apretados.
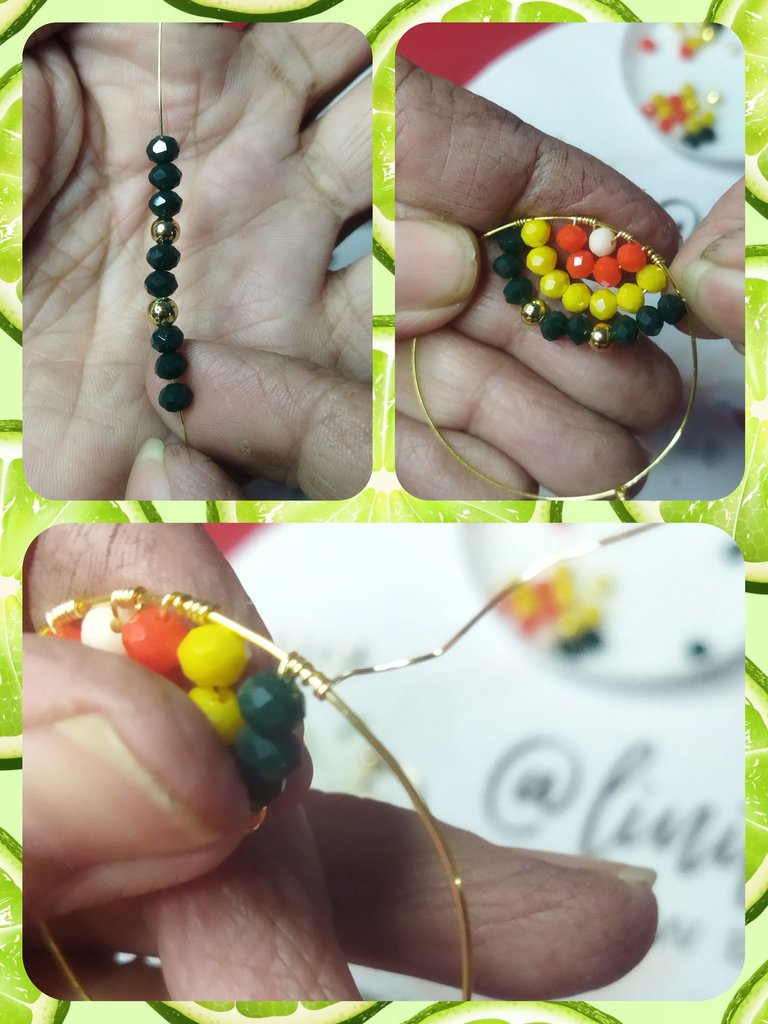
STEP Nº 8
We cut the wire and with the flat pliers we adjust the wire.
PASO Nº 8
Cortamos el alambre y con la pinza plana ajustamos el alambre.

STEP Nº 9
On the opposite side of the design that we finished, 2 cm from the base ring, we are going to repeat steps from 4 to 6. At the end we cut the wire and polish it with the flat tweezers.
PASO Nº 9
En el lado contrario del diseño que terminamos, a 2 cm de la argolla de la base, vamos a repetir los pasos desde el 4 hasta el 6. Al finalizar cortamos el alambre y pulimos con la pinza plana.
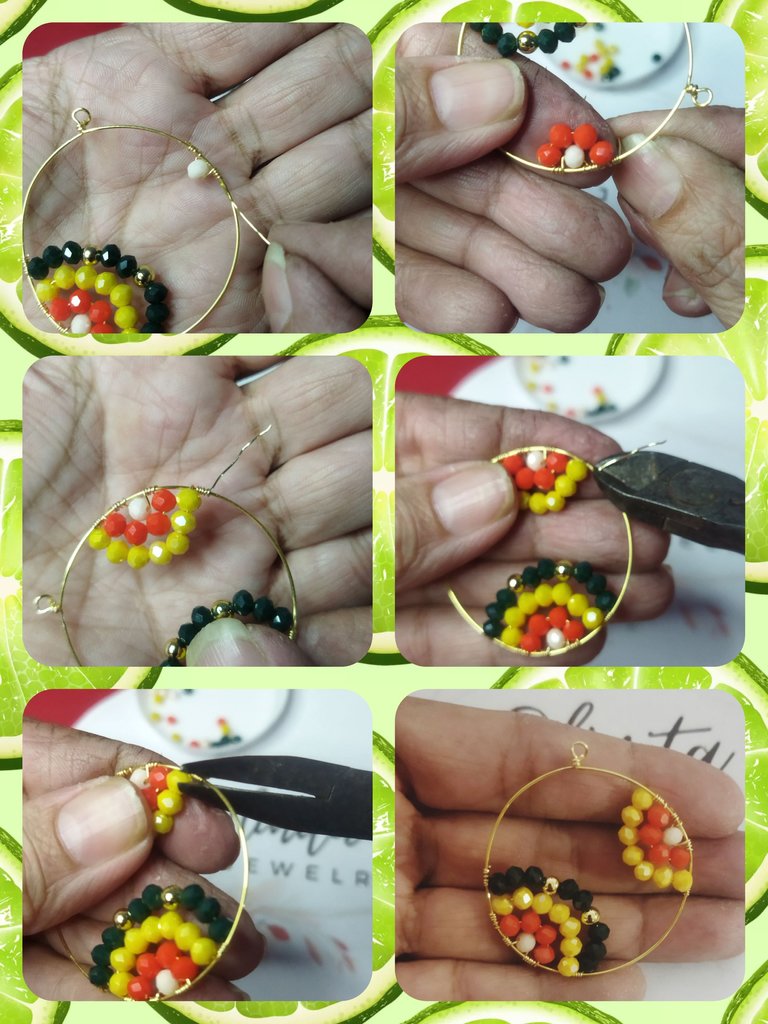
STEP Nº 10
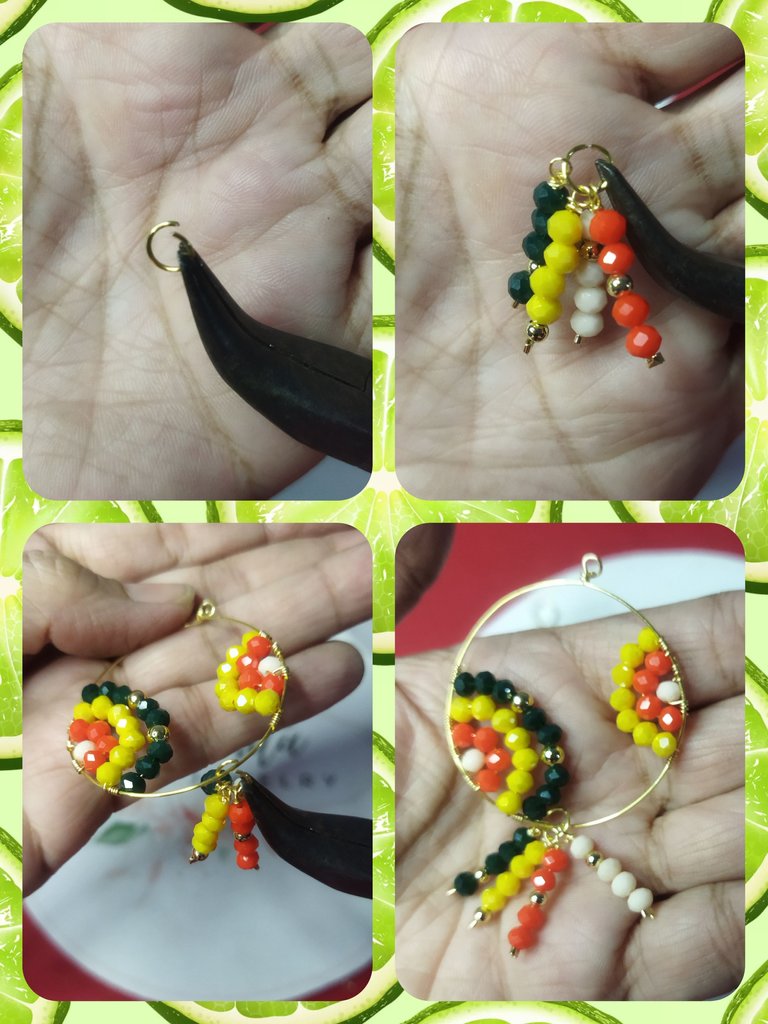
To give length to the earrings we are going to make some 2 cm strips, with 4 crystals of each of the colors of the design. To do this we cut 5 cm of #26 wire. We place a staple at the end of the wire and cut off the excess.
PASO Nº 10
Para darle largo a los aretes vamos a realizar unas tiras de 2 cm, con 4 cristales de cada uno de los colores del diseño. Para ello cortamos 5 cm de alambre #26. Colocamos una grapa en la punta del alambre y cortamos el exceso.
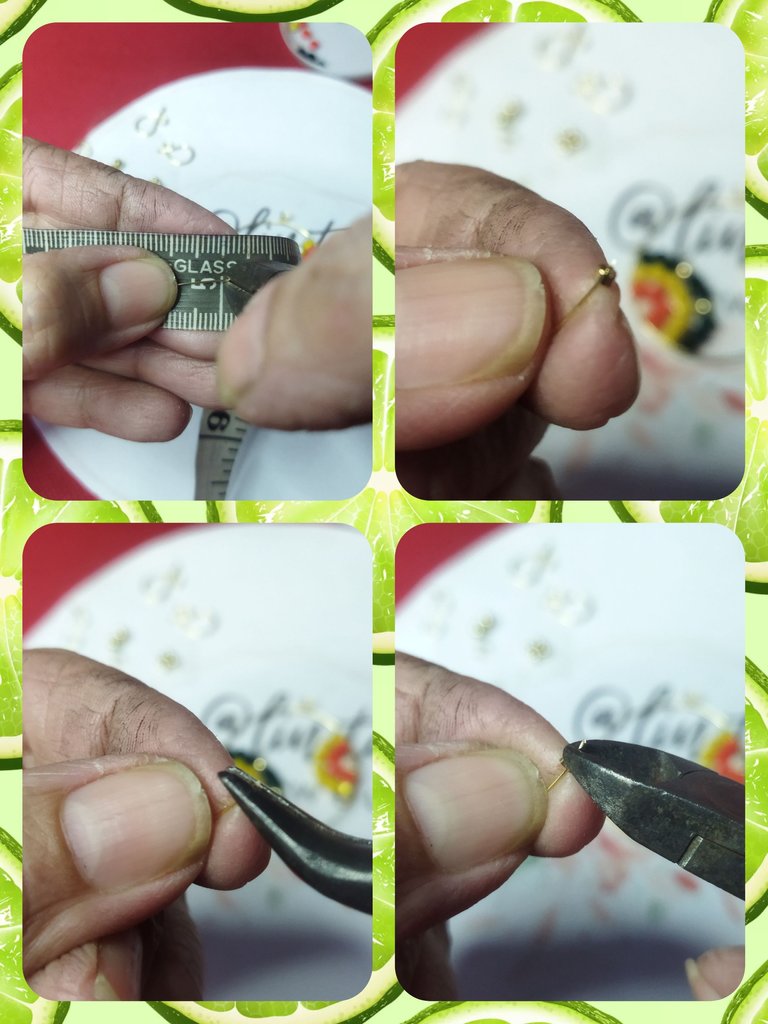
STEP Nº 11
Then we introduce 1 pellet and 4 yellow crystals. We make a 90º bend and with the conical clamp we make a small 1 mm ring and make a two-twist rosary knot.
PASO Nº 11
Luego introducimos 1 balín, y 4 cristales amarillos. Realizamos un doblez de 90º y con la pinza cónica hacemos una aro pequeño de 1 mm y realizamos un nudo de rosario de dos giros.
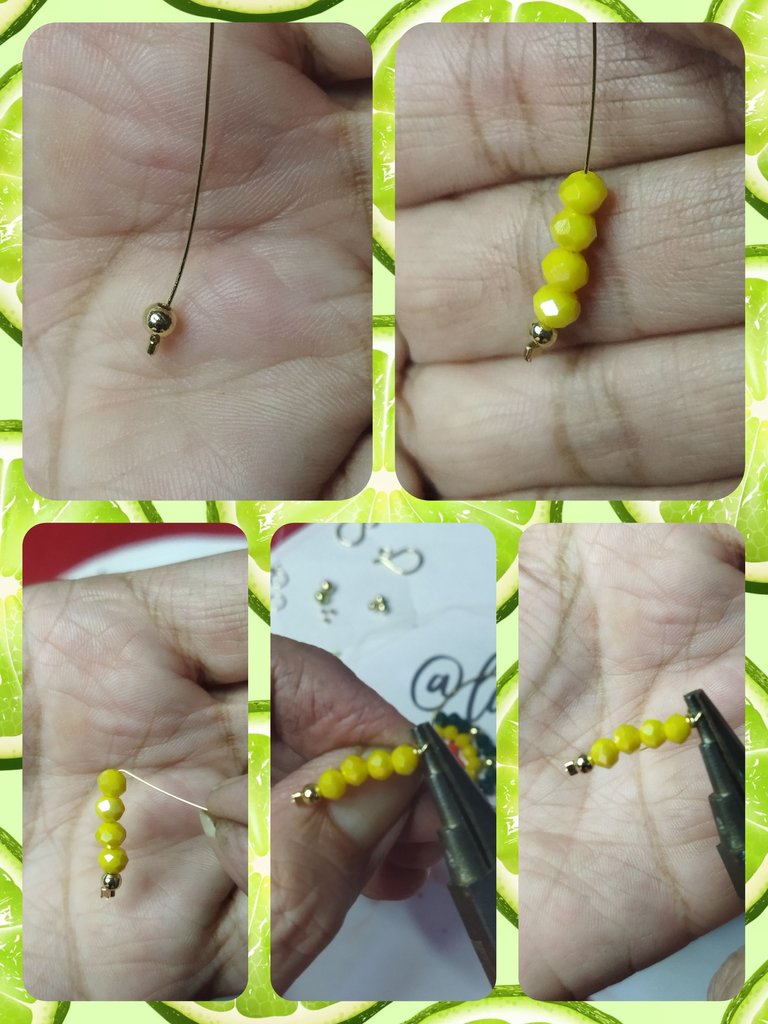
STEP Nº 12
We made 3 more, varying the color and position of the ball between the crystals so that it gives contrast to the earring when it moves.
PASO Nº 12
Realizamos 3 más, variando el color y la posición del balín entre los cristales para que le de un contraste al arete cuando se mueve.
STEP Nº 13
We take one of the 5 mm rings, open it with the tweezers and place the 4 strips. Then we insert it into the earring and close it.
PASO Nº 13
Tomamos uno de los aros de 5 mm, abrimos con las pinzas y colocamos las 4 tiras. Luego lo introducimos al arete y cerramos.
STEP Nº 14
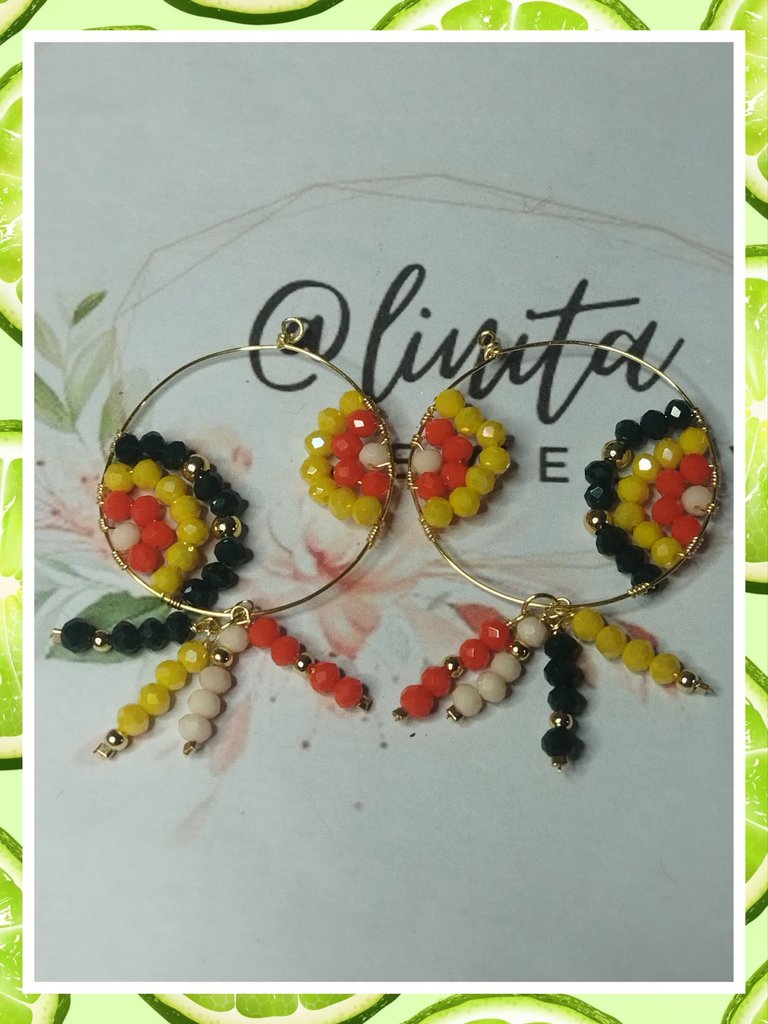
We make the second earring, mirror type, that is, we are going to make the same design but in reverse. Measuring with the first one so that they are at the same height.
PASO Nº 14
Realizamos el segundo arete, tipo espejo, es decir, vamos a realizar el mismo diseño pero al inverso. Midiendo con el primero para que queden a la misma altura.
STEP Nº 15
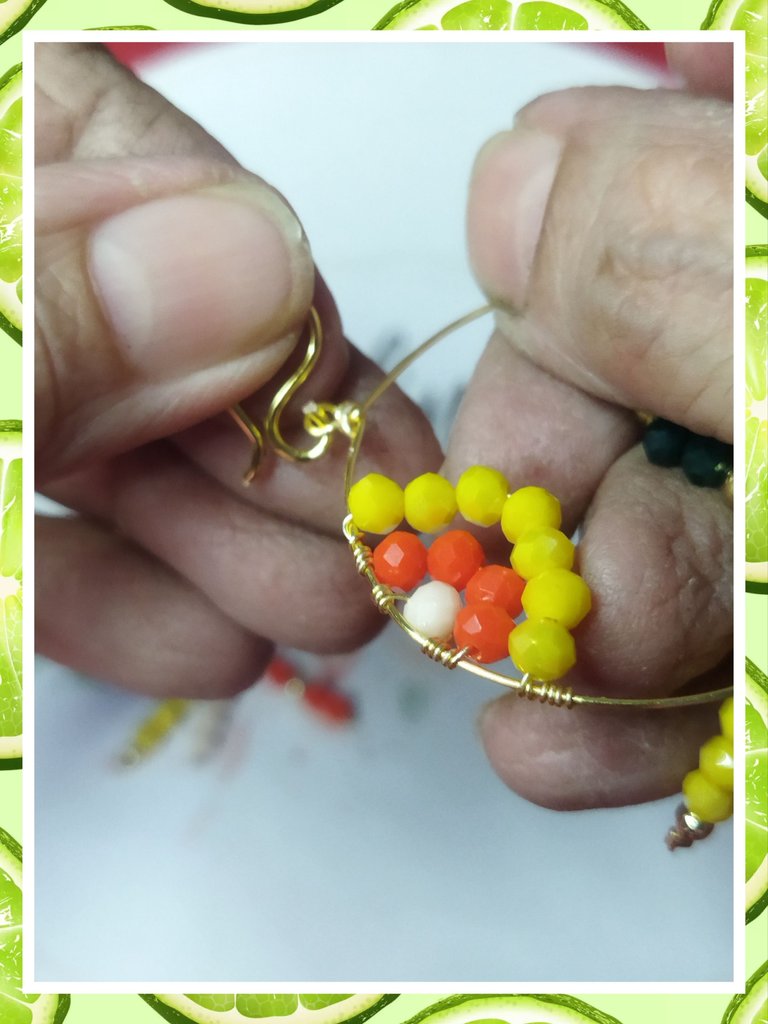
And to finish, we place the hooks in each of the earrings. We adjust with the clamp and that's it.
PASO Nº 15
Y para finalizar, colocamos los anzuelos en cada uno de los aretes. Ajustamos con la pinza y listo.
Fashionable, with very striking citrus colors and ready to show off with your nondescript outfit. With these earrings, any garment you wear will look spectacular, as long as you know how to combine it. I hope you like it. See you next time.
A la moda, con colores cítricos bien llamativos y ya listos para lucir con tu oufit anodino. Con estos aretes cualquier prenda que uses se verás espectacular, siempre y cuando sepas combinar. Espero te guste. Nos vemos en la próxima.
I love 💕 your explanation concerning those who wears earring. I believe as you make use of your face to make the earring, you'll love to wear it almost everyday.
Hi thanks. It is good to know what type of accessories we can use depending on our shapes. Sometimes we wear clothes that do not match our face and we do not achieve the result we want or imagine. Thanks for your comment. Greetings.
Muy bonitos aretes amiga
The earring is very fashionable and stylish. Nice work.
Earrings of this style are in trend. I'm glad you like it. Greetings.
Están bellisismos y los colores verdaderamente hermosos..me encantó...gran creatividad amiga...saludos...lindo domingo.
Muchas gracias, a mí también me gustaron mucho 😁😁