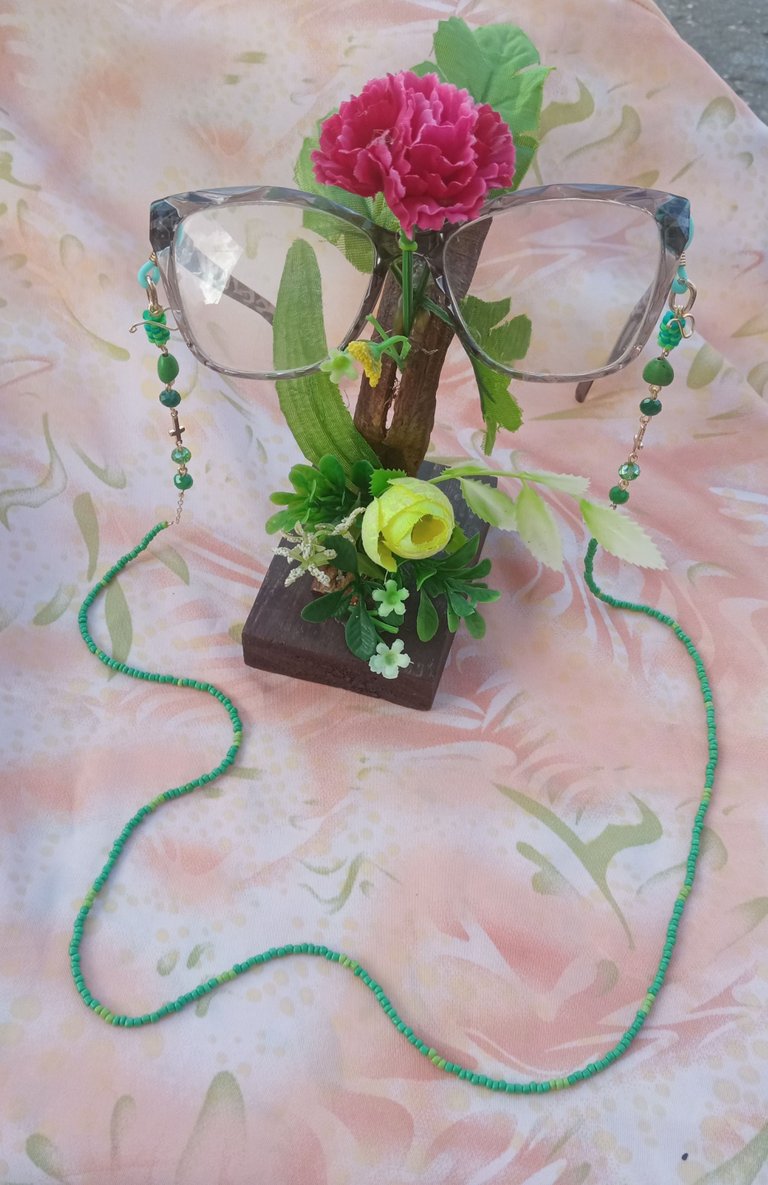
Buenos días amigos de #hive y a los amigos de #jewelry, aquí les traigo mi segundo trabajo de joyería para compartirlo con ustedes, tutorial o paso a paso para realizar un bello colgante para lentes, espejuelos o gafas, espero les guste mi trabajo, igualmente espero seguir contando con su apoyo en la comunidad #hive.
Good afternoon friends of #hive and friends of #jewelry, here I bring you my second jewelry job to share with you, tutorial or step by step to make a beautiful pendant for glasses, eyeglasses or glasses, I hope you like my work, anyway I hope to continue counting on your support in the #hive community.
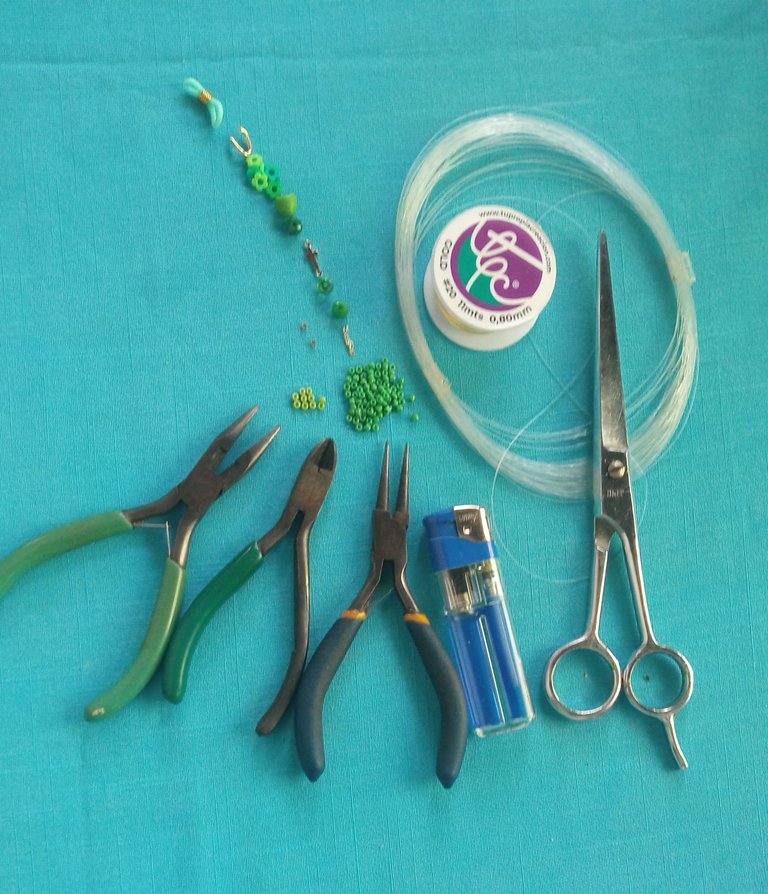
✓Materiales📝
💠 Hilo nylon transparente grosor 0.30 o 0.40 mm
💠 40 Cms de Alambre tpc dorado número 20 o 22
💠 2 Grapas o Escarlachin
💠 2 1/2 gramos de mostacillas del color de su preferencia
💠 4 cm de cadena de woldfield
💠 6 Cristales número 6 de su preferencia
💠 2 cuentas o piedras en forma de corazón de pasta turquesa
💠 2 Dijes en forma de cruz en goldfieeld
💠 12 Piezas de fimos o pucas
💠 2 Eslabones de cadena dorada
💠 1par de gomas para colgantes de lentes
💠 Cinta métrica
💠 Pinza punta plana
💠 Pinza punta redonda
💠 Pinza piqueta
✓Materials 📝
💠 Transparent nylon thread thickness 0.30 or 0.40 mm
💠 40 Cms of Golden tpc Wire number 20 or 22
💠 2 Staples or Escarlachin
💠 2 1/2 grams of beads of the color of your choice
💠 4cm woldfield chain
💠 6 Crystals number 6 of your choice
💠 2 turquoise pasta heart-shaped beads or stones
💠 2 Cross pendants in goldfield 💠 12 pieces of fimos or pucas
💠 2 Gold Chain Links
💠 1 pair of rubber bands for eyeglass pendants
💠 Tape measure
💠 Flat tip pliers
💠 Round tip pliers
💠 Pickaxe clamp
TUTORIAL:
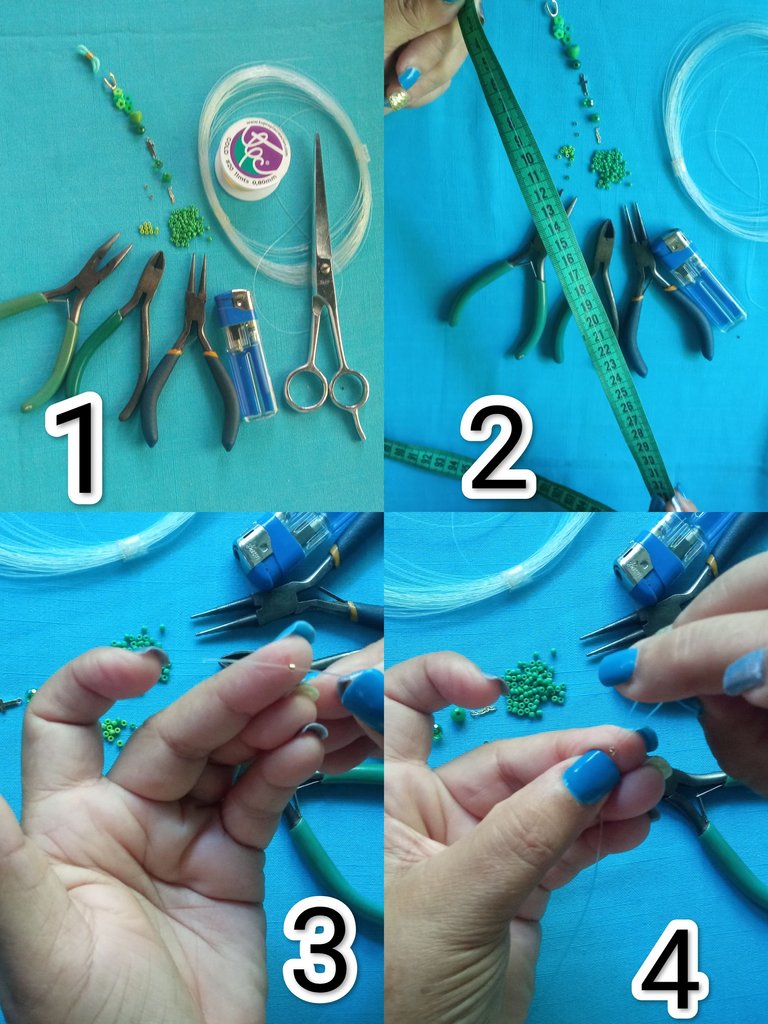
✓ Pasos 1.2.3.4
Iniciamos midiendo 60 cm de hilo nylon transparente número 0.30 o 0.40 mm, luego introducimos una grapa o Escarlachin en uno de los extremos, doblamos un pedacito del nylon y lo volvemos a introducir en la grapa o Escarlachin dejando una orejita o asita.
✓ Steps 1.2.3.4 We start by measuring 60 cm of transparent nylon thread number 0.30 or 0.40 mm, then we introduce a staple or Escarlachin in one of the ends, fold a small piece of nylon and reinsert it into the staple or Escarlachin leaving a little ear or loop.
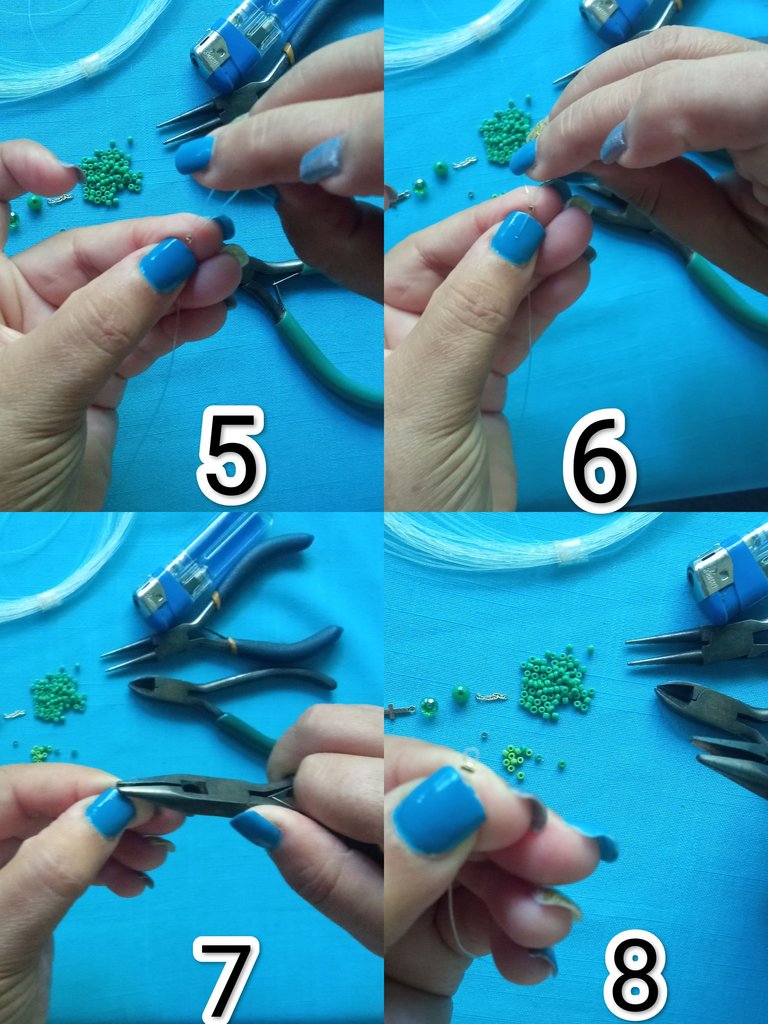
✓Pasos 5.6.7.8
Luego de introducir el hilo nylon transparente por la grapa o Escarlachin,dejamos un pequeño sobrante de nylon y con la pinza punta plana apretamos o presionamos la grapa para cerrar y quede la asita u orejita.
✓Steps 5.6.7.8
After introducing the transparent nylon thread through the staple or Escarlachin, we leave a small excess of nylon and with the flat tip pliers we squeeze or press the staple to close and the little ear or ear remains.
✓Pasos 9.10.11.12
Empezamos a introducir las mostacillas de nuestra preferencia en el hilo nylon, iniciamos siempre con una mostacilla de color diferente o del mismo color un tono diferente y llenamos de mostacillas 55 cm del hilo nylon, luego empezamos a engarzar las pucas o fimos en el alambre dorado número 20 o 22 mm y realizamos un aro con la pinza punta redonda para evitar que se salgan las piezas.
✓Steps 9.10.11.12
We begin to introduce the beads of our preference in the nylon thread, we always start with a bead of a different color or of the same color a different tone and fill 55 cm of the nylon thread with beads, then we begin to crimp the pucas or fimos in the wire gold number 20 or 22 mm and make a ring with the round tip pliers to prevent the pieces from coming out.
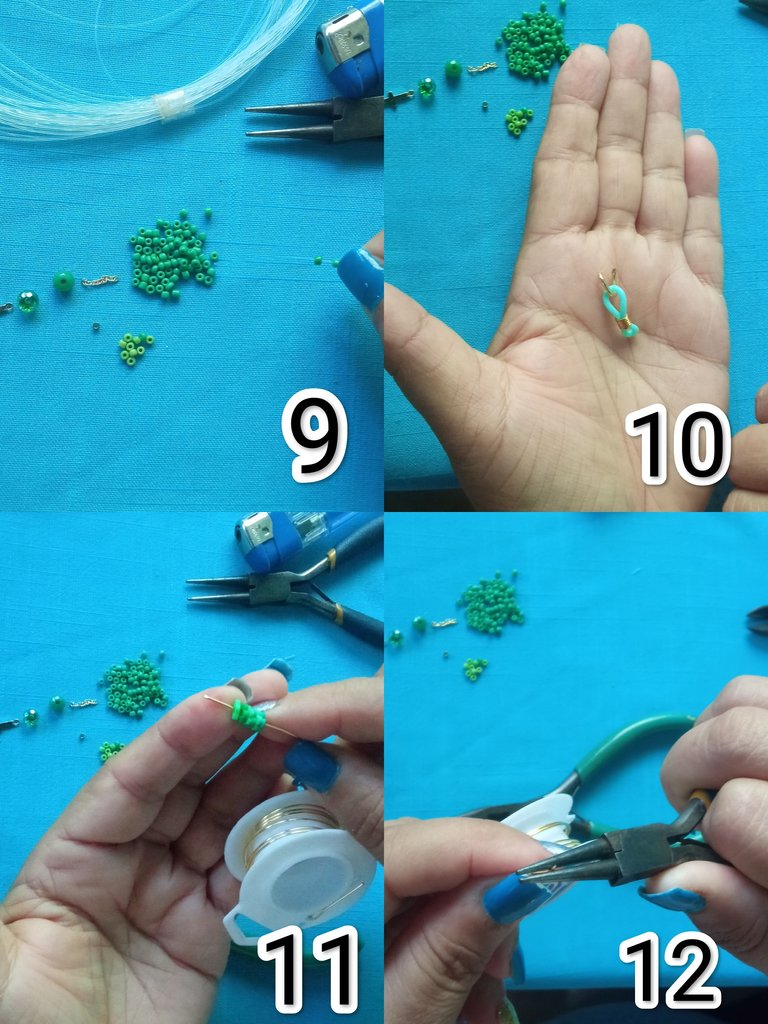
✓Pasos 13.14.15.16
Luego de asegurar las pucas o fimos de un lado , picamos dejando un cm de alambre para realizar el otro arito o dobles para asegurar las piezas antes mencionadas, ya previamente hemos unido la gomita del colgante para lentes, espejuelos o gafas al eslabón de la cadena y unimos la pieza que formamos con los fimos o pucas y el alambre.
✓Steps 13.14.15.16
After securing the pucas or fimos on one side, we cut leaving a cm of wire to make the other ring or double to secure the aforementioned pieces, we have already previously attached the rubber band of the pendant for glasses, eyeglasses or glasses to the link of the chain and join the piece that we form with the fimos or pucas and the wire.
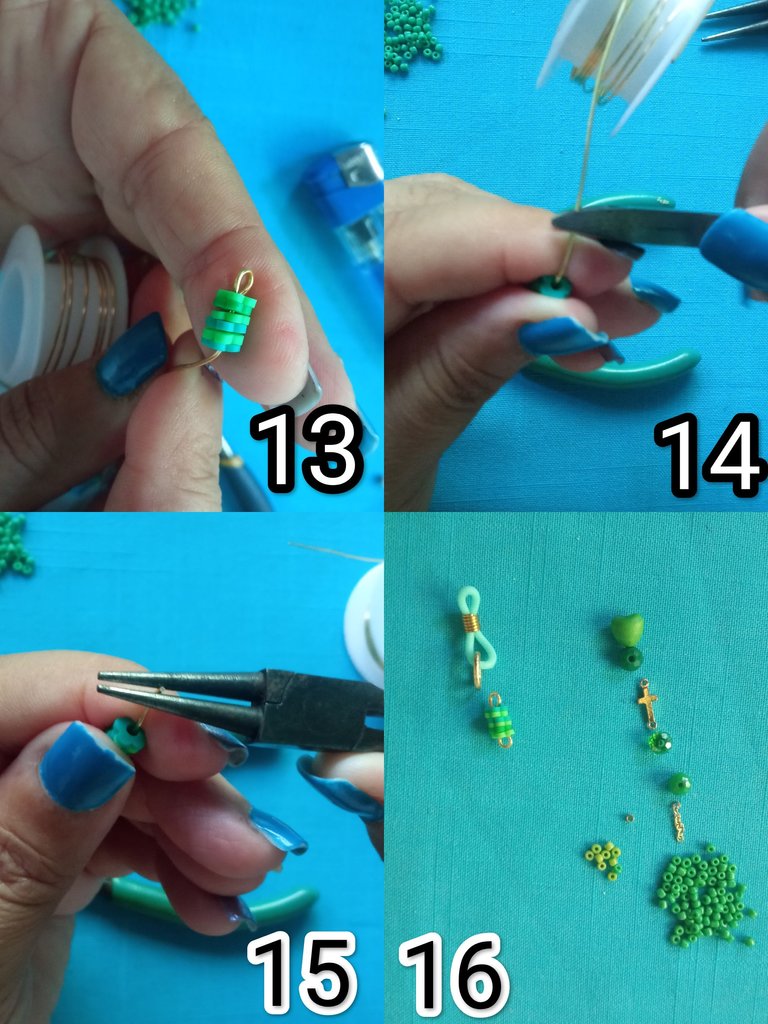
✓Pasos 17.18.19.20
Así engarzamos todas y cada una de las piezas como cristales , cuentas de pasta turquesa y cruz de goldfieeld, en este caso quedarían en ambos lados o extremos goma, eslabón de cadena, pieza engarzada con fimos o pucas, corazón de pasta turquesa,cristal, dije de cruz, cristal, cristal y pedacito de cadena , todo eso lo unimos.
✓Steps 17.18.19.20
This is how we set each and every one of the pieces such as crystals, turquoise paste beads and goldfield cross, in this case there would be rubber on both sides or ends, chain link, piece set with fimos or pucas, turquoise paste heart, crystal I said a cross, crystal, crystal and a bit of chain, we put all of that together.
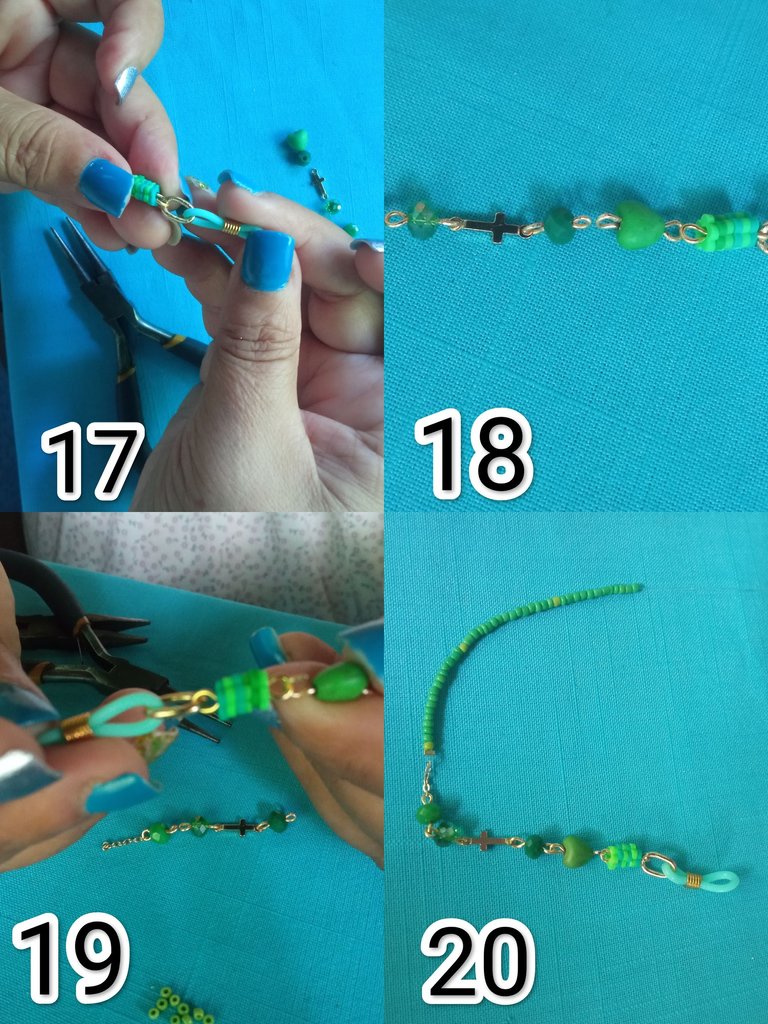
✓Pasos 21.22.23.24
Luego de engarzadas todas las cuentas o piezas unimos la cadenita introduciendo el hilo nylon por un eslabón de la cadenita y seguido lo introducimos en la grapa o Escarlachin y apretamos dicha grapa con la pinza punta plana y cortamos el hilo nylon sobrante, si sobra un pedacito de hilo nylon lo introducimos por las mostacillas para que no se vea.
✓Steps 21.22.23.24
After all the beads or pieces are crimped, we join the chain by inserting the nylon thread through a link of the chain and then we insert it into the staple or Escarlachin and press said staple with the flat tip pliers and cut the excess nylon thread, if there is any left over. We introduce a small piece of nylon thread through the beads so that it does not show.
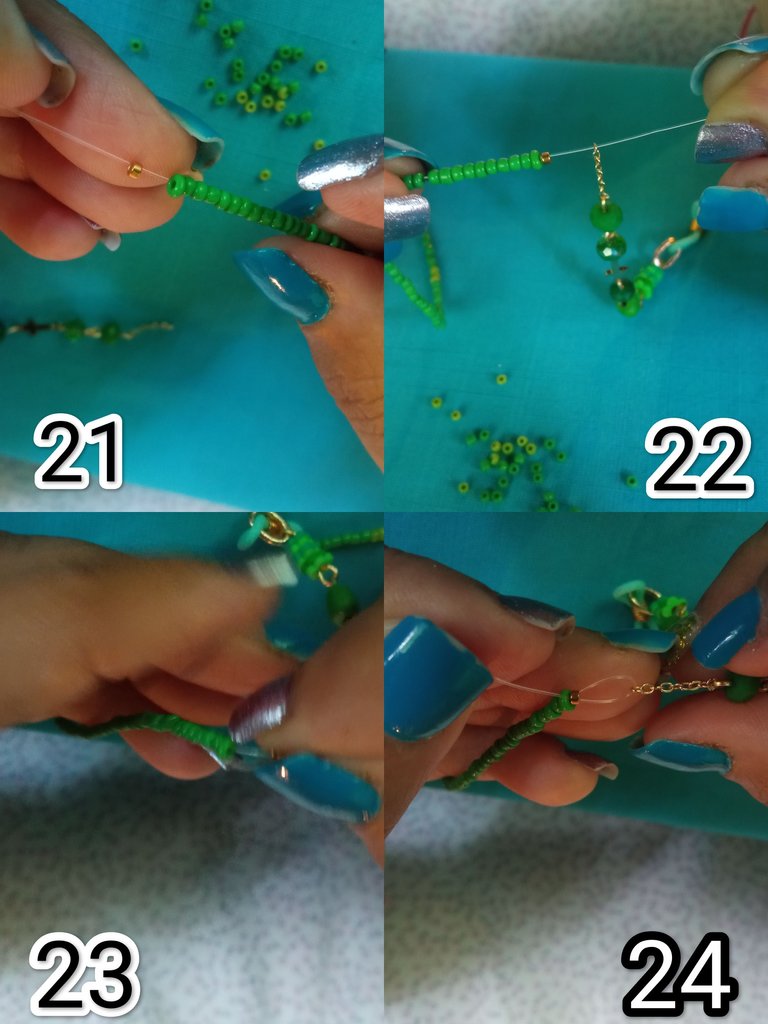
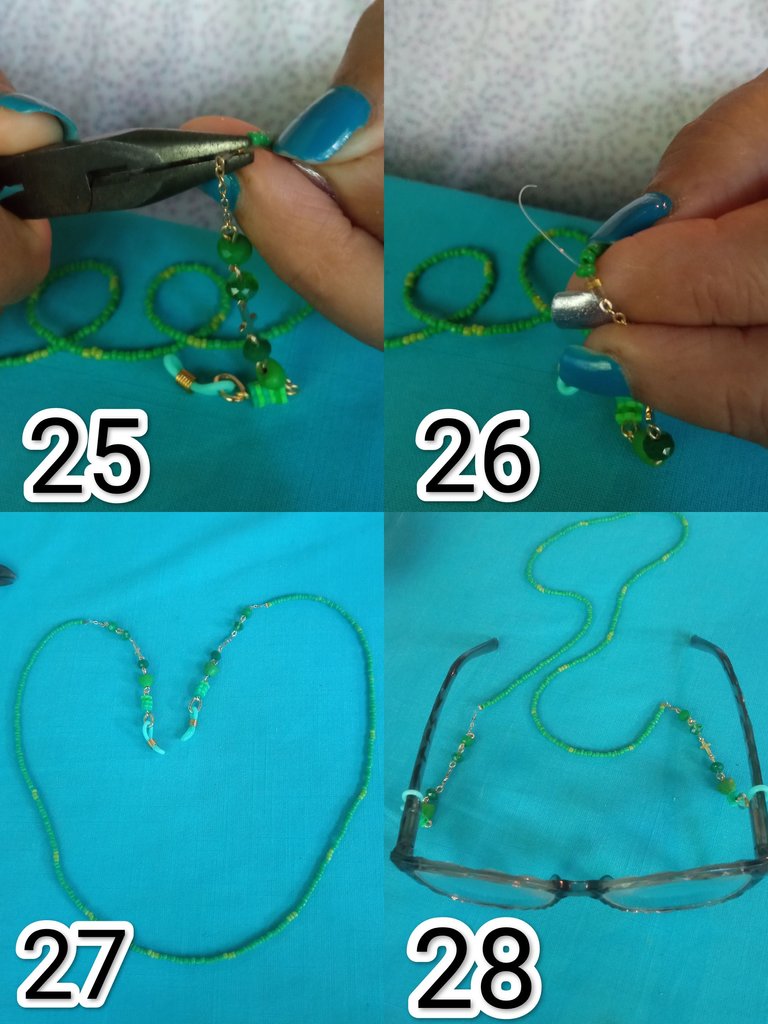
✓Pasos 25.26.27.28
Cerramos los dos extremos uniendo la cadenita al hilo nylon apretando muy bien las grapas o Escarlachin, verificamos que todos los engarces de las piedras estén bien cerrados y damos por terminado el proyecto.
✓Steps 25.26.27.28
We close the two ends joining the chain to the nylon thread, tightening the staples or Escarlachin very well, we verify that all the settings of the stones are well closed and we consider the project finished.
Espero les haya gustado mi tutorial y les sirva de guía para otra persona que desee realizarlo, gracias por leerme. Hasta otra próxima oportunidad. Síganme como @lupasbra21..
Estás fotos son de mi propiedad @lupasbra21
I hope you liked my tutorial and it serves as a guide for someone else who wants to do it, thanks for reading. Until another next opportunity. Follow me as @ lupasbra21.. These photos are my property @ lupasbra21

Congratulations @lupasbra21! You have completed the following achievement on the Hive blockchain and have been rewarded with new badge(s):
Your next payout target is 50 HP.
The unit is Hive Power equivalent because post and comment rewards can be split into HP and HBD
You can view your badges on your board and compare yourself to others in the Ranking
If you no longer want to receive notifications, reply to this comment with the word
STOPTo support your work, I also upvoted your post!
Check out the last post from @hivebuzz:
Support the HiveBuzz project. Vote for our proposal!
@hivebuzz . Gracias por comentar.
De nada @lupasbra21.
Por cierto, también necesitamos tu ayuda. ¿Podemos pedirle que apoye nuestra propuesta para que nuestro equipo pueda continuar con su trabajo?
Puedes hacerlo en peakd, ecency,
https://peakd.com/me/proposals/199
¡Muchas gracias!
Buena publicación. Estos colgantes son muy prácticos y pueden ser un complemento más. Me gustó mucho el detalle con el que guías todo el proceso. Gracias por este buen trabajo y por compartirlo aquí en Hive. 🤗
Hola amiga @palomap3 gracias por tu comentario, que bueno que te haya gustado mi trabajo. Un abrazo
¡Felicidades! Esta publicación obtuvo upvote y fue compartido por @la-colmena, un proyecto de Curación Manual para la comunidad hispana de Hive que cuenta con el respaldo de @curie.
Si te gusta el trabajo que hacemos, te invitamos a darle tu voto a este comentario y a votar como testigo por Curie.
Si quieres saber más sobre nuestro proyecto, acompáñanos en Discord: La Colmena.
Hola, te han quedado lindo, deseo mucha suerte en tu publicación, muy fácil de seguir tu paso. felicidades.@lupasbra21
Hola amiga @katiuskamata , gracias por tu comentario, me agrada que te haya gustado. Un abrazo
Te han quedado lindos con el color verde de esperanza es bueno verte de nuevo por aquí, 💚 un lindo paso a paso, las piedras quedaron muy lindas, gran trabajo ❤️
@hive-189504 Gracias por tu comentario, el color verde de la esperanza y de la naturaleza, me encanta que te haya gustado mi trabajo. Un abrazo