
Hola, aquí la muestra de mi proceso nuevamente; esta vez con el Nudo de Brujas, una pieza que empieza a ser de la que más me piden. Para los que no conocen, el Nudo de Brujas, es un amuleto de origen celta que se usa de protección contra hechizos malignos y tiene la capacidad de devolverlos contra quien lo realizo; sus cuatro puntas se asocian con los 4 elementos (agua, fuego, tierra y aire) y también con los 4 puntos cardinales (norte, sur, este y oeste).
Si desean leer un poco más pueden revisar este artículo. .LINK.
Ya que sabes más o menos lo que es el Nudo de Brujas, te comento que disfruto mucho hacer joyería con motivos o nudos celtas, sobre todo porque para hacerlos empleando la técnica de la joyería que más domino como lo es el calado o el corte de sobre metal, con la ayuda del arco de segueta...
Te dejo la lista de cosas que use para elaborar esta pieza:
🌟 Lámina de cobre 1,3 mm
🌟 Arco de segueta y pelos de segueta 0/1
🌟 Lijas 3M de número 220, 340 y 400
🌟 Astillero de Madera o superficie plana con forma de V para hacer los cortes.
🌟 Dremel, con eje flexible
🌟 Fresa de 0,7 mm y Porta lijas.
🌟 Mopa de pulir y cera de pulir para joyería.
🌟 Argolla de cobre.
PROCESO DE ELABORACIÓN

Se pegó el diseño del nudo de brujas sobre una lámina de cobre de 1.3 mm usando pega de barra y los agujeros para el corte interno se abrieron con una fresa de 0, 75 mm usando el Dremel. Algo que debo comentar es que a la hora diseñar en el computador o a mano cualquier pieza, las líneas que nos sirven de guía deben ser delgadas, para que el corte sea más exacto en lo posible.

Empiezo el corte de la pieza en sus áreas internas con la caladora o arco de segueta, metiendo por los agujeros la sierra número 0/1, este número de sierras de segueta me pareció muy buena para cortar láminas que pasan del milímetro de espesor.
Los cortes deben hacerse siguiendo la línea guía con mucho cuidado.
Terminado los espacios internos, vamos con el corte exterior o de la silueta del nudo de brujas.

Cómo ven aquí hay un error mío, la lámina debe ir recta sobre el astillero de madera, por lo que debo adaptarlo o hacer un astillero nuevo... Pero igual esto poco me afecta para hacer la pieza, pero con piezas pequeñas puede ser un gran problema.

Así se ve al haber terminado el corte externo, las líneas que representan el cruce del nudo se hacen inclinando la segueta un poco y haciendo el corte superficial, esto requiere un poco de paciencia.

Con el Dremel y las lijas número 220, 340 y 400, lijo la superficie de la pieza, esta es una etapa necesaria para alisar la superficie antes del proceso de lijado. Igualmente, antes o después de este proceso, con la segueta y limas es necesario corregir los detalles del corte.

Aquí pulo la pieza con la mopa de tela usando el Dremel, uso cera de pulir para darle el brillo, con esta herramienta el proceso de pulido requiere un poco de paciencia, ya que no es tan potente, yo regularmente este paso lo hago con un motor de banco y una mopa mucho más grande.
Una recomendación para el proceso de pulido es que utilicen una superficie de cuero como soporte base de la pieza y su mano, evitando que la mopa roce su piel y pueda lastimarlo, evitando también que el calor que genera la pieza en este proceso nos afecte.
Otro dato es que pueden introducir un alambre muy delgado en el orificio donde iría la argolla, esto para ayudar con el agarre de la pieza, hay que tratar de que el alambre sea lo suficientemente largo...

Así luce la pieza terminada con su argolla puesta donde pasara una cadena o cordón.
Igual te comento que después de pulir es conveniente lavar la pieza con agua y jabón con la ayuda de un cepillo, para remover los restos de cera de pulir; enjuagar con agua y secar con un paño de algodón, si se suma a este proceso un secador de pelo mucho mejor.

Esta foto la edité en Picsart para poder usarla en mis redes sociales....
Espero les haya servido o gustado este post, si tienes cualquier, opinión sobre esta pieza me pueden escribir en los comentarios...
Gracias por el apoyo y puedes conocer o ver más de mi trabajo en Instagram.
https://www.instagram.com/m16ueljoyas/
.Translated into English with Google
.>>>VVVVVVVVVVVVVVVVVVVVVVVVV
Hello, here is the sample of my process again; this time with the Bruges Knot, a piece that is beginning to be one of the most requested. For those who do not know, the Witches Knot is an amulet of Celtic origin that is used for protection against evil spells and has the ability to return them against whoever cast it; its four points are associated with the 4 elements (water, fire, earth and air) and also with the 4 cardinal points (north, south, east and west).
If you want to read a little more you can check this article.
LINK.
Since you know more or less what the Bruges Knot is, I tell you that I really enjoy making jewelry with Celtic motifs or knots, especially because to make them using the jewelry technique that I master the most, such as fretwork or cutting on metal, with the help of the hacksaw bow...
I leave you the list of things I used to make this piece:
🌟 Copper foil 1.3 mm
🌟 Hacksaw bow and hacksaw hairs 0/1
🌟 3M sandpaper number 220, 340 and 400
🌟 Wood Shipyard or V-shaped flat surface to make the cuts.
🌟 Dremel, with flexible shaft
🌟 0.7 mm strawberry and sandpaper holder.
🌟 Polishing mop and polishing wax for jewelry.
🌟 Copper ring.
ELABORATION PROCESS
The witches knot design was glued onto 1.3mm copper foil using bar glue and the holes for the internal cut were made with a 0.75mm cutter using the Dremel. Something that I must comment on is that when designing any piece on the computer or by hand, the lines that serve as a guide must be thin, so that the cut is as exact as possible.
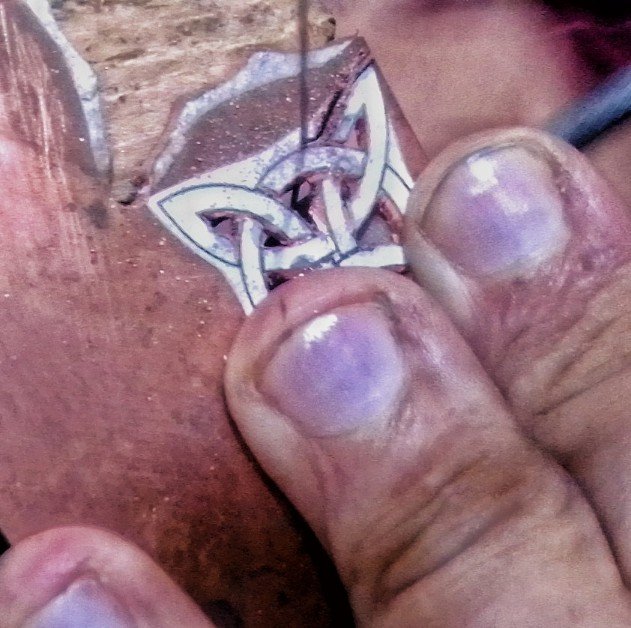
I start cutting the piece in its internal areas with the jigsaw or hacksaw, inserting the number 0/1 saw through the holes, this number of hacksaws seemed very good for cutting sheets that are more than a millimeter thick.
The cuts must be made following the guide line very carefully.
Finished the internal spaces, we go with the outer cut or the silhouette of the witches knot.
As you can see, here's a mistake of mine, the sheet must go straight on the wooden yard, so I have to adapt it or make a new yard... But this doesn't affect me to make the piece, but with small pieces it can be a problem. big problem.
This is how it looks when the external cut is finished, the lines that represent the crossing of the knot are made by tilting the saw a little and making the superficial cut, this requires a little patience.
With the Dremel and the number 220, 340 and 400 sandpaper, I sand the surface of the piece, this is a necessary stage to smooth the surface before the sanding process. Likewise, before or after this process, with the hacksaw and files it is necessary to correct the details of the cut.
Here I polish the piece with the cloth mop using the Dremel, I use polishing wax to give it the shine, with this tool the polishing process requires a little patience, since it is not as powerful, I regularly do this step with a bench motor and a much larger mop.
A recommendation for the polishing process is to use a leather surface as the base support for the piece and your hand, preventing the mop from rubbing your skin and hurting it, also preventing the heat generated by the piece in this process from affecting us.
Another fact is that they can introduce a very thin wire in the hole where the ring would go, this to help with the grip of the piece, you have to try to make the wire long enough...
This is what the finished piece looks like with its ring placed where a chain or cord will pass.
I also tell you that after polishing it is convenient to wash the piece with soap and water with the help of a brush, to remove the remains of polishing wax; rinse with water and dry with a cotton cloth, if a much better hair dryer is added to this process.
I edited this photo in Picsart to be able to use it in my social networks....
I hope you have enjoyed or liked this post, if you have any opinion about this piece you can write me in the comments...
Thanks for the support and you can learn or see more of my work on Instagram.
Yay! 🤗
Your content has been boosted with Ecency Points, by @m16uellop.
Use Ecency daily to boost your growth on platform!
Support Ecency
Vote for new Proposal
Delegate HP and earn more
Hola Miguel, tienes mucho talento todas tus creaciones son muy bonitas, oye hay una comunidad para los que tienen tu talento es https://peakd.com/c/hive-130560/created, lee las reglas y comparte tus post en esa comunidad, a lo mejor sean mejor valorados.
Que tengas un lindo día! ☀️
Hola gracias, yo publicaba allí al principio, pero nació la comunidad de joyeria y me quedé aquí, regularmente me va bien pero no sé que pasó 😁...
Chevere muy bien elaborado, haz hecho el de Las Reliquias de la Muerte ? saludos
Hola gracias, si he hecho ese, ese era uno de los más populares lo pedían a cada rato hace unos años
Siempre tienes unos diseños muy lindos y pocos común, excelente trabajo estimado @m16uellop
Gracias mi estimada
Hi @m16uellop
Do you know you could have used #diy tag for this post to earn some BUIDL tokens in addition to Hive crypto?
In case you are not aware, read this post to know the kinds of content, among others, you could post using #diy tag.
You could also use the #diy tag when you share content showcasing your DIY skills.
When you use #diy tag your posts will also appear on https://built-it.io website, giving you wider exposure.
Because most people are not aware of the potential of BUIDL token, it can still be bought at very cheap price now.
Un hermoso trabajo amigo @m16uellop estos nudos celtas son muy bonitos y extraños, no conocía este nuevo ni su nombre grapor traerlo aquí 😉
Gracias! No mucha gente lo conoce, pero los que son wiccanos o los que tienen alguna relación con el mundo esotérico si lo conocen....
Wowww, pero que hermosura de trabajo. Es que todo lo que haces te queda fascinante. la forma, color, material y acabado me encanto. Éxitos, que tengas bello día amigo @m16uellop ⭐🌈⭐
😉🥳 gracias amiga, ya empezó bien con estos super comentarios
Realmente hermoso trabajo es que debo decirlo, Ohh lo amo! Lo quiero para mí 🥰🤩 me encanta el trabajo qué estás realizando. Gracias por compartir tu proceso.
😉 gracias, estoy a la orden para lo que necesites...