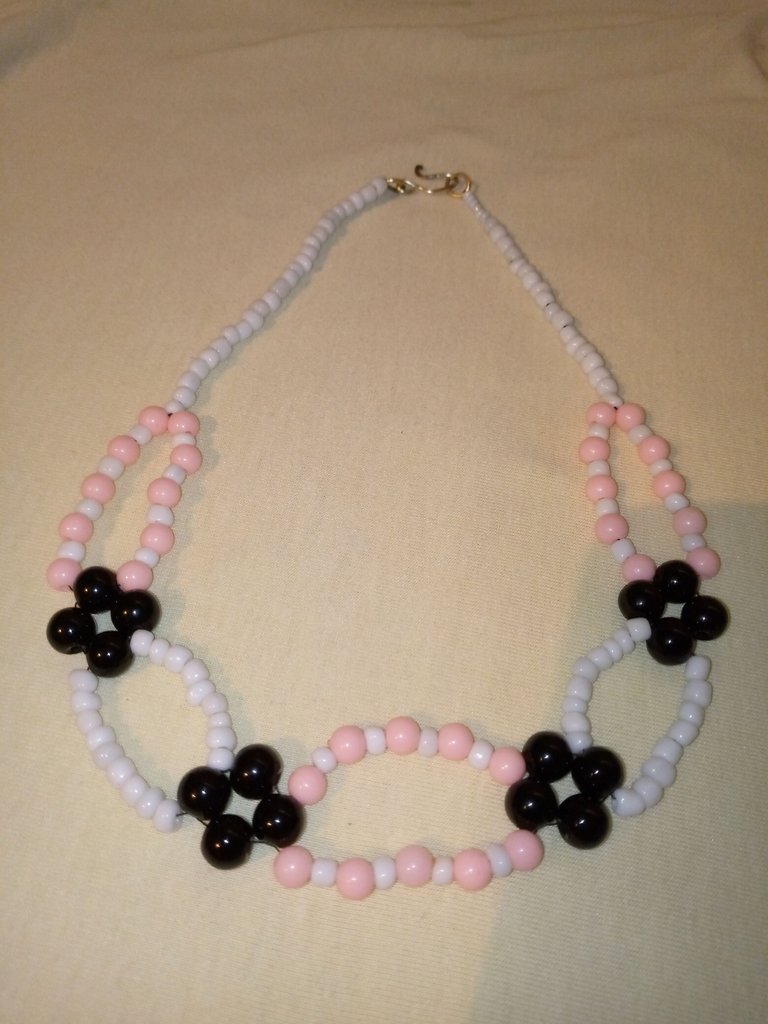
Esp-Ing Un collar sencillo ideal para utilizar todos los días en Navidad.
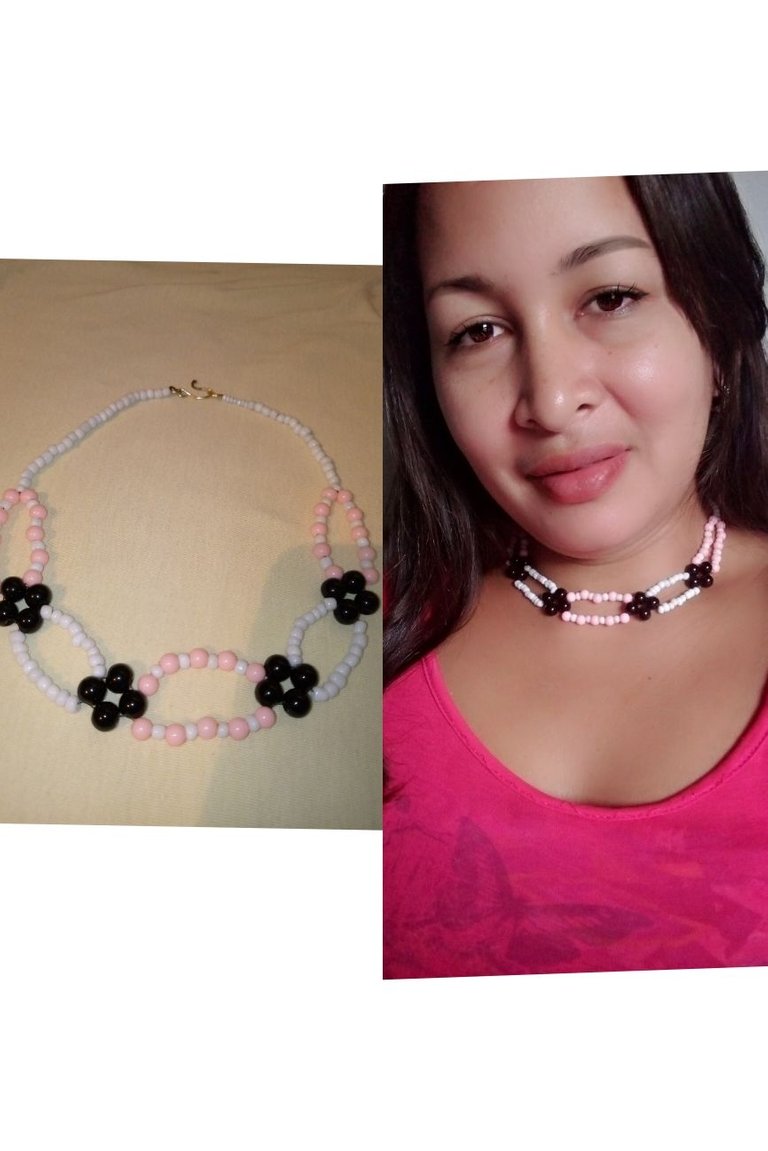
Hola mis queridos amigos hivers y miembros de esta hermosa comunidad creativa de #jewelry, feliz noche para todos, espero que se encuentren bien disfrutando de este fin de semana en compañía de su familia y seres más queridos y por supuesto aprovechando el tiempo de descanso para hacer las cosas que por el trabajo no podemos realizar, para mí es un placer estar de nuevo aquí compartiendo con todos ustedes un tutorial donde les mostraré cómo realice un collar en tres tonos y con una técnica muy sencilla y fácil de realizar, este collar es ideal para utilizarlo en ocasiones muy sencillas, espero que sea de su agrado y para darle comienzo a este tutorial le daré los materiales que he utilizado para la creación del collar.
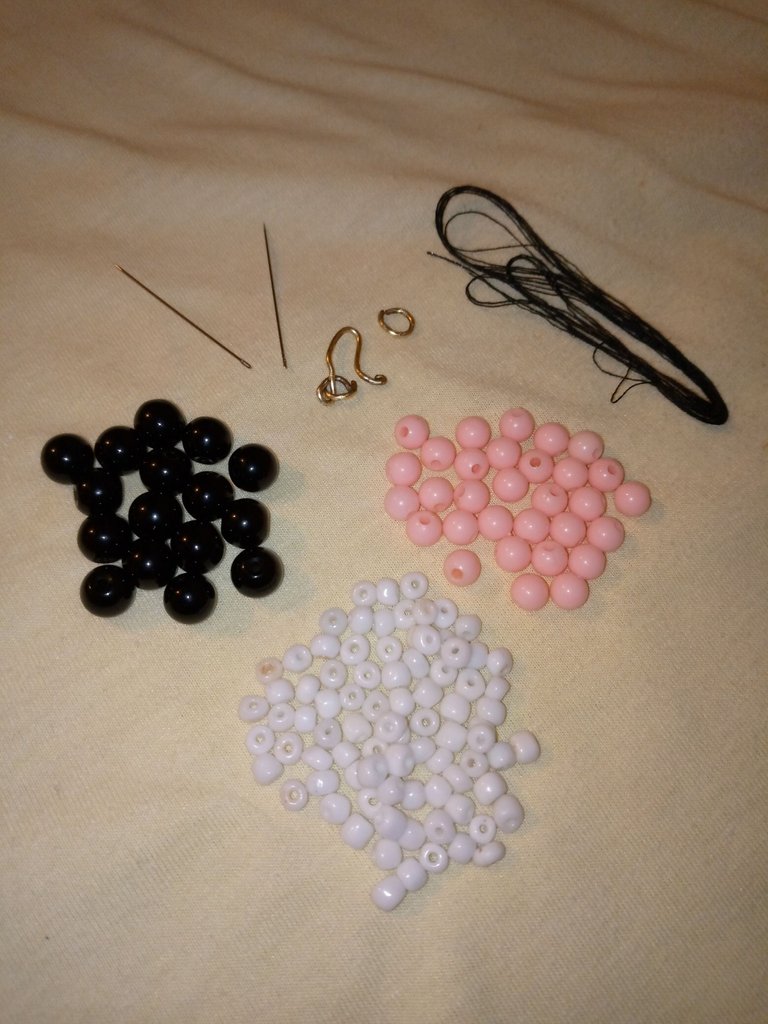
MATERIALES
📿 PERLAS NEGRAS
📿 PERLAS ROSADAS
📿 MOSTACILLAS BLANCAS
📿 DOS AGUJAS
📿 HILO
📿 Pasador
PASO A PASO
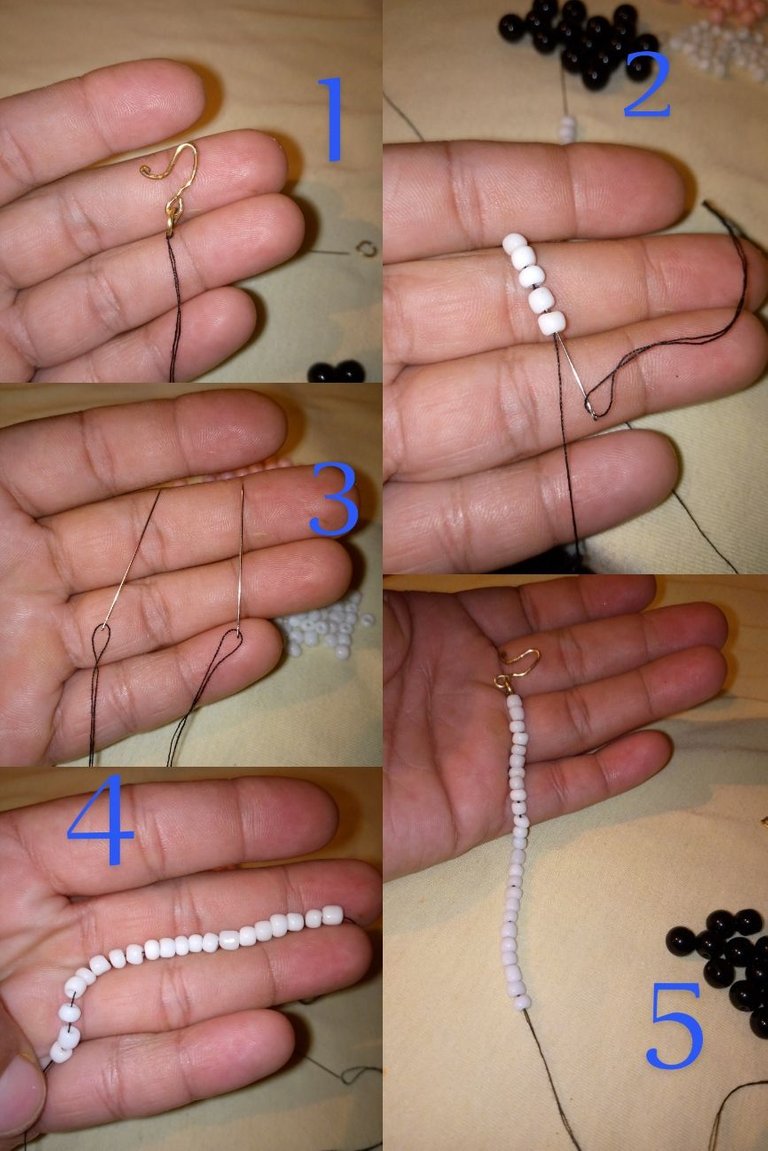
Para comenzar con la creación de este collar lo primero que tenemos que hacer es cortar aproximadamente metro y medio de hilo para luego colocarle el pasador justo en el medio del hilo pasando el hilo por el aro y luego por el hilo y hacer un nudo, ya con el pasador colocado en el centro colocó en cada punta de hilo una aguja y así empezar a colocar las mostacillas blancas hasta lograr colocar 25 mostacillas, esto lo hacemos pasando por los dos hilos primero lo coloqué por uno y luego pase la otra aguja por las mismas mostacillas para que quedarán en un mismo nivel.
En los siguientes pasó lo que hice fue separar los hilos y colocar en cada hilo una perla rosada una mostacilla blanca una perla rosada una moto silla blanca hasta colocar la cantidad de 5 Perlas rosadas y 4 mostacillas blancas intercaladas una de otras y para cruzar ambos y lo coloqué una perla negra después de cruzar los hilos colocó de un lado del hilo dos Perlas negras y del otro lado colo con uno y con la aguja donde está una perla pasó la aguja por una de las dos del otro lado y así formar un módulo de cuatro con las perlas negras.
Aquí en estos pasos colocó en cada lado del hilo 9 mostacillas blanca y para cruzar ambos y lo colocó una perla negra, luego colocó dos perlas de un lado del hilo y una del siguiente lado y con la aguja dónde está una perla pasó por una de las dos Perlas para formar un módulo de 4 con las perlas negras.

Luego en estos siguientes pasos repito colocando las perlas rosadas intercaladas juntos con las mostacillas blancas, colocando un total de 5 perlas y 4 mostacillas de cada lado del hilo e igual cruzó con la perla negra y formó con las siguientes el módulo de 4 este pasó lo repito por 2 veces más al igual que al colocar las 9 mostacillas en cada lado cruzó igual con las perlas negras para formar un módulo de cuatro con ellas y terminar con la ronda de perlas rosadas y mostacillas, pero en este caso para cruzar los hilos en vez de colocar ver la colocó por ambos y los una mostacilla blanca.
En estos últimos pasos es donde colocó por ambos hilos las mostacillas blancas al igual que el comienzo hasta colocar 25 mostacillas blancas y aprovecho de una vez para colocarle el aro y regresó la aguja por la misma mostacilla hasta donde podamos hacer un nudo ovarios nudo para asegurar la mejor y listo así terminamos este lindo collar alternativo para nuestro día a día en Navidad, espero que les guste, será hasta otra próxima ocasión y muchas gracias por visitar mi blog.
Todas las fotos son de mi propiedad.
@mariaj151305
INGLÉS
Esp-Ing A simple necklace ideal to use every day at Christmas.
Hello my dear friend Reverse and members of this beautiful creative community to take away and happy night to all I hope you are well enjoying this weekend in the company of your family and loved ones and of course taking advantage of the rest time to do the things that we cannot do because of work, for me it is a pleasure to be here again sharing with all of you a tutorial where I will show you how to make a necklace in three tones and with a very simple and easy technique to make, this necklace is ideal for use it on very simple occasions, I hope you like it and to start this tutorial I will give you the materials that I used to create the necklace.
MATERIALS
📿 BLACK PEARLS
📿 PINK PEARLS
📿 WHITE MUSTERS
📿 TWO NEEDLES
📿 THREAD
📿 Barrette
STEP BY STEP
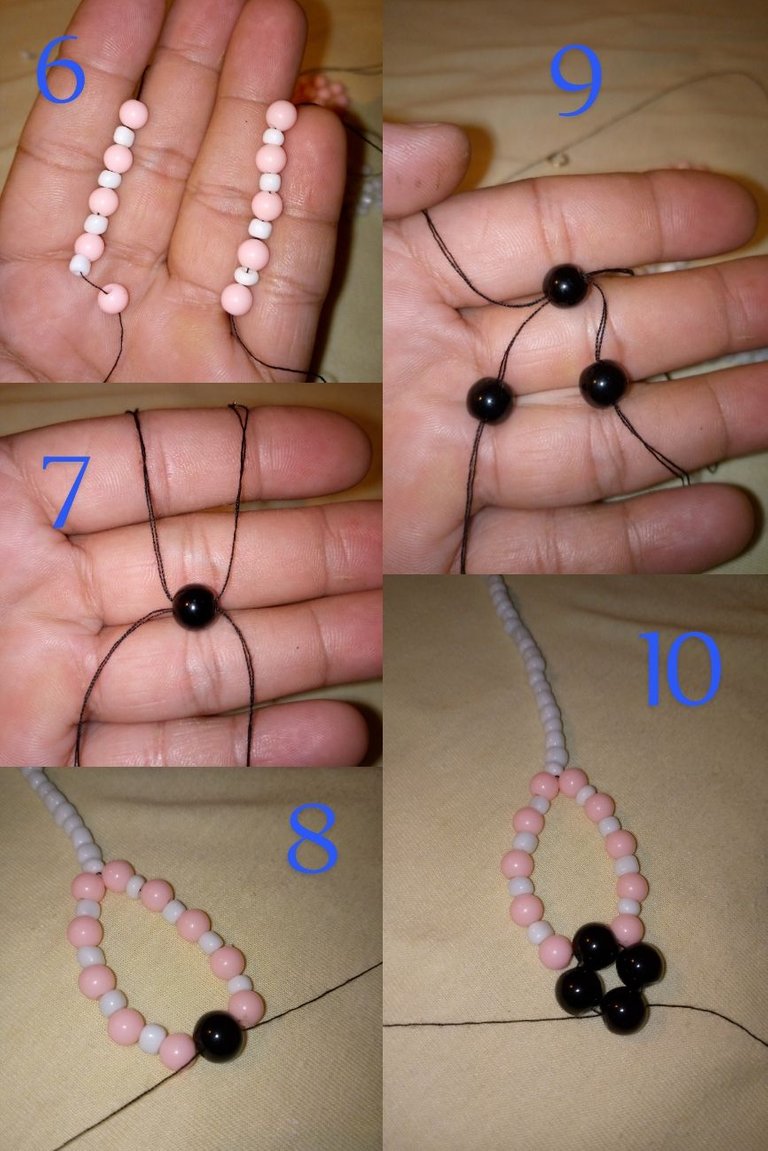
To begin with the creation of this necklace, the first thing we have to do is cut approximately a meter and a half of thread and then place the pin right in the middle of the thread, passing the thread through the ring and then through the thread and tie a knot, now With the pin placed in the center, he placed a needle at each end of the thread and thus began to place the white beads until we managed to place 25 beads. We do this by going through the two threads, first I placed it through one and then passed the other needle through the same beads so that they will remain on the same level.
In the following steps, what I did was separate the threads and place on each thread a pink pearl, a white bead, a pink pearl, a white motorcycle chair until I placed the amount of 5 pink pearls and 4 white beads interspersed with each other and to cross both and I placed a black pearl after crossing the threads placed two black Pearls on one side of the thread and on the other side I placed one and with the needle where a pearl is, passed the needle through one of the two on the other side and thus form a module of four with black pearls.
Here in these steps he placed 9 white beads on each side of the thread and to cross both and placed a black pearl, then he placed two pearls on one side of the thread and one on the next side and with the needle where a pearl is, he passed through one of them. the two Pearls to form a module of 4 with the black pearls.
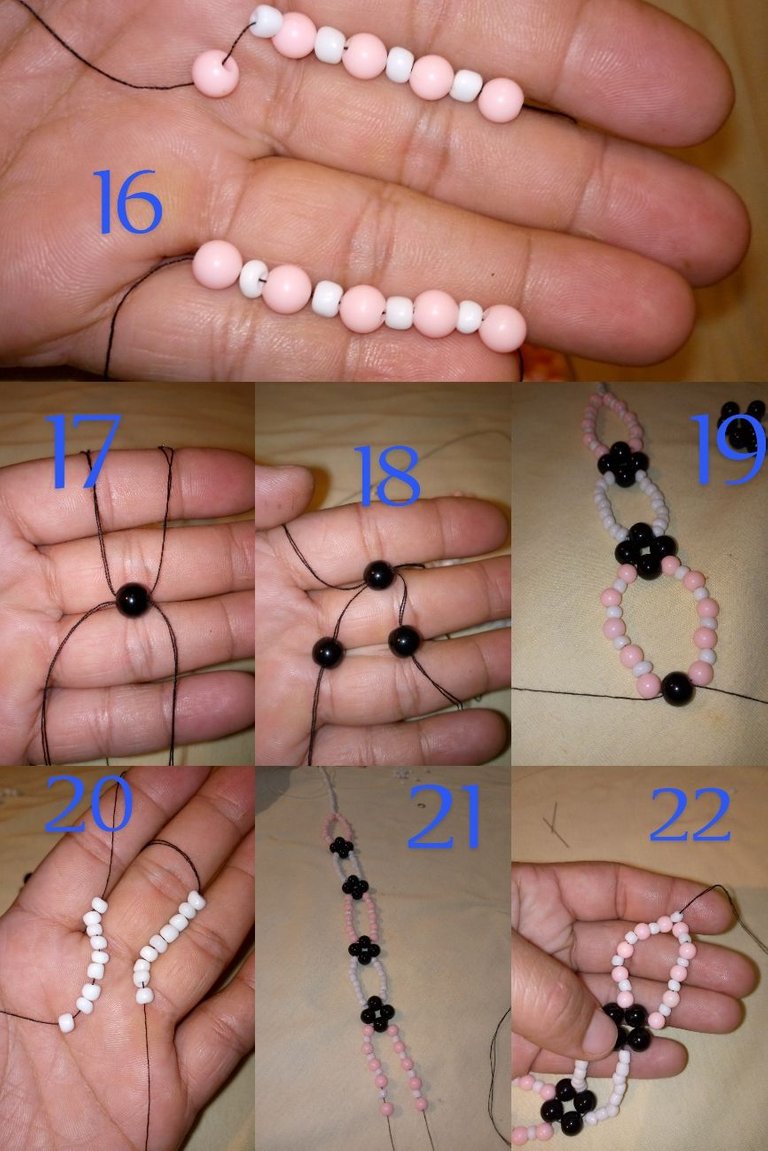
Then in these next steps I repeat placing the pink pearls interspersed together with the white beads, placing a total of 5 pearls and 4 beads on each side of the thread and the same crossed with the black pearl and formed with the following the module of 4 this passed the I repeat 2 more times in the same way as when placing the 9 beads on each side, crossed the same with the black pearls to form a module of four with them and finish with the round of pink pearls and beads, but in this case to cross the threads in Instead of placing see placed by both and a white bead.
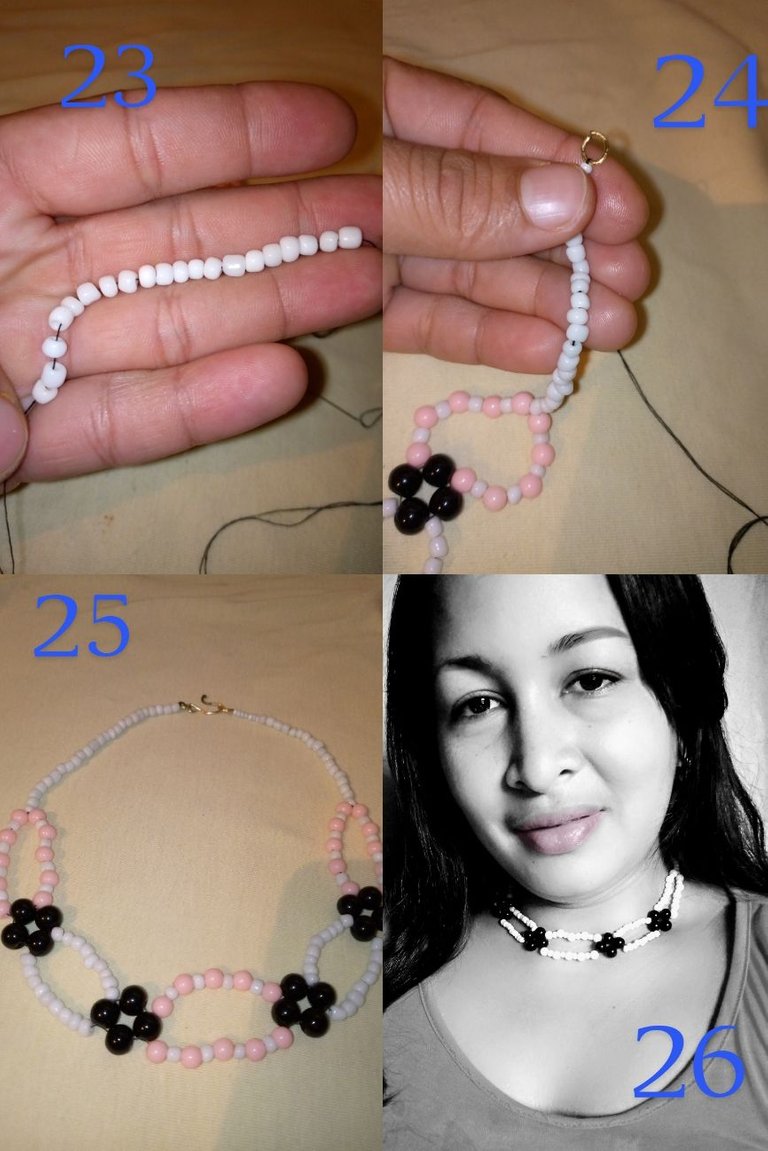
In these last steps is where he placed the white beads on both threads as well as the beginning until placing 25 white beads and I take the opportunity at once to place the ring and return the needle through the same beads to where we can tie an ovaries knot to secure The best and that's how we finished this beautiful alternative necklace for our day to day at Christmas, I hope you like it, it will be until another time and thank you very much for visiting my blog.
All photos are my property.
@mariaj151305
@mariaj151305 Muy bello el collar, me encantó, saludos 😊
Gracias amiga @anamariag, me alegra mucho que te haya gustado. Saludos 👋
Muy lindo collar amiga, sencillo pero muy hermoso, además es muy fácil de elaborar.
Gracias por compartir.
Hola buenos días amiga @emmaris, espero que te encuentres bien, gracias por comentar y me alegra mucho que te haya gustado. Saludos 👋
Thank you for sharing this post on HIVE!
Your content got selected by our fellow curator jasonmunapasee & you just received a little thank you upvote from us for your great work! Your post will be featured in one of our recurring compilations which are aiming to offer you a stage to widen your audience within the DIY scene of Hive. Next time make sure to post / cross-post your creation within the DIYHub community on HIVE and you will receive a higher upvote ;) Stay creative & HIVE ON!
Please vote for our hive witness <3
Hola buenos días @diyhub, gracias por siempre apoyar mi trabajo eso me motiva hacer mejor cada día junto a ustedes. Saludos