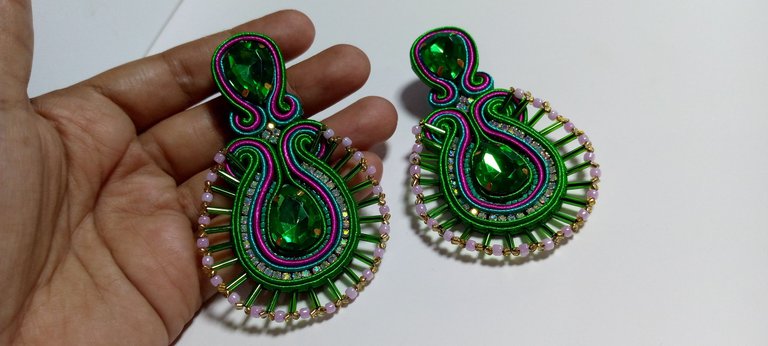
Feliz y bendecido nuevo día, ante todo espero y deseo que se encuentren bien llenos de mucha, salud, bienestar, creciendo, brillando, siendo su mejor versión!!! El día de Ayer logré realizar el envió de estas bellezas después de unas largas semanas de trabajo arduo y casi sin dormir! Realmente me ha gustado tanto esta pieza que no podía dejar de mostrarles el paso a paso! Es realmente fácil, los materiales son de fácil acceso y los puedes encontrar en las mercerías, Para mí estos días fueron realmente un reto, mi trabajo más que trabajo es una pasión y me encanta lo que estoy haciendo, siento que esta es mi manera de devolver amor al mundo; Espero que estos Maxi Aretes sean de tu agrado y estaré atenta a cualquier duda, Recuerda Tu Puedes con todo lo que te propongas y más!
Happy and blessed new day, first of all I hope and wish that you are well filled with lots of health, well-being, growing, shining, being your best version!!! Yesterday I managed to ship these beauties after a few long weeks of hard work and hardly any sleep! I really liked this piece so much that I couldn't stop showing you the step by step! It's really easy, the materials are easily accessible and you can find them in haberdashery. For me these days were really a challenge, my job is more of a passion than work and I love what I'm doing, I feel that this is my way of return love to the world; I hope that these Maxi Earrings are to your liking and I will be attentive to any questions, Remember You Can with everything you propose and more!
Materiales: Hilos Soutache 3 milímetros, Strass plateado o dorado de 2 milímetros, canutillos, mostacillas número 11, mostacilla un poco más grande, tela Pop, Tela Gamuza o cuero, encendedor, 4 apliques tipo gota de 13*18 milímetros preferiblemente engastado, Aguja e Hilo, tijera, Silicon líquido, Pin de zarcillo plano.
Materials: 3-millimeter Soutache threads, 2-millimeter silver or gold rhinestones, beads, number 11 beads, slightly larger bead, Pop fabric, Suede or leather, lighter, 4 13*18-millimeter drop-type appliques preferably set, Needle and Thread, Scissors, Liquid Silicon, Flat Tendril Pin.
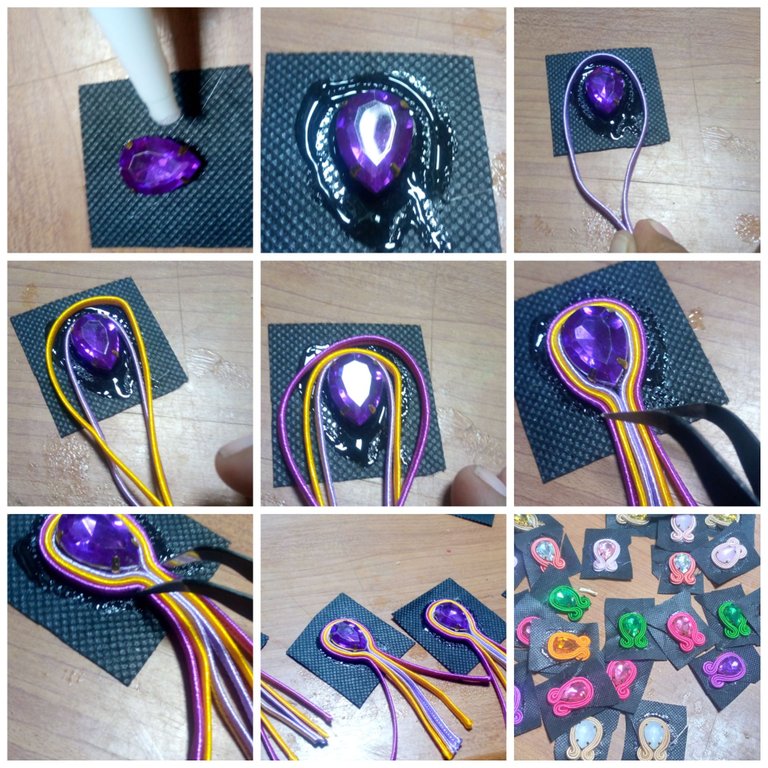
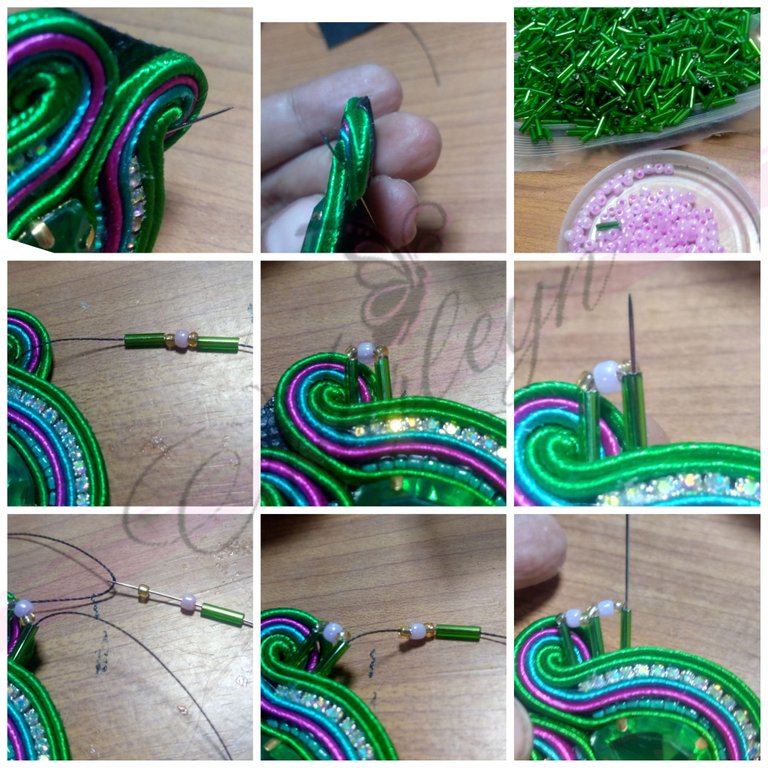
PASO 1: corta un trozo de tela Pop, coloca Silicon líquido y procede a pegar una gota con la punta de la gota con dirección hacia abajo, luego coloca Silicon líquido alrededor, cortamos 2 hilos de aproximadamente 10 centímetros cada uno, puedes guiarte por las imágenes, toma los hilos por la punta y los pagaremos alrededor del aplique, puedes ayudarte con una pinza punta fina! En la parte de atrás pega el pim de zarcillo plano! Dejarlo secar un poquito y ahora con la tijera realiza 2 cortes en la tela Pop por la orilla del hilo. En esta parte no le tome la foto del paso final, no te preocupes que lo explicaré con detalle cuando realice la parte de abajo del zarcillo para mayor detalle que es básicamente el mismo proceso en ambas partes.
STEP 1: cut a piece of Pop fabric, place liquid Silicon and proceed to stick a drop with the tip of the drop pointing downwards, then place liquid Silicon around it, cut 2 threads of approximately 10 centimeters each, you can be guided by the images, take the threads by the end and we will pay them around the appliqué, you can help with a fine tip tweezer! On the back glue the flat tendril pim! Let it dry a little and now with the scissors make 2 cuts in the Pop fabric along the edge of the thread. In this part I did not take the photo of the final step, do not worry I will explain it in detail when I make the lower part of the tendril for more detail that is basically the same process in both parts.
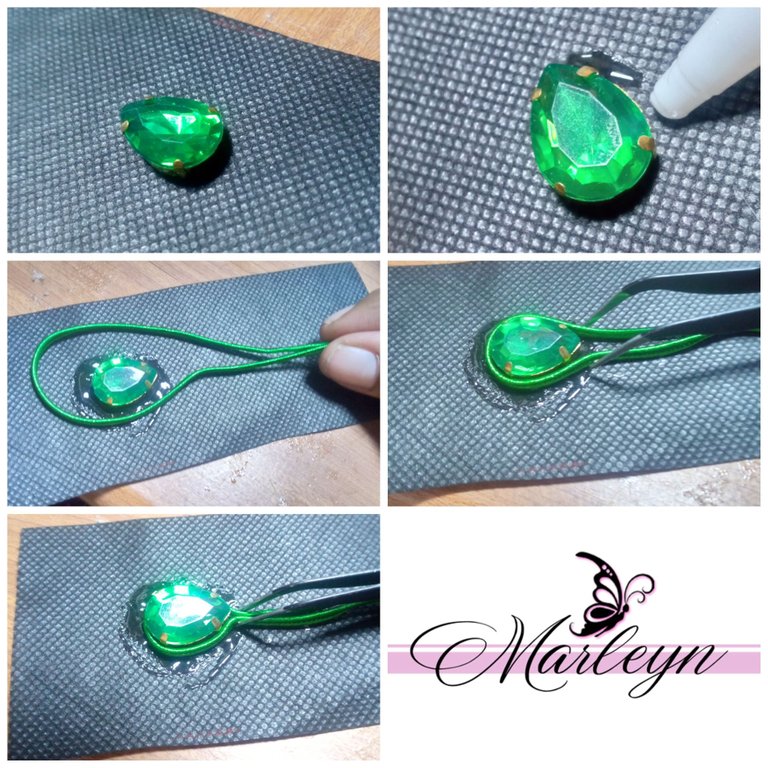
Paso 2: Corta un trozo de tela Pop, de aproximadamente 6*8 centímetros, coloca un poco de silicon Liquido y pega una gota con la punta hacia arriba, cortar un hilo de aproximadamente 10 centímetros de largo, coloca Silicon líquido por alrededor de la piedra y pega el hilo, puedes ayudarte con una pinza, dejarlo secar un poco antes de continuar. Siempre pendiente que los hilos peguen bien en la punta de la piedra.
Step 2: Cut a piece of Pop fabric, approximately 6*8 centimeters, place a little Liquid Silicon and paste a drop with the tip upwards, cut a thread approximately 10 centimeters long, place Liquid Silicon around the stone and glue the thread, you can help with a clamp, let it dry a bit before continuing. Always pending that the threads hit well on the tip of the stone.
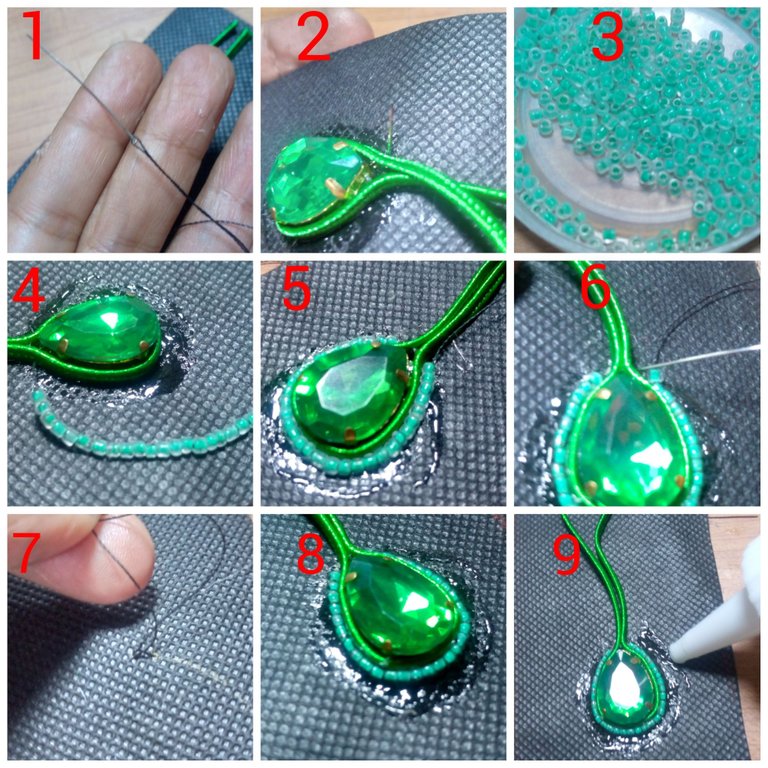
Paso 3: Ensarta el hilo en la aguja y realiza un nudo,la vamos a introducir de abajo hacia arriba, coloca Silicon líquido al rededor del hilo anteriormente pegado, deja medio secar un poquito mientras introduces mostacillas de las pequeñas en la aguja, tantas como sean necesarias para cubrir todo el alrededor del aplique, al terminar introduce la aguja hacia abajo y con cuidado que no se salga el hilo vas a realizar un nudo o varios por atrás de la pieza, corta el hilo sobrante.
Step 3: Thread the thread on the needle and make a knot, we are going to introduce it from the bottom up, place liquid Silicon around the previously glued thread, let it dry a little while you introduce small beads on the needle, as many as are necessary to cover the entire area around the appliqué, at the end insert the needle downwards and carefully so that the thread does not come out, you are going to make a knot or several on the back of the piece, cut the excess thread.
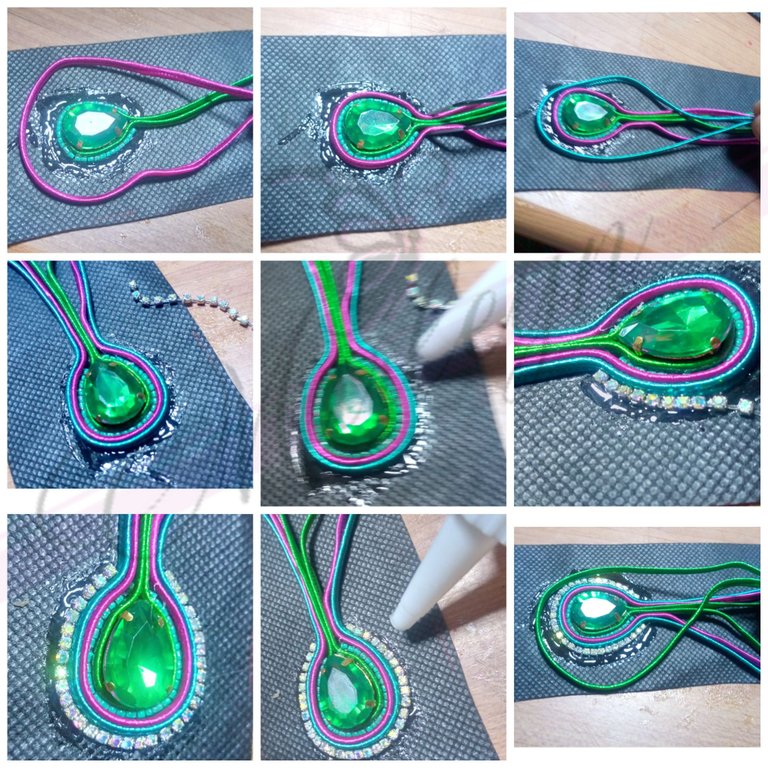
Paso 4: Ahora colocamos silicona liquido alrededor de las mostacillas y vamos a pegar 2 hilos de aproximadamente 12 centímetros de largo, puedes ayudarte con la pinza para no llenar los hilos de silicon,al terminar vamos a cortar 33 piedras de atrás 2 milímetros o si tienes algun otro tamaño solo debes medir que llegue de punta a punta en esta parte si te parece puedes sustituir el strass plateado por mostacillas! Ahora colocamos silicona liquido y comenzamos a pegar el strass con las piedras bien unidas para que le de mucho brillo nuestra pieza, cortamos dos tiras mas de hilo de aproximadamente 15 centímetros y se pegaran alrededor del strass como te muestro en la secuencia de imágenes!
Step 4: Now we place liquid silicone around the beads and we are going to paste 2 threads of approximately 12 centimeters long, you can help yourself with the clamp so as not to fill the silicone threads, when we finish we are going to cut 33 stones from the back 2 millimeters or if do you have any other size you just have to measure that it reaches from end to end in this part if you think you can replace the silver rhinestones with beads! Now we place liquid silicone and begin to glue the strass with the stones well together so that our piece will shine a lot, we cut two more strips of thread of approximately 15 centimeters and they will be glued around the strass as I show you in the sequence of images!
Paso 5: Realiza un poco de presión con la pinza en la parte superior para que los hilos peguen bien unidos, debe verse como la imagen 2, (ahora vamos a realizar el mismo paso que no explique para la parte superior del zarcillo por favor toma la en consideración al momento de realizarla) con una tijera vamos a cortar la tela Pop con cuidado justo a la orilla del hilo como ves en la tercera imagen de abajo hacia arriba,ahora mira la imagen 4 te quedara de esta manera,vamos con cuidado tomar la mitad de los hilos que queden iguales de ambos lados, y los vamos a doblar formando un semi circulo hacia atrás entrando por la tela que cortamos, voltea la pieza sin soltar los hilos,corta el hilo sobrante y quema las puntas con el encendedor, realiza el mimo proceso del otro lado, coloca silicona liquido atrás para que se peguen! Yo los dejo con un gancho de ropa un rato para que haga presión y se fije bien la pieza.
Step 5: Make a little pressure with the clamp on the upper part so that the threads stick well together, it should look like image 2, (now we are going to carry out the same step that I do not explain for the upper part of the earring, please take the one in consideration at the time of making it) with scissors we are going to cut the Pop fabric carefully right at the edge of the thread as you see in the third image from bottom to top, now look at image 4 it will look like this, go carefully take half of the threads that are the same on both sides, and we are going to fold them forming a semi circle backwards entering through the fabric that we cut, turn the piece over without releasing the threads, cut the excess thread and burn the ends with the lighter , carry out the same process on the other side, place liquid silicone on the back so that they stick! I leave them with a clothes hanger for a while so that it puts pressure and fixes the piece well.
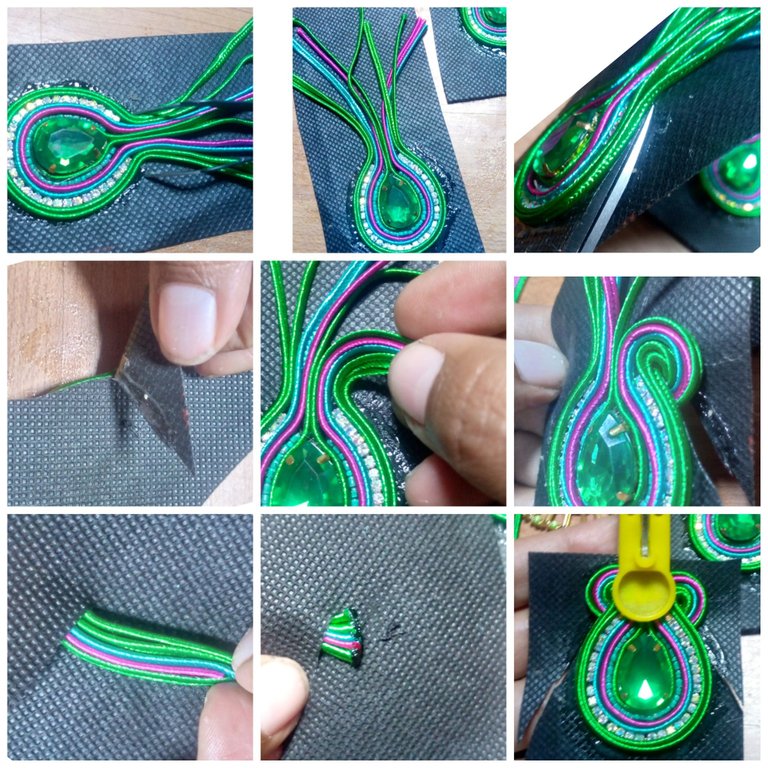
Paso 6: Luego de un tiempo prudencial para que la pieza seque un poco no completamente, vamos a cortar la tela pop sobrante con una tijera! Al terminar pasa la llama del encendedor suavemente por toda la pieza, "(OJO no lo hagas con una vela porque dañarás la pieza)". Ensarta la aguja con unos 40 centímetros de hilo para el próximo paso.😁
Step 6: After a reasonable time for the piece to dry a little, not completely, we are going to cut the remaining pop fabric with scissors! At the end, gently pass the flame of the lighter throughout the piece, "(BEWARE do not do it with a candle because you will damage the piece)". Thread the needle with about 40 centimeters of thread for the next step.😁
Paso 7: Vamos a cocer los canutillos por toda la orilla de la pieza, con cuidado vamos a introducir la aguja con el hilo justamente donde comienza el circulo que formamos en el paso anterior tal como ves en las imágenes, vamos a colocar en la aguja un canutillo, una mostacilla numero 11, seguido de una mostacilla un con mas grande, nuevamente una mostacilla numero 11, y terminas con un canutillo, mide al ojo la distancia que sería entre canutillo y canutillo EH introduce la aguja hacia abajo, luego la regresa hacia arriba, entrando por el ultimo canutillo, ahora la secuencia cambia sera una mostacilla pequeña o numero 11, una mostacilla mas grande, seguimos con una mostacilla pequeña y por ultimo canutillo, introduce la aguja hacia abajo por nuestra pieza y repite el proceso hasta llegar al otro semicírculo.
Step 7: We are going to cook the beads along the entire edge of the piece, carefully we are going to introduce the needle with the thread just where the circle that we formed in the previous step begins as you see in the images, we are going to place in the needle a bead, a number 11 bead, followed by a larger bead, again a number 11 bead, and you end up with a bead, eye-measure the distance that would be between bead and bead EH inserts the needle down, then returns it up, entering through the last bead, now the sequence changes will be a small bead or number 11, a larger bead, we continue with a small bead and finally bead, insert the needle down through our piece and repeat the process until we reach to the other semicircle.
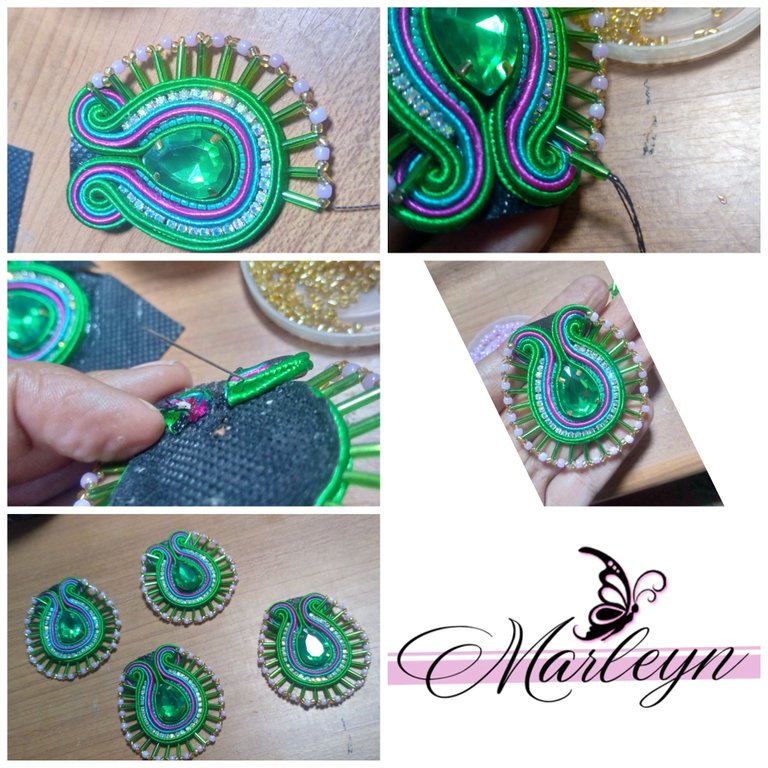
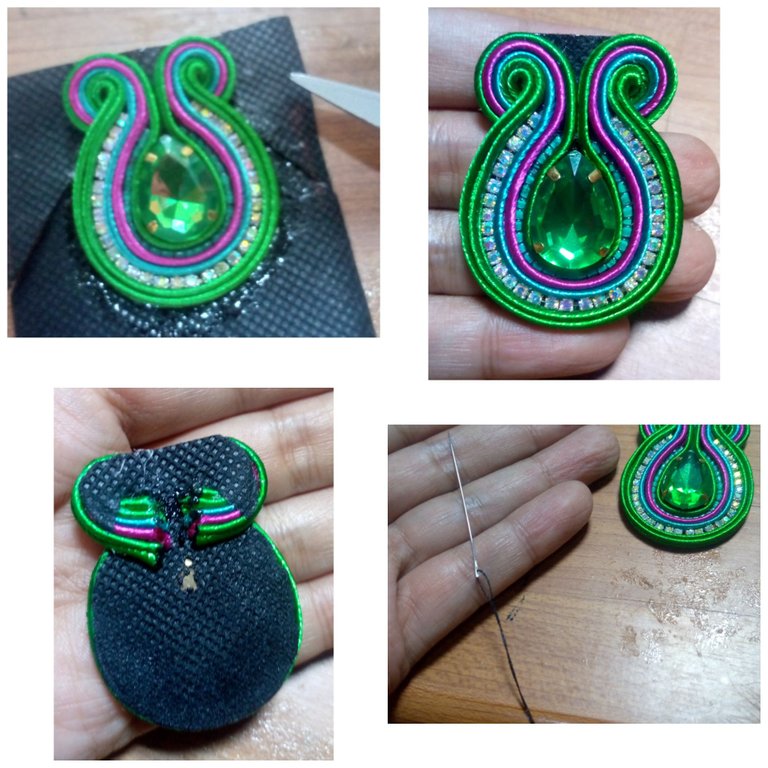
Paso 8: Al terminar de coser canutillos realiza un amarre en la parte de atrás de la pieza y cortamos el hilo sobrante!!! Debe quedar de esta manera que te muestro en las fotos.
Step 8: When you finish sewing beads, make a tie on the back of the piece and cut the excess thread!!! It should be this way that I show you in the photos.
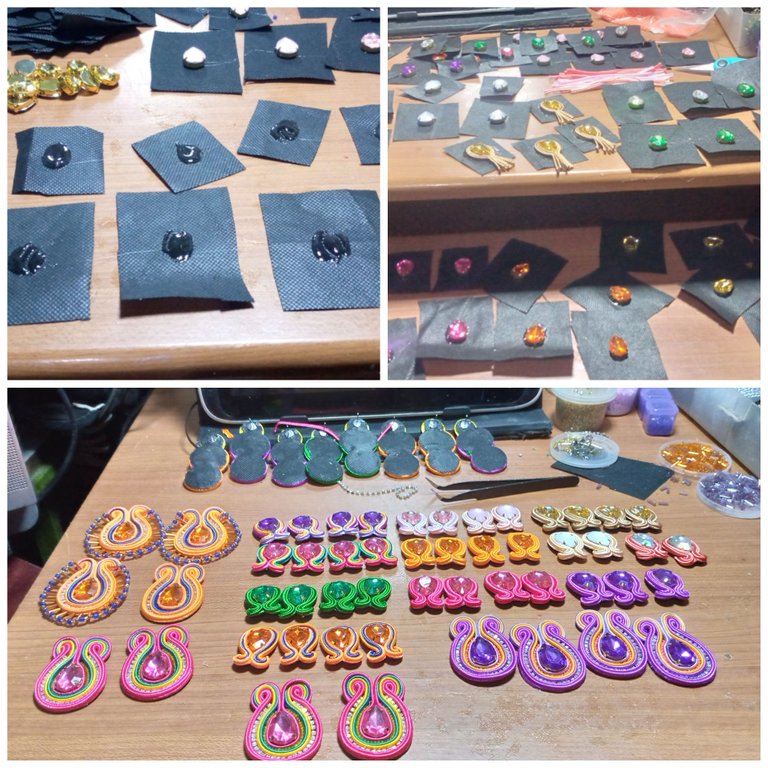
Como ves yo trabajo en producción en cadena, estos los realice para una venta al mayor, me sentí súper realizada al ver mi trabajo final! Realmente feliz y Animada de lograr este reto....
As you can see I work in chain production, I made these for a wholesale sale, I felt super accomplished when I saw my final work! Really happy and encouraged to achieve this challenge....

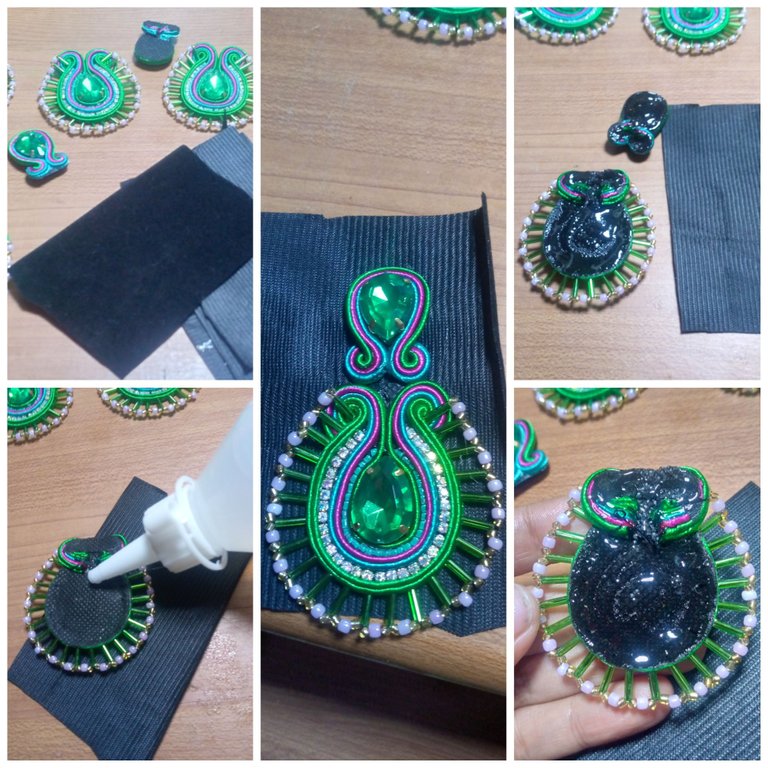
Paso final: coloca silicona liquido en las piezas, espera unos 2 minutos y procede a pegarlos en la tela de gamuza o en cuero! Dejarlo secar un momento y corta la tela sobrante. Pasa el encendedor por toda la pieza para sellar los hilos. De esta manera hemos finalizado!
Final step: put liquid silicone on the pieces, wait about 2 minutes and proceed to stick them on the suede or leather! Let it dry for a moment and cut off the excess fabric. Run the lighter all over the piece to seal the threads. In this way we have finished!


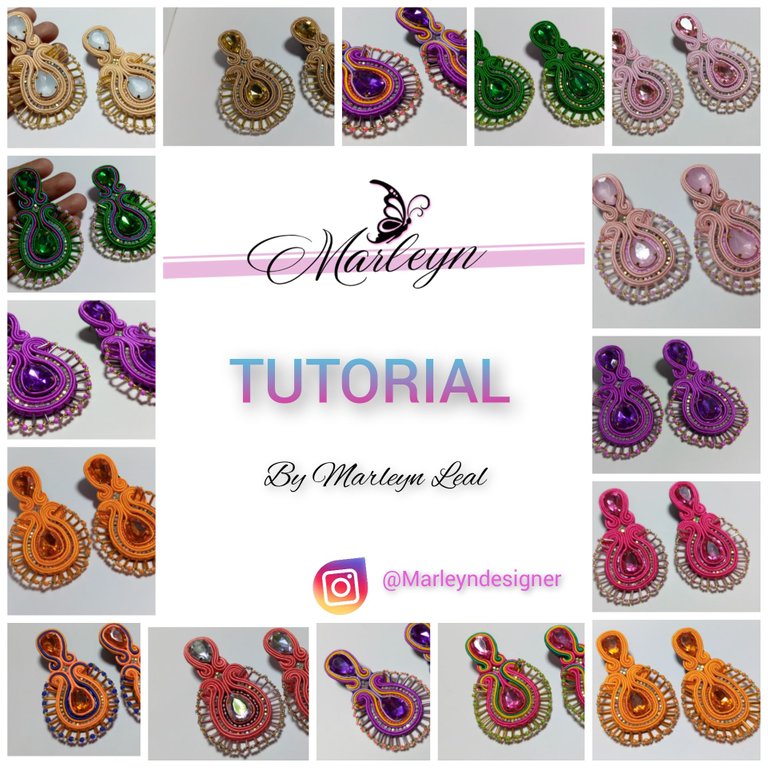
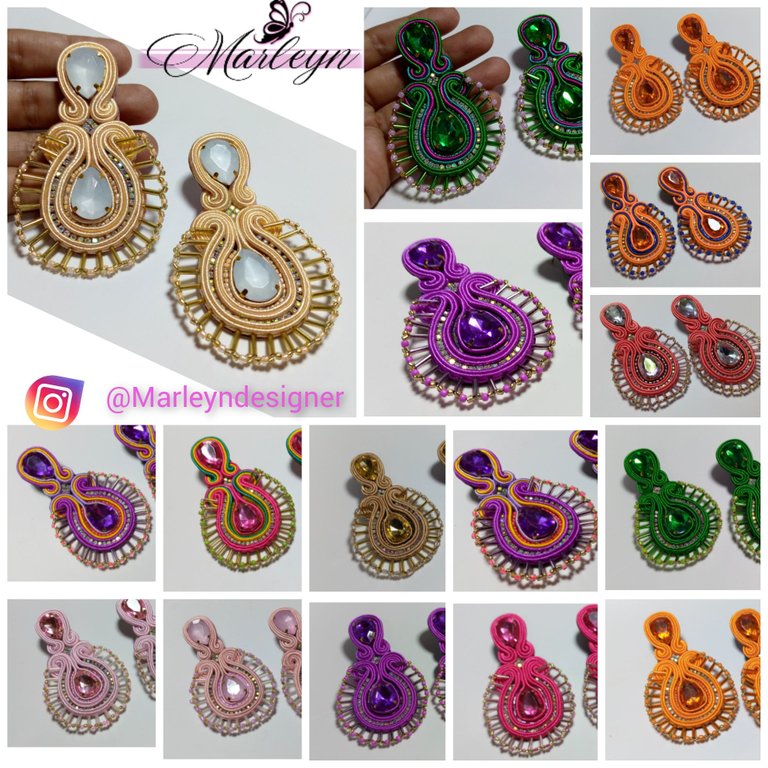
IMAGENES CREADAS EN CANVA
IMAGES CREATED IN CANVA
Tus creaciones son hermosas las amooooo la verdad que tienes un talento chica, yo sería clienta tuya si viviera cerca o en mismo estado, eres inpiracion en la comunidad @marleyn
!discovery 50
Que emoción despertar y leer esto @mili2801, me encanta saber que ha gustado! Esto más que mi trabajo es mi pasión, y tener la oportunidad de compartir esto es mejor aun, me llena y me hace feliz, es una manera de apoyar y devolver amor al mundo!!! Gracias por estas palabras tan motivadoras 🙏🥳🥳 tú estás en Ecuador leí, lo más lejos que e enviado es a Panamá 🤗...
This post was shared and voted inside the discord by the curators team of discovery-it
Join our community! hive-193212
Discovery-it is also a Witness, vote for us here
Delegate to us for passive income. Check our 80% fee-back Program
Gracias por el apoyo!!! @discovery-it
Un trabajo muy hermoso, con una paciencia increíble querida @marleyn fíjate que pensaba que usabas otra pega que no fuera Silicon ya que a muchos y me incluyo se nos ve la pega, pero a ti te queda muy prolijo, y luego el toque de coser los canutillos, un trabajo sin duda arduo, gran tutorial 😉 gracias por traerlo a la comunidad.
Gracias, me alegra saber que ha gustado @hive-189504... Bueno de la pega todo depende de la.pieza que haremos y del silicón líquido a utilizar, existen algunas marcas que son de mala calidad y no pegan bien o manchan porque son muy líquidos no sé explicarte, es decir son como más aguados de lo normal, a mi particularmente me gusta pegar los apliques con la pega E6000, y el hilo con el Silicon líquido! Si es una pieza muy elaborada muy minuciosa, es recomendable también coser el aplique! (Por la orilla del engaste de metal tienen 4 huecos donde puedes coser la pieza a la tela) la E6000 es costosa pero lo vale porque creo que el acabado de la pieza lo es todo, ya que es tu imagen, tu marca!
@marleyn Hermosos!!! 😍, Excelente creaciones, me encanta como se combinan los colores, gracias por compartir tu talento con nosotros, un abrazote 🤗
@anamariag Gracias por leerme! Me alegra el día saber que ha gustado esta pieza!! Te digo un secreto, estos fueron los colores que menos me han gustado de todos los que realice 😂 fue un pedido personalizado, yo amo es el negro, negro claro, negro brillante, negro mate, negro oscuro, negro negro 🤣🤣🤣
Me llena mucho, y me da plenitud tener la oportunidad de compartir y crear para ustedes, es realmente una ventana abierta al mundo donde lo más bonito es compartir nuestro conocimiento con los demás, sin importar raza, color o el lugar del mundo donde te encuentres, aprendiendo juntos y cada día algo nuevo!
Amiga @marleyn todos están realmente bellisimos y te felicito por ese maravilloso tutorial. Felicidades y éxitos. Saludos
Gracias @janettbrito76 por estás bellas palabras y leerme!
De hecho, esto es único porque para hacer esto, puedo terminar pasando todo el día. Honestamente, no pertenecen a las familias reales.
Thank you very much, I am glad to know that you liked it @apunawu
Que hermosura de trabajo @marleyn. Gracias porque pese a estar tan ocupada te tomaste tu tiempo para compartir tu paso a paso. Mucho éxito en tus ventas, que sigan saliendo mas y mas. Felicidades y bendiciones...✨
Muchísimas Gracias @dayadam por tus palabras, Me halaga y lo agradezco viniendo de una mujer tan creativa como tu; Siempre encontraré el tiempo para compartir con todos ustedes me encanta hacerlo!!! 🥰
Que hermoso trabajo, me gusta la técnica del soutache pero no lo he trabajado, te felicito
Gracias @lupasbra21 está técnica es sumamente versátil, si lo imaginas lo puedes crear!!!
Hola amiga admiro tu creatividad y tu capacidad para combinar colores y darle forma, te quedaron bellísimos, me encantó leerte, tu blog es muy organizado y bien explicado... Éxito amiga
Gracias @nayed en realidad combinarlos se m hace un poco difícil, porque yo soy más negro con negro y negro pero me ayudó con las combinaciones de Google 🤪😂, Me agrada saber que te gusta y lo bien que te ha gustado leerme, ya pronto nos leeremos otra vez!!! Un abrazo
Congratulations @marleyn! You have completed the following achievement on the Hive blockchain and have been rewarded with new badge(s):
Your next target is to reach 18000 upvotes.
You can view your badges on your board and compare yourself to others in the Ranking
If you no longer want to receive notifications, reply to this comment with the word
STOPSupport the HiveBuzz project. Vote for our proposal!