
Feliz y Bendecido dia, Deseo se encuentren muy bien llenos de salud, bienestar, brillando, creciendo y siempre siendo la mejor versión de si mismos... Este hermoso dia les e realizado un tutorial un poco mas avanzado, no es dificil solo que a mi percepción es mas elaborado, el resultado final me gusto muchísimo, para esta pieza la arme y desarme muchas veces, le coloque distintas piedras y distintos materiales en el centro peo nada me gustaba, hasta que probé con los flecos de mostacillas y en seguida ame el resultado! me pareció tan distinto pero a la vez muy llamativo.. Espero que de verdad sean de tu gusto, y lo intentes... Como se acercan las fiestas esta es una opción diferente, original y puedes jugar con los colores y las combinaciones... hablando de diciembre les estoy preparando unos tutoriales de zarcillos bordados en mostacillas de un muñeco de nieve que se ve super lindo, y si eres como yo una amante de la navidad te van a encantar!!! Recuerda confía en ti, en tus capacidades, todo lo puede lograr mientras lo intentes.
Happy and Blessed day, I wish you are very well full of health, well-being, shining, growing and always being the best version of yourself... This beautiful day I have made a tutorial a little more advanced, it is not difficult only that in my perception is more elaborate, the end result I liked a lot, for this piece I put it together and disassembled many times, I put different stones and different materials in the center but nothing I liked, until I tried with the bangs of beads and immediately loved the result! I found it so different but at the same time very striking ... I hope you really like them, and give them a try.... As the holidays are approaching this is a different option, original and you can play with colors and combinations ... speaking of December I am preparing some tutorials of embroidered tendrils in beads of a snowman that looks super cute, and if you are like me a lover of Christmas you will love it! Remember trust in yourself, in your abilities, you can do anything as long as you try.
Materiales: Tela POP para la base, 10 Apliques tipo lagrimas engastados en base de metal dorada o plateada según tu gusto,silicon liquido aunque mi recomendación es la Pega E6000, aguja e Hilo preferiblemente nailon delgado para coser, canutillos y mostacillas colores de tu preferencia, yo combine 7 colores! Strass 2 milímetros, tijera, Cuero, Gamuza o alguna tela gruesa para la parte de atrás de la pieza, Mostacilla dorada #11 para la orilla de la pieza, Pim plano para zarcillos.
Materials: POP fabric for the base, 10 teardrop appliques set in gold or silver metal base according to your taste, liquid silicone although my recommendation is the E6000 glue, needle and thread preferably thin nylon for sewing, beads and beads colors of your choice, I combine 7 colors! Strass 2 millimeters, scissors, leather, suede or some thick fabric for the back of the piece, gold beads #11 for the edge of the piece, flat Pim for tendrils.
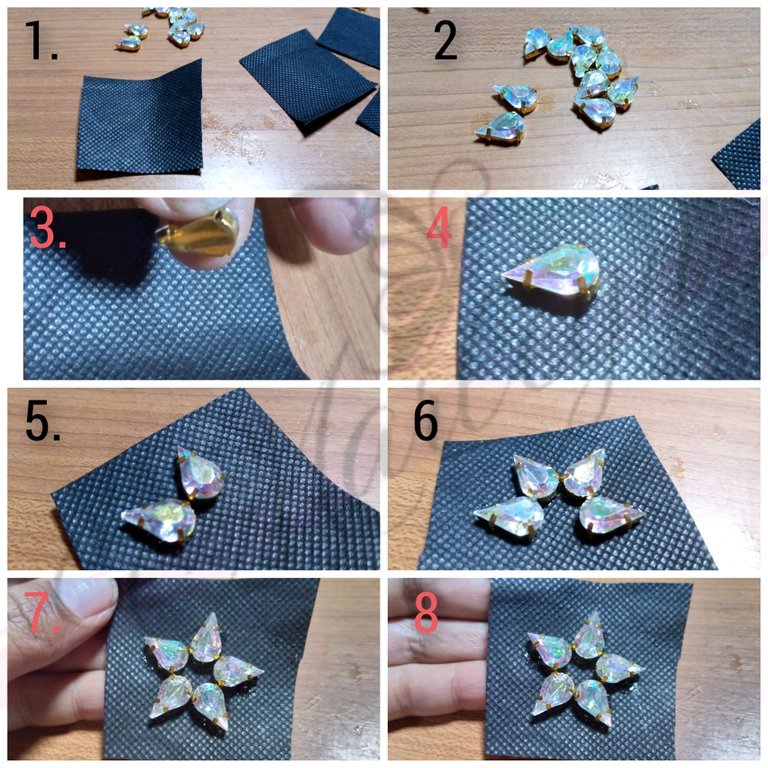
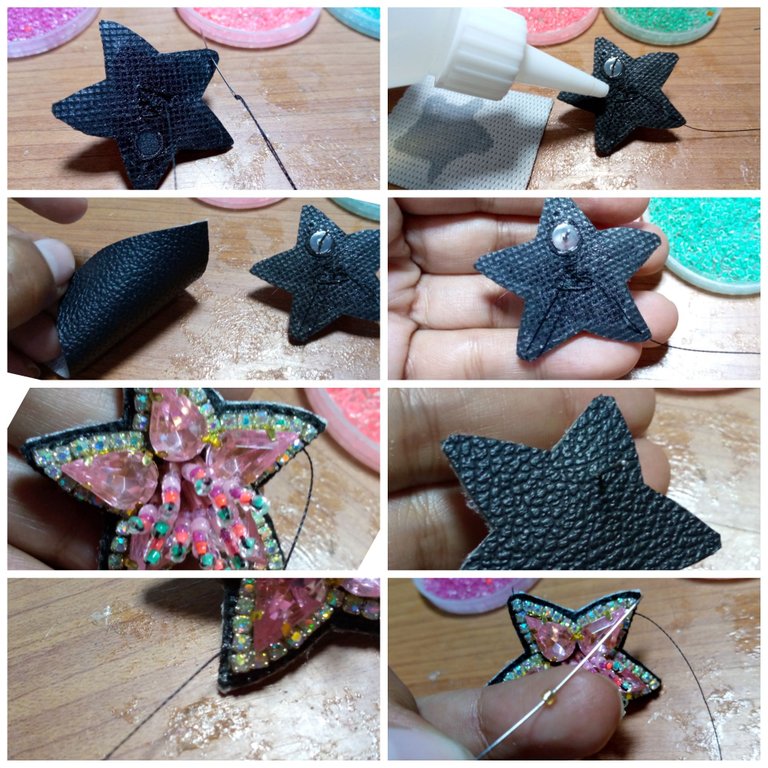
Paso 1: Vamos a cortar un pequeño trozo de la tela POP aproximadamente unos 5*5 centímetros, tomaremos 5 apliques de gotas y comenzaremos a pegarlos uno a uno formando una estrella en la tela como puedes ver en las imágenes que te dejo arriba, puedes ir pegando una a una no ejerzas presión en las piezas hasta pegar la ultima y verificar que sea la forma perfecta, como veras el engaste tiene como unas pinzas arriba de la piedra puedes utilizarlo para guiarte que todos los apliques estén a la misma altura y distancia, para que queden como te muestro en la imagen 7 y 8 dejar secar un rato.
Materials: POP fabric for the base, 10 teardrop appliques set in gold or silver metal base according to your taste, liquid silicone although my recommendation is the E6000 glue, needle and thread preferably thin nylon for sewing, beads and beads colors of your choice, I combine 7 colors! Strass 2 millimeters, scissors, leather, suede or some thick fabric for the back of the piece, gold beads #11 for the edge of the piece, flat Pim for tendrils.
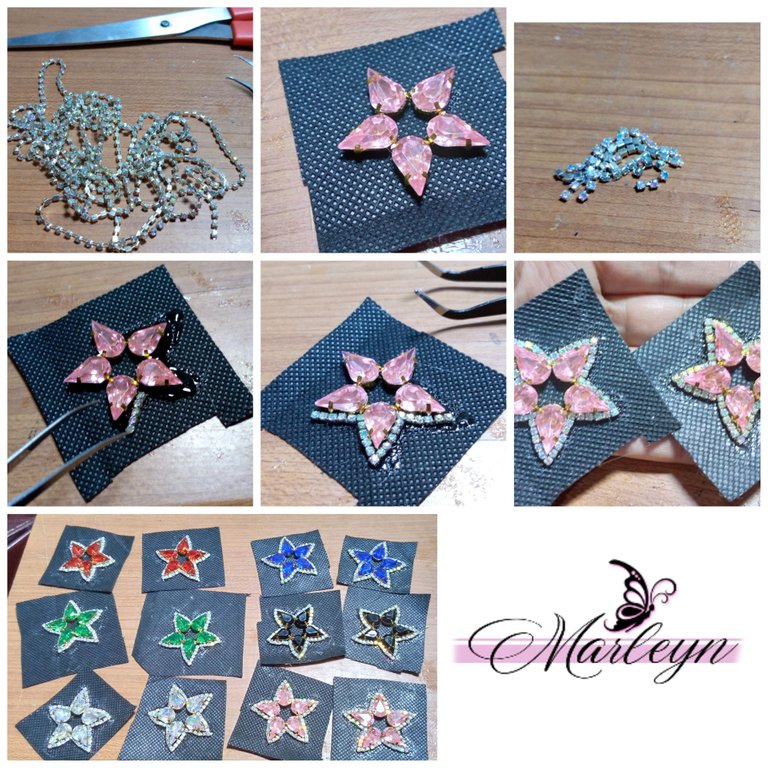
Ṕaso 2: Después de dejar secar las piezas, vamos a colocar el strass, vamos a cortar 5 piezas de 5 piedras, y 5 piezas de 6 piedras aunque si tu strass es de un tamaño diferente lo puedes medir y cortar según el tamaño de la piedra. Coloca silicon liquido o pega E6000 por las orillas de los apliques y con ayuda de la pinza punta fina procede a pegar el strass intercalando 1 de 5 piedras y 1 de 6 piedras, hasta completar la estrella deja secar lo mas posible antes de continuar la elaboración si es posible de un dia para otro.
Ṕaso 2: After letting the pieces dry, we are going to place the rhinestone, we are going to cut 5 pieces of 5 stones, and 5 pieces of 6 stones although if your rhinestone is of a different size you can measure and cut it according to the size of the stone. Place liquid silicon or E6000 glue on the edges of the appliques and with the help of the fine tip tweezers proceed to glue the rhinestone alternating 1 of 5 stones and 1 of 6 stones, to complete the star, let it dry as much as possible before continuing the elaboration if possible from one day to the next.
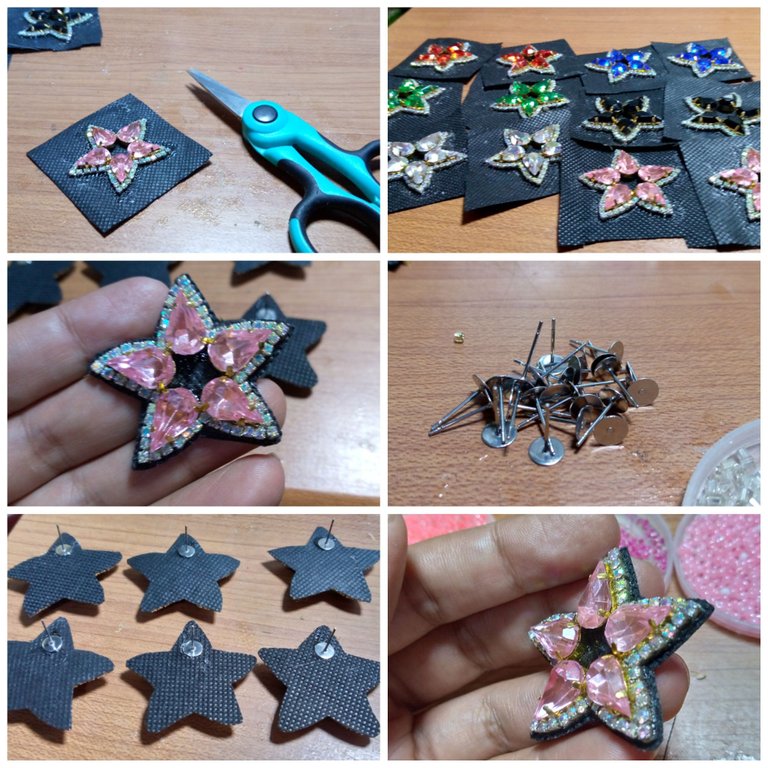
Paso 3: Con cuidado corta la tela sobrante alrededor de la pieza, dejando aproximadamente 1 milímetro de tela por toda la orilla, luego por la parte de atrás vamos a pegar el pim o base de zarcillo plano, (para pegarlo puedes utilizar la pega E6000 que es mas fuerte asi strass segura que tu pieza no se soltara con el tiempo) Deja secar un rato lo más posible para que al continuar al siguiente paso no se suelte.
Step 3: Carefully cut the excess fabric around the piece, leaving approximately 1 millimeter of fabric around the edge, then on the back we will glue the pim or flat tendril base, (to glue it you can use the E6000 glue which is stronger so strass sure that your piece will not come loose over time) Let it dry for a while as much as possible so that when you continue to the next step does not come loose.
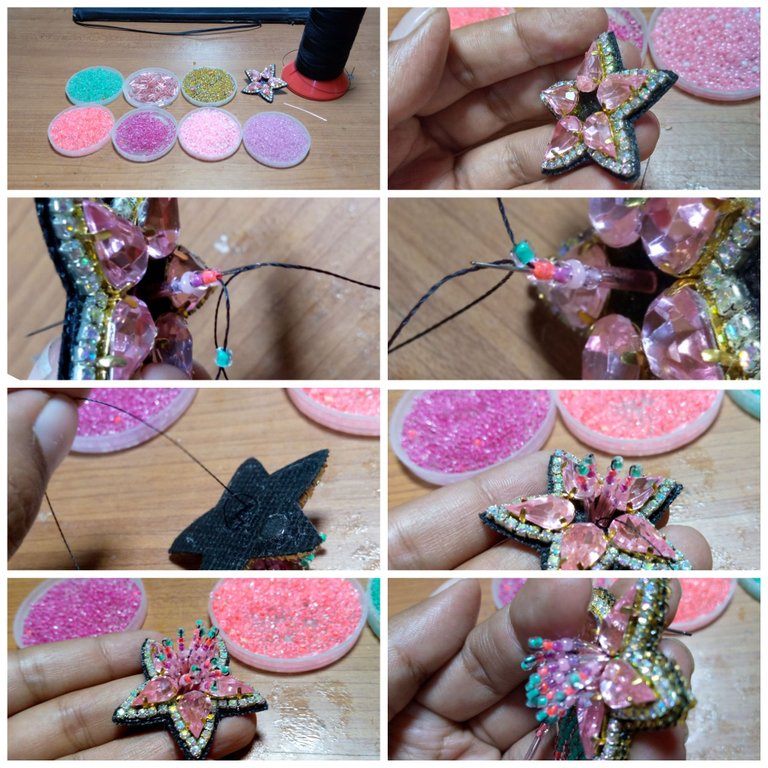
Paso 4: Vamos a colocar unos pequeños flecos en el centro de nuestra estrella, no te preocupes por los colores puedes jugar con ellos y darle color a tu oufit diario. Como verás en la primera imagen seleccione 7 colores al principio me encanto, despues lo dude (jajaja) aunque al terminar el primer fleco ufs para mi el resultado fue bello, y solo quería seguir cociendo... bueno continuamos, Ensarta el hilo en la aguja de al menos 2 metros de largo y le realizamos un nudo al final del hilo, introduce la aguja por detrás de la estrella en el centro, coloca las mostacillas de tu selección cada fleco mide 1.5 centímetros de largo, yo coloque los flecos al revés de como los coloque abajo, empece con un canutillo luego continúe con las distintas mostacillas para terminar con el color mas fuerte para ser mas llamativo, coloca tantos flecos desees para tapar ese espacio vacio que quedo entre las piedras, al terminar sacamos la aguja por atrás realizamos un nudo para darle seguridad pero OJO no cortes el hilo restante.
Step 4: We are going to place some small bangs in the center of our star, don't worry about the colors you can play with them and give color to your daily oufit. As you will see in the first image I selected 7 colors at first I loved it, then I hesitated (hahaha) but when I finished the first fringe ufs for me the result was beautiful, and I just wanted to continue cooking .... well let's continue, string the thread on the needle at least 2 meters long and tie a knot at the end of the thread, insert the needle behind the star in the center, place the beads of your choice each fringe measures 1. 5 centimeters long, I placed the bangs the other way around from how I placed them below, start with a bead then continue with the different beads to finish with the strongest color to be more striking, place as many bangs as you want to cover the empty space left between the stones, when finished remove the needle from behind and tie a knot to give security but do not cut the remaining thread WATCH OUT.
Paso 5: Subiremos la aguja por una de las orillas de la estrella, debes estar pendiente de subir por una orilla porque allí mismo vas a terminar y de allí salen los flecos ( Sin subes el hilo por el centro los flecos comenzarán en el centro y se ve algo raro, aunque todo es a tu gusto, siéntete libre de personalizar y crear diversidad) Colocar muy poco silicon liquido en la parte de atrás de la pieza, y procede a pegar el cuero o tela gruesa deja secar un rato, luego lo cortamos dejando igualmente 1 milímetro de tela adicional, OJO no cortes el hilo. Ahora vamos a bordar las mostacillas doradas #11 por toda la orilla
Step 5: We will go up the needle by one of the edges of the star, you must be aware of going up one edge because right there you are going to finish and from there the bangs come out (If you go up the thread through the center the bangs will start in the center and it looks a little weird, although everything is to your taste, Feel free to customize and create diversity) Place very little liquid silicone on the back of the piece, and proceed to glue the leather or thick fabric, let it dry for a while, then cut it leaving 1 millimeter of extra fabric, DO NOT cut the thread. Now we are going to embroider the golden beads #11 all around the edge.
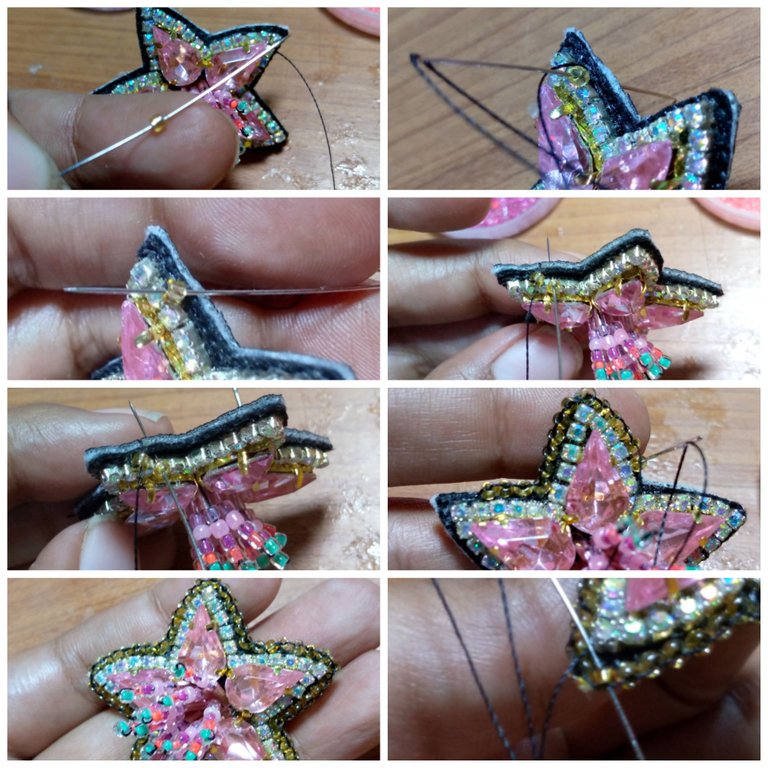
Paso 6: Introduce una mostacilla en la aguja, deja un espacio al ojo del tamaño de la mostacilla y procede a pasar la aguja para abajo, sube la aguja por la mostacilla sin entrar en el cuero, Ahora vuelve a introducir una mostacilla en la aguja y repite todo el procedimiento hasta llegar nuevamente a la punta, como tu hilo esta muy largo ve con mucha calma, mucha atención porque este se enreda muy fácil, la idea del hilo largo es realizar todo de una vez sin dejar amarres que se vean y le quiten calidad a nuestra pieza. Puedes guiarte de la secuencia de imágenes que te dejo arriba para que veas como debe ir quedando.
Step 6: Insert a bead in the needle, leave a space at the eye the size of the bead and proceed to pass the needle down, up the needle by the bead without entering the leather, now reinsert a bead in the needle and repeat the whole procedure until you reach the tip again, as your thread is very long go very calmly, very carefully because this is very easy to tangle, the idea of the long thread is to do everything at once without leaving ties that are seen and take away quality to our piece. You can be guided by the sequence of images that I leave you above so you can see how it should be.
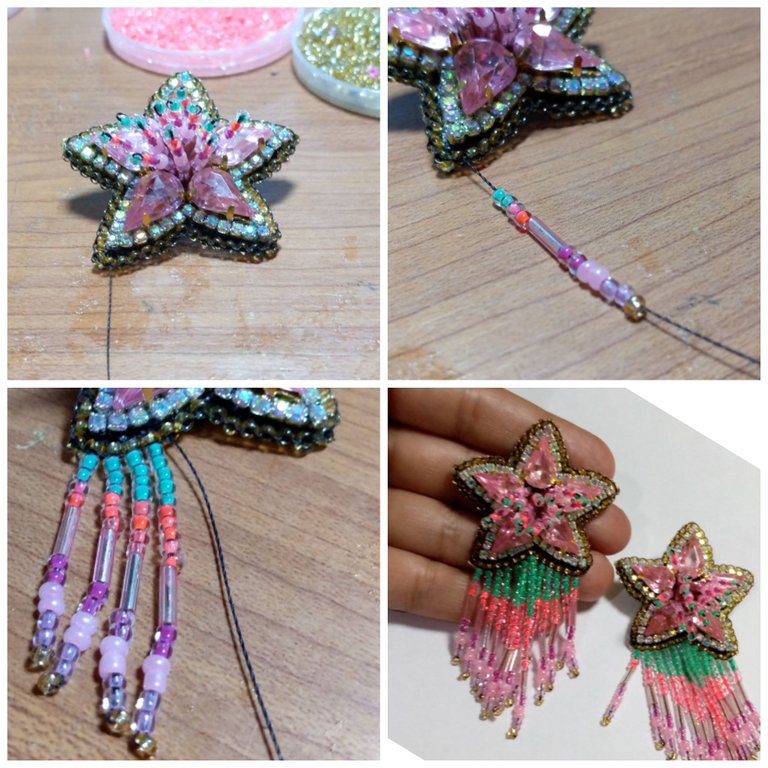
Paso 7: Cuenta la cantidad de mostacillas que te quedaron en la parte de abajo y lo vas a dividir en 2 partes iguales dejando una mostacilla central. yo fui aumentando los flecos de 1 a 1 mostacilla empece en el primero con 2 mostacillas por color, al terminar el fleco dejaremos la ultima mostacilla por afuera y vamos a regresar la aguja por las otras mostacillas entrando hasta arriba en la mostacilla dorada del bordado superior, ahora sacamos la aguja por la siguiente mostacilla dorada y volvemos a formar otro fleco aumentando una mostacilla mas por color esta vez no coloque 2 si no 3 mostacillas por color.. Aunque puedes realizar los flecos a tu gusto tal vez los quieras mas grandes o bien mas pequeños Para terminar realiza un nudo doble y luego triple, antes de cortar pasa la aguja entre varias mostacillas para ocultar el nudo y cortamos el hilo sobrante. De esta manera hemos finalizado nuestra pieza, repite todo el proceso para realizar el par, espero que sea de agrado y no dejes de crear y jugar con tus gustos la vida es una sola esta en ti disfrutarla.
Step 7: Count the amount of beads that you have left at the bottom and divide it into 2 equal parts leaving a central bead. I was increasing the bangs from 1 to 1 bead I started in the first one with 2 beads per color, at the end of the fringe we will leave the last bead on the outside and we will return the needle through the other beads entering up to the top in the golden bead of the upper embroidery, now we take the needle through the next golden bead and return to form another fringe increasing one more bead per color this time I did not place 2 but 3 beads per color. Although you can make the bangs to your liking maybe you want them bigger or smaller To finish make a double knot and then triple, before cutting pass the needle between several beads to hide the knot and cut the excess thread. In this way we have finished our piece, repeat the whole process to make the pair, I hope you like it and do not stop creating and playing with your tastes, life is only one, it is up to you to enjoy it.


IMAGENES CREADAS EN CANVA
IMAGES CREATED IN CANVA
The rewards earned on this comment will go directly to the people sharing the post on Twitter as long as they are registered with @poshtoken. Sign up at https://hiveposh.com.
Como siempre un gran trabajo amiga @marleyn un trabajo extraordinario me encanta el paso a paso tan laborioso que nos regalas hoy, increíble ver el resultado, felicidades 👏
Gracias, @hive-189504 Que Excelente que te guste!! Lo más importante es que se entienda con claridad.