¡Hola mis queridos amigos amantes de la joyería! Hoy traigo un nuevo diseño de bisutería, donde el color negro es el protagonista, acompañado colores tornasol y detalles en dorado para así realzar la belleza de cualquier look, brindándole un toque interesante y por qué no hasta de misterio, con su hermosa forma geométrica. Sigue leyendo y aprende el paso a paso de este colgante que te hará destacar.
English Version
Hello my dear friends who love jewelry! Today I bring you a new costume jewelry design, where the black color is the protagonist, accompanied by iridescent colors and gold details to enhance the beauty of any look, giving it an interesting touch and why not even mystery, with its beautiful geometric shape. Read on and learn the step by step of this pendant that will make you stand out.
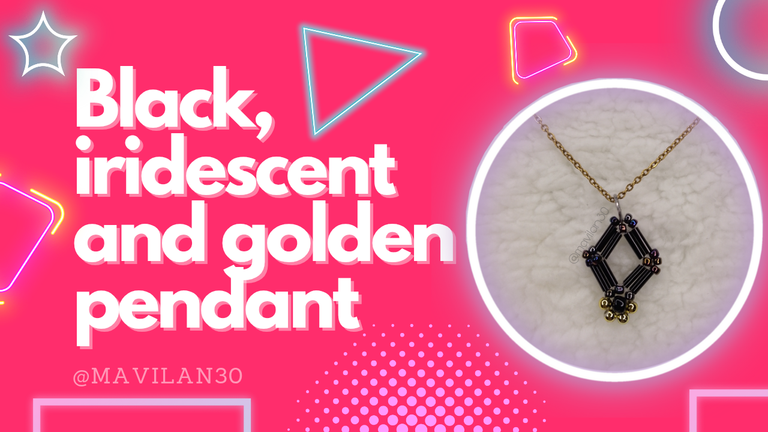
Imagen creada por mí en Canva / Image created by me in Canva
Materiales:
- Nilón 0.25mm
- Mostacillas negro tornasol
- Canutillos negros
- Mostacillones negros
- Balines dorados 3mm
- Tijeras
- Aguja (opcional)
- Aro
- Cadena
Procedimiento:
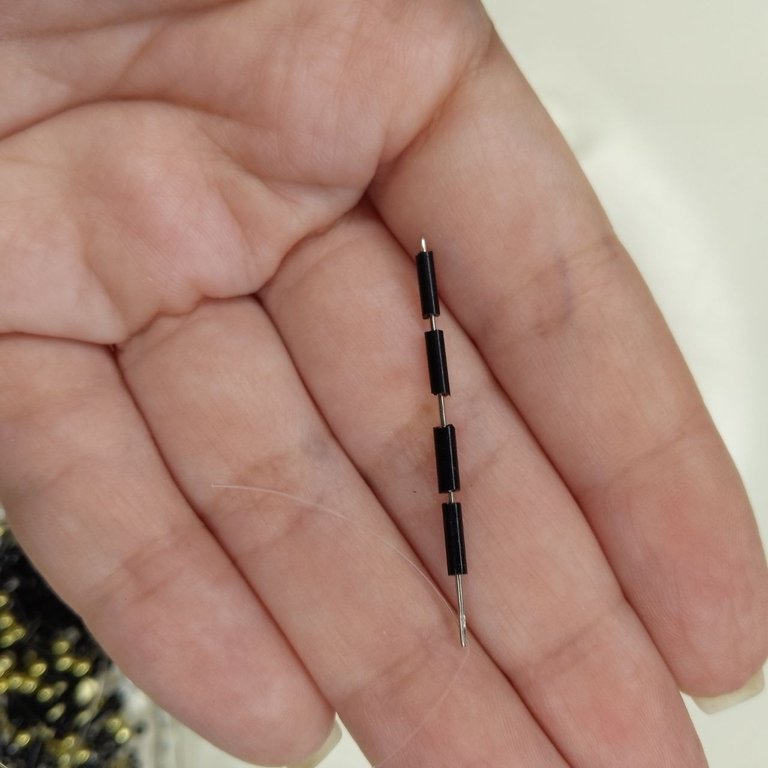
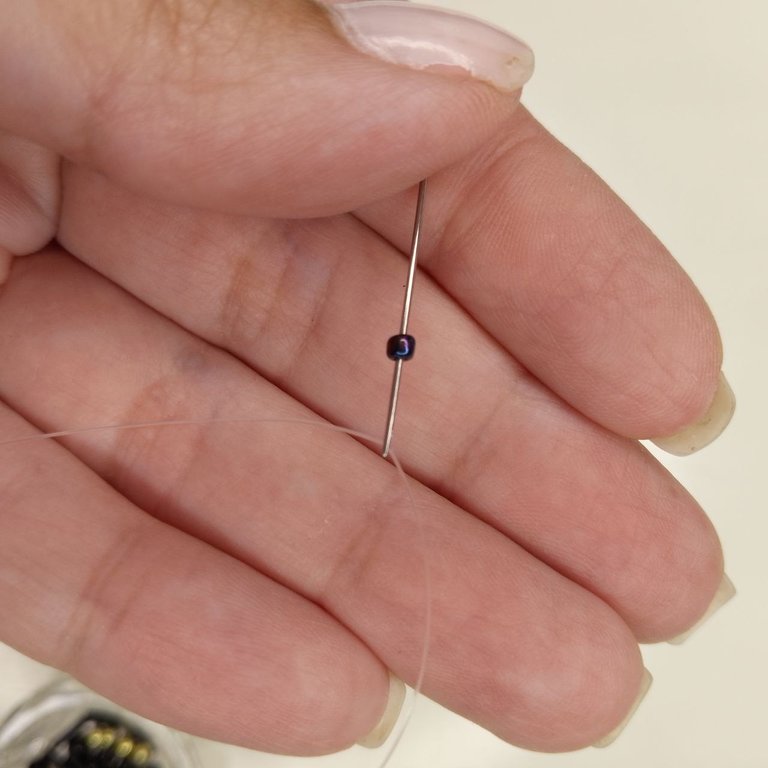
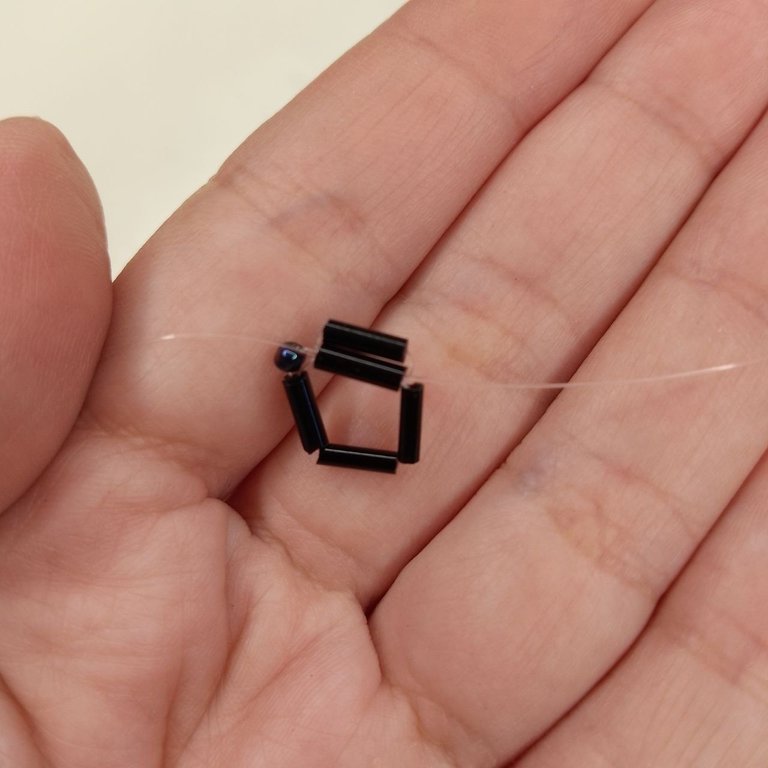
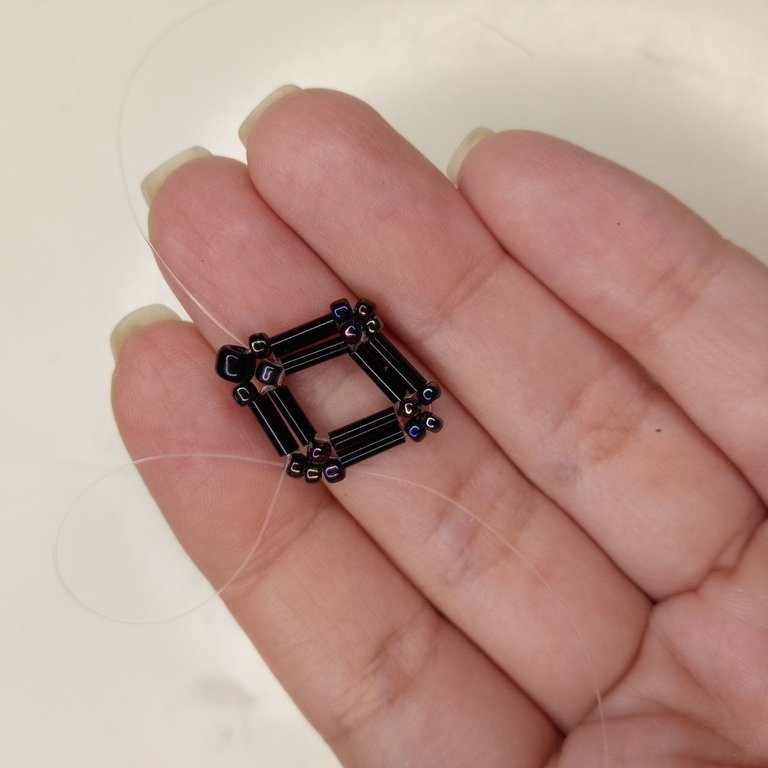
Iniciamos tomando cuatro canutillos y pasamos una de las puntas del nilón nuevamente a través de cada uno de ellos, asegurando así la forma de rombo pero también aportando rigidez a la figura base de este diseño.
English Version
Materials:
- 0.25mm nylon
- Black litmus beads
- Black beads
- Black beads
- 3mm gold-plated balls
- Scissors
- Needle (optional)
- Hoop
- Chain
Procedure:
We start by taking four canutillos and pass one of the ends of the nylon again through each of them, thus ensuring the diamond shape but also providing rigidity to the base figure of this design.
 |  |
|---|
 |  |
|---|
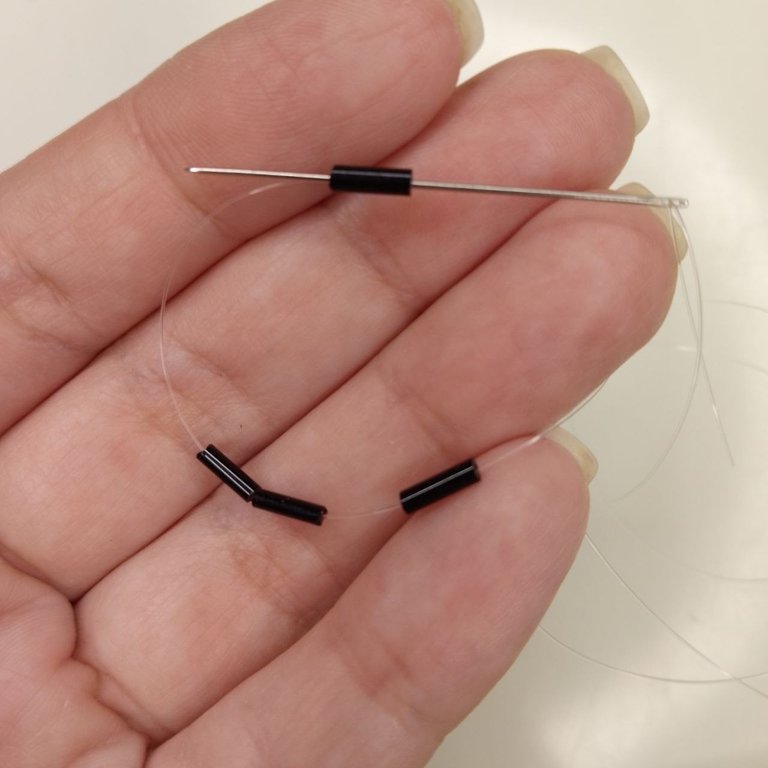
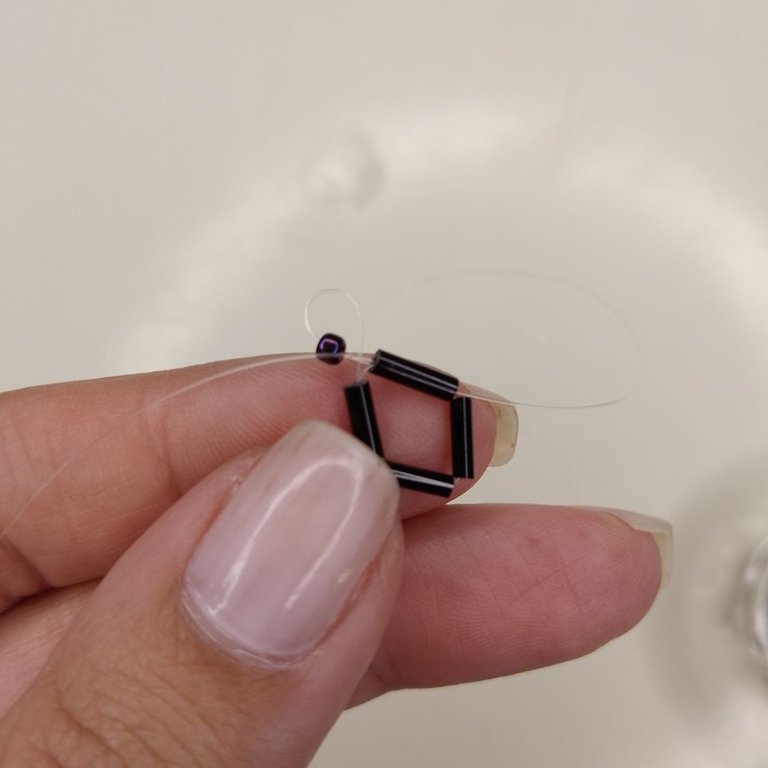
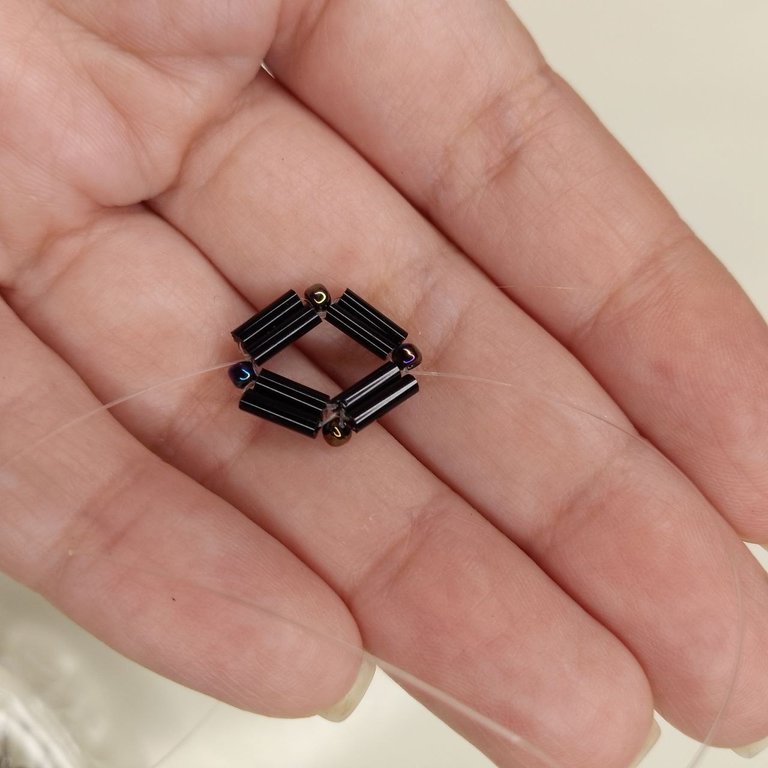
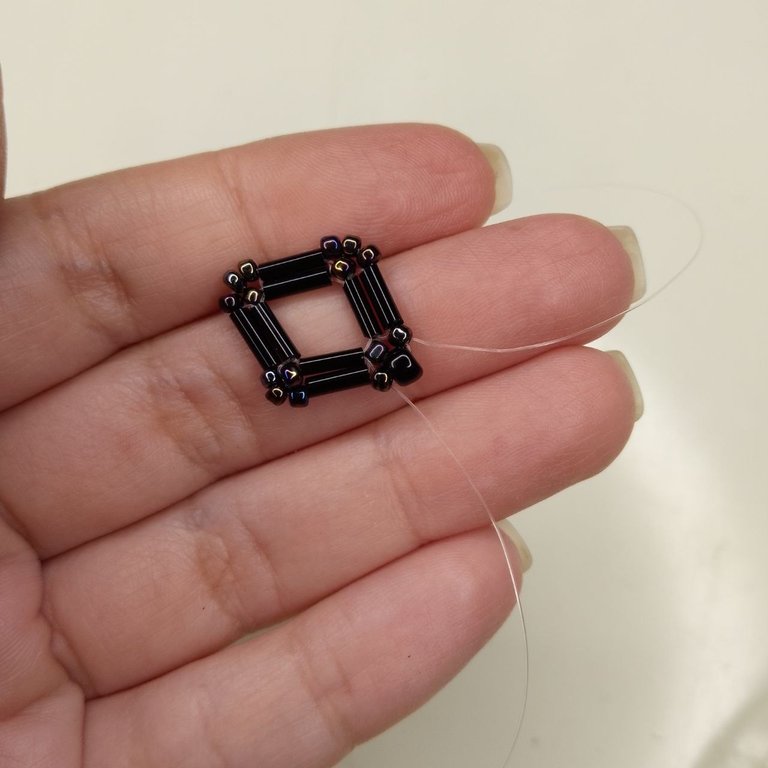
Ahora, procedemos a añadir una pequeña mostacilla de color negro tornasol en uno de los extremos del nilón y acto seguido, pasamos la misma punta del nilón a través del canutillo siguiente inmediato pero su sentido de ingreso será como devolviéndose hacia la mostacilla tornasol que acabamos de añadir y tiramos del nilón para que el nuevo canutillo tome su posición. Repetiremos este paso para cada uno de los vértices y lados del rombo.
English Version
Now, we proceed to add a small iridescent black bead at one end of the nylon and then, we pass the same end of the nylon through the next immediate bead but its direction of entry will be like going back towards the iridescent bead that we just added and we pull the nylon so that the new bead takes its position. Repeat this step for each of the vertices and sides of the rhombus.
 |  |
|---|
 |  |
|---|
 |  |
|---|
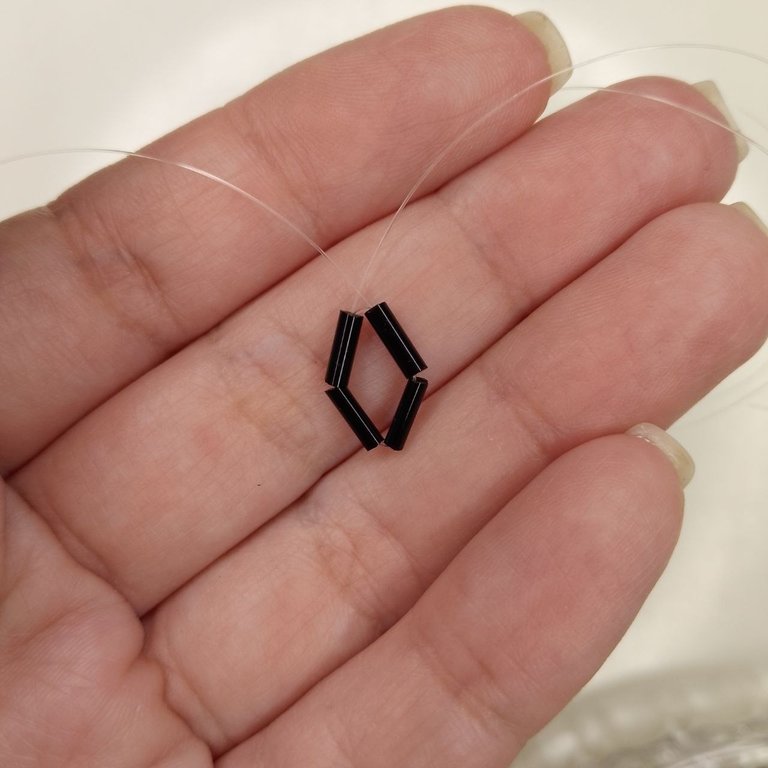
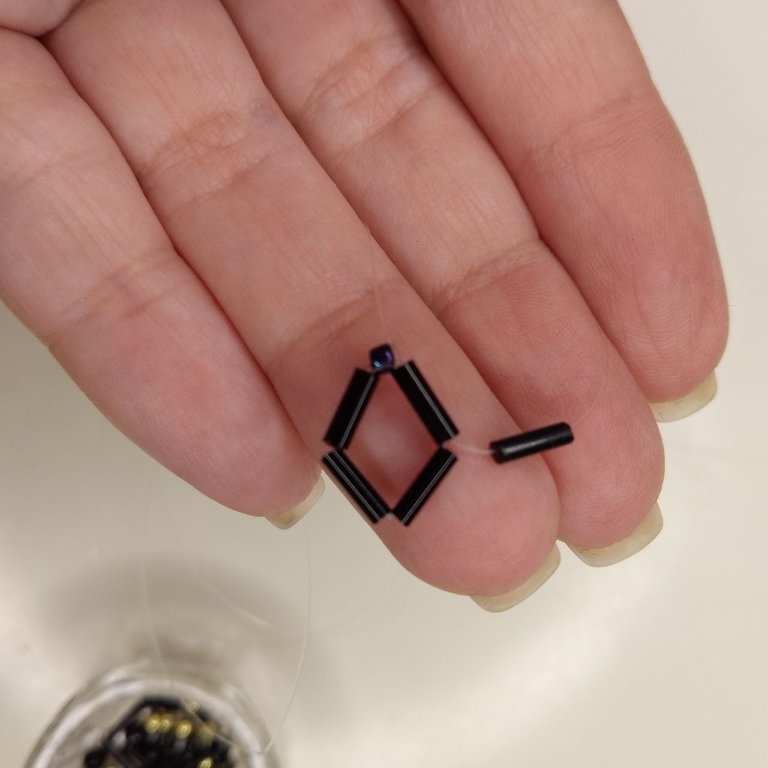
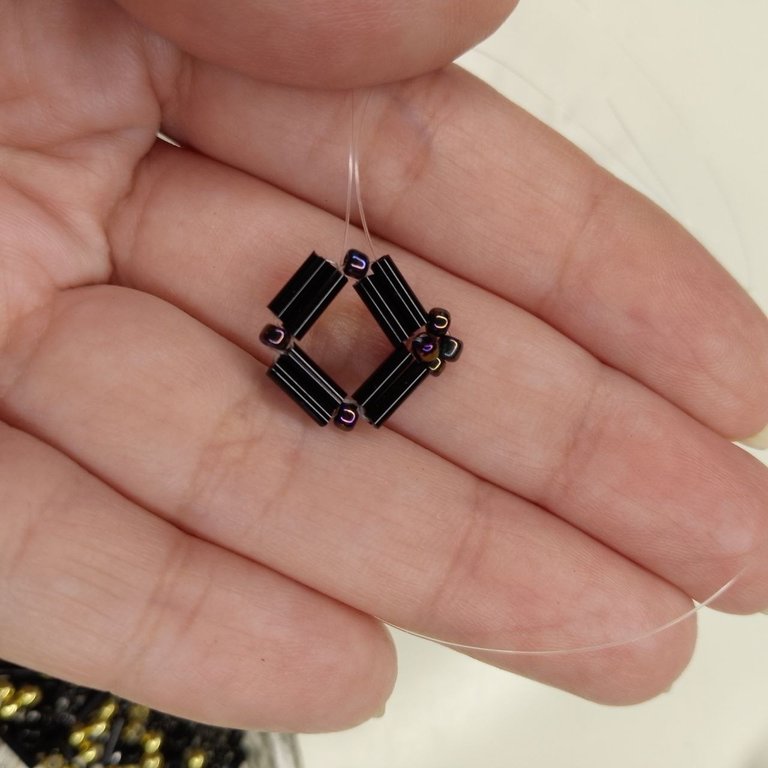
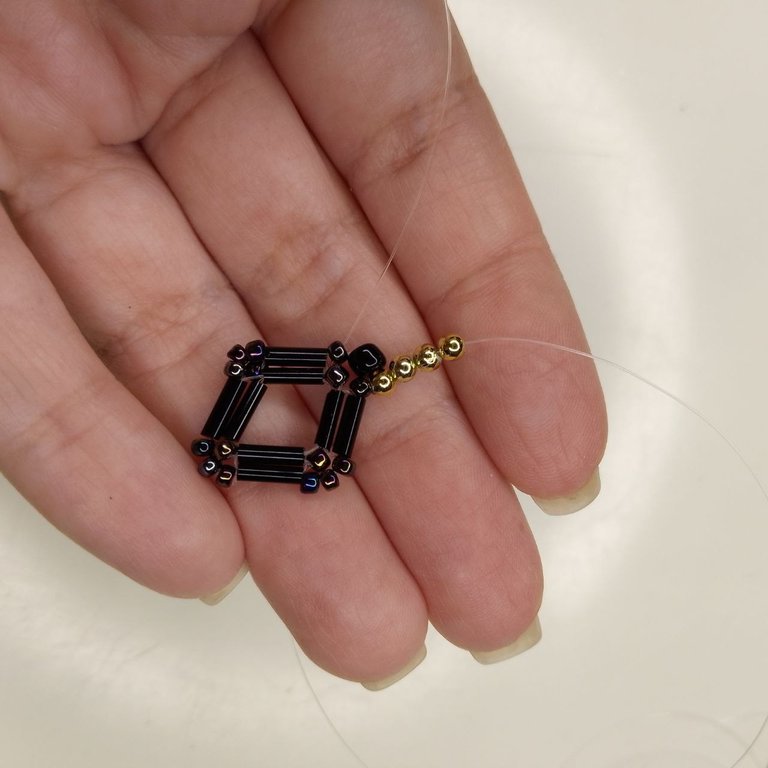
Es momento de añadir tres mostacillas tornasol a través de uno de los extremos del nilón, luego, este mismo extremo lo pasaremos por medio del canutillo externo inmediato y repetiremos el mismo paso para los siguientes vértices, sin embargo, debemos recordar que en uno de los vértices (el que prefiramos) que corresponderá al vértice inferior del rombo, en lugar de colocar tres mostacillas, agregaremos dos mostacillas y un mostacillón en orden alternado.
English Version
It is time to add three litmus beads through one of the ends of the nylon, then, we will pass this same end through the immediate external bead and repeat the same step for the following vertices, however, we must remember that in one of the vertices (the one we prefer) that will correspond to the lower vertex of the rhombus, instead of placing three beads, we will add two beads and one bead in alternating order.
 |  |
|---|
Cuentas externas / External beads
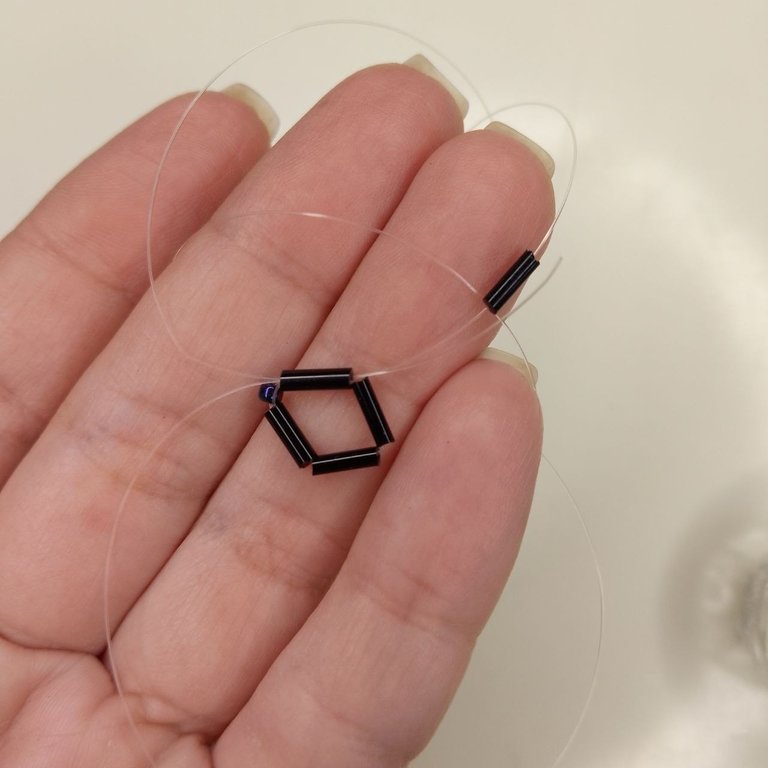
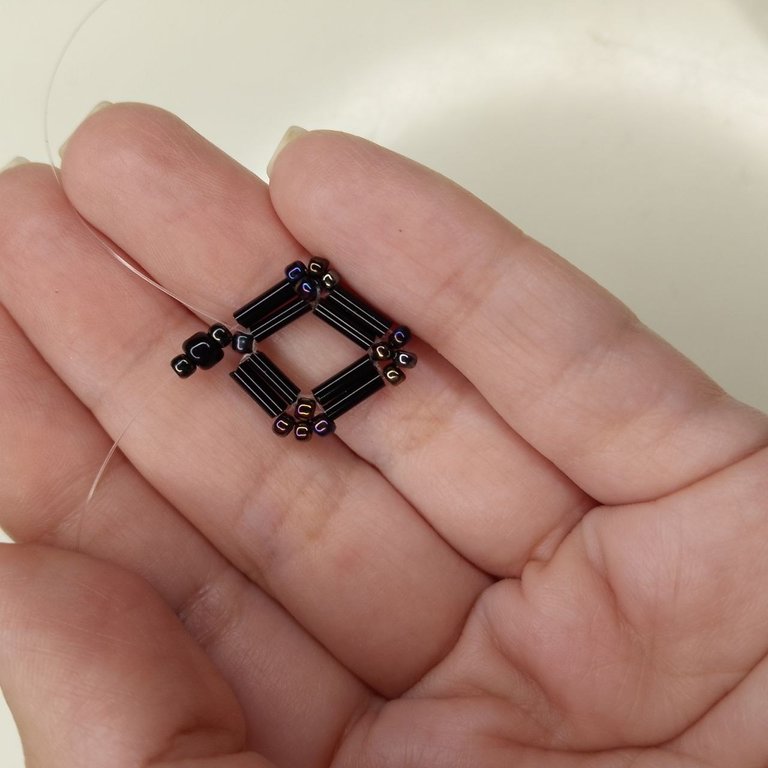
Es importante que ambos extremos del nilón queden hacia la parte inferior de la figura, por lo que deberemos pasar el extremo que lo requiera a través de las mostacillas y canutillos externos necesarios para este fin.
English Version
It is important that both ends of the nylon remain towards the bottom of the figure, so we must pass the end that requires it through the beads and external beads necessary for this purpose.
 |  |
|---|
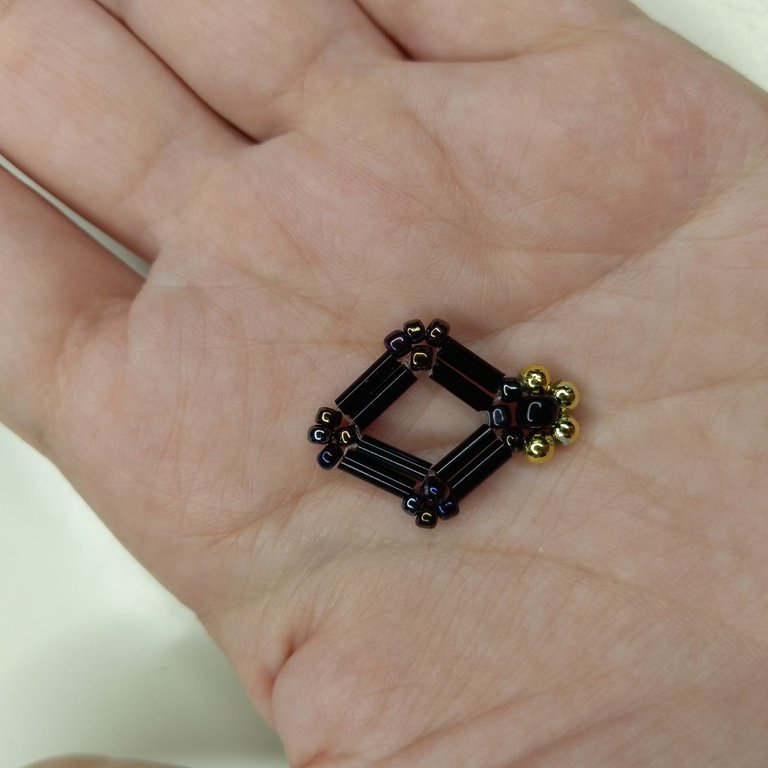
Una vez en la posición correcta, agregaremos cuatro balines dorados en uno de los extremos del nilón, esta misma punta la pasaremos por la mostacilla tornasol inmediata al mostacillón en el lado opuesto de donde sale el extremo de nilón con el que estamos trabajando y anudamos con el otro extremo. Cortamos el excedente y así queda la figura:
English Version
Once in the correct position, we will add four golden balls in one of the ends of the nylon, this same tip we will pass it through the litmus bead immediately to the bead on the opposite side from where the end of the nylon we are working with comes out and we knot it with the other end. We cut the excess and this is how the figure looks like:
 |  |
|---|
Para finalizar, colocamos un aro en el vértice superior y lo colgamos de una cadena y listo, un dije hermoso con un poco de dificultad pero que te encantará.
English Version
To finish, we place a ring on the top vertex and hang it on a chain and that's it, a beautiful pendant with a little difficulty but you will love it.
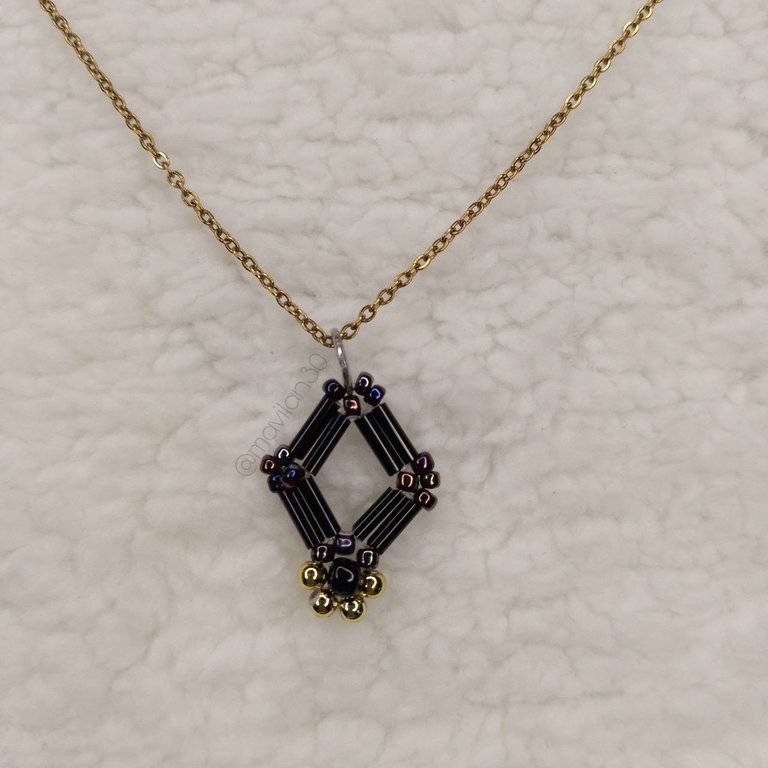
Resultado final / Final result
Comentarios finales:
Este diseño se me hizo más complicado de lo que esperaba (risas), aunque no lo crean, tuve que iniciarlo tres veces y se cumplió que la tercera es la vencida, siguiendo esta misma idea, les comparto mis complicaciones para que cuando ustedes lo intentan no sufran tanto como yo (risas).
Si usarás una aguja, debe en verdad ser muy fina, la mía funcionó para las primeras pasadas pero ya para la segunda vuelta no pasaba a través de los canutillos.
Verifiquen siempre que tan espacioso es el agujerito de las cuentas y principalmente el de los canutillos, en mi primer intento me sucedió que uno de los canutillos que había usado tenía un agujero tan pequeño que solo pasaba el nilón una vez y por la posición que ocupaba en el diseño (que ya estaba por terminarlo por cierto) no podía solo retirarlo y seguir y me tocó empezar de cero otra vez.
La segunda vez que lo intenté estaba tirando del nilón y se rompió, no tengo idea de cómo sucedió esto, así que solo puedo decir "sean cuidadosos" (risas).
No es imposible hacer el diseño sin una aguja pero se complica un poco pasar el nilón una tercera vez por el mismo lugar, ya que no es lo suficientemente rígido para penetrar entre el resto del nilón, algunas veces lo que hice fue introducir un poco la aguja al canutillo y mover y así se hacía un poco de espacio entre el resto del nilón y el nuevo nilón lograba pasar.
English Version
Final comments:
This design was more complicated than I expected (laughs), believe it or not, I had to start it three times and it was true that the third time is the charm, following this same idea, I share with you my complications so that when you try it you don't suffer as much as I did (laughs).
If you will use a needle, it must be really fine, mine worked for the first few passes but by the second round it did not pass through the canutillos.
Always check how wide is the hole of the beads and mainly the beads of the canutillos, in my first attempt it happened to me that one of the canutillos that I had used had a hole so small that it only passed the nylon once and because of the position it occupied in the design (which I was about to finish it by the way) I could not just remove it and continue and I had to start from scratch again.
The second time I tried it I was pulling the nylon and it broke, I have no idea how this happened, so I can only say “be careful” (laughs).
It is not impossible to make the design without a needle but it is a little complicated to pass the nylon a third time through the same place, as it is not rigid enough to penetrate between the rest of the nylon, sometimes what I did was to introduce the needle a little bit into the comb and move and that way a little space was made between the rest of the nylon and the new nylon was able to pass through.
¡Muchas gracias por leerme!
Thank you so much for reading me!
Fotografías propias, tomadas con mi Tecno Spark 10C.
Traducido al inglés con DeepL.
English Version
Own photographs, taken with my Tecno Spark 10C.
Translated to English with DeepL.

Está precioso, haces cositas sencillas pero que tienen un toque de elegancia para utilizar en un momento muy especial. Me encantó el diseño y la combinación que le proporcionaste 💖
!discovery 35
Muchas gracias por el apoyo💖 me alegra que te gustara🤗✨
This post was shared and voted inside the discord by the curators team of discovery-it
Join our Community and follow our Curation Trail
Discovery-it is also a Witness, vote for us here
Delegate to us for passive income. Check our 80% fee-back Program
Muy delicado y precioso!
Muchas gracias✨
Beautiful, very elegant pendant to use on a special occasion Thank you for sharing your beautiful work with all of us.
Thank you so much 💖✨
Thank you so much for your support 💖🤗✨
Al leer tus recomendaciones finales recordé cuando me estrasaba por no encontrar la aguja mas finita, recuerdo que incluso algunos canutillos se me rompían no sé porqué 😆 qué tiempos aquellos, la vida era más fácil.
Hermoso pendiente Mavi linda, como siempre te he dicho eres una multiartista muy talentosa. 🥰🫂
Jajajaja puede pasar cualquier cosa con la bisutería😅
Muchas gracias por tus palabras querida amiga🤗💖
This pendant is really elegant. Thanks for sharing this with us.
Thank you so much for your comment☺️✨
Hermoso trabajo de joyeria amiga, y el colgante es muy elegante.