Saluditos Artistas Creativos de las Manualidades y la Joyería, como siempre agradecida con Dios por permitirme estar de nuevo compartiendo con todos ustedes en esta maravillosa comunidad y con mis deseos porque se encuentren muy bien, como de costumbre agobiada con el trabajo, hoy iniciamos la semana celebrando el Día Mundial de la Actividad Física y nuestros equipos deportivos se botaron en una gran celebración general por esta fecha; a pesar de que mi semana estuvo muy comprometida no me faltó tiempo para realizar un par de pulseras, pedido de una amiga que es muy aficionada al esoterismo a la metafísica y a esas creencias que practican muchos de acuerdo a la vida espiritual de cada uno; el total es que no se si porque está cerca la semana mayor, anda muy en boga las pulseras y collares siete nudos, las pulseras rosarios, las de cruces, ojos turcos etcétera, etcétera ,
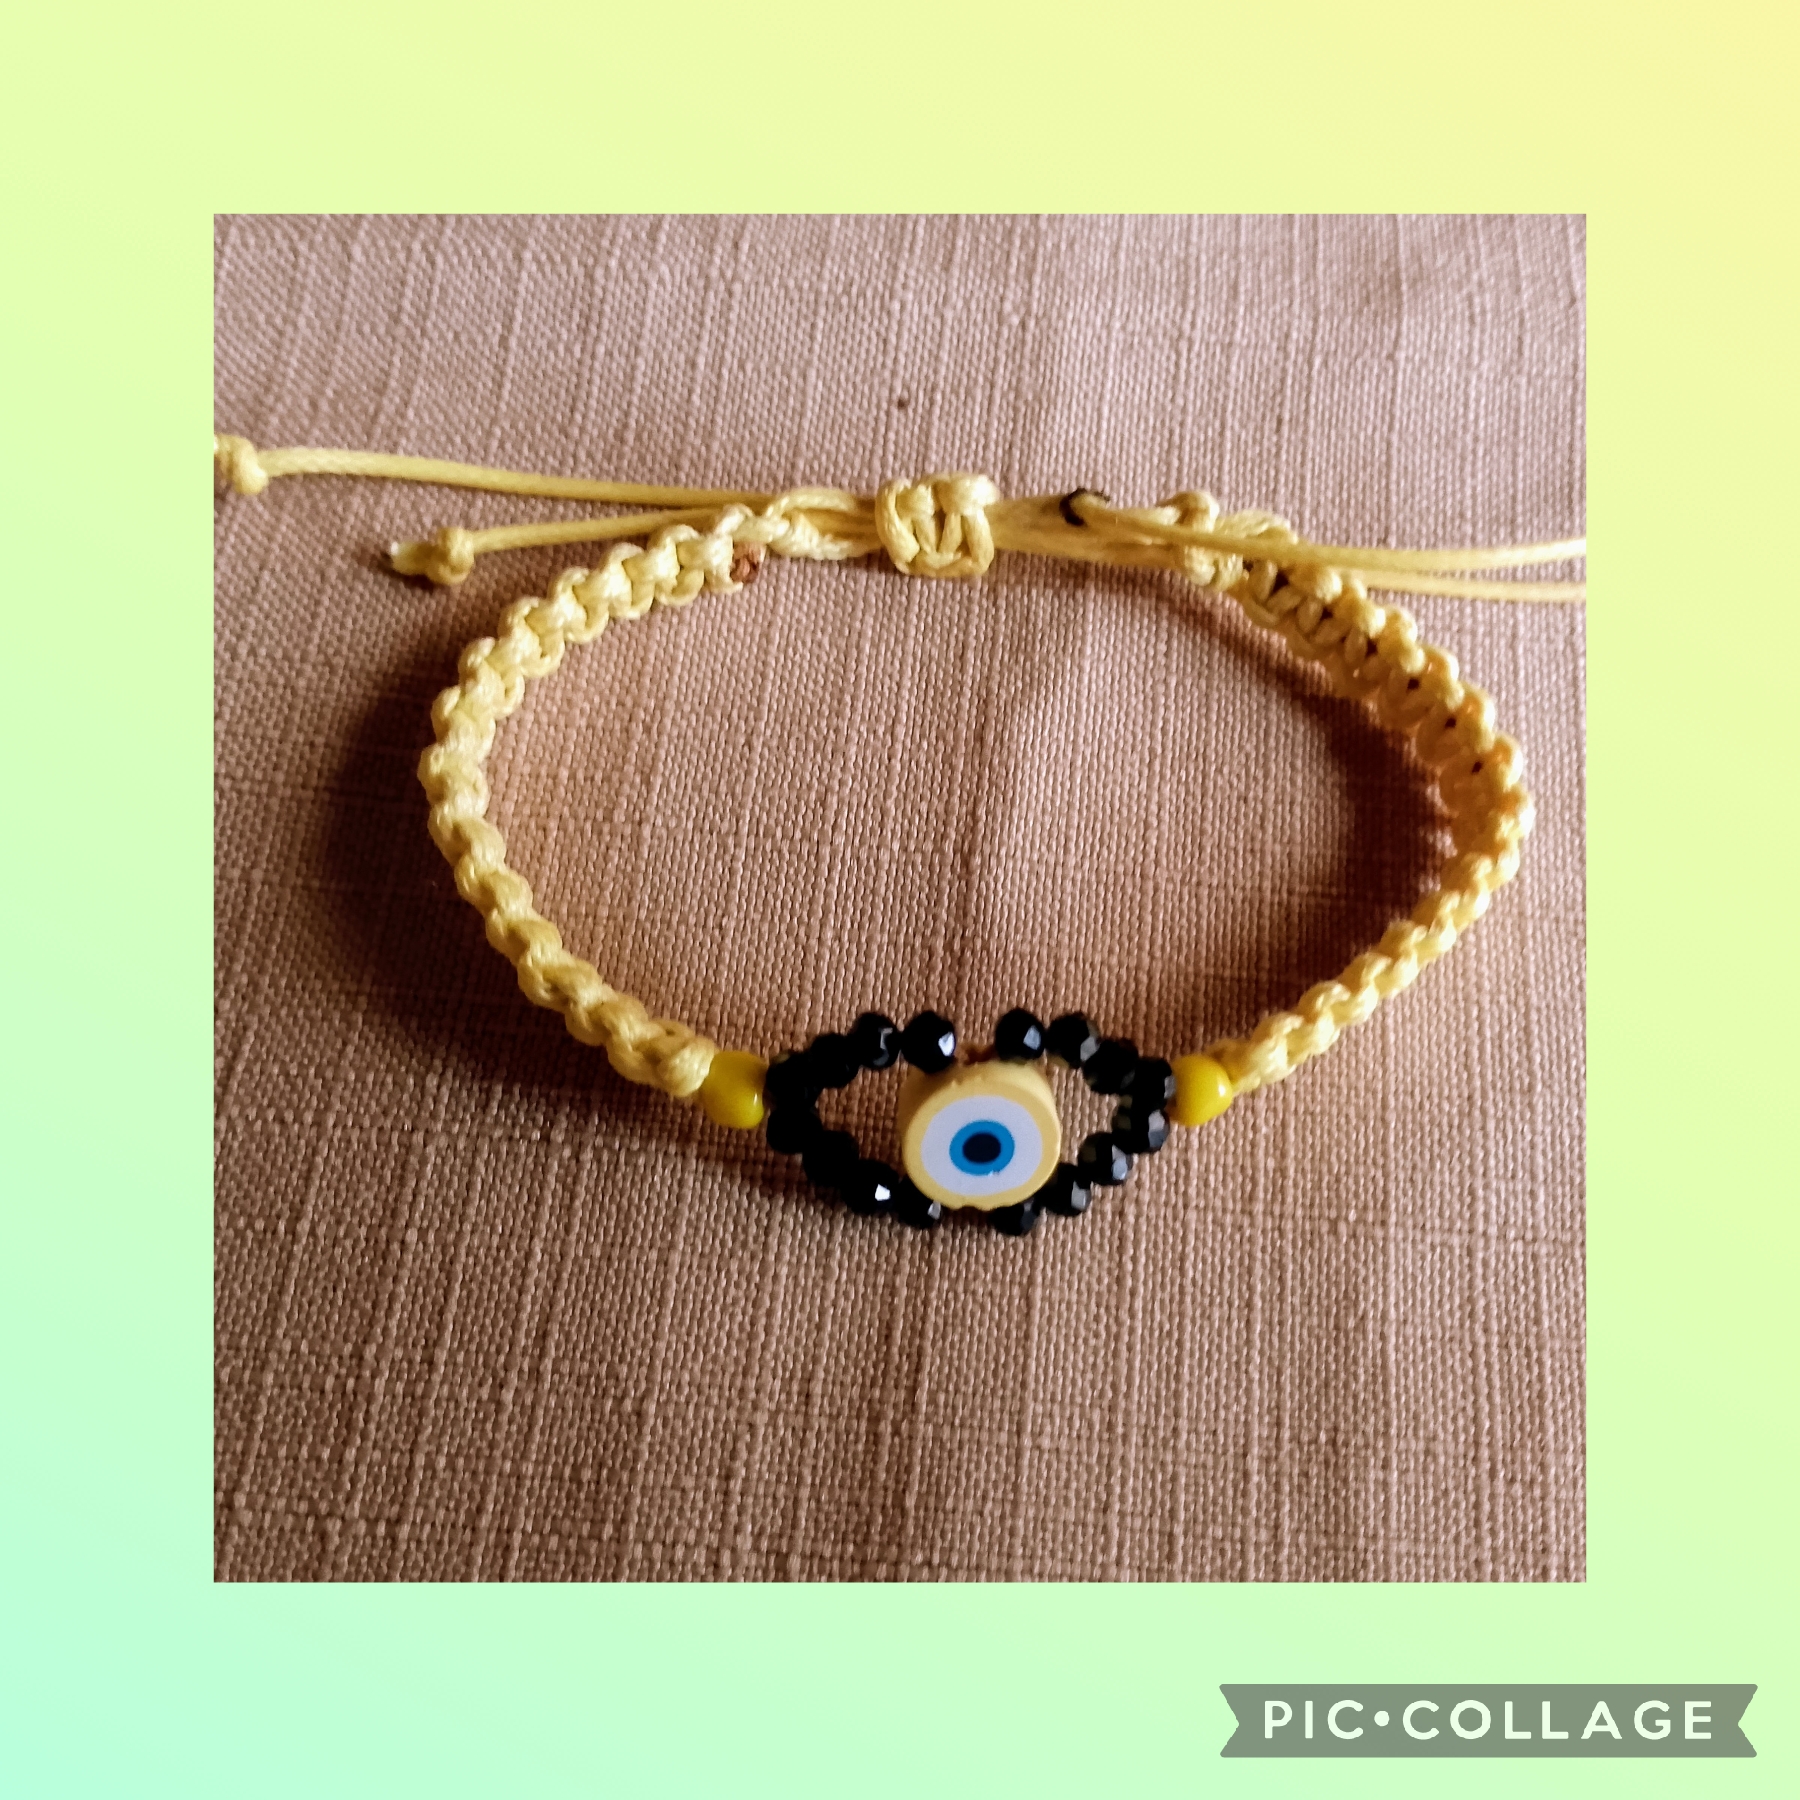
ella quiso una con el ojo turco amarillo porque este representa la salud, fuerza, la vitalidad, y riquezas; y la otra de color verde ya que este está asociado con la esperanza. La mayoría de los que siguen estás creencias dicen que el ojo turco es amuleto que proteje del mal de ojo, la envidia y la mala suerte; cosas de cada quien.
Para realizar estás pulseras busqué los ojitos de fimo ya que este material es muy versátil como una arcilla plástica y con el pueden realizarse cualquier cantidad de piezas en la bisutería además tienen un toque muy bonito.
Les voy a invitar a que sigan leyendo el paso a paso para que vean cómo las hice:
Greetings Creative Artists of Crafts and Jewelry, as always grateful to God for allowing me to share with you all again in this wonderful community, and with my best wishes for your well-being. As usual, overwhelmed with work, today we begin the week celebrating World Physical Activity Day, and our sports teams threw themselves into a grand celebration for this date. Despite my busy week, I didn't lack time to make a couple of bracelets, requested by a friend who is very fond of esotericism, metaphysics, and those beliefs that many practice according to their spiritual life. The bottom line is, I don't know if it's because Holy Week is approaching, but seven-knot bracelets and necklaces, rosary bracelets, cross bracelets, Turkish evil eyes, etc., are very popular. She wanted one with the yellow evil eye because it represents health, strength, vitality, and wealth; and the other in green because it is associated with hope. Most followers of these beliefs say the Turkish evil eye is an amulet that protects against the evil eye, envy, and bad luck; it's up to each individual.
To make these bracelets, I looked for Fimo eyes, as this material is very versatile, like plasticine, and can be used to make any number of jewelry pieces, plus they have a very pretty touch.
I'll invite you to continue reading the step-by-step instructions to see how I made them:

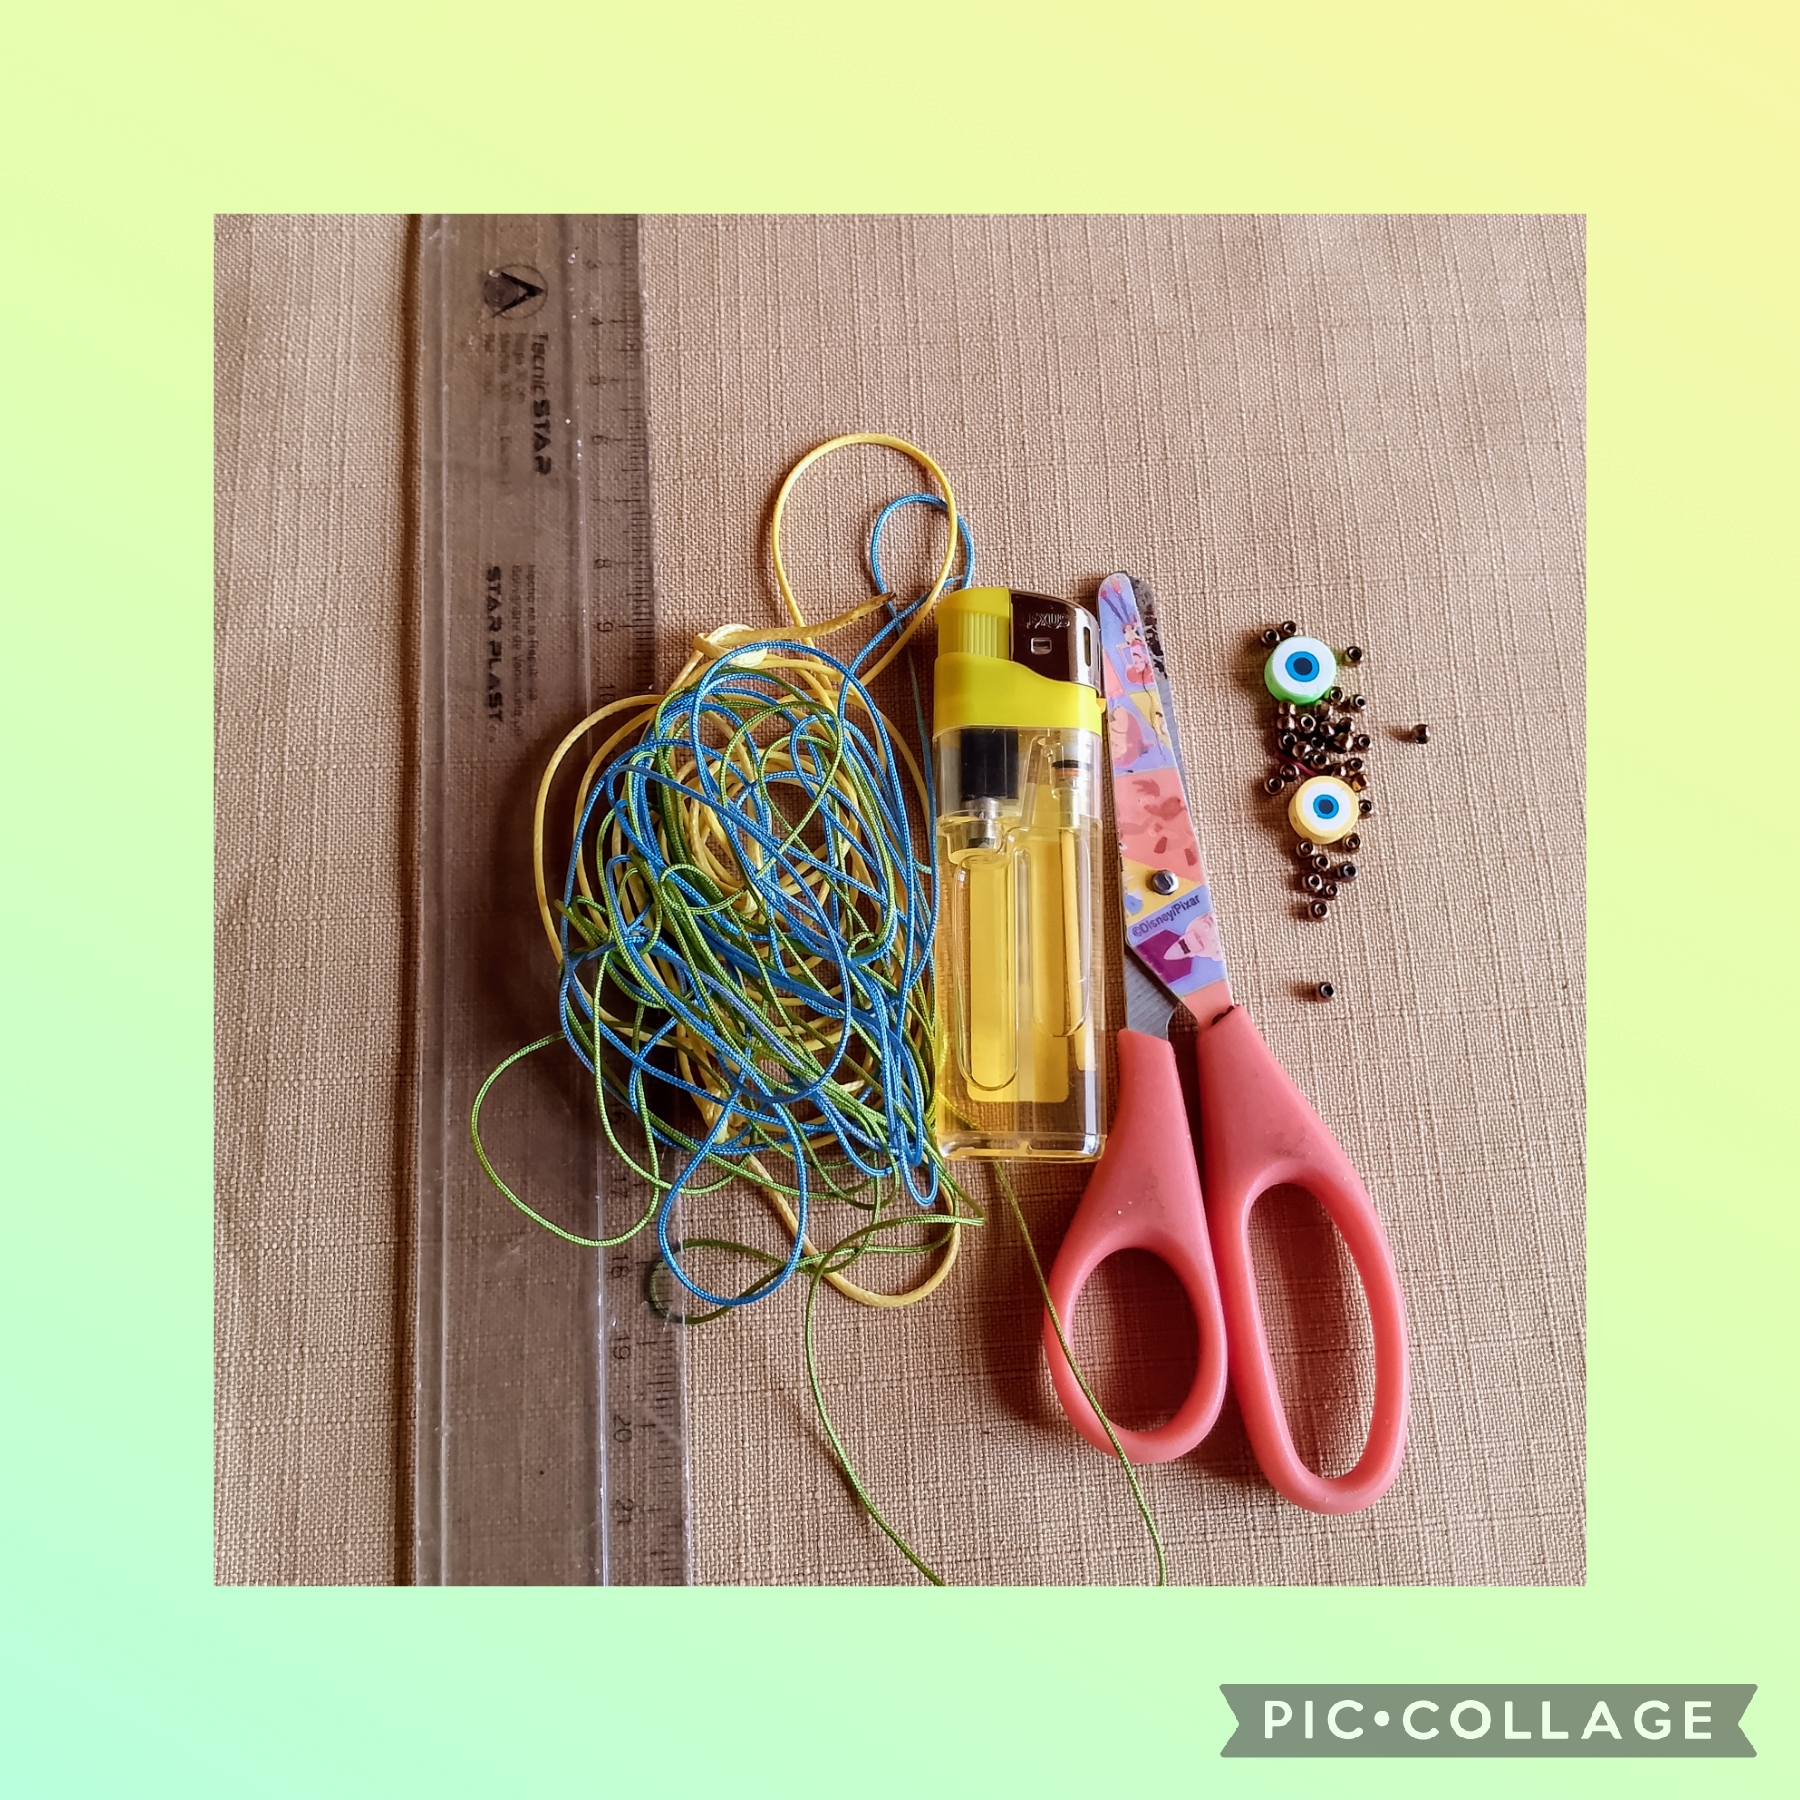
MATERIALES USADOS EN SU ELABORACIÓN:
✓ Hilo chino color verde de 0,8
milímetros.
✓ Hilo chino color azul de 0,8 milímetros.
✓ Hilo chino color dorado de 0,8 mm.
✓ Hilo coreano de color amarillo de un
milímetro.
✓ Un ojo turco de fimo color amarillo.
✓ Un ojo turco de fimo color verde.
✓ Mostacillas calibradas color bronce.
✓ Cristales negros dieciséis.
✓ Un encendedor.
✓ Tijeras.
✓ Regla.
MATERIALS USED IN ITS PREPARATION:
✓ 0.8 millimeters of green Chinese thread.
✓ 0.8 millimeters of blue Chinese thread.
✓ 0.8 millimeters of gold Chinese thread.
✓ 1 millimeter of yellow Korean thread.
✓ One yellow Fimo evil eye.
✓ One green Fimo evil eye.
✓ Calibrated bronze seed beads.
✓ Sixteen black crystals.
✓ A lighter.
✓ Scissors.
✓ Ruler.
PASOS QUÉ USÉ EN SU ELABORACIÓN:
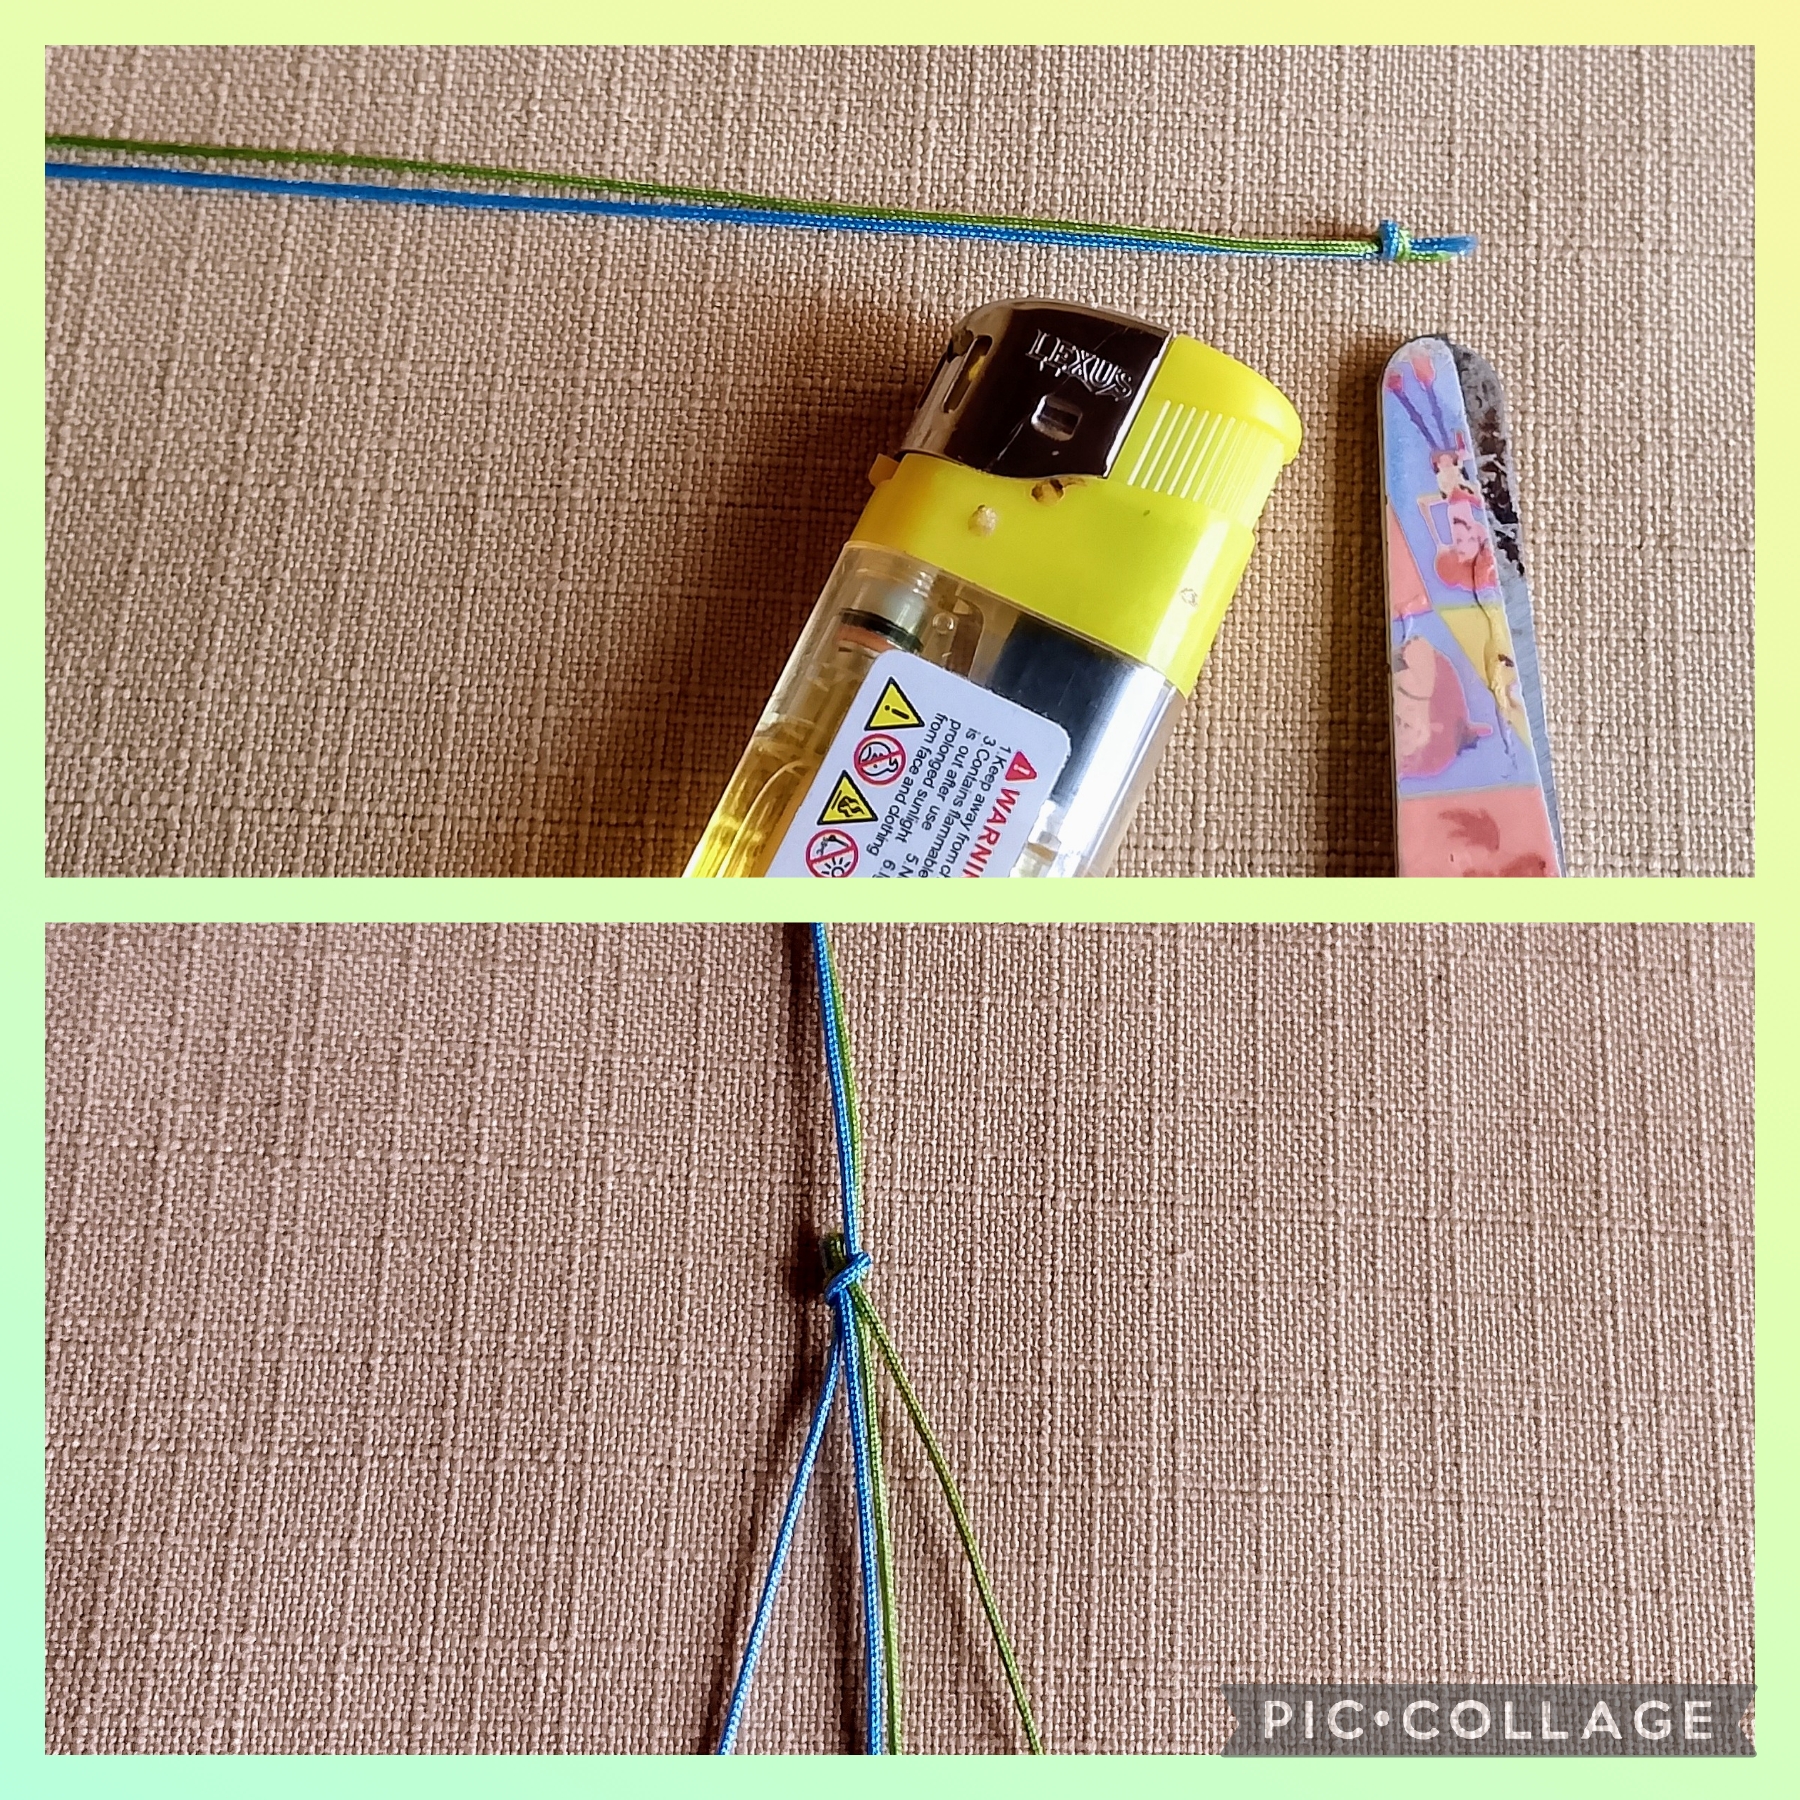
PRIMER PASO:
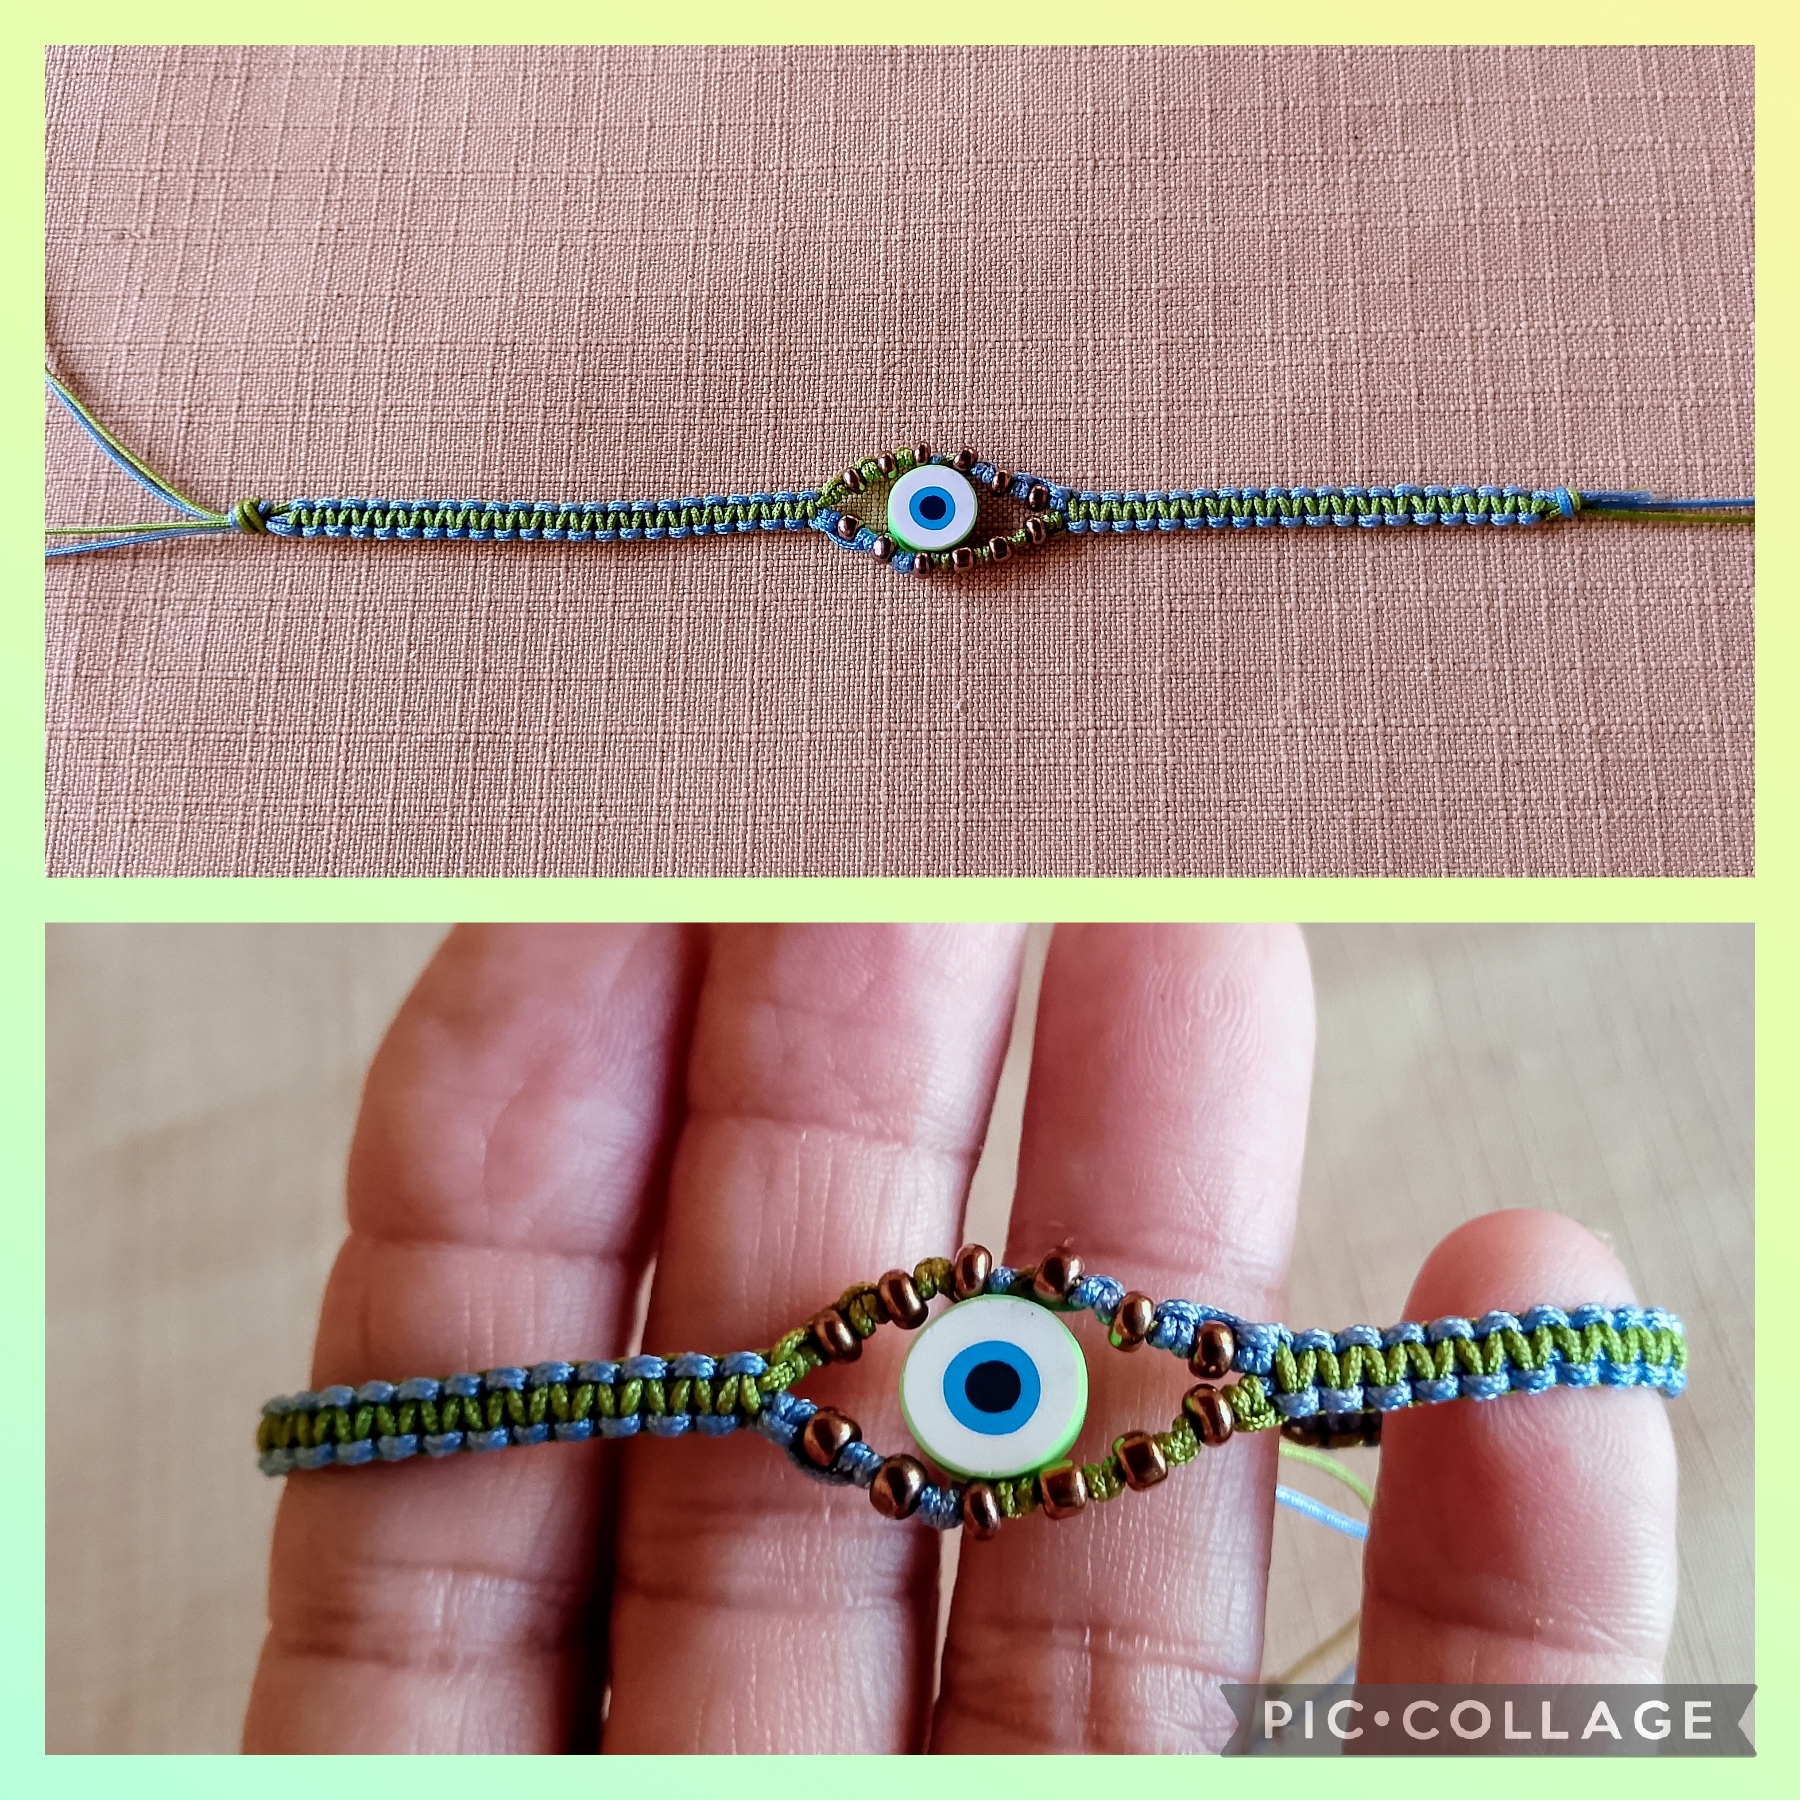
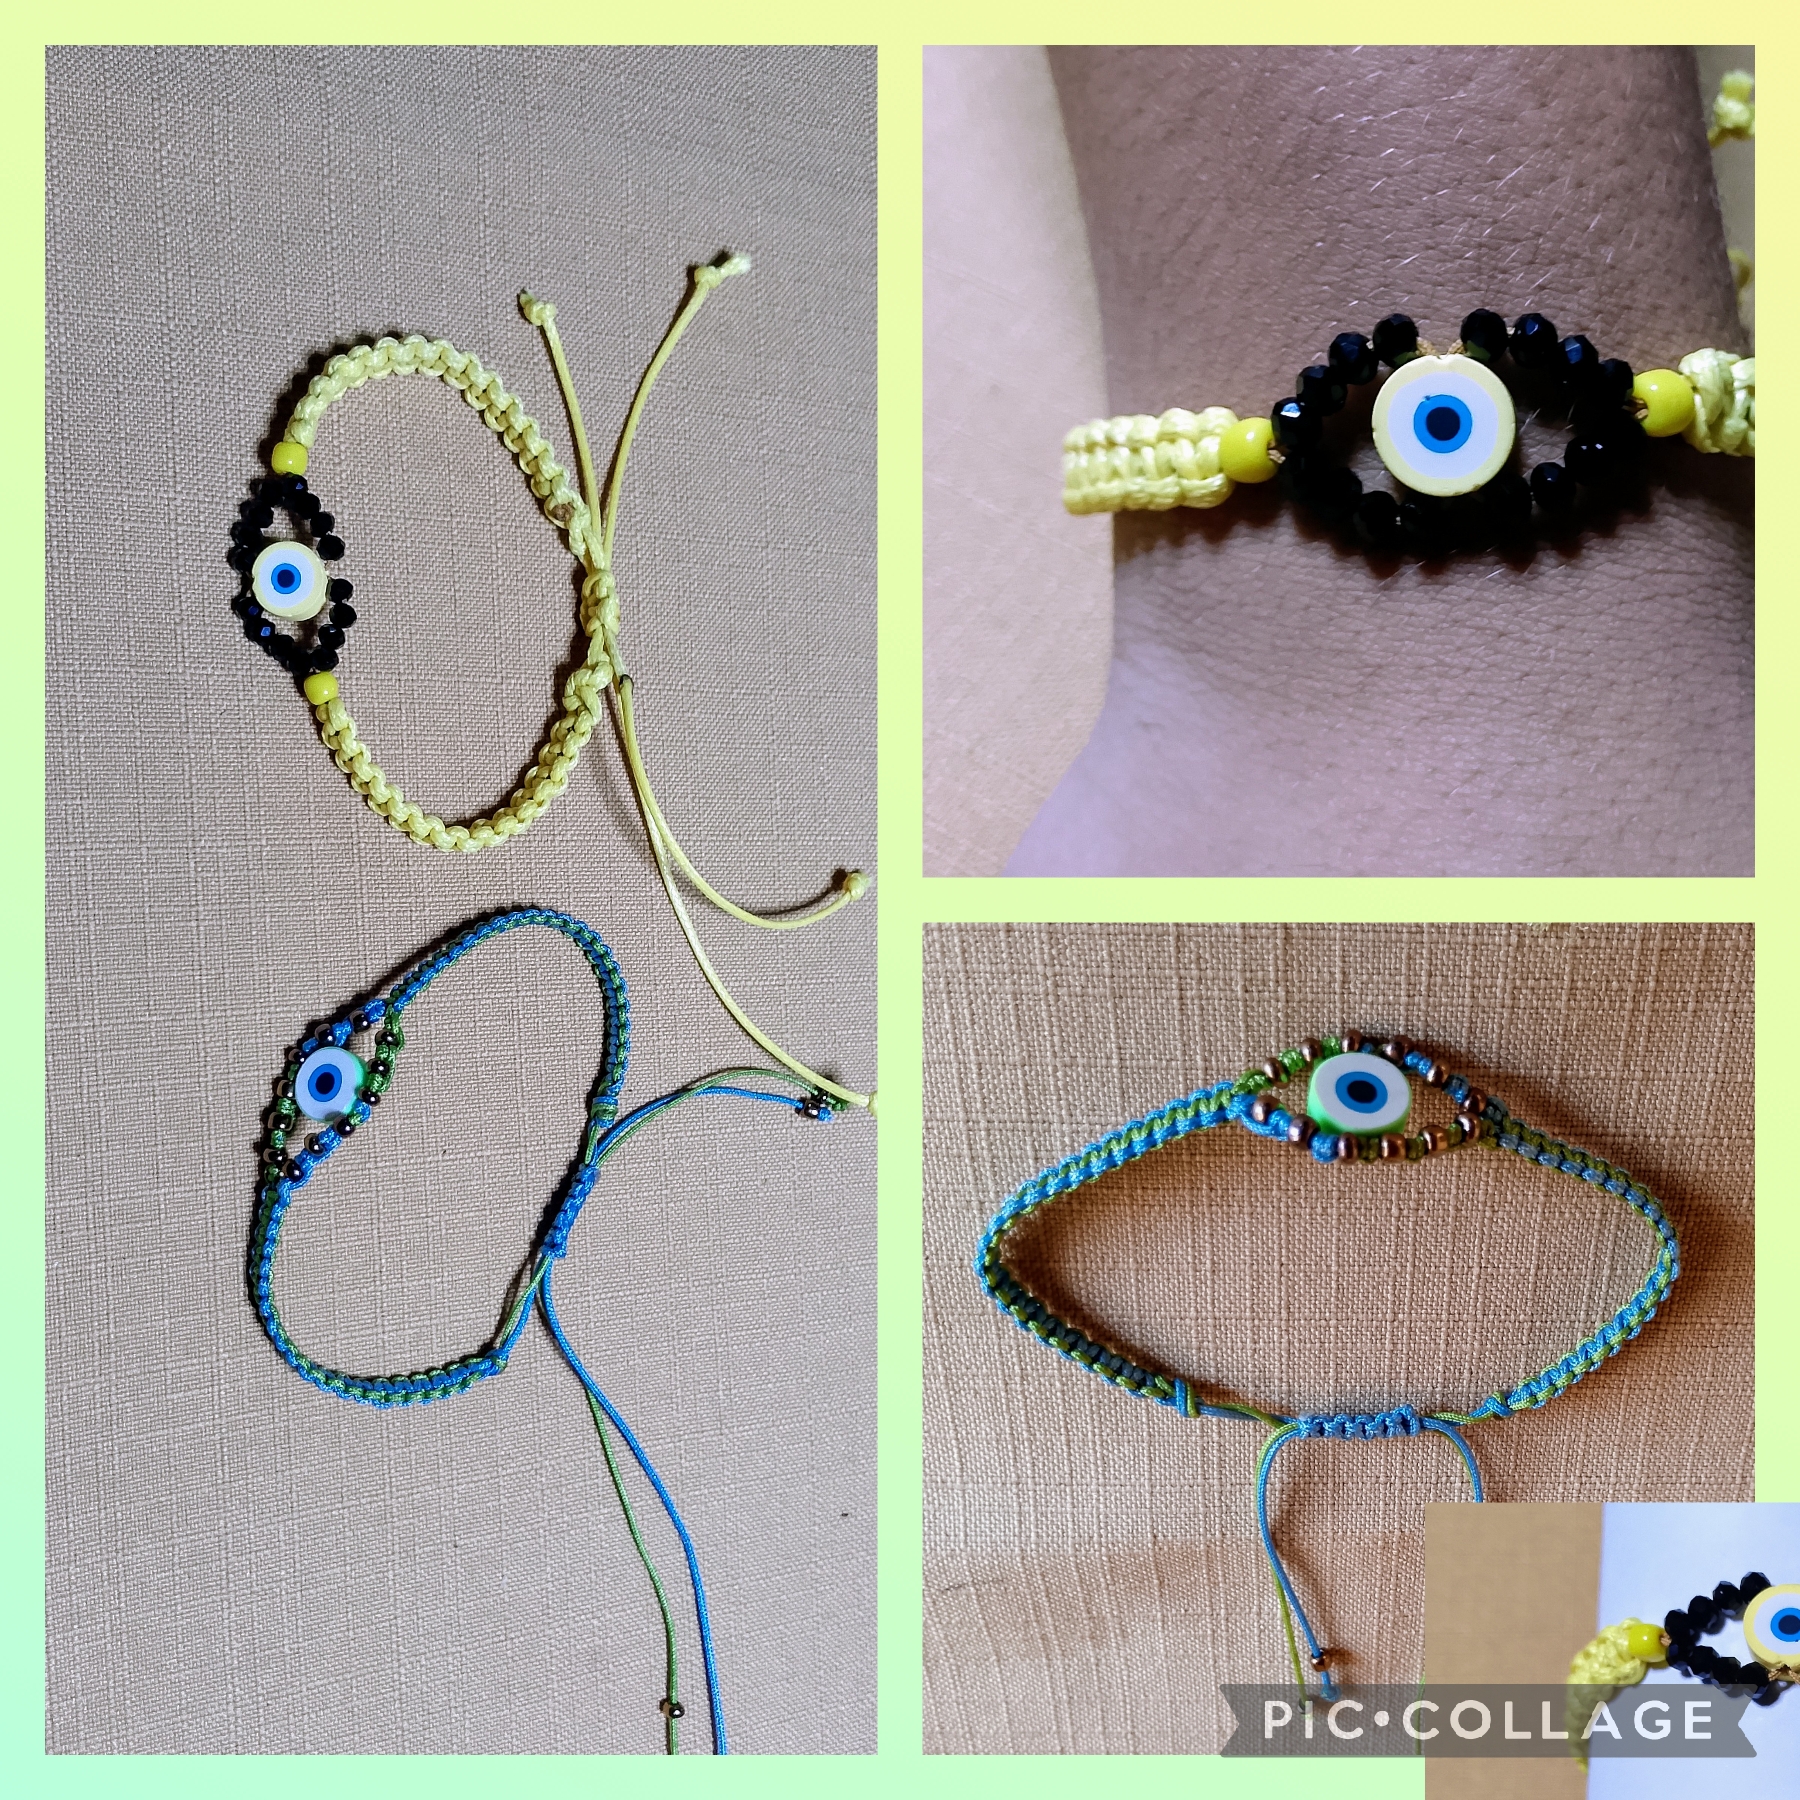
Voy a comenzar elaborando la primera Pulsera; para ello me voy a ayudar con la regla y corto una medida de cuarenta y cinco centímetros de hilo chino color azul y otra medida igual de hilo chino de color verde, estos para que sean los hilos centrales y dos medidas de setenta centímetros uno verde y otro azul para que sean los hilos anudadores, mi pulsera será bicolor. Empiezo juntando los hilos centrales y realizo un nudo simple en uno de los extremos corto y sello con el encendedor así como muestro; ahora con la regla mido ocho centímetros y a cada lado de los hilos centrales coloco los hilos anudadores para comenzar a tejer el diseño de mi pulsera con nudo plano, este Nudo ya lo he realizado en otras oportunidades y si no lo conocen les invito a leer mis publicaciones dónde en tutorial explico cómo se hace. Tejo cinco centímetros y medio de nudo plano así como muestro.
STEPS I USED IN ITS PREPARATION:
FIRST STEP:
I'm going to start by making the first bracelet. To do this, I'll use the ruler to cut a 45-centimeter length of blue Chinese thread and another 45-centimeter length of green Chinese thread. These will be the center threads. I'll cut two 70-centimeter lengths, one green and one blue, to be the knotting threads. My bracelet will be two-tone. I start by joining the center threads and making a simple knot at one of the short ends, sealing it with a lighter, as shown. Now, using the ruler, I measure eight centimeters, and on each side of the center threads, I place the knotting threads to begin weaving my bracelet design with a flat knot. I've made this knot before, and if you're not familiar with it, I invite you to read my posts where I explain how to do it in the tutorial. I weave a five-and-a-half-centimeter flat knot, as shown.
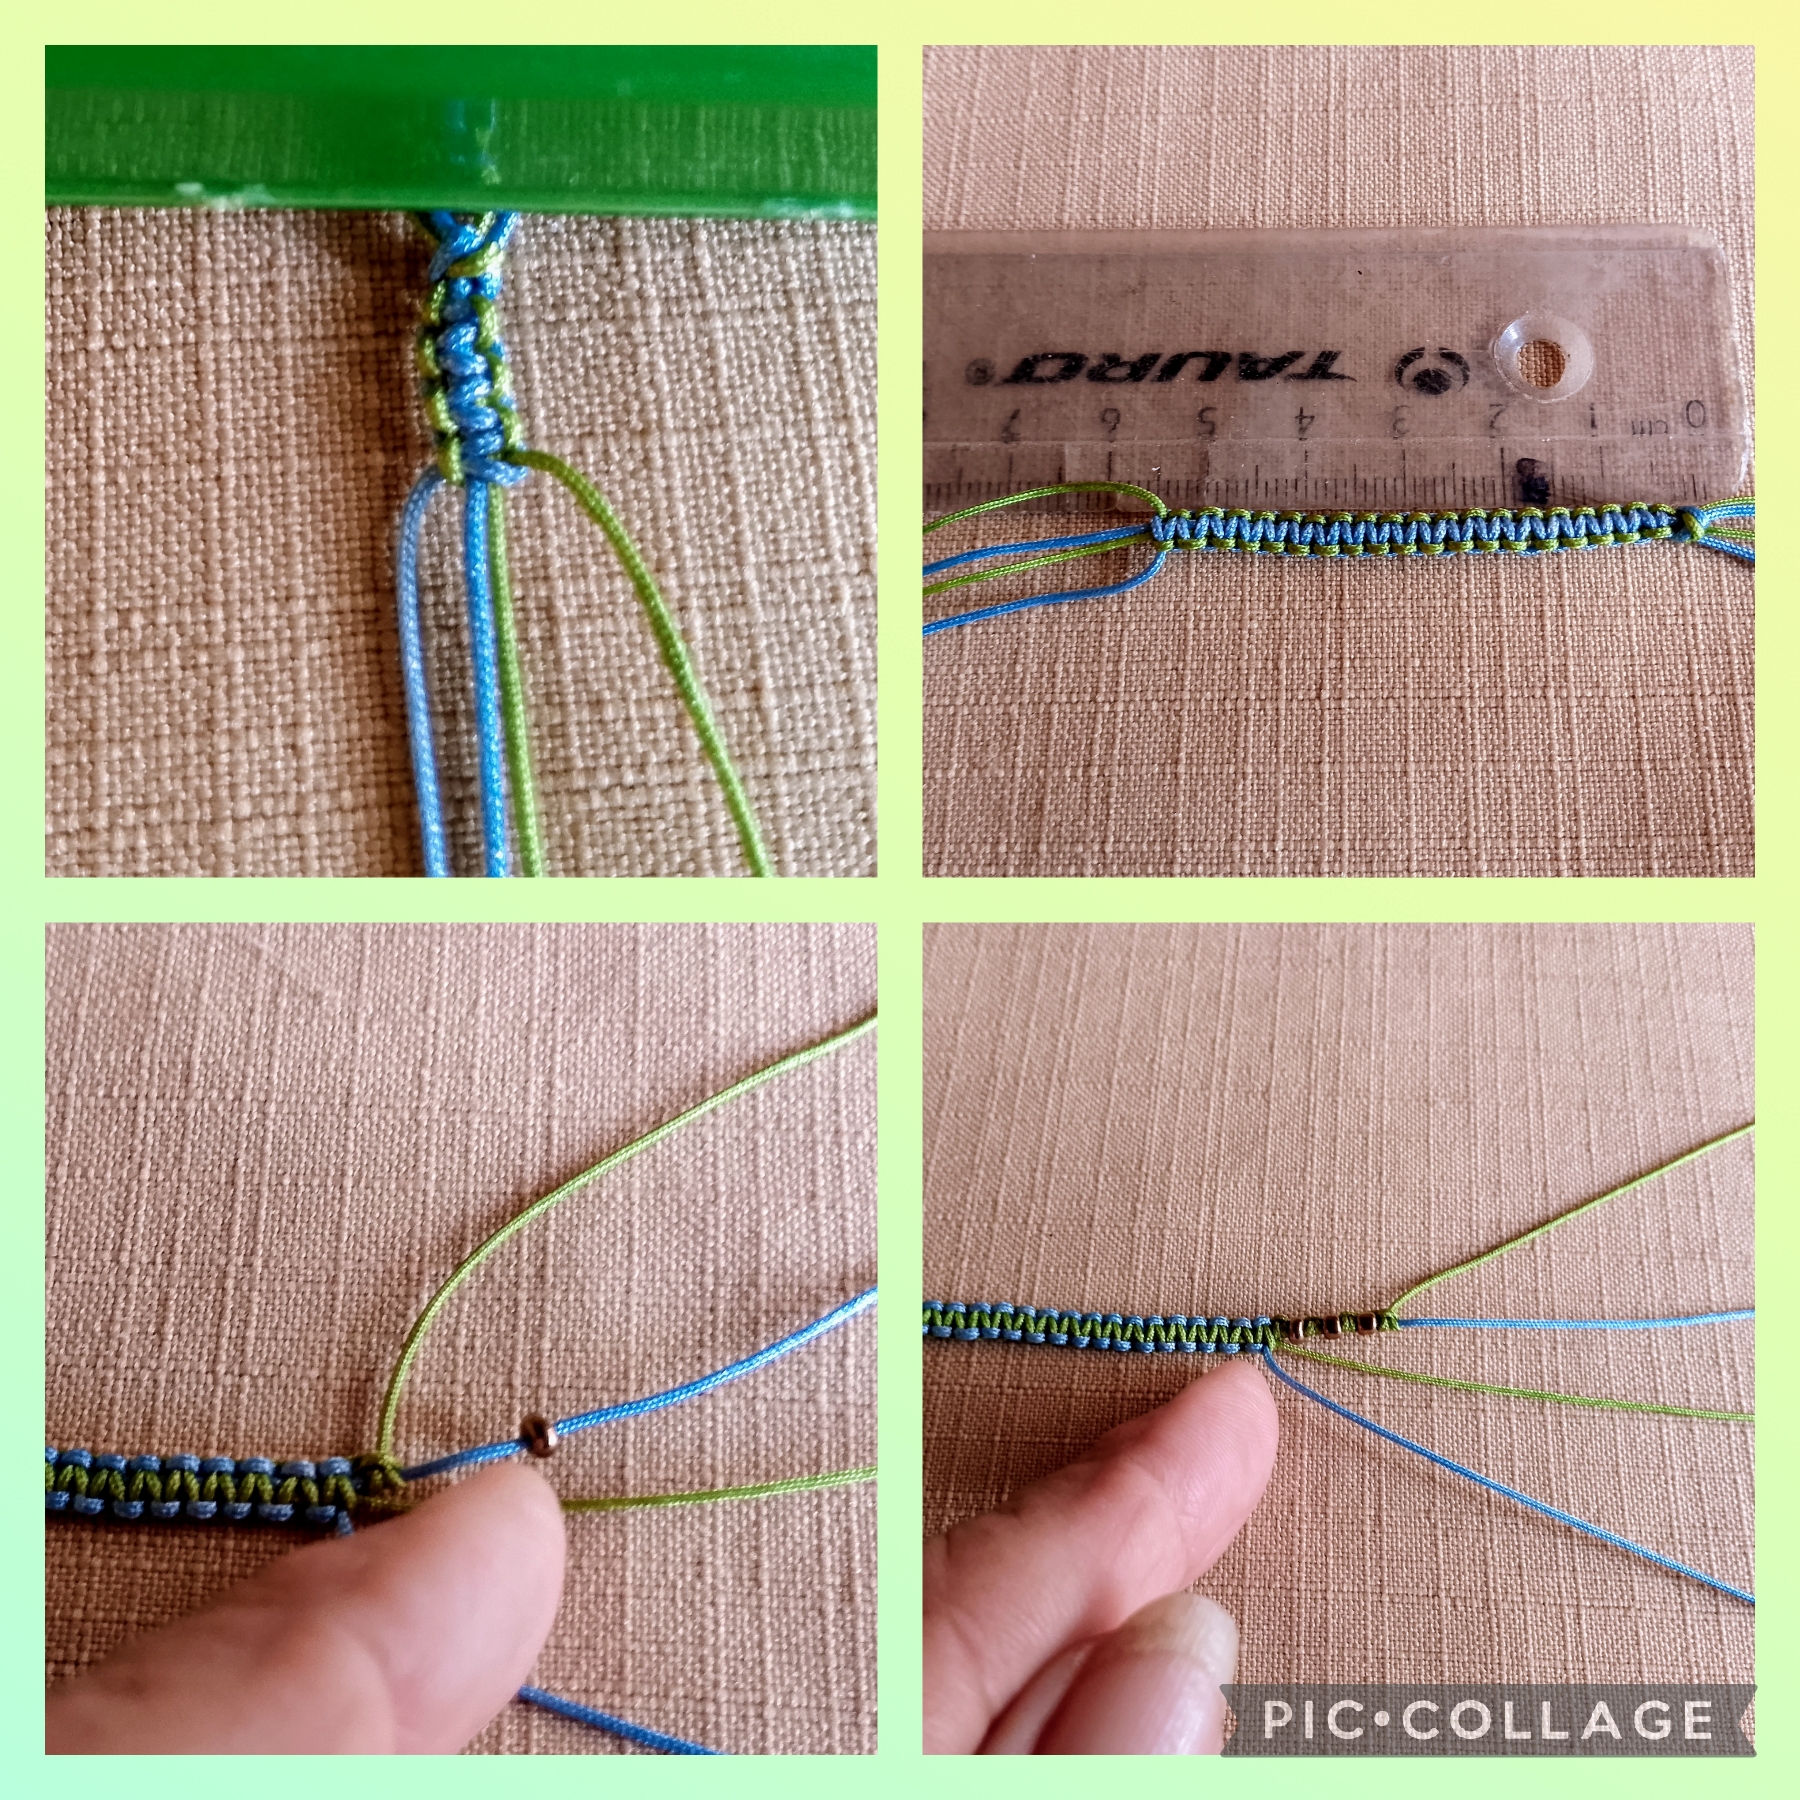
PASO DOS:
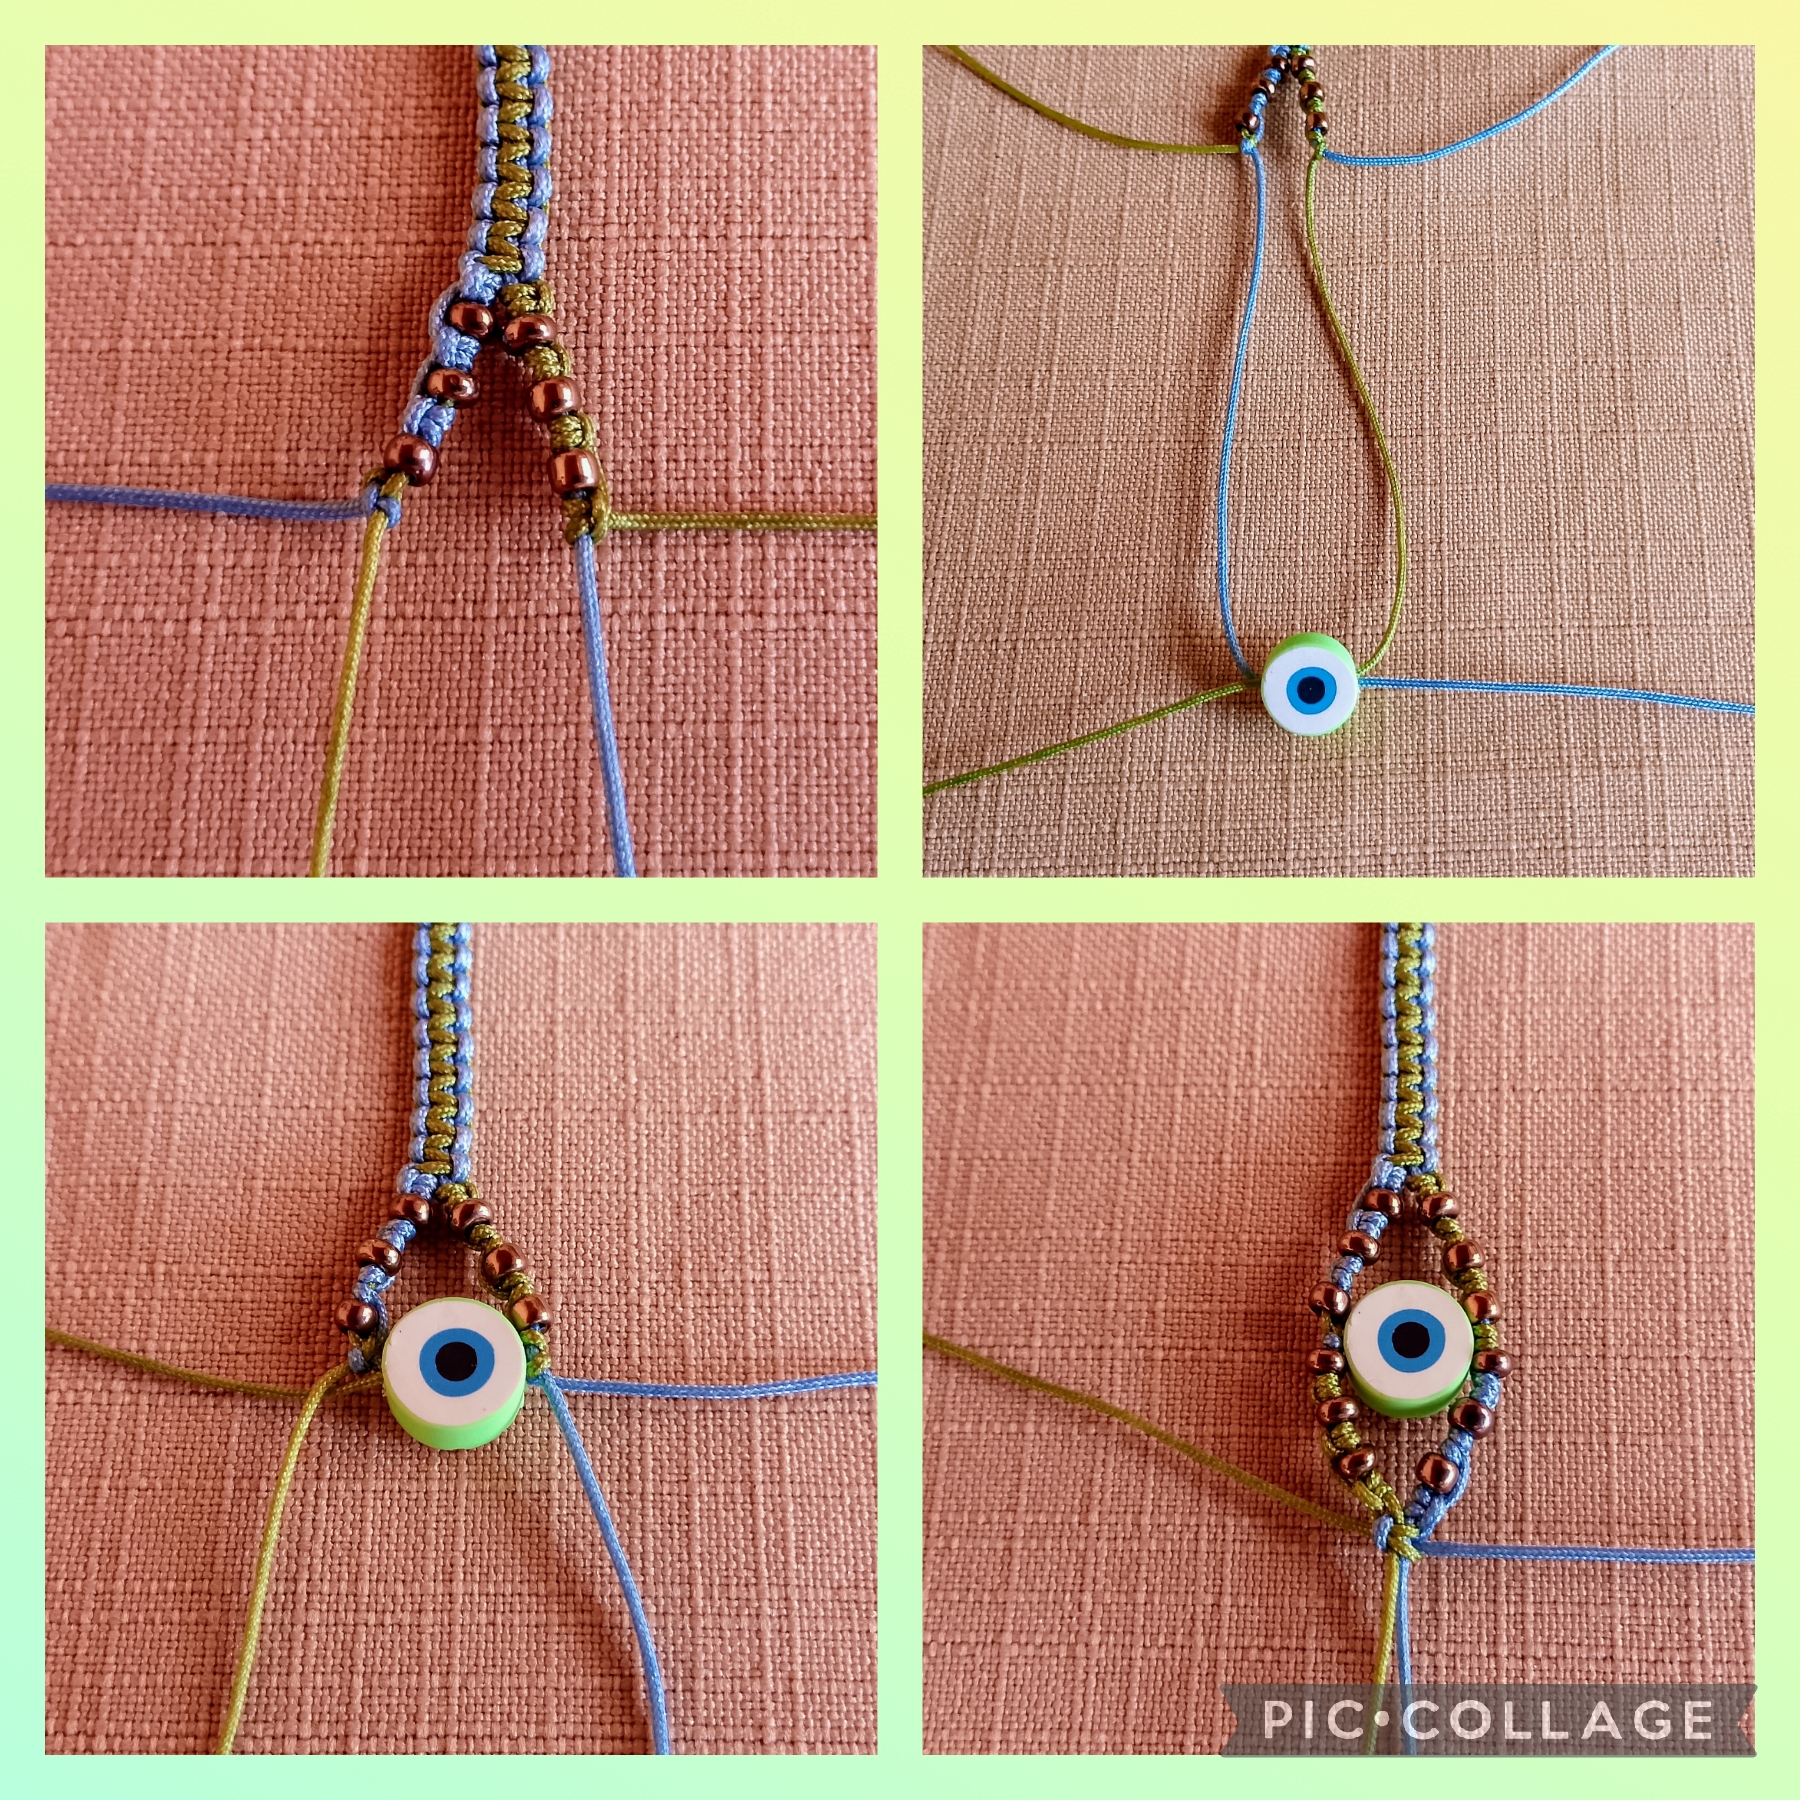
Así como muestro en la imagen una vez que tengo la medida de cinco centímetros de tejido nudo plano; voy a insertar cuatro mostacillas calibradas color bronce de esta manera abro los hilos y tengo dos de cada lado un hilo central y un nudo anudador, voy a trabajar por separado así: comienzo con los dos hilos de la derecha realizo un nudo alondra, pongo el hilo anudador encima del hilo central, paso la punta del hilo por debajo del hilo central y saco por el ojal que forme con el hilo anudador, ahora tomo de nuevo el hilo anudador y lo coloco del lado derecho lo pongo encima del hilo central paso la punta por debajo del ojal y lo saco hacia la derecha para formar un nudo alondra completo, ahora paso la primera mostacilla por el hilo central derecho y la coloco junto al Nudo Alondra, realizó otro nudo alondra y paso otra mostacilla hasta tener cuatro con los dos hilos de la izquierda hago un procedimiento igual y ya inserte ocho mostacillas. Ahora tomo los hilos anudadores y voy a insertar el ojo turco de fimo cruzando los hilos por el orificio del ojo, de nuevo con los hilos centrales y los nudos anudadores hago el mismo procedimiento anterior insertando las ocho mostacillas para seguir tejiendo nudo plano.
STEP TWO:
Just as I show in the image, once I have the five-centimeter measurement of flat knot fabric, I'm going to insert four calibrated bronze-colored seed beads. I open the threads and have two on each side, a center thread and a knotter. I'm going to work separately like this: I start with the two threads on the right and make a lark's head knot. I place the knotter thread on top of the center thread, pass the tip of the thread under the center thread, and pull it through the eyelet I formed with the knotter thread. Now I take the knotter thread again and place it on the right side. I place it on top of the center thread, pass the tip under the eyelet, and pull it out to the right to form a complete lark's head knot. Now I pass the first seed bead through the right center thread and place it next to the Lark's Head Knot. I make another lark's head knot and pass another seed bead until I have four with the two threads on the left. I do the same procedure and I have now inserted eight seed beads. Now I take the knotting threads and I am going to insert the fimo Turkish eye by crossing the threads through the eye hole, again with the central threads and the knotting knots I do the same previous procedure inserting the eight beads to continue weaving a flat knot.
PASO TRES:
En este paso una vez realizado todo el largo deseado, realizo el cierre también con nudo plano, corto los excedentes de los hilos anudadores y sello con el encendedor, ahora coloco los hilos centrales unos al lado de los otros y con un trocito de hilo de diez centímetros en este caso lo use azul hice diez nudos, corte el excedente con las tijeras selle con el encendedor y coloqué una mostacilla en cada hilo para este resultado.
STEP THREE:
In this step, once the desired length is reached, I also make the closure with a flat knot. I cut off the excess knotting threads and seal with the lighter. Now I place the central threads side by side and with a ten-centimeter piece of thread (in this case, I used blue thread), I made ten knots. I cut off the excess with scissors, sealed with the lighter, and placed a seed bead on each thread for this result.
PASO CUATRO:
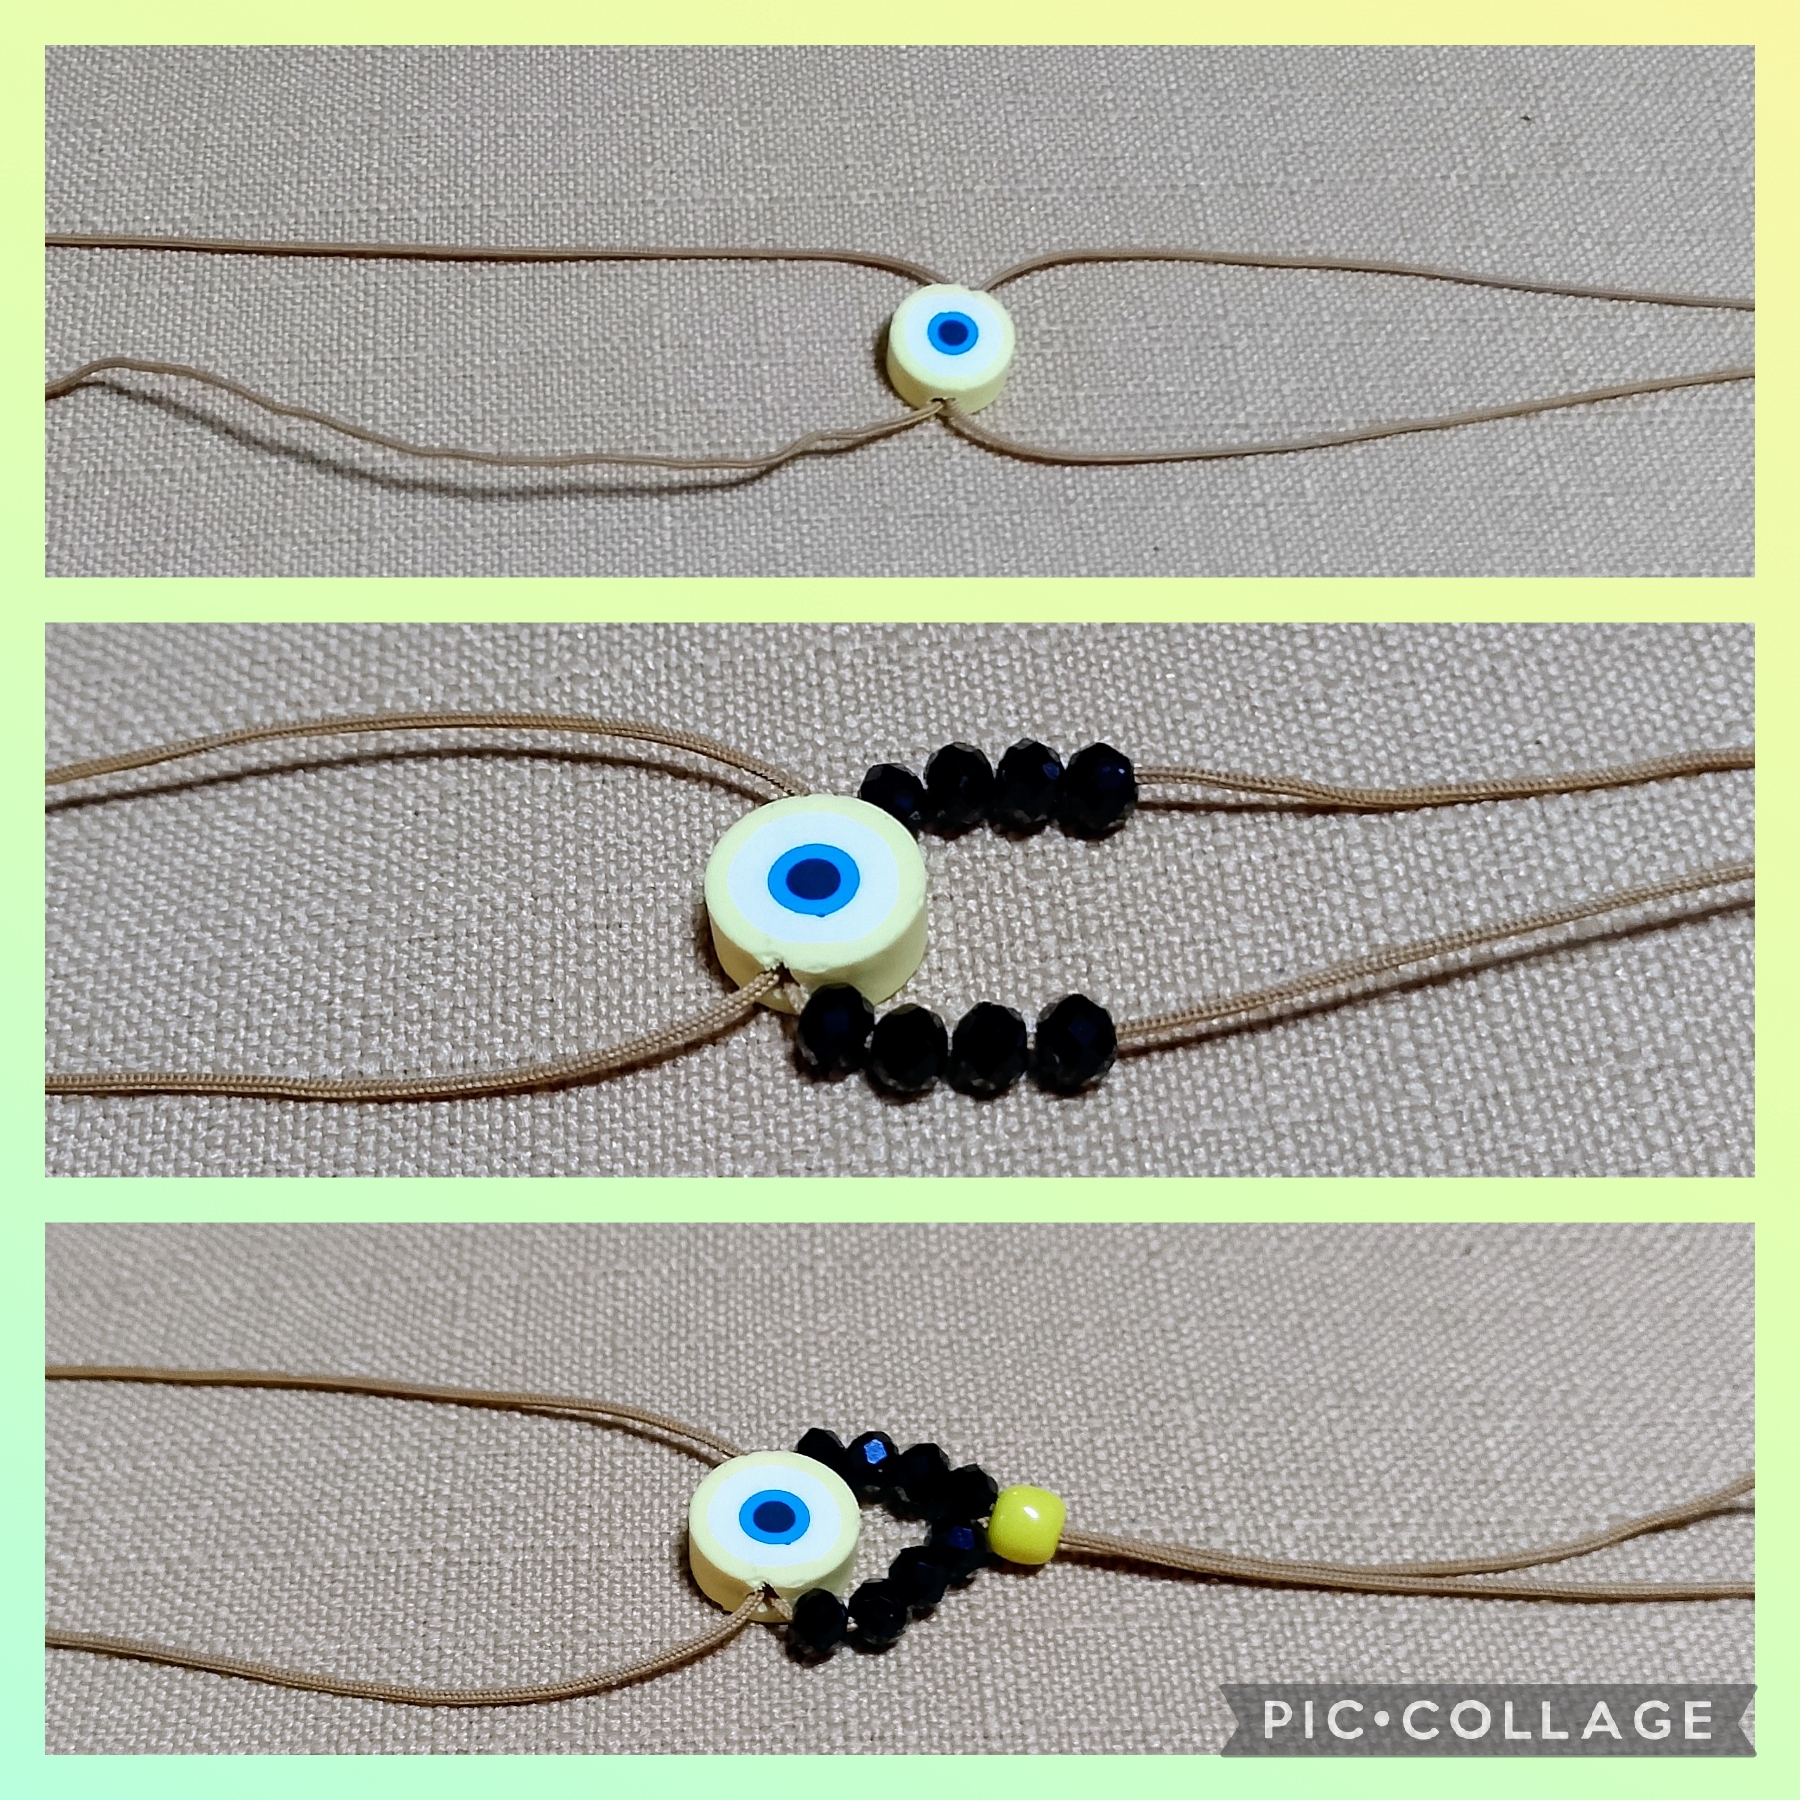
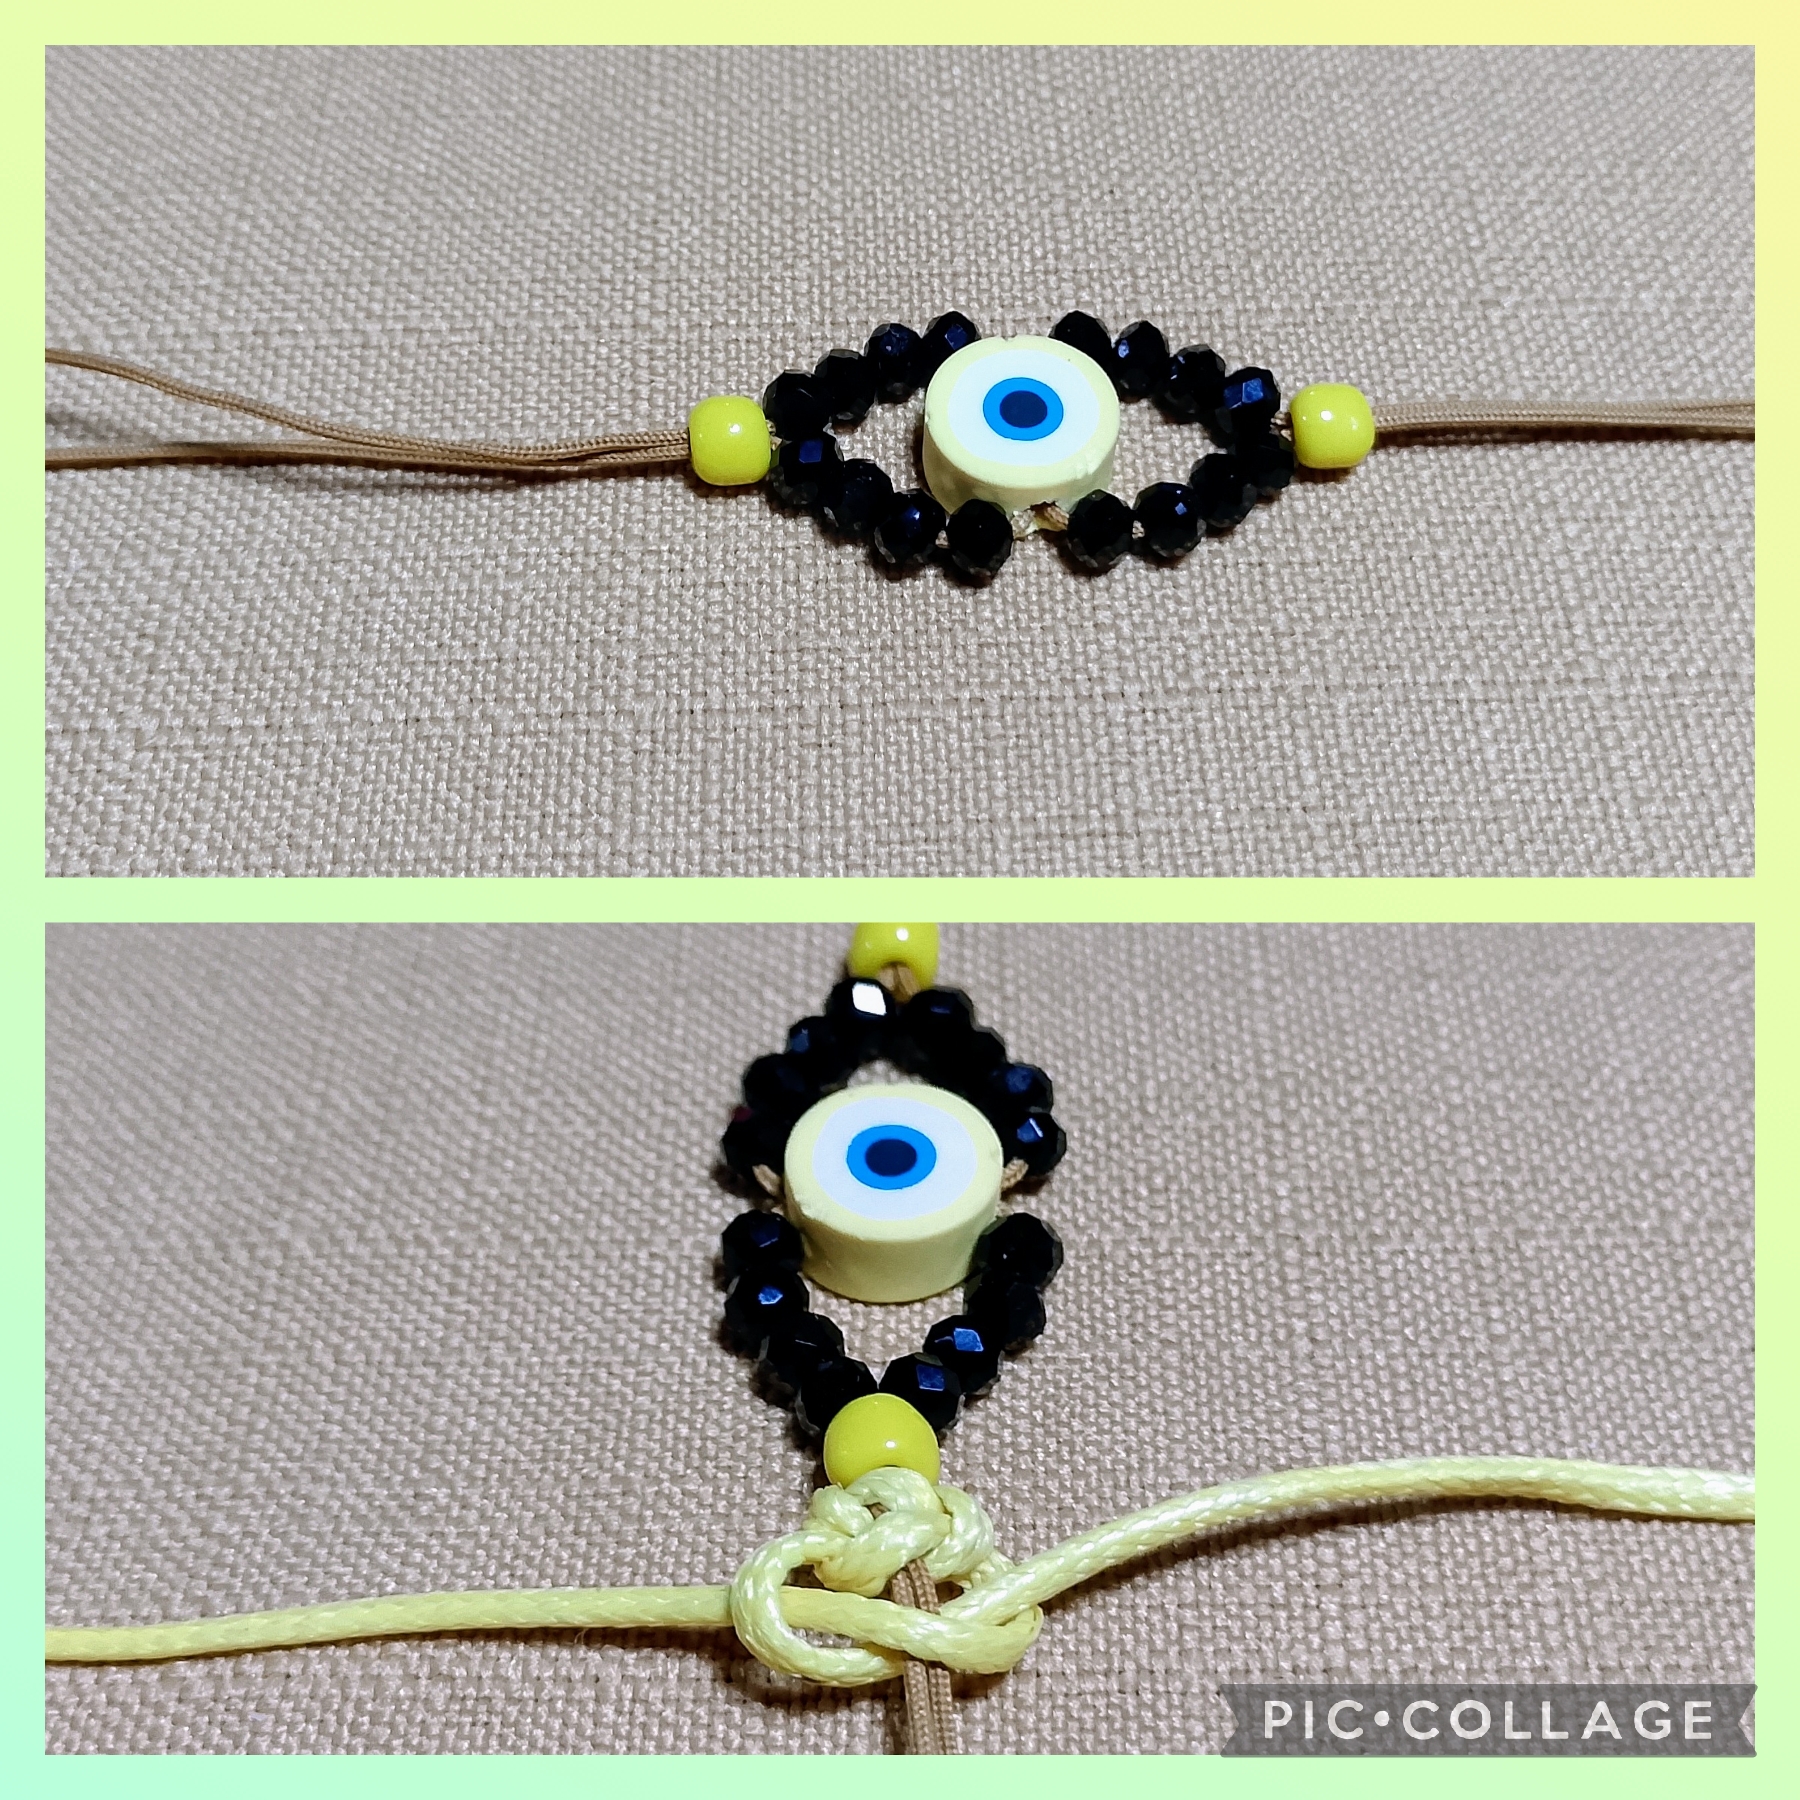
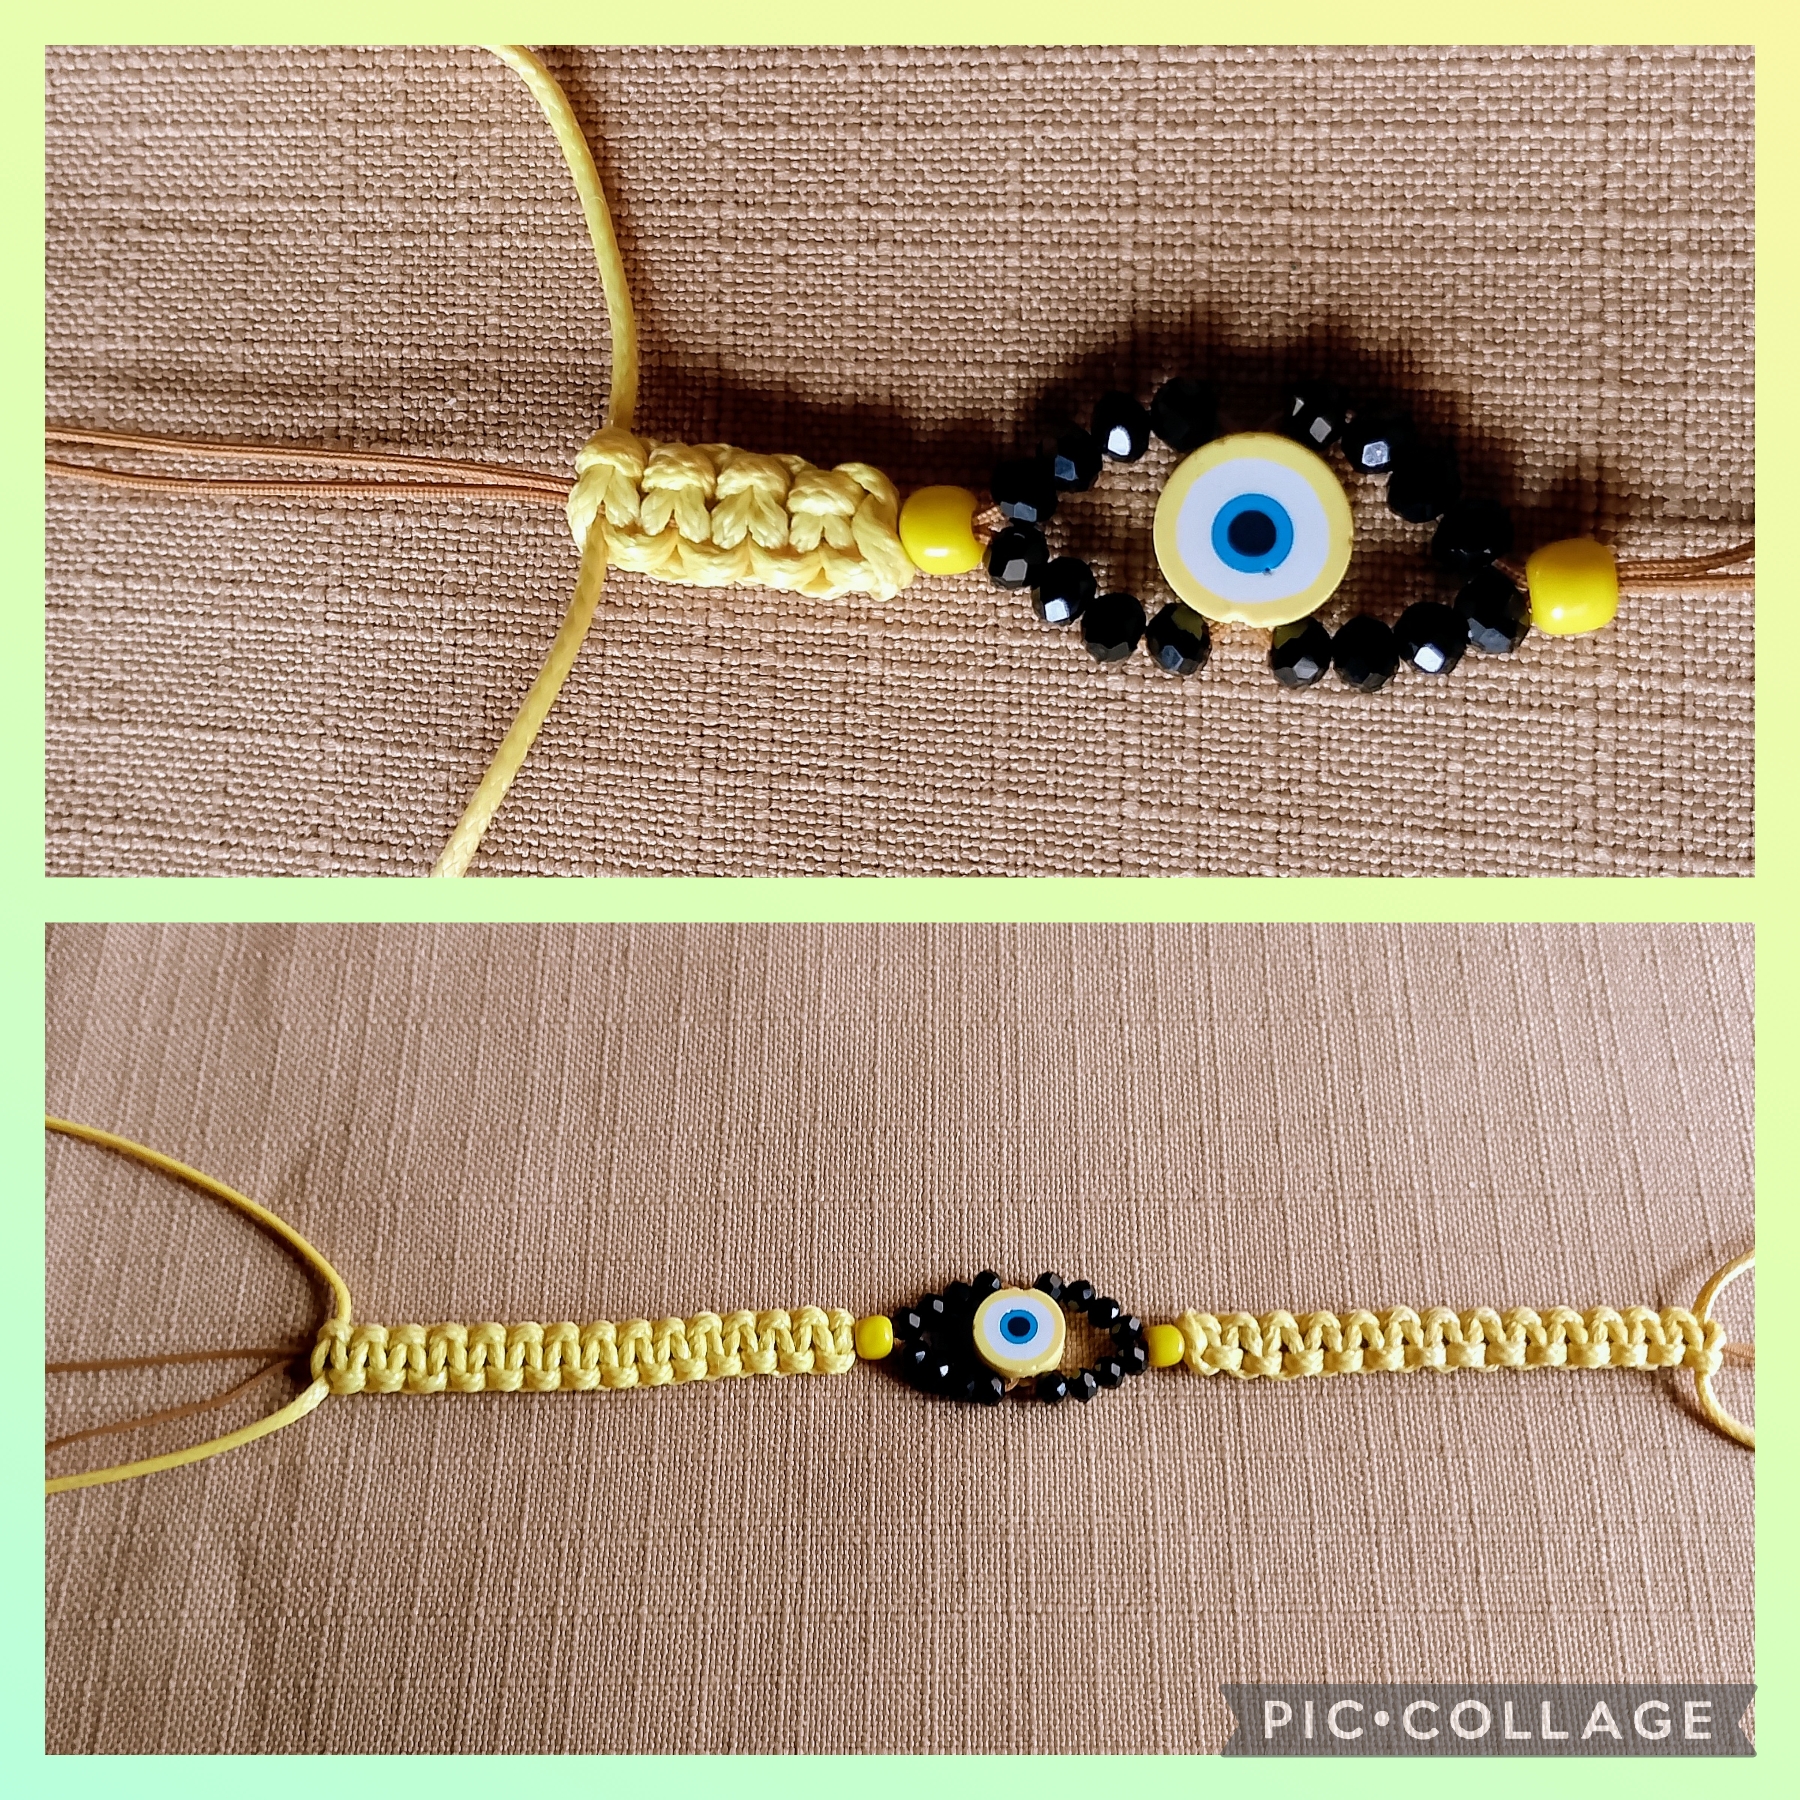
Ahora voy a elaborar la segunda Pulsera está vez el ojo es de color amarillo y la realicé en dos partes, corto dos hilos chinos dorados de treinta centímetros cada uno para los hilos centrales y dos coreanos de cuarenta y cinco centímetros cada uno para los anudadores de color amarillo, inserto por el orificio del ojo turco de fimo color amarillo los hilos de treinta centímetros doblo cada hilo por separado y uno las puntas para igualar la medida, voy a insertar en cada hilo cuatro cristales negros de nuevo junto las puntas e inserto un mostacillón amarillo ajusto bien para formar la mitad del ojo, tomo el hilo coreano amarillo de cuarenta y cinco centímetros y realizo de ese lado nudo plano hasta completar seis centímetros, realizo igual procedimiento del otro lado y ya tengo el largo deseado, uso las tijeras y corto los excedentes de los hilos centrales y sello con el encendedor, con un hilo de ocho centímetros realizo el cierre con nudo plano, aquí hice un nudo simple para las puntas y así queda esta segunda Pulsera.
STEP FOUR:
Now I'm going to make the second bracelet, this time the eye is yellow and I made it in two parts. I cut two golden Chinese threads, thirty centimeters each, for the central threads and two Korean threads, for the yellow knotters, for the thirty-centimeter threads. I insert the thirty-centimeter threads through the hole of the yellow fimo evil eye. I fold each thread separately and join the ends to equalize the length. I'm going to insert four black crystals into each thread, again together with the tips, and insert a yellow seed bead. I adjust it well to form half the eye. I take the forty-five-centimeter yellow Korean thread and make a flat knot on that side until it completes six centimeters. I do the same procedure on the other side and now I have the desired length. I use scissors and cut the excess from the central threads and seal with the lighter. With an eight-centimeter thread, I make the closure with a flat knot. Here I made a simple knot for the ends and this is how this second bracelet looks.
Artistas Creativos de las Manualidades y la Joyería, así elaboré estás pulseras de ojos turco las cuales les gustó mucho a mi clienta y me confesó que eran para su hija que enseguida las coloco en su muñeca para sentirse protegida de las malas vibras, espero que les guste a ustedes también y me dejen sus valiosos comentarios que aprecio mucho, mis gracias a todos por ver y leer mis publicaciones y nos vemos en la próxima manualidad, bye, bye.
Creative Artists of Crafts and Jewelry, this is how I made these Turkish eye bracelets, which my client really liked and confessed to me that they were for her daughter who immediately placed them on her wrist to feel protected from bad vibes, I hope you like them too and leave me your valuable comments which I greatly appreciate, my thanks to all for seeing and reading my publications and see you in the next craft, bye, bye
Las imágenes y redacción de este tutorial son de mi exclusiva propiedad, las fotos fueron tomadas con mi teléfono celular Tecno Spark Go 20 y las edite con una aplicación gratis del mismo.
Para traducir texto use Google traductor.
The images and writing in this tutorial are my exclusive property. The photos were taken with my Tecno Spark Go 20 cell phone and edited with a free app.
Use Google Translate to translate the text.
Your bracelet is very beautiful, the prominent blue eyes give the impression of a protective symbol full of meaning.
Thank you so much for viewing and commenting on my post.
Yes, you're welcome dear. Happy Monday.
🤗
Quedaron preciosas las pulseras protectoras. Feliz lunes😍👍🙏
Agradecida con tu comentario @multifacetas, excelente semana para ti 🪷
Congratulations @nhaydu! You received a personal badge!
You can view your badges on your board and compare yourself to others in the Ranking