Hello very blessed day to all my artist friends of this great community #jewelry, I hope this day is full of many blessings and successes, new opportunities to continue growing with good energy and motivation full of smiles, joy and unforgettable moments with the family this day and every day of this year 2024.
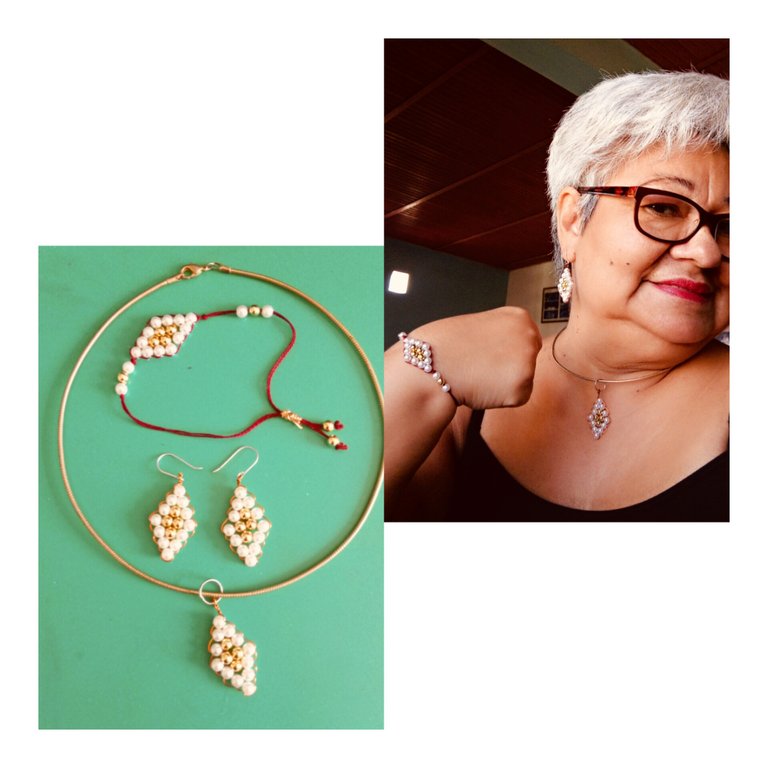
Acà les traigo el paso a paso de un hermoso juego de accesorios que consta de Unos Aretes, una pulsera y un Colgante en forma de Rombo espectaculares y muy fàcil de realizar, me los hice para mi siempre realizando para los demà, ya es hora de pensar en uno y quererse un poco porque no los merecemos. Sabe que tengo un collar tipo aro que mientras estaba haciendo la pulsera y los aretes recordè que lo tengo y me hice un Dije para complementar mi juego.
Here I bring you the step by step of a beautiful set of accessories consisting of earrings, a bracelet and a diamond-shaped pendant spectacular and very easy to perform, I made them for me always performing for others, it's time to think of one and love yourself a little because we do not deserve them. You know I have a hoop necklace that while I was making the bracelet and earrings I remembered that I have it and I made a charm to complement my set.
MATERIALES A UTILIZAR:
MATERIALS TO BE USED:
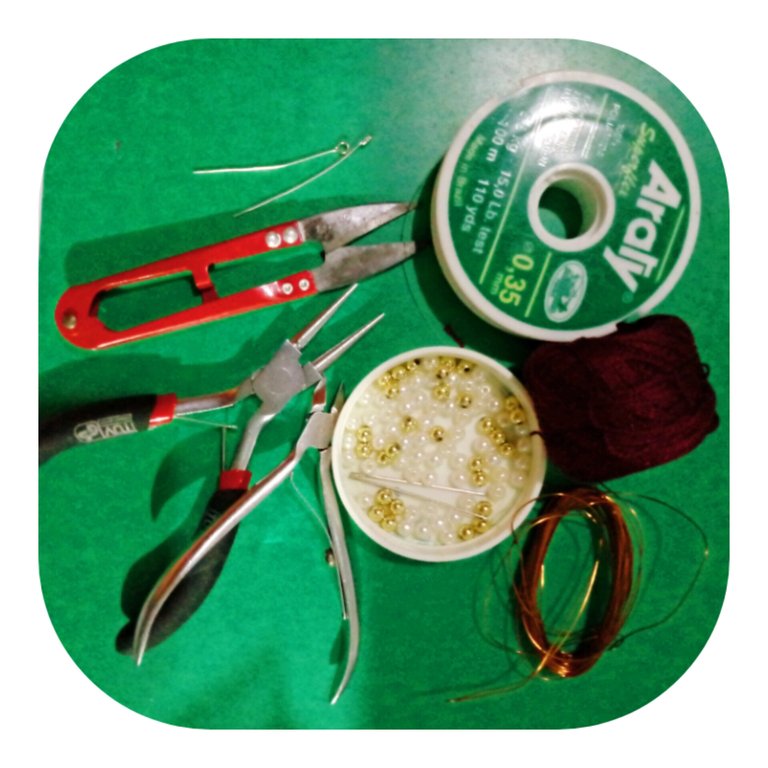
- Perlas blancas y doradas
- Pinzas de bisuterìa
- Tijera
- Alambres color bronce
- Alambres plata
- Hilo nylon N. 0,35 mm
- Hilo para tejer color vino
- Tabla portapapeles.
- 2 Aguja de coser.
- Regla.
- White and golden pearls
- Jewelry tweezers
- Scissors
- Bronze wires
- Silver wires
- Nylon thread N. 0,35 mm
- Wine-colored weaving thread
- Clipboard.
- 2 Sewing needle.
- Ruler.
ELABORACION:
ELABORATION:
PASO 1:
STEP 1:
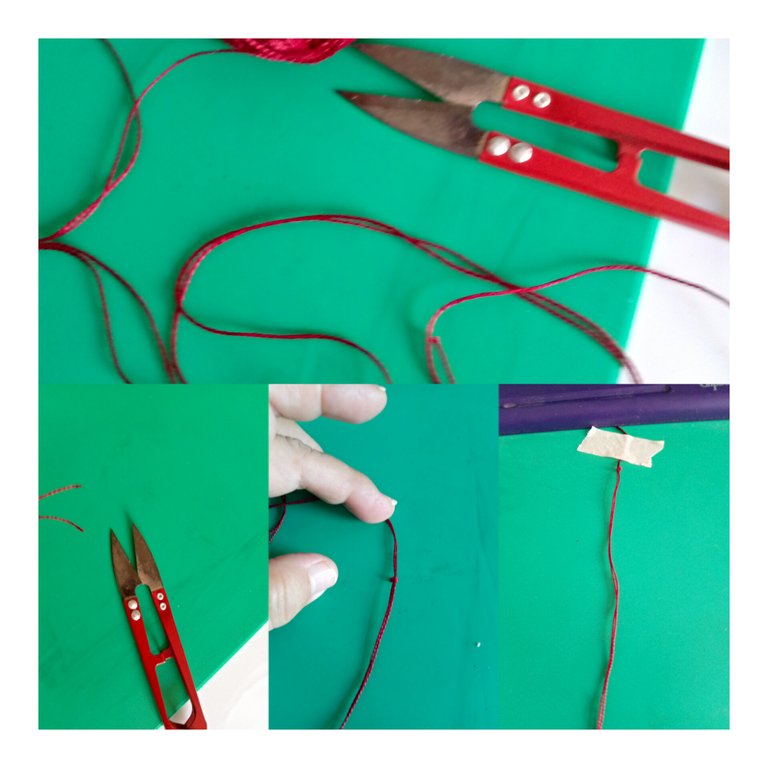
EMPEZAMOS LA PULSERA:
STARTING THE BRACELET:
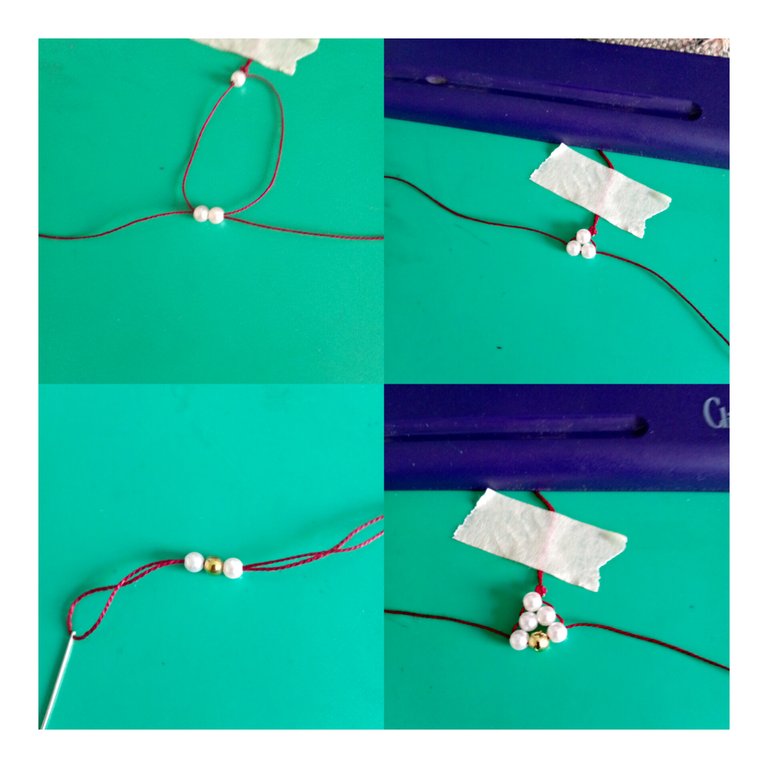
Tomo el hilo color vino y la tijera y mido 1, 40 cmts de largo, luego doblo el hilo a la mitad exactamente y me queda 70 cmts con el cual vamos a trabajar para hacer la pulsera y corto a la mitad y luego hago un nudo a la mitad del hilo para centrar y tomo una tabla portapapeles y introduzco el hilo y le pego un tirro para asegurar arriba.
I take the wine colored thread and the scissors and measure 1, 40 cmts long, then I fold the thread in half exactly and I have 70 cmts left with which we are going to work to make the bracelet and I cut it in half and then I make a knot in the middle of the thread to center and I take a clipboard and I introduce the thread and I put a pull to secure it on top.
PASO 2:
STEP 2:
Luego Toma una punta del hilo y enhebra con la aguja y del otro lado del hilo introduce una perla blanca y despuès pasa la aguja acà hace un cruce y jala y lleva la perla hasta arriba donde habìa hecho el nudo y luego introduce 2 perlas blancas y la aguja la introduce haz un cruce.
Then take one end of the thread and thread it with the needle and on the other side of the thread insert a white pearl and then pass the needle here, make a cross and pull and bring the pearl to the top where you had made the knot and then insert 2 white pearls and the needle insert it and make a cross.
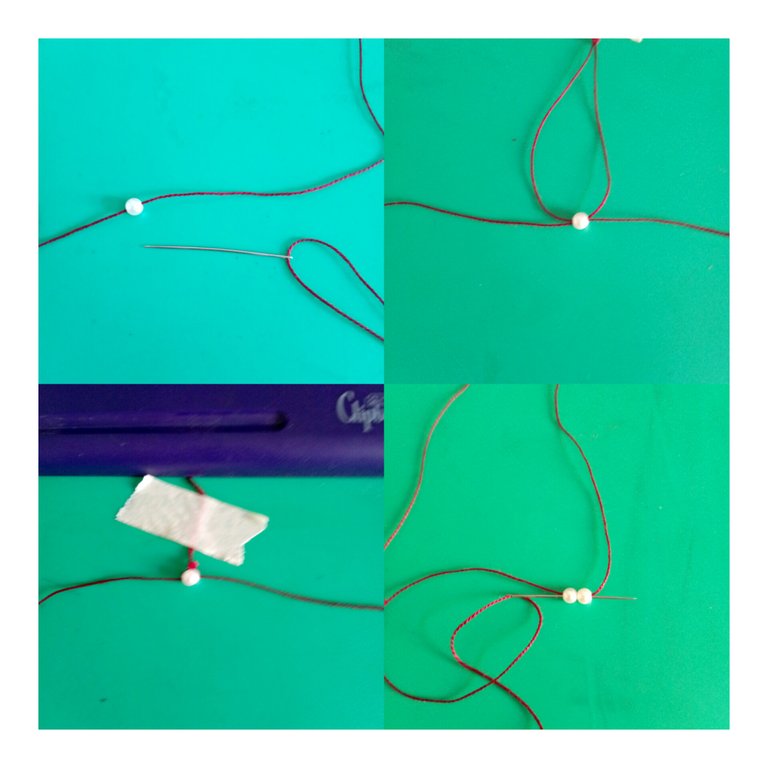
PASO 3:
STEP 3:
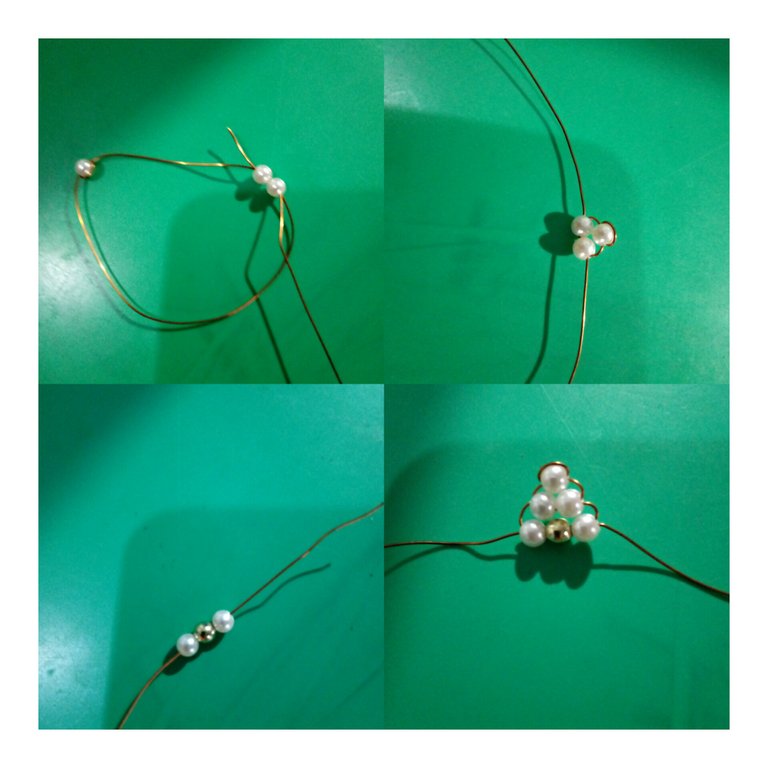
Una vez que introduzca las dos perlas blancas introduce la aguja por las dos perlas es un cruce y jala y te va quedando de esta forma parece un triàngulo, Ok seguimos introducimos una perla blanca, 1 perla dorada y 1 perla blanca antes enhebramos la aguja y despuès enhebramos del otro lado e introducimos la aguja por las tres perlas cruzamos y jalamos y ya te toma otra forma.
Once you introduce the two white pearls introduce the needle through the two pearls is a cross and pull and you will be like this looks like a triangle, Ok we introduce a white pearl, 1 golden pearl and 1 white pearl before threading the needle and then thread the other side and introduce the needle through the three pearls cross and pull and you take another form.
PASO 4:
STEP 4:
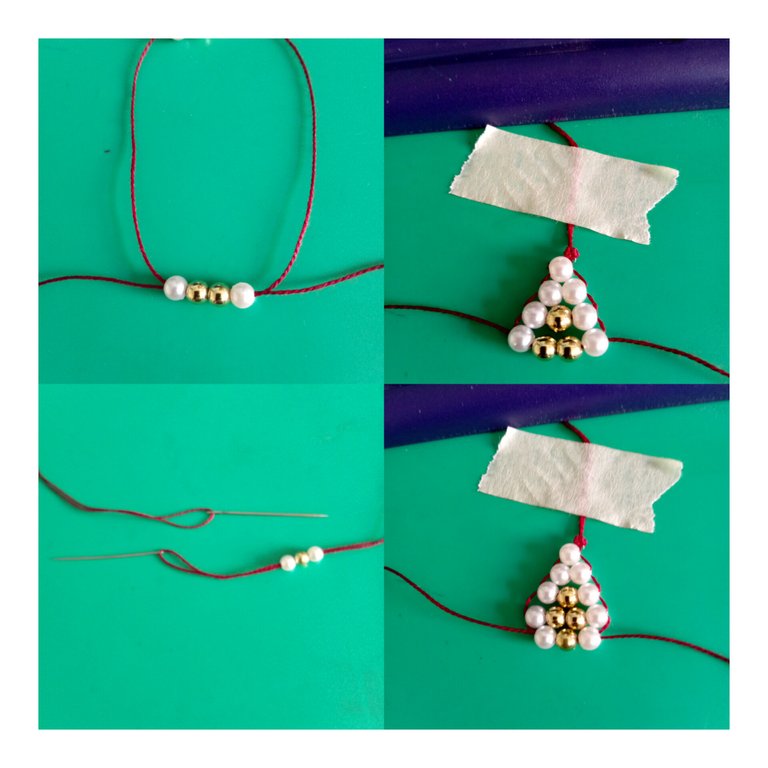
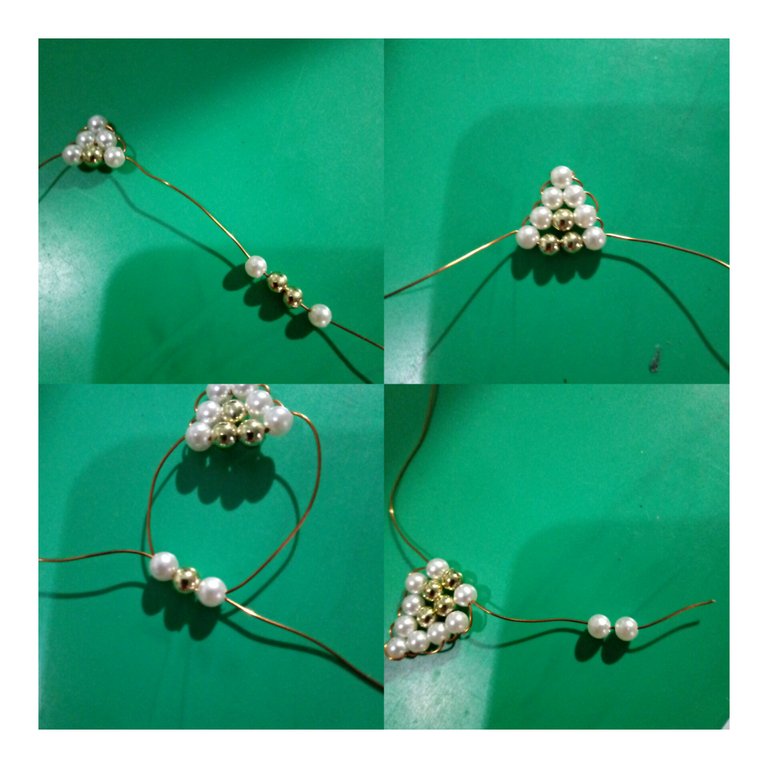
Seguimos con la elaboraciòn introducimos por una aguja 1 perla blanca, 2 perlas doradas y 1 perla blanca pasamos la aguja cruzamos y jalamos. Despuès introduce 1 perla blanca , 1 perla dorada y 1 perla blanca cruzamos y jalamos y ya esta formando la figura que se quiere.
We continue with the elaboration we introduce through a needle 1 white pearl, 2 golden pearls and 1 white pearl we cross the needle and pull. Then introduce 1 white pearl, 1 golden pearl and 1 white pearl, cross and pull and you are already forming the figure you want.
PASO 5:
STEP 5:
Ahora acà introduce dos perlas blancas cruza y jala y por ùltimo toma 1 perla blanca cruza y jala y te queda esta forma de rombo y ya tiene parte de la pulsera esta serìa la parte central.
Now here insert two white pearls cross and pull and finally take 1 white pearl cross and pull and you have this diamond shape and you already have part of the bracelet this would be the central part.
PASO 6:
STEP 6:
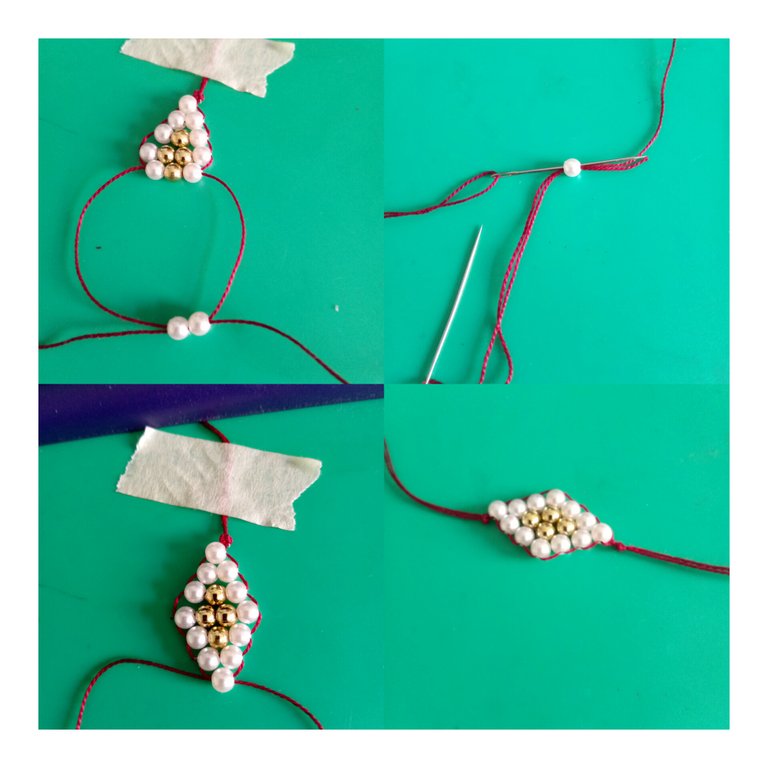
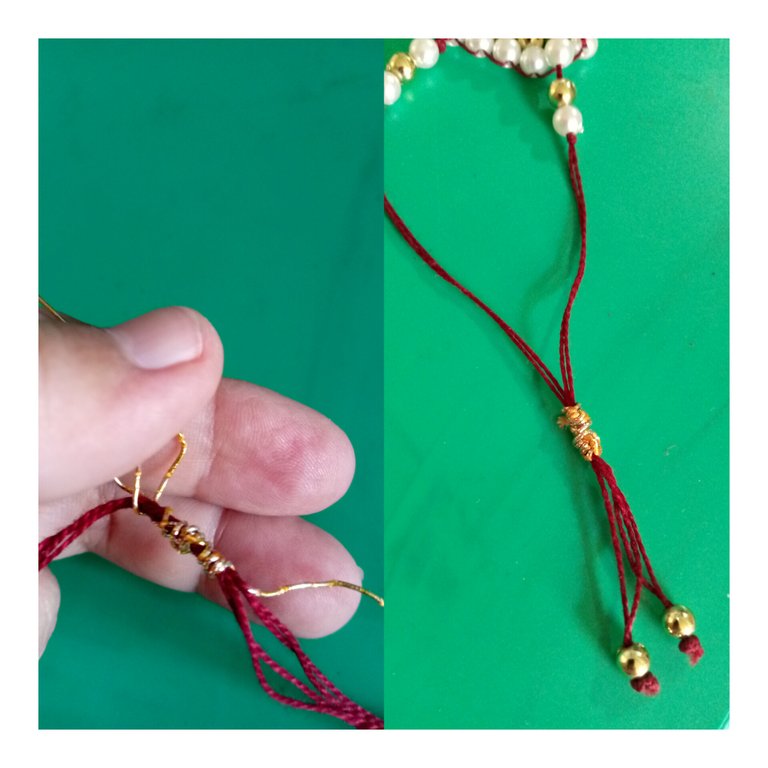
Luego empezamos a colocarle otras perlas de cada lado tomamos los dos hilos enhebramos y pasamos 1 perla blanca, 1 perla dorada y 1 perla blanca de ambos lados y luego haz dos nudos y lo lleva hasta arriba de la perla para asegurar y por ùltimo introduce una perla dorada y le hace dos nudos para que no se salga la perla.
Then we begin to place other pearls on each side, we take the two threads, thread and pass 1 white pearl, 1 golden pearl and 1 white pearl on both sides and then make two knots and bring it up to the top of the pearl to secure it and finally introduce a golden pearl and make two knots so that the pearl does not come off.
PASO 7:
STEP 7:
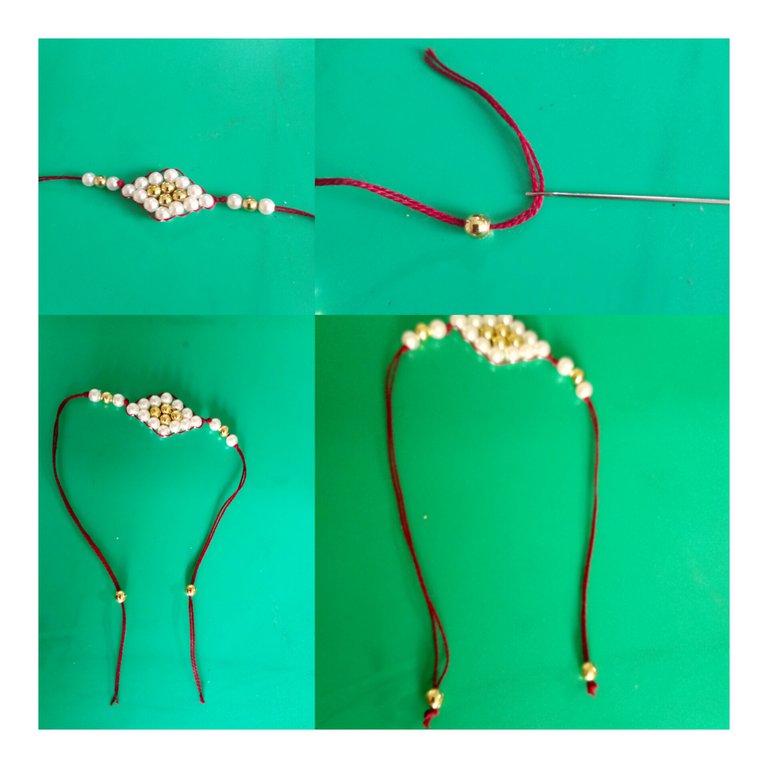
Luego para hacer el cierre de la pulsera pones un hilo hacia la derecha y la otra a la izquierda en el medio vas hacer el cierre tomas un hilo dorado y lo doblas a la mitad lo colocas y una punta le empieza a enrrollar alrededor de los hilos de la pulsera y debes dejar un circulo una vez enrrollado introduce por el circulo el hilo y jalas la punta de abajo y la punta de arriba y el excedente lo cortas y te queda tu pulsera asì hermosa.
Then to make the clasp of the bracelet you put one thread to the right and the other to the left in the middle you are going to make the clasp you take a golden thread and fold it in half you place it and one end you start to wind it around the threads of the bracelet and you must leave a circle once wound introduce the thread through the circle and pull the bottom end and the top end and the excess you cut it and you have your bracelet as beautiful as this.
PASO 8:
STEP 8:
ELABORACION DE LOS ARETES:
EARRINGS ELABORATION:
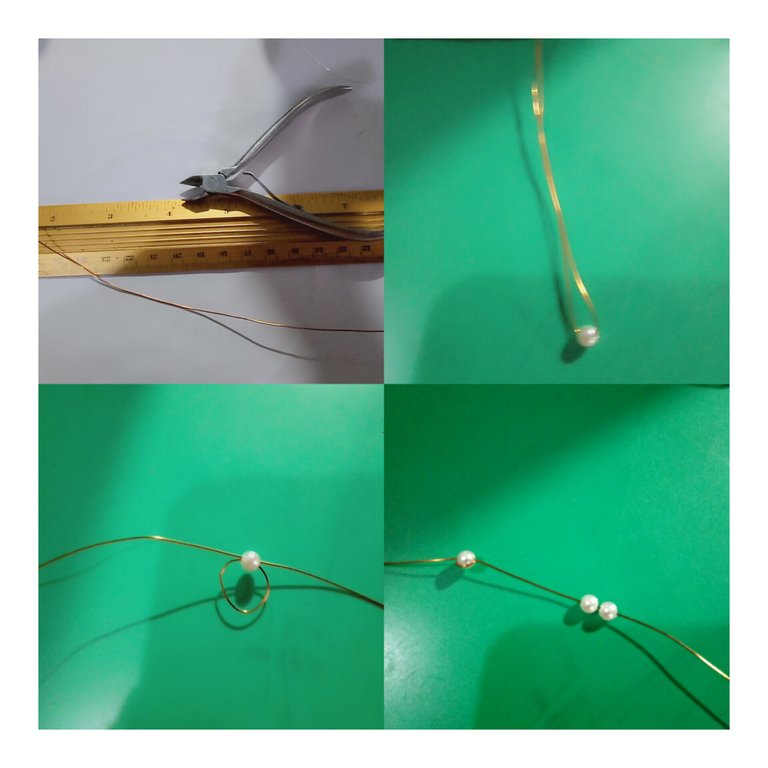
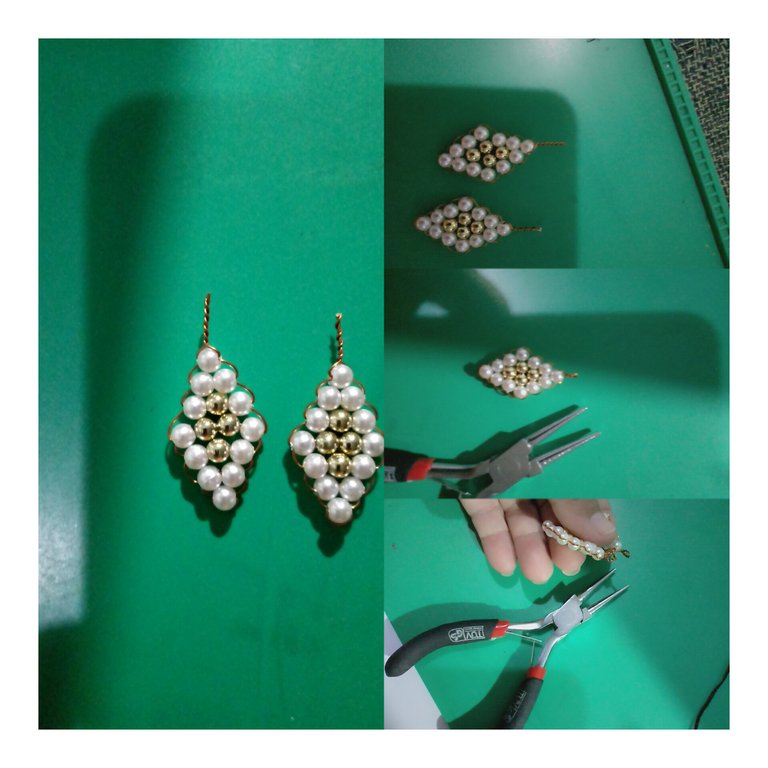
Tomo el alambre de bronce, la regla y tijera mido 50 cmts y corto despuès introduzco una perla y la ruedo hasta el centro uniendo los dos alambres con los que se va a elaborar los aretes exactamente centrado luego introduzco el alambre por el orificio de la perla cruzo y jalo siempre manteniendo lo centrado y acomodas bien el alambre, luego introduce 2 perlas blancas.
I take the bronze wire, the ruler and scissors I measure 50 cm and cut then I introduce a pearl and roll it to the center joining the two wires with which the earrings will be made exactly centered then I introduce the wire through the hole of the pearl I cross and pull always keeping it centered and you accommodate the wire well, then introduce 2 white pearls.
PASO 9:
STEP 9:
Despuès introduce el alambre por los orificios haciendo el cruce y jala y sube hasta la perla anterior acomoda bien los alambres y queda la forma, luego introduce 1 perla blanca 1 perla dorada , 1 perla blanca introduce los alambre cruza y jala y llevas hasta arriba y acomoda observa como va quedando de esta manera.
Then introduce the wire through the holes making the crossing and pull and go up to the previous pearl, arrange the wires well and the shape remains, then introduce 1 white pearl, 1 golden pearl, 1 white pearl, introduce the wires, cross and pull and take it up to the top and arrange it, observe how it remains in this way.
PASO 10:
STEP 10:
Luego introduce 1 perla blanca, 2 perlas doradas y 1 perla blanca introduce el alambre cruza y jala y llevas hasta arriba y acomoda, luego introduce 1 perla blanca 1 perla dorada, 1 perla blanca introduce el alambre cruza y jala, despuès introduce 2 perlas blancas.
Then introduce 1 white pearl, 2 golden pearls and 1 white pearl introduce the wire cross and pull and bring to the top and arrange, then introduce 1 white pearl, 1 golden pearl, 1 white pearl introduce the wire cross and pull, then introduce 2 white pearls.
PASO 11:
STEP 11:
Una vez que hayas introducido las 2 perlas blancas hace el cruce y jala luego introduce 1 perla blanca introduce el alambre cruza, jala y acomoda, acà ha llegado al final del rombo, ahora vas a hacer un torcido con los dos alambres y luego cortas con la pinza y deja 1 cms y medio.
Once you have introduced the 2 white beads make the cross and pull then introduce 1 white bead introduce the wire cross, pull and arrange, here you have reached the end of the rhombus, now you are going to make a twist with the two wires and then cut with the pliers and leave 1 cm and a half.

PASO 12:
STEP 12:
Ya cortaste y dejaste para luego hacer el arito de los aretes con la pinza para luego introducirlo al anzuelo y asì haces el otro arete el mismo procedimiento.
You have already cut and left to then make the earrings with the pliers and then insert it into the hook to make the other earring, the same procedure.
PASO 13:
STEP 13:
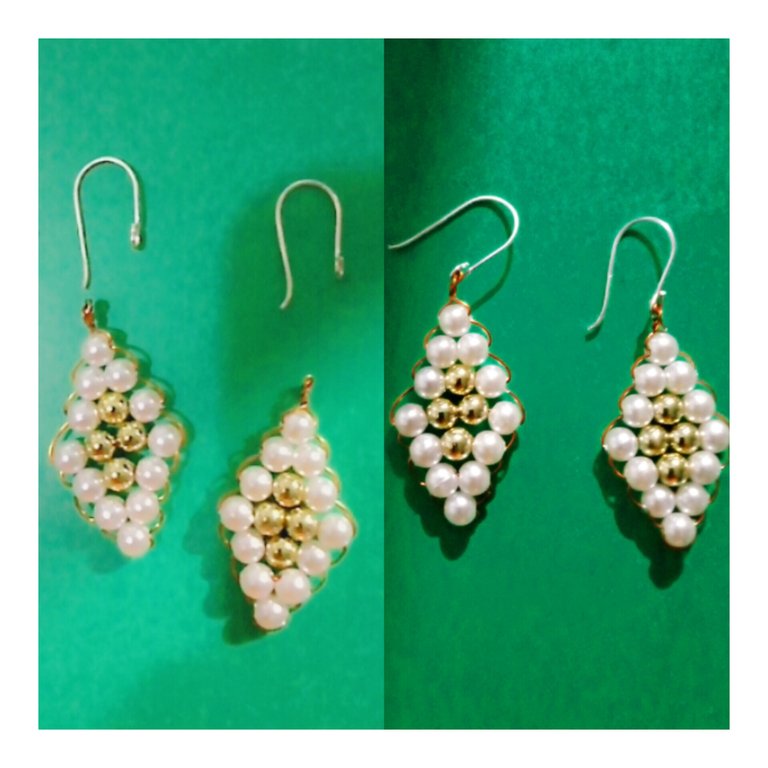
Acà ya tengo mis dos aretes con sus respectivos anzuelos para acomodarlos y de esta manera quedan nuestros aretes hermosos.
Here I already have my two earrings with their respective hooks to place them and in this way our earrings are beautiful.
COLGANTE :*
PENDANT :*
PASO 14:
STEP 14:
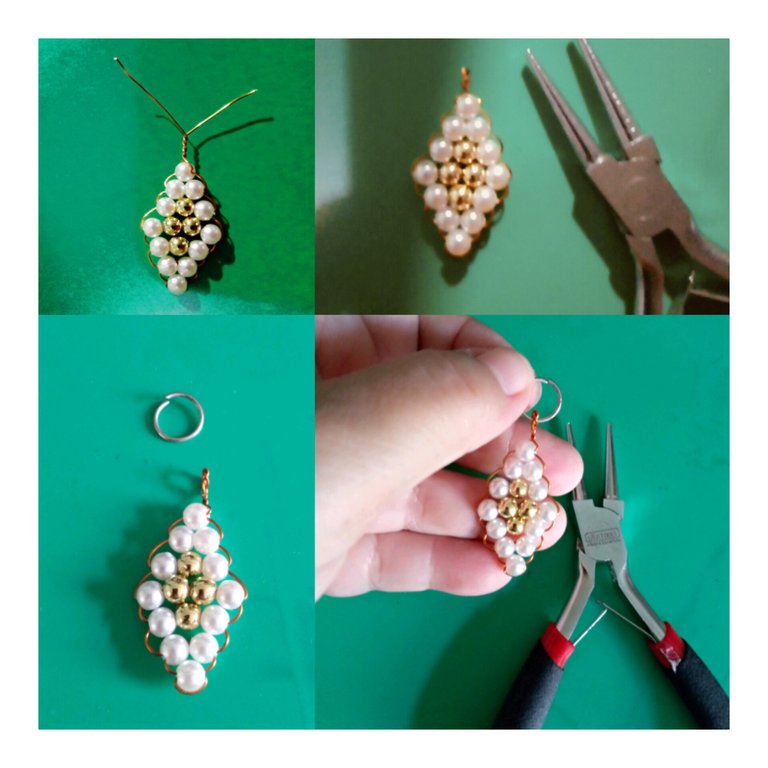
Luego realicè un colgante que recordè que tengo un collar aro y asì que procedì en realizarlo haciendo el mismo procedimiento de los aretes y pulsera, una vez que terminè mi figura rombo hice el torcido y dejè 1 cm y medio y le hice el arito con la ayuda de la pinza, busquè un arito lo abrì y lo introduje por el arito del dije y asì obtengo mi juego completo.
Then I made a pendant that I remembered that I have a hoop necklace and so I proceeded to make it doing the same procedure of the earrings and bracelet, once I finished my rhombus figure I made the twisted and left 1 cm and a half and I made the hoop with the help of the pliers, I looked for a hoop I opened it and I introduced it through the hoop of the pendant and so I got my complete set.
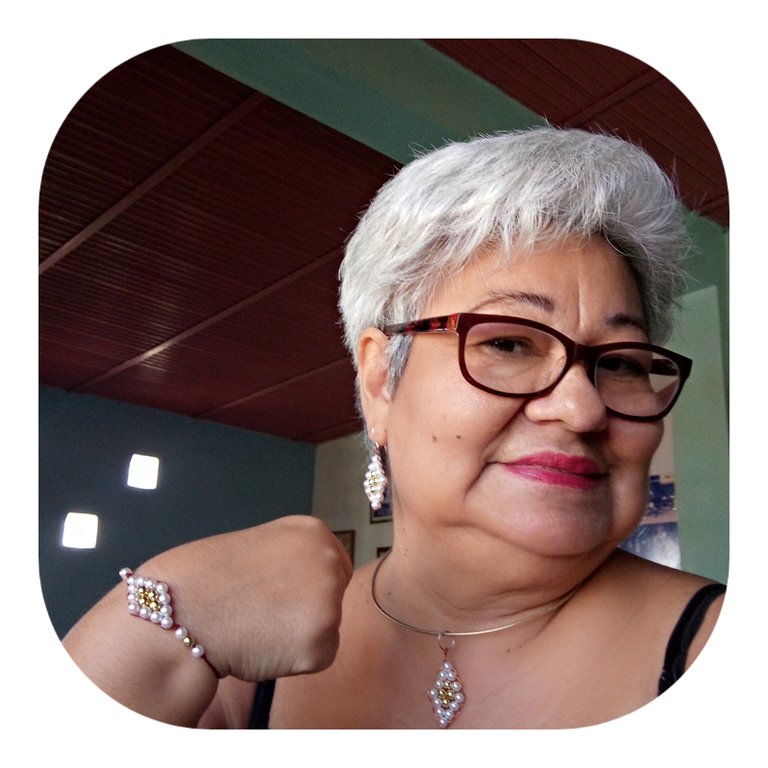
Y ACÀ LUCIENDO MIS ACCESORIOS ESTOY FASCINADA CON EL RESULTADO ESPECTACULAR Y HECHO POR MI.
AND HERE I AM WEARING MY ACCESSORIES AND I AM FASCINATED WITH THE SPECTACULAR RESULT AND MADE BY ME.
Gracias por su grata visita y sus comentarios espero le guste esta sumamente fàcil de realizar.
Thank you for your visit and your comments, I hope you like this very easy to make.
Las imagenes son tomafas con mi celular Tecno go spark editada con inshot collage.
Traducido con deepl translate.
The images are taken with my Tecno go spark cell phone edited with inshot collage.
Translated with deepl translate.
BENDICIONES PARA TODOS.
BLESSINGS TO ALL.
It is so beautiful, charming, and elegant. Love its design. It shows your talent and creativity. Great job!
A pleasure to greet you I am very glad you liked it yes a very elegant design blessings.
¡Hola! Feliz día.
Te quedó muy hermoso todo el juego. Es verdad, también nos merecemos lucir algo de lo que hacemos amiga.
La forma de rombo 🔶 quedó muy bien elaborada. Haces un trabajo muy bueno con estos materiales. Me encantó todo, más la pulsera. 😍
Hola un gusto saludarte gracias por tu grata visita y comentario excelente asì es un abrazo.
Un juego completamente hermoso. Sutil pero con mucha presencia. Muy elegante. Es precioso
Gracias amiga por tu grata visita y comentario me alegro mucho que te haya gustado feliz tarde.
Esta muy hermoso este conjunto de accesorios, me encanto el diseño y los colores. Definitivamente un conjunto que usaría a diario.
Gracias por regalarnos su paso a paso @tibisayq23 ✨
!DIY
Gracias amiga me alegro mucho que te haya gustado feliz tarde.
You can query your personal balance by
!DIYSTATSThank you always grateful and have a happy afternoon.
Congratulations @tibisayq23! You have completed the following achievement on the Hive blockchain And have been rewarded with New badge(s)
Your next target is to reach 1000 replies.
You can view your badges on your board and compare yourself to others in the Ranking
If you no longer want to receive notifications, reply to this comment with the word
STOPThank you always grateful and have a happy afternoon.
You're welcome @tibisayq23! Have a nice day 😊👍
Gracias bendiciones.
¡Gracias @tibisayq23! Esperamos recibir su apoyo para nuestra propuesta. 🙂⏳
Thank you always grateful and have a happy afternoon.
A beautiful diamond set, you have turned out beautifully, we love to see how simple you describe the process, keep creating beautiful designs.
Thank you always grateful and have a happy afternoon.
Que bonito set amiga saludos!
Gracias amiga feliz tarde.