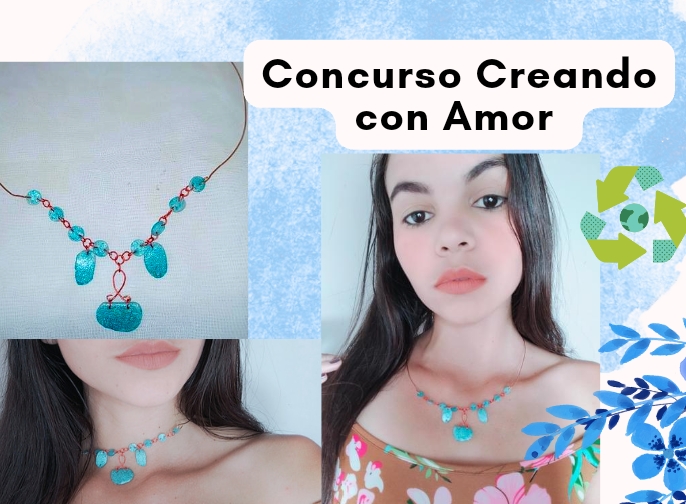
Hello creative friends of #jewelry, I'm happy to greet you, and participate in this incredible dynamic, so I stopped by today to share with you a tutorial where I explain step by step how to make this amazing necklace! I did it with a wire technique, here I will explain the amount of wire that we will use and the tweezers that we must have, it should be noted that it is a piece that will give a different touch to our necks, the main material will be silicone.
I hope you like this little step by step since I really liked creating it and mainly sharing it with you, it is a necklace that we can also use as a choker, you will see how easy it is to make it and I will try to be as explicit as possible in this tutorial, however more preambles here I leave the steps to follow, In this opportunity we will use the following materials:
MATERIALES
- 25 cm de alambre de Cobre rojo.
- 15 cm de alambre de cobre.
- Pinza plana.
- pinza punta redonda.
- objeto cilíndrico.
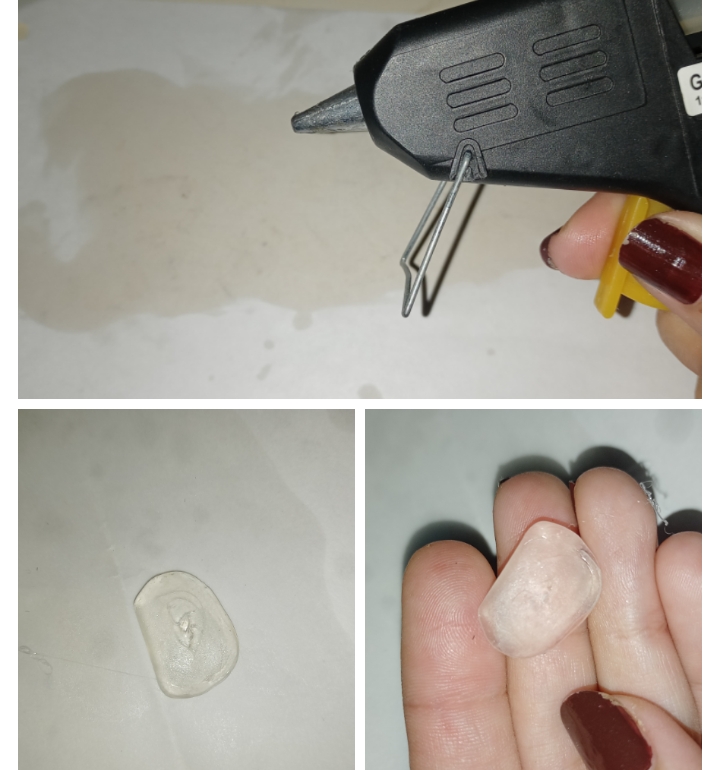
- Silicon en barra
- pistola de Silicon.
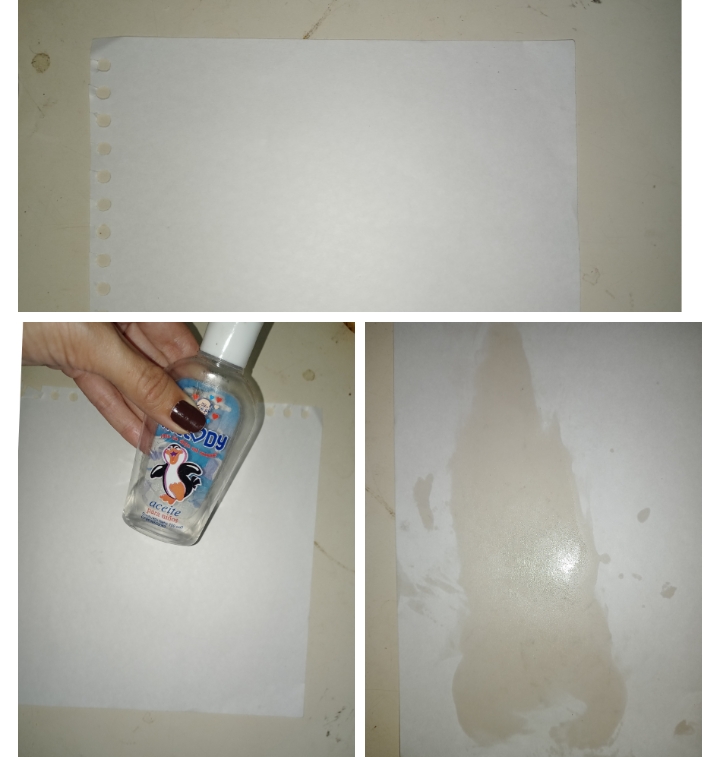
- aceite para bebe o comestible.
- exacto
- esmalte para uñas
- tijera
MATERIALS
- 25 cm of red copper wire.
- 15 cm of copper wire.
- Flat clamp.
- round nose pliers.
- cylindrical object.
- Silicon in bar
- silicone gun.
- baby or edible oil.
- exact
- nail polish
- scissors
PASO A PASO
STEP BY STEP
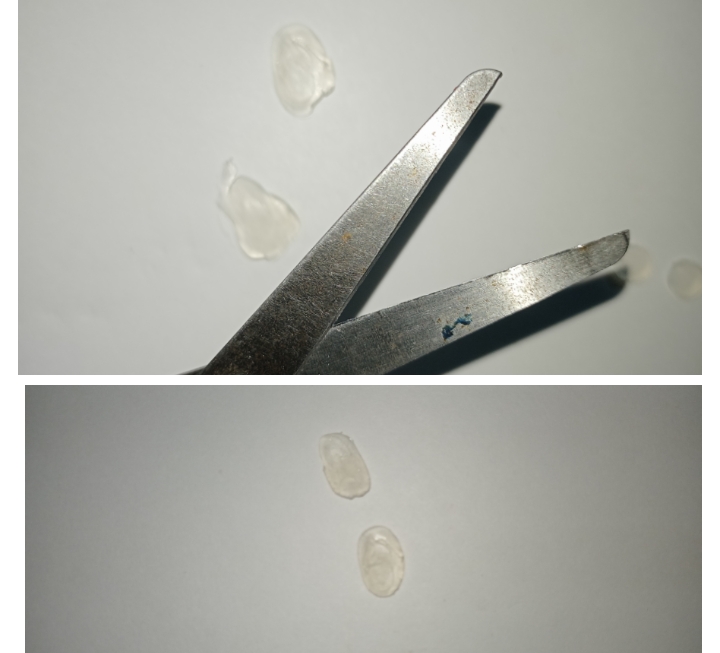
1 . The first thing I did was create the pieces that we will use for our necklace, for this I took a white sheet and baby oil or you can also use edible oil, we will apply this on top of the sheet so it will be crimped.
2 . Then, I took the silicone gun and put it to heat, when it was at a suitable temperature, apply the desired amount in the place where I had placed the oil, bend the sheet and press so that the surface will be flat, in this way make one medium and two small parties.
3 . Now take the thin silicone bar and my exact one, cutting small pieces as I show you below.
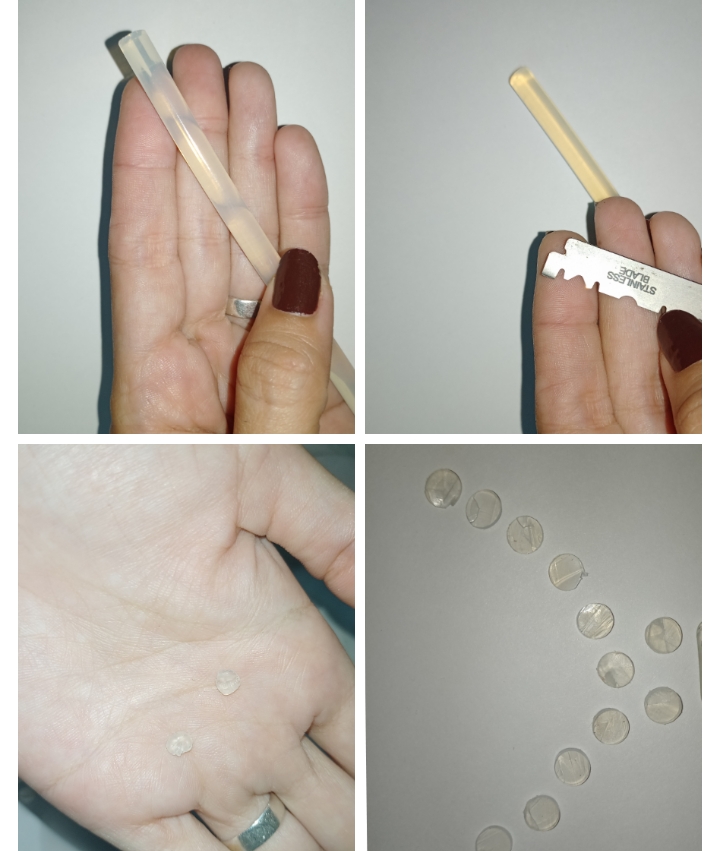
4 . Then I took the scissors and had it remove the imperfections of the pieces that we made in step 2.
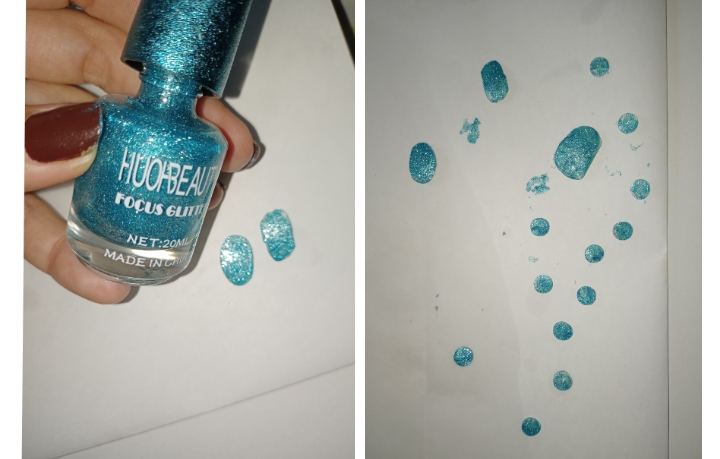
5 . The next step will be to take the nail polish, in my case select a frosty blue tone and paint all the pieces if necessary you can apply two coats of paint.
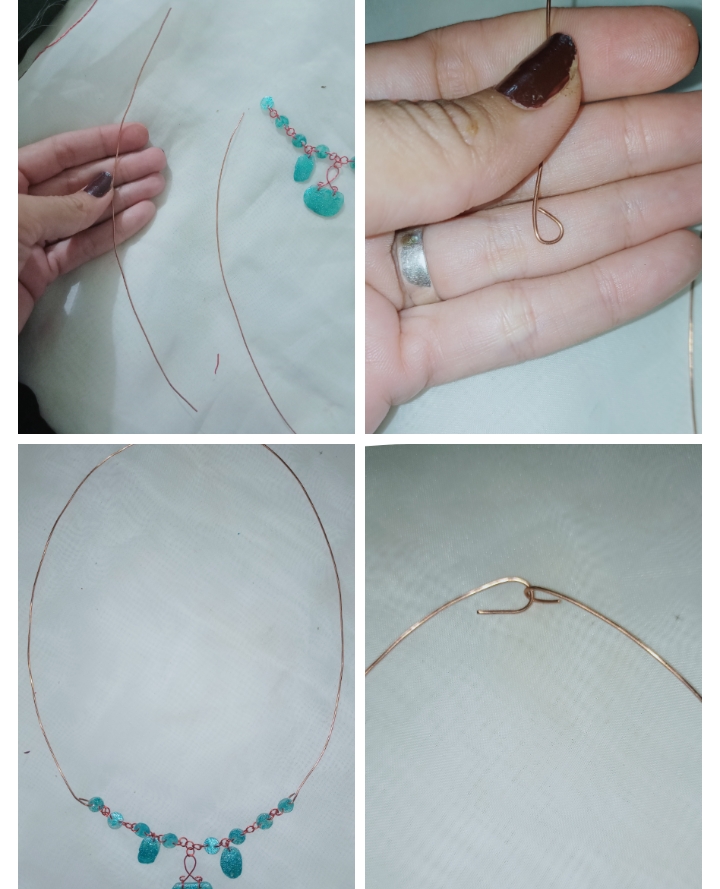
6 . Take a break while the pieces are drying for this we do need to give it a few minutes in the meantime look for my red tone copper wire.
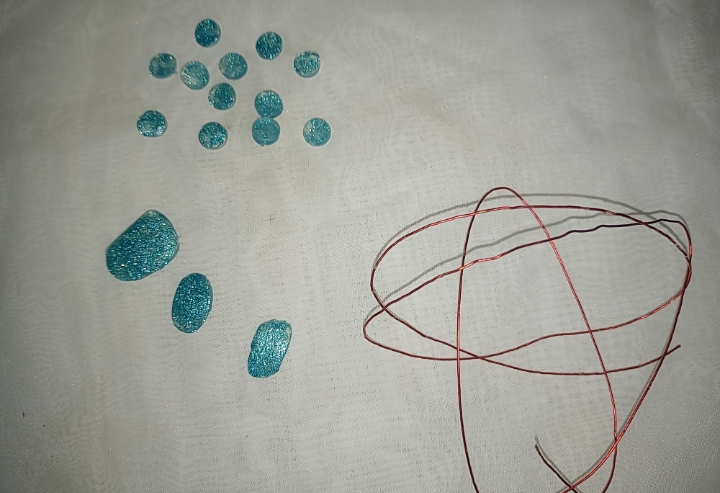
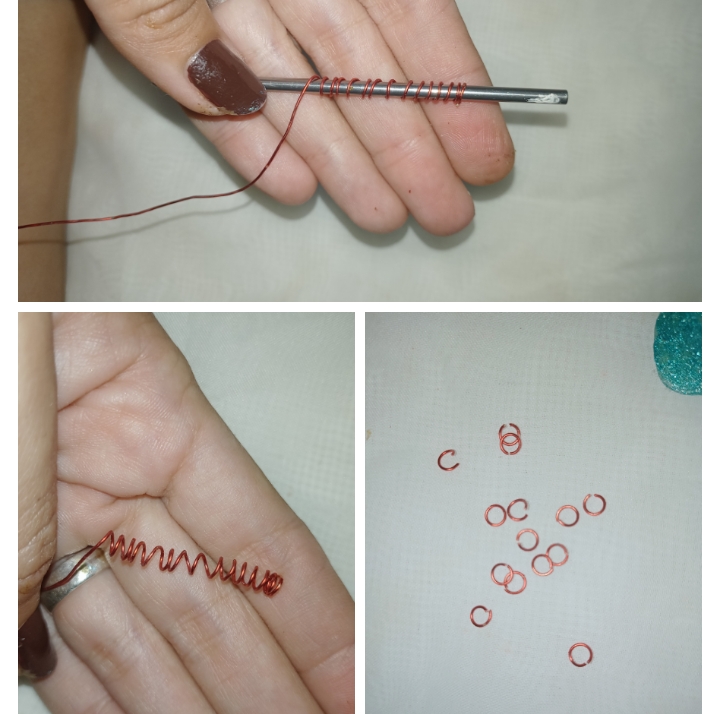
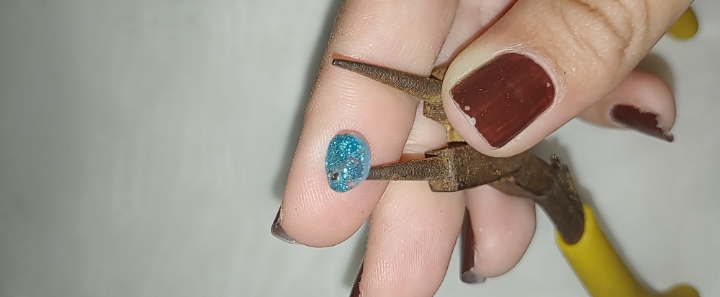
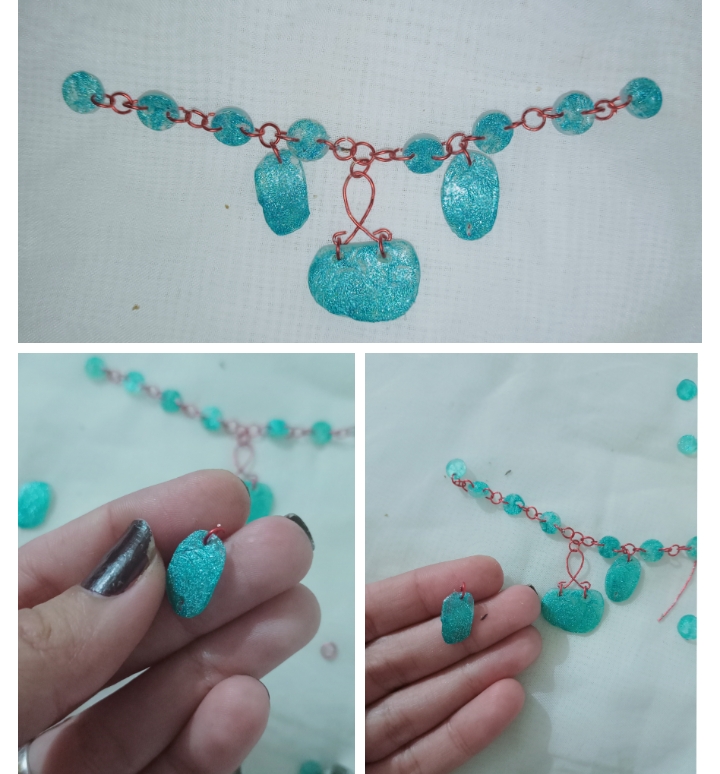
7 . Take the cylindrical object and wrap the wire and then with my pliers cut right in the middle of each ring to form the small rings that will join piece by piece.
8 . With the round tip pliers, make two holes in each piece, one on each side, so we can intertwine the rings.
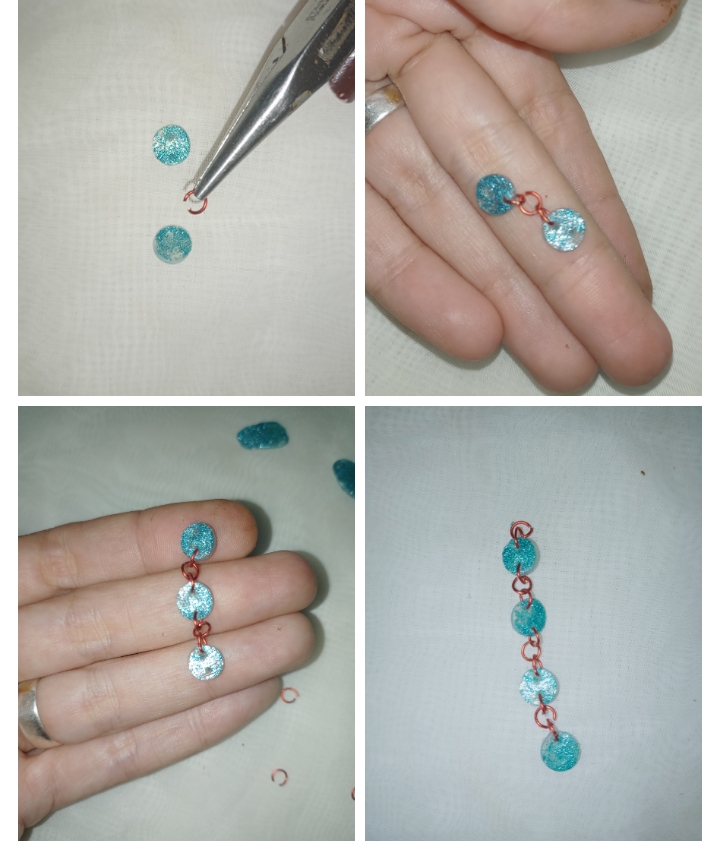
9 . Now, with the flat pliers, I took the first ring and placed it in one of the holes of the first small piece, then attached another ring to it, added one more by placing another piece. the pieces, we will elaborate this process twice in order to obtain 2 pieces of 4 each.
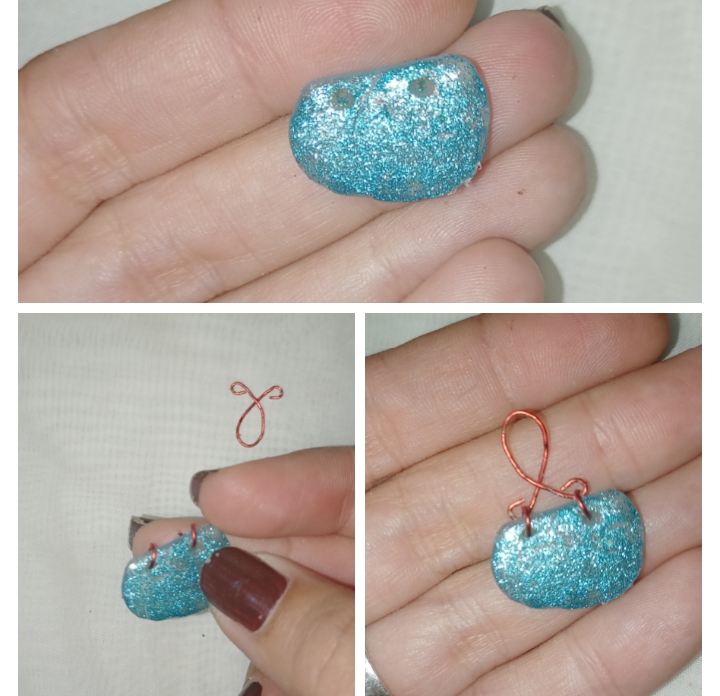
10 . I took a piece of red copper wire of approximately 3.5 cm, folded it in half and crossed it at the top, making a ring at each end with the round nose pliers.

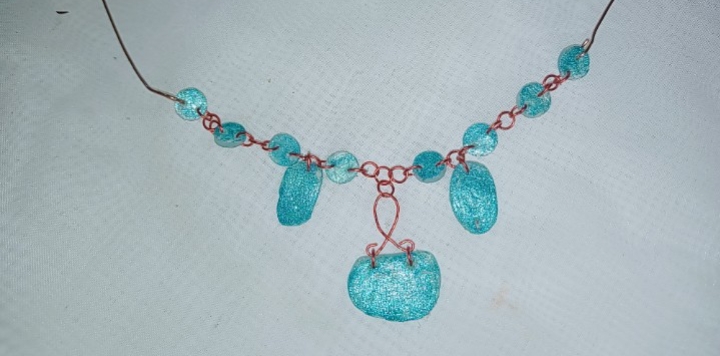
11 . I took the large piece of silicone, made two holes in the upper part, placed a ring in each hole and attached it to the piece that we made in the previous step.
12 . To continue join the two pieces in the form of a chain, placing 3 rings in the middle.
13 . Locate the large piece with a ring in the middle ring of the join we just made. Being that way.
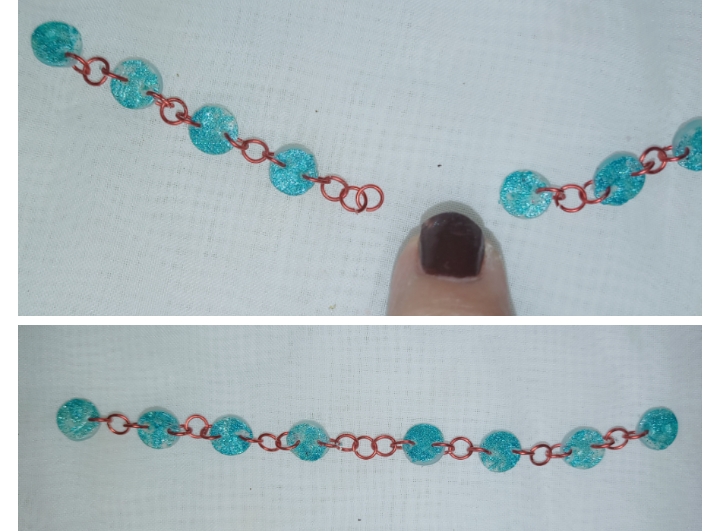
14 . I took the two small pieces of silicone and hung them on the sides of the main piece using a hoop.
15 . Finally I took the piece of copper wire and doubled it just in half, cutting to get two pieces of the same length, with the round tip pliers I made a ring for each piece and attached one to each side of the central piece of our necklace, to To close one of the wires, I made a ring at the top and from the other I made one in the shape of a hook, so we will secure our necklace and we cannot place them easily.
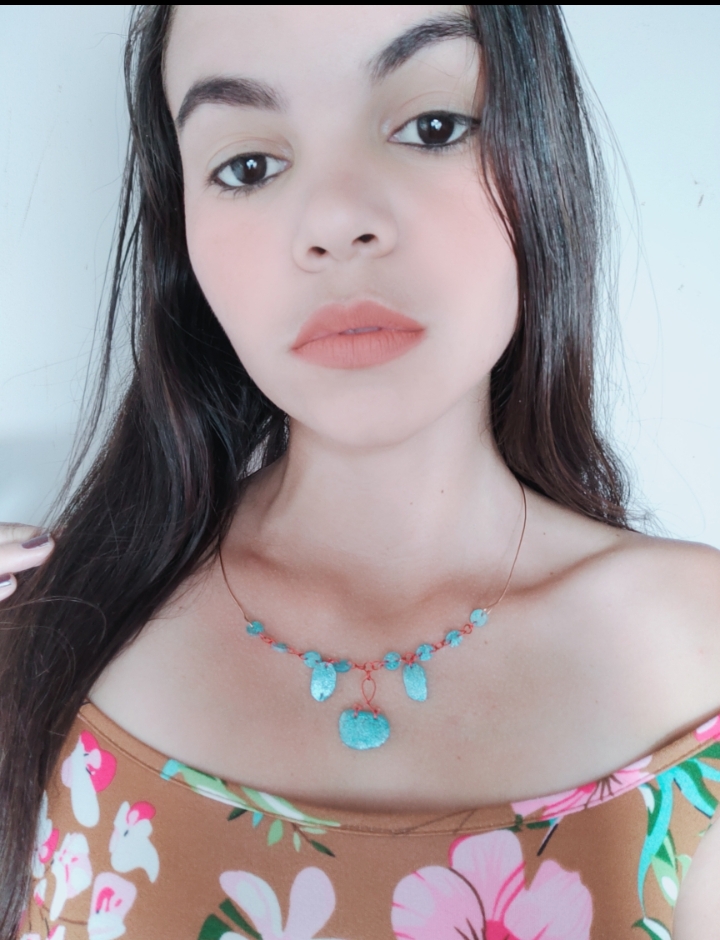
Did you imagine that you could create it this way? Pretty interesting right? I hope you liked it, and you are encouraged to try it, because it is easy to do and they will look great on you.
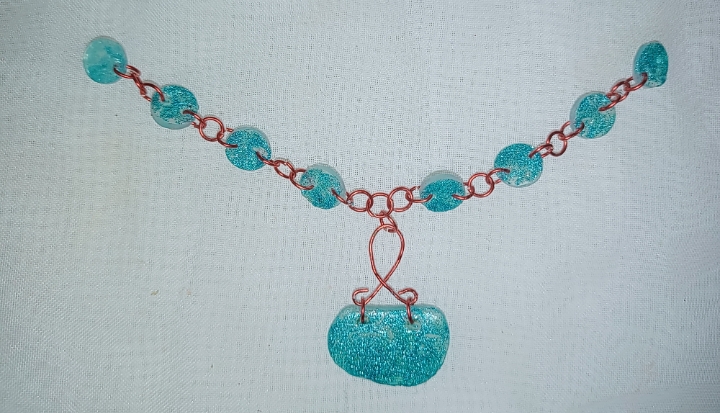
RESULTADO FINAL
FINAL SCORE


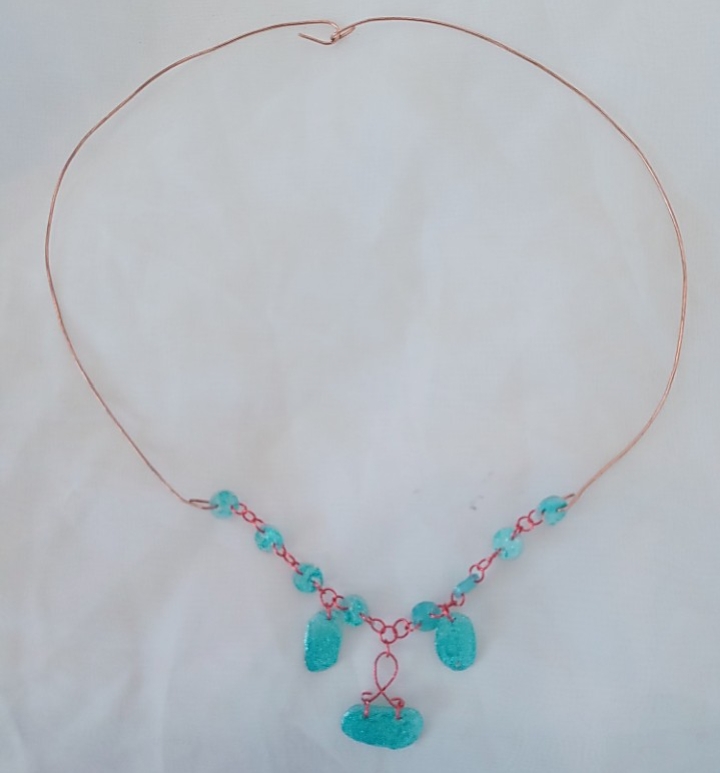
REMEMBER THAT YOU CAN GIVE IT YOUR PERSONAL TOUCH!
Happy to share with you friends of #jewelry one more of my projects, I hope you liked it! It was made with love and dedication😊
You can find more tutorials like this on my blog, it will be until a next opportunity!
Fotografías propias tomadas con mi REALME 7i
Contenido 100% exclusivo
Own photos taken with my REALME 7i
100% exclusive content
Wowww te quedó maravilloso este trabajo, de verdad me encantó, los materiales que usaste, la complejidad del trabajo, el acabado y detalles. Y lo mejor todo realizado con materiales de provecho. Te felicito. La mejor de las suertes en el concurso.
Muchas gracias por la invitación, estoy precisamente pensando que hacer jajaja.
Saludos @venusl19 ❣️🌹
Gracias amiga, espero ver tu entrada pronto!😁 Se que será algo hermoso!
Publicada en Twitter
Hola. Estoy encantada con tu creación. De verdad que sí no leo el paso a paso ni cuenta me doy de los materiales que usaste. Se ve genial. El esmalte escarchado fue muy bien elegido.
Luce linda la gargantilla. Mucha suerte ☘️
Bueno amiga esa es la idea, que luzca genial y pase desapercibido el silicón, que bueno saber que te agrado!😁
Que bello collar amiga @venusl19, me encantó, que tengas mucha suerte en el concurso, muy lindo el resultado final 💋😍🌸
Te ha quedado muy lindo nena, y te luce excelente, suerte en la competencia.
Gracias querida amiga. ☺️
Te quedo super genial y hermoso, me encantó tu técnica. Mucha suerte en el concurso, saludos.
Primero que nada felicidades 👏 que gran trabajo, al ver la foto cualquiera piensa que son piedras turquesa, cuando.leemos el paso a paso y los materiales que usaste nos sorprende como lo has realizado, gracias por este hermosos tutor por enseñarnos que se puede crear con lo que tengamos a la mano, bravo👏.
Te deseamos mucho éxito en el concurso, gracias por participar 😉
Fue genial para mi participar, he visto grandes trabajos para este concurso, y es fantástico ver el compromiso de todos los que hacemos vida en esta comunidad!
Gracias por su apoyo y visita!
Thank you for sharing this amazing post on HIVE!
Your content got selected by our fellow curator @rezoanulvibes & you just received a little thank you via an upvote from our non-profit curation initiative!
You will be featured in one of our recurring curation compilations and on our pinterest boards! Both are aiming to offer you a stage to widen your audience within and outside of the DIY scene of hive.
Join the official DIYHub community on HIVE and show us more of your amazing work and feel free to connect with us and other DIYers via our discord server: https://discord.gg/mY5uCfQ !
If you want to support our goal to motivate other DIY/art/music/homesteading/... creators just delegate to us and earn 100% of your curation rewards!
Stay creative & hive on!
Hola @venusl19 👋
Te ha quedado hermosa está gargantilla 😃 y la luces muy bien. Me encanta la técnica que empleas para realizarla pues con pocos materiales creaste una bella joya 🥰
Mucha suerte, saludos 😘
Te quedó precioso... Buen trabajo amiga.
🎆🎇🎉🎊🌧️💐✨🌾🌱🌹🌙🌿🍃🥀⚡🌺☘️🍀🌈🌷⭐🪴🌵🌸🌟💮🌴🌳💫☀️💮☔🌲🌳🌍🌌🌠☄️🏵️🐝🌻🌼🍄🐞🦋💙☕💜🍍🎆🎇🎉🎊
Que trabajo tan hermoso, super original! @venusl19, Gracia spor compartir el proceso de creación, una excelente manera de realizar un accesorio de provecho, Mucho exito!
Me encantó y me sorprendió muchísimo los materiales que usaste, muy creativo 💗